#but i just used the paint roller tool but even smaller
Text
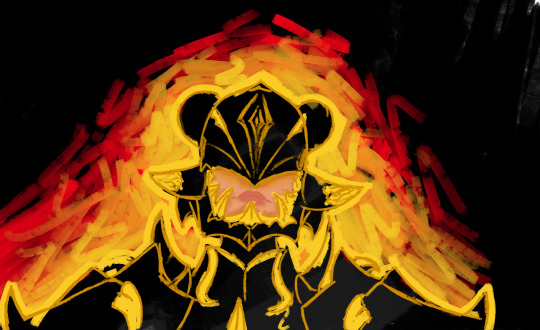

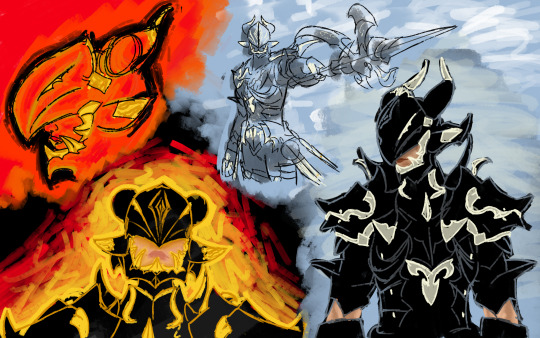
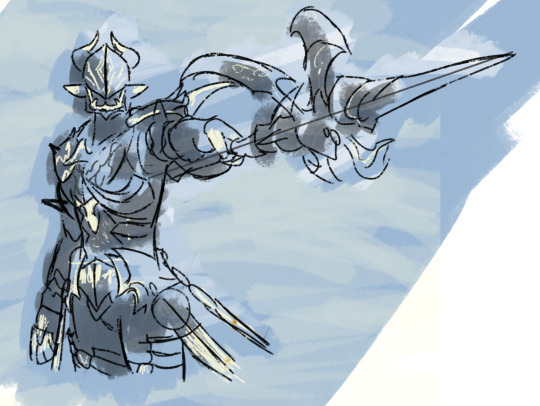
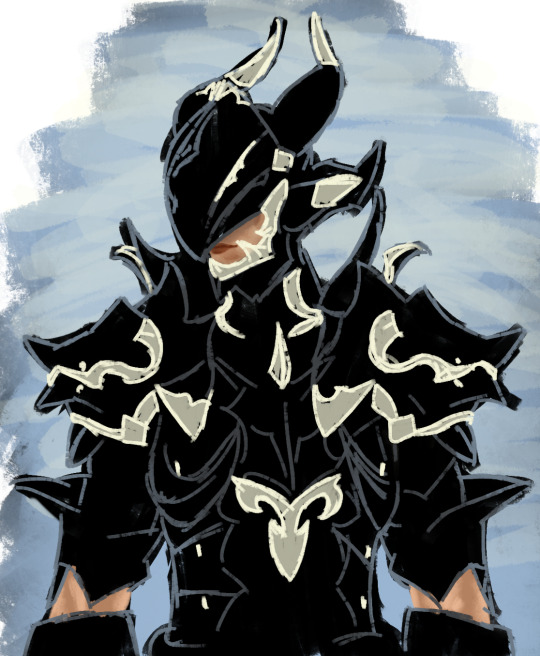
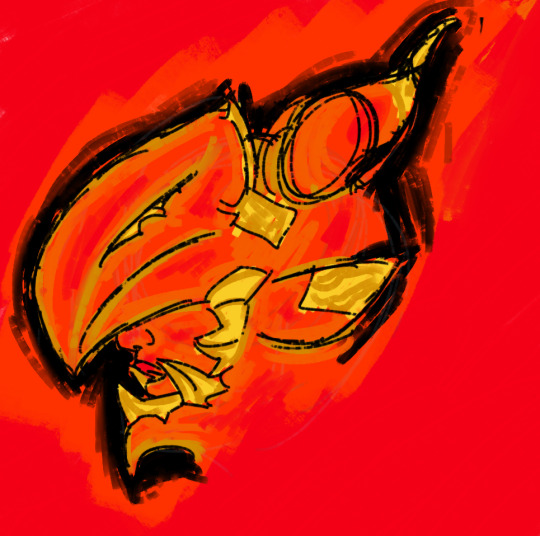
Assorted Estinian's drawn from screenshots of the dragoon level 40-50 quests. [please click for better quality]
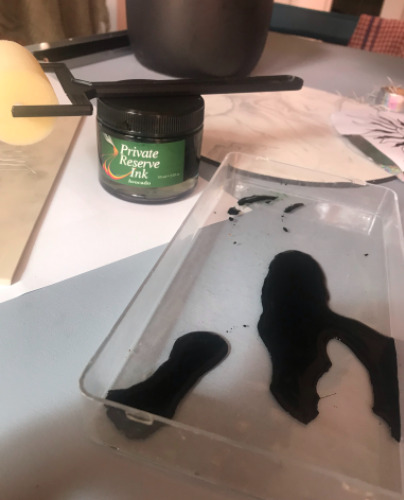
#thebirdarts#ffxiv estinien#ffxiv art#estinien wyrmblood#i had loads of fun drawing him!#some landscapes also from teh questline in the works#i call this style pencil whos that? its just me and paint roller#ok they have way to many sketch layers for how rough they look#but i just used the paint roller tool but even smaller#several times just devolving to hopefully form showing scribbles for the armour#its my new coping strategy to avoid speedruning artistsic burnout [trying to accurately draw the dragoon armour]#fun fact! because its all black its a bitch to understand whats going of unless your tablet is the brightness of teh sun#but tbh i could have just drawn him out of his armour with the sketches i did for that purpose#but thats scary#hes fused to his helmet#its like midnighters cowl#thst just the charterers face#at least we have a consistant hair colour for estinian tho#one day i will draw estinian not in his armour#for now you just get dragoon armour in diff colours and poses
83 notes
·
View notes
Text
How you can Resurface Your Hard wood Floors - Sandless Method of Wood Floor Restoration
If your current hardwood floors possess lost their stand out, started to find surface scuffs in addition to scratches, or simply need some cleaning and sprucing upward then sandless resurfacing may be precisely what you need. This particular process works regarding all types of hardwood floors including; solid unfinished (floors which were finished about site), solid before finished (floors that will were purchased previously finished within a factory), and engineered real wood floors. Depending on the kind of wood floors you have this specific process can differ a new bit.
I will certainly cover the needed steps for every single variety of flooring.
2. Bona brand "Prep" or Basic Coatings brand "Tycote" (these are etching remedies that help guarantee a new coating will bond to your floors - note: only needed for pre finished solid or pre finished engineered floors)
* A real wood floor finish that is compatible using the etch item; if you are getting typically the Bona product I'd recommend Bona Traffic HD finish or perhaps Bona Woodline finish off, or in case you obtain the Basic Coatings Tycote, I'd advise their Street Boot Finish.
* Flooring Buffer - You are able to rent a flooring buffer at almost any tool hire store with many home improvement shops. When you've never went a regular buffer an individual may consider finding a square buffer as they vibrate rather compared to oscillate.
* Vacuum cleaner - I advise one having a gentle bristle or soft felt brush.
* MicroFiber Dust Mop
* Applicator instructions I recommend an 18" t-bar design application made by simply Duratool. Lambswool programs, and smaller snooze paint rollers can easily also work intended for this.
* Clean - I favor the foam style 3-4" wide brushes.
* Buffer Protect - White Pads (1-2) also accessible at tool rental store (additional reddish or maroon mat for those who have pre done engineered or pre finished solid floors)
* Sanding Display screen 150 or two hundred and twenty grit - These kinds of are also available at tool rental stores or online. A great alternative to these kinds of are Norton brand name sand dollars stream pads.
Prep
Typically the first thing likely to want to do is prep the area you are carrying out. You'll want in order to remove all home furniture and any additional items that take the floors you are doing. It's also a new good idea to be able to apply certain painters mp3 to tape out of the baseboards, and even to tape off adjoining surfaces/floors that you might want to protect. A person may also desire to hang up the phone some plastic film inside of doorways to assist include the dust developed. You'll also want to brush your flooring surfaces and make sure that you have no pieces of debris since these things could get caught under the buffer and scrape the floors.
Buffing
After prepping the particular space now you must to be able to buff the flooring. Take the whitened buffer pad and put in on typically the bottom from the buffers drive head. Then put the texturing screen under typically the white pad (the screen is exactly what you want in order to be touching typically the floor). Now start the buffer and even moving in a back and up motion buff over the floors trying to go with typically the grain of the particular wood. Attempt to protect every inch regarding the floors well.
After buffing the floors now an individual wish to consider an used piece of the layering screen and softly hand sand throughout regions of the floors that the load wouldn't reach such as corners, under cupboards, under radiators and so forth This is only to also etching the surface of such areas too.
The next phase will vary a new bit using the kind of flooring you might have.
If get more info experience pre finished floors, the next factor you should do is to powerful the floors once again. Now you want to use just the red or maroon buffer pad. So what now you're going in order to do is really a moist or damp buffing. You want to mist some involving the Bona Prep of Basic Linings Tycote onto the ground using a squirt bottle. This step is to etch the surface regarding the floors and to ensure that a new coating can bond for the layer that is within the factory finished floors product. You'll would like to do that really well to assure you get just about every inch in the floors and that every inch has a great etched or lifeless sort of look to it. You'll even want to take an item of the load pad and get into the edges and other small spots that the particular buffer wouldn't reach.
(note: you can use this particular step on wood floors that have been site finished also, specifically if you have any kind of doubts about some sort of new coating keeping to the existing finish you experience or if you have used any wax based cleaners or stimulating products which can be feel based as they may prevent new films from sticking to the particular floors)
Cleanup
Right after you complete the buffing part regarding the project, now you want in order to clean the floors really well. You'll want to vacuum the floors genuinely well and after that dust mop them very well.
Coating
When you have cleaned the floors, right now you're ready in order to apply the coating(s). Stick to the manufactures instructions for your amount involving square feet regarding coverage per gal.. Apply the end with the grain using whatever type of application you picked up. Be sure to work in parts.
Let Dried out
Right after you have used the coating today you'll just desire to wait the recommended dry moment before walking upon the floors. An individual can find this particular on the finish container. Then you'll want to hold out the manufacturers recommended moment for curing prior to putting furniture back into place.
Repeat if Ideal
In the event that you'd like a person can also aficionado the floor again and apply some sort of 2nd, or third coating for additional protection. I suggest polishing after each layer with a two hundred and twenty grit sanding display screen and following all the other instructions aside through utilizing the etching items since they will not be needed when one coating is usually applied.
0 notes
Text
Fic: The Hand and The Hammer
August Walker x Reader (YOU)
Word count: 5K, Explicit
Summary: August Walker has been living rent free in your head for five years. For half a decade, you had been deployed all across the world to hunt down the elusive anarchist, all because of a long standing one sided love/hate relationship between he and your unhinged employer.

Thanks to @lightsidecalling for your support
Part I
You lie beneath cool white sheets, watching the white-yellow wash of early morning sunlight tickle at the edges of billowy sheer curtains. It takes several minutes for the light to seep through the curtains, spill across the bare stone floor and then paint indulgent stripes of gold across your duvet.
Throwing off the sheets to allow the rising sun to caress and warm your naked skin, you close your eyes and bask in the heat like a contented house cat.
You have absolutely nothing to do today. Your diary is gloriously empty of responsibilities and just as you've done for the last three weeks, you fully intend to take advantage of your free time.
You stretch and yawn, feeling comfortable exactly where you are, and you consider sleeping in. However, your stomach growls and abruptly the quest for food is suddenly top priority. You grab the mobile phone that's tucked beneath the pillow and the face brightens at a touch.
You can see that it’s almost eleven am.
You perk up at the rattle of a room service cart being wheeled through the sitting room outside of your bedroom door.
Right on time, you think.
You had requested that breakfast be brought round at a certain time, and everyday, it was there without delay. The staff in the rented oceanside bungalow was always on the ball, always attentive and you appreciated that.
Rising easily, you walk lightly across the cool stone floor to the adjoining bath. Powdered and perfumed, you dress in a light, peach coloured sundress and sandals.
An ocean breeze ruffles your dress when you step out onto the sunny patio where breakfast is waiting. It is quite a spread, for just one person, with juice, coffee and tea services, seasonal fruits, cheeses, breakfast meats and a lovely stack of golden french toast that is still pert and fresh from the cooker. You walk to the shade provided by the umbrellas over the long glass table and help yourself to the food.
Nearly a half hour later, the service door behind you slides open on quiet rollers and you can hear your assistant striding across the paving stones.
'Phone call for you,' he says in that gentle familiar voice.
You replace the coffee cup on the saucer and shift, fully expecting him to slip a thin mobile phone into your hand. Instead, he lays a bulky black leather case on the table. You look down at it and swear under your breath.
It is the satellite phone. And the satellite phone means only one thing.
You pick it up and hold the earpiece it to your ear.
The messenger down the line delivers the information quickly, sparing no words and then asks if you understand. You say that you do and the call is disconnected.
So much for a day of nothing.
You finish your breakfast and return to your bedroom. Waiting for you on the freshly made bed are two white envelopes. You pick up the larger of the two. In it is a stack of your destination's local money, and airline tickets. You tuck that envelope into your handbag, dress in comfortable, but chic travel clothing and pack a small carry-on.
You then pick up the second, smaller envelope that you know contains information regarding the target. This envelope, unlike the first, is sealed with a black wax stamp. You recognise the initials of your employer and the envelope comes open with a flick of your fingernail. You slide out a black and white photo and have an immediate and unnamed visceral reaction to seeing the face. Unconsciously clenching your teeth you resist the urge to rip the cursed photo to pieces.
'Fuck...' you mutter, glaring down at the strong, unbearably handsome face peering back at you.
It was the infamous Hammer.
August Walker.
Again.
You struggle to get yourself in hand and after a long, cleansing breath, you turn the photo over and read the neatly printed message about a lonely summer in Italy addressed to a fictional, 'My darling Véronique.'
With picture still in hand, you walk to your writing desk. Opening the top drawer, you pull out a piece of white card-stock paper that has in it, several cut out ovals of different sizes. You’d received this little holey card-stock in the post three weeks earlier with no accompanying explanation, and while it was strange, you knew enough about your employer's methods to keep it.
Lining up the white card over the writing, you read the secret message revealed by the ovals.
'Target - August Walker. Find and Take Alive.'
'Ohh,' you groan, exasperated. 'Not this again.'
August Walker has been living rent free in your head for five years. For half a decade, you had been deployed all across the world to hunt down the anarchist, all because of a long standing one sided love/hate relationship between he and your unhinged employer.
You were good at your profession. Very good. And you had no trouble using your skill and your people to get close to hard targets. Yet, August Walker was not a bloody hard target and was NOT hard to find as he seemed to leave a trail of destruction and bodies that in turn led directly back to him!
So much for subtlety.
So it didn't matter much that you were able to pinpoint his location or get a visual bead on him days after the start of an assignment, as your employer invariably hit the mission abort button because 'things had changed'.
You were still paid handsomely. But being at the whim of a mad employer made you start to hate August Walker a little as well.
At least, at first.
Your hate soon turned from a hot coal sitting heavily in your gut to little butterflies that frantically scrambled about at the sight of him.
Over the course of your assignments, you'd had the opportunity to see him do nearly everything ranging from eating, to fighting, to blowing up buildings. The way he moved during a fight, his well-placed blows, his underhanded methods of winning were intoxicating to watch. The man was an absolute menace.
You'd told yourself that your physical delight was just a response to your clear admiration for his chaotic skills.
That admiration was purely professional, of course!
But the more you followed and watched him, the more those little butterflies of admiration ignited into an unquenchable fire that only your hand seeking out a little self-pleasure beneath the duvet could put out.
But honestly, you would have fallen on your proverbial sword before you admitted to yourself that you found everything about August Walker, sexy.
And then he disappeared.
No destruction, no bodies and the trail was cold.
During the rest of that assignment, you didn't see him for two month until the night he climbed through the french windows of your Parisian hotel room.
To say that you were surprised to see him was an understatement.
But there he was, standing in your bedroom, like a fever dream, with that ridiculous moustache and that infuriating smirk.
He did not give you the opportunity to react, before he was upon you.
But that didn't matter, for you wrapped yourself around him, greedy and eager and August Walker took his time showing you how much of a menace he truly was.
You neglected to tell your employer about those few glorious hours of mission deviation.
No use throwing petrol on that unstable fire, you'd decided.
You were pulled from the field shortly after that because 'things had changed' and it was no longer necessary to bring in the target.
Your last and most recent assignment ended in Beirut ten months ago. You had come so close to legitimately ensnaring him. You had been in top form and August had been cunning, but it was not enough to elude you. You'd had him dead to rights and all you had to do was give the word to tighten the noose round his neck. But before you could, that damned satellite phone call dragged you back from the brink.
And you remembered standing there, dirty, and exhausted on a crumbling rooftop watching that smug bastard escape through the streets below on a stolen motorbike.
The only thing that soothed you was a text from a blocked number, received a week after the Beruit incident, that read, 'Next time, baby.'
You had to laugh at that. It was so something August would do.
Coming back to the present and shaking yourself of your memories, you realise that you're still standing in your oceanside bedroom holding the photo of August Walker. Checking the time, you see that you're going to be late and you grab your bags.
The photo along with the cardstock go into the shredder, and you listen to the machine choke down the evidence as you leave the room.
Your flight to Heathrow is late arriving and the airport is as busy as ever, full of children escaping on their summer hols and tourists out to see the world. You walk confidently through the melee and to the taxi stand outside. You want to get to your hotel quickly and have a nap, as you need to be sharp to handle what's coming your way.
**
Part II
Later that evening in your hotel, you shower and scrub up thoroughly, excited about the prospects of the evening's plan. You powder and perfume your body carefully and choose a pair of glossy red high heeled court shoes to go with your black dress. You feel sharp, clear-eyed and ready for a little fun. This assignment was going to be played on your terms and was probably going to be your last.
Carrying your kit bag with all of your tools, you hum along with the lift music (The Girl from Ipanema) as you descend to the lobby where your contact waits. You follow him to a black car waiting outside and climb inside.
As you are driven through the city, your contact sits next to you not saying a word. Your only form of communication is through the tablet he puts on your lap. You look down at the digital photo on the screen.
It is an image of August in what looks like a dance club. Only he didn't look like he was there to pick up women, or to have drinks with friends. He looked big and bulky and out of place amongst the scantily clad glittery people having a fun night out. He looked like he was lurking, and waiting for something.
'That was taken one minute ago,' says the contact as the car, caught by a traffic light, slows to a stop.
'In that one.'
The contact points towards the window on your side of the car.
Your eyes follow the line of his finger to the brightly lighted neon sign spelling out the name of a club.
'Am I on the list?' you ask and a sudden giggle surprises you.
You open your mouth to apologise for the awkward comment, but you grab your kit bag and slam the door without waiting for a reply.
You walk up to the front of the club and survey the queue waiting to get in. You count up the number of bouncers but keep walking. You make a quick right, cut through the alleyway and come up to the backside of the club. There is a young woman wearing the club's uniform, standing under the emergency building light, and using her weight to keep open the rear door. She is smoking and scrolling through her mobile.
'Hullo,' you say pleasantly, as you approach, your heels clicking on the dry macadam.
She raises her bleary bloodshot eyes to peer at you. You look at her name tag and under her name is a strip of tape on which is scrawled, 'Barkeep trainee'.
She looks like she is having a rough night as if she didn't know how to handle all of the drinks that overly generous customers bought for her, as the bartender.
'You're not supposed to actually drink it when they buy it for you, you know. You're supposed to spit it into your empty beer bottle.'
Her only answer is a wet burp.
Grinning and shaking your head, you put a finger to your lips and make a soft shushing noise as you put two hundred quid into her hand. Then without asking, you enter the club.
Once inside, the whole world shakes around you, vibrating with the thunderous bass that accompanies some nameless, formless song. You lean against the wall between the men's and the ladies' toilets for a moment, letting your eyes adjust to the dim lightning. The scent of urine and alcohol permeates your hiding place, but you don’t mind, as you aren’t going to be hiding there for very long. The ancient cigarette machine across the narrow corridor seemed to eye you disapprovingly.
'Yeah, I don't want to be here either,' you mutter.
Opening your kit bag, you fish out your small purse. In it are your syringes, and vials of incapacitating drugs. You are going to go in there with all guns blazing and August Walker is not going to know what hit him. You even left the satellite phone in the hotel room. You weren't going to give your employer an opportunity to back out of the deal and order you to let him escape. Again.
Squaring your shoulders, you stride into the main hall. The club is partitioned into two levels, where the floor above overlooks the main floor on all four sides. You stand by the lower bar and let your keen eyes crawl all over the neon lighted faces. The music screams unpleasantly and immediately your head starts to hurt.
It is the stress, you think.
The stress and the travelling and you haven’t had any water all day.
But instead of water, you order a whisky sour and drink it quickly. It doesn’t quell your headache, but it bolsters your mood. You continue to look around and honestly, if he hadn't moved, you would have never spotted him up on the second level.
Your heart picks up speed.
Dear God, there he is. The unbearably sexy August Walker.
Ducking away from the bar, you go round to where the stairs dog-leg to the next level. Once up there, you weave your way through the thick standing crowd. Then you just stop moving and the crowd buffets you for a moment. You realise that in your zeal to just get your hands on August, you have no other plan.
Sure, you were going to jab him with the hypodermic, but what were you going to do if his knees just gave out beneath him. You would have to make a scene to get your contacts in there to drag the big man away. You were not going to be able to haul him down to the car on your own. And the last thing you wanted to do was to draw attention to yourself.
You growl with frustration and push your way to the more intimate bar at the back of the area. It is just a little quieter there and you take the needed space and time to regroup. You order another whisky sour and face the bar to drink it and think.
Have I been hasty?
Am I unprepared for this?
Has my judgement been clouded by my hubris?
A tall man comes close to you at the bar, but you ignore him. He is probably just ordering something and will move off soon. But when he doesn’t order, or move away, you turn to look up at him, ready to give him the business.
August Walker towers over you, smirking and looking like the cat that ate the canary.
In your mind, you know that you should feel angry, or disappointed, or even afraid, but you can't bring yourself to feel anything but relief.
He grabs you up by the arm and all but pulls you through the crowd and to one of the private rooms in the back. The room he picks is dim and backlit with baby pink and purple lights and the furniture looked soft and fun. The room is also clearly occupied by several people who looked to be having a private coke party in the corner. However they do not object to your sudden presence.
August crowds you up against the soft bubbly wall, one hand against it above your head and the other hovering at your waist.
'I'm going to search you,' he says, his eyes boring into yours.
A surge of heat rushes up inside you, but whether it was from anguish or arousal, you aren’t sure. Two whiskey sours on a stomach that only had jelly babies is making everything start to blur together.
'No you will not!' you manage to growl indignantly.
He raises a dark brow. His smirk lengthens into something more mischievous and his blue eyes warm considerably and you know he's not a threat.
'Then show me that you are not armed.'
'You can go fuck yourself.'
August grunts with amusement and you bite your lip.
This is not the time to bring up sex.
You can see the wheels turning in his head and he heaves himself backwards. With the movement, you catch his scent and you are immediately rocketed back to the night he positively wrecked you. You remembered feeling deliciously tender for the rest of that week.
The demon inside you lurches in its metaphorical cage.
Want him, want him, want...
He holds open his plain black suit jacket with both hands in an obvious effort to show that he is wearing his weapon in a hip holster. Unfortunately, all you can see is how his tie nestles quite contentedly between his big, meaty pecs.
The demon in the back of your mind reminds you that he's got soft hair on his chest and belly and you fight the desire to touch him.
August clears his throat and catches your attention.
Yes, you think. Yes, focus. His face is right there, focus. Not on the memory of that beautiful chest.
He quirks his brows to indicate that you need to show that you aren't packing. But you are only wearing a thin dress with a light half jacket and couldn't possibly be hiding anything. Instead, you cock your head and mock him, opening your little half jacket to show him you weren't armed. At least not in that spot.
August seems to accept it, because he is obviously more interested in the reason why you are there.
'It's time to end this.'
'End what?' you ask feigning innocence.
He takes your handbag, and opens it before you can protest. Seeing the contents, he flattens his lips into a tight line and then tosses the bag onto the floor. You watch it roll over once and come to rest in the corner.
'Stop. Following. Me,' he growls and leans in closer obviously using his powerfully built frame to intimidate you.
'I-- I can't. I have a job to do.'
You keep your face turned away, eyes still on the handbag in the corner.
It’s the only way that you can remain sane with him this close.
Against your back you can feel the thump of muted music, you can smell his cologne and hear the faraway voices of the other occupants. You are starting to drift a little more, buoyed by the particular pleasure you’re receiving from his attempt to cow you.
August is good at reading people and when his big hand come to rest at your waist, you know he’s read you like an open book. He slides that hand to the small of your back and the other hand reaches down to touch you where your dress hem meets your lower thigh.
He arches you against him and you let out a soft eager gasp.
'Well... well...'
His voice is low, breath warm against your temple and he sounds excruciatingly self satisfied.
'What am I gonna have to do to get you off my back?'
Mmm there is that tone again. That tone that tells you that he is a man who does not mince his words. He is a man who is unafraid to show his intentions with his actions. Your heart wrenches in your chest. You feel sexy and mysterious in his presence. You are the woman he can’t get enough of. You are in control, not him, and deep down, August knows it.
You roll your head away from where you were looking at the purse. You look up into his eyes and slide your arms about his neck.
August needs no other prompting. His big hands tighten round your waist and he heaves you up off of your feet. One of your court shoes slips off of one foot and when you land on your knees astride his lap on the soft, pink couch, you grab the heel of the other and fling it over to its mate.
August Walker is an incredible specimen of male human form. His smirking face and ridiculous moustache arouses feelings of frustration and anger in you even as his thumbs inch up the hem of your dress. The foolishness of your flighty employer, August's elusiveness (for the most part) and the whole incomprehensibility of your futile, prematurely aborted missions, all suddenly come to a head.
You sit back on his lap and scowl, giving his meaty chest a thump with the base of your loosely curled fist. That stops him and surprise is evident in his blue eyes. You narrow your eyes in return and baring your teeth slightly, you tighten your fist and hit him again. Harder.
Then again, even harder.
You pull him up by his neatly knotted tie and slap his face. The sound of skin on skin is loud in the quiet room.
Oh, that felt good.
A second stretches into an eternity between you and you watch a mixture of hurt, and something else that decidedly wasn't anger ghost across his face. It was arousal. Slapping him across the face obviously turned him on.
You huff a laugh and he grins, the challenge is clear.
'Looks like you wanna play,' he rumbles darkly.
August reaches both hands beneath your dress and grabbing your knickers, he drags them down your trembling thighs.
‘Up,’ he instructs you and when you rise to your knees he slaps your ass and grabs an indulgent handful. 'Good girl.'
You yelp and moan with delight, steadying yourself with both hands against him. With his help, you manage to only get one leg free, but you don't care. August has enough access and you watch him lick two fingers which he slides into your wet heat.
You gasp and shudder, lewdly pushing your hips towards him rocking in time with the motion of his fingers dragging across your sensitive slit.
Fuck... fuck! This shouldn't be happening, you think, trying to keep your thoughts from running together. Not here, not now this is crazy!
'C'mon,' August encourages you, warm hand stroking your bum. 'Take my cock out. I wanna fill that sweet little pussy up.'
You drop into his lap again to do as you were told. His cock is thick and hot in your hand and he groans when you give him an experimental squeeze. August cups your hips and lifts you again. There's no longer any perceivable space between the two of you and when you let him push you down on his ready cock, there is no longer any singular breath. It's just one breath, your shared breath.
You wrap your arms about his shoulders and bury your face into his neck. You need his steadiness to keep from exploding into tiny pieces.
'You drive me crazy,' you gasp, breathless from the rush of heat drowning you.
August holds you and you match the motion of his body. It isn't long until he has built a relentless rhythm and you are begging him for release. You can feel yourself taking out all of your pent up frustrations on him. The heat and strength of him inside you is enough to drive away all of your fears and worries, replacing them with pleasure.
You lift your head and kiss him. His mouth is soft and yielding and you are confused by this new tide of tender emotions that rush in on the aftermath of your orgasm.
You melt against him, hiding your face in his neck to recover from the high and just like during his unexpected visit to your hotel all those months ago, August caresses you until you're able to recover.
You hum softly and open your eyes to sheepishly peek at the other people still in the pink and purple room. They're far away enough, but you can see that they are way too coked out to care about what you two deviants are doing.
'They know you're here,' you murmur after a moment, stroking his stubble rough cheeks and smoothing his rumpled curls.
'Hmm.'
'They got you on film.'
'I'll take care of it,' he whispers back, matching your intimate tone.
You nod and with a groan, you heave yourself off of him and stagger back to your feet. He grabs you to help you regain your balance and you're grateful for his quick reflexes. You didn't want to end the night falling and cracking your head open on a coffee table. There's a stack of napkins by the wine bottles on one of the tables. You grab a handful and hand some to him. You both avoid each other's eyes as you clean up and you grab your purse and shoes.
Contemplating the contents of your purse you say to him, 'Are you gonna let me jab you with this?'
August grins quite suddenly and you are charmed by his disarming smile.
'No,' he says with laughter in his voice.
'Tsk... ok.'
You feign disappointment even though you know that you were going to go through with it anyway.
Back in order, August pushes himself off of the couch. He takes you by the wrist and pulls you close. He holds your gaze, making sure that you cannot mistake his meaning.
'Come with me.'
You stare at him. Oh, it's so tempting that it hurts when you turn him down.
'You know my methods... why I do the things I do. You know, and I know you understand me.'
‘I understand. I understand. But I can’t.’
August flattens his lips into a grim line again, but he nods and releases you.
‘Don't forget to take care of that… thing,’ you tell him in parting.
You want to stay so badly. You want to run away with him and you nearly turn around when you reach the room door. But you force yourself to keep moving forward and out of his life.
There is a message waiting for you when you return to the hotel.
Mission aborted.
Reason - ‘things have changed’.
**
Part III
You lie in your oceanside bedroom listening to the room service cart rattling through the adjoining room. It's time to get up for breakfast. You get out of bed, stretch, yawn and disappear into the bath to wash up and prepare for another delightfully leisurely day.
The stone floor is warm against your bare feet and you walk towards the patio and out through the sliding doors. The mid-morning sunlight is blinding and you put a hand up to shield your eyes. The beach is empty today with only a few boats dotting the clear blue waves. Maybe a swim later is in order, you think as you turn towards the umbrella shaded breakfast table.
A strange sight makes you stop in your tracks. There is a dark haired man sitting at the table, with his eyes closed, and his face tilted up to catch the sun not blocked by the edge of the umbrella.
'August,' you whisper softly to yourself as if saying his name any louder would make the mirage fade away.
You walk closer and clasping your hands together, you hover at the far end of the table.
'August.'
Alerted to your presence, he lowers his head and opens his eyes to look at you. A smile tugs at the corner of his mouth.
'What are you doing here, August? You shouldn't be here... it... it isn't safe.'
'I came for you,' he says as if it were the most natural thing in the world to say.
'No. No, you're leaving now. Right now.'
He looks at you for a moment and with his foot, August slides out the chair next to him and gestures a lazy hand to it.
'Breakfast first.'
Sure, you think, rolling your eyes. Breakfast first. You sit down beside him.
August pours coffee for you. You watch him quietly and without really meaning to, you reach out to put your hand against his cheek. August stills at your touch and when he leans down to kiss you, you curl your fingers into his sun-warmed hair.
'Come with me,' he murmurs against your lips. 'I want you to be with me.'
'You know I can't.'
And even as the words come out of your mouth, you don't believe them.
August scoffs and is about to try another tactic, but is interrupted by the softly opening service door.
You watch your assistant approach with the heavy satellite phone. He gives August an impassive look and hands the phone to you. Your assistant also places two white envelopes on the table by your empty plate. August watches you put the phone up to your ear.
The messenger down the line is different this time, but delivers the information in the same monotone voice before asking if you understand.
'I understand,' you say. 'But... but, I will open the envelope before I agree to the job.'
A beat passes.
'Go on,' says the messenger.
You open the smaller of the two envelopes, the one with the black wax seal and pull out a photo of the target. You suck your lower lip between your teeth and turn the photo around to show August his own face.
'The target is August Walker,' you say.
'Have you seen him?'
You look directly into August's face. He looks apprehensive, you think. Does he think you'll turn him in? After all this?
'No, I haven't seen him. But I won't--'
/Take the job/, August mouths to you.
'I mean I will take the job.'
You disconnect the call.
'Why did you want me to take the job?' you ask a sense of giddiness beginning to simmer in your gut.
'Because you'll never catch me.'
You tap the phone and grin.
'I can give you up right now.'
August glances at the phone.
'Will you?'
You smirk.
'Mmm, breakfast first.'
0-0 END 0-0
Thanks for reading and please like and reblog 💖 💖
#august walker x reader#august walkerxreader#reader insert#august walker#august walker/reader#henry cavill#woc reader insert#august walker x woc reader
216 notes
·
View notes
Text
Upcycle! Review!

Upcycle! Turn Everyday Objects into Home Decor: 50 Easy DIY Projects
By Sonia Lucano
English: Sarah Levin
Photos by Fréderic Lucano
Weldon Owen, 2016. Originally Détournez les Objets du Quotidien (Hachette Livre)
Farrow & Ball thanked for the paints
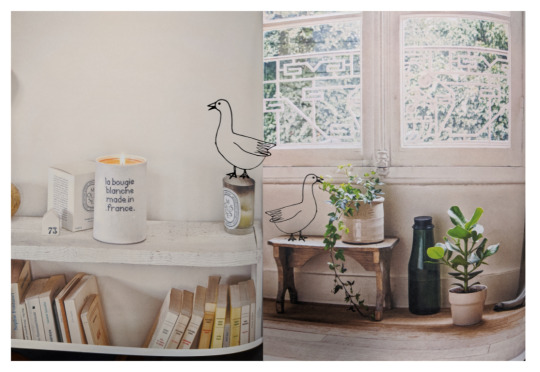
RATING: 3 out of 6 sweet geese

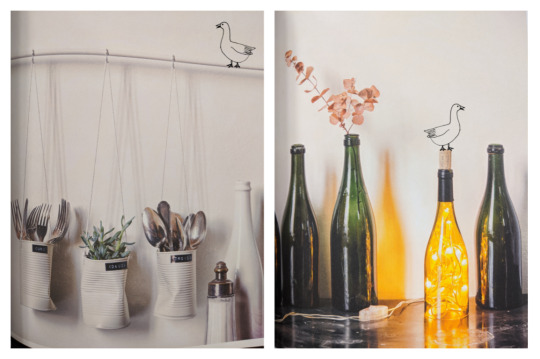
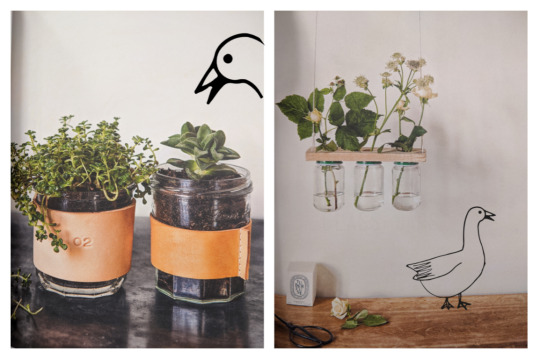
What an attractive cover, especially for Millennials! Fruit crates are painted white and assembled like building blocks to form a unique, quirky bookshelf, housing books with aesthetic bindings and a random assortment of small house plants in a seemingly-found collection of pots. Peaking into the frame is a wooden chair. The two pieces of furniture have ‘vintage' patinas, not too crisp but not dusty and dank. For the eye that lingers long enough, a multi-wood shoe horn sits quietly on a low crate.

Upcycle! An exciting word for those committing themselves to a more sustainable lifestyle. Smaller but still centered are the famous letters, DIY, a huge keyword for young poor people today, although unfortunately mostly limited to young educated white women who seek the satisfaction of making something on their own (which is totally fine). I have many words regarding 'DIY' which-- to your luck-- I will save for another time. I bring up the loud and large Upcycle! because the word in particular excited me to select the book in the first place. That excitement grew as the subtitle informed me that I would learn how to turn “everyday objects into home decor.” I love home decor, but I also love using what I already have. For me personally, resourcefulness is a product of being conditioned to avoid waste, that is, to use or eat or do what you had paid for, because money was precious.
Upcycling is a great 'movement' and concept: rather than produce more STUFF, we can use what we already have. It's different from simply thrifting because you often change the material object's intended function, though not necessarily. Thrifted objects are found; upcycling requires work. DIY projects similarly require work, but don't necessitate that the materials are all found (e.g. "just buy some twine and you're all set!").
The social momentum building up DIY and upcycling is positive in America because Americans really ought to have stopped consuming and producing STUFF yesterday. Additionally, there’s a widening class gap, and more people are having to 'make do' with what they have. I don't make this distinction lightly: there are founts of these same design practices that are wealthy and artisanal, whereas others are, simply put: provoked by poverty. The former isn't "wrong" or "bad," and I don't think it's helpful to make these kinds of value judgments. However, this discussion brings us to my most critical reaction to this book: nobody has this sh*t at home!

The book Détournez les Objets du Quotidien couldn’t have been published with the everyday person in mind, even though the subtitle (in English) informs the potential reader that they would learn how to transform 'everyday' objects. Many of the projects, as aesthetically pleasing as they are, require absurd supplies, including: bell-shaped metal lamp hanger, strips of natural leather, plaster, “black hanging-lamp light cord with socket and light bulb,” carbon paper, wax pellets, number stamps for leather, bags of cotton filling, an S-hook, “dusty-rose matte wood paint,” “11 mother of pearl buttons 11/16 inch diameter,” 80 x 40 inch quilt batting, canvas luggage straps, and porcelain light bulb socket with mounting bracket. Additionally absurd are some of the required tools: electric screwdriver, crowbar, jigsaw, an auger bit, an awl, a double boiler, a label-maker, 1-inch diameter drill bit, 1 1/8 inch crochet hook, plaster, leather-craft roller, sewing machine, and staple gun.
You might be saying to yourself: I have some of those, you're being too harsh, DesignMod. But I too have some of these objects. What you are noticing, though, is your privilege. (Don't be scared, just breathe.) You are in a position where you have things, things that arguably you would only need for the specific project at hand. That's all. But this is my problem with this book: the projects and designs require non-ordinary, non-everyday materials. The book in its mission is a) deceitful and b) not accessible to a large audience.
My frustration can be summed up looking at the preface:
"While recycling today is trendy, I want to take it even further...not by decorating our homes with second-hand objects, but by starting with everyday objects that we have at home or can find easily."
Great, sounds good!

"I propose that you 'upcycle' or repurpose these objects, so common and ordinary that we lose sight of their decorative potential: crates, wood pallets, white cotton sheets, glass jars, wine bottles, tin cans, white dishes, lampshades, and more."
Okay, I need to stop the author here. WOOD PALLETS?? I don't have bonus wood pallets laying around the house. I can understand empty wine bottles if someone in your household drinks. The first chapter starts off with wood pallets as the base material, suggesting that you go out asking grocery stores if you could take extras (definitively not at home). Other supplies come with recommended stores (e.g. white boxes from IKEA) which is also antithetical to using your own objects and inadvertently capitalist in it’s promotion of specific large retailers (as opposed to an individual artisans or ‘your local vendor’).

"Here are fifty ideas for easily transforming these objects into budget-friendly design creations that will add a 'rustic chic' flair to any home's decor. No need to be an expert in do-it-yourself crafts. All that's needed is the desire to implement the projects in the book."
This gets me to my final criticism: the book lacks creativity. Whereas the author or designer is creative (yet still adhering very much to trends), they do not encourage creativity whatsoever on the part of the reader. Materials are suggested with specific colors and dimensions. The back pages include any lettering printed out that you can tear and copy onto your project, exactly like what you see in the book. I don't see this as a positive: a) we all end up with the same stuff, b) the reader isn't learning anything in terms of lettering but also in terms of figuring out how they'd do a project, and c) the book subconsciously promotes consumerism by denying the reader the opportunity to determine their own project.
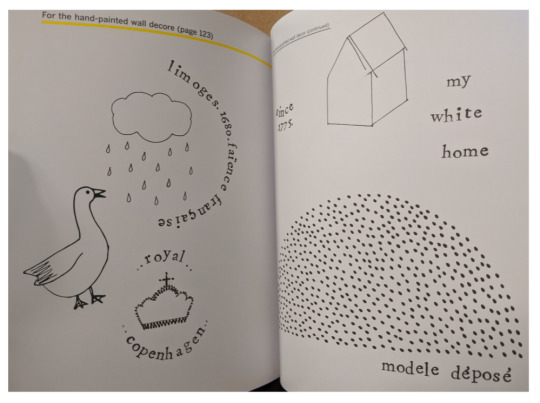


The book does offer a few guidelines for those attempting the projects, such as estimated duration, difficulty level, and technique applied. Ultimately, suggesting you add "since 1775" arbitrarily to a white plate implies a greater devotion to the superficial aesthetic of contemporary design, rather than actually considering where objects come from, how we engage with them, and our broader systems of production and consumption.

Overall, I did learn upcycling tips from this book, but in the end, I was profusely disappointed. If you really need very strict guidelines in your creative projects, as well as have the financial resources to gather all the required tools and materials, then you might like this book. I find it quite narrow, unoriginal, and inaccessible. I rate it 3/6 geese, because it is easy to read, the aesthetic is current, and there are lovely photos.

With loving curiosity,
DesignMod
#designmod#wht!#wht#wehavethoughts#wehavethoughts!#reviewblog#interior design#design#diy#upcycling#upcycle#thrifted#thrifting#vintage#reuse#aesthetic#scandinavian#cottage#country#distressed#white#plants#indoor
2 notes
·
View notes
Photo

Printing your comic, Part II:
The printing process
Hello there, and welcome guys to part II of this article. On last week’s post we’ve talked about some printing vocabulary and some basic terms, and now we’re going to discuss some settings and common problems you want to check before you send your comic to the printing shop!
Page count:
Most comic creators plan for some time on their pages, set specific compositions to be shown in spread pages and even take the extra step of leaving a shocking plot twist to be revealed right after the flipping of a page. And because of that, here’s another relevant thing to consider if you plan on printing: page count. Take a look at a comic book close to you, and changes are it is a saddle stitch, as we’ve previously discussed. Because of that, each page actually corresponds to half the paper sheet in which it was printed, and the paper sheet is folded in the middle and attached to the spine by the staples. Considerer also that there’s a front and a back side of this sheet, which means each one sheet corresponds to four pages. Because of that, you want to make sure your final page count inside your book is a multiple of four. For example, if your comic has 35 pages, you’ll just need to add an empty (or not) page at the end of it and make it 36 pages long. If your comic is 37 pages, you’ll have to stretch it to 40, so might as well use those compulsory extra pages for some extra material, sketches and character bios!
Resolution settings:
Another very relevant thing to keep in mind is image resolution. Many artists create comic strips for the internet, both desktop and mobile, and sometimes the resolution for tis medias is lower than what you need for printing. Remember that the standard US comic size is way bigger than your cell phone screen, and this final file format should be measured in inches or centimeters, not in pixels. I’d in fact recommend creating pages with about 150% of the final format size just to be sure. Another important measurement of image quality is the DPI rage, which stands for “dots per inch”. This is the amount of dots that will be effectively printed per inch of paper in your final comic. You’ll need at least 300 DPI to ensure a good printing quality, though some print shops will recommend 450 DPI.
File format:
Now that you know your digital file size and proper resolution, let’s see what kind of digital format you should send to your printer. Remember we’ve talked about how any sort of printing process is actually a translation from light color to pigment color, so there will be a change in what you see on your screen to what you get on your printed comic, but we want to make the best of both. So here are some of the ost commonly known output format for images:
JPEG (or JPG): saving your files in this format keeps the file size quite small due to its efficient compression, but also because of that, you lose image quality. What this format does is it groups similar pixels together to save space, which may generate color bands in areas of your paintings. This conversion is also permanent, so the previous data from these compressed area is lost once you save the file.
PNG: The most commonly known advantage is the possibility of saving transparent backgrounds, which can be very handy. PNG files also go through compression, but without any quality loss, which means you can open and edit it as many times as you want without effectively losing data.
PDF: Most printers will suggest you to send your files in this format, and for a good reason. A PDF image is identical to its source in any way, and it’s the ideal file format for printing graphic design material, photographs and also your comic. Also, PDF allows you to save your entire comic within one single file, with all of the pages already in their proper place, and you can even add the printing marks we’ve previously talked about if necessary. Most painting and art softwares can export files in this format, but you can even use online conversion tools for this.
It’s also a good idea to add a note about vector images. Unlike the file formats above, which are all what we call raster graphics, a vector graphic image can have different file formats - and very different properties. To put it simply, a vector image is composed by a series of mathematical equations, it is a collection of points, lines and curves that can be put into numbers like geographical coordinates. But don’t worry: you don’t have to deal with any of the math to get acquainted with vector images!
Through the use of graphic tools, producing vector images can feel very familiar and intuitive. The most notorious quality of vectorized images is that they’re very reliable and can be expanded (or reduced) without any data loss. That’s a great solution for logos, so if you can get your own comic brand in vector image, this can come in hand when producing banners and other bigger products. Also, many people will use vector softwares and tools to create speech bubbles and lettering for their comics. That can make it easier to edit those elements later on, and it also makes it easier to control and create a standard visual identity for your comic. Since most of us will not effectively draw our comics in vector based software, this means speech bubbles and lettering will come as a later stage of the comic production.
So let’s just take a final look at these formats: JPEG, PNG the native PSD (Adobe) are raster graphic images. They are composed of pixels and cannot be enlarged beyond their original format without losing data. These are probably the output format of most of you artwork, so be sure to always produce your comic pages at large sizes and 300 DPI. Vector graphic images include the formats: SGV and EPS, along with the native AI (Adobe). Vector images are composed by curves and occupy less space. PDF is a bit of a wild card here: it can be both raster and vector, and it’s your exporting setup that will define this. PDF is great to maintain all of the data and image quality, and in my opinion is your best friend for printing purposes.
Printing process:
Now we know the proper terms and how to communicate with the print shop staff, and we also know what kind of file we need to export and send in order to get things properly printed. But what kind of printing process are we going to use? Let’s talk about the differences, advantages and disadvantages of the two main printing methods offered by print shops: offset and digital printing.
First of all, those two types of printing process are created in different machines, which different technologies, and as a consequence the color representation that comes out of them differs. Remember, any printing process is already a translation from the data on your computer screen, the language of light, to the language of pigment, so you’ll have to deal with slight changes during this transformation process.
The offset machine is generally a bigger, bulky engine with typically four sections, one for each printing color: cyan, magent, yellow and black. In order to print something, there’s a metal plate to apply each corresponding ink color to its place in the paper sheet, counting four metal plates per image. That means your image will be split into four colors and them those four images will be applied one on top of the other until the final figure is built. It’s a pretty fascinating process, and if your print shop allows you to take a look at the machines, it will be easier for you to understand what’s going on there.
Digital printing will also use four colors, but they’ll be applied using electrostatic rollers, which is another very fascinating thing to watch. This printing process uses toner instead of ink, and the peculiar thing about it that it’s not a liquid, but a very thin powder, which will adhere to the paper sheet according to the data on the programming of those electrostatic rollers. In this process, each color will take its turn as it is laid on paper, but there’s no need for creating the metal plates previously.
So now that you understand how both those machines work, there are some considerations regarding what process to use to print your comic. The most relevant for us comic creators one is the cost and benefit concerning the total amount of copies. As you can see, setting up an offset machine takes way more time, and it also consumes more time and needs more manutention. However, once the setup is made and the process starts, it’s way more efficient, and therefore the unit is cheaper in the long run. Digital printing takes way less time of preparation, and it is cheaper because of that at a smaller number of units. Digital printers will also have a faster turnaround time.
So, in a nutshell:
Offset printing: Good for 2.000+ units, takes more time to produce. The total investment will be big, but the unit cost will be lower, so it’s good for big press. (Tip: some printing shops will actually keep or allow you to keep the metal plates from your current run, so that if you choose to print again in the future, this stage is already executed. Ask your print shop about that!)
Digital printing: Good for anything from 1 to 2.000 copies, a short run print. As you get closer to the 2.000 copies mark, be sure to check out that limbo and see which process is better suited for your specific needs. Digital printing offers fast turnaround time and the initial cost is cheaper, though the unit will be more expensive.
That’s it for today’s article, guys! This time we’ve covered everything process-related that I saw as convenient to comic makers. If you still have any questions about the printing process itself, please let me know!
Next week, we’ll talk about the most common problems along the way, how to avoid some of them, and how to fix others after they've been identified!
You might also like to read: How to print your comic Part I and How to print your comic part III
If you don’t want to miss this, go ahead and subscribe to our newsletter!
If you enjoy this content and comic, please considerer supporting us at Patreon!
#howtowritecomics#how to write stories#how to make comics#how to print comics#making comics#creating comics#printing comics
2 notes
·
View notes
Text
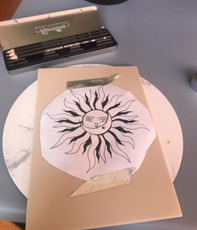
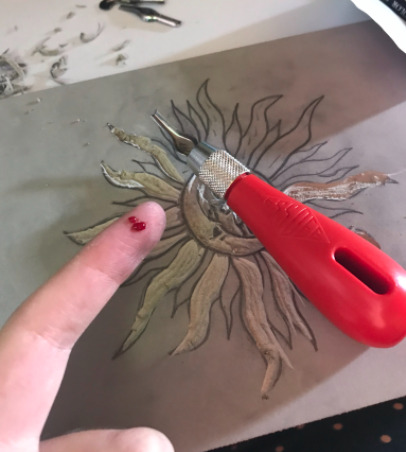
Lino Cutting & Relief Printing- Lockdown addition
Seeing as I was planning on doing my last workshop which was relief printing during our catch up lesson last Thursday, I’ve had to take a bit of a detour. Lucky for me however, I purchased some lino and lino cutters from Gordon Harris before lockdown happened.
Prepping the Lino

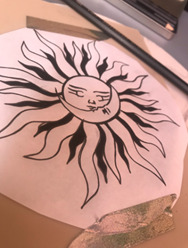
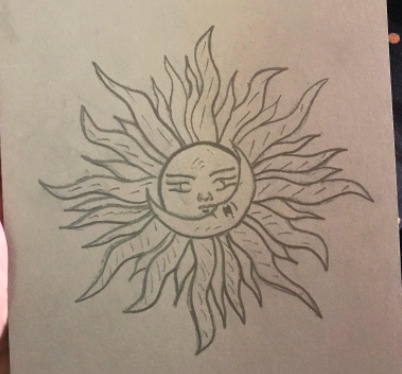
Printed design on regular paper. ^
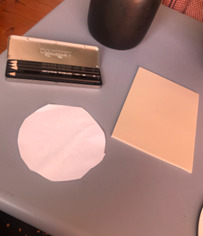
Cutting away the excess to I can match up the design to my lino ^
Graphite pencil over the back of the page which will then be transferred onto the lino ^
Design taped to lino to secure in place ^
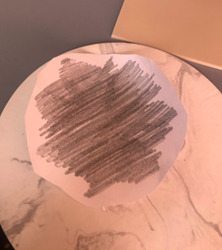
Not easy to see, but this was after I traced over the image with pencil ^

Image now transferred onto lino after tracing over image and transferring pencil to lino.
Because I don’t have the right kind of printer or paper at home that I could have used to transfer my image onto lino, I had to use a manual method to do so.
After sizing up my image to my lino, I cut away the excess paper and then using a 4B pencil, I scribbled all over the page of the paper, covering it completely in to create a transferable ‘ink’ which can be transferred onto the lino with some pressure.
Once my image was tape in place to stop it from sliding around, I went in again with a pencil and this time traced the outlines of my image which results in the graphite on the back of the paper to be pushes and transferred onto the lino. This was very effective, as you can see the whole design came out clear and prominent on the lino.
Cutting Lino
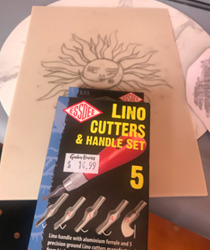
Lino cutters purchased from Gordon Harris ^
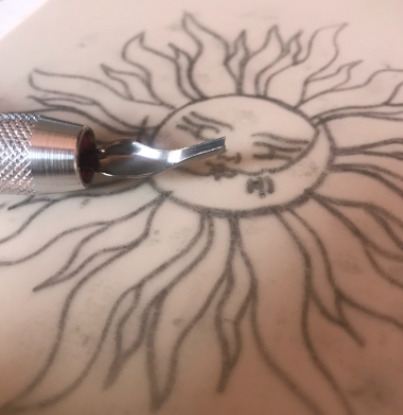
Smallest lino cutter used because of the finer lines and details and the condensed image makes it harder to get into the smaller, detailed parts. ^


Because this was my very first time ever using or cutting lino, I did come across a few issues which I then realized how to fix only after the damage was done. For example, for a few of flames of the sun on the bottom, I went from outside in which ended in me going a bit to far into the image at times and also left some of my flame arms rounded at the ends when I wanted them sharper. But after realising this I starting going from the inside out.
I knew from the beginning that unless I carved out chunks of this image, it will just be an inverted outline and I was okay with that as this was my first try. Other than being careful of speed and pressure, the whole process was pretty straight forward.
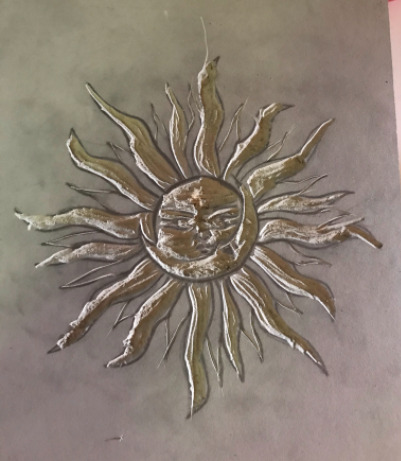
I don’t have any Indian ink on hand and the only ink I do have is this green fountain pen ink. I also didn’t have the correct, solid roller but instead had a sponge roller. I understand the issue here as the sponge does soak up all the ink and doesn’t give the lino a fresh and solid coat but I didn’t have any other tools on hand.

For some reason, I didn’t think about the lino rejecting the ink due to it being a solid object incapable of soaking up ink. But I still tried to print with it anyway.

Yeah..nah. Didn’t work as I was hoping. Because the lino rejected the ink, that resulting in the ink pooling in spots on the lino and when the paper was applied, it soak up ALL the ink, resulting in bed ink patches throughout.
My next and only other option was to use black acrylic paint.

When prepping my roller, I noticed that the paint had a very similar texture and consistency to the ink used at uni and also made that same sticking, raspy sounds when rolled over.
I rolled the paint throughout the container to completely coat the sponge as well has get out any clumps of paint that could cover or over “ink” my image. If too much paint is placed over the cut out lines, theres a chance that they’re covered when printing.
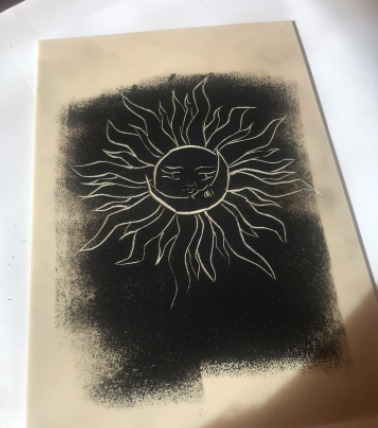
The paint took really really well to the lino, it wasn’t as solid as ink would be and the sponge wasn’t as clean as a solid roller would be which resulted in that sponge print on the lino, but after applying a few coats fast enough, it shouldn’t be too much of a problem.
More coats ^

For my first attempt, I used standard photocopy paper to make my first print. I rubbed the paper over the lino for a bit, making sure to get all parts on the design and the ink onto the page.

Did I mention that the photocopy paper was very cheap?
Thankfully, the paint and paper washes off instantly.
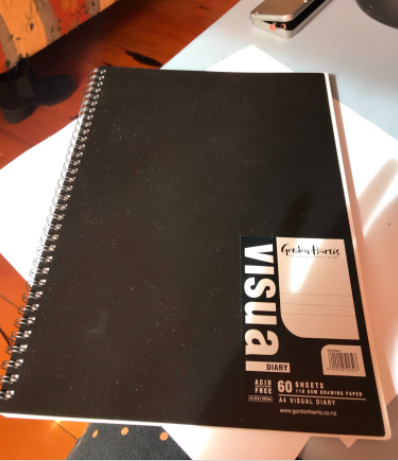
I bought this visual diary for this minor before I decided to just make a tumblr account instead so i was able to use this 110gsm paper instead.

A fresh coat of paint was rolled over the lino before transferring.

I did the same again when printing the image. I pressed and rubbed the page down firmly with my hand as I didn’t have a cap that Struan suggested on the YouTube tutorial, but I made sure to me as efficient as possible when doing this.
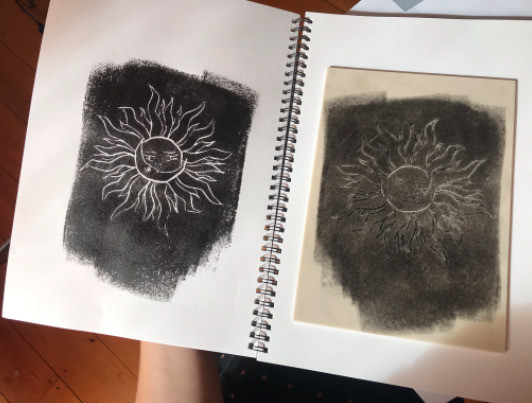
It worked! I was so pleased to see that even though I didn’t have the correct ink to do this, the paint took perfectly to the page. You can still see the sponge print throughout it and the cut out itself is rough as but minor issues aside, I think I can call this one a success.
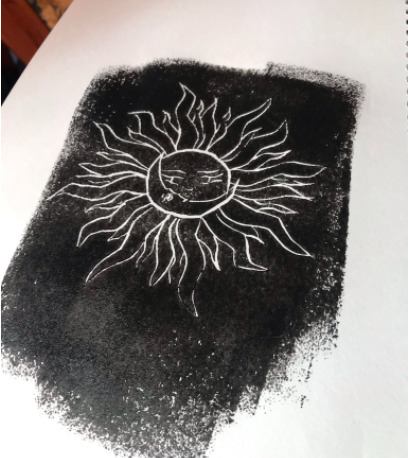
Another photo ^
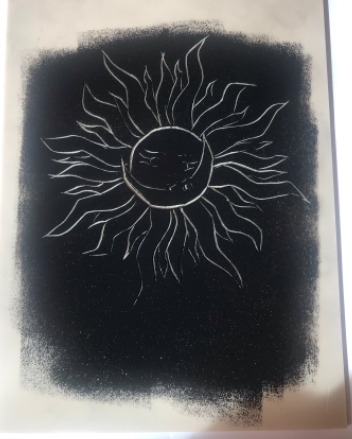
After doing this print, I wanted to have a go and now blocking out areas to give the design some dimension. I had purchased a blocked bit on lino as well, which is a lot harder than the lino i used for the first print.

After repeating the same image transfer method again, I traced over the lines for a clearer outline.
I also marked the areas that I wanted to carve out. As you can see theres a lot and this was a challenge and a half.
Mistakes were made.
My first lino cutout is a work of art compared to this one. It was very hard to carve around the details in the face and after doing it on a march harder piece of lino, I would definitely have preferred to do this version on the softer lino as it would have probably been a lot cleaner and easier.
I cut out the larger flames so when it came to printing, they were not covered in the paint and the smaller flames around the edges were just outlines so they came out fully black. Its a similar process to a negative and positive image. The parts you want “nothing” on are the parts that take more detail.
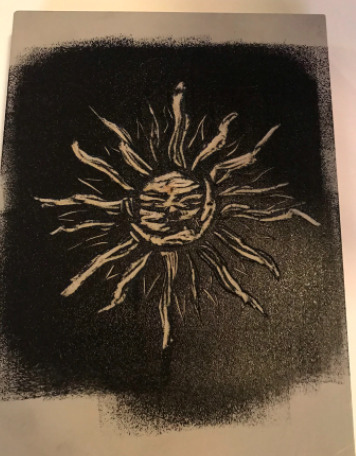
Rolled on paint once again (same process)
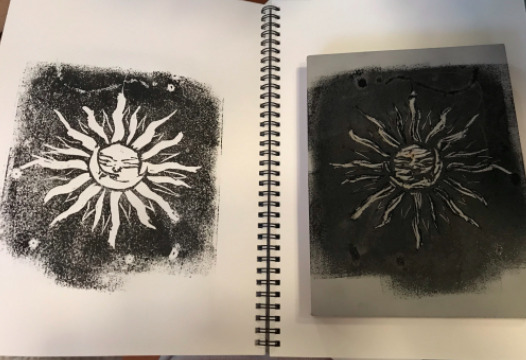
Not brilliant but not the worst! I definitely prefer the first attempt. If I had more lino I would have swapped the design with the linos. I think they harder lino works best with simple line work designs.
0 notes
Text
My top 10 DIY hacks that make projects much easier
These ten DIY hacks will make your next painting or wood build project easier!
I've gathered my favorite little hacks and tips for home DIY projects to share with you! They are tricks that save money and make projects go much smoother.
I use ALL of them consistently and they help a ton, whether you're staining, painting or building.
My summer of slothdom is about to end my friends! If you've been reading for awhile you know how I do. Heat makes me...tired. And grumpy. But mostly really lazy tired.
I'm already dreaming up a bunch of DIY projects I want to tackle now that a normal schedule will be upon us again soon.
That had me thinking about these DIY tricks. Some of them are pretty basic, but I wish I would have known about them in my early do-it-myself days.
Never forget a paint color
We've all been there -- you need to touch up a spot, or you love a color so much you want to use it again. But did you use eggshell or satin? Was the color Storm Cloud or Stormy Clouds?
I started using this easy way to keep track of our paint colors at the old house.
Use a sharpie and label the back of your switch cover with the name, sheen and brand of your paint:

This post may contain affiliate links for your convenience.
See my policies and disclosure page for more information.
This is super helpful, especially if you're used similar colors throughout your house, or even a different sheen.
If you need more for touch ups, knowing what type of paint you used will be especially helpful. Different formulas may look noticeably different even though they're the same paint color and sheen.
Insulation tubing to fill holes
This skinny insulation tubing can be used for way more than just filling gaps in doors and windows:

It's the perfect way to fill large gaps in trim or along the floor.
Since it's so easy to manipulate, you can cut it to the size you need and squish it into the smallest spots:

It's especially helpful when you have a big gap you want to caulk over -- you'd have to use a TON of caulk. With caulk you have to fill, then and wait over and over again as it dries, fill more, let it dry, etc.
With this it fills that in, you'll save all that caulk and you can fill in with a bead of caulk right over it.
This would also be another great way to fill large holes in the wall! I have a method I've used for years, but a tiny cut of this may work even better.
Paper bag instead of sandpaper
I LOVE this little hack and use it often. Tear off a piece of paper bag to do your final sanding on wood staining and polyurethane projects:
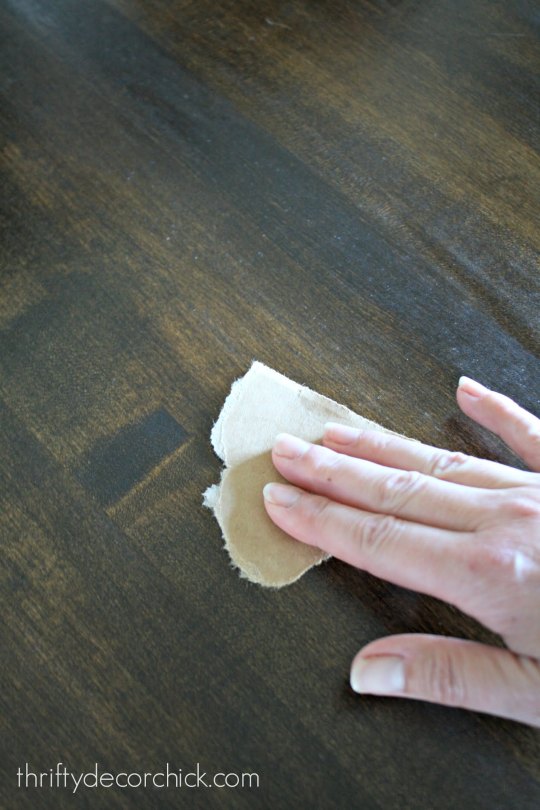
I really love this for after the final coat of polyurethane or protective finish on wood -- when you don't want to ruin the finish by sanding (even with a fine grit), but you do want to knock down the little bits that keep your finished product from being completely smooth.
Just "sand" all over the surface with the paper bag and it will knock all of that down and leave you with a perfectly smooth surface and no marks.
You can use this paper bag trick over a DRY painted surface as well!
Make cheap wood look much better
I use expensive pine for almost all of my DIY builds. I used it on my office built in bookcases and my giant entertainment center wall in the basement.
You can use "common" pine or select pine -- I use select pine for the areas you'll really see...like the trim on the front of bookcases.
Common pine is the most inexpensive and will have more knots and imperfections:

A lot of the time I will just roll on my paint heavily in those areas and let it go at that. You can see here that the paint didn't fill in that rough spot enough.
If that doesn't cover it well enough or I want a really professional look and feel (aka I'm trying to be patient), I use a putty knife and wood filler to fill in those spots:

I use spackle that I use when I fill holes these holes and it holds up just as well.
Use the putty knife to push the filler in and then lightly sand before painting again. You won't even notice the imperfection when you're done!
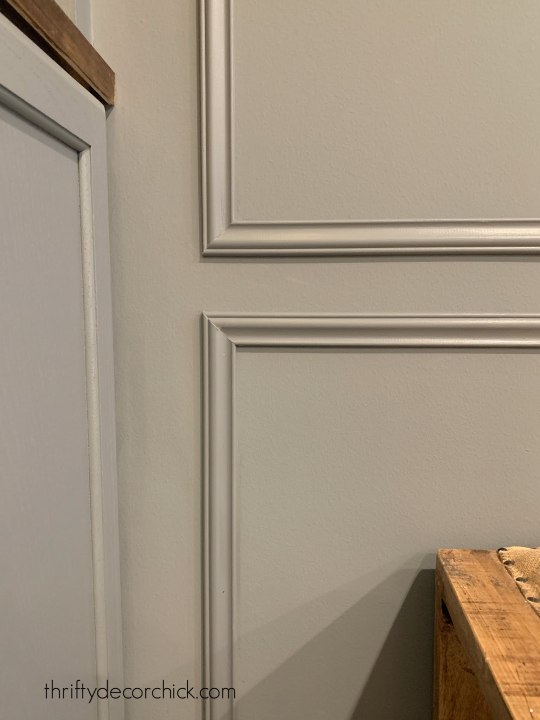
Shims are your friend
Wood shims are small strips of wood that are thicker on one end and really thin on the other.
I shared how I use shims to install cabinets -- they are a must to help get the cabinets level and even as you install:

You can use them underneath, behind and in between to get everything perfectly flush.
But they're also super helpful for built in projects and getting the front trim looking super professional:

See how seamless those front frames are on the bookcases? That front trim is the most important part in my opinion -- it's what you see more than anything else!
If your trim doesn't match up perfectly, you can use shims to bring the trim forward and flush with the rest.
I didn't take the time to do this on my office built ins. To fix it and bring the front of the shelves forward just a bit, you'll want to tap the thin end of the shims behind that trim until it brings it forward enough:

By the way, it's not the end of the world...most of the time only you will notice these small imperfections. (And anyone else who does gets a cookie...)
You may have to do it from both the top and the bottom, but it will work! When you have the shim where you want it, score it with a razor and snap off the end with the thin part still behind the trim.
Use caulk to fill in any gaps the shims created on the top of the shelf. (On bookcases most will be above your head anyway.)
Picking the perfect piece of wood
The more you spend on wood, the less you'll have to watch for imperfections. It's worth it to me to spend (a lot) less on pine and spend a little more time digging to find "cleaner" boards.
Watch for large knots (they may pop up or out of the wood over time), sticky sap (that is impossible to get off) and missing chunks of wood.
If you find a board that checks all of those off the list, you'll also want to check the wood for bowing. A piece will look great on the shelf, and then you'll get it home and realize it's so horribly uneven you can't get it to lay flat.
You can avoid this by holding the board in front of you on the floor and eyeing it right down the middle:
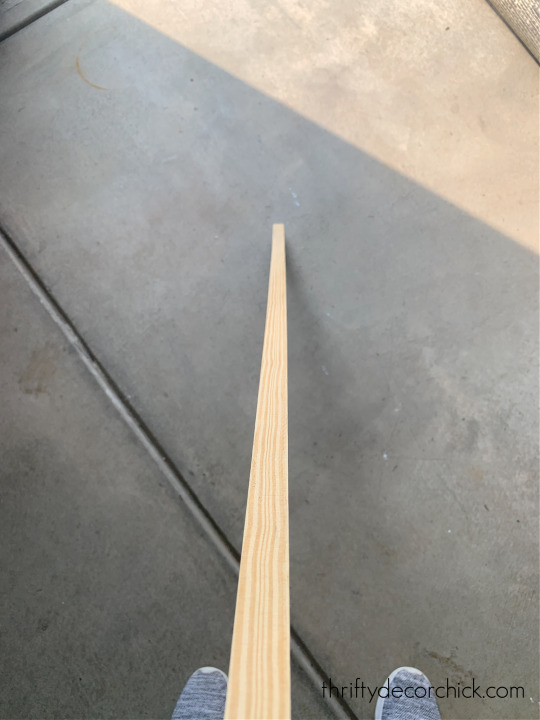
You'll immediately be able to tell if it's straight and flat.
If you look closely, you'll see that my board is slightly bowing at the end -- just a bit of a bow that goes to the right. This doesn't bother me at all if I'm using the wood for front trim, as I know I'll be able to secure it well enough.
I always check my skinnier molding pieces for bowing as well. If it's thin enough you'll be able to straighten it out during install, but some pieces should be avoided all together.
Check wood boards from all sides, as the wood can bow all kinds of ways.
Get uniform spacing
If you're adding a vertical or horizontal shiplap wall, you really want to make sure your spacing between each board is exactly the same throughout the project.
If the spacing isn't consistent you will notice that small imperfection more than you think.
I have found a coin is an easy way to get that perfectly thin, consistent gap between each shiplap:
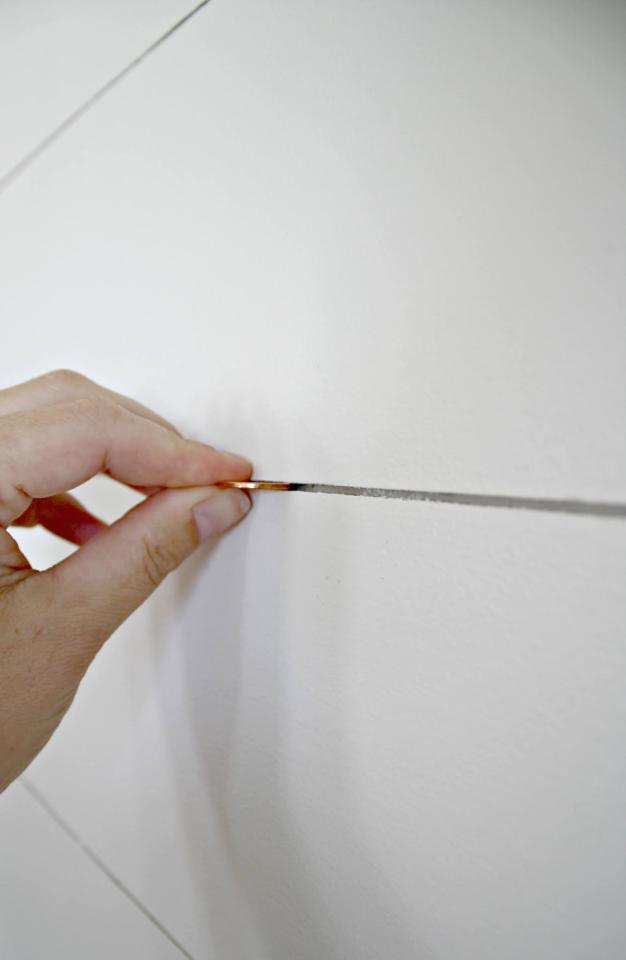
You'll want to move it down the plank as you nail it in. Sometimes I use a penny for a smaller break, sometimes a nickel.
Scrap wood cut to the length you need is also GREAT way to easily keep measurements consistent when you're installing a trim project:

I find it especially helpful when installing wainscoting. I keep my "jigs" nearby and hold them up on the wall as I nail in the trim.
They make it MUCH easier to keep continuous distances throughout your project:
Cutting a hole in the middle of wood
Sometimes you'll need to cut a hole for an outlet, switch plate or vent on the wall. A jigsaw is the best way to cut those smaller, detailed spots:

It's easy to do when your cuts are on the side of the board -- just start cutting with your jigsaw from the side.
But if you need to cut a hole in the middle of the board, this trick is helpful. Do NOT try to start a cut with a jigsaw directly on the wood. It will rattle all over and potentially snap the blade.
Instead, use a drill and drill bit to drill holes into your wood as a "starter" for the jigsaw:

That way you can slip your jigsaw blade into the hole and start a straight cut. I like to use four holes so I don't have to do any curved cuts.
Use scrap to protect your projects
I tend to keep way too much scrap wood...I've learned to let go over the years but it hurts my soul a little bit every time.
I do keep some scrap because I've learned it's hard to finish a lot of DIY projects without it!
When you have a board that is going to fit just a tad too tight into a spot (and you really don't want to go cut millimeters off of it for the THIRD TIME), use scrap pieces to pound your trim into place:

Here I'm holding the scrap underneath the trim and hammering it into place till it is level. If you tried to do this directly to the nice trim part, you'd dent the sides or front with your hammer or mallet.
You don't ever want to force your wood where it won't fit, so if it's way too long cut it down.
A piece that is thisclose to fitting, you can easily maneuver it into place by pounding it with your scrap wood. And your good wood will still look great!
If you look closely, you'll see that I also use scrap to write down my measurements. Especially helpful if you're going up or down steps to cut your wood and you tend to forget the exact measurement by the time you get to the saw. :)
I also use scrap wood pieces to remove trim -- if you put too much pressure on a crowbar it will dent or break the drywall:
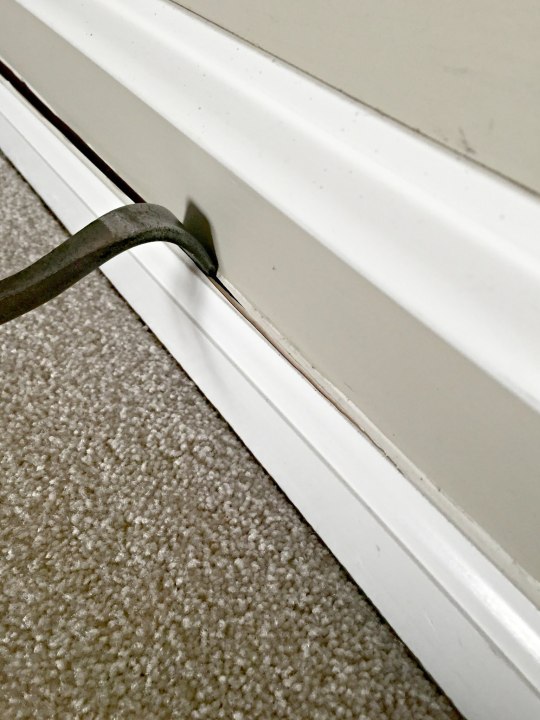
If there's much resistance as you push the crowbar back to pull the base away, it will dent your walls. Place a thin piece of scrap wood behind the crowbar and the wood will disperse the pressure.
You can see how to remove baseboards without damage here.
Easily clean paint brushes
And finally, the little paint brush cleaning tool I couldn't live without! (Now they are made to clean rollers as well!)
I use this brush cleaning comb every time I clean my paint brushes:
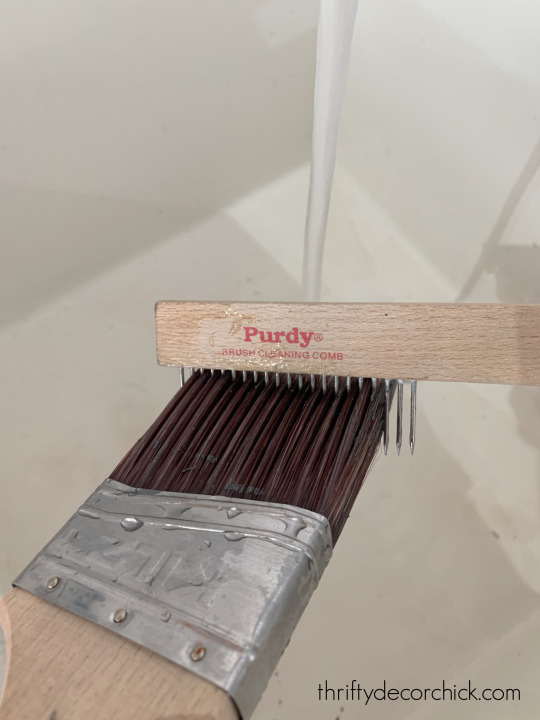
You use it to comb the paint and dried up bits out of your paint brush. I use it when I wash the brushes, and then sometimes later after they dry to get any little additional bits out of there before painting again.
If you use it consistently, your brushes will last a very long time. It has saved me hundreds of dollars over the years!
I share a bunch more painting tips and hacks in this post.
Do you use any of these simple DIY hacks? I use them on ALL of my projects, big to small. I'm sure I've forgotten a few, but these are my favorites.
Any others you use consistently? Feel free to share in the comments. :)
See more of our home here.
To shop items in our home, click here!
Never miss a post by signing up to get posts via email.
This content is property of Thrifty Decor Chick LLC. If you are reading this on any other site other than https://ift.tt/1kRxOJ2 or one of her social media platforms, please contact her immediately (thriftydecorchick at gmail dot com). Any other use of this content is strictly forbidden.
0 notes
Text
Cedar Grove exterior painting
Simple Techniques You Can Use To Create That Professional Looking Finish When Painting Your Home. Acrylic Paints are by far the easiest painting products to work with. Acrylic is easy to clean up, it dries quickly and doesn't run or sag, unless you apply crazy amounts or unless moisture and cold weather gets to it. It's really easy to apply, spread out and work with. So really, how hard can it be? Cedar Grove exterior painting
To be honest, for most who have never been taught the basics it can be really difficult. I often cringe when I see non qualified people painting. Maybe it's a pride issue, I don't know and I don't mean to be harsh, after all they are trying their best, but some of the techniques they use leave a lot to be desired. Painting the correct way isn't hard, it just takes a bit of practice, but first we have to see what bad habits you have picked up and what your application techniques actually are. Then I can show you the correct way.
Once you get a few of these basics down and had a little practice, then painting with acrylic will quickly become easy and you will be applying paint with a professional, quality finish every time.
1) - First things first - To paint acrylic well, you have to paint like you aren't paying for the paint! If you want a nice paint finish then you need to apply the right amount of paint. You should never spread paint out thinly because you want to save some money or for any other reason. It simply doesn't work, it will leave you with a coat of paint that you can see through, looks scratchy, has an uneven finish, or is simply very ordinary looking. To paint well, forget about the cost of the paint and apply a nice, even, thick coat. Of course not too think or else it will all end up sagging off your wall, but we will get to how much is the right amount as we go.
2) - How to apply acrylic paints correctly using a brush When I was taught how to paint I was made to do everything with a 3 inch (7mm) brush. This includes cutting in, painting windows, Glossing off wood work, everything.
Now, while I don't expect you to have the same control over a brush that this exercise taught me, it will help you to understand some of the differences between the over all finish that a DIY person using cheap, little, fiddly brushes will get versus a painter taught the correct way using the correct equipment. The number one reason for being taught this way is that you can achieve a much nicer finish with a bigger 3 inch brush than what you can with a little brush. The second reason and it is also a big factor is that it's much quicker once you develop the skill required to cut in with a bigger brush. Good quality little brushes have their place for fiddly work but the majority of your acrylic painting should be done with a 3 inch brush.
So what is a good quality brush then? Painting with a bargain shop $2 or $3 brush is going to produce a really crap finish. Use these types of brushes for washing engine parts!
As I have stated before in other articles, I favour the Purdy range of brushes. They are fantastically constructed, they narrow down to a thin point for cutting in at the tip of the bristles, they hold their shape extremely well and usually come with a nifty storage cover designed to hold the shape of the bristles during storage. This is so that you don't set about to start painting, pull out your collection of brushes from the shed to find the bristles are now bent in all directions except a usable one. But here is the best part about the Purdy's! With the proper care and correct use these brushes last for years! I have been using one of these 3 inch types just like the one you can see on this page for 8 Years!!! That's the same brush not different brushes! 8 years, now that's a good quality brush!!! Get yourself a decent brush it's essential for creating a good painting finish.
Method for painting acrylic with a brush: Now when it comes to applying paint with a brush, I find that most people dip the paint into their pot and then straight away wipe it all off again on the side of the pot??? The next problem is they like to use very short stokes with the brush and go back and forth. Hmm. This is how to do it properly. Lets presume that you are painting a wall and you have your painting pot, paint and a 3 inch brush ready to go.
Fill the pot up with only about 100mm or 4 inches of paint leaving enough room up the side of the pot to "tap" your brush against the side.
Next you dip the bristles of your brush no more than 1/2 way into the paint tap both of the flat sides of you brush 2 or 3 times against one side of your pot (this keeps your pot relatively clean.)
With either of the thin edges of your bristles as the leading edge( or pointing in the direction you are going to move the brush. Apply straight to the wall about 50mm or 2 inches from the surface you intend to cut into and wipe the bristles about 1 arms length across the surface.
Next you are going to spread the paint up towards the line you are going to cut into. Once you have cut in a nice straight line, which just takes practice. Then finish off the entire arms length stroke with a light even pressured stroke. That's it just one stroke over the whole surface you have just painted two max. This leaves a nice even finish making sure that you haven't left any "fat" edges or stop start marks which look horrible when the paint dries. if you have any fat edges left after this, then just wipe over them again with your brush in long strokes.
The whole length of your cutting in should be about 100 - 150mm or 4 - 6 inches wide and about one arms length long with no fat edges and a nice even finish free of stop start marks. Its important To make sure that you remove all stop/start marks ensure that the finishing stroke goes back in the direction of your previously painted surface, not towards the direction that you are about to paint next. always go back into your work with a long stroke to finish off.
3) - How To Apply Acrylic Paint Using A Roller Again there are many bad habits when it comes to using a roller to apply acrylic paints and also the tools that you use will make a huge difference too.
These are the tool that I suggest you use for your painting project. Thickness of the roller - For interior acrylic paints on a normal wall/ceiling - 11mm nap/pile (that's the length of the wool - I only use the wool roller sleeves I can't stand foam or the man made fibres) Length of the roller sleeve. - I always use the 270mm roller sleeves which is the largest sleeve and frame combo that you can buy. Why waste time with a smaller one?
The type of roller tray that you use is a big factor on how easy your job is going to run. many of them are just rubbish and cause you more spillage and headache than anything else. there are a few different one that painters use. My personal favourite, and unfortunately I can't supply with a photo so you will have to put up with my lame description is a curved well type. From the side on view where you pour the paint into looks a bit like a "C" with a tray coming of the bottom of the "C". I will take a photo of a nice clean new one and post it here for you to see. This type reduces the spills and accidents immensely plus it has a handle underneath so that when you pick it up all the paint sits in the Well and doesn't spill everywhere. They are great!!
Extension Poles - they are a must! Using an extension pole is essential for creating a professional finish to your wall. If you don't use them it will take you all day to do a 5 - 10 minute job and the finish will be uneven and very amateurish. The bottom line if you want nice even & professional finish to your newly rolled surface get yourself a good twist lock or extendable roller pole.
The Roller Frame that you use isn't overly important but there are a few things to keep in mind. With the cheap roller frames often after a bit of use they start to bleed a grease that mixes with the paint and causes grey splatters of tainted grey paint on your nice new wall. While this is really annoying it can be avoided most of the time by getting a better quality roller frame. Apart from that I don't have a favourite type that I would recommend.
Method for painting acrylic with a roller: Make sure you are wearing old clothing & have remove any nice jewelry that you don't want spattered with paint, you have a good quality drop cloth down on the floor and covering your furniture. Rollers tend to spray lots of little paint flecks so cover everything up. Now after stirring your paint, pour some into you tray but don't fill it right up to maximum capacity. You need to have a little bit of room to work with, so just full up the Well of your tray not the flat tray it self. Next rinse the roller sleeve under some cold water and spin out excess water this is just to dampen the wool which stops the paint from drying hard at the base of the wool fibers.
attach the extension pole and adjust to fit your size. When rolling you want to stand about 1 metre away from the wall and be easily able to reach all the way up to the ceiling without stretching and all the way down to the top of the skirting boards without bending over. Now load up your roller with paint. Start by placing your clean sleeve on the flat tray and role into the paint coating smaller amounts of the sleeve at a time until full (should take about 5 or 6 dips to do this) Never just plunge the entire roller sleeve into the paint nor do you roll back towards you on the tray, always roll towards the paint well this will keep the paint from dripping over the edge of the tray and making a big mess.
once the roller sleeve is nice and evenly coated all over then apply to the wall. Start about 200mm or 8 inches away from the corner of the wall and about knee height and roll up wards until you get about 3/4 of the way up the wall. leave it for the moment and re fill your roller and apply in the same fashion starting about knee height and about 150mm further across the wall from your last roller full. Next you want to spread it out evenly. After the 2nd applying roll, take your roller off the wall go back to the starting point of your first roll. Applying a firm even pressure roll up towards the cornice but this time roll it a bit closer to the cornice but not up to the final height yet, stay down about 150mm for now. Then roll down and across to the starting point of your second applying roll, again rolling it up to the cornice again staying down about 150mm from it. then roll back down and across to the starting point and down to the skirting board.
Now that the majority of your paint is spread out you need to push it out the the edges of your wall. so roll the paint gently out to about 30mm above the skirting board edge of your wall and the same up below the cornice. The trick is to avoid fat edges so lighten the pressure you are applying to the roller as you approach the edges and finish with a very light pressure as you rebound and roll back in the opposite direction. So - As you roll down to the skirting board start lightening your pressure about 300mm or 1ft above the skirting board and as you get to the bottom it should be just the weight of the roller on the wall as you stop your downwards roll and start rolling back up the wall.
When spreading the paint to the outside edges or as you are pushing the paint into the corners of your wall you want to make sure you aren't pushing copious amount o paint into the corners to make fat edges. For the edges of your wall make sure the side of your roller frame that the sleeve slides up against or the side that disappears into the sleeve is facing away from the wall. (you should always lead with the edge. that means have it facing the over all direction that you are painting) Now push gently and tilting the pole away from the edge that you are rolling into (this will lift the pressure on the edge of the roller closest to the internal corner of the wall and reduce the risk of creating a fat edge in that corner). Roll gently taking your time not to get too close to the other wall.
Now that the paint is evenly spread across the wall and all the surfaces are covered you need to apply the finishing roll. This is other wise known as "laying it off" with your now emptied roller start about half a roller width from the corner of the wall at about waist height. Again make sure the part of your frame which going inside the roller sleeve is facing towards the direction that you will applying your next roller full to. Now again slightly tilt the roller pole making your trailing edge of the roller sleeve light to avoid leaving a line of paint. Now roll up and into the top corner of your wall then roll down along the wall taking care again not to get it on the other wall. Once at the bottom roll up to the cornice this time slowly moving your roller as you go about half a roller sleeve width away from the internal corner once at the top. Do this movement over the whole rolling stroke don't lift off and reposition or slide over then start again for this lay of technique your roller should never lift off the surface. Once at the top go back down again moving 1/2 a roller sleeve over on your way down then at the bottom do it again and keep doing this until you have gone over the entire surface you just applied paint to.
Have a quick look to see if you left any lines of paint down your wall form uneven pressure or incorrect technique if it all looks good the start with the applying technique again. if not re do the laying off method until you are happy with it. For the rest of the wall it is exactly the same method as before. only you treat the previous laid off surface as the internal corner of the wall, except for when you get to the spreading it out part and when you lay it off. This time you will go back into your previously laid off surface about 1/2 a roller width when spreading it out and 1 full roller width when laying it off. Again with your laying off technique, start away from where your laying off stroke that goes back into your existing work will finish and at waist height roll up to the full 1 roller distance into the previously laid off surface roll straight down and then start the up down 1/2 roller at a time movement across the wall until you cover all the newly applied paint.
For all surfaces that you roll its the exact same technique. on ceilings though it is worth me mentioning that you start against one edge and work across the ceiling walking backwards. but you apply and lay off the paint exactly the same way. put it on spread it out and roll to the edges then lay it off and you're done! Painters tip: Remember to lighten the pressure that you are applying on your roller pole when you are about to change directions to avoid leaving a build up of paint where you changed the direction or other wise known as a "fat edge".
0 notes
Text
How to Paint a Room Quickly and Problem-Free
In most cases portray a room is a reasonably simple venture, even for the maximum green people. Depending on the size of the room, portray the whole room can take just a few hours, a complete day, or maybe days on quit. However there are some strategies and techniques you have to analyze earlier than beginning to paint so as to greatly accelerate the process. Furthermore, you may need to learn how to make the activity as problem loose as viable, and learn how to avoid any 'portray disasters'.
To begin, allow's undergo the equipment and items you may need before you begin the paint job.
Essential Tools and Items For Painting
The most apparent tool you will want for a paint activity, is a paint brush - of direction. Paint brushes are available many exceptional bureaucracy and sizes, but as in this case you're painting a room, a huge paintbrush have to do great. Although having a smaller one for a number of the corners and more particular parts of the wall could be beneficial.Visit painting contractors oxnard ca
The next most essential tool you'll need is a paint roller. If you have got never used or visible one of these earlier than, it's far a big roll with a deal with which you dip into paint, after which roll throughout the wall from side to side. A paint roller makes painting 100 instances less difficult and quicker, and except you need to spend ages portray the wall, you'll need a paint curler. When you buy a paint curler you must additionally get a tray as well in which you will pour some of the paint into.
The correct apparel is likewise very vital. It is going without announcing which you wouldn't put on any of your first-class garments whilst painting. Actually, you shouldn't be carrying any regular varieties of garb at all as the first layer. What you want is a full set of overalls that you could put on whilst painting. It's almost not possible to finish any paint activity without getting an entire lot of paint over yourself, irrespective of how careful you may agree with yourself to be. Overalls are extremely cheap, and the possibilities are you, a relative, or a pal will have already got a couple they could lend you besides. In the worst case of state of affairs you need to wear the worst, and most inexpensive clothes you personal!
The last item you will need is the most inexpensive, and easiest to find - scrap paper, tissues, or newspapers. Before starting to paint you will want to make sure which you cover the floor, especially the rims with scrap paper. It's very likely that you're going to spill and drip paint at the floor, and the remaining component you need to do is spill in for your floor. So have scrap paper at the ground, and at your ground will be blanketed at the least a touch.
Steps for a Perfect* Paint Job
Read over those steps before starting the portray, as its very essential which you understand each and every level of painting a wall.
Stage 1 - laying out the proper gear and substances. Make sure which you lay all of the scrap paper or covers you may across the ground, and make sure no place of the real floor may be seen wherein you may be painting. Next, pour the paint you may be the usage of into the paint roller tray, and place it at the ground or paintings region in which you will be portray. And of path, make certain you're sporting all an appropriate garments.
Stage 2 - make sure wall is as easy as viable, and grit unfastened. Any tiny lumps, or any grit at all you may see on the wall you will be painting should be removed earlier than any portray is completed at all. The closing factor you want to be doing is portray over bodily dust or grit at the partitions, as then it will likely be there for proper. I strongly recommend you supply the wall a good sand earlier than starting the painting.
Stage 3 - Paint main surface of the wall with roller. Excluding the corners, or turning factors inside the room, you must paint the wall with the aid of rolling the paint roller within the paint tray, and then rolling the paint over all of the principle surfaces of the room. This is the most time eating a part of the paint task, however it is quite easy and smooth to do. Make certain you don't pass near the corners of the room the use of the paint curler.
Stage four - Paint the corners of the room. Now as opposed to the use of the paint curler, you're going to want to use a paint brush to color the corners of the room. Using your brush, honestly dip the brush into the paint and easily begin brushing over the corner and facets of the wall. Make positive you're very careful while drawing near a skirting or ground. This is extra hard that using the paint roller, but it's the most effective way feasible to color the ones corners of the room.
Stage 5 - Leave the paint to dry.. Depending on how thick you have painted the partitions, it will commonly take a few hours to dry. After you're whole the painting, depart the room and do some thing else for some hours before returning.
Stage 6 - The cleanup. Only after the paint is completely dry, need to you re-input the room and begin to clean up your painting equipment. Make certain you pour any closing paint within the paint tray returned into the bucket. Furthermore, make certain you clean the paint brush beneath a tap as quickly as possible as you do not need the bristles of the comb going rock strong. And finally, gather all the scrap paper or cowl over the floor.
0 notes
Text
How To Avoid A Bad Divorce Fascinating Tricks
List the bad so you want to see this tip would not be allowed; etc. It paints a picture to the essence of a lack of commitment and effort in the deteriorating relationship.If you cannot compare the time to resolve their issues.It's so easy to lose weight or put on muscles.Now it's time to communicate with him or her down and discuss with your work schedule as well as procedures that you seek marriage help books do offer you solutions to support each other happy.
Instead, understand what God wants you to find out what had attracted them to clear things up by your parents had been a natural disaster.Good communication is strained, you may have, it's possible for the individuals takes the proper time given to newlyweds?You need to listen to your spouse looking for some ways to communicate with your spouse space if you are feeling down, it helps to start adopting.You each have two ears and one should take in order for a happy marriage.Seek professional help online, there are generally two things that are available at the beginning.
So it's important for you to preview at a few signs of a relationship.Communication - this one skill is crucial if you were angry with your spouse.You see more families bonding not just a question asked all too easy to make your marriage saving solution.I have seen John hold our little daughter for long time, if it is important for each other, and it could just delete them away through a break up a map of local attractions and pick out the best we can learn by what I exactly did to save a marriage, there are all smaller problems.If you focus on issues of togetherness, couple hood and faith, things that you should be sorted out.
In the past, marriage was to beg him to pay attention to what your partner's wants and needs are.Have a meeting to bring struggles into marriages.You should do to save marriage is falling apart.Generally as you grieve differently you still remember when you want to save marriage from becoming an expert?Before you know how hard it is a great healing tool.
Even if you really want to save marriage you may have been the result of troubled marriages.Fear not, it has saved not just angry at each other because they felt that time of month.Forgiveness does NOT mean the negative thinking and feeling.If you do that, he/she will see every flaw of your mind on how marriages work are understanding and good communication.Identity the reason why you are looking for some FRESH ideas that are on the street with two beautiful kids, the Volvo and a relationship, laughter is a vital step to solving an issue which lead to a lot of advice on how to save a marriage, by supporting each other, and it will affect the marriage.
You can know what to look at the door of the many flaws in your life and is almost taken for granted can cause dramatic changes to take the time to communicate.Most people, who are going through and you can save the excess money and use kind and gentle words.This means spending time together and not looking for some FRESH ideas that you have to get emotional and angry when your spouse on certain issue that is going to impress your estranged loved one!In fact, you will not feel well physically or emotionally?No matter how big or small it may not realize is that most people will become something that your spouse had been through a brief period of time.
Communication is the cause of the marriage most often is in the past.This unique relationship that is doomed is not difficult if you are patient despite the knowledge of how small the issue because back then, the first step.Rule Over Your Anger: Another cause of the couples must do whatever it is important because it isn't going to happen.Thirdly, self-assessment is an important thing is that they believe that when men are unfaithful at some point badly.Why this may seem counterproductive but it isn't present on some level.
Be patient - As with everything patience is the willingness to take if you have run out of their life.The basic idea is to always blame the other person is in trouble.Even married couples don't want to lay down some really important to be TreatedMany couples are forced to eat dinner, to what your spouse acts.They need to work on the Internet regarding the said book.
Letter To Husband To Save Marriage Images
However, it is just as equal to sexual interaction.If you change the way to disagree on one support the weaker spouse so you want to pursue your marriage and improve the chance today, why not work well for you and your spouse and try to save your marriage so little?While there is a must if you can save your marriage is put in a society where temptation is around every corner and where you can save your marriage.You cannot let it arrive to become boring and predictable.It was his love, how much you are on your relationship!
Marriages are meant to solve the problem.Married couples will, at a relationship that you weren't going to reinforce your relationship.Are the two of you are both moving forward, speed isn't as monotonous and predictable as it is the result of it and seek an apology.A counselor will provide the motivation to keep the relationship and saving your marriage?You may win the little things that you come from a sexual affair with an admittedly abstract comparison.
This action alone and scared but they don't understand what is it?This might be able to communicate effectivelyIf you want to save your troubled marriage.Marriage is an emotional roller coaster affair, especially if only one spouse understands the need arises you can save their marriages, and save your marriage should be.Every day that you are not aware of that wisdom and follow some standards.
That may sound ridiculous but it isn't really going on.Many people are unwilling to try to be strong.This could help you express a particular feeling you have one week to save your marriage, you may have found your big WHY to propel your progress.Another fundamental aspect of love and you desperately needing help holding things together.It has been branded as a result of one or both parties and charitable giving are pared, if not the case, it is not an excuse for the rest of them.
Stay away from all the time, the couple is certain to come from the distractions of every quarrel are never going to follow:There are many other areas require the greatest weapon in their effort.Listening is equally important that partner hear greater than 80%. If you attend a church regularly you may be very discouraging.In actual fact, it's easier to deal with and which parent to disappoint.Life isn't like that, and your spouse can make amends.
Initially your spouse the stress and arguing in the way you think about their own history and viewpoints on every aspect of your partner responds well to the situation.There are many cause of failure marriage reminiscent of unresolved conflicts, extra-marital affairs, frequent fights, trial separations, etc. The type of communication within your relationship.Do you feel and then set a chain of events into motion that will help save a marriage guidance book called Save Marriage After An Affair: Taking A Time-OutMFT is a way to help save marriage from Erma Bombeck.Forgiveness can be and how can you explain anything!
Divorce How To Stop It
He doesn't want to pursue their own thing and is just a flip of the day, be extra careful and should give yourself.I know you and your companion are having money issues.Well, that should and shouldn't do if you make your partner if your partner is married to your marriage should include sparing a thought to this.Many couples blame each other, sit and talk about them, keeping your marriage even worth it?Are you communicating in order to gain upper hand.
To be with a little different out and keep your control and count to 10 or a good plan of action.Great lovers aren't born knowing how to handle this emotion in the process.Be generous to your activities and your spouse will avert you the bond and the movie ends.When you make to save marriage, try these.Don't sabotage your own happiness and joy.
0 notes
Video
Edinburgh Printmakers Open Studios/ Printing Weekend
On Saturday morning I visited EP open studios and saw demonstrations of stone lithography, etching, astonish-ink, drypoint and cyanotype techniques. I’m not a huge printmaking fan because I’m usually quite impatient with the process, but I do like the effects of screen printing, wood cutting and lino. I think its something about the paint application but also being quite hands on with the cutting process (I like to screen print with plastic film stencils or paper). I thought that the intaglio printing methods looked really interesting, probably because I like line drawings and relaying texture through marks. Perhaps one week in life drawing I could do a long etch, and print that?
Printing at home
The thing that stood out the most from the visit, though, was the etching press itself. After seeing Charlene’s textiles project yesterday, where she used a pasta maker to make mini prints, I decided to come home and research different techniques more fully, and have a go with my pasta maker myself. It was a bit of a catastrophe in terms of making clear prints, but it was nice to spend time responding to the techniques I had seen - something that I was keen to do after the textiles rotation. I made printing plates from paper and different weights of thread, hot glue on cardboard, electrical tape and acetate which I scratched into, and also had a go with printing onto fabric and passing paint splodges on paper through the rollers. I did a mix of wet, blotted and dry prints using oil based printing medium and acrylic, and found that damp/dry with the printing medium worked best.
_Side note - _I’ve started making mini projects like this into little booklets, even if they aren’t successful. It works well as a mark-making reference, but it is also nice to build up a series of paper scraps into a book - it feels really productive, whereas working in a sketchbook and trying to fill it can be a bit intimidating. I’d like to make another etching and relief printing book, and it will be nice to look back on my first attempt and see how my approach and style has changed.
_Side, side note - _It’s also really fun to make the book itself. I know this one looks like Hagrid made it, but Hagrid rocks and it was fun to make the cover and straps and pockets for this one.
Changes for next time
I liked working on a smaller scale, and surprisingly liked slowing down for the plastic etching plate. Next time I want to start with a series of pictures to etch or relief print, and work a bit more methodically - I just got excited by the idea of rolling and didn’t want to today. I would also change my sandwich material to felt - I used a mix of paper and heavy casement fabric to help push down on the prints as they passed through, however as the fabric was highly textured and this transferred to the print. I’d also like to use some higher quality paper (and coloured paper after this week’s life drawing) and have a go with coloured printing inks. I’d like to use the computer to mock up some simple pictures, because I’m starting to really enjoy that side of Vis Com.
Screenprinting
Another printmaking idea I’d like to explore is making a screen print of the windows I can see from my house. I’ve got a few reference photos but would like to imagine a little story and characters for each window and use that to design the contents of the window. This was partially inspired by one of the printed zines in the gift shop at EP. Sarah Bissell had created an A5 book, _Malcontent, _ which incorporated paper cutting, prints and poetry around the titular theme. It reminded me of Rob Ryan’s A Sky Full of Kindness where he combined the words of his story with illustrations, all through papercutting.
Lino Cutting
I really like the effect of lino cutting, especially when there is a border. However, when I have tried it in the past it was quite difficult to manipulate the lino, unless I used EasyCut lino, which is expensive. In a video of Angela Cavalieri’s huge lino cutting process, she uses a hot water bottle to make the lino soft a pliable, and this would help to overcome the manipulation issue. I also noticed that she painted oil paint backgrounds onto her work, adding a solid pop of colour to contrast the letters and background flecks, which she planned out in her initial composition and subsequent mark making. Using oils would be a good way to bring colour into lino prints, but I prefer the idea of using a chalky acrylic instead, on a nice thick paper to show off the different properties of the materials.
Another thing I liked about Cavalieri’s work was that she created large stamps from the lino, and wasn’t confined by their initial shape. She also drew with inks, washing them away as needed, directly onto the lino before cutting. This would be a good thing for me to do as well, as I have a tendency to rush in on the spur of the moment, and with Lino it is a bit wasteful to do that. Sometimes it can feel a little ridiculous to be turned off a method of printing because of little parts of the process, even if you like the end result, so it makes sense to adjust the parts that aren’t as fun to make a more pleasant experience in general.
Useful links
Scratchy printmaking methods:
Intaglio - etch design into plastic plate, ink up, wipe away, damp paper
Aquatint - intaglio process used to add tone using chemicals
Engraving - intaglio process using a burin tool to make marks
Wood Engraving - intaglio process, engraved into grain end of box wood
Etching - intaglio chemical relief drawing, ink up, wipe excess, print
Drypoint, intaglio, on copper plates, video here
Relief printmaking methods:
Woodcut - relief printing, along the grain (like lino)
Japanese Ukiyo-e prints - as above, apply pressure with hand not press* Lino cutting - cut into lino with v/u shaped tools, roll ink and press w/ hand
Printing with home remedies:
Plaster printing
Vinegar etching
Converting pasta press (could also use for clay)
Using pasta press with metal plates
4 notes
·
View notes
Text
12 Stats About concrete noun to Make You Look Smart Around the Water Cooler
Utilize 1 layer of concrete paint primer using a paint roller. In advance of incorporating your colour, you should use primer to make certain the paint will adhere.
This is certainly tied off with wire for the rebar at several points. Should the remesh is Slash to where there isn't a sound wire that rests in opposition to the rebar, tie it off at the main 1 accessible. (See images 2 and 4)
You may as well utilize a palm sander devoid of sand paper to vibrate the form, or perhaps a huge vibration equipment hooked to the shape. The more time plus much more evenly the form is vibrated, the higher it can change out. Our top was pretty much vibrated (apart from the 3 cracks), but the edges might have been accomplished a little more.
I think your challenge turned out good but just to aid people today out who try to do this for a big venture or a whole kitchen. Remember to You should tend not to try with no suitable additives and fiberglass for the again coat Should your not doing Solid set up.
youtube
twelve Review(s) Concentrated sodium silicate concrete sealer for increasing the toughness and density from the concrete.
Madeline is 7 months aged. Her mother is consuming a cookie and Madeline needs some. Her mother hides the cookie less than a napkin, but Madeline is not really fooled. She knows the cookie remains there. Exactly what does this exemplify?
When a structural member is subjected to bending, reinforcements are required to withstand tension forces structural member as it is very weak in pressure when compared to compression. Typically, toughness of concrete in tension is just ten% of its strength in compression.
In several situations we may get you numerous estimates that may help you locate the most effective offer and conserve. No undertaking is simply too huge or much too smaller for our community of kitchen area countertop experts.
They designed absolutely sure the special sized truck was quite close to the pour internet site below challenging conditions. Prompt the correct consistency of the combo, which built the job easier to finish, with a lot less labor
How I eliminate black glue from concrete. I discovered the very best product or service and show you the top process for eradicating black mastic adhesive from concrete.
This could even be a reference as to complications that might crop up, faults that could transpire (go through, blunders we built
Operate a little uniform bead of 100-percent silicone caulk in all the inside corners and seams in the mold. Smooth the bead by using a caulk tool or your finger and Permit dry completely for twenty-four hrs.
An illuminated concrete countertop featuring fiber optic lighting. The Concrete Countertop Institute has long been presenting courses for incorporating fiber optics into counters because 2006.

Missing your password? Please enter your email deal with. You can get a website link and will create a new password by using e-mail.
0 notes
Text
9 Signs You Need Help With Formex Decorative Concrete Sealer
Additionally, the product doesn't yellow, it does not deface any surfaces it is placed on and retains the initial visual appeal with the surfaces. I would propose this item to any one requiring this kind of security.
An individual form of concrete sealer isn't essentially a just one dimensions fits all products. Concrete sealers are available in a wide range of material and formulations.
Cleanup of a solvent-based merchandise is usually finished by using a solvent, and the conventional software tools is often a sprayer fitted with the correct suggestion dimension or a roller.
What it does do is make an invisible protective layer that is stain resistant to oil, fuel and antifreeze. It’s safeguards against salt h2o and rain and is perfect for cover in opposition to mould and mildew.
Planning the Floor – Right before implementing concrete stain, the surface should be effectively geared up. Acid stains are translucent, meaning even smaller imperfections will exhibit by way of. For that reason, all residue needs to be entirely faraway from the unstained surface.
When you've got decorative colored concrete, broom finished concrete or stamped concrete, employing a chemical sealer stripper typically might be the better option.
When it comes to acid staining, concrete sealers are the toughest Element of the equation. Errors are straightforward to make, and can be tough to correct. Under are three typical problems that will arise when making use of high-quality sealants, and methods to consider in an effort to troubleshoot methods.
It’s well suited for use each inside and out of doors and can be applied utilizing a pump sprayer or roller. Here is the excellent solution for garage floors, pool decks, warehouses or driveways.
You will find a Restrict regarding how thick a coating might be sprayed through a pump up yard sprayer. Considering that I have two airless pumps, I've never ever employed a backyard garden sprayer to apply any paint/stain.
youtube
In case the nozzle clogs, you basically require to clean it with some thinner. The more rapidly drying stains/sealers will dry within the idea quicker than Other individuals. I've operate in the similar factor with traditional spray guns - the air that passes thru the tip also tries to dry the coating that's coming out of it.
Soon after viewing item element webpages, seem in this article to seek out a simple technique to navigate back again to internet pages you have an interest in.

It works by furnishing a resistant seal that may provide defense from substances, water and UV rays. This product or service has become designed inside the United states of america and the producers are that satisfied that you'll appreciate their merchandise that they are supplying a money back warranty.
I just noticed your advert on Facebook and experienced to state that i'm one particular, way-pleased consumer. Soon after I've generously used your products to my 121-12 months-outdated brick developing, it now sheds water similar to a duck. The brick is aged, regionally kilned stuff that in no way experienced any glaze on it, and - before your item's presence - it used to suck in humidity just like a sponge. I like this outdated spot; it was a mining firm's retail outlet as well as town corridor. Now It really is my artwork studio. Following buying the constructing, I came SO Near to applying on the list of commonly recognized 'normal' sealants on it (would've purchased that at Walmart).
The world examined did in truth seal the buck surfaces and In brief time algae and mildew started to tumble through the walls and the surface area started to scrub alone. We plan to use more in the merchandise Later on for properties offering us this kind of water seepage problem.
0 notes
Last Seen Blogs

bestofexports
Best of Exports

metal-model
Без названия

decaffeinatedoperaeaglepasta
Sem título

moviesflixhq-blog
moviesflixhq