#bathroomplumbing
Text
Sydney's Bath Tub Repair Heroes: Restoring Relaxation, One Tub at a Time!
Every homeowner treasures their little haven in the fast-paced metropolis of Sydney, where life can sometimes feel as hectic as the waves smashing against its famous shores: the bathtub. It's a sanctuary of renewal and relaxation, where tension fades and peace settles. However, what occurs if there are leaks or other signs of wear and tear in this peaceful haven? Don't worry, bath tub repair experts are here to help you regain your peace of mind, one tub at a time.
The Importance of a Functional Bath Tub
Let's pause to consider the importance of this household fixture before getting into the topic of bathtub repairs. Beyond its practical use, a bathtub represents pleasure and self-care. It's where aching muscles find relief from a long day, where weary spirits find relief from the bustle of everyday life, and where minds find clarity amid the bubbles. In addition to upsetting this haven, a broken bathtub presents possible risks including mould development and water damage.
Identifying Common Bath Tub Issues
Bathtubs can develop problems over time, from small chips to large fissures. Among the most prevalent issues are:
Cracks and chips in the porcelain or enamel
Leaks around the drain or faucet
Discoloration and stains
Rust or corrosion
Poor caulking or sealant
While some homeowners might try do-it-yourself repairs, these frequently only offer modestly effective solutions and, at worst, might make the issue worse. This is the situation in which expert bathtub repair services are helpful.
These experts start by performing a complete plumbing inspection of the bathtub, figuring out the source of the issue and creating a customised repair strategy. They use cutting-edge methods and premium materials to produce long-lasting results, whether they are repainting an entire surface, sealing a leaking joint, or fixing a little chip.

Furthermore, trustworthy bathtub repair services in Sydney know how important it is to keep your daily schedule. They work hard to finish repairs quickly and smoothly so you may resume your blissful bathing experience. They schedule efficiently and have little downtime.
The Advantages of Skilled Bathtub Repair
Hiring a professional bathtub repair company has several advantages for homeowners in Sydney. These advantages include:
Cost-effectiveness: Investing in professional repairs rather than do-it-yourself projects that can cause more damage can save money over time.
Improved looks: A tastefully renovated bathtub can breathe new life into the entire bathroom, increasing the value and allure of your house.
Increased longevity: Bathtubs that are maintained can last longer, saving you money and the trouble of replacing them too soon.
Peace of mind: You may enjoy your bathing experience to the fullest without worrying about anything when you know your bathtub has been skilfully fixed.
A bathtub is practical and visually beautiful and a luxury and a need in a city like Sydney, where people live fast and play hard and leisure is crucial. You may say goodbye to bath tub troubles and rediscover the bliss of soaking in tranquilly, one tub at a time, with Sydney's bath tub repair heroes at your disposal.
#plumbingbathroomrenovation#bathroomplumbing#bathroomrenovationplumber#bathroomvanityinstallation#toiletbuttonreplacement#toiletrepair#toiletreplacement#toiletreplacementcost#toiletseatreplacement
0 notes
Text
#bathroomsinkinstallation#bathroomsinkdrain#bathroomplumbing#bathroomsinkplumbing#cloggedshowerdrain#ezplumbingusa#emergency plumber san diego#plumbingservices#plumberorangecountyca
0 notes
Text
How to Keep Your Bathroom Plumbing Working Properly

A well-maintained plumbing system is essential for a functional and hygienic bathroom. Whether you are a homeowner, a tenant, or a property manager, these tips will help you prevent costly repairs and ensure the smooth operation of your bathroom plumbing.
The Importance of Regular Maintenance
Regular maintenance of your bathroom plumbing is crucial to avoid inconvenient and expensive plumbing issues. By following a few simple steps, you can keep your plumbing system in excellent condition and prevent common problems such as clogs, leaks, and pipe damage.
1. Watch What You Flush
One of the most common causes of plumbing issues in the bathroom is flushing inappropriate items down the toilet. Make sure to only flush toilet paper and human waste. Avoid flushing items like wet wipes, tampons, sanitary pads, diapers, or any other non-biodegradable materials, as they can cause clogs and damage to your plumbing system.
2. Use Drain Covers
Installing drain covers in your sinks, showers, and tubs can help prevent hair, soap scum, and other debris from entering the drains and causing blockages. Clean the drain covers regularly to remove any build-up and ensure proper water flow.
3. Be Mindful of What Goes Down the Sink
Avoid pouring grease, oils, coffee grounds, or food scraps down the sink drain. These substances can solidify and create blockages in the pipes. Instead, dispose of them in the trash or recycle when appropriate.
4. Check for Leaks
Regularly inspect your bathroom plumbing for any signs of leaks. Look for water stains, dampness, or pooling water around the sink, toilet, shower, or bathtub. If you notice any leaks, address them promptly to prevent further damage and water wastage.
5. Preventing Clogs
a) Sink Clogs: Avoid allowing food scraps, hair, or small objects to go down the sink drain. Use a sink strainer or drain cover to catch any debris and clean it regularly.
b) Toilet Clogs: Use a moderate amount of toilet paper, and avoid flushing excessive amounts or non-flushable items down the toilet. Keep a plunger handy for minor clogs and address more stubborn clogs with a toilet auger or call a professional plumber.
c) Shower and Tub Clogs: Prevent hair from going down the drain by using a drain cover or catcher. Clean the drain cover regularly and consider using a hair-stopping product to reduce the build-up of hair in the drain.
6. Clean Faucet Aerators and Showerheads
Mineral deposits can build up in faucet aerators and showerheads over time, causing reduced water flow. Remove the aerators and showerheads periodically and soak them in vinegar or a descaling solution to dissolve the deposits. Rinse them thoroughly before reattaching.
7. Insulate Exposed Pipes
If you live in a region with cold winters, insulating exposed pipes can help prevent them from freezing and bursting. Use pipe insulation sleeves or heat tape to protect the pipes. Pay special attention to pipes in unheated areas such as basements, crawl spaces, or exterior walls.
8. Ventilate Your Bathroom
Proper ventilation is essential for preventing moisture build-up in the bathroom, which can lead to mold growth and damage to your plumbing system. Use exhaust fans or open windows during and after showers or baths to reduce humidity levels. Make sure the ventilation system is clean and functioning correctly.
9. Know When to Call a Professional
While regular maintenance can help prevent many plumbing issues, some problems may require the expertise of a professional plumber. If you encounter persistent clogs, leaks that you can't fix, low water pressure, or any other significant plumbing concerns, don't hesitate to call a qualified plumber.
In Conclusion
By following these tips and performing regular maintenance, you can keep your bathroom plumbing working properly and avoid costly repairs. Remember to be mindful of what you flush, use drain covers to prevent clogs, check for leaks, and clean faucet aerators and showerheads. Insulating exposed pipes, ventilating your bathroom, and knowing when to call a professional are also key to maintaining a healthy plumbing system. With proper care, your bathroom's plumbing will provide years of reliable service.
0 notes
Text

🚨🚽 Dealing with a stubborn clog?
Don't let a backed-up toilet disrupt your day! Our Clogged Toilet Service is here to unclog the mess and restore the flow in no time. 🛠️🚽
Why choose our service?
✅ Swift Solutions: We understand the urgency – our team responds quickly!
✅ Expert Technicians: Our skilled professionals know toilets inside and out.
✅ State-of-the-Art Equipment: We use advanced tools to tackle even the toughest clogs.
✅ 24/7 Availability: Clogs don't wait for business hours, and neither do we!
Say goodbye to plungers and DIY headaches. Let our experienced team handle the dirty work, so you can get back to your day worry-free. 🌟 Contact us now for prompt and reliable Clogged Toilet Service! 💧🔧
Contact us now to transform your home:
📞+1 (747) 245-1788
🌐 https://plumberlandla.com/
📍Find Plumberland Emergency Plumbing Land Commerce: https://www.plumberlandla.com
#CloggedToilet#PlumbingProblems#ToiletTroubles#BlockedToilet#ToiletClog#PlumbingNightmare#EmergencyPlumbing#FlushFail#PlumbingIssues#UnclogTheToilet#ToiletRescue#PlumbingSolutions#DIYPlumbing#PlumbingTips#ToiletOverflow#PlumbingEmergency#ToiletWoes#ToiletDrainage#PlumbingFixes#BathroomPlumbing
0 notes
Text
🚽💦 Is your toilet playing hard to flush?
🚫 Don't let a clogged toilet ruin your day! Our expert Clogged Toilet Service is here to save the day! 🦸♂️🔧
Say goodbye to plungers and messy DIY attempts. 🙅♂️ Our skilled technicians are equipped with the latest tools and know-how to unclog even the toughest toilets, leaving your bathroom in tip-top shape. 💪🚽
Why choose us?
✅ 24/7 Emergency Service: We're here when you need us the most.
✅ Quick Response Time: No more waiting around for help to arrive.
✅ Experienced Technicians: Our team knows toilets inside and out.
✅ Fair and Transparent Pricing: No hidden fees or surprises.
Say farewell to toilet troubles and hello to a smoothly flowing bathroom experience! 🌟 Contact us now to schedule your Clogged Toilet Service. Your toilet will thank you! 🚽💙
Contact us now to transform your home:
📞+1 (559) 242-6606
🌐 https://www.angelinosplumbing.com
📍Find Angelino’s Plumbing Emergency Services Pacific Palisades: https://goo.gl/maps/xJiuRChF6cGd4DCHA
#CloggedToilet#PlumbingProblems#ToiletTroubles#BlockedToilet#ToiletClog#PlumbingNightmare#EmergencyPlumbing#FlushFail#PlumbingIssues#UnclogTheToilet#ToiletRescue#PlumbingSolutions#DIYPlumbing#PlumbingTips#ToiletOverflow#PlumbingEmergency#ToiletWoes#ToiletDrainage#PlumbingFixes#BathroomPlumbing
0 notes
Text

Major Bathroom Plumbing Problems You Must Know
Discover the major bathroom plumbing problems you must know. Learn how to tackle them and when to call in the experts. Get informed today for a hassle-free bathroom! For More Details Connect With EZ Plumbing USA Now!
0 notes
Text

WHAT SHOULD I DO IF MY TOILET IS CLOGGED?
Discovering a clogged toilet can be distressing, but there's no need to panic. The first step is to avoid flushing repeatedly, as it may cause an overflow. Instead, grab a plunger and apply gentle but firm pressure to create a seal around the drain. Pump the plunger up and down several times to dislodge the blockage. If the plunger fails, consider using a toilet auger or plumbing snake to break up stubborn clogs. In case these DIY methods don't work, refrain from using harsh chemicals and call a professional plumber for assistance. Prevent future clogs by being mindful of what you flush, using minimal toilet paper, and regular maintenance.
Find Master Plumbers Services Anaheim: https://goo.gl/maps/TnG4aHfawzitFoe69
Master Plumbers Services Anaheim: https://mymasterplumbersla.com/
7710 E Moonridge Ln, Anaheim Hills, CA 92808, Estados Unidos
V733+CF Anaheim Hills, Anaheim, California, EE. UU.
+1 (747) 245–1787
#CloggedToilet#PlumbingProblems#ToiletTroubles#BlockedToilet#ToiletClog#EmergencyPlumbing#ToiletOverflow#ToiletWoes#BathroomPlumbing
0 notes
Link
🚿 Shaving is a daily routine for many people, but it can also cause clogged drains. Hair and shaving cream can accumulate in pipes, leading to slow drainage or complete blockages. In this article, we'll provide tips and tricks for unclogging your drain after shaving. 👨🦲 First, prevent clogs by using a drain catcher or mesh screen to catch hair and debris. If you do experience a clog, try using a plunger or drain snake to remove it. For stubborn clogs, a mixture of baking soda and vinegar can help dissolve the blockage. 💡 Regular maintenance can also prevent future clogs. Pouring boiling water down the drain once a week can help break up any buildup. And if you're still experiencing issues, consider calling a professional plumber for assistance. Don't let a clogged drain ruin your shaving routine - follow these tips for a smooth drain every time.1. Common Causes of Drain Clogs When Shaving Excessive hair buildup in the drain Using too much shaving cream or gel Not rinsing the razor frequently enough Leaving hair clippings in the sink Flushing foreign objects down the drain 🚫 Avoid these common causes to prevent drain clogs when shaving. 💡 Use a drain catcher to catch hair and dispose of it properly. 🧼 Rinse the sink thoroughly after shaving to remove any hair clippings. 🔧 Call a plumber if the clog persists.2. Essential Tools for Unclogging Your DrainUnclogging your drain can be a daunting task, but having the right tools can make it easier. Here are some essential tools to have: Plunger: A plunger is a must-have tool for unclogging your drain. It creates suction to dislodge blockages. Drain Snake: A drain snake is a long, flexible tool that can reach deep into your drain to remove blockages. Baking Soda and Vinegar: A natural and effective way to unclog your drain. Pour baking soda and vinegar down the drain and let it sit for 30 minutes before flushing with hot water. Wet/Dry Vacuum: A wet/dry vacuum can be used to suck out blockages in your drain. Using these tools can save you time and money on professional services. Remember to always follow safety precautions when using these tools. 👍 Happy unclogging!3. Natural Remedies for Clearing Hair from Your DrainIf you're tired of using harsh chemicals to clear your drain, try these natural remedies: Baking Soda and Vinegar: Pour 1/2 cup of baking soda followed by 1/2 cup of vinegar down the drain. Wait 30 minutes, then flush with hot water. Salt and Baking Soda: Mix 1/2 cup of salt with 1/2 cup of baking soda and pour down the drain. Wait 10-20 minutes, then flush with hot water. Lemon Juice and Baking Soda: Mix 1/2 cup of lemon juice with 1/2 cup of baking soda and pour down the drain. Wait 30 minutes, then flush with hot water. For ongoing maintenance, try these tips: Use a Drain Strainer: Prevent hair from going down the drain by using a strainer. Boiling Water: Once a week, pour boiling water down the drain to dissolve any buildup. Borax: Sprinkle 1/4 cup of borax down the drain and let sit for 30 minutes. Flush with hot water. Remember, natural remedies may take longer to work than harsh chemicals, but they are better for the environment and your health. 🌿4. How to Prevent Future Drain Clogs When ShavingPrevent future drain clogs by following these simple steps: Use a drain catcher to catch hair and other debris. Shave over a towel or newspaper to catch any stray hairs. Rinse the drain with hot water after shaving to flush any remaining hair. Use a drain cleaner once a month to prevent build-up. Remember, prevention is key to avoiding future clogs. 🚫🚰5. Professional Drain Cleaning Services: When to Call for HelpWhen your drains start to act up, it's important to know when to call for professional help. Here are some signs that indicate it's time to bring in the experts: Slow draining sinks or showers Unpleasant odors coming from your drains Gurgling or bubbling sounds when water is draining Water backing up in your sink or shower Ignoring these signs can lead to bigger problems like clogged pipes and even sewage backups. Professional drain cleaning services can help prevent these issues and keep your plumbing system running smoothly. Expert plumbers use specialized equipment like drain snakes and hydro-jetting machines to clear out even the toughest clogs. They can also provide regular maintenance to prevent future problems. DIY drain cleaning methods like using chemical cleaners can actually do more harm than good. These harsh chemicals can damage your pipes and harm the environment. It's best to leave it to the professionals. Investing in professional drain cleaning services can save you time, money, and headaches in the long run. Don't wait until it's too late. Call for help at the first sign of trouble. 👍👨🔧🚿💧💻📞 In conclusion, keeping your drain unclogged is essential for a clean and hygienic bathroom. Use a shaving cream or gel to reduce the chances of clogging. Always run hot water after shaving to flush out any hair or debris. 🚿 Don't forget to clean your razor regularly to prevent buildup. A clogged drain can lead to costly repairs and unpleasant odors. Follow these tips to keep your drain running smoothly. 🛁 Remember, prevention is key. Be mindful of what goes down your drain. Avoid flushing anything other than toilet paper and human waste. A little effort goes a long way in maintaining a healthy plumbing system. 🚽 https://shavingformen.com/unclog-your-drain-tips-for-shaving/?_unique_id=648b96888a467
#Uncategorised#bathroomplumbing#DIYplumbingsolutions#drainuncloggingtips#hairclogs#ShavingTips#aiomatic_0
0 notes
Photo

Etobicoke plumbers: toilet and bidet seat installation, we are available 24/7 and won’t charge any overtime fees . 🌐 Our website: https://www.misterplumber.ca/ ✅ Request a FREE estimate: https://www.misterplumber.ca/free-estimate-plumber-toronto/ ☎️ Phone: 416-939-1530 📧 Email: [email protected] . #toiletinstallation #bidetinstallation #bathroomplumbing #Etobicokeplumbing #plumberEtobicoke #localplumber #licensedplumber #Etobicoke #Etobicokeplumbers (Etobicoke, Toronto) https://www.instagram.com/p/CpOMbL3I6HQ/?igshid=NGJjMDIxMWI=
#toiletinstallation#bidetinstallation#bathroomplumbing#etobicokeplumbing#plumberetobicoke#localplumber#licensedplumber#etobicoke#etobicokeplumbers
0 notes
Text
youtube
Everyday Plumbing & Septic Inc offers a variety of commercial plumbing services designed to keep your system running and working its best.
Call us at (678) 724-0700 or visit EverydayPlumbingAndSeptic.com for more information.
1 note
·
View note
Text
How to Replace a Shower Head?

The shower head is one of those things that we often forget about when it comes to potential damages and repairs. Unfortunately, they are very prone to damage and wear, and it’s good to replace them from time to time. If the time has come to install a new shower head, you’re in the right place. Going on a hunch is not recommended for bathroom repair, and replacing a shower head is no exception. That’s why our team at Chicago Plumbing Experts has decided to share some valuable tips on how to replace a shower head. And, of course, if you don’t feel like doing it yourself, know that there are always experts available out there who will do an excellent job whenever called upon.
When is the right time to replace a shower head?
Even if your shower head seems to be in excellent condition, many processes can be ongoing under the surface. The area inside a shower head is rich soil for bacteria to form. Showerheads are a prime location for bacteria because of their ever-present moisture. Eventually, it can even become a health hazard. So, even if you don’t see any problems, replacing a shower head once every 6 to 8 months is advisable. And, it goes without saying that if the shower head is broken or any other type of problem is visible, you should replace it right away. Continuing to use a broken showerhead could cause damage to your bathroom or even lead to injury.

If you’re wondering how often you should replace the shower head, the answer is every 6 to 8 months.
For example, if your shower head smells bad, this is a signal to replace it as soon as possible. Sometimes you might not even be able to locate the source of the foul smell, and it turns out it is your shower head. The bacteria we mentioned can cause this. However, various gasses from pipes that the functional shower head was supposed to deal with can also cause the smell. Therefore, replacing a shower head might remove the bathroom odors you were facing. As you can see, it’s clear why you should address all shower head issues quickly. After all, a shower head is something you and your family use daily, so it’s not a good idea to procrastinate with the replacement.
Choosing a new shower head
Before you learn how to replace a shower head, you’ll need to buy a new one first. Nowadays, there are so many different types of shower heads to choose from, and it will all depend on your preferences. Here are some of the most common types:
Fixed shower head
Handheld shower head
Filtered shower head
Rain shower head
Massage shower head
High-pressure shower head
It’s worth noting that there are some more expensive types out there with tons of additional features. But the basic types are perfectly fine as well; after all, they are the cheaper options. Plus, when it comes to bathroom upgrades, getting a new and slightly different shower head than you used to have, is an excellent place to start. There are plenty of cheap bathroom upgrades and easy ways to spruce it up, and you’ll enjoy the showers even more. Therefore, consider doing a few simple DIY upgrades, starting with the shower head.

There are many types of shower heads out there, so before you learn how to replace a shower head, find a model that suits you the most.
Removing the old shower head
In most cases, you can easily remove the old shower head by hand. A few simple counterclockwise movements should be enough to do work. If your shower head is fixed, you’ll need a screwdriver. But, once again, it is pretty easy to remove it. Ensure the water is off so the whole process doesn’t become a mess. After removing the shower head, clean the area where you will put your new shower head. This is the beginning of the pipe called the shower arm. Unfortunately, as with any other pipe in your home, the shower arm could be damaged in many ways. If the pipe is damaged and you don’t know how to fix it, maybe you should ask bathroom plumbing professionals for some help. On the other hand, the damage might not be visible. If you suspect the pipes are malfunctioning, perhaps you should call professionals to inspect the plumbing in your home.
It might be useful to put Teflon tape on the shower arm before putting a new shower head
Putting Teflon tape on the beginning of the shower arm pipe is highly recommended. It prevents leaks that would almost certainly occur over time if there weren’t any tape. You’ll probably find a piece of old Teflon tape after removing your old shower head. It would be best if you didn’t leave the old tape because that wouldn’t provide any benefits. So, carefully remove the old Teflon tape and add a new one. When applying the new tape, 2 or 3 turns should be enough for the necessary protection. As for the way of putting this tape, we have another suggestion. Apply the tape in a clockwise motion because you will use the same motion to set a new shower head later. Therefore, you’ll avoid inflicting any damage to the tape. Save any excess tape for the next time you replace the shower head.

Don’t forget to get some Teflon tape before replacing a shower head.
Installing the new shower head
Finally, it’s time to put on a new shower head and finish things up. The new shower head will be easy to put by doing it in a clockwise motion. However, it would help if you protected the shower arm from twisting and turning. So, our suggestion would be, and experts at zippyshellcolumbus.com agree with us on this, to put a towel on the shower arm and use pliers to grasp it up to secure it. Make sure to fasten the new shower head firmly. Slowly turn on the water and check for any leaks.
Enjoy your new shower head!
Well, there you go. Now you know how to replace a shower head. It isn’t too complicated, but learning a thing or two about the process was certainly worth it. Now, all that’s left for you to do is enjoy your new shower head.
0 notes
Text
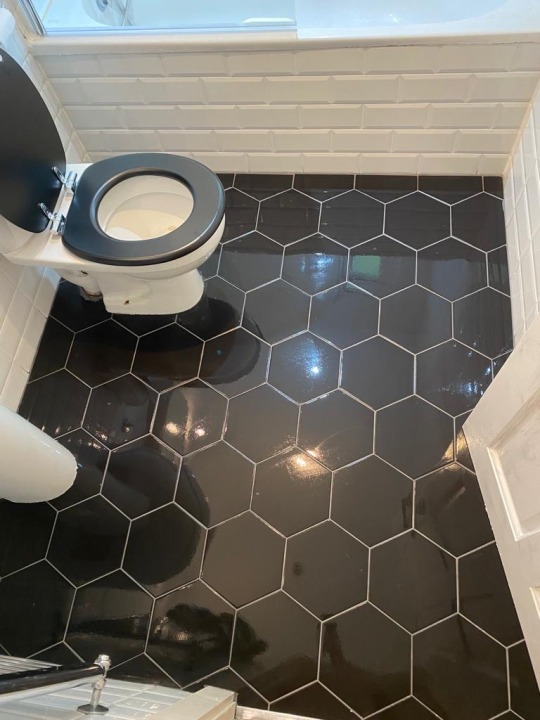


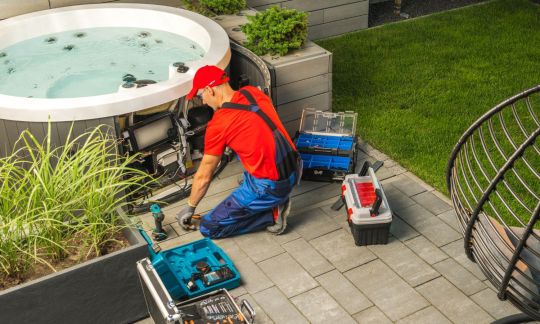
Another bathroom renovation completed last week in Dublin 6, we fixed the floor and replaced all the rotten and molded timber, found where the leakage was that made all these troubles and fixed it, covered the bathtub then tiled it over, resealed all the cracked corners and fitted the floors with hex black porcelain tiles which looks so nice now 🤩
What we do: Top to Bottom Bathroom renovation. Plumbing, Electrical and Tiling Services with all types of tiles
Design - Supply - Fit out Specialists
Every job we do is finished to the highest standard. Our prices are very reasonable and competitive. There’s no too big or too small job for us.
We’re making sure our customers are 100 % satisfied from start to finish treating peoples homes as our own and only offering a high quality service
Get in touch with us today to get your free quote, advice and measurements with no obligation 📞0870699873 Michael (whatsapp / viber) [email protected]
Follow us on:
Facebook Page - https://www.facebook.com/PLTilingandBathrooms/
Instagram - https://www.instagram.com/pltilingandbathrooms/
Youtube - https://www.youtube.com/@PLTilingandBathrooms
Tiktok - https://www.tiktok.com/@pltilingandbathrooms
Twitter - https://twitter.com/PLTilingandBath
Tumblr - https://www.tumblr.com/pltilingandbathrooms
Linkedin - https://www.linkedin.com/in/pltilingandbathrooms/
Pinterest - https://www.pinterest.ie/PLTilingandBathrooms/
#bathroomsrenovations #bathroomrefit #bathroomrenovation #Bathroomrefubrishment #bathroomdesign #bathroomtransformation #bathroomdream #splashback #kitchensplashback #Flooring #tilingdublin #tilingservices #tilingservicedublin #tilingservice #bathroomplumbing #splashbacks #kitchensplashbacks #bathroomrestorator #bathroomrestoration #tilingservicesdublin #tiler #tilerdublin #bathroomrenovationdublin #bathroomrefitdublin #PLtilingandbathrooms #tilers #fitting #plumbing
0 notes
Text

Effective Bathroom Plumbing in San Diego
Experience the pinnacle of effective bathroom plumbing with EZ Plumbing USA! We redefine bathrooms, one detail at a time. Our expert team ensures seamless bathroom function. We're committed to your satisfaction and complete plumbing solutions. Don't settle for less! We deliver swift, precise plumbing services. Your dream bathroom is our canvas! Contact us today and transform your bathroom into a haven of relaxation. Your dream bathroom awaits!
#BathroomPlumbing#BathroomSinkDrain#BathroomSinkInstallation#BathroomSinkPlumbing#CloggedShowerDrain#ReplaceBathroomSink
0 notes
Text
How to Replace a Toilet Flush Valve

Replacing a toilet flush valve may seem like a daunting task, but with the right tools and a little bit of know-how, it can be a relatively simple DIY project. A faulty flush valve can cause your toilet to continuously run, leading to wasted water and potentially higher utility bills. By replacing the flush valve, you can restore your toilet's proper function and save water in the process. In this guide, we will walk you through the step-by-step process of replacing a toilet flush valve.
What is a Toilet Flush Valve?
Before we dive into the replacement process, it's important to understand what exactly a toilet flush valve is. The flush valve is a crucial component of your toilet's flushing mechanism. It is responsible for releasing water from the tank into the bowl when you flush. When the flush valve fails to operate correctly, the toilet may not flush properly or may even continue to run after flushing.
Tools and Materials Needed
Before you begin the replacement process, gather the necessary tools and materials:
Adjustable wrench
Sponge or towel
Bucket or container
New flush valve
New flapper or tank ball
New bolts and gaskets (if necessary)
Pliers
Hacksaw (if necessary)
Plumber's tape
Step 1: Shut off the Water Supply
Before you begin any work on your toilet flush valve, it's essential to turn off the water supply. Locate the shut-off valve, usually located beneath the toilet tank, and turn it clockwise until it stops. Make sure to flush the toilet afterward to drain any remaining water in the tank and bowl.
Step 2: Remove the Toilet Tank
In order to access the flush valve, you will need to remove the toilet tank. Start by disconnecting the water supply line from the tank using an adjustable wrench. Next, remove the nuts or bolts securing the tank to the bowl. Carefully lift the tank off the bowl and place it on a towel or a soft surface to prevent any damage.
Step 3: Remove the Old Flush Valve
With the toilet tank removed, you can now focus on removing the old flush valve. Start by disconnecting the flush valve from the overflow pipe. This is typically achieved by twisting the flush valve counterclockwise and then pulling it out. Depending on the type of flush valve installed, you may need to remove any associated nuts or bolts as well.
Step 4: Install the New Flush Valve
Once the old flush valve has been removed, it's time to install the new one. Begin by applying a small amount of plumber's tape to the threads of the new flush valve. This will help create a watertight seal. Insert the new flush valve into the opening where the old one was removed and secure it in place using any necessary nuts or bolts.
Step 5: Replace the Flapper or Tank Ball
While you have the toilet tank disassembled, it's a good idea to inspect and possibly replace the flapper or tank ball. These components are responsible for sealing off the flush valve and preventing water from continuously running. If the flapper or tank ball is worn or damaged, simply remove the old one and replace it with a new one.
Step 6: Reassemble the Toilet Tank
With the new flush valve and potentially a new flapper or tank ball in place, it's time to reassemble the toilet tank. Carefully place the tank back onto the bowl, ensuring that the bolts line up with the corresponding holes. Secure the tank to the bowl by tightening the nuts or bolts, being careful not to overtighten as this can cause damage to the toilet.
Step 7: Turn on the Water Supply
Now that the toilet tank is reassembled, it's time to turn on the water supply and test the flush valve. Slowly turn the shut-off valve counterclockwise to allow water back into the tank. Check for any leaks around the flush valve and ensure that the tank fills up properly. If everything looks good, give the toilet a few test flushes to make sure it operates correctly.
Conclusion
Replacing a toilet flush valve does not have to be an intimidating task. By following these steps and taking your time, you can successfully replace a faulty flush valve and restore your toilet's proper function. Remember to always shut off the water supply before beginning any work and take care when reassembling the toilet tank. With a little bit of DIY know-how, you can save water and avoid the need to call a plumber near you for this common household repair.
1 note
·
View note
Text

HOW CAN I PREVENT MY TOILET FROM GETTING CLOGGED IN THE FUTURE?
Preventing toilet clogs is easier than dealing with them later on. Firstly, use toilet paper sparingly, and consider switching to thinner, septic-safe varieties. Avoid flushing non-flushable items like wet wipes, sanitary products, cotton balls, or excessive amounts of tissues. Encourage everyone in your household to be mindful of what they dispose of in the toilet. Regular maintenance is crucial; periodically check for mineral buildup or sediment in the bowl and pipes, and consider using enzyme-based cleaners to keep the plumbing clear. Lastly, educate family members about proper toilet use, and keep a wastebasket in the bathroom for non-flushable items. These practices will significantly reduce the likelihood of future clogs and help maintain a smoothly running toilet.
Find Plumberland Plumber Wilmington: https://goo.gl/maps/1Ue3uvTQ45LW372k7
Plumberland Plumber Wilmington: https://www.plumberlandla.com
1222 N Fries Ave, Wilmington, CA 90744
QPPM+WW Wilmington, Los Angeles, CA
+1 (747) 245 1789
#CloggedToilet#PlumbingProblems#ToiletTroubles#BlockedToilet#ToiletClog#EmergencyPlumbing#ToiletOverflow#ToiletWoes#BathroomPlumbing
0 notes
Text
HOW DO I KNOW IF MY TOILET IS CLOGGED?
If you're wondering whether your toilet is clogged, there are a few telltale signs to watch for. Firstly, if you flush the toilet and the water rises to the brim, but doesn't drain as it should, that's a definite red flag. Another indicator is slow drainage; if the water takes an unusually long time to go down after flushing, there might be an obstruction. Additionally, gurgling noises or bubbling in the bowl when running water elsewhere in the house could be an indication of a clog. In such cases, refrain from flushing repeatedly and consider using a plunger or seeking professional assistance to avoid worsening the situation.
Find Angelino’s Plumbing Emergency Services Pacific Palisades: https://goo.gl/maps/xJiuRChF6cGd4DCHA
Angelino’s Plumbing Emergency Services Pacific Palisades: https://www.angelinosplumbing.com
16776 Bollinger Dr, Pacific Palisades, CA 90272
2FW4+32 Pacific Palisades, Los Angeles, CA
+1 (310) 359 0376
#CloggedToilet#PlumbingProblems#ToiletTroubles#BlockedToilet#ToiletClog#EmergencyPlumbing#ToiletOverflow#ToiletWoes#BathroomPlumbing
0 notes
Last Seen Blogs

clinicarecuperandovida2022
Clinica Recuperando Vida

celagarayarquitectos
CELA GARAY ARQUITECTOS
blog

vanvia
Untitled

nightrice
Night

kdk-k0d0ku
Kodoku