#automotivepaint
Text
Automotive Paint Flash Time Explained

So, you have read or been told the flash time between coats is so many minutes. Just what exactly does that mean and how important is it? There are many so called experts that have their own ideas but are they right? In this article; automotive paint flash time explained...
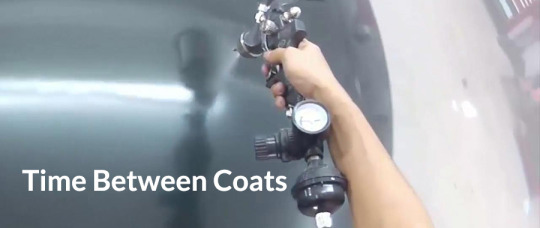
What is flash time between coats, is it something really crucial or just a suggestion? Well, it is both, and I know that is a vague answer but I will explain.
What Does Flash Time Mean When Painting a Car?
Here is the technical definition of what paint flash time is. Flash time in car painting refers to the waiting period between applying coats of paint.
It's essentially the time it takes for the solvents in the first coat to evaporate enough for a second coat to adhere properly.
This definition has everything you really need to know about flash times. Unfortunately, many car painters think they know better, or stick to exactly what the back of the paint can says.
Who is right? The seasoned old painter that says you wait to the next day to spray clear over a base coat? Or, is the directions on the can the best method to follow?
Paints have changed over the years and they keep changing. So, the season old painter is way off, you do not want to wait 24 hours. However, the instructions on the can could also be wrong but for different reasons.
How Do You Know the Proper Flash Time?
I understand that you may be confused on flash times, due to all the conflicting information out there. As the definition for paint flash time explained. You are waiting for the paint solvents to evaporate before applying the next coat.
This applies to primers, base coats, clear coats, single stages and sealers. Now, there are some products that tell you, no flash times. That you keep spraying until the desired coverage is achieved, but that is another topic.
If you kept spraying clear coat and not giving each coat time to tack up, it will run and sag. It is like building a house. You can’t lay several layers of block, and start building the main structure on it before the mortar cures.
Painting basically follows the same methodology. If you apply a layer of paint and then another on top of the first layer before it firms up. The first layer isn’t going to hold the second layer of paint, it will give way.
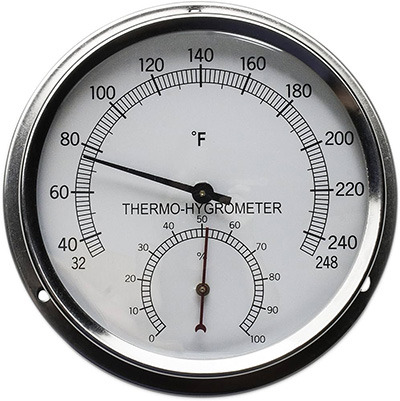
Due to humidity, temperatures and general moisture in the air, flash times vary from specs. The back of the can may say to flash your coats 10 to 15 minutes.
However, if you are painting in a super dry and hot environment. The solvents in your paint will dry far faster. This goes the extreme the other direction as well. If your environment is cool and damp, your solvents may not evaporate for 20 to 30 minutes.
That’s right, the specs on the back of the can are a guide, a general suggestion. They kind of leave it up to the painter to make the best decision based on their painting conditions. So then, how can you know the correct paint flash time?
The Tape Test
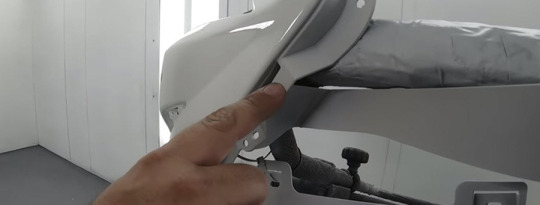
What is the flash time between coats and what does tape have to do with it? Well, you do not stick the tape into the paint. But you are going to use some, green, yellow or blue tape is the best.
The tape test is really simple. You take some tape, peel it or rip it off, doesn’t matter. Put your finger to the sticky side. Notice how your finger sticks to it when you pull it away?
This is what you want your coats to feel like. This will apply more to the clear or single stages paints than base coats or sealers. Base coats, sealers and primers dry a bit different but you can still use this method if you are unsure.
If you are applying a clear coat, touch an area that doesn’t matter. Possibly the masking tape or paper or even up in a wheel well.
If you touch the freshly painted surface. Your finger should stick ever so lightly but not pull off with any clear on your finger. If no paint comes off on your finger, your coat is what is called tacky and ready for the next coat. This is paint flash time or often called paint flash-off.
When the specifications indicate a flash time of 10 minutes, you can perform a touch test after that period. If paint still transfers onto your finger, wait an additional 5 minutes and test again. Once the paint feels sticky or dry to the touch, it's time to apply the next coat.
Why Is Paint Flash Time Important
As mentioned, there are painters that claim to wait 24 hours before spraying the clear coat. Why would they think this is correct if specs call for minutes instead of hours?
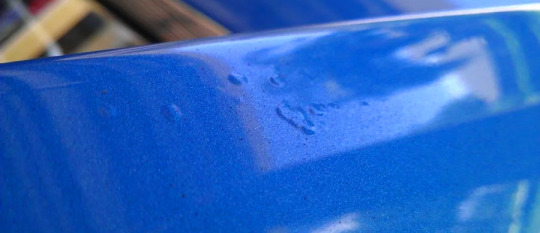
If you remember the definition of paint flash time, it refers to the solvents evaporating. By spraying the clear over a base coat too soon, you can trap the solvent trying to evaporate. What does that mean?
Trapping the vapors coming off the base coat, can cause tiny white spots, sometimes bubbles in the clear. On the other hand, if you wait too long to apply the clear coat, it will not bond to the base coat. This can also cause lifting and bubbles.
So, you can see that flash times can make or break your paint job. You may not see vapor spots in a light color but for darks and or blacks, it looks horrible.

However, if your clear coat doesn’t bond to the base coat, you can get paint lifting and bubbles like this.
The ideal method is for each coat you apply, allow the solvents to evaporate but the material to not totally dry or cure.
Base coat flash time can be manipulated by heat and cold. If you are spraying a panel that is hot. Either from a heated paint booth to sitting out in the sun. This can deliver bad vapor trapping.
The base coat applied to a hot surface can immediately appear dry. However, this is just the surface, the solvent can be trapped under the surface of the base coat. When you apply the clear, the solvents in it will release the solvents in the base coat and cause vapor spots.
Choosing the Correct Paint Reducers by Temps
Most production clear coats do not normally use reducers. However, the activators you mix in them do commonly come in temperature selections.
Single stage paints, base coats, primers and sealers often require reducers and or basemaker. Ideally, you want to paint in temperatures between 70° and 72°F with the humidity around 50%.
When you have these conditions, it is far easier to experiment with fast to medium reducers or activators. You can decide which is best based on the brand and type of paint or primer you are using.
You may find with the temps between 70° and 72°F. Shooting a base coat with a fast reducer or basemaker, works best. Especially when the need for several coats is required to get the achieved look.
As with clear coats, a medium or even slow drying may work best for how you want to the surface to flow out. Of course, the slower the dry time is for clear, the longer your flash times need to be.
So, the slower your reducer, activator or basemaker, the longer your flash times will need to be. Even with primers. Most people don’t think too much about flashing their primers. But to build good filling coats, flash times for primers help.
If your environment it around 75°F but your humidity is high, like between 75% and 90%. You would want to use a fast-drying reducer, activator or basemaker.
On the reverse side, if the temps are around 75°F, and the humidity is between 10% and 30%. You then would want to use a slower drying reducer, activator or basemaker.
Most paint manufacturers only list temperature ranges. You also need to pay attention to the humidity as well.
What If Your Paint Flash Time Is Too Long
If you wait too long before applying any coat on top of the other, then the coats won’t bond. By the coats not bonding, separation, lifting, bubbling or discolorations can occur.
When spraying a sealer before top coating. Be sure to read the paint flash time on the can. Some sealers can flash up to a few hours. However, no matter the flash time, if you wait too long, you will need to scuffy the surface and clean before applying another layer.
This applies to primers, sealers, base coats and clear coats. For the best outcome, you never want to allow a coat to dry that long to where it would require to be scuffed.
If you have to scuff a surface before applying the next, do not wipe it down with a solvent type cleaner. If you can wipe it off with a mid-coat tack cloth would be best. However, if it is heavy in debris, you can use a cloth dampened with water, then the tack cloth.
Primers are more forgiving and you can just sand them. Sealers and top-coats need to be super clean before spraying them.
Conclusion

From the things I have gone over, you can see that paint flash times are really critical. You may not believe this, but all those clear coat issues Honda’s had between 2003 to 2011, were due to the clear not bonding.
Cars are painted far different at the factory than what a body shop would. They are electrostatically sprayed. However, they still have flash times and the base coats were too cured before the clear was applied. Not to mention they didn’t apply a thick enough coating of clear.
Remember, do not spray a coat on anther too soon, as you can get vapor trap. Also, do not wait too long, as the layers will not bond.
If ever in doubt, just touch the paint somewhere it won’t hurt the looks, to see if it is tacky. Remember to adjust your temps in reducers based on your temperature and humidity.
I have an article on Creating Your Own Paint Booth at Home. Having some form of paint booth can immensely help on the look and quality of your paint job.
Read your paint specifications on the cans, but remember, they are general guides. However, they are close to what the flash times need to be. You just adjust due to your environment.
Do not listen to the people that claim you wait days to apply coats. Read your paint specs or ask your paint store. If you need help, reach out and Contact Me.
Read the full article
0 notes
Text
Spray paint grey color
Asmaco Grey Spray Paint offers a convenient solution for your painting needs, whether indoors or outdoors. This quick-drying spray paint delivers a sophisticated grey color with a high luster, providing excellent coverage and adhesion. It is ideal for a variety of surfaces including wood, metals, plastic, automotive, and motorcycle parts, ensuring a non-fading, non-yellowing, and weather-resistant result.
Specifications:
Color: Grey
Brand: Asmaco
Finish: Eggshell
Size: 0.30 Liters (280 Milliliters)
Volume: 400ml
Features:
Quick-drying formula ensures sophisticated grey color with high luster.
Suitable for both interior and exterior applications.
Ideal for use on wood, metals, plastic, automotive, and motorcycle parts.
Provides excellent coverage and adhesion.
Offers better flexibility compared to traditional paints.
Fast-drying and scratch-resistant formula for long-lasting results.
Provides excellent protection against rust, impact, UV rays, and other environmental factors.
Will not fade or yellow over time.
Super environmental protection formula.
Instructions for Use:
Ensure that the surface to be painted is free from oil, water, and dust.
Shake the spray can for approximately 2 minutes to ensure thorough mixing of the paint.
Hold the can approximately 20-30 cm away from the surface to be painted.

#alramiz#hvac#machines#wholesale#rewinding materials#thermostat#tools & safety#heater & element#are#acsparta#SprayPaint#DIY#HomeImprovement#Asmaco#GreyPaint#QuickDry#HighLuster#InteriorDesign#ExteriorDesign#SurfaceCoating#MetalPaint#PlasticPaint#AutomotivePaint
1 note
·
View note
Text
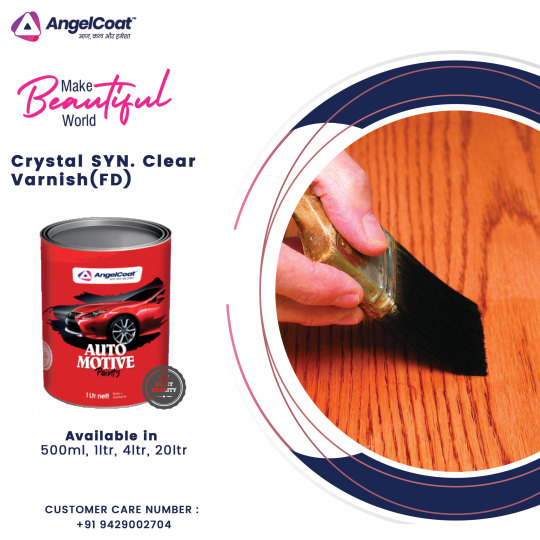
Buy Crystal Syn. Clear Varnish at best price from Ahmedabad, India
Angel Coating is offering a premium quality "𝑪𝒚𝒔𝒕𝒂𝒍 𝑺𝒀𝑵.𝑪𝒍𝒆𝒂𝒓 𝑽𝒂𝒓𝒏𝒊𝒔𝒉 (𝑭𝑫)"
.
.
✏️ Available Packaging Size: 500 ML, 1 LTR, 4 LTR, 20 LTR
𝐅𝐨𝐫 𝐅𝐮𝐫𝐭𝐡𝐞𝐫 𝐃𝐞𝐭𝐚𝐢𝐥𝐬, 𝐏𝐥𝐞𝐚𝐬𝐞 𝐂𝐨𝐧𝐭𝐚𝐜𝐭 𝐔𝐬 𝐨𝐧 𝐁𝐞𝐥𝐨𝐰 𝐃𝐞𝐭𝐚𝐢𝐥𝐬👇
📱 Call Now : +91 94290 02704
💬 WhatsApp: https://wa.me/919429002704
🌐 Website: https://angelcoating.com/products/
#BuycystalsynclearvarnishFD#Automotivepaint#AngelCoatingVarnish#BuySYNClearVarnish#Varnish#cystalsynclearvarnishFD#ClearVarnish#AngelCoating
1 note
·
View note
Link
If you love working on your car, why not repaint it yourself? Check out the best tips for painting your car like a professional for a perfect turnout.
#automotivepaint#maskingacar#nationalautobodywholesalers#paint#paintthinner#paintingacar#strippingacar
0 notes
Text
Expert Tips to Start a Painting Business – Justin Crato
Justin Crato's professional guidance on beginning your own custom painting business is the key to success. Learn about important tools, pricing methods, and how to establish a loyal client base. Click the link to maximize your company potential!
0 notes
Text

Pioneer Tapes is a one-stop solution for all your self-adhesive tape requirements.Visit us at- https://www.pioneertapes.com/
0 notes
Text
When women embrace vocational training, they unlock a force for economic growth and societal advancement. These women acquire essential skills, nurturing self-sufficiency and contributing to their communities. Empowered with knowledge and abilities, they become catalysts for progress, enriching not only their lives but also the nations they serve.
#school for technician in philadelphia#philadelphia trade school#types of skilled trades in philadelphia#trades in high demand in philadelphia#trade school in Haddonfield
0 notes
Photo
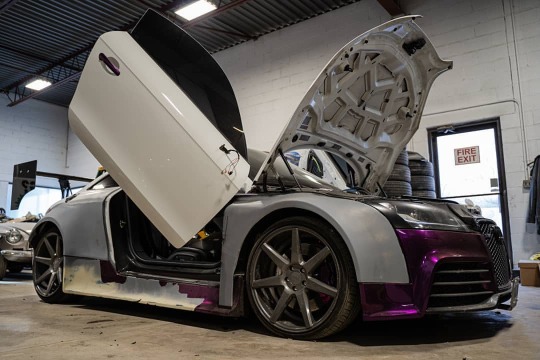
Transformation Thursday ⠀ Trying to get that one-update-per-week going... One month into paint and bodywork and the wrap is still on the car, so I'm thinking it's going to be a busy holiday season to see this ready for it to get to @ivansautoservice! Once there, all the electrical will be sorted out and a few small tweaks need to be made 🙃 ⠀ Behind the scenes though there's been a ton of parts delivered to @akcarbonfiber and @jeffpomfret to get skinned in carbon. Three piece wheels have been split. Additional speakers have arrived. Carbon wheel in hand. My interior somehow looks worse than the outside. ⠀ Can't wait to see these guys start making progress on the exterior. Full faith in them that they'll crush it 💪 ⠀ Sponsored By: - @jppowdercoating - @incurve - @lightingtrendz ⠀ Facebook: https://facebook.com/ignantt Instagram: https://instagram.com/ignantt/ Twitter: https://twitter.com/ignantt Tumblr: https://ignanttrs.tumblr.com Blog: http://www.ignantt.com VSCO: https://vsco.co/Ignantt ⠀ Supporter Of: - @chopshoptgsc - @lavignemotorsports - @ivansautoservice - @cars_auto_repair - @osirdesignusa ⠀ #transformationthursday #wip #workinprogress #bodywork #paint #automotivepaint #project #winterproject #audi #auditt #audittrs #auditts #audirs #vossen #vossenwheels #audittmk2 #auditt8j #messy (at Cars Auto Repair) https://www.instagram.com/p/CICxyNEnjQS/?igshid=119tujtqsptx1
#transformationthursday#wip#workinprogress#bodywork#paint#automotivepaint#project#winterproject#audi#auditt#audittrs#auditts#audirs#vossen#vossenwheels#audittmk2#auditt8j#messy
5 notes
·
View notes
Photo

Artist: @roger_reutimann_artist . "My new painted bronze sculpture is getting comfortable on a “soft” cushion made from white concrete." ... .. . #rogerreutimann #sculptor #contemporarysculpture #contemporaryart #figurativeart #reclyningfigure #figurativesculpture #bronzesculpture #americanswissartist #artist #artsy #instaart #instagood #gallery #masterpiece #creative #photooftheday #instaartist #artoftheday #automotivepaint #artdealer #artconsultant #abstracto #instaabstract #weknowcity #abstractsculpture https://www.instagram.com/p/CFnhvA8H8yB/?igshid=2nebopuoboiq
#rogerreutimann#sculptor#contemporarysculpture#contemporaryart#figurativeart#reclyningfigure#figurativesculpture#bronzesculpture#americanswissartist#artist#artsy#instaart#instagood#gallery#masterpiece#creative#photooftheday#instaartist#artoftheday#automotivepaint#artdealer#artconsultant#abstracto#instaabstract#weknowcity#abstractsculpture
1 note
·
View note
Photo

Welcome to Patriot Refinish Solutions, your number one source for automotive and industrial paint in Fort Worth, TX. We are a Texas based company committed to providing our customers with the best paint for the best prices. Patriot Refinish Solutions has been supplying local body shops and industrial companies since 2000! We value our clients above all and strive to make every experience a positive one. It is our goal to serve you in any way possible and will do what it takes to earn your business. We have a strong sense of quality and trust and that makes us the ideal source for your paint.
Some of our paint offerings include:
Car Paint
Body Shop Supplies
Autobody Supplies
Body Shop Equipment
Custom Auto Paint
Autobody Products
Industrial Supplies
Industrial Chemicals
Industrial Paint
At Patriot Refinish Solutions we take pride in our customer service. We value honesty, quality, and amiable customer service, and most importantly, hard work above all else. Our company is committed to exceeding the expectations of our customers. We strive to deliver complete customer satisfaction for each and every service, providing quality, affordable pricing, and excellent customer service.
If you are interested in learning more about our paint, please contact Patriot Refinish Solutions today!
https://www.fortworthcarpaint.com/
#CarPaint#VehiclePaint#BodyShopSupplies#AutobodyPaint#AutobodySupplies#BodyShopEquipment#VehiclePaintShop#AutoPaint#AutomotivePaint#CustomAutoPaint#AudobodyProducts#InstrialSupplies#IndustrialChemicals#IndustrialPaint#FleetPaint
1 note
·
View note
Text
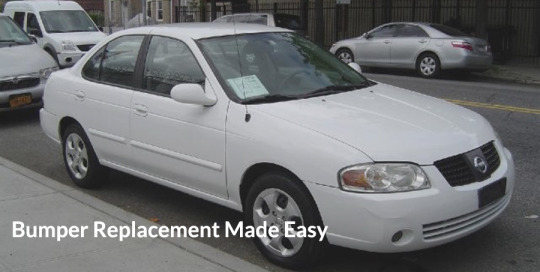
How to Replace a Nissan Sentra Rear Bumper | 2004 to 2006

Have you had some sort of damage to your rear bumper and need to get it fixed. This article goes over how to replace a Nissan Sentra rear bumper, between the years of 2004 and 2006. However, this can apply to many types of cars around these years.
The days before inflation went up like it has. Getting a bumper repair or replacement from a body shop, wasn’t that expensive. Today, paint and labor are so expensive, more and more people are learning how to do these repairs themselves.
This article on how to replace a Nissan Sentra rear bumper, really won’t be that long. My goal for this article is to help the DIY car enthusiast, see how simple a job this is. Not to mention, save as much money as they can.
What Kind of Damage Would Warrant a Rear Bumper Replacement
Most car bumpers, both front and rear, are made out of plastic that contains polypropylene. The polypropylene adds a flexibility to allow the bumper to absorb impacts.
I have proven that dents in bumpers can be repaired. You can watch my video, How To Pop Out A Dent In A Plastic Bumper, to see get an idea.
Even though some dents and damages can be repaired in these types of bumpers. There is a point where replacing it is more economical and easier.
Damages to where you would want to replace the bumper are as follows.
- Multiple dents that warp the entire bumper
- Bumper warped to where it doesn’t fit correctly
- Damages to the snaps and mounting areas
- Heavy splits and cracks
- Bumper busted into halves or pieces
If you have like a single dent or even a small crack, there are tricks and methods to fix these. However, when you are looking at removing the bumper for repairs, you may want to evaluate your investment.
Cracks and splits usually require a plastic welder and special weld in clips. Many dents require a heat gun to heat it to pop it out. Not to mention all your time.
If you do not have all these tools, then you have to weigh in how much do tools cost to a new bumper?
Tools Needed for Replacing a Nissan Sentra Rear Bumper
If you are on a budget and trying to a rear bumper replacement on a Nissan Sentra, you’re in luck. The tools needed to remove the bumper are a small flat blade screwdriver and a 10mm socket. Provided you have an inexpensive metric socket set.
You can purchase a new aftermarket rear bumper for around $100. Junk yards you have to be careful with. As mentioned, you can buy new for around $100, you will find junk yards want about the same.
If you can find a good undamaged and unscratched junk yard bumper, the price might be OK. Even better if you can find one the exact same color, it is always worth looking.
Junk yards like Pull-a-Part or Pick-a-Part charge around $50 for a bumper cover. But again, if you go that route, ensure that you get one that needs little to no work.
If your new or used bumper requires painting, there is always the aerosol method. Today’s automotive aerosol paints are as good as what comes out of a professional spray gun. RodsShop promotes Automotive Touchup Paints, be sure to check them out.
How to Replace a Nissan Sentra Rear Bumper Cover
The first thing to removing the Sentra rear bumper cover is to find all the clips and bolts. Let’s start with the 4 top plastic clips that need to be removed.
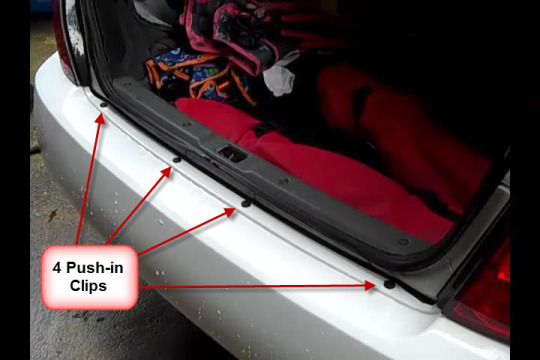
Open the trunk lid and look straight down where the bumper cover meets the truck opening. You will see 4 black push-in type clips. These will require a small flat blade screwdriver to remove them. These are 8mm Retainer Clips.
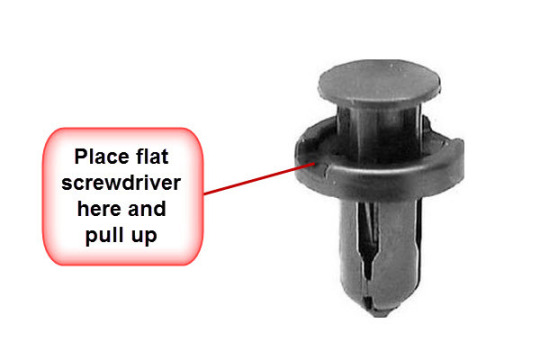
Using the screwdriver, place it in the gap between the outer part of the clip and the inside round button. Pry and lift up to release the clip. Once the center is up, lift the entire clip out of its hole.
Note: After some years, these clips can become brittle and break apart. Just be patient and pull the center up. This may require digging into the center with the screwdriver and to lift it.
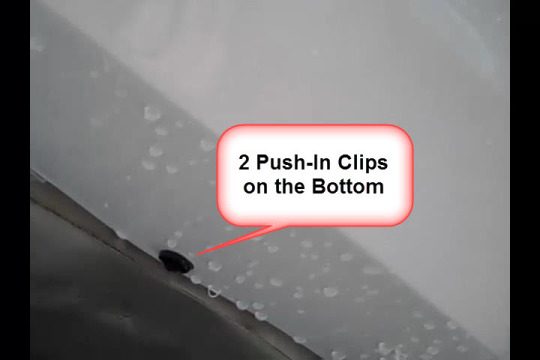
Once the 4 8mm retainer clips are out, go under the rear bumper and look up, kind of a wide center. You will find 2 more of these same type clips. They will require the same process to remove them as the top ones.
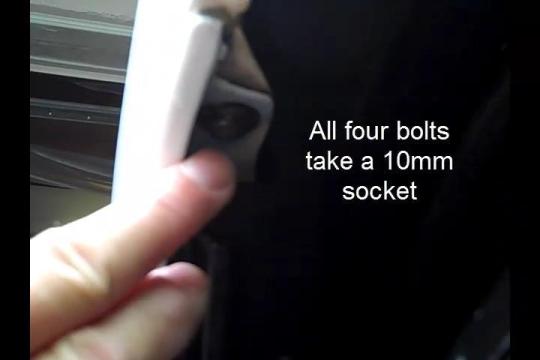
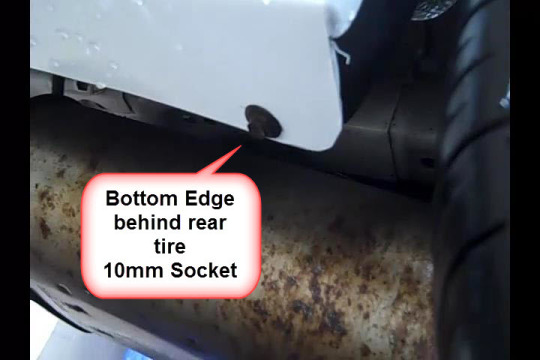
You will now have 4 10mm head bolts to locate and remove. These will be located at the opening of the wheel wells.
There will be 2 bolts on each side, one at the top inside the wheel well and the other at the bottom. Looking at the wheel well, behind the tire and just inside at the top, you will find the first one.
You will want to look at the bottom of the bumper behind the rear wheel to find the bottom one.
Pulling the Nissan Sentra Rear Bumper Off
Many bumpers today, snap into place on the sides. However, this rear bumper cover does not. It does however slip into some clips that keep the gap between it and the rear quarter even.
In order to remove the bumper once all the hardware removal is complete. You can do each side one at a time and reach in the wheel well area. Grab a hold of the bumper and pull straight out.
Do the other side the same, then from the rear, lift and pull it toward you. You may have to shift a little side to side to clear the sides of the quarter panels as you pull.
Installing the Replacement Bumper Cover
There are a few ways to put the replacement bumper cover back on your Nissan Sentra. If you have a helper, one will get on one side, and the other on the other.
The bumper can be flexed open a little and walk it into place, ensuring that the bumper rest on the inner bumper support. From there, you can line up the mounting holes on each side and place the 10mm bolts back in and tighten.
If you are a solo act, then use some tape Running a blue or green tape on the quarter panels around the mounting areas might be a good idea.
Holding the bumper from the top edge, walk it towards the car. Shifting it a bit side to side will allow the sides of the bumper to go around the quarter panels. Once you have the sides clear to move forward, rest the bumper cover on the inner bumper reinforcement.
Start inserting the 4 top push in clips into the holes. This will lock the bumper into place so that you can get the 4 10mm bolts started. No not tighten the bolts all the way until you have all the push in clips in place.
When you have all the clips in place, you can tighten the 4 bolts. Ensure that you get the top edge of the bumper where it meets the quarter panel, into the plastic track. Often times, it will want to set below it causing an excessive or uneven gap.
Painting the Replacement Nissan Sentra Rear Bumper Cover
When it comes to auto body and paint, many people feel they just can’t do that. Either due to lack of knowledge or not having the equipment.
I can tell you; anyone can paint. It just takes a little information, patients and knowing the materials you will need.
If you are going with a used Nissan Sentra rear bumper cover, you will want to sand it. By purchasing an aftermarket replacement, all you will need is a scuffy pad.
Painting a Used Bumper Cover
As long as the used bumper cover has no damage to it, all you will need is 400 grit wet-or-dry sandpaper.
Get a bucket and put a little dish washing liquid in with some water. Using the 400-grit sandpaper and a small sponge sanding pad. Wet sand the entire bumper cover down. You are not trying to sand the old paint off, just a light sand to where the whole thing is dull looking when dry.
Once the bumper cover is dry, go back over it with a scuffy pad. Set the cover on any kind of make shift stand that gets it off the ground and wipe it down with a prep solvent.
Before applying your base coat, I highly recommend spray an adhesion promoter. Apply one coat and start spraying your base coat no more than 10 minutes after applying the adhesion promoter.
Using aerosol paints, get the base coat that is matched by your paint code. Apply a coat of color and then give it about 15 to 20 minutes to dry. Apply a second and let dry the same amount of time. Lastly, apply a third coat. You may have to apply more if you are not getting the desired color match.
Read the back of the base coat aerosol can to ensure flash times, especially how long to wait before applying the clear.
Most aerosols require about 30 to 40 minutes before spraying the clear. I highly recommend using a 2K clear. Yes, they are more expensive but the 1K will peal dull out and peel often as soon as in a month’s time.
Learn the difference between the two clears in this article, The Difference Between 2k And 1k Clear Coat.
Always where a mask when spraying any kind of paints.
Painting a New Aftermarket Bumper Cover
All the steps will be the same as above except for the wet sanding. New bumper covers come in primer. This makes prepping so much easier. Just run a scuffy pad over the entire bumper cover until it is all dull.
Same as the used bumper, wipe it down with a prep solvent and it is ready for coating. Note: It is crucial that you spray a new bumper cover with an adhesion promoter. If not, I have seen the paint peel right of the cover months later.
Watch How to Replace a 2005 Nissan Sentra Rear Bumper Video
Resources
Here is a list of parts, tools and materials mentioned in this article. Some of these links are Amazon Affiliate Links in which RodsShop will collect a small commission, however that does not infalte the cost to you in anyway.
- Rear Bumper Cover
- 8mm Retainer Clips
- Aerosol Paints
- Get Your Paint Code
- Scuffy Pad
- 400 Grit Sandpaper
- Sponge Rubber Sanding Pad
- Adhesion Promoter
- Prep Solvent
Conclusion
You will find that just the mechanics of swapping out a bumper cover is far simpler than painting it. Do not let auto body and paint scare you off.
I have been promoting a course for years. The course is super cheap and has great reviews. The course is at the bottom of this article.
I have made many paint repairs right in my driveway. Be sure to read my article on Low Cost Clear Coat Repair. In this article, there is a video of doing a aerosol paint repair right in my driveway.
Read the full article
0 notes
Text
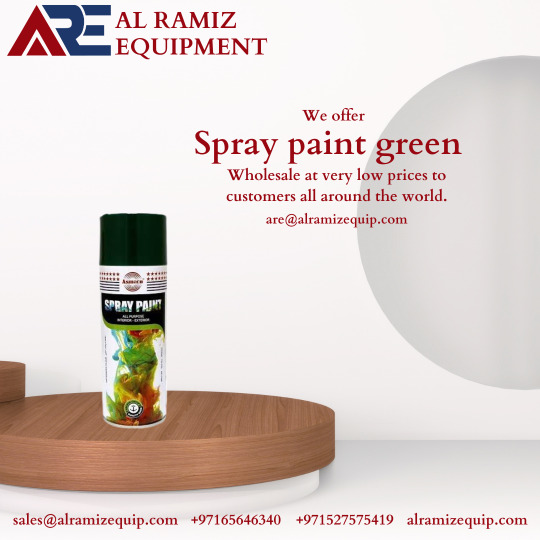
Spray paint green color
Asmaco Green Spray Paint offers a convenient solution for your painting needs, whether indoors or outdoors. This quick-drying spray paint delivers a fresh green color with a high luster, providing excellent coverage and adhesion. It is ideal for a variety of surfaces including wood, metals, plastic, automotive, and motorcycle parts, ensuring a non-fading, non-yellowing, and weather-resistant result.
Specifications:
Color: Green
Brand: Asmaco
Finish: Eggshell
Size: 0.30 Liters (280 Milliliters)
Volume: 400ml
Features:
Quick-drying formula ensures fresh green color with high luster.
Suitable for both interior and exterior applications.
Ideal for use on wood, metals, plastic, automotive, and motorcycle parts.
Provides excellent coverage and adhesion.
Offers better flexibility compared to traditional paints.
Fast-drying and scratch-resistant formula for long-lasting results.
Provides excellent protection against rust, impact, UV rays, and other environmental factors.
Will not fade or yellow over time.
Super environmental protection formula:
Instructions for Use:
Ensure that the surface to be painted is free from oil, water, and dust.ng of the paint.
Hold the can approximately 20-30 cm away from the surface to be
#alramiz#hvac#wholesale#machines#rewinding materials#thermostat#tools & safety#heater & element#are#acsparta#SprayPaint#GreenPaint#Asmaco#EggshellFinish#QuickDrying#InteriorPaint#ExteriorPaint#WoodPaint#MetalPaint#PlasticPaint#AutomotivePaint#MotorcyclePaint#HighLuster#WeatherResistant
1 note
·
View note
Photo
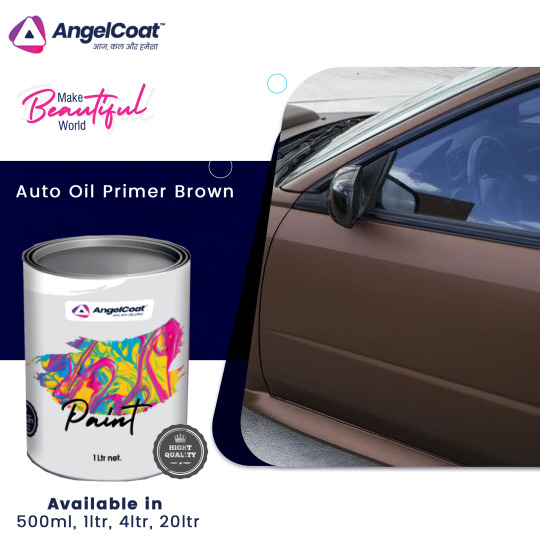
𝐁𝐫𝐨𝐰𝐧 𝐀𝐮𝐭𝐨 𝐎𝐢𝐥 𝐏𝐫𝐢𝐦𝐞𝐫 Manufacturer in Ahmedabad, India
In Ahmedabad, India, #AngelCoating is providing "𝘼𝙪𝙩𝙤 𝙊𝙞𝙡 𝙋𝙧𝙞𝙢𝙚𝙧 𝘽𝙧𝙤𝙬𝙣," Reliable 𝗕𝗿𝗼𝘄𝗻 𝗔𝘂𝘁𝗼 𝗣𝗿𝗶𝗺𝗲𝗿
✏️ Available Packaging Size: 500 ml 1 Ltr, 4 Ltr, 20 Ltr
✏️ Packaging Type: Bucket
𝑭𝒐𝒓 𝑭𝒖𝒓𝒕𝒉𝒆𝒓 𝑫𝒆𝒕𝒂𝒊𝒍𝒔, 𝑷𝒍𝒆𝒂𝒔𝒆 𝑪𝒐𝒏𝒕𝒂𝒄𝒕 𝑼𝒔 𝒐𝒏 𝑩𝒆𝒍𝒐𝒘 𝑫𝒆𝒕𝒂𝒊𝒍𝒔,
📱 Call: +91 94290 02704
💬 WhatsApp : https://wa.me/919429002704
🛒 https://angelcoating.com/.../nc-primer-surfacer-automotive/
#AngelCoatingIndia#CoatIndia#CoatingProducts#AutoOilPrimerBrown#OilPrimerBrown#OilPrimer#OilPrimerPaint#AutoOilPrimer#AutomotiveRefinish#AutomotivePaint#AutomotiveCoating#WoodCoating#Paints#DecorationPaints#AutomotiveDecorative#RefinishPaints#CrystalAutoOilPrimerBrown#Primer#Brown AutomotivePaints#Rajkot#Surat#Baroda#Bangladesh#Nepal
0 notes
Photo

The Dragon Lord Van is here for the first time ever at the Chrysler DODGE nationals at Carlisle PA! Having a great time meeting and greeting all the folks and especially the kids who love dragons wizards and sorcery. it's been a big hit with all ages and custom airbrush enthusiasts. And as always representing vanning culture #ChryslerNationals #ChryslerDodgeNationals #Mopar #DodgeVan #CustomVan #oldschoolvans #Art #Dragons #DragonArt #AirbrushArt #AutomotivePaint #CustomCulture #kustomkulture # Car show # hot Rod # rat Fink # zoomy's # wizards # fantasy art # wizards and dragons# Hand-painted #edbeardjr https://www.instagram.com/p/Bz00oW-h-66/?igshid=trging5ahsvt
#chryslernationals#chryslerdodgenationals#mopar#dodgevan#customvan#oldschoolvans#art#dragons#dragonart#airbrushart#automotivepaint#customculture#kustomkulture#edbeardjr
2 notes
·
View notes
Text
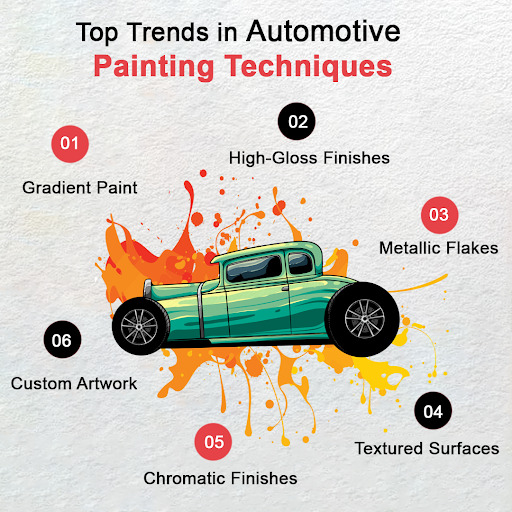
Revolutionizing Car Aesthetics: Justin Crato's Insights
Unlock the secrets of automotive painting with Justin Crato, who reveals the top trends that will shape the industry's future. Car coatings have evolved, from augmented reality design tools to sustainable materials.
0 notes
Text

Pioneer Tapes is a one-stop solution for all your self-adhesive tape requirements.Visit us at- https://www.pioneertapes.com/
0 notes
Last Seen Blogs

akariplusplus
akariplus+

exoprincess0709-blog
Untitled

martha-you-clumsy-slut
Hell Yeh

jkitsjoni
Joni Kim

pakalkinav
Moonlit Nights and Music 🎶✨