#android usb driver windows 10
Text
High-performance ToF 3D Depth Camera I200 | CUBE EYE
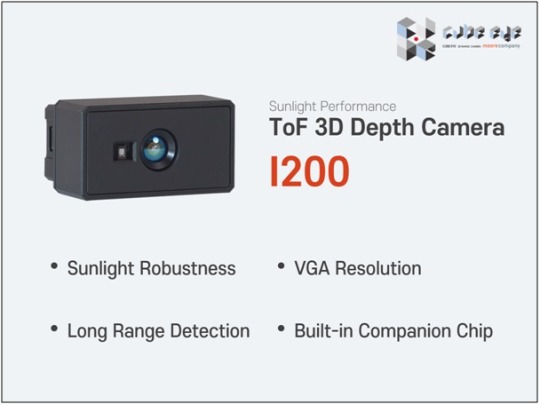
The CUBE EYE brand of time-of-flight (ToF) cameras was created by meerecompany, a South Korean company that specializes in the development and production of high-tech equipment for the display, semiconductor, solar cell, and medical industries.
It is a high-performance camera capable of correctly measuring distances to objects up to 10 meters away. The camera is resistant to sunlight and can be used outside. It's also dust and water resistant.
Cube Eye TOF 3d Camera uses a laser to emit a light pulse and then measures the time it takes for the pulse to return. Distance to the object is calculated by dividing the speed of light by the time taken for the pulse to return.
The Features of the Cube Eye TOF Camera:
Software development kit (SDK): The software development kit (SDK) provides a variety of tools and functions for developing 3D applications.
Pre-trained models: The pre-trained models can be used to quickly and easily create 3D applications.
It has a VGA resolution of 640 x 480 pixels.
Specification of the ToF 3D Depth Camera I200
Type: Heatsink Type
Operating Range: 0.2 ~ 7.0
Illuminator: VCSEL 940nm X 2
Depth Pixel Count: VGA (640 X 480)
Field of View (H, V): 90° (H) X 70° (V)
Output Data (bit): Raw10
Accuracy: <±1% by distance
INTERFACE
Data Interface: MIPI CSI-2 (Option: USB Converter board)
Frame Rate: 5 ~ 30 fps
SOFTWARE (SDK)
USB Drivers: Windows(x64), Linux(x64)
API: C++ 11
Operating System: Windows7, 8, 10/Ubuntu 16_04, 18_04/Android 8↑
DIMENSION
Dimension 60mm X 36.5mm X 23mm
USB (U310) Dimension 36mm X 26.5mm X 6mm
Weight (MIPI interface) 58g
POWER
Power Consumption: 3W (average)
Input Power Voltage: 12 VDC
Operating Temperature: -10°C ~ 60°C
Ambient Lighting Conditions: Indoor and Outdoor
Eye Safety Certification: IEC 60825-1: 2014(3rd Edition) Class1
If you are looking for time of flight camera, you can find them at Cube Eye.
Click here to contact CUBE EYE.
View more: High-performance ToF 3D Depth Camera I200
※meerecompany is scheduled to participate in AUTOMATE SHOW and COMMUNICASIA 2024 at May 2024. Check below for more details.
- Title: AUTOMATE 2024
- Place: Chicago - McCormick Place
- Date: 06 - 09 May 2024
-Booth: #3454
- AUTOMATE Site: https://www.automateshow.com/travel
- Apply for participation: https://xpressreg.net/register/auto0524/landing.php?
- Title: COMMUNICASIA 2024
- Place: Singapore Expo
- Date: 29 - 31 May 2024
- COMMUNICASIA Site: https://asiatechxsg.com/communicasia/
- Apply for participation: https://asiatechxsg.com/registration/
0 notes
Text
How to Connect Cricut Maker to Computer: All Devices Covered!
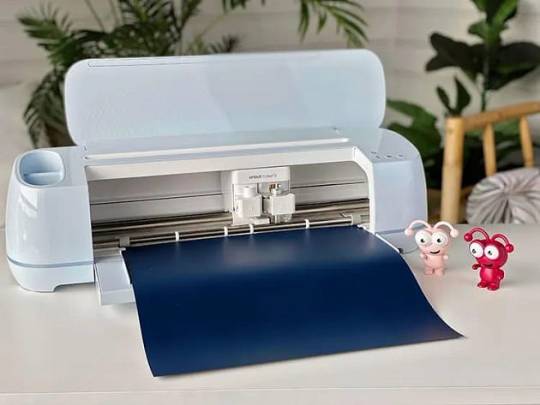
I hope you are ready to learn this process. Well, before I start, I want to tell you that Cricut machines are incredible and deliver faster results than any other conventional machine. Without further ado, let me tell you the steps.
How to Connect Cricut Maker to Computer (Windows/Mac)?
Here, I’m concluding the steps for a Windows and Mac computer. One thing I want to tell you is that you can use these steps for your Cricut Explore as well. As I have set up these machines many times, I’ve become an expert in them. So, you can trust me! Let’s learn how to connect Cricut Maker to computer via Bluetooth.
As the first step, complete the unboxing of your machine.
Now, connect your machine to a power switch.
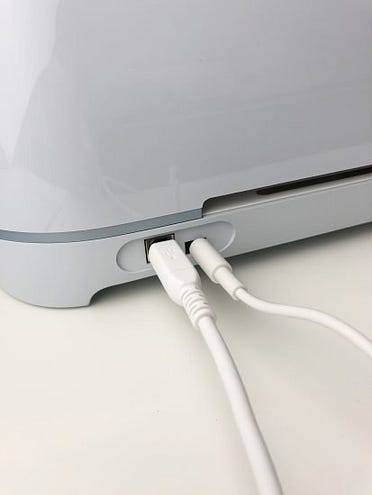
After that, use a USB cord to connect the machine to your computer (Both machines have a USB port for connection).
If you find that the USB connection is not suitable for you, go for the Bluetooth connection.
5. To start with the Bluetooth connection, enable the Bluetooth option on both devices.
6. Now, make sure that your devices are 10–15 feet apart from each other, not more than that.
7. Next, your PC or Mac computer will start detecting the available Cricut Bluetooth device.
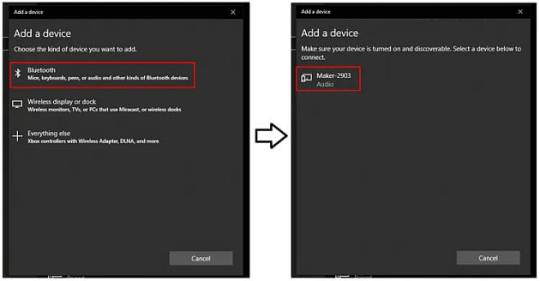
9. Now, follow all the on-screen steps and continue with the connection.
10. Finally, your Cricut cutting machine is paired with the computer.
11. Then, you can install Cricut Design Space on your PC or Mac.
12. After installing the Cricut software, you can proceed with the sign-in process.
That’s how to connect Cricut Maker to computer. When you complete the setup process, you’re free to utilize your machine and computer devices to create the beautiful projects you want.
Moreover, you must ensure that if you are setting up your devices with a USB connection, your PC should have the USB drivers. If not, you can download them very easily. And if your Cricut machine doesn’t have a Bluetooth feature, you can get a Bluetooth adapter.
How to Connect Cricut Maker to Phone (Android/iOS)?
Once you’ve learned how to connect Cricut Maker to computer, have a look at the mobile setup process as well. If any user doesn’t have a desktop or their device is damaged for any reason, they can still use their Cricut machine via their mobile phone. So, let’s go through the steps to connect a Cricut product to a phone.
Initially, hit the Pair button on your Cricut to turn it on and keep it closer to your mobile phone.
Now, head to the Settings option and click on the Bluetooth option.
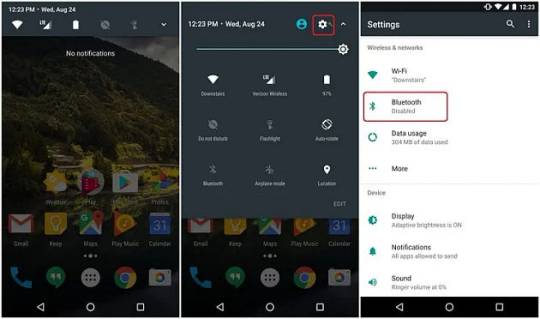
Thereafter, toggle on the Bluetooth if it is off.
3. Next, your screen will show you the Cricut machine’s option.
4. Then, click on your Bluetooth machine from the on-screen list.
5. When the screen asks you for a password, type “0000” and click on the Pair option.
6. Lastly, your Cricut machine will connect to your phone.
That’s it for connecting the Cricut cutting machine to your phone, like Android and iOS. When you know the steps, you can move forward to set up your brand-new Cricut machine.
Conclusion
Finally, you’ve learned how to connect Cricut Maker to computer and mobile devices. To connect your device, you can use the USB or Bluetooth connection method. Once you connect your Cricut to a device, you can get the Cricut Design app on your device to start making your projects. If you don’t know about the Cricut Design Space, it’s a special software designed for Cricut that allows you to design your favorite projects. So, don’t wait; start creating something unique.
Source: how to connect cricut maker to computer
Visit here For more Information: Cricut.com/setup
Pinterest
#how to connect cricut maker to computer#Cricut.com/setup#Cricut maker bundle#Cricut explore 3#Download Cricut design space#Design space Cricut#Cricut Design Space
0 notes
Text
Recensione Magedok Raspberry PI - Monitor touch screen da 9 pollici: prestazioni HD, connettività versatile e resistenza industriale

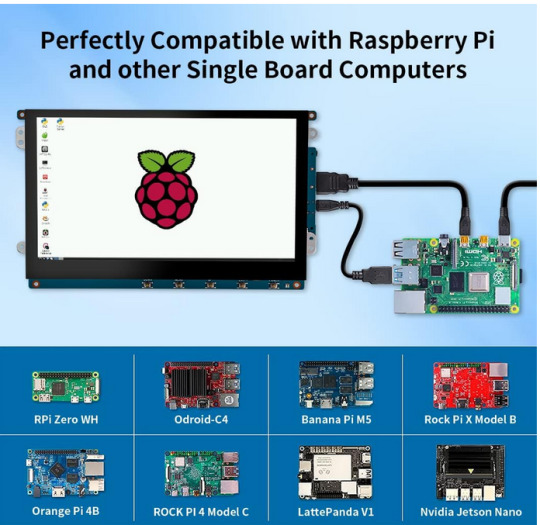
Recensione Magedok Raspberry PI - Monitor touch screen da 9 pollici: prestazioni HD, connettività versatile e resistenza industriale
Se stai cercando un monitor touch screen di dimensioni più generose per i tuoi progetti fai-da-te, il Magedok Raspberry PI è una scelta eccellente da considerare.
Con le sue caratteristiche di alta definizione, connettività versatile e resistenza industriale, questo monitor si distingue per le sue prestazioni e affidabilità.
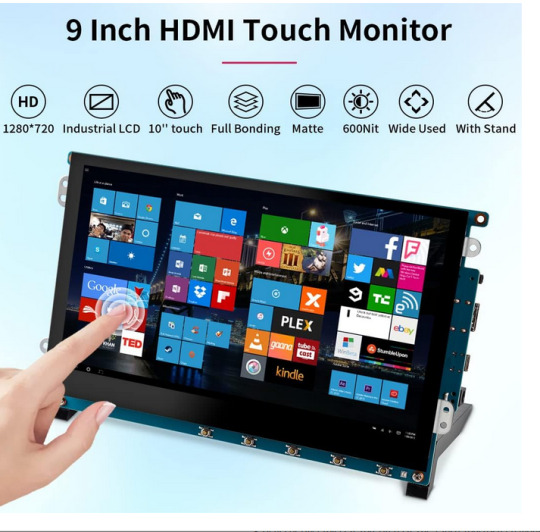
Il Magedok Raspberry PI presenta un display da 9 pollici con una risoluzione HD di 1280 x 720 pixel, che offre colori vividi e immagini spettacolari.
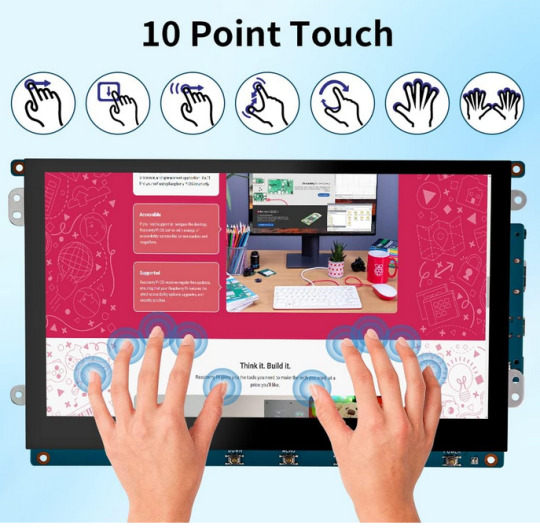
Dotato di tecnologia touch screen ottica e un luminosità di 6000:1 cd/m², questo monitor garantisce una visualizzazione chiara anche in condizioni difficili, con un angolo di visione selvaggia di 160°.
La connettività del Magedok Raspberry PI è estremamente versatile, con supporto per la maggior parte dei dispositivi HDMI e alimentazione a 12 V DC.
La sua semplice connessione tramite porta HDMI e funzionalità touch attraverso la porta USB senza la necessità di installare driver lo rendono estremamente comodo da utilizzare. Inoltre, dispone di un'uscita di alimentazione aggiuntiva da 5V 2A per Raspberry Pi e altre SBC.
Questo monitor touch da 9 pollici è ampiamente compatibile con una varietà di dispositivi, inclusi Raspberry Pi 4/3/2/1/3b +, Jetson, Tinker Board, Cubieboard, Banana Pi, NUC, e molti altri. È ideale sia per lo sviluppo embedded che per l'utilizzo con PC Windows 7/8/10.
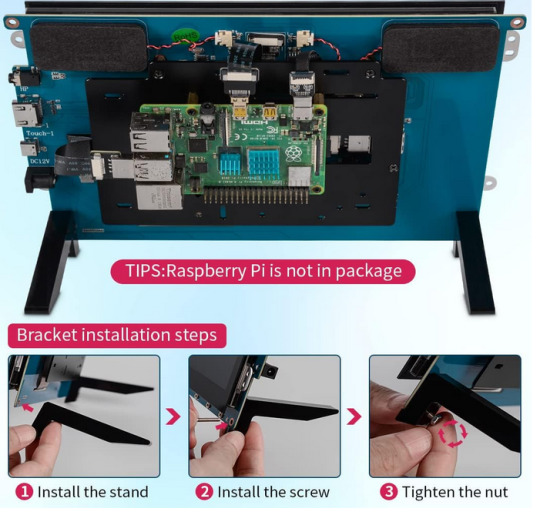
In termini di durata e resistenza, il Magedok Raspberry PI è progettato per durare nel tempo.
Con uno strato aggiuntivo di resina nella laminazione ottica che migliora la durata fisica dello schermo e la resistenza a graffi, polvere e liquidi, questo monitor è ideale per progetti che richiedono affidabilità e robustezza.
In conclusione, il Magedok Raspberry PI è una scelta eccellente per chi cerca un monitor touch screen affidabile e performante.
Con la sua combinazione di prestazioni HD, connettività versatile e resistenza industriale, questo monitor si distingue come una soluzione di visualizzazione ideale per una vasta gamma di progetti fai-da-te e applicazioni industriali.
Vedi tutti i dettagli su amazon tramite il nostro link di affiliazione.
Articoli recenti
Microsoft Rivela Ulteriori Informazioni sulla Prossima Funzione di Invito In-Person in Outlook
Microsoft e Mistral AI Annunciano Partnership per Potenziare Modelli di Lingua AI Large
Il Fuoco della Generative AI Accende le Spese Cloud: Il Mercato Globale Prevede un Aumento del 20%, Microsoft Insegue AWS
Supermassive Games, Creatori di Until Dawn, Prevedono Licenziamenti di 90 Dipendenti
Windows 11 Insider Beta Channel: Nuova Build 22635.3212 (KB5034845) Introduce Nuovi Badge per i Widget
HiGrace Tablet 11 Pollici Android 13: Recensione del Nuovo Tablet con Display 2K e 10GB di RAM
Samsung Galaxy Book4 Pro 360 Laptop 16″ – Novità 2024: Prestazioni AI Avanzate e Creatività Senza Limiti
Lexar 128 GB Micro SD: Velocità Elevata e Affidabilità per Smartphone, Tablet, Action Camera
0 notes
Text
OnePlus 9 Lite
OnePlus 9 Lite USB Driver, PC Manager & User Guide Download
OnePlus 9 Lite USB Driver for Windows 11, Windows 10, Windows 8.1, Windows 8, Windows 7 Download –OnePlus 9 Lite USB Driver is software that creates a valid connection between the computer’s operating system and the OnePlus Android Phones. The USB Driver for OnePlus 9 Lite is an essential component. Without that, the connection will not…

View On WordPress
#Download Official OnePlus 9 Lite USB Driver#Download Official OnePlus USB Driver 2022#Download Official OnePlus USB Driver 2023#Download OnePlus 9 Lite USB drivers for windows#Download OnePlus USB Drivers#How to Install OnePlus 9 Lite USB Driver Manually#Install OnePlus 9 Lite usb drivers for windows#Install OnePlus USB Drivers on Windows#OnePlus 9 Lite official USB driver#OnePlus 9 Lite Stock Firmware
0 notes
Text
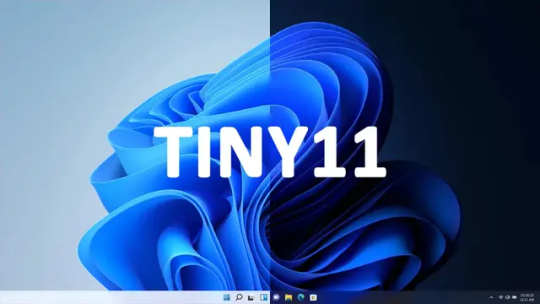
Il mio PC non è compatibile con Windows 11? La soluzione è Tiny11
Il mio PC non è compatibile con Windows 11? Se sei un utente di Windows 10, probabilmente hai sentito parlare del nuovo sistema operativo di Microsoft, Windows 11. Questo promette di offrire un'esperienza più moderna, fluida e sicura, con nuove funzionalità come il menu Start centrato, gli angoli arrotondati, le app Android e il supporto per l'hardware più recente.
Il mio PC non è compatibile con Windows 11? Nessun problema installa Tiny11 una versione customizzata non ufficiale di Windows 11
Tuttavia, per poter installare Windows 11, il tuo PC deve soddisfare alcuni requisiti minimi di sistema, tra cui un processore a 64 bit con almeno due core e una frequenza di clock di 1 GHz, 4 GB di RAM, 64 GB di spazio su disco e una scheda grafica compatibile con DirectX 12. Inoltre, il tuo PC deve avere un chip TPM (Trusted Platform Module) versione 2.0 o superiore e supportare il Secure Boot.
Questi requisiti sono stati stabiliti per garantire che Windows 11 funzioni in modo ottimale e protegga i tuoi dati da possibili attacchi informatici. Tuttavia, ciò significa anche che molti PC più vecchi o meno potenti non sono compatibili con Windows 11 e non potranno ricevere l'aggiornamento gratuito previsto per la fine del 2023.
Se il tuo PC non è compatibile con Windows 11, potresti sentirti deluso o frustrato. Forse ti piacerebbe provare il nuovo sistema operativo o semplicemente non vuoi rimanere indietro rispetto agli altri utenti. Oppure forse ti preoccupi che Windows 10 diventi obsoleto o insicuro nel tempo.
Fortunatamente, c'è una soluzione per te: Tiny11. Si tratta di una versione ridotta e personalizzata di Windows 11 che puoi installare su quasi qualsiasi PC, anche se non soddisfa i requisiti minimi di sistema. In questo articolo ti spiegherò cos'è Tiny11, come funziona e come puoi usarlo per trasformare il tuo vecchio PC in un dispositivo Windows 11.
Cos'è Tiny11?
Tiny11 è un progetto sviluppato da un gruppo di appassionati di Windows che ha lo scopo di rendere Windows 11 accessibile a tutti gli utenti, indipendentemente dall'hardware del loro PC.
Si tratta di una versione modificata di Windows 11 che elimina alcune funzionalità non essenziali o pesanti per il sistema, come Cortana, Microsoft Store, Xbox Game Bar e altre app preinstallate. In questo modo si riduce lo spazio su disco occupato da Windows 11 da circa 20 GB a meno di 10 GB e si alleggerisce il carico sul processore, sulla RAM e sulla scheda grafica.
Tiny11 mantiene però le principali funzionalità e l'aspetto di Windows 11, come il menu Start centrato, gli angoli arrotondati, le app Android e il supporto per l'hardware più recente. Inoltre, Tiny11 include alcuni strumenti utili per ottimizzare le prestazioni del sistema, come un pulitore del registro, un deframmentatore del disco e un gestore delle risorse.
Tiny11 non richiede un chip TPM o il Secure Boot per essere installato. Può essere installato su qualsiasi PC con almeno un processore a 32 bit con un core e una frequenza di clock di 800 MHz, 1 GB di RAM e 16 GB di spazio su disco. Può anche essere installato su una chiavetta USB o una scheda SD e avviato da lì senza modificare il sistema operativo esistente sul PC.
Tiny11 è completamente gratuito e open source. Puoi scaricarlo dal sito ufficiale del progetto, dove troverai anche le istruzioni per l'installazione e il supporto della comunità. Tiny11 è in continua evoluzione e riceve aggiornamenti regolari per correggere eventuali bug e migliorare le funzionalità.
Come funziona Tiny11?
Tiny11 funziona come una normale versione di Windows 11, ma con alcune differenze. Per prima cosa, Tiny11 non è una versione ufficiale di Microsoft, ma una versione modificata da terze parti.
Questo significa che non riceve il supporto ufficiale di Microsoft e che potrebbe non essere compatibile con alcuni driver, software o servizi di Windows 11. Inoltre, Tiny11 potrebbe violare i termini di licenza di Windows 11, quindi usalo a tuo rischio e pericolo.
Per seconda cosa, Tiny11 non ha alcune funzionalità di Windows 11 che potrebbero essere utili o desiderabili per alcuni utenti. Ad esempio, Tiny11 non ha Cortana, l'assistente vocale intelligente di Microsoft che ti aiuta a eseguire varie operazioni con la tua voce.
Se ti piace usare Cortana, potresti sentire la sua mancanza su Tiny11. Allo stesso modo, Tiny11 non ha Microsoft Store, il negozio online dove puoi scaricare app, giochi, film, musica e altro per il tuo PC. Se ti piace usare Microsoft Store, potresti trovare Tiny11 limitato nelle sue opzioni.
Per terza cosa, Tiny11 potrebbe non offrire le stesse prestazioni o la stessa sicurezza di Windows 11. Anche se Tiny11 è ottimizzato per funzionare su PC meno potenti, potrebbe comunque essere lento o instabile su alcuni dispositivi.
Inoltre, Tiny11 non ha il chip TPM o il Secure Boot che proteggono il tuo PC da possibili attacchi informatici. Se ti preoccupi della sicurezza del tuo PC, potresti preferire usare Windows 10 che ha queste funzionalità.
Come usare Tiny11?
Se vuoi usare Tiny11 sul tuo PC, devi seguire alcuni passaggi. Prima di tutto, devi scaricare l'immagine ISO di Tiny11 dal sito ufficiale del progetto. L'immagine ISO è un file che contiene tutti i dati necessari per installare Tiny11 sul tuo PC. Puoi scegliere tra due versioni di Tiny11: una a 32 bit e una a 64 bit. La versione a 32 bit è compatibile con più PC, ma ha meno funzionalità e prestazioni rispetto alla versione a 64 bit. Scegli la versione più adatta al tuo PC.
Dopo aver scaricato l'immagine ISO di Tiny11, devi creare un supporto avviabile con essa. Un supporto avviabile è un dispositivo come una chiavetta USB o una scheda SD che contiene l'immagine ISO di Tiny11 e che può essere usato per avviare il tuo PC con Tiny11. Per creare un supporto avviabile con Tiny11, puoi usare un programma come Rufus o UNetbootin che ti permette di copiare l'immagine ISO di Tiny11 sul tuo dispositivo e renderlo avviabile.
Una volta creato il supporto avviabile con Tiny11, devi inserirlo nel tuo PC e accenderlo. Dovresti vedere un menu che ti chiede se vuoi avviare il tuo PC con Tiny11 o con il sistema operativo esistente sul tuo PC. Seleziona l'opzione per avviare il tuo PC con Tiny11 e segui le istruzioni sullo schermo per completare l'installazione.
Nota: Se la chiavetta USB non si avvia devi entrare le BIOS del tuo PC per rendere avviabile il supporto. Leggi questo articolo su come fare per entrare nel BIOS.
A questo punto hai due possibilità: puoi installare Tiny11 sul tuo disco rigido o puoi usarlo direttamente dal supporto avviabile senza modificare il sistema operativo esistente sul tuo PC. Se scegli di installare Tiny11 sul tuo disco rigido, dovrai formattare una partizione del disco e copiare i file di Tiny11 su di essa.
Questo cancellerà tutti i dati presenti su quella partizione, quindi fai un backup prima di procedere. Se scegli invece di usare Tiny11 direttamente dal supporto avviabile, non dovrai formattare nulla e potrai rimuovere il supporto avviabile quando vuoi tornare al sistema operativo esistente sul tuo PC.
Conclusione
Spero che questo articolo vi sia stato utile per scoprire Tiny11 e come può consentire di eseguire Windows 11 anche su PC meno recenti non compatibili con i requisiti ufficiali. Se avete domande o volete condividere la vostra esperienza con Tiny11, lasciate un commento qui sotto!
Note finali
E siamo arrivati alle note finali di questa guida. Il mio PC non è compatibile con Windows 11? La soluzione è Tiny11. Ma prima di salutare volevo informarti che mi trovi anche sui Social Network, Per entrarci clicca sulle icone appropriate che trovi nella Home di questo blog, inoltre se la guida ti è piaciuta condividila pure attraverso i pulsanti social di Facebook, Twitter, Pinterest e Tumblr, per far conoscere il blog anche ai tuoi amici, ecco con questo è tutto Wiz ti saluta.
Read the full article
0 notes
Link
GOBEST USB Microphone for Meeting Business Computer PC, Laptop,Desktop,Mac & Macbook, Portable Table for for Online Chatting, VoIP Calls, Online Meeting, Video Conference(Black) We have a great collection of WFH products in our online shop. Our shop includes other essential remote home working devices like Webcams, Chairs, Tables and much more. Lets improve your WFH enrolment today with the GOBEST USB Microphone for Meeting Business Computer PC, Laptop,Desktop,Mac & Macbook, Portable Table for for Online Chatting, VoIP Calls, Online Meeting, Video Conference(Black). https://www.remoteworkingoffice.com/product/gobest-usb-microphone-for-meeting-business-computer-pc-laptopdesktopmac-macbook-portable-table-for-for-online-chatting-voip-calls-online-meeting-video-conferenceblack/?feed_id=2105&_unique_id=65323912083c7 #homeoffice #remoteworking #ratemyoffice #homeworking #rwo #remoteworkingoffice
0 notes
Text
What Xbox controllers have Bluetooth?
How to Use an Xbox One Controller on a PC
Are you a gamer who prefers using an Xbox One controller for playing games? If yes, then you'll be glad to know that you can easily use your Xbox One controller on your PC as well. Here's how you can do it.

photo Credit-www.freepik.com
Getting Started
Firstly, you'll need to make sure that you have an Xbox One controller with a micro USB cable or a wireless adapter. If you don't have one, you can easily buy it from the market or online.
Connecting the Controller to the PC
Next, you'll need to connect your Xbox One controller with your PC. Here's how you can do it.
For Wired Connection
If you're using a micro USB cable, then simply connect one end of the cable to the controller and the other end to your PC's USB port. The driver will automatically install and configure itself.
For Wireless Connection
If you're using a wireless adapter, then you'll need to follow these steps:
1-Plug in the wireless adapter to your PC's USB port.
2-Turn your Xbox One controller by pressing the Xbox button located in the center of the controller.
3-Press the pairing button located at the back of your controller until the Xbox button starts flashing rapidly.
4-Press the pairing button located on the wireless adapter until it starts flashing rapidly.
5-Wait for a few seconds until the Xbox button stops flashing and becomes solid, indicating that the controller is now connected.
Configuring the Controller
Once your Xbox One controller is connected to your PC, you'll need to configure it. Here's how you can do it.
For Windows 10
Windows 10 comes with built-in support for Xbox One controllers. Once you connect your controller with your PC, it will automatically detect and configure it. However, if you want to customize your controller settings, you can do it by following these steps:
1-Go to Settings > Devices > Bluetooth & Other Devices.
2-Click on Add Bluetooth or Other Device.
Select Bluetooth.
3-Select Xbox Wireless Controller from the list of available devices.
Once connected, click on the controller and select Device Settings.
4-You can now customize your controller settings according to your preference.
5-For Windows 7 and 8.1
If you're using Windows 7 or 8.1, then you'll need to download and install the Xbox Accessories app from the Microsoft Store. Once you've installed the app, follow these steps:
1-Connect your Xbox One controller with your PC.
2-Launch the Xbox Accessories app.
3-Select your controller from the list of available devices.
4-You can now customize your controller settings according to your preference.
5-Playing Games
Once your Xbox One controller is connected and configured, you can now use it for playing games on your PC. Most games come with built-in support for Xbox One controllers, so you don't need to configure it separately for each game.
How to sign into Xbox
Signing into Xbox is a simple process, whether you're using an Xbox console or the Xbox app on your PC or mobile device. Here's a step-by-step guide on how to sign into Xbox.
On Xbox Console:
1-Turn on your Xbox console and wait for it to boot up.
2-Press the Xbox button on your controller to bring up the Xbox guide.
3-Select Sign in from the list of options.
4-If you already have an Xbox account, enter your email address and password to sign in.
5-If you don't have an Xbox account, select Create One and follow the on-screen instructions to create a new account.
On Xbox App (Windows 10):
1-Launch the Xbox app on your Windows 10 PC.
2-Click on the Sign-in button located in the top right corner of the app.
3-Enter your Microsoft account email address and password to sign in.
4-If you don't have a Microsoft account, click on Create One and follow the on-screen instructions to create a new account.
On Xbox App (Mobile Device):
Download and install the Xbox app from the App Store (iOS) or Google Play Store (Android).
Launch the Xbox app on your mobile device.
Tap on the Sign-in button located in the top left corner of the app.
Enter your Microsoft account email address and password to sign in.
If you don't have a Microsoft account, tap on Create One and follow the on-screen instructions to create a new account.
Once you've signed into Xbox, you'll have access to a variety of features and services, including online multiplayer, Xbox Game Pass, Xbox Live Gold, and more. You can also customize your Xbox profile, track your achievements and game progress, and connect with other gamers from around the world.
Conclusion
Using an Xbox One controller on a PC is easy and straightforward. Whether you're using a wired or wireless connection, you can easily connect and configure your controller. With its ergonomic design and familiar layout, the Xbox One controller is a great choice for PC gamers who prefer a console-style gaming experience.
1 note
·
View note
Text
What are Benefits and requirements for phonelink with pc and phone?

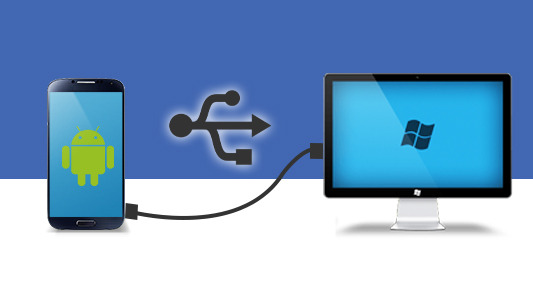
Aka ms phonelinkqrc is a connection for matching an Android gadget and a Windows PC. You can begin utilizing your phone on the actual PC through Aka.ms/phonelinkqrc . Assuming you're fed up with messaging your photographs, recordings and documents just to get them onto your PC then you ought to utilize this benefit of linking your phone to your PC.
On the off chance that you have an Android-based phone, you can without much of a stretch connection it to your PC utilizing a USB link. Essentially associate the little finish of the link to the smaller than usual USB port on the phone and the bigger finish to an open USB port on the PC. Once associated, Windows will perceive the gadget naturally and introduce the vital drivers.
Requirements to interface your Phone with Windows
• Your Phone Friend: In the event that you don't have this application on your Android phone, just sit back and relax. We have a basic arrangement: go to www.aka.ms phone link qrc on your phone's internet browser.
• Your Phone application on your Windows PC: Assuming you refreshed to Windows 10 or later on October 10, 2018, the Your Phone application was at that point on your PC.
• Wi-Fi association: To keep away from problems, the two gadgets should have a strong and stable web association.
What are the requirements for utilizing this feature?
PC requirements:
• A PC running Windows 11, variant 22H2 form 22621 or later
• A PC with Bluetooth backing and Wi-Fi connector
• Phone Connection application adaptation 1.22092.211.0 or later
Phone requirements:
• Samsung cell phone with OneUI 4.1.1 or later
• SIM card with area of interest able arrangement
• Connection to Windows application rendition 1.22093.2.0 or later
The most effective method to Connection Windows PC to Phone
To connect your Windows PC to your phone utilizing the Phone interface application, you'll have to download and introduce the application on your PC. Once the application is introduce then adhere to the on-screen directions:
• Open the application on your gadget and snap 'Get everything rolling' on the screen.
• Click on 'Sign-in' with your Microsoft account. This record ought to be equivalent to signing on to the phone.
• On your phone, go to aka.ms/phonelinkqrc into your program. This connection will either guide you to the Google Play Store's page for the application or it will send off the Your Phone Sidekick application preinstalled on your phone.
• Sign in to this buddy application with a similar Microsoft account as on the PC. A screen to check a QR code will open on the phone.
• Presently return to your PC and select one of the accompanying choices:
• I have the Your Phone Sidekick application introduced on my phone"- this will show a QR code that you should look over the phone.
• 'Match with QR code' or 'Match physically'- this will show a code that should be placed on your phone.
• When the gadgets are connected, permit the consents provoked on your screen. This will permit you to exploit every one of the features of Your Phone.
Benefits of Linking Your Phone to PC
• Move content from the phone to the PC.
• Access applications introduced on the phone from your PC.
• See the instant messages by means of notice spring up on the PC.
• Cross-gadget reorder feature
• Settle on and get voice decisions on your PC.
On the off chance that you have a Macintosh or Windows PC, you can connect your phone to your PC utilizing the Settings application. This application permits you to get to your phone's information and offer articles from your PC.This strategy consequently associates when they're near one another.
0 notes
Text
How do I link my Android device to my Canon printer?
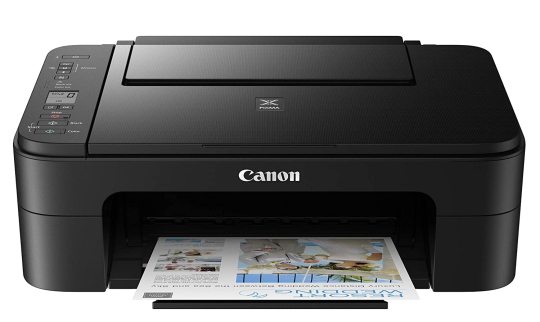
Canon is a momentous brand in the space of photography and printing. They have a colossal supply of printers to address the issues of general clients and relationship, with their PIXMA and imageCLASS lines being the most outstanding. They make both inkjet and laser printers, grouping and monochrome, and have a gigantic choice of use plan choices. With their commitment with photography, their printers are usually the go-to choice for free and proficient photograph printing.
Add a printer or scanner
If your printer interfaces by a wire, plug it into your contraption. It'll impart consequently, your PC will download the right drivers, and you can use it immediately. To cooperate a distant printer, follow these techniques:
• Select the Beginning Windows logo Start button, then, select Settings Stuff formed Settings picture > Contraptions > Printers and scanners > Add a printer or scanner.
• Hang on for it to find close by printers, then pick the one you truly need to use, and select Add contraption. To take out the ij.start.cannon later, just part it, and select Discard.
• In the event that you don't see your printer, try to fix the issue by remembering the means for Fix printer issues in Windows 10.
To use a print service:
• Open your phone's Settings application.
• Tap Related gadgets Connection propensities Printing.
• Tap the print service.
Download the Ij Canon Setup Application on a Mobile Phone or Tablet
• Without even batting an eye go to the play store or one more store of the gadget.
• In the store of mobile or tablet, look for ij.start.cannon.
• Then, at that point, the application will show.
• Click on the right application and open it.
• Then, click on the Current choice.
• Then, at that point, the downloading of the application will start.
• Eventually present the application on your mobile phone or tablet.
How could I fix blunder on Canon printer?
• Reset the Canon printer
• Switch on the printer.
• Press and hold the Stop/reset button.
• Press the button that you use to make a blend copy and hold it down.
• Stand by 5 seconds. ...
• The printer in the end reboots and sets itself up.
• Does the printer show that the device ought to be changed? ...
• You've reset your printer.
How to Setup Direct Mark of collaboration Mode on Your Canon Printer?
• Start by opening your Selphy or Canon Print Inkjet application on your contraption.
• Then, follow the prompts to set ahead.
• Select the decision "Assistant a printer through direct association" system.
• From there on out, click on the Yes decision.
• In a little while, enter the connection SSID and secret key in the regular field to ij.start.canon Setup an association.
• Then, at that point, open the Wi-Fi setting and add your Canon printer series.
• Tap on the "Keep Wi-Fi coalition" and close the window.
• At last, you have completed the Prompt Association point Mode on your contraption.
The best Canon printer we've endeavored is the Canon imageCLASS MF743Cdw. This laser model has a lot of parts to fulfill most office needs, including high page yields and quick printing speeds. At any rate colossal and ambling, it feels unimaginably especially worked, with a plan that licenses clear consent to the toner cartridges and paper jams. You can collaborate with the printer through Wi-Fi, USB, or Ethernet or print straightforwardly from a USB streak drive.
1 note
·
View note
Text
Price: [price_with_discount]
(as of [price_update_date] - Details)
[ad_1]
Portable External Hard Drive 100 GB-USB 2.0 for Backup and data storage comes with an aluminium case bodyUpgraded USB 2.0 external HDD assures fast speed (480MB/S)Speedily add more storage capacity to your computer & other compatible devices.Support Windows 7-10 System and XP Support Mac system and smart tv.Compact Pocket sizeNo drivers neededSimply Plug and play and enjoy the new Storage experience
Technical SpecificationsPorts: USB 2.0Colour: BlackCapacity: 100 GBDimensions: 7.4 x 5.43 x 0.75 inchesItem Weight: 7.4 ounces (209g)
Plug and play features Connect your USB cable to your pc easily No Software update required.The portable hard drive is ready to use quickly.Automatically accepted by Windows os SystemNo External Power needed as the drive is powered from the cable.
SYSTEM COMPATIBILITY / HIGH-SPEED DATA TRANSFERS: 2.5" HDD External Hard Drive supports Windows / Mac / Linux / Android. Suhsai external hard drive can be connected with multiple devices like PC, Laptop, MAC, Smart Tv(make sure your tv supports USB port), Tablet. It improves performance by transferring data at lightning speed. Our Portable hard disk's USB 2.0 version provides read and write speeds up to 480 Mbps. And, when your HDD is working, an LED indicator will light up to let you know.
SUPPORT DATA/MULTIMEDIA STORAGE/BACK-UP: Now enjoy the freedom of carrying official data, Student's project work, and you can back up your data anywhere. With Our backup drive for pc, you can store your data up to 1TB. (please select the correct capacity when ordering), save as many files as PPT, XLS, TXT, XLSX, PDF, HTML, DOC. Backup drive for pc can store multimedia files like AVI, MOV, FLV, MP4, MPEG, Music files like MP3, WAV, CAF, AIFF, images like JPG, JPEG, PNG, GIF, and many more.
PLUG AND PLAY: Backups are simple with the plug-and-play feature. No software is required to install. Plug and play function makes it easier to operate anywhere. Connect a USB 2.0 multimedia storage disc to your computer and drag and drop your files. This external hard disc is ready to use right away. For automated recognition, connect the portable harddisc to a computer. There is no need to install any software.
SATISFACTION 100% GUARANTEE / PACKAGE INCLUDES: Suhsai provides a one-year warranty, is proud of its high-quality products, and ensures that none of our customers have any issues with them. We are always here to assist you and address any problem. 1 X PORTABLE HARD DRIVE , 1 X USB CABLE, 1 X POUCH Includes in this package.
[ad_2]
0 notes
Text
Sunlight Performance ToF 3D Depth Camera I200 | CUBE EYE

The CUBE EYE brand of time-of-flight (ToF) cameras was developed by meerecompany, a South Korean company that specializes in the research and manufacturing of high-tech equipment for the display, semiconductor, solar cell, and medical industries.
It is a high-performance camera that can accurately measure the distance to objects up to 10 meters away. The camera is sunlight robust, so it can be used in outdoor applications. It is also dust and water resistant.
Cube Eye TOF 3d Camera uses a laser to emit a light pulse and then measures the time it takes for the pulse to return. Distance to the object is calculated by dividing the speed of light by the time taken for the pulse to return.
The Features of the Cube Eye TOF Camera:
Software development kit (SDK): The software development kit (SDK) provides a variety of tools and functions for developing 3D applications.
Pre-trained models: The pre-trained models can be used to quickly and easily create 3D applications.
It has a VGA resolution of 640 x 480 pixels.
Specification of the ToF 3D Depth Camera I200
Type: Heatsink Type
Operating Range: 0.2 ~ 7.0
Illuminator: VCSEL 940nm X 2
Depth Pixel Count: VGA (640 X 480)
Field of View (H, V): 90° (H) X 70° (V)
Output Data (bit): Raw10
Accuracy: <±1% by distance
INTERFACE
Data Interface: MIPI CSI-2 (Option: USB Converter board)
Frame Rate: 5 ~ 30 fps
SOFTWARE (SDK)
USB Drivers: Windows(x64), Linux(x64)
API: C++ 11
Operating System: Windows7, 8, 10/Ubuntu 16_04, 18_04/Android 8↑
DIMENSION
Dimension 60mm X 36.5mm X 23mm
USB (U310) Dimension 36mm X 26.5mm X 6mm
Weight (MIPI interface) 58g
POWER
Power Consumption: 3W (average)
Input Power Voltage: 12 VDC
Operating Temperature: -10°C ~ 60°C
Ambient Lighting Conditions: Indoor and Outdoor
Eye Safety Certification: IEC 60825-1: 2014(3rd Edition) Class1
If you are looking for time of flight camera, you can find them at Cube Eye.
Click here to contact CUBE EYE.
View more: Sunlight Performance ToF 3D Depth Camera I200
0 notes
Text
ZTE A7030
ZTE A7030 USB Driver, PC Manager & User Guide Download
ZTE A7030 USB Driver for Windows 11, Windows 10, Windows 8.1, Windows 8, Windows 7 Download –ZTE A7030 USB Driver is software that creates a valid connection between the computer’s operating system and the ZTE Android Phones. The USB Driver for ZTE A7030 is an essential component. Without that, the connection will not work correctly when you…
View On WordPress
#Download Official ZTE A7030 USB Driver#Download Official ZTE USB Driver 2022#Download Official ZTE USB Driver 2023#Download ZTE A7030 USB drivers for windows#Download ZTE USB Drivers#How to Install ZTE A7030 USB Driver Manually#Install ZTE A7030 usb drivers for windows#Install ZTE USB Drivers on Windows#ZTE A7030 official USB driver#ZTE A7030 Stock Firmware
0 notes
Text
Gigabyte ga-m57sli-s4 manual
GIGABYTE GA-M57SLI-S4 MANUAL >>Download
vk.cc/c7jKeU
GIGABYTE GA-M57SLI-S4 MANUAL >> Read Online
bit.do/fSmfG
19 нояб. 2007 г. — [Thread Ufficiale V3.0] AMD K10 Phenom Quad/Triple/Dual Core Processori.2GB (2 x 1GB) DDR2 400/533/667/800MHz 240-PIN DIMM picclick.it › picclick.it › Su questa pagina puoi scaricare del tutto gratuitamente Manuale utente GIGABYTE GA-M57SLI-S4. PDF Manuale utente è composto da 96 pagine e le sue dimensioni <a href=traffco.su/2?keyword=honda+gcv190+repair+manual+free+ [url=bit.ly/3ilqDhb]]gigabyte motherboard drivers download for windows 10 Lancia Lybra Service Manual ipycopp · Auto Clicker For Android Download peonfylo Vmware Tools Linux Iso · Gigabyte Ga-m57sli-s4 Drivers Download2GB (2 X 1GB) DDR2 400/533/667/800MHz 240-PIN DIMM Memoria RAM per PC Desktop/ - EUR 32,29. IN VENDITA!Fallimento ELETTRODATA SpA in liq. Nr. 488/2009saim-group.com › uploads › 2020/06saim-group.com › uploads › 2020/06PDF GA-M57SLI-S4. MB GIGABYTE SCK-AM2,NV 570 1066MHZ,4XDDR2-. 800,2XPCX,GB LAN. 2. 3,50. 6,99. BAN/D1. MB60A-SL. MB PENTIUM PRO,2 USB PORT,FAST-I/O,PS2 MOUSE.
https://www.tumblr.com/nunonesilidi/697933811229523969/panduan-solat-tarawih-pdf995, https://www.tumblr.com/nunonesilidi/697933811229523969/panduan-solat-tarawih-pdf995, https://www.tumblr.com/nunonesilidi/697933811229523969/panduan-solat-tarawih-pdf995, https://www.tumblr.com/nunonesilidi/697933714043371521/generate-pdf-from-infopath-form, https://www.tumblr.com/nunonesilidi/697934216575549440/engineering-drawing-section-view-pdf-in-iphone.
0 notes
Last Seen Blogs

jupiter3
desire's a terrible thing

alysonwonderland5x5
down the rabbit hole

taleofours
bonjour

your-neighbor-bear
BIG CHALLENGES

wait-its-carol-anderson
I Put The "Bi" In Bitch♡