#and this sample running software kept closing itself in the middle of running samples so that was a pain to deal with
Text

why can’t this week just end alreadyyyyyyy
#rant about the week incomin’ in the tags bc ‘complaining’ is my unofficial middle name#this week has *not* been my week so far and it’s only wednesday morning#my horrible week commenced on sunday night when i was unable to sleep bc my pillow was oriented wrong#thus i had a grand total of 1 hour of sleep which was not very poggers tbh. so i tried to sleep on the train but…#the guy next to me??? kept swaying to lean on my shoulder??? so i hunched over to avoid physical contact but he just landed on my back??#so that sucked balls. i kept having to wake up to push him away with my bag and then trying to go back to sleep.#but then!!! just as i fell asleep after one such instance!!! the guy’s phone alarm went off????? like?? why???? why would you set an alarm??#we’re on a friggin train mannnnn!!!!! why did you have to set an alarm?????????????#and ofc when the dude finally alighted (and i was asleep) he just *had* to jab me in the side with his elbow when he got up. ಠ_ಠ#so that’s how i knew the rest of the week was gonna be just ✨peachy✨#anyways manning 2 workstations (+ 1 bonus ‘mini’ workstation) on 1h of sleep isn’t very fun. esp if you’re incompetent af like me#and ofc there just had to be problems too. like the printers couldn’t print (and the systems crashed everytime i tried to print something)#and this sample running software kept closing itself in the middle of running samples so that was a pain to deal with#and tuesday (yesterday) wasn’t much better. in fact it was ✨worse✨. none of the 2 workstations could get started till like 10am and aaaaaa—#to make matters worse i had stubbed my toe so badly in the morning that my skin tore. so walking was ✨much pain✨ as well :(#and ofc yesterday had to be the one day where i had to walk back and forth an unnecessarily high number of times >:( sadded#and ofc they *had* to have an hour-long meeting about something or other towards the end of the workday when i had yet to eat my lunch >:(#(fell asleep during the meeting though bc it was boring as balls whoops)#and i could only take a half-hour break after that >:((( i wanted my full hour dammitttttttt#and ofc it was raining when i left and ofc it took like 25 mins for me to hail a taxi on this booking app bc i didn’t want to take the train#and ofccccc i misheard the taxi driver when he arrived and he roasted my chinese speaking skills. and ofcccc we were caught in a traffic jam#(i had a really nice hour long nap in the cab though so thanks traffic jam)#and thus ended my terrible 2 past weekdays. i’m drained af and it’s *only* wednesday morning????!!!!!!!!!!!!!#i’m mentally looping anzu no uta (imascg) to cope. ‘nu-uh i don’t wanna work’ so true anzu#i just wanna sleeeeeeep and wake up this weekend or sth idk it’s too early in the year for this#it is suiyoubi my dudes#may spam self-rb my monster-length character image/gif posts later to cope. you have been warned
12 notes
·
View notes
Text
Lightning Sunset (Desktop 12)
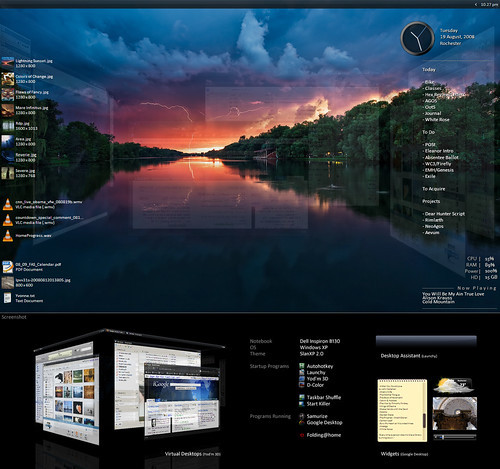
Edit: much thanks to Lifehacker. 🙂
Featured Desktop: Lightning at Sunset
How To: Roll Your Own Lightning at Sunset Desktop
This is a minor update to my previous desktop. As before, every bit of software in the shot is freeware, sans only the copy of Photoshop used to put it together.
Mouseover the icons on the left for a description of the new additions, D-Color and Xentient Thumbnails. The rest, as listed before:
Theme:
– SlanXP 2.0. Requires patched uxtheme.dll – patcher here.
– Wallpaper: "lightning in sunset" by ddoi.
Startups:
– Autohotkey. See the note in the upper-right corner.
– Launchy. My beloved.
– Yod’m 3D 1.4. Last free version before it became Deskspaces. Probably the closest thing to Compiz Fusion you can get for Windows.
– Taskbar Shuffle. I swear, it’s worth it just for middle-clicking to close windows.
– Start Killer.
Programs usually running:
– Samurize. I made the config myself, which you’re welcome to download here in a few different resolutions.
– Google Desktop. Solely for the gadgets.
I’ve added a few other details as notes. And I’d be happy to answer any questions. I love talking about this stuff.
– – – – – – –
UPDATE: Much thanks to Lifehacker for the featured article. 🙂 As requested by some of the commenters over there, here follows a brief tutorial on getting this setup for your PC.
Theme. Download the above Uxtheme.dll Patcher. You’ll have to restart your computer; do so. Then, download "SlanXP2.msstyles", and run it; Windows will know what to do. Customize it however you want (I use the third color scheme). Hit Apply. You may want to keep the ".msstyles" file in a safe place; I placed a copy with my other themes in "C:WindowsResourcesThemes".
I’m sure most of you know how to move the taskbar to the top of the screen.
Launchy. I love Launchy so very much. Download, install and run it. The default hotkey to access it is Alt+Space, but I use Win+Z. Right-click to access options. From here, there are so many ways to go that I’m just going to refer you to Lifehacker’s numerous articles on customizing Launchy. But the gist is this: use the hotkey to bring it up. Start typing what you’re looking for, until Launchy finds it, then hit Enter to run it. The more you use it, the more Launchy will learn what you use most often, and you’ll have to type less and less. By default, it will index your Start Menu, Control Panel, and bookmarks, so feel free to get rid of those application icons on your desktop. Just go for it. Go!
Yod’m3D. This is actually a portable application, meaning you don’t have to install it. Extract the folder from the ZIP you downloaded to somewhere safe, like "C:Program Files". Manually add a shortcut to "Yodm3d.exe" in your Start Menu. Run it, and right-click the tray icon to open options.
I kept most of the defaults. I enabled "Auto turn cube when window move out of screen." I also disabled the tray icon (you can access options without it just by launching the shortcut again). In the Mouse tab, I enabled the bottom two corners for activation, with a delay of 250ms. In Zoom, I have the following numbers down the side: 0.00, 1.00, 1.00, 0.00, 0.12, 0.10.
To use it, just move your mouse to either bottom corner of the screen, which should suddenly become a translucent cube. To rotate it, click and drag, or just use the arrow keys. To select the face you’re centered on, middle-click or press Enter. Using the numbers I gave you, it won’t zoom at all by default, but if you want to zoom out a bit and visualize the whole cube, press the Up arrow. Yod’m can remember a different wallpaper for each desktop, but you have to set it through the Display dialogue.
D-Color. This one’s pretty self-explanatory. Download, install, run. Right-click the tray icon to select the icon style you want (tiles, in my case). Click "Configure" to customize the text color; I just have white text and a transparent background. (No shadows, annoyingly, which means this works best with a darkish background.)
Taskbar Shuffle. Another easy one. Download, install, run. As noted above, I don’t even really care about moving the window tabs around; I keep this around because it lets me middle-click to close windows. You will be amazed at how much you miss it on other computers. I disabled the tray icon with this one; as with Yod’m, you can just run the program shortcut again to bring it back.
StartKiller. Even easier. Download, install, run. Start button is gone. Done. (You can still access the start menu using the windows key button, or Ctrl-Esc.)
Google Desktop. Download, install, run. If I recall, it will open a browser window for you to start setting options. With Launchy, I have no need for GD’s primary function, desktop search, so I went through and disabled every option I could find related to indexing. When you’re done with this, right-click the tray icon and select "Sidebar." Said object should promptly appear on the side of your desktop, if it hadn’t already. On the top, click the middle of the three corner buttons, with the triangle. Select "Auto-hide," then "Add gadgets" to browse Google’s immense library of widgets. Once they’re added to your sidebar, you can click and drag to pull them onto the desktop in whatever arrangement you like. Now, you can just tap the "Shift" key twice to hide or reveal them, ala Dashboard.
Samurize. Samurize is the one program here with a bit of a learning curve, particularly because my config doesn’t fit all resolutions by default. Samurize’s website has a good comprehensive tutorial. For more information, see Lifehacker’s How To article on this desktop.
Basic instructions for this config are included in the download. I provided for a few different resolutions, mainly on request; I’m working on a way to make it auto-conform to any resolution, so keep an eye on this post.
Autohotkey. Download, install. You can run the program if you want to look at a sample script, but all you really have to do is create a new ".ahk" file somewhere safe (mine’s in My Documents). You can create a start menu shortcut to the "whatever.ahk" file itself; it will launch Autohotkey with that file, or "script," and to edit it, you can right-click the tray icon. When you’re done editing, save the file, right-click the tray icon again, and click "Reload script."
As for what you actually put into your script, you have free reign. Autohotkey’s website has a tutorial to get you familiar with the format. I’ll give you a few examples that I use regularly – in fact, you can copy and paste these if you want.
#f:: Run firefox.exe
; Win+F launches Firefox.
#+n:: Run notepad++
; Win+Shift+N launches Notepad++.
^!d:: Run C:…Todo.txt
; Opens my to-do list; Samurize reads from the same file.
#1:: WinSet, Transparent, 255, A
#2:: WinSet, Transparent, 217, A
; Win + 1-2 sets transparency of active window to 0%/15%. (255 is opaque.)]
#3:: WinSet, Transparent, 255, ahk_class Shell_TrayWnd
#4:: WinSet, Transparent, 217, ahk_class Shell_TrayWnd
; Win + 3-4 sets taskbar transparency.]
!F2:: WinMinimize, A
; Alt+F2 minimizes active window.
!F3::
WinGet MX, MinMax, A
If MX
WinRestore A
Else WinMaximize A
return
; Alt+F3 maximizes/restores active window.
For more information, see Lifehacker’s How To article on this desktop.
Posted by Kaelri on 2008-08-20 03:36:11
Tagged: , lifehacker , desktop , customization , deskspace , yod’m , transparency , slanxp , samurize , launchy , google , autohotkey , d-color , xentient
The post Lightning Sunset (Desktop 12) appeared first on Good Info.
0 notes
Last Seen Blogs

smilingcrittersthingig
Critter AU

vfabron
saving hehe, soon to be rp blgo?

riverindulge
is hedonism a kink

shady-era
SHADY-ƎRA

wiccanash
— ᴘʀᴜᴇ