#VPNClient
Link
0 notes
Text
how to install softether vpn client on linux
🔒🌍✨ Obtén 3 Meses GRATIS de VPN - Acceso a Internet Seguro y Privado en Todo el Mundo! Haz Clic Aquí ✨🌍🔒
how to install softether vpn client on linux
Descarga SoftEther VPN Client Linux
SoftEther VPN Client es una herramienta popular que permite a los usuarios establecer conexiones VPN seguras en sus dispositivos. Para aquellos que utilizan sistemas operativos Linux, la descarga e instalación del SoftEther VPN Client es sencilla y ofrece una forma eficaz de proteger su privacidad en línea.
El proceso de descarga de SoftEther VPN Client para Linux comienza visitando el sitio web oficial del SoftEther Project. Una vez en la página de descargas, los usuarios pueden seleccionar la versión adecuada para Linux e iniciar la descarga del archivo de instalación.
Una vez completada la descarga, los usuarios pueden seguir las instrucciones de instalación proporcionadas en la documentación oficial del SoftEther VPN Client. El proceso de instalación es fácil de seguir y no requiere de conocimientos técnicos avanzados.
Una vez instalado, los usuarios pueden configurar su conexión VPN utilizando la interfaz intuitiva del SoftEther VPN Client. Esta herramienta les permitirá encriptar su tráfico de Internet y navegar de forma segura en redes públicas o privadas.
En resumen, la descarga del SoftEther VPN Client para Linux es una excelente opción para aquellos usuarios que buscan proteger su privacidad en línea y disfrutar de una conexión segura y estable. Si estás buscando una forma sencilla de establecer una conexión VPN en tu dispositivo Linux, el SoftEther VPN Client es una opción confiable y fácil de usar.
Instalación SoftEther VPN Client Linux
El SoftEther VPN Client es una herramienta versátil y potente que te permite conectarte de forma segura a través de una red virtual privada (VPN). En este artículo, te guiaré a través del proceso de instalación del SoftEther VPN Client en un sistema Linux.
Antes de comenzar con la instalación, es importante asegurarse de que tu sistema esté actualizado y tenga los paquetes necesarios para instalar el SoftEther VPN Client. Puedes hacer esto ejecutando los comandos de actualización del sistema en tu terminal.
Una vez que tu sistema esté actualizado, puedes descargar el paquete de instalación del SoftEther VPN Client desde el sitio web oficial. Descomprime el archivo descargado y abre la terminal en la carpeta donde se encuentra el archivo de instalación.
Para instalar el SoftEther VPN Client, ejecuta el script de instalación con privilegios de superusuario utilizando el siguiente comando:sudo ./vpnclient install
Sigue las instrucciones en la terminal para completar la instalación. Una vez finalizada la instalación, puedes configurar el SoftEther VPN Client para conectarte a un servidor VPN de tu elección.
En resumen, la instalación del SoftEther VPN Client en Linux es un proceso sencillo y directo que te permitirá disfrutar de una conexión segura y privada a través de una red VPN. ¡Protege tu privacidad en línea instalando el SoftEther VPN Client en tu sistema Linux hoy mismo!
Configuración SoftEther VPN Client Linux
El SoftEther VPN Client es una herramienta popular para establecer conexiones VPN en sistemas Linux. Configurar el SoftEther VPN Client en Linux puede resultar un proceso sencillo siguiendo algunos pasos básicos.
Para empezar, es importante descargar el archivo de instalación correspondiente a la versión de Linux que estés utilizando. Una vez descargado, puedes proceder con la instalación ejecutando el archivo descargado y siguiendo las instrucciones que aparecen en pantalla.
Después de completar la instalación, es necesario configurar la conexión VPN. Para ello, abre el SoftEther VPN Client y haz clic en la opción "Nuevo" para agregar una nueva conexión. Ingresa los detalles de la conexión VPN, como la dirección del servidor, el tipo de conexión y las credenciales de acceso.
Una vez configurada la conexión, puedes activarla haciendo clic en el botón de conexión. Si la configuración es correcta, el SoftEther VPN Client establecerá la conexión VPN y podrás comenzar a navegar de forma segura y privada.
Es importante recordar que la configuración del SoftEther VPN Client en Linux puede variar ligeramente dependiendo de la distribución que estés utilizando, pero en general, seguir los pasos mencionados anteriormente te permitirá establecer una conexión VPN de forma rápida y sencilla. ¡Protege tu privacidad en línea con SoftEther VPN Client en Linux!
Conexión SoftEther VPN Client Linux
La conexión SoftEther VPN Client en Linux es una opción popular para aquellos que buscan proteger su privacidad y seguridad en línea. SoftEther es un software de código abierto que permite a los usuarios crear una red privada virtual (VPN) de forma gratuita. En este artículo, exploraremos cómo configurar y usar SoftEther VPN Client en un sistema Linux.
Para empezar, es importante descargar e instalar el cliente SoftEther en su dispositivo Linux. Una vez instalado, podrá conectarse a servidores VPN en todo el mundo y encriptar su conexión a Internet. Esto es especialmente útil cuando se utiliza Wi-Fi público o se accede a información sensible en línea.
Para configurar la conexión en Linux, simplemente abra el cliente SoftEther y seleccione la opción "Connect". A continuación, introduzca la dirección del servidor al que desea conectarse, así como sus credenciales si es necesario. Una vez completado este paso, debería estar conectado de forma segura a la red VPN y su tráfico en línea estará encriptado.
Es fundamental recordar que una VPN no garantiza el anonimato completo en línea, pero puede ser una herramienta útil para proteger su privacidad y aumentar su seguridad en Internet. Si valora su privacidad en línea, considera la posibilidad de utilizar SoftEther VPN Client en Linux como una opción confiable y gratuita para proteger su información personal. ¡Manténgase seguro en línea con SoftEther VPN!
Utilización SoftEther VPN Client Linux
El SoftEther VPN Client es una herramienta versátil y poderosa que permite a los usuarios de Linux acceder a redes privadas virtuales de forma segura y eficiente. Con una interfaz amigable y una amplia gama de opciones de configuración, este software es una excelente opción para proteger la privacidad y la seguridad de la conexión a Internet en sistemas Linux.
Una de las principales ventajas del SoftEther VPN Client es su compatibilidad con una variedad de protocolos de VPN, lo que garantiza una conexión estable y segura en todo momento. Además, su capacidad para conectarse a múltiples servidores VPN simultáneamente brinda a los usuarios una mayor flexibilidad y libertad para elegir la ubicación y el rendimiento de la red.
La instalación y configuración del SoftEther VPN Client en Linux es sencilla y directa, lo que permite a los usuarios sin experiencia técnica disfrutar de sus beneficios sin complicaciones. Una vez instalado, los usuarios pueden establecer conexiones VPN de forma rápida y segura, protegiendo su información confidencial y navegando de forma anónima en la web.
En resumen, el SoftEther VPN Client es una herramienta indispensable para aquellos que buscan proteger su privacidad en Internet y garantizar una conexión segura en sistemas Linux. Con su facilidad de uso y su alto rendimiento, este software se ha convertido en una opción popular entre los usuarios de Linux que valoran la seguridad y la privacidad en línea.
0 notes
Text
how to install cisco vpn client on ubuntu 18.04
🔒🌍✨ Obtén 3 Meses GRATIS de VPN - Acceso a Internet Seguro y Privado en Todo el Mundo! Haz Clic Aquí ✨🌍🔒
how to install cisco vpn client on ubuntu 18.04
Instalación Cisco VPN Client Ubuntu 18.04
La instalación del cliente Cisco VPN en Ubuntu 18.04 puede ser un proceso importante para aquellos que necesitan acceder a una red privada de manera segura. Aunque Cisco VPN Client es un software popular en entornos empresariales, su configuración en Ubuntu puede presentar desafíos para algunos usuarios.
Para instalar Cisco VPN Client en Ubuntu 18.04, es recomendable seguir algunos pasos clave. En primer lugar, es fundamental contar con los privilegios de administrador para poder llevar a cabo la instalación. Además, se debe asegurar que el sistema esté actualizado antes de iniciar el proceso.
Uno de los métodos comunes para instalar Cisco VPN Client en Ubuntu 18.04 es mediante el uso de paquetes DEB. Estos paquetes se pueden descargar desde el sitio web oficial de Cisco y luego instalarlos en el sistema utilizando el comando dpkg en la terminal.
Es importante recordar que, una vez instalado, es necesario configurar el cliente Cisco VPN con la información proporcionada por el administrador de red. Esto incluye la dirección del servidor VPN, las credenciales de inicio de sesión y cualquier otro detalle relevante para establecer una conexión segura.
En resumen, la instalación del cliente Cisco VPN en Ubuntu 18.04 puede requerir ciertos pasos técnicos, pero con la debida diligencia y atención a las instrucciones, los usuarios pueden disfrutar de una conexión segura a redes privadas desde sus dispositivos con este sistema operativo.
Pasos instalar Cisco VPN Client en Ubuntu 18.04
Para instalar el cliente Cisco VPN en un sistema Ubuntu 18.04, es necesario seguir varios pasos para asegurar una correcta configuración y conexión a la red privada virtual. A continuación, se detallan los pasos necesarios para llevar a cabo la instalación:
Lo primero que se debe hacer es descargar el paquete de instalación del cliente Cisco VPN desde el sitio web oficial de Cisco. Es fundamental seleccionar la versión adecuada para Ubuntu 18.04.
Una vez descargado el archivo, se debe abrir una terminal en Ubuntu e ingresar el directorio donde se encuentra el paquete descargado.
A continuación, se debe descomprimir el archivo utilizando el comando 'tar -zxvf nombre_del_archivo.tar.gz' y luego acceder al directorio generado.
Para proceder con la instalación, se debe ejecutar el comando './vpn_install.sh' y seguir las instrucciones que aparezcan en pantalla.
Una vez completada la instalación, se puede ejecutar el cliente Cisco VPN utilizando el comando 'vpnclient'. Se abrirá una interfaz gráfica donde se podrá configurar la conexión VPN.
Para finalizar, se debe ingresar la información de configuración provista por el administrador de la red VPN, como la dirección del servidor, nombre de usuario y contraseña.
Siguiendo estos pasos, se podrá instalar y configurar el cliente Cisco VPN en Ubuntu 18.04 de manera adecuada, permitiendo establecer conexiones seguras a través de redes privadas virtuales.
Tutorial Cisco VPN Client Ubuntu 18.04
El tutorial del Cliente VPN de Cisco para Ubuntu 18.04 es un recurso invaluable para aquellos que desean configurar una conexión segura a través de una red privada virtual en su sistema operativo basado en Linux. Al seguir estos pasos detallados, podrás disfrutar de una navegación segura y protegida en línea.
Para comenzar, es importante descargar el paquete necesario desde el sitio web oficial de Cisco. Una vez descargado, procede a instalar el cliente VPN en tu Ubuntu 18.04 siguiendo las instrucciones proporcionadas en el tutorial. Es crucial prestar atención a cada paso para garantizar una instalación exitosa.
Después de completar la instalación, deberás configurar el cliente VPN con la información de tu red privada virtual, incluyendo la dirección del servidor y las credenciales de inicio de sesión. Asegúrate de ingresar estos datos con precisión para evitar problemas de conexión.
Una vez configurado, podrás conectarte a la red privada virtual de manera segura y acceder a los recursos compartidos de forma remota. Recuerda seguir las mejores prácticas de seguridad en línea al utilizar una VPN para proteger tu privacidad y datos en todo momento.
En resumen, el tutorial del Cliente VPN de Cisco para Ubuntu 18.04 es una guía paso a paso fundamental para aquellos que buscan establecer una conexión segura a través de una red privada virtual en su sistema Linux. Sigue cada paso detenidamente y disfruta de una navegación segura y protegida en línea.
Requisitos Cisco VPN Client Ubuntu 18.04
Para instalar y utilizar Cisco VPN Client en Ubuntu 18.04, es necesario seguir una serie de requisitos y pasos específicos. En primer lugar, se necesita tener privilegios de superusuario en el sistema para poder instalar aplicaciones y realizar configuraciones.
El Cisco VPN Client es una herramienta utilizada para establecer conexiones seguras a redes privadas a través de Internet. Para ello, es imprescindible contar con el paquete de software adecuado y seguir las instrucciones de instalación detalladas.
Es importante tener en cuenta que el Cisco VPN Client no es compatible de forma nativa con Ubuntu 18.04, por lo que se requiere realizar algunos ajustes adicionales. Una opción común es utilizar la herramienta de código abierto OpenConnect, que es compatible con la mayoría de los sistemas operativos basados en Linux, incluido Ubuntu.
Para instalar OpenConnect en Ubuntu 18.04, se puede utilizar el gestor de paquetes apt-get. Una vez instalado, se pueden configurar las conexiones VPN de manera sencilla utilizando la línea de comandos o una interfaz gráfica, según las preferencias del usuario.
En resumen, si se desean utilizar conexiones VPN con Cisco en Ubuntu 18.04, es necesario cumplir con los requisitos de software y seguir las instrucciones adecuadas para configurar la conexión de manera segura y eficiente.
Configuración Cisco VPN Client Ubuntu 18.04
Al configurar Cisco VPN Client en Ubuntu 18.04, es importante seguir unos sencillos pasos para garantizar una conexión segura y estable. En primer lugar, es necesario descargar el archivo de instalación del cliente VPN desde el sitio web oficial de Cisco. Una vez descargado, se debe instalar el paquete haciendo doble clic en el archivo o mediante el comando correspondiente en la terminal.
Después de la instalación, se debe ejecutar el cliente VPN e ingresar la dirección del servidor al que se desea conectarse, así como las credenciales de autenticación proporcionadas por el administrador de la red. Es importante seguir las indicaciones para establecer correctamente la conexión VPN y asegurarse de que los ajustes de seguridad sean los adecuados para proteger la información transmitida.
Es recomendable configurar la conexión VPN para que se inicie automáticamente al encender el sistema, lo que garantizará una conexión segura en todo momento. Además, es aconsejable mantener actualizado el cliente VPN y revisar periódicamente la configuración para asegurarse de que cumpla con los requisitos de seguridad establecidos.
En resumen, la configuración del cliente VPN de Cisco en Ubuntu 18.04 es fundamental para garantizar una conexión segura y confiable a través de una red privada virtual. Siguiendo los pasos adecuados y manteniendo la configuración actualizada, se puede disfrutar de todos los beneficios que ofrece esta tecnología en términos de privacidad y seguridad en la comunicación en línea.
0 notes
Text
Setting up mguard vpn

#SETTING UP MGUARD VPN WINDOWS#
This machine also has to be connected to a VPN connection. If it is not, then please continue on with the other troubleshooting ideas posted.I have a machine that has a LAN network connection, which is used for internet access. That isn't VMWare's fault.Īgain, this all assumes that Linkideo is using PPtP. But the hotspot's firewall isn't capable of PPtP passthrough. Think of it this way, from your posts I'm getting the impression that you're on a laptop and want to use this VPN when you're away from your home. But that is the firewall having to create a workaround for PPtP not being compatile with NAT. You were fortunate that the Linksys box you have does support PPtP. Many firewalls do not allow for PPtP passthrough. While you may still think this is a bug, IMO, it is not a bug with VMWare's NAT implementation. Since the point of Linkideo is security, their use of PPtP would be a huge issue, at least for me. (More specifically, you can't enter a DNS name, you must enter an IP address so if you have dynamic, you constantly have to reconfigure the VPN client.) Also, many do not feel that PPtP is fully secure. I suspect not, because PPtP is ridiculously simply to setup, while Microsoft's implementation of L2TP IPSec does not work with dynamic IP.
#SETTING UP MGUARD VPN WINDOWS#
See if Linkideo also has settings for L2TP IPSec, which is also directly supported in the Windows VPN client. If you are using PPtP, then theres not much you can do. While in bridged mode, if your VPN still connects, you know that Linkideo is using PPtP. You can confirm if you're using PPtP by changing the VPN properties networking tab from Automatic to PPtP VPN. (In Linksys boxes, there's a selection for "PPtP Passthrough." I have only used PPtP for a few clients where high security is not an issue and the client doesn't travel so there's no need to worry about firewalls not under our control. A firewall using NAT must specifically allow for PPtP. It also requires 2 sessions, according to this Wiki article. If that is the case, then the reason why this particular VPN will not work through NAT is because PPtP VPN uses port 47 of the GRE protocol. Since the VPN client is supposed to be the one that's included with Windows, I assumed that it would use the PPtP protocol rather than L2TP IPsec. I did some testing on my own, based on some assumptions. (They only started in 2007?! Good luck with customer support.) Perhaps someone else who uses their service will see this thread. (Or with Linkideo's configuration on their end.) Their website has very little info if you're not logged in so I can't tell you much more. In general, I would say that you should contact Linkideo, since the issue IMHO is with your configuration of the VPN. It's been a while, but i have used Cisco's VPN in a virtual machine (NATed) and with consumer firewalls using NAT so again, VMWare's virtual machines do support and work with NAT. I can only guess that Linkideo is configured to not allow this or their instruction to you on configuring your end somehow doesn't work with NAT. I have used the Windows XP and 2003 VPN using both PPtP and IPSec with consumer grade hardware firewalls on both sides. It is up to the VPN client and VPN endpoint server to be able to traverse NAT. As you said, VMware workstation only can support VPN while it in bridged mode? and only way is to adjust VPN Client now?Īnd is ther any other way beside change VPNClient? if the answer is no now, will some in the future? because while I google, I can find under some NAT VPN can't connect but under some other NAT VPN can work, and the same VPN Client is the one shipped with Windows, then seems the whole work can do at the NAT.
0 notes
Text
Setting up mguard vpn

SETTING UP MGUARD VPN TRIAL
SETTING UP MGUARD VPN WINDOWS
SETTING UP MGUARD VPN TRIAL
Download a free 30-days trial version of the mGuard Secure VPN Client // version 10.x.
If it is not, then please continue on with the other troubleshooting ideas posted. That isn't VMWare's fault.Īgain, this all assumes that Linkideo is using PPtP. But the hotspot's firewall isn't capable of PPtP passthrough. Think of it this way, from your posts I'm getting the impression that you're on a laptop and want to use this VPN when you're away from your home. But that is the firewall having to create a workaround for PPtP not being compatile with NAT. You were fortunate that the Linksys box you have does support PPtP. Many firewalls do not allow for PPtP passthrough. While you may still think this is a bug, IMO, it is not a bug with VMWare's NAT implementation. Since the point of Linkideo is security, their use of PPtP would be a huge issue, at least for me. (More specifically, you can't enter a DNS name, you must enter an IP address so if you have dynamic, you constantly have to reconfigure the VPN client.) Also, many do not feel that PPtP is fully secure. I suspect not, because PPtP is ridiculously simply to setup, while Microsoft's implementation of L2TP IPSec does not work with dynamic IP.
SETTING UP MGUARD VPN WINDOWS
See if Linkideo also has settings for L2TP IPSec, which is also directly supported in the Windows VPN client. If you are using PPtP, then theres not much you can do. While in bridged mode, if your VPN still connects, you know that Linkideo is using PPtP. You can confirm if you're using PPtP by changing the VPN properties networking tab from Automatic to PPtP VPN. (In Linksys boxes, there's a selection for "PPtP Passthrough." I have only used PPtP for a few clients where high security is not an issue and the client doesn't travel so there's no need to worry about firewalls not under our control. A firewall using NAT must specifically allow for PPtP. It also requires 2 sessions, according to this Wiki article. If that is the case, then the reason why this particular VPN will not work through NAT is because PPtP VPN uses port 47 of the GRE protocol. Since the VPN client is supposed to be the one that's included with Windows, I assumed that it would use the PPtP protocol rather than L2TP IPsec. I did some testing on my own, based on some assumptions. (They only started in 2007?! Good luck with customer support.) Perhaps someone else who uses their service will see this thread. (Or with Linkideo's configuration on their end.) Their website has very little info if you're not logged in so I can't tell you much more. In general, I would say that you should contact Linkideo, since the issue IMHO is with your configuration of the VPN. It's been a while, but i have used Cisco's VPN in a virtual machine (NATed) and with consumer firewalls using NAT so again, VMWare's virtual machines do support and work with NAT. I can only guess that Linkideo is configured to not allow this or their instruction to you on configuring your end somehow doesn't work with NAT. I have used the Windows XP and 2003 VPN using both PPtP and IPSec with consumer grade hardware firewalls on both sides. It is up to the VPN client and VPN endpoint server to be able to traverse NAT. As you said, VMware workstation only can support VPN while it in bridged mode? and only way is to adjust VPN Client now?Īnd is ther any other way beside change VPNClient? if the answer is no now, will some in the future? because while I google, I can find under some NAT VPN can't connect but under some other NAT VPN can work, and the same VPN Client is the one shipped with Windows, then seems the whole work can do at the NAT.
0 notes
Photo

Ngobrol Santai di Telegram - https://t.me/GNUWeeb - https://t.me/MalingIT 12 Februari 2022 Tema: https://github.com/TeaInside/teavpn2 . . . . . #vpn #teavpn #teainside #dev #clanguage #indonesia #malingit #programming #networking #networkengineer #vpnserver #vpnclient https://www.instagram.com/p/CZ1VNZ1plej/?utm_medium=tumblr
#vpn#teavpn#teainside#dev#clanguage#indonesia#malingit#programming#networking#networkengineer#vpnserver#vpnclient
0 notes
Photo

Streamline connectivity and improve efficiency for remote work using Azure Virtual WAN Today, we see a huge shift to remote work due to the global pandemic. Organizations around the world need to enable more of their employees to work remotely. We are working to address common infrastructure challenges businesses face when helping remote employees stay connected at scale. A common operational challenge is to seamlessly connect remote users to on-premises resources. Read how Azure Virtual WAN provide unified approach to solve this challenge : http://ow.ly/FaHD50AhHvr Looking to leverage azure services for your organizations ? reach out to [email protected] #Azure #Azurewan #VPN #Firewall #VPNClient #FourD https://www.instagram.com/p/CCFkLNiAkVP/?igshid=10rwej6mhzfk2
0 notes
Text
Cisco Vpn Client 4.9 01 Mac Download

Cisco Vpn Client 4 9 01 Mac Download And Azure Client Vpn Setup Reviews: Best Pr. Windows 10/8.1/8/7/Vista/XP x86 (32 Bit) Cisco VPN Client vpnclient-win-msi-5.0.07.0410-k9 MAC OSX vpnclient-darwin-4.9.01.0100-universal-k9 Linux vpnclient-linux-x8664-4.8.02.0030-k9. Cisco Vpn Client 4 9 01 Mac Download And Download Vpn Untuk Pc. Description Additional Information Reviews(1) Additional Information Reviews(1).
Cisco Vpn Client Mac Download
Cisco Vpn For Mac
KB ID 0001098
Problem
The Cisco VPN client software (CVPN-CL-IPSEC-ALL) is no longer available from Cisco.
Milestone
Definition
Date
End-of-Llfe Announcement DateThe date the document that announces the end of sale and end of life of a product is distributed to the general public.July 29, 2011End-of-Availability DateThe last date to download the product from Cisco.com. The product is no longer for download after this date.July 29, 2014End of SW Maintenance Releases Date: The last date that Cisco Engineering may release any final software maintenance releases or bug fixes. After this date, Cisco Engineering will no longer develop, repair, maintain, or test the product software.July 30, 2012Last Date of Support: The last date to receive service and support for the product. After this date, all support services for the product are unavailable, and the product becomes obsolete.July 29, 2014
Solution

Download The latest versions below;
Windows 10/8.1/8/7/Vista x64 Bit Cisco VPN Clientvpnclient-winx64-msi-5.0.07.0440-k9
Windows 10/8.1/8/7/Vista/XP x86 (32 Bit) Cisco VPN Client vpnclient-win-msi-5.0.07.0410-k9
MAC OSXvpnclient-darwin-4.9.01.0100-universal-k9
Linuxvpnclient-linux-x86_64-4.8.02.0030-k9
Related Articles, References, Credits, or External Links
NA
KB ID 0001098
Problem
The Cisco VPN client software (CVPN-CL-IPSEC-ALL) is no longer available from Cisco.
Milestone
Definition
Date
End-of-Llfe Announcement DateThe date the document that announces the end of sale and end of life of a product is distributed to the general public.July 29, 2011End-of-Availability DateThe last date to download the product from Cisco.com. The product is no longer for download after this date.July 29, 2014End of SW Maintenance Releases Date: The last date that Cisco Engineering may release any final software maintenance releases or bug fixes. After this date, Cisco Engineering will no longer develop, repair, maintain, or test the product software.July 30, 2012Last Date of Support: The last date to receive service and support for the product. After this date, all support services for the product are unavailable, and the product becomes obsolete.July 29, 2014
Solution
Download The latest versions below;
Windows 10/8.1/8/7/Vista x64 Bit Cisco VPN Clientvpnclient-winx64-msi-5.0.07.0440-k9
Cisco Vpn Client Mac Download
Windows 10/8.1/8/7/Vista/XP x86 (32 Bit) Cisco VPN Client vpnclient-win-msi-5.0.07.0410-k9
MAC OSXvpnclient-darwin-4.9.01.0100-universal-k9
Linuxvpnclient-linux-x86_64-4.8.02.0030-k9
Related Articles, References, Credits, or External Links
Cisco Vpn For Mac
NA
1 note
·
View note
Text
Vpnclient For Mac

Best VPN service for Mac – private internet access for your online security
Vpn Client For Mac Catalina
Vpn Client For Macos
Vpn Client For Mac
7 days Free Unlimited VPN
HMA VPN for macOS is fast and easy to use Pick Lightning Connect to immediately get the fastest server. Choose one of 290 + locations around the world. Browse, stream, shop, and live your online life privately and securely.
You can configure SSL VPN for Mac OS X using Tunnelblick VPN client by following the steps below. Download and install Tunnelblick Client Download the latest version Tunnelblick for MAC from Put the file in the Applications folder and Install the file Tunnelblick.dmg file.
Get the best VPN connection for your online privacy and protection
The fastest secure access to the internet on Mac. MacOS Sierra 10.12 or later. Use with no hassle. Easy to set up, easy to use. Benefit from a simple yet powerful VPN app that works smoothly with your Mac. Go private instantly. Seize the power of a single click – hit Quick Connect and get connected to the best. PrimoVPN is the first low cost VPN and Incredibly user-friendly client for Mac that is easy to use and reliably establishes a secure network connection. Helps you get out of the trouble all Mac VPN users ran into after upgrading to Mac OS Sierra version - it just runs PPTP protocol.
Keep your personal information safe from identity thieves with VPN Client.
Protect your internet connection with VPN tunnel and get access to restricted internet content globally.
Get online, freedom, Security and Anonymity with Mac VPN Client
Unblock geo-located resources
Avoid identity thieves
Secure your internet connection while using public WiFi
View how websites appear at different locations
Vpn Client For Mac Catalina
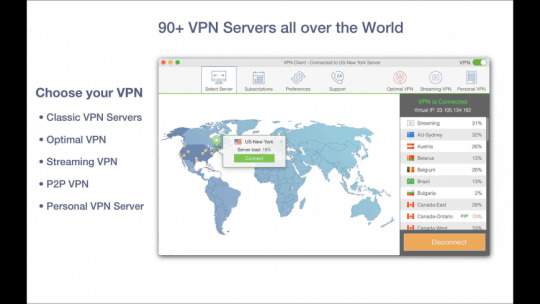
Why VPN Client Application?
VPN Server Locations
Our VPN servers are located in 60+ location over the world
Fastest VPN speed and completely secure servers
VPN unlimited bandwidth
Select any of 90+ VPN servers
A number of available servers are growing steadily
Australia
Brazil
Canada
Croatia
Vpn Client For Macos
Spain
Finland
Vpn Client For Mac
Germany
India
Israel
Japan
Sweden
Poland
Ukraine
0 notes
Photo

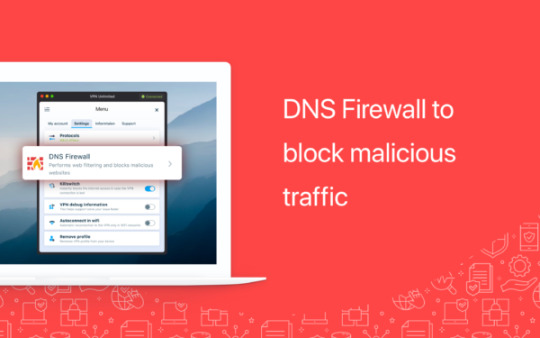
A Review Of KeepSolid DNS Firewall – Adding More Privacy To VPN Connections #dns #dnsfirewall #vpn #vpnclient #hacking #hacker #cybersecurity #hack #ethicalhacking #hacknews
0 notes
Photo
A Review Of KeepSolid DNS Firewall – Adding More Privacy To VPN Connections | TheHackerNews.Co #dns #dnsfirewall #vpn #vpnclient #hacker #hacking #cybersecurity #hackers #linux #ethicalhacking #programming #security #thehackernews
0 notes
Photo

A Review Of KeepSolid DNS Firewall – Adding More Privacy To VPN Connections | MrHacker.Co #dns #dnsfirewall #vpn #vpnclient #hacker #hacking #cybersecurity #hackers #linux #ethicalhacking #programming #security #mrhacker
0 notes
Photo
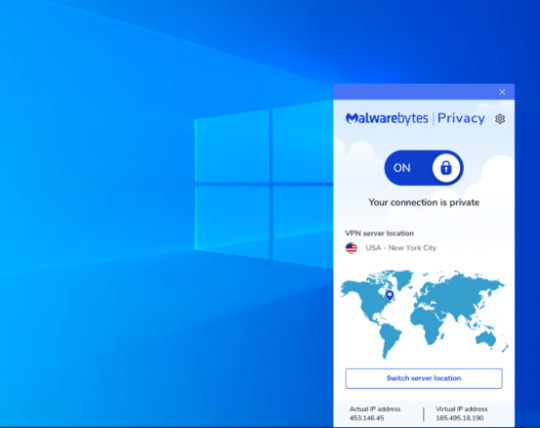
Malwarebytes Launched ‘Malwarebytes Privacy’ VPN For Windows #malwarebytes #malwarebytesprivacy #malwarebytesprivacyvpn #malwarebytesvpn #malwarebyteswindowsvpn #nologsvpn #vpn #vpnapps #vpnclient #vpnprotocol #vpnservice #windowsvpn #hacking #hacker #cybersecurity #hack #ethicalhacking #hacknews
0 notes
Photo

Google Removed Shady Android VPN App That Allowed MiTM Attacks #android #androidapp #androidappmalware #androidapplication #androidapps #androidappscontainingmalware #androiddevice #androiddevicesvulnerable #androidmalware #androidphone #androidsmartphone #androidvpn #androidvpnapps #appscontainingmalware #arefreevpnsgood #arevpnssecure #canvpnsbeexploited #eavesdroppingvpns #evadesecurity #freevpnbad #freevpndataleak #freevpnsecurity #google #googleplay #googleplaystore #googleplaystoreapprejections #hackandroidphone #playstore #playstoremaliciousapps #vpn #vpnapps #vpnclient #vpnclients #vpnexploits #vpnfalsesecurity #vpnnotsecure #vpnsecurityflaws #vpnvulnerabilities #hacking #hacker #cybersecurity #hack #ethicalhacking #hacknews
0 notes
Photo

Vulnerabilities In Top Free Android VPN Apps Risk Over 120 Million Users #android #androidapp #androidappmalware #androidapplication #androidapps #androidappscontainingmalware #androiddevice #androiddevicesvulnerable #androidmalware #androidphone #androidsmartphone #androidvpn #androidvpnapps #appscontainingmalware #arefreevpnsgood #arevpnssecure #canvpnsbeexploited #eavesdroppingvpns #evadesecurity #fakeandroidapp #fakeapp #fakeapplication #freevpnbad #freevpndataleak #freevpnsecurity #google #googleplay #googleplaystore #googleplaystoreapprejections #hackandroidphone #playstore #playstoremaliciousapps #vpn #vpnapps #vpnclient #vpnclients #vpnexploits #vpnfalsesecurity #vpnnotsecure #vpnsecurityflaws #vpnvulnerabilities #hacking #hacker #cybersecurity #hack #ethicalhacking #hacknews
0 notes
Photo

UK Spy Agency Alerts Users Of Numerous VPN Vulnerabilities Under Exploit #bug #flaw #fortinet #gchq #hackingavpn #ncsc #ncscreport #paloaltonetworks #vpn #vpnclient #vpnexploit #vpnexploits #vpnprotocol #vpnsecurity #vpnsecurityflaws #vpnvulnerabilities #vulnerability #hacking #hacker #cybersecurity #hack #ethicalhacking #hacknews
0 notes
Last Seen Blogs

locustheologicus
Locus Theologicus

anime-captured
Anime Screen Captures


graceandgrit
Grace and Grit

littlejotuncrybaby
Untitled