#Faux shirring tutorial
Text
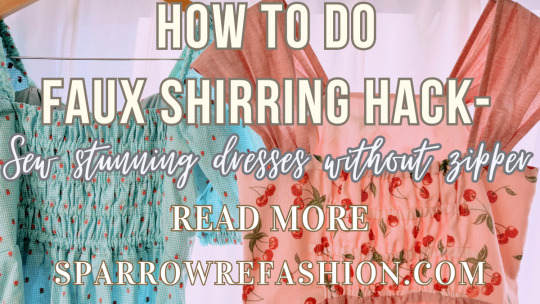
Faux Shirring Hack: How to Create Stunning Shirred Dresses with Just an Elastic Band
In this post, you will learn faux shirring hack to create dresses without the need of a zipper.
Have you ever admired those shirred dresses that look so chic and comfortable, but thought they were too complicated or expensive to make? Well, you’re in luck, because in this faux shirring tutorial, I will show you how to create your own shirred dresses with just an elastic band and some…
View On WordPress
#Elastic band#Faux shirring#Faux shirring dress#Faux shirring fabric#Faux shirring hack#Faux shirring sewing machine#Faux shirring technique#Faux shirring tutorial#How to do faux shirring#Sewing hack#sewing tutorial
23 notes
·
View notes
Note
hi! me again. cut/sew 015 has me in the trenches. if you don't mind, do you think you could look at the instructions and tell me if they're setting me up for failure? specifically steps 9, 10, and 18. i've tried pinning the shirring to the bodice in every way i can & it either doesn't turn out the way that step 18 indicates OR the straps come out twisted. i'm not sure if i did something wrong at steps 9 and 10 (i've triple and quadruple checked and don't think i have) or if it's a misprint. ty!
So, I have the instructions here, but the instructions do not specify notches, so I'm doing a little bit of guessing here.
Quick note from someone who's been doing amateur lolita sewing tutorials for almost 9 years now: when you make a design that will be lined, write the instructions such that you treat the lining as if it's a different fabric from the face. Even if the end user decides to line the garment with its self, it will help people understand what is going on. This is because a lining in the mirror version of the face fabric. When you have four pieces that are identical, except that some of them are mirrored, things get very confusing very quickly.
Anyway, for everyone new to the party:

Cut/Sew dot Co is an indie pattern brand. They're basically one incredibly dedicated woman who designs, patterns, cams, builds, tests, writes instructions for, markets, and distributes the patterns. She's made nearly 100 different patterns, as far as my counting goes. Their goal is to make alternative j-fashion inspired patterns available for everyone, especially beginners who don't have a lot of technical sewing experience.
They're relevant to this blog because 1) they make patterns that they claim are lolita fashion patterns and 2) one incident in 2020 where the designer had a go at the lolita fashion community because we said her designs weren't actually lolita and 3) someone specifically asked me about this pattern.
I've previously made one of her patterns, and the main issue that I had with it was that none of the images of the pattern actually properly represent what the pattern will actually make. My other issue is that the patterns seem to have 1/4" seam allowance, which is a really bad seam allowance to use when you're sewing a garment that needs to be adjusted and have techniques like gathering and zipper application. 1/4" seams are usually used in quilt piecing, where they're being used on stable plainweave cotton and not on curved, load-bearing seams.
Anyway, CUT/SEW 15: Lolita JSK appears to be a self-lined JSK with a 1/4 back shirring panel and a 12" invisible side zipper closure. It has a front faux-lacing panel, and princess seams with trim along the princess line that extends all the way to the hem. The hem has two wide ruffles.
I'm not here to critique this pattern. That will be later.
So the questioner here has kindly provided me with the instructions, and here's my best ability to help them. The question is that steps 9 and 10 explain how to assemble the bodice, which is then set aside until step 18. When we pick the bodice back up in step 18, it feels like it has somehow changed and does not line up with step 10.
I am posting the instructions here in the hopes that my input will help other people who bought this pattern use it effectively. These instructions and images are posted to help cut/sew's customer base use their product without frustration.
STEP 9:
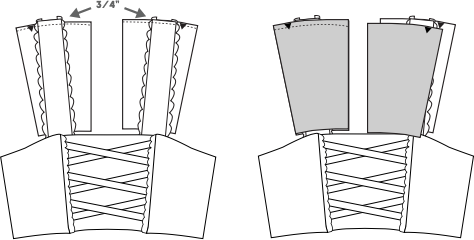
9. Place the sewn bodice front face up in your work space, making sure the dress straps are laying flat. Take a bodice side back piece and lay it under one of the dress straps so one edge of the strap just meets the notch along the top edge of the bodice side back. With the angle of the straps, the other edge of the strap should hang off past the bodice side back by about 3/4” - that’s okay! Pin this strap in place right at the notch, then take it to your sewing machine and baste the strap in place, sewing 1/4“ away from the edge..
Lay the sewn bodice front face up in your work space, then take another bodice side back piece and lay it over top, face down. Match it to one of the basted bodice side back pieces on all sides, then pin the two together. Take the pinned bodice to your sewing machine and stitch the two together along the top, sewing 1/2” away from the edge. Pull out the basting stitch underneath, then press out this seam.
Repeat this entire step with the second set of bodice side back pieces on the opposite strap. When finished, flip both bodice side back pieces out so they’re face up, then press the seams you’ve just sewn flat.
Okay so this makes plenty of sense to me, once you remember that this is self-lined. This means that there are four side-back pieces in play. We're going to call that left-sideback-face, left-sideback-lining, right-sideback-face, and right-sideback-lining. LSF, LSL, RSF, and RSL, if you will.
The image up there shows the in-progress picture, but here's what I think it'll look like when you've finished everything, and you're at " flip both bodice side back pieces out so they’re face up, then press the seams you’ve just sewn flat.":

The important thing to note is that, from my understanding of these images, you will have the straps attached with the short end (where is says SA in my drawing) facing the center.
For the record, this is where commercial patterns have notches. You notch the side seams on all patterns so that you don't get confused about what pieces connect to the side seams. Notches make patterns easier.
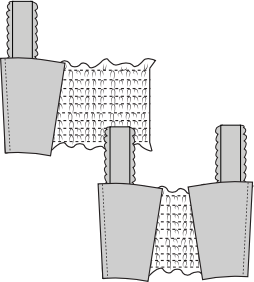
10. Place the shirred bodice center back face up in your work space. Lay a sewn bodice side back piece over top, face down, and match the edge with the notch and strap to one raw edge of the bodice center back. Pin the two together along this side, then take the pinned bodice to your sewing machine and stitch, sewing 1” away from the edge.
Repeat this step on the opposite side with the second bodice side back piece to create one continuous bodice.
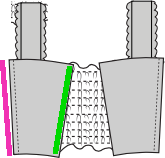
So here is where the instruction diagrams confused me a little bit. I added some color to clarify things: The PINK line is the back sewn to the shirring panel. The GREEN line is not sewn to anything.
When this step is over, and we lay the complete bodice out, it will look like this:
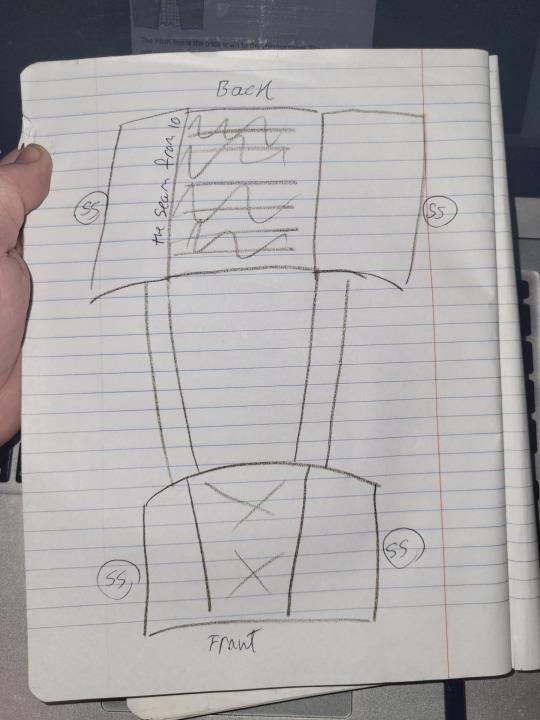
If this is what your bodice looks like at step 10, when we pick back up in step 18:

18. Place the bodice front face up in your work space. Lay the bodice back over top, face down, and match the two together on the right side. Pin them at this seam, then sew both together by stitching 1” away from the edge. Trim the raw seam with your pinking scissors, then press open this seam.
Note that you're only going to sew one side seam here, because the other one will have the zipper installed. We can't actually lay the piece flat anymore, but if we could magically lengthen one of the straps so that it was suuuper long, it'd look like this:

I think your part is getting twisted because that image up there that I had to add the green/pink line on isn't very clear about what side is being sewn. If you look at that and sew the sides that LOOK like they're lined up in the picture, you'll sew your side backs backward.
I just want to emphasize that THIS is what notches are for. Notches are a means of communication between the pattern developer and the user. Placing your standard one notch on your side seams will allow the person who uses the pattern to know for sure what pieces are being connected to what pieces, and where those should be. The decision to not notch the common things (back and front, side seams, sleeve holes and sleeve caps) is just something that makes no sense to me.
While not directly asked, I am also VERY confused about the instructions for placing an invisible zipper in this dress.
I really, really want to like cut/sew as a company. Their mentality is in line with my own: make things easy for beginners, and make the environment they're in accepting and supportive, and people will be able to build things and have fun. I regularly have to remind myself that just because something didn't get done my way, it doesn't mean it wasn't done effectively. Cut/Sew has put out something like 100 patterns, which were all the work of one incredibly dedicated individual. My general complaints with the company have been with social media presence and marketing, as well as not having clear images of the garments and/or technically usable fashion flats. My other beef that I had with them, the 1/4" seam allowance, seems to be resolved in this pattern. It looks like they've gone up to 1/2".
If there's enough demand, I can buy this pattern, make it, and provide a technically accurate flat as well as complete images of the garment. Just let me know if you want to see that and then get ready to wait possibly literal years until I acutally get it done.
Hope this helps somehow. G'night.
29 notes
·
View notes
Text
CUTSEW 015 // Lolita JSK Pattern Review - Bodice Section
Crisscross Lacing
You may have noticed that I did not add the crisscross lacing on the bodice, like in the pattern pictures.
ISSUE: This is because I think it will look bad.
This is totally subjective, but I just think that the distance (from princess seam to princess seam) is much too wide. I’m sure it can be done well (Innocent World's Rococo Bustle JSK, AP's Antique Rose OP), I just don’t think it would be the case here.
Examples of typical distance: AP Classical Princess JSK, AP Assorted Cookie JSK, AP Creamy Scallop JSK, etc.
It’s faux lacing, the ribbons are sewn directly into the seams, which isn’t inherently negative or anything, but just means that it isn’t removable.
So, without it, the bodice is incredibly plain. I… don’t really know what I want to do for the center yet. I'm thinking I'll go for the fake button up style center (ex. SoufSong's SRH JSK, AP Dream Fantasy Special Set JSK).
Tip: If you do omit the lacing, make the lace on the bodice seams face outwards. It faces inwards here to make the ribbon lacing look more proper (Ex. AP's Lovely Organdy OP). So if there isn’t any ribbon lacing, the inward lace will look...unorthodox, I suppose. Because most Lolita dresses have their bodice-seam lace face outwards.
Bodice Straps
The straps are atypically (I think?) wide (2.5 in/6.35cm), which is interesting because most straps on mainstream Lolita JSKs are on the thinner side. (The straps on my SoufSong SRH JSK are 1 in/2.54cm wide.)
One example of a wide strap JSK I've seen is Metamorphose's Jewel Butterfly High Waist Drape JSK.
It’s unusual, but it’s not necessarily a bad thing. In fact, I kind of do like how it looks. That was just something I wanted to bring up.
The straps are not adjustable, they're sewn in, which leads me to ->ISSUE: There are marks for where the straps are sewn in in the bodice, in the instructions (obviously), but positioning is really just a total guessing game. If you don’t angle it correctly, the straps will wrinkle weirdly when you wear it and will also feel really, really awkward on your shoulders, like they’re floating or are about to slip off. good luck I guess
ISSUE(?): The instructions say that if they're too long, to just cut out a chunk and then sew it together again which is???????
And if they're too short to cut it in half and then sew in an extra strip???

I...suppose? The provided strap length was fine for me, so I didn't have to do something like this. But if I did, it's not like I'd have a solution to it other than what they're suggesting, but...it seems like a rather undesirable outcome to say the least.
I know how I could make them adjustable in theory (Buttonholes on the ends of the straps instead of sewing them in, and buttons on the inside of the dress) but not too sure in practice here because these straps are so wide. Theory: Maybe use larger buttons if you want to try?
Waist Ties
The ends are in the shape of [using scissors to cut a piece of ribbon at a diagonal angle]. Simple, but cute.
ISSUE: The waist ties are sewn directly into the bodice. This is a problem for two reasons.
1) Many people don’t like waist ties. They’re difficult to tie, the bow pokes into your back when you sit in a car, you can’t use waist ties and an apron at the same time, etc.
2) It was insanely difficult to get the zipper up past the area where the waist tie was sewn in. It’s already difficult enough on normal dresses to get the zipper up past the border where the skirt and bodice meet.
There aren’t many tutorials specifically about making detachable waist ties, but I learned how to do so on my own.
(I can make a tutorial if enough people ask and if I feel motivated enough).
Shirring Panel
Oh god the shirring panel.
Most mainstream Lolita shirring panels use the elastic casing/channel technique.
ISSUE: This pattern uses the elastic thread technique, where you wind up elastic thread in your bobbin.
Pros: it’s kind of cute looking I guess.
Cons: it’s not much cuter than the standard elastic casing technique, and I found the experience REALLY REALLY HARD AND THE PANEL NOT PARTICULARLY EFFECTIVE. This reviewer had a hard time with it too [X].
Yeah. This isn't something you can skip, so if you can't do it, you can't complete the dress.
Tip: If you have a Brother machine like I do and need to use the elastic thread technique for whatever reason, a YouTube video I found says you have to take out the thing you put the bobbin in and tighten the green screw carefully. But like, go find actual instructions, don’t just do that without proper context please.
Tip: Don’t forget to stretch out the panel while you’re sewing the bodice to the skirt, or else the skirt won’t also stretch and you won’t be able to fit inside because the waist of the dress won't move.
Tip: If you succeed at this and finish the dress and are able to put it on, measure the width of the panel when you are wearing the dress (it will be stretched over your body, and longer than it normally is, not-on-person). Should you choose to make another dress and decide to try making it with an elastic channel panel instead, that would be the length of the elastic you would use.
Tip: This pattern doesn’t include instructions for corset lacing over the shirring panel on the back. This isn’t a huge loss because as cute as it looks, it is also impractical as all hell. I do not recommend adding this feature to your dress, but it’s something to consider if you wanted to, I guess :/
0 notes
Photo

The other day I needed a sewing “win” and had the idea to hack the #antheablouse so it has a scooped neckline (also cut the front on the fold to eliminate the button placket). I also added 2” of extra width at the front and back so I could gather it at the neckline, making it a fuller blouse (you wouldn’t need to do this, but I like how this looks). I attached a neckline ruffle with narrow bias tape as well as adding a faux necktie (although as this neckline is quite big I wish I had made the ties more functional so I could cinch it in more). I cut the sleeves straight at the hem and narrowly hemmed it (turning up 1/8” pressing, then again 1/8”). I sewed two rows of elastic shirring about 1” from the sleeve hem to create the cuff and ruffle. But the shirring didn’t give a tight enough cuff so I gently pulled the elastic a bit tighter. I then knotted the threads and sewed a French seam. For the puffed sleeves I decided to sew basting stitches higher up the sleeve so instead of having the gathers all around the armscye, they are more concentrated at the shoulder. I also pressed the sleeve seam towards the sleeve (unlike the instructions tell you to press away from the sleeve) so it gives a puffier puff! It’s fun and I love how it turned out! Anyway, I know this isn’t exactly a tutorial but I haven’t had the time or energy to write one up yet. But I might if there’s interest. Enjoy these unedited photos in my messy studio! ❤️ https://www.instagram.com/p/CRWwQLdsbLq/?utm_medium=tumblr
0 notes
Text
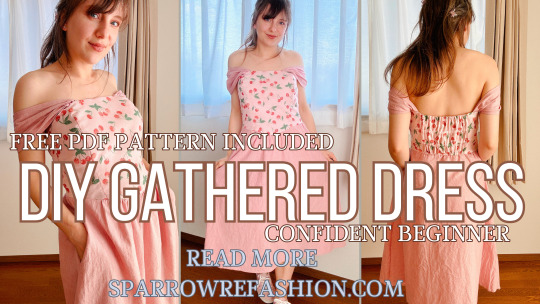
How to Sew a Gathered Dress with Pockets and Off Shoulder (Free PDF Pattern + Video Tutorial)
In this post, you will learn how to sew a gathered dress with pockets and off shoulder with free PDF pattern and video tutorial.
Do you love the look of a gathered dress with pockets and off shoulder? Do you want to learn how to sew one yourself? If so, you are in the right place!
In this blog post, I will show you how to sew a gathered dress with pockets and off shoulder, using a free PDF…
View On WordPress
#Basque Waistline#beginner#Dress#Faux shirring#free pattern#Gathered#Off Shoulder#pockets#sewing#Video Tutorial
5 notes
·
View notes
Text
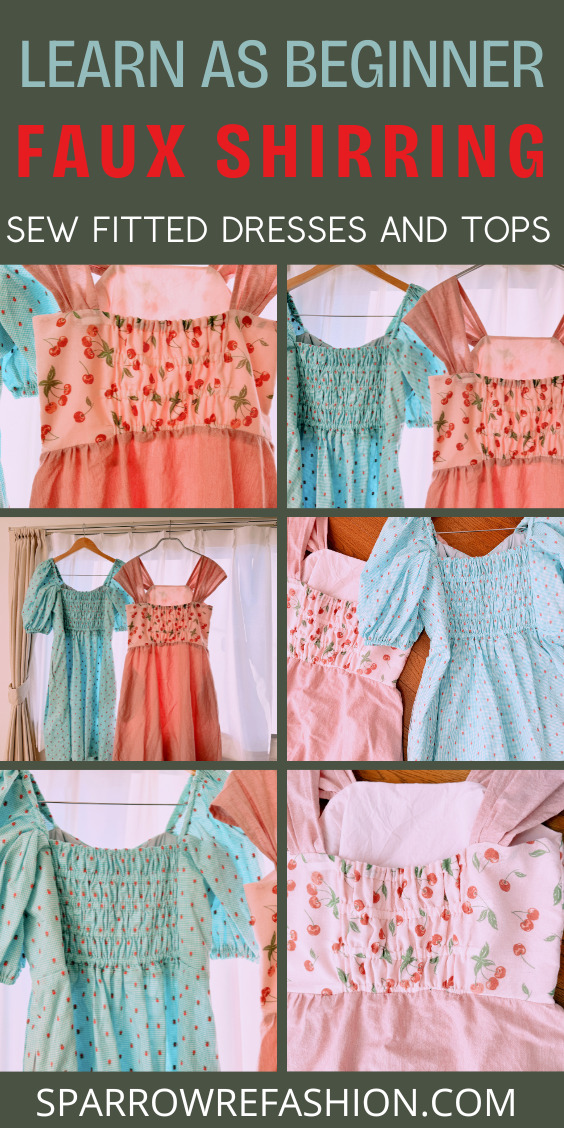
Learn faux shirring hack with my step by step video tutorial and create amazing tops and dresses which will need no zipper yet they will be perfectly fitted. This tutorial is beginner friendly and will help you level up your sewing skills.
#sewing#diy fashion#modern sewing#faux shirring#no zipper needed#modern fashion#sewing skills#sewing techniques
6 notes
·
View notes
Last Seen Blogs

smartrascalstudios
Smart Rascal Studios

nessaedwards
~ness~

saifnasrrr
Saif

innerhorsestatesmanmonger
Dark Soul.🐺🌔

janative
rien du tout