swisherguitars
Swisher Guitars
Guitar Builder, Luthier. https://swisherguitars.com/showroom
1225 posts
Last active 60 minutes ago
Don't wanna be here? Send us removal request.
Last Seen Blogs

fendermustang1964-blog
Fender Mustang 1964 ©

rubyglassigloo
Growing Up is Overrated

wineaunt420
nyxiee

vantaenims
𐐪 hey angel 𐑂

stapley0urmouthshut
Nah, I'ma do my own thing...
Text
Cleaning up and beveling some fret ends.
#luthier#guitarbuilder#guitar#swisherguitars#handmade#wood#electricguitar#customguitars#guitarmaker#handmadeguitars
0 notes
Text
Some Friday fretwork.
#luthier#guitarbuilder#guitar#swisherguitars#handmade#wood#electricguitar#customguitars#guitarmaker#handmadeguitars
5 notes
·
View notes
Text
Installing and test fitting an electrosocket jack mount. There's lots of ways to do this, I like it to be as clean a hole as possible, so to eliminate the drill ramming into the body and denting it, I'm clamping a scrap piece in the control cavity to create a "bottom". This also keeps the bit from tearing out the back side.
#luthier#guitarbuilder#guitar#swisherguitars#handmade#wood#electricguitar#customguitars#guitarmaker#handmadeguitars
8 notes
·
View notes
Text
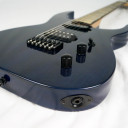
Adding a round-over to the back of this body. I didn't do any videos on adding the binding, but here is a peak of this body with the black binding installed.
#luthier#guitarbuilder#guitar#swisherguitars#handmade#wood#electricguitar#customguitars#guitarmaker#handmadeguitars
9 notes
·
View notes
Text
Test fitting a set of Hipshot open gear tuners, lining them up and drilling some holes.
#luthier#guitarbuilder#guitar#swisherguitars#handmade#wood#electricguitar#customguitars#guitarmaker#handmadeguitars
5 notes
·
View notes
Text
Cleaning out and prepping the nut slot. I originally outlined the nut area when I cut the fret slots, and here I break away the area using an awl. Once that top layer has been broken away, it leaves the sides very well defined. I then run the Stewmac nut slotting file over it to clean it up.
#luthier#guitarbuilder#guitar#swisherguitars#handmade#wood#electricguitar#customguitars#guitarmaker#handmadeguitars
3 notes
·
View notes
Text
Hand carved transitions.
#luthier#guitarbuilder#guitar#swisherguitars#handmade#wood#electricguitar#customguitars#guitarmaker#handmadeguitars
5 notes
·
View notes
Text
Shaping and measuring. All part of the tedious work when shaping a neck.
#luthier#guitarbuilder#guitar#swisherguitars#handmade#wood#electricguitar#customguitars#guitarmaker#handmadeguitars
19 notes
·
View notes
Text
Just some neck carving.
#luthier#guitarbuilder#guitar#swisherguitars#handmade#wood#electricguitar#customguitars#guitarmaker#handmadeguitars
7 notes
·
View notes
Text
I've been adding a beveled edge to my control cavity covers. It makes it much easier on the fit. It's also much easier to take them off.
#luthier#guitarbuilder#guitar#swisherguitars#handmade#wood#electricguitar#customguitars#guitarmaker#handmadeguitars
1 note
·
View note
Text
Making a control cavity cover.
#luthier#guitarbuilder#guitar#swisherguitars#handmade#wood#electricguitar#customguitars#guitarmaker#handmadeguitars
5 notes
·
View notes
Text
Routing out the control cavity and test fitting the switch and pots.
#luthier#guitarbuilder#guitar#swisherguitars#handmade#wood#electricguitar#customguitars#guitarmaker#handmadeguitars
4 notes
·
View notes
Text
Routing and drilling controls. I made this jig for the 3 way switch quite a while ago. After using it here I'm going to modify it just a bit. The bushing I'm using is too small and I think I can go up one size. No plate here, the cavity will be routed from the back.
#luthier#guitarbuilder#guitar#swisherguitars#handmade#wood#electricguitar#customguitars#guitarmaker#handmadeguitars
7 notes
·
View notes
Text
Routing pickup cavities.
#luthier#guitarbuilder#guitar#swisherguitars#handmade#wood#electricguitar#customguitars#guitarmaker#handmadeguitars
6 notes
·
View notes
Text
Hogging out pickup cavities. This video also has lots vacuuming.
#luthier#guitarbuilder#guitar#swisherguitars#handmade#wood#electricguitar#customguitars#guitarmaker#handmadeguitars
5 notes
·
View notes
Text
Bridge position layout and test fit. I make these templates in Inkscape. I use the same hardware all the time so anything I lay out always fits.
#luthier#guitarbuilder#guitar#swisherguitars#handmade#wood#electricguitar#customguitars#guitarmaker#handmadeguitars
4 notes
·
View notes
Text
Trimming off the excess on the lower side of the neck pocket, and routing flush with the neck. I do it this way because it ensures that pocket lines up with the neck perfectly.
#luthier#guitarbuilder#guitar#swisherguitars#handmade#wood#electricguitar#customguitars#guitarmaker#handmadeguitars
6 notes
·
View notes