
Last Seen Blogs

ajtmjgdjpwj
ATgnkM®︎

dehydrated-salt
keep warm m'dude

barney31
Untitled

sleepyconfusedpotato
In a Constant State of Sleepiness and Confusion

okapiandpaste
strange how the brain controls the brain 🧠
Text
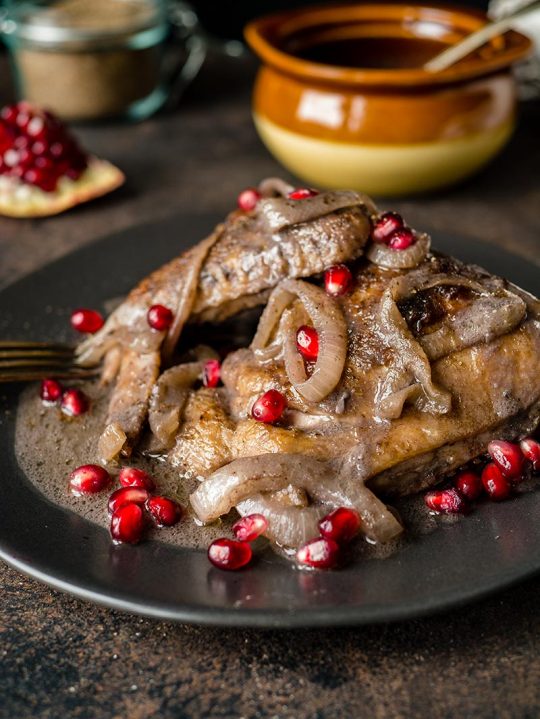
Think Pink With This Dragon Fruit Cooler!
The best way to beat the heat is with a cool drink and this naturally pink tropical dragon fruit drink is nothing short of refreshing!
This last week when I visited the markets it was awash with pink. Dragon fruit pink specifically. These striking looking fruit were everywhere. Some were pink, others yellow.
Pink dragon fruit or pitaya is either red inside or white and it is always marked which one it is - although I have no idea how they can tell because they look identical on the outside to me. I've read that the red ones are rounder in shape while the white ones are longer and more oval in shape. For some reason red seems to be more expensive than white but a little red dragon fruit goes a loooong way with colouring something naturally. Just one red dragon fruit was all that was needed for this vividly hued drink.
If you've had a fresh dragon fruit you'll know that there isn't that much flavour to it. It's all about a good sweetness and juicy texture and it juices up beautifully. When I've had dragon fruit juice in China or Thailand on a hot day it has sated my thirst perfectly. It is a fruit high in fibre and is said to boost immunity and lower cholesterol along with a host of other benefits.
A while back I wrote about how I had spent a few days chasing a courier because I had bought some food styling backgrounds and they had not arrived in time. A few of you asked me about how it went. Well I finally did receive them. I told the man that I bought them from that I needed them by a certain day and that was my deadline (which had already passed really). He told me that it would be with me by noon. Considering that noon was in 20 minutes, I rolled my eyes and didn't believe it.
But at 11:53am I got a knock at the door and when I rushed to open it I saw a courier running away. He had literally dumped, knocked and ran.
"Hang on!! Are you the courier that delivered me the package on Friday?" I asked him.
"No it wasn't me!" he said putting his hands up and waving them, absolving himself of all responsibility.
"They told me it was the same courier," I said to him.
"Oh hang on, do you mean that small package from the pet store?" he said referencing the package that he did deliver to me on the Friday.
"Yes but why didn't you deliver me these at the same time?" I asked him.
He then explained that the backgrounds weren't in his truck! So basically I don't know who was incompetent, lazy or fibbing, I just know that someone was. And thankfully I finally had my backgrounds. And I used one of them in this story!
So tell me Dear Reader, do you like dragon fruit? Do you find it refreshing? Do you have a favourite juice or juice combo?
An Original Recipe by Lorraine Elliott
Preparation time: 10 minutes
Cooking time: 0 minutes
1 red dragonfruit
2-3 fresh figs (optional)
1/2 cup sugar syrup (or to taste)
1 cup apple juice
Juice from 2 limes
Soda water or water to top up to taste (you can also replace with 1 cup of ice cubes for a slushie)
Step 1 - Cut the dragon fruit in half and scrape out the coloured flesh. Blend with the figs to a puree. Mix with the sugar syrup, apple juice and lime juice. Top up with as much soda water or water to your taste.
Source: https://www.notquitenigella.com/2019/02/16/dragonfruit-pitaya-juice/
0 notes
Text
Our Favorite Stocking Stuffers for Cooks
Come Christmas morning, stocking stuffers don’t get enough love. While all my friends are focused on the big, bow-wrapped presents under the tree, I’m eyeing my stocking to see if I can guess what I’ve been given (and then peeking into it to see if I was right).
The people in my life know me well, so it's always full of essential cooking tools, ones I can't believe I didn't already own. Sure, they’re usually the smallest gifts, but they’re the ones I end up using most—my steadfast vegetable peeler, a trusty metal sauce spoon, the "fancy" tweezers I now use in place of regular tongs. Whether or not you and yours actually hang festive stockings on the mantle, this is the perfect time to buy small but essential kitchen tools for the ones you love—yourself included.
Luckily, some of our favorite kitchen tools and gadgets are just the right size to stuff in a stocking or exchange at a casual office party. Below are a few of our favorites. If none of these stocking stuffers are quite what you need, we have a whole category of small but meaningful kitchen presents for you to peruse over in the Serious Eats holiday gift guide.
This knife is ideal for a food-curious kid who's just transitioning into using adult-grade knives and other sharp tools. It has a plastic loop to keep their index finger safely away from the blade and a guard for the other hand, allowing the user to practice slicing and chopping with much less risk if their knife does happen to slip. Give this gift first thing in the morning, and you’ll have an enthusiastic sous chef by your side all day long.
There’s not a lot we don’t use this neat little thermometer for. It’s a must-have tool, and a perfect gift, for anyone who grills steak, broils salmon, roasts pork, or cooks any kind of meat, really. This highly accurate—not to mention adorable—thermometer comes in a variety of colors, and while it doesn’t read temperatures quite as quickly as the larger and pricier Thermapen, it’ll still flash a number in less than five seconds.
[Photograph: Vicky Wasik]
This chef’s press is another great gift for a grilling fanatic, but it’s just as handy for making grilled cheese sandwiches or panini as it is for ribeyes. The heavy press ensures constant contact between your ingredients and the heat source, while grates in the metal allow steam to escape, keeping whatever you're cooking from getting soggy. If you don’t have one of these for yourself yet, consider ordering a few extras. They stack easily when you're ready to put them away, and you’ll wonder how you ever cooked without one.
Most people already have a few stirring tools in their drawers, but not all spoons are created equal. This wooden Le Creuset model has a blunt end, which makes it perfect for scraping up fond or stirring vegetables. It might not seem like the most exciting holiday gift, but when your giftee sees that beautiful beechwood poking out of their stocking and feels the slightly contoured handle, they’ll understand.
We admit, beef jerky isn't exactly the sort of glamorous gift you want to wrap up with a snazzy bow, but it makes a perfectly tasty stocking stuffer. South African–style biltong is made by putting the beef through a flavorful vinegar bath before it’s dried, giving it a mellow tanginess. While we don’t love the Original flavor, our office devoured the Jo'burg Steakhouse variety in mere moments. Plus, if this gift gets opened while you’re around, you get to eat half the bag. We don’t write the rules.
After you've given someone these heirloom beans, they'll never want to eat canned beans again, which is both a blessing and a curse. Rancho Gordo's inventory has impressed upon us just how many varieties are out there—some are rich and perfect for cooking slowly with big pieces of meat (we're looking at you, Flageolet), while others need little more than a drizzle of good olive oil and a touch of fresh cheese (here's to you, Christmas Lima Bean). Whatever legumes you prefer, you can't go wrong with one of Rancho Gordo's fantastically flavorful and colorful products.
No stocking is complete without at least a few pieces of chocolate, but the candy in most is often no more than a sweet afterthought. That's where this assortment of single-origin chocolate bars comes in: The bars are beautifully wrapped in colorful paper, and they offer the recipient a fun way to explore the world of chocolate and learn how different beans and countries of origin can impact its taste.
We're not done. You can find plenty more stocking stuffer gift ideas right this way »
This post may contain links to Amazon or other partners; your purchases via these links can benefit Serious Eats. Read more about our affiliate linking policy.
Source: https://www.seriouseats.com/2018/12/stocking-stuffer-holiday-gifts.html
0 notes
Text
Need A Nap? Here Are 5 Good Reasons To Go For It
I have never been a big fan of taking naps. Even if I feel exhausted, it’s always difficult for me to fall asleep in the middle of the day. And even if I do manage to fall asleep, I always wake up feeling groggy and disoriented! My anti-nap stance mystifies my husband and daughter, who are both more pro-nap (and pro-sleep in general) than anyone else I know!
But even though I don’t personally enjoy taking naps, that doesn’t mean I think they are worthless! In fact, I recently learned some interesting facts about naps that made me wish I liked them more! But even if I can’t change my own preferences, at least I can pass the information along to you. Because as it turns out, there are actually plenty of good reasons to grab some afternoon shut-eye!
Today I’ll be sharing 5 benefits you can experience from taking a nap when you’re feeling sleepy. After that, I’ll also share some a few bonus tips for getting the most out of your nap time! I don’t know about you, but I’m feeling more well-rested already! ;-)
<![CDATA[.player-position padding-left:0px !important; padding-right:0px !important; padding-bottom:0px !important; .copy padding: 12px !important; font-weight: 700; font-size: 15px !important; ]]>
1. Improved Mental Performance
Taking a nap when you’re feeling tired can boost your mental performance. You may feel more alert, or notice improvements in your short-term memory.
2. Improved Physical Performance
Grabbing a quick power nap can also have physical benefits too! A 2007 study found that after a night of limited sleep, participants who took a post-lunch nap recorded faster sprint times than their no-nap counterparts.
3. Reduced Stress & Anxiety
After a night of limited or low-quality sleep, your body produces a stress hormone called noradrenaline. This hormone contributes to the tired and lethargic feeling of being sleep-deprived. But grabbing an afternoon nap can balance out your levels of noradrenaline and other stress hormones, leaving you in a better mood and mental state!
4. Fewer Food Cravings
Are you susceptible to the “afternoon sleepies?” That post-lunch energy crash can leave you reaching for junk food, sodas, or energy drinks to help keep you going. But taking a nap instead will leave you feeling more focused and less stressed. And that will make it much easier to fight those cravings for sugary drinks and junk food!
5. Healthier Heart
According to the Harvard School of Public Health, people who take naps regularly are less likely to die from heart disease than those who don’t. So go ahead and nod off for a while—it’s good for your health!
6 Bonus Tips For Better Naps
1. Keep It Short
A luxurious two-hour snooze can be nice every once in a while, but it’s best to limit most naps to 10-20 minutes long. A five-minute power nap won’t produce many benefits, and staying asleep for too long could make it hard to fall asleep later.
2. Time It Right
You can maximize the benefits of a nap (and minimize potential drawbacks) by taking it at the right time. Check out this handy Nap Wheel by Dr. Sara Mednick, which will tell you the prime time for the “ultimate nap” based on when you woke up.
3. Take A “Caffeine Nap”
Some sleep experts recommend the “caffeine nap” method. It involves drinking a cup of coffee or a caffeinated soda, and then immediately going to sleep for 10-15 minutes. The goal is to wake up around the same time the caffeine kicks in, so you’ll feel focused, energized, and ready to get back at it! (However, unless you have no trouble falling asleep on command, this one could be tricky to pull off!)
4. Hit The Lights
To make sure your nap time is actually restful, you may need help creating a dark, quiet environment. Consider using an eye mask to block out the daylight, and a pair of earplugs to block out distracting sounds. (Some people need a quiet environment to fall asleep, but I prefer to use a white noise app.)
As far as light-blocking eye masks go, I recommend getting one like this. These types of masks are contoured to fit around your eyes without pressing down on them. It’s perfect for napping, because it will block out the light without messing up your eye makeup!
5. No Sleep? No Problem
Sometimes, despite your best efforts, you just can’t seem to fall asleep. And that’s okay! You can still reap many of the benefits of napping by resting quietly for 10-20 minutes. Focus on taking slow, deep breaths, and you’ll be feeling refreshed in no time!
6. Get Plenty Of Sleep
Taking a quick snooze can be beneficial, but those benefits come from eliminating a sleep deficit. If you’re tired from not getting enough sleep, it makes sense that getting more sleep in the form of a nap will help you feel less tired. But there’s another way to reap these benefits—just get more and/or better sleep at night! You won’t need to rely on the benefits of napping if you already feel well-rested.
Are you pro-nap or anti-nap?
Source: https://www.onegoodthingbyjillee.com/5-reasons-to-take-a-nap/

0 notes
Text
These are the top allergy-friendly chain restaurants in America, ranked
If you have a food allergy, eating out at restaurants can be difficult — and in some cases genuinely risky. Some restaurants are accommodating and equipped to adjust their meals to their customers' needs. Other restaurants might struggle to provide allergy-friendly options. The number of people with food allergies is increasing by the day. Every year, AllergyEats scours the reviews and feedback they receive from customers and ranks the 10 most allergy-friendly chains in America. These chains are ranked from 1 to 5 on how well they are able to accommodate visitors with food allergies.
The Top Allergy-Friendly Chain Restaurants in America
“For the over 15 million Americans with food allergies, it’s incredibly important to know which restaurants are the best at creating allergy-friendly meals so these individuals can more comfortably dine out,” said Paul Antico, founder and CEO of AllergyEats, in an emialed press release announcing this year’s list. Food allergies can be extremely dangerous — while many restaurants are accustomed to dealing with some of the most common food allergies, these restaurants went above and beyond.
“The restaurant chains on this 2019 list have differentiated themselves with exceptional food allergy protocols, education, and training, according to peer reviews from AllergyEats users,” Antico explained.
AllergyEats separated the chains into two groups: small chains and large chains. Large chains included restaurants with over 50 locations. Small chains had fewer than 50 locations.
Many of the same chains make the list every year. But this year, four new chains have made the list. One of them earned the title of the smallest chain to ever earn a spot on the ranking. Find out which restaurants made the list in the complete ranking of large and small chain restaurants.
Source: https://www.thedailymeal.com/healthy-eating/top-allergy-friendly-restaurants-america
0 notes
Text
Jackfruit Tinga Tacos
Jackfruit Tinga Tacos
Dinner, Healthy, Vegetarian
I’m not going to lie, it took me yearrrrrs to finally get up the courage to try jackfruit. I have no idea why because it’s the least offensive out of all the vegan meat substitutes. I’d like to declare that it actually tastes good!
If you’ve never had jackfruit, here’s some info:
Jackfruit comes from jack trees—they’re related to the fig and mulberry trees—which are commonly found in southeast Asia. And while it’s related to figs and mulberries, jack fruit’s texture is similar to artichoke hearts. The best part about jackfruit is that it’s easily attainable (I bought it in the can) and shreds kinda similarly to meat (think carnitas or chicken!). It’s wild. It sort of blew my mind.
This recipe for Jackfruit Tinga Tacos are super easy. You start with the tinga sauce, which is full of all good things, including lots of spices and tomatoes. After everything is toasted and cooked, it goes in the blender so it’s silky smooth.
And then the jackfruit is drained from the can, rinsed and shredded. If you have no idea how to shred jackfruit, do not worry! I’ll be posting a tutorial on my IG stories (and I’ll save it in the highlights). It couldn’t be simpler but I needed to see a visual before I knew how to do it!
This jackfruit tinga lasts a good while in the fridge, is 100% vegan and heats up like a pro.
Add it to the center of a corn or flour tortilla and top it with whatever you like. I like lots of toppings because I enjoy life! So that means diced white onion, cilantro, lots of lime juice and cotija cheese (of course this isn’t vegan, but you know…).
Jackfruit Tinga Tacos
Print
Jackfruit--from the jack tree--shreds up almost like carnitas or chicken! But this is vegan. It's slowly cooked in a tinga sauce to make the best vegan Jackfruit Tinga Tacos
CourseMain Course
CuisineAmerican, Mexican, Vegan
Keywordjackfruit tacos, jackfruit tinga, tinga tacos, vegan dinner, vegan mexican, vegan tacos, weeknight vegan dinner
Prep Time: 10 minutes
Cook Time: 30 minutes
Total Time: 40 minutes
Serving Size: 8
Calories: 250kcal
Ingredients
Tinga:
1 tablespoon olive oil
1/2 yellow or white onion, peeled and roughly chopped
4 garlic cloves
1 teaspoon kosher salt + 1/2 teaspoon kosher salt
1/2 teaspoon freshly ground pepper
1/2 teaspoon dried Mexican oregano
1/2 teaspoon ground cumin
2 whole chipotles in adobo
1 (15-ounce) can fire-roasted tomatoes or regular tomatoes
2 (15-ounce) cans jackfruit, drained
For Serving:
Flour or corn tortillas , warmed
Diced white onion, as garnish
Diced cilantro, as garnish
Limes, as garnish
Cotija cheese (optional)
Directions
To Make the Tinga:
To a medium pot, set over medium heat, add the olive oil. When warm, add the onion and garlic cloves, along with the salt. Cook until softened, about 5 minutes.
Transfer to the onion mixture to the blender, along with kosher salt, freshly ground pepper, Mexican oregano, ground cumin, chipotles in adobo and can of fire-roasted tomatoes. Blend for about 30 seconds, until smooth. Pour the mixture into the pot.
Meanwhile, chop up and shred the jackfruit. When you’re done, rinse it with cold water and then give it a bit of a shake to get rid of any excess water that’s on them. Transfer the jackfruit to the pot with the tinga sauce and bring to a gentle simmer. Immediately return the heat to low and cover the pot; cook for about 20 to 25 minutes, until all of the flavors have been married. Give it a taste and adjust the salt according to taste (I actually didn’t need any additional salt but everyone is different!).
To Serve:
Add a spoonful of tinga to the center of a warm tortilla. Top with diced white onion, cilantro, a squeeze of lime and a handful of cotija cheese (if using).
Any leftover tinga can be kept in an airtight container in the fridge for up to 5 days. Or you can freeze it up to 3 months.
April 29, 2019 by Adrianna Adarme
Adrianna Adarme
A Cozy Kitchen is a blog written by Adrianna Adarme. Adrianna likes corgis, pancakes and cute things.
Previous Post
You Might Also Like
How to Build a Cheese Plate for Two
April 21, 2017
Sheet Pan Mojo Turkey
November 6, 2017
Acorn Squash Soup with Cheesy Croutons
November 7, 2011

Hi! This is my lil’ corner on da internets called A Cozy Kitchen. I live in Los Angeles, California with my husband Joshua and my corgi Amelia.
Read More
Cozy Cooking Playlist!
Cookbook!

Stay Up To Date
SUBSCRIBE
Fun Brand Partnerships


Source: https://www.acozykitchen.com/jackfruit-tinga-tacos/
0 notes
Text
Curry Butternut Squash Noodles
This Curry Butternut Squash Noodles recipe is an easy weeknight meatless dinner that is full of flavor and packed with veggies! A delicious curry sauce with tender butternut squash “noodles”, peppers, onions and spinach can be prepped and cooked in under 30 minutes and is paleo, gluten-free, dairy-free and keto and whole-30 friendly.
Curry Butternut Squash Noodles
This super easy Curry Butternut Squash Noodles recipe is the perfect weeknight dinner to spice things up! Well, at least as spicy as you want it to be because it’s easy to control the heat so you can make this family friendly. A simple coconut based curry is cooked while you cook up some veggies so you can have dinner ready in under 3o minutes. It’s so flavorful for such little effort it’s quickly going to be a new favorite!
How to Make Butternut Squash “Noodles”
If you can’t find these at your local grocery store (we buy already made butternut squash “noodles” at Whole Foods if we are short on time) you can spiralize them at home! A few tips:
Buy the straightest and longest butternut squash you can find. You can’t spiralize the bulb at the end, so look for a long one!
Remove the bulb and reserve for another use. Peel the squash really well, trim the tip off and cut in half so it’s easier to handle.
Spiralize using the large noodle fitting! We like this spiralizer:
If you like this healthy weeknight dinner, check out these others:
Curry Butternut Squash Noodles
Ingredients
2 tablespoons avocado oil, divided
1/2 inch piece fresh ginger, peeled and grated
2 garlic cloves, minced
pinch red pepper flakes
1 tablespoon green curry paste
1 teaspoon cumin
1 tablespoon green curry paste
2 cups full fat coconut milk
2 teaspoons lime juice, more to taste
1 teaspoon fish sauce
1 teaspoon coconut sugar
1/2 teaspoon sea salt, more to taste
1 yellow onion, thinly sliced
1 red pepper, thinly sliced
1 green pepper, thinly sliced
3 cups butternut squash "noodles"
1 cup fresh spinach (optional)
1 tablespoon scallions, thinly sliced
1 tablespoon cilantro, for garnish
1 lime, sliced into wedges for garnish
1 red chili pepper, sliced thin for garnish
Optional: 1 cup fresh spinach
Directions
Make the curry broth: Heat 1 tablespoon oil in a medium pot over medium-high heat. When hot add ginger, garlic, red pepper flakes, green curry paste and cumin. Stir and cook for 1 minutes.
Add in coconut milk, lime juice, fish sauce, coconut sugar and sea salt. Whisk to combine. Bring sauce to a boil and then lower the heat to low, and let simmer for 10-15 minutes. Taste and adjust seasoning as desired.
Meanwhile sauté vegetables: Heat 1 tablespoon oil in a large sauté pan. Add peppers, onions, and a pinch of salt and cook until onions turn translucent and the peppers have started to softened, about 3-5 minutes.
Add butternut squash "noodles" and sauté for an additional 5-7 minutes. If adding the spinach, add at the end and toss until wilted.
Divide vegetables in serving bowls and pour curry sauce over. Garnish with cilantro, scallions, and red chili pepper, if using, and enjoy immediately.
Recipe Notes
For keto or whole 30 omit the coconut sugar.
This dish isn’t very spicy, but has a kick. If you don’t like spicy food, start with 1/4 teaspoon green curry paste and add more to taste while the sauce is cooking!
You can add any veggies to this dish that you have on hand! Potatoes, carrots, corn, spinach, etc. If you add vegetables, add them in step 5 along with the peppers and onions with the exception of dark leafy greens such as spinach and kale. Add the leafy greens once the butternut squash has cooked for at least 5 minutes in step 6 and cook the leafy green just until it starts to wilt. If added before, the greens will be overcooked.
Loading nutrition data...
There may be affiliate links in this post! By clicking on them, or purchasing recommended items I may receive a small compensation, at no cost to you! However, I only recommend products I absolutely love and use in my own home! Thank you for supporting Lexi's Clean Kitchen when you shop! See my privacy policy for more information about this, the information we save, and more!

Source: https://lexiscleankitchen.com/curry-butternut-squash-noodles/
0 notes
Text
Chili’s(™) Original Chicken Crispers
Today’s secret recipe will show you how to make a classic dish served at Chili’s. The original chicken crispers fried in a batter that’s smooth, light and super crispy. These are served with a honey mustard dipping sauce and corn on the cob on the side.
You can also serve these with a side of oven baked fries by following this recipe from our forum: Go Here
Enjoy!
=-=-=-=-=-=-=-=-=-=-=-=-=-=-=-=-=-=-=-=-=-=-=-=
Stop Eating Veggies (Eat This Instead)
Just drink this super tasty drink first thing in the morning and you’ll hit 10+ servings of veggies every single day with ease: Go Here
=-=-=-=-=-=-=-=-=-=-=-=-=-=-=-=-=-=-=-=-=-=-=-=
=-=-=-=-=-=-=-=-=-=
New Secret Recipe
=-=-=-=-=-=-=-=-=-=
Chili’s(™) Original Chicken Crispers
Like this recipe? Get our secret recipe cookbooks on sale – Go Here

Chicken Crispers:
1 pound chicken tenders
1 1/2 cup flour
2 teaspoons baking powder
1 1/2 teaspoons salt
1/2 teaspoon black pepper
1 egg
1 cup club soda plus 2 tablespoons
1/2 cup flour for dredging
Honey Mustard:
1 cup mayonnaise
1/4 cup dijion mustard
1/4 teaspoon cayenne
1/4 cup honey
vegetable oil for frying
Make the batter by first combining the club soda and the egg together. Whisk together until they form a uniform mixture. Then add in the dry ingredients: 1 1/2 cups flour, baking powder, salt, pepper. Stir together. Allow the batter to sit for a few minutes.
Remove chicken from package and pat dry with a paper towel. Dredge the chicken with the 1/2 cup flour. Preheat the oil to 350 degrees F. Dip chicken into the batter an fry a few pieces at a time. If there is any additional batter left over, could make some onion rings, but the excess batter should be discarded.
Prepare honey mustard by combining the mayonnaise, dijon mustard, cayenne, and honey. Stir well. You can store the honey mustard for about a week in your refrigerator.
Share This Recipe:
Have a comment or question about this recipe? Post it here
Source: Recipe Secrets Forum
Until Next Time… Be Well!
Kind Regards,
Ron
PS- Join us on Facebook and get more recipes and freebies: Go Here
PPS- Forward this email to a friend or tell them to sign up here.
=-=-=-=-=-=-=-=-=-=-=-=-=-=-=-=-=-=
=-=-=-=-=-=-=-=-=-=-=-=-=-=-=-=-=-=
The Recipe Secrets Newsletter (RSN)

Source: https://www.recipesecrets.net/blog/recipes/chilis-original-chicken-crispers/
0 notes
Text
Shrimp Scampi Pasta with Asparagus (VIDEO)
Shrimp Scampi Pasta with Asparagus… it really doesn’t get any better than this! The light lemon garlic and herb sauce packs so much fresh and amazing flavor.
We took classic Shrimp Scampi and turned it into this shrimp scampi pasta recipe. Just like our Creamy Shrimp Pasta, this is perfect for busy weeknights because it’s easy, takes less than 30 minutes and tastes like fine dining.
This post may contain affiliate links. Read my disclosure policy.
Shrimp Scampi Pasta Recipe:
Tossing shrimp scampi with pasta is our favorite way to serve scampi. The lemon butter scampi sauce is so fresh, vibrant and flavorful and goes so well with pasta.
Watch the video recipe below to see just how easy it is. You’ll make this shrimp scampi pasta again and again!
What is the Best Shrimp for Scampi?
Look for raw shrimp (preferably wild caught) that are large 21-30 count. Slightly larger or smaller will still work but you will have to increase or decrease cooking time accordingly as shrimp can easily overcook.
Save prep time by purchasing shrimp that are already peeled and deveined. Tail on or tail off is based on preference. It’s easier to eat without the tails but the presentation is nicer with tails on.
Can I Substitute Cooked Shrimp?
Cooking raw shrimp will give you the best flavor as it takes on the garlic flavors from the pan and will add flavor to the sauce, which is why we highly recommend raw shrimp.
If you have cooked shrimp on hand, be sure to fully thaw and thoroughly pat dry with paper towels. Add them to the pan just long enough to heat through. If you re-cook the shrimp, they will end up overcooked and rubbery.
How to Trim Asparagus:
Asparagus ends are fibrous and must be removed before cooking. The fastest way is by snapping off the ends and wherever they snap is where the fibrous part ends. You can also use a vegetable peeler to remove fibrous ends.
How to Make Shrimp Scampi Pasta:
With the exception of the pasta, the shrimp and scampi sauce come together in one pan. This recipe comes together fast so have all of your ingredients prepped and ready before you fire up the stove.
1. Bring a large pot of salted water to a boil and cook pasta until al-dente.
2. Place a large, deep pan over medium/high heat with 1 Tbsp olive oil and 1 Tbsp butter. Add asparagus, season with 1/4 tsp salt and 1/8 tsp pepper and cook uncovered for 5 minutes until crisp tender, stirring occasionally. Transfer asparagus to a plate.
3. In the same hot pant, add 2 Tbsp oil and 2 Tbsp butter. Once the butter melts, add garlic and sautee 1 minute. Add shrimp in a single layer, season with 1 tsp salt and 1/4 tsp black pepper and saute until shrimp are pink and opaque (2 min per side). Do not overcook.
4. Add 1/4 cup lemon juice, 1/3 cup parsley, 1 Tbsp lemon zest and stir to combine. Turn off heat, return pasta and asparagus to the pan and toss to combine. Serve with grated parmesan.
This shrimp scampi pasta with asparagus is so juicy and flavorful. Every noodle is coated with amazing fresh flavor.
Our Best Reviewed Pasta Recipes:
Watch How to Make Shrimp Scampi Pasta:
Mmm… this shrimp scampi pasta is ridiculously tasty. Enjoy this my friends!
Shrimp Scampi Pasta with Asparagus
Prep Time: 5 minutes
Cook Time: 23 minutes
Total Time: 28 minutes
Shrimp Scampi Pasta with Asparagus has a lemon garlic and herb sauce that packs so much fresh and amazing flavor. A 30 minute shrimp scampi pasta recipe!
Author: Natasha of NatashasKitchen.com
Skill Level: Easy
Cost to Make: $18-$20
Keyword: shrimp scampi pasta
Calories: 525 kcal
Servings: 4 as a main course
1/2 lb spaghetti
1 lb asparagus trimmed and cut into 2" pieces
3 Tbsp butter divided
3 Tbsp olive oil divided
4 cloves garlic minced (about 1 1/2 Tbsp)
1 lb large shrimp peeled and deveined (16-20 or 21-25 count)
1 1/4 tsp Sea Salt divided, plus more for cooking pasta
1/4 tsp Black Pepper ground, or to taste
1/4 cup fresh lemon juice from 1 large or 2 small lemons
1/3 cup fresh parsley finely chopped
1 Tbsp grated lemon zest
Grated parmesan to serve
Bring a large pot of water to a boil, add 1 Tbsp salt and 1 Tbsp olive oil and cook pasta according to package instructions until aldente, or desired doneness (meanwhile, continue with recipe). Drain pasta, return to pot and cover to keep warm.
Place a large, deep pan over medium/high heat and add 1 Tbsp olive oil and 1 Tbsp butter. Add asparagus, season lightly with 1/4 tsp salt and 1/8 tsp pepper and cook uncovered for 5 minutes or until crisp tender, stirring occasionally. Remove from pan.
In the same hot skillet, add 2 Tbsp oil and 2 Tbsp butter. Once the butter is melted, add minced garlic and sautee, stirring frequently for 1 minute. Add shrimp in a single layer and season with 1 tsp salt and 1/4 tsp black pepper. Saute until shrimp are pink and not translucent (about 2 minutes per side). Be careful not to overcook or shrimp will be tough.
Add 1/4 cup lemon juice, 1/3 cup chopped parsley, 1 Tbsp lemon zest and stir to combine. Turn off the heat and return pasta and asparagus to the pan. Toss everything to combine and serve with grated parmesan.
Nutrition Facts
Shrimp Scampi Pasta with Asparagus
Amount Per Serving
Calories 525 Calories from Fat 189
% Daily Value*
Total Fat 21g 32%
Saturated Fat 7g 35%
Cholesterol 308mg 103%
Sodium 966mg 40%
Potassium 501mg 14%
Total Carbohydrates 49g 16%
Dietary Fiber 4g 16%
Sugars 4g
Protein 33g 66%
Vitamin A 30.9%
Vitamin C 32%
Calcium 21.8%
Iron 33.3%
* Percent Daily Values are based on a 2000 calorie diet.
If you make this recipe, I’d love to see pics of your creations on Instagram, Facebook and Twitter! Hashtag them #natashaskitchen
Q: What’s your favorite go-to (quick) weeknight meal?

Source: https://natashaskitchen.com/shrimp-scampi-pasta/
0 notes
Text
Hyderabadi Bagara Baingan
Bagara Baingan is a popular Hyderabadi dish. It is made with small eggplants that are cooked in a rich masala curry. Hyderabadi baingan is the perfect dish to serve to guests with a sophisticated palette because of the mixture of nutty spices.
Method
Make a slit into eggplants, but not cutting them into half. If you are using Japanese eggplant slice them in 8 long pieces.
Heat the oil in flat frying pan over low medium heat and stir-fry eggplant rotating occasionally till they are tender not mushy. Set them aside.
For the spice mix take all the ingredients, cumin seeds, fenugreek seeds, coriander seeds, cashews, sesame seeds, coconut powder and grind them in fine powder. Set aside.
Blend tomatoes and ginger together to make into fine puree. Set aside.
Heat the flat frying pan over low medium heat, I am using the same pan I stir fry the eggplants. When oil is moderately hot add the mustard seeds as they crack turn off the heat. Add all the spices asafetida, turmeric, red chili powder and dry spice mix stir for about 2 minutes, all the spices should be roasted.
Add tomato puree, sugar, salt and about 1 tablespoon of tamarind paste. Stir fry the gravy until mix become little thick and start leaving the oil from sides. Add 1/2 cup of water and bring it boil.
Add the eggplant spreading in the frying pan, stir gently cover the pan lower the heat to low and let it simmer for about 7-8 minutes stirring occasionally.
Eggplant should be soft and tender not mushy and coated well with the spices. Adjust the gravy thickness to your choice. Add the cilantro stir gently.
Please Subscribe to my YouTube channel
Source: http://www.manjulaskitchen.com/hyderabadi-bagara-baingan/
0 notes
Text
MY COOKIE SWAP
Every year I host a ladies only (mostly) cookie swap. Or at least, no husbands/boyfriends allowed cookie swap. If someone brings a husband or boyfriend, they’re banished to “husband island,” aka Craig’s TV room where him and my brother watch Parks and Rec reruns.
I love the cookie swap. It’s simple. I make hot chocolate and marshmallows, and a plate of cookies. There’s a wreath making station I put together because, as an introvert, I really appreciate a structured activity at a party. My friends do the rest – everyone brings a plate of cookies, and we spend a few hours eating, drinking, and wreathing. Hosting a party or get together can be stressful because there’s just so much to do – it sucks up your day into a black hole until you hear the doorbell ring when you’re still in sweat pants elbow deep in a cheese board.
Cookie swap was my way of meeting a holiday party halfway. I’ll host and create the scene, but everyone else brings the food. It’s perfect! Many hands make light work, etc.
This year, SOMEONE ate the cookies I had set aside to shoot (cornmeal thumbprint cookies with berry cream jam), so instead I’m going to share my hot cocoa and marshmallows. Happy Holidays!
Hot Cocoa
2 cups unsweetened cocoa powder (I used Valrhona)
1 cup semi sweet chocolate, either small chips or finely chopped
1/2 cup brown sugar, packed
1/2 cup sugar
1 1/2 teaspoon espresso powder
1/4 teaspoon nutmeg
1/4 teaspoon cayenne pepper
1/2 teaspoon cinnamon
1/4 teaspoon salt
1 tablespoon vanilla extract
Whisk the ingredients together. To make an 8 oz cup (which is honestly enough for 2-3 people), mix 3 tablespoons of the mix with a dash of milk to form a paste. Gently heat the paste over medium-low heat until the chocolate bits start to melt. Add an additional cup of milk and stir until hot and steaming. Pour into cups and top off with a dash of heavy cream. Enjoy!
Marshmallows
about 1/2 cup powdered sugar
3 1/2 envelopes (2 tablespoons plus 2 1/2 teaspoons) unflavored gelatin
1 cup hot water, divided
2 cups white sugar
1/2 cup light corn syrup
1/4 teaspoon salt
1 vanilla bean, split and scraped
Oil bottom and sides of a 13 by 9 inch rectangular metal baking pan and heavily dust the bottom and sides with some powdered sugar.
In the bowl of a standing electric mixer, pour in a ½ cup hot water and sprinkle with the gelatin. Let it stand for about 10 minutes.
In a medium heavy saucepan combine the white sugar, corn syrup, vanilla bean and seeds, and remaining hot water over medium heat, stirring with a wooden spoon, until sugar is dissolved. Bring the mixture to a boil and cook, without stirring, until a candy or digital thermometer registers 240 degrees, after about 12 minutes. A word to the wise, this happens very very quickly. While I turned around to tidy up, the entire batch jumped to 275 and burned, so once the thermometer reads 200, keep a close watch, and take it off the heat when it reaches 238. The thermometer should still creep up to 240 after that. Remove the pan from heat and pour sugar mixture over gelatin mixture, stirring until gelatin is dissolved.
Pour the mixture into the prepared baking pan and garnish with the above ingredients (or sift a thin layer of powdered sugar) evenly over top. Let the marshmallow set uncovered, until firm, at least three hours, and up to 1 day.
Run a thin knife around edges of pan and invert pan onto large cutting board. Lifting up 1 corner of inverted pan, with fingers loosen marshmallow and let drop onto cutting board. With a large knife trim edges of marshmallow and cut marshmallows into roughly 1-inch cubes. Sift remaining powdered sugar into a large bowl and add marshmallows in batches, tossing to evenly coat. Marshmallow keep in an airtight container for up to 1 week. Pop into some cocoa and enjoy!
Source: https://www.thekitchykitchen.com/?recipes=/my-cookie-swap/

0 notes
Text
SIBO Made Simple Podcast | EP 04 | FODMAP WTF: A Complete Guide to Life Without Fermentable Carbs with Kate Scarlata
Over the last 5 years, the low FODMAP approach has become the gut healing diet du jour, with everyone from naturopaths to conventional MD’s prescribing it for IBS relief. On today’s episode we get into the nitty gritty of what eliminating fermentable carbs from your life actually looks like, the healing potential for your SIBO, and how this diet can effect your long-term gut health for better or for worse.
If Allison Siebecker, our guest on episode 1, is the queen of SIBO, Kate Scarlata is definitely the queen of FODMAP’s. She’s been writing out this dietary approach for IBS and creating tons of research on her site since long before people like myself were aware of it. She is also the author of several books, her latest of which is called The Low FODMAP Diet Step by Step.
A quick taste of what we’ll cover:
What the FODMAP acronym stands for
Fructose malabsorption and why it effects people with SIBO more than others
How to navigate the complicated ingredient lists for low FODMAP quantities
Kate’s tips for keeping the flavor in your meals without garlic and onion
Her strategies for reintroducing these ingredients back into your diet without fear
What really constitutes a failed test or on-going insensitivity and what other milder symptoms might mean about your SIBO recovery
And so much more…
Resources, Mentions and Notes:
Click here to download a free e-book + transcript of the episode
This episode is brought to you by Fody Foods, my favorite resource for condiments, sauces and spice blends that are low FODMAP and use real ingredients to promote digestive health. Everything is Gluten-Free, Dairy-Free, non-GMO, and most importantly, delicious. The garlic-infused oil and tomato-basil sauce are my personal favorites. Use code SIBOMADESIMPLE at checkout for 15 percent off your order!
Source: https://feedmephoebe.com/smsepisode4/
0 notes
Text
Back-to-School "Toothpick" Apple Cookies

When Imperial Sugar asked me to make some back-to-school cookies, I was thrilled. Now that Jack's in college, I don't get the chance to make cute school cookies much. *insert quiet sobbing here*


I am obsessed with these cookies. Those "flat apples" in the background are created using a toothpick. (Well, lots of toothpicks.)
Mr. E thought the apples were from an icing transfer sheet or some sort of stencil. Nope! Icing and toothpicks! Magic!

I love, love, love the crisp white, red, and green color scheme. It screams September to me. As much as I'm ready for fall, I'm just not onboard with orange and pumpkins quite yet. (Give me another week or so.) Oh, and I'm also not ready for Hobby Lobby to start displaying their Valentine merchandise.
I should mention that these are also DOUBLE-DECKER cookies! Woo hoo!

The complete tutorial is over on the Imperial Sugar blog, Sweetalk. ♥
Go find it along with links to the recipes AND a few options for customization.

Are your kids back in school yet?

Source: http://www.bakeat350.net/2018/08/back-to-school-toothpick-apple-decorated-cookies.html
0 notes
Text
Corn Chowder Recipe (VIDEO)
Fresh Corn Chowder Recipe loaded with summer produce at its peak of freshness. This is a crowd-pleasing chowder that is perfect for entertaining on cool summer nights and would make a great addition to your Labor Day Menu.
Summer Corn Chowder
Thank you to our friends at Walmart who sponsored this delicious recipe and for making fresh LOCAL produce available to give this chowder the best flavor!
When shopping for ingredients, fresh corn is best and you can purchase everything you need for this recipe at your local Walmart. We love that Walmart partners with local growers so you know their produce is:
Picked ripe for peak of freshness
Guaranteed fresh
Supporting your local community
At a price that saves you money!
Walmart has a 100% fresh guarantee so if you aren’t satisfied, they will give you a full refund.
What is Corn Stock?
We love that Walmart carries fresh, locally grown corn* which will give you the best flavored corn stock. Allowing the stripped cobs to simmer with the broth, cream and milk, draws out every bit of rich and sweet flavor from the corn. To save time, set the corn broth to cook at the same time you are making the chowder.
What if Corn is not In Season?
For Winter Corn Chowder: Use (1) 15 oz can corn and (1) 15 oz can creamed corn. Add the liquid ingredients at step 3 without pre-cooking them. The liquid from the canned corn will add a boost of corn flavor.
Watch Natasha Make Summer Corn Chowder:
Corn Chowder Recipe
Prep Time: 15 minutes
Cook Time: 30 minutes
Total Time: 45 minutes
This fresh corn chowder recipe is loaded with summer produce at its peak of freshness. This is a crowd-pleasing chowder that is perfect for entertaining on cool summer nights.
Author: Natasha of NatashasKitchen.com
Skill Level: Easy/Medium
Cost to Make: $10-$12
Keyword: Corn Chowder
Calories: 321 kcal
Servings: 8 cups
For the Corn Chowder:
4 cups corn kernels (from 4-5 ears corn) reserve cobs for stock
4 oz (4 slices) bacon, chopped
1 large onion finely diced (1 1/2 cup)
1 large carrot cut into 1/4" dice (1 cup)
3 stalks celery finely diced (1 cup)
1 lb Yukon potatoes 3 medium, peeled and cut into 1/4" thick pieces
2-3 tsp sea salt or to taste
1/4 tsp black pepper
1/4 tsp cayenne pepper or to taste
2 Tbsp Chives chopped, to garnish
How to Make Corn Stock:
Cut the kernels from the cobs and set kernels aside for making chowder.* Place the bare cobs in a stockpot.
Add 4 cups broth, 1 1/2 cups milk, and 1 cup cream to pot. Bring to a boil then reduce heat and simmer un-covered 20 minutes while making the chowder. Use tongs to remove and discard cobs before using corn stock in step 3.
How to Make Corn Chowder:
Place a 5 Qt dutch oven over medium/high heat. Add chopped bacon and cook stirring occasionally until browned. Remove bacon bits with a slotted spoon and set aside.
In the same pot, add chopped onion, celery and carrot to the bacon fat and cook uncovered, stirring occasionally, until onion is soft (7-8 min).
Add sliced potatoes, 4 cups corn kernels, 2 tsp salt, 1/4 tsp black pepper, and 1/4 tsp cayenne pepper. Pour corn stock into the pot, bring to a light boil then simmer uncovered 10-15 minutes or until potatoes are tender. Season with salt and pepper to taste**. Ladle into bowls and garnish with reserved bacon and chopped chives.
*After cutting the corn off the cobs, remove as much of the silk threads as possible to give your finished chowder a smooth consistency.
**Corn can have varying degrees of sweetness, if your corn is super sweet, you can add a little more salt to balance the sweetness.
FOR A CREAMIER SOUP: transfer 1/4 of the soup to a blender and blend until smooth then stir it into the rest of your chowder.
Nutrition Facts
Corn Chowder Recipe
Amount Per Serving
Calories 321 Calories from Fat 171
% Daily Value*
Total Fat 19g 29%
Saturated Fat 9g 45%
Cholesterol 53mg 18%
Sodium 767mg 32%
Potassium 699mg 20%
Total Carbohydrates 30g 10%
Dietary Fiber 3g 12%
Sugars 7g
Protein 10g 20%
Vitamin A 41.6%
Vitamin C 16.1%
Calcium 10.8%
Iron 14.3%
* Percent Daily Values are based on a 2000 calorie diet.
If you make this recipe, I’d love to see pics of your creations on Instagram, Facebook and Twitter! Hashtag them #natashaskitchen
*Local produce varies by location.
Corn Recipes to Explore:
What is YOUR favorite way to use fresh summer corn?
This is a sponsored conversation written by me on behalf of Walmart. The opinions and text are all mine.
Source: https://natashaskitchen.com/corn-chowder-recipe/
0 notes
Text
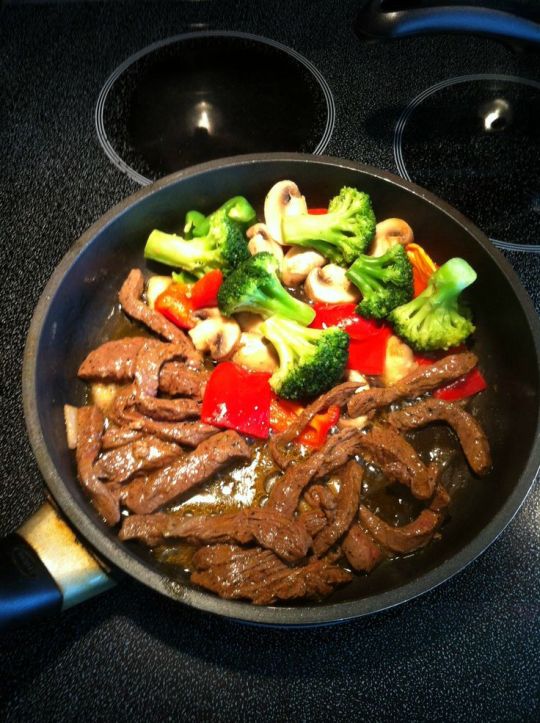
Asian Balsamic Sheet Pan Chicken and Veggies
Oh, how I love an easy sheet pan dinner! Not only is preparation easy, but so is clean up. The best part is that you can modify these dinners in so many ways. Don’t like chicken thighs? No problem, substitute chicken breasts. Don’t like carrots? No problem, substitute sweet potatoes. Actually, sweet potatoes might be really good in this dish (haha). I’ll have to try that one next time! :)
To make this easy recipe a complete meal, I like to serve it over whole-grain ramen noodles or brown rice. Yes, ramen noodles don’t have to be highly processed or bad for you! The ones from Lotus Foods are great. They are made with brown rice and millet flours and are 100% whole grain (I found them in the International section at Whole Foods and Earth Fare). I either toss the seasoning packet in the trash or buy the four pack that doesn’t even come with the seasonings. It only takes 3 to 4 minutes to boil, so I just pop them in the boiling water at the same time that I turn up the oven to broil to finish this dish. Couldn’t be any easier! Plus, there’s nothing like patting yourself on the back when the timing of your different dishes line up so perfectly. :)
I had the opportunity to share this recipe and these tips on our local Charlotte Today show. Here’s the clip below if you’d like to view it!
And here’s the recipe if you’re ready to give this meal a go. I’d love to hear what subs you try (or plan to try) in the comments below!
Asian Balsamic Sheet Pan Chicken & Veggies
This is a quick and flavorful recipe packed with veggies.
Print
Instructions
Combine the soy sauce, balsamic, honey, olive oil, and garlic in a container (with a lid) or a zip-top bag. Add the chicken and marinate for at least one hour or up to 24 hours.
When ready to cook, preheat oven to 400 degrees F.
Line a baking sheet with foil or parchment (if desired for easy clean up) and arrange the chicken on top. Nestle the veggies around the chicken and drizzle with the remaining marinade (tossing to coat).
Sprinkle with the sesame seeds and red pepper flakes on top, and bake until the chicken is done (no longer pink in the middle) and the veggies are soft when pierced with a fork, about 22 to 25 minutes.
Turn the broiler up to high, move sheet pan to top rack, and cook for another 3 to 4 minutes until the glaze is set. Serve warm over brown rice or Asian noodles, if desired.
Recipe Notes
We recommend organic ingredients when feasible.
Use gluten-free tamari/soy sauce and GF ramen noodles/brown rice to make this recipe gluten-free.
Nutrition Facts
Nutrition Facts
Asian Balsamic Sheet Pan Chicken & Veggies
Amount Per Serving
Calories 659 Calories from Fat 144
% Daily Value*
Total Fat 16g 25%
Saturated Fat 3g 15%
Cholesterol 161mg 54%
Sodium 1097mg 46%
Potassium 1182mg 34%
Total Carbohydrates 86g 29%
Dietary Fiber 11g 44%
Sugars 19g
Protein 43g 86%
Vitamin A 395.3%
Vitamin C 131.3%
Calcium 12%
Iron 16.9%
* Percent Daily Values are based on a 2000 calorie diet.
Posts may contain affiliate links. If you purchase a product through an affiliate link, your cost will be the same but 100 Days of Real Food will automatically receive a small commission. Your support is greatly appreciated and helps us spread our message!
Category: Dinner
Free Membership
Get instant access to tons of content by joining the 100 Days Membership area! 100% free, always!
Other Posts You Might Like
About Lisa Leake
Lisa is a wife, mother, foodie, blogger, and New York Times Best-selling author who is on a mission to cut out processed food.
Reader Interactions
Primary Sidebar

Hi, I'm Lisa Welcome to my blog about cutting out processed food! Learn more →

Real Food is More Affordable Than You Think
All 100 recipes in my latest cookbook (#3 in the series!) are $15 or less to make.
Learn More
Source: https://www.100daysofrealfood.com/asian-balsamic-sheet-pan-chicken/

0 notes
Text
Spiced Carrot Soup
We are at that time of year now where our stored and root vegetables are beginning to get tired and no longer at their very best. Too early for the fresh crops, we make do with what we can get . . . I often find that my onions have started to go a bit . . .
I find myself having to peel off and discard several layers before I get to what is good and usable . . . all of these winter vegetables might be a bit past their prime, but they are still fabulous for things like soups and stews.
You are going to love this soup I am sharing with you today . . . Spiced Carrot Soup, or the soup that almost wasn't! Today was one of those days . . . when anything that could go wrong went wrong . . .
Everything for the soup went together quickly and easily . . . it makes good use of onions, garlic, and carrots . . . some grated fresh ginger root . . . warm spices . . .
Ground cumin, turmeric, cinnamon . . . all very aromatic and when combined most delicious . . .
These are cooked in chicken stock until the carrots are meltingly tender . . . be warned it smells heavenly when it is cooking . . .
After that all you need to do is puree it . . . simple. Right??? Right!!! Normally I would use my stick blender, but do you think I could find the motor for mine today???
It was nowhere to be found. All of the attachments were at the ready, but no motor, and I looked every where . . . even in places it couldn't possibly be, but I thought I would check anyways. I even had Todd come in and look . . . sometimes you can't see the forest for the trees and I thought perhaps he could see what I couldn't.
I opened one of the upper cupboards to see if I had crazily put it in there and my pack of Miso Paste flew out of the cupboard landing in the soup and splattering it all over the counter top and back splash . . . dripping off my knife block and cutting boards . . . into our toaster . . . grrrr . . .
You know how turmeric stains . . . BLAH! Most annoying
I could not find it anywhere. I can only think (and I really hope that this isn't what happened) that it got accidentally thrown out the last time I used it, which doesn't make sense, but I don't know where else it could be. I have looked everywhere.
After I cleaned up the mess, I had to dig my big blender out from the back of the wardrobe upstairs, where it is stored. I was quite happy at that point that I hadn't given it away. It did need a good cleaning however.
Its so big and bulky that it just can't live in my kitchen. The stick blender does a great job, takes up a lot less room and is a lot easier to clean, so that is normally what I use. But meh . . . today I had to do what I had to do.
So into the now cleaned blender on the now cleaned counter the soup went. It blitzed up beautifully in about 30 seconds. I threw poured it back into the saucepan and reheated it gently until it was hot again, and stirring in some lime juice and a bit of brown sugar, it was then ready to eat.
With a dollop of plain yogurt on top and a sprinkling of lemon zest and black pepper it was THE BEST CARROT SOUP EITHER OF US HAS EVER EATEN!
I kid you NOT . . . simple to make (aside from the comedy of errors and happenstances), using simple ingredients, but totally, TOTALLY delicious. What a wonderful combination of flavours. Todd had two helpings and I was sorely tempted to do the same!
Spiced Carrot Soup
Print
With ImageWithout Image
Yield: 4
Author: Marie Rayner
You can thicken the soup with a handful of basmati rice if you wish. This soup is really delicious as is. If you don't have or can't find sumac, you can substitute a mix of lemon zest and coarse black pepper for it.
ingredients:
2 TBS olive oil
2 medium onions, peeled and diced
2 tsp freshly grated ginger root
2 cloves garlic, peeled and crushed
1 tsp ground cumin
1 tsp ground turmeric
1 1/2 tsp ground cinnamon
1 kg carrots, peeled and sliced (2.2 pounds)
1 1/2 litres of chicken stock (about 6 cups)
1 tsp brown sugar
1 TBS lime juice
fine sea salt
To serve:
Plain yogurt
ground sumac to sprinkle
instructions:
Heat the oil in a large saucepan with a heavy bottom. Add the onions and cook, stirring occasionally, until softened and translucent without colouring. Add the garlic, grated ginger and all of the spices. Cook, stirring until quite fragrant. Add the carrots and toss to coat them with the spice mixture. Add the chicken stock and bring to the boil. Reduce to a simmer and cook over low heat for about 30 minutes until the carrots are soft and meltingly tender.
Remove from the heat and puree using a stick blender, or very carefully in a full sized blender or food processor. Take care as it will be quite hot and you don't want to scald yourself. Return to the stove and gently reheat. Stir in the lime juice and brown sugar. Taste and adjust seasoning as required with salt.
Ladle into heated bowls, garnishing each with a dollop of yogurt and a sprinkle of sumac. Delicious!
If you only try one soup this week, let it be this one! I promise you that you will fall in love with it. I can't wait to have some company now and serve them this as a first course. It is AMAZING! Truly. I promise. I really hope that I can find my stick blender motor. I feel quite lost without it! I hope that I don't have to buy a new one. 😟😟😟
Source: https://theenglishkitchen.blogspot.com/2019/04/spiced-carrot-soup.html
0 notes
Text
Three Bean Salad with Vidalia Onion
My favorite time of year for fresh salads! This Three Bean Salad with Vidalia Onion is a perfect side dish for your weekend barbecue or great to make ahead to serve at dinnertime during the week.
This recipe and post were created in partnership with Shuman Farms’ Real Sweet Vidalia Onions.
This Three Bean and Vidalia Onion Salad has to be one of my favorite salads to make when we are barbecuing over the summer. It’s a classic salad that you probably have seen more than once on a salad bar – but homemade is so much better! Wow, can you taste the freshness. I love to add sweet Vidalia onions for extra flavor, especially when they are in season mid-April to early August.
How to make three bean salad
So easy! All you need is a few ingredients for the base of the salad and a few for the dressing. The base of the salad is fresh green beans, garbanzo beans, kidney beans and sliced Vidalia (or sweet) onion.
The dressing is vinegar, oil, sugar, garlic, salt and pepper. You boil the dressing for a short time to meld the flavors then combine with the beans. That’s it!
Vidalia Onions
I love using Vidalia onions in a lot of my recipes, especially salads, because of their mild, sweet flavor. Did you know that the reason these onions are sweet is because they are grown in the sandy soils of southeast Georgia with average rainfall that washes away the sulfur compounds that give onions the ability to make you cry? No tears when slicing up these sweet onions.
Another fun fact you may not know – Produce For Kids was founded by John Shuman in 2002 with the purpose to help inspire families to eat more fresh produce while raising money for charitable causes. If you have been reading my blog for a while, then you already know I’ve been a big supporter of Produce For Kids for several years as a contributor to their blog and recipe developer. I stand behind their mission and love seeing how they are working with the communities and charities they support.
I originally started making this recipe for Three Bean Salad when I first started blogging years ago after seeing a recipe for homemade 3 bean salad on another blog. I tweaked it a bit by using apple cider vinegar and adding a good amount of sliced Vidalia Onions. Leftovers are awesome because you can continue to use the dressing along with the beans by adding it to a nice green salad. And bonus, this salad is super portable so go ahead and take it to your next summer get together. Your friends will love it!
More recipes using Vidalia Onions:
Greek Grilled Cauliflower and Vidalia Onion Quinoa Salad
Grilled Broccoli and Vidalia Onion Salad with Pine Nuts and Parmesan
Check out How To Caramelize Onions – 3 Ways (Stovetop, Instant Pot, Slow Cooker)
Print
Ingredients
Salad:
1 1/2 lbs fresh green beans, cut into 1-inch-long pieces
1 cup water
1 can garbanzo beans, rinsed and drained
1 can red kidney beans , rinsed and drained
1 large Vidalia onion, thinly sliced
Dressing:
1 cup apple cider vinegar
1/4 cup sugar
1/2 cup canola oil
2 medium cloves garlic, pressed through a garlic press (or minced)
1 teaspoon salt
Ground black pepper
Instructions
Heat vinegar, sugar, oil, garlic, salt, and pepper to taste in small saucepan over medium heat, stirring occasionally, until sugar dissolves, about 5 minutes. Remove from heat and let cool to room temperature.
Steam green beans in a large pot with 1 cup water with 1 tablespoon salt added to it; cook until crisp-tender, about 5 minutes. Meanwhile, fill medium bowl with ice water. When beans are done, immediately add to ice water to stop cooking process; let sit until chilled, about 2 minutes. Drain well.
Add green beans, garbanzo beans, kidney beans and onions to a large bowl. Pour dressing over salad mixture and gently toss to coat. Cover and refrigerate for a few hours (or overnight) to let flavors meld. Toss salad with dressing occasionally while chilling.
Notes
Dressing makes a large amount but is used more as a marinade for the salad so you will have a lot leftover at the bottom of the bowl. Be sure to occasionally stir salad when in fridge so it is distributed to all the beans.
Serve with a slotted spoon.
Salad can be covered and refrigerated up to 4 days.
Recipe inspired by Mixed Salad Annie
Keywords: green beans, garbanzo beans, kidney beans, onion
Ingredients:
1 cup apple cider vinegar
1/4 cup sugar
1/2 cup canola oil
2 medium cloves garlic, pressed through a garlic press (or minced)
1 teaspoon salt
Ground black pepper
1 1/2 lbs fresh green beans, cut into 1-inch-long pieces
1 can garbanzo beans, rinsed and drained
1 can red kidney beans , rinsed and drained
1 large Vidalia onion, thinly sliced
Directions:
Heat vinegar, sugar, oil, garlic, salt, and pepper to taste in small saucepan over medium heat, stirring occasionally, until sugar dissolves, about 5 minutes. Transfer to a large bowl and cool to room temperature.
Steam green beans in water with 1 tablespoon salt added to it; cook until crisp-tender, about 5-7 minutes. Meanwhile, fill medium bowl with ice water. When beans are done, immediately plunge into ice water to stop cooking process; let sit until chilled, about 2 minutes. Drain well.
Add green beans, garbanzo beans, kidney beans and onions to vinegar mixture; toss well to coat. Cover and refrigerate overnight (or for a few hours) to let flavors meld. Let stand at room temperature 30 minutes before serving. (Salad can be covered and refrigerated up to 4 days.)
Follow AggiesKitchen on Instagram and show us what recipes you are making from the blog! Use the hashtag #aggieskitchen - I'd love to see what you are cooking up!
Disclosure: This recipe and post were created in partnership with Shuman Farms’ Real Sweet Vidalia Onions and Produce For Kids. All opinions are my own. Thank you for supporting the brands that support Aggie’s Kitchen!
Follow Aggie’s Kitchen’s board Salads on Pinterest.
Are you following me on Instagram, Twitter, Facebook and Pinterest? If you’d like to subscribe to Aggie’s Kitchen and have each post delivered straight to your e-mail box, then please add your email here. Happy cooking!
There are affiliate links in this post. I make small earnings through any purchases made through these links. Thank you for supporting Aggie’s Kitchen!
Source: https://aggieskitchen.com/three-bean-and-vidalia-onion-salad/
0 notes
Text
How to Make Yogurt in the Instant Pot (Greek Yogurt Style)
It’s here! Homemade GREEK YOGURT. Made right in your Instant Pot. Now we know that for many things it’s easier to buy product at the store instead of making at home, but sometimes the resulting homemade product is SO GOOD that it’s 100% worth the effort, which is why we’re talking all about How to Make Yogurt in the Instant Pot, specifically GREEK YOGURT. Mike is so in love with this one, he couldn’t believe it was homemade!
How to Make Yogurt in the Instant Pot (Greek Yogurt Style)
How to Make Yogurt in the Instant Pot is definitely one of those recipes we could not wait to share with you. Of course, there are a few more steps than usual to complete this recipe, because after all it is making yogurt at home., but trust us when we say the resulting yogurt, which is strained to make greek yogurt is so worth the effort. It’s so incredibly delicious and creamy, it’s super filling and doesn’t contain any sugar or additives! It’s made with two ingredients only: milk and probiotic bacteria. It’s worlds-away-different from anything you’ll buy at the store! We are so in love with this greek yogurt and are so excited for you to get your hands on this recipe!
We also love that homemade yogurt has way more probiotics than most anything you can buy at the store, because you can control how long you ferment the yogurt. The longer you ferment the more probiotic bacteria you have! We also can attest that making yogurt is so much cheaper than it is to buy at the store.
Prefer to make non-dairy coconut milk yogurt? Check out this post.
Why make homemade yogurt in the Instant Pot?
As if there aren’t enough ways to love our Instant Pot, using them to make yogurt is just another one of them! We loved the idea of doing it in the Instant Pot because it means we don’t need to buy a separate gadget to incubate the yogurt (and we know there are ways to do it without any gadget, but we’d prefer the controlled temperature). Of course, we are talking about an Instant Pot that has a yogurt function button. However if you do have a dedicated yogurt maker, you can certainly use it with this recipe as we opt to heat the milk on the stove because we didn’t like that heating it in the Instant Pot left the milk stuck to inner pot and in turn left the resulting yogurt chunky. If you prefer to skip this and just do the whole thing in the Instant Pot you can! All you need to do is hit the yogurt button until it says boil, and then let the Instant Pot do the rest. You follow the remainder of the steps after that.
What does it actually mean to make yogurt or ferment food?
In a nutshell, when you are making yogurt you are introducing bacteria cultures to milk and creating a warm and comfortably environment for them to grow for a specified period of time, or ferment. The culture is either a purchased yogurt culture or probiotic capsule that is combined with the milk to inoculate the batch with bacteria. You can also make yogurt with a previously inoculated batch of yogurt. The introduced bacteria feed off of the sugar in the milk and will thrive and multiply in an environment around 110 degrees or so, and the Instant Pot Yogurt setting keeps the milk at that temperature consistently.
If you’ve never made yogurt or fermented food before this can seem a little daunting. But once you get the hang of it making it will seem easy and can be done every week for an unending supply of yogurt.
Tips on How to Make Yogurt in the Instant Pot
Read through the entire post and follow all of the recipe instructions. This is the type of recipe where the directions sound so specific and it’s all for a reason!
If you are making this for the first time purchase a starter culture. After you’ve made the yogurt for a few times and have a feel for it you can start saving a tablespoon of yogurt to make new batches, but wait to do that until you’ve got the hang of making yogurt.
Clean all your utensils and cookware and anything else you are going to use with hot soapy water, or place in the dishwasher. Generally speaking whenever you are fermenting food you want to make sure your cookware and utensils are sanitary so you don’t encourage the growth of bad bacteria. We also remove the inner seal from the Instant Pot lid because it has a tendency to hold on to odors, and they will definitely transfer to the yogurt.
Use an instant read thermometer (we love our Thermapen: it’s an investment but one that will last forever) to make sure you have the correct temperature when heating up the milk and cooling it down so you don’t accidentally kill the starter culture by placing it in liquid too hot. If you don’t have an instant read thermometer make sure the milk is warm, but not hot by pickup up a couple of drops and putting them on your inner wrist. If it feels very warm it’s likely too warm for the bacteria.
The longer you ferment the yogurt the tangier it will be. But you CAN ferment it too long. Check the package of your yogurt starter to see what it recommends. We found a sweet spot between 12-16 hours, but if your package says something different start out with that time and see how your yogurt tastes. If it isn’t very tangy try fermenting it for longer than next time you make a batch to get the yogurt you think tastes best.
Strain your yogurt to turn it into greek yogurt! When your yogurt has finished fermenting it should definitely be thickened up, but you have to strain the yogurt if you want it to get greek style! The whey will separate from the milk and produce a super dreamy and creamy greek yogurt. Don’t throw away the whey though! You can use it in smoothies for some extra protein!
Tools we used to make this recipe:
If you like this how to post, check our these others:
Want to make dairy-free yogurt in the Instant Pot? We have you covered here!
How to Make Yogurt in the Instant Pot
Ingredients
4 cups whole milk (see this post for dairy free)
1 Packet Yogurt Starter (ours was 5 grams) or 1 tablespoon prepared yogurt with live cultures
Directions
In an Instant Pot with a yogurt function, remove the seal from the lid. Clean the lid and the inner pot with hot soapy water, or place in the dishwasher, and dry thoroughly. Set aside. (see note)
Heat milk in clean medium pot over medium heat until it has started to steam and bubble around the edges, to 180ºF (we like to use our Thermapen for this).
Place the hot milk in the Instant Pot inner liner, and let cool until it reaches 105ºF - 110ºF, about 40 minutes.
Once it has cooled enough, in a small bowl add the live culture together with about ¼ cup of the milk and whisk until it is fully combined. Add it back to the inner pot, whisk until combined.
Press the Yogurt function on the Instant Pot until it displays a timer. Set for 8-16 hours, depending on how tangy you want your yogurt and close the lid (without the inner seal). It does not matter whether you press sealing or not.
Once finished, smell the yogurt. It should be pleasantly tangy.
To make greek yogurt: Line a fine mesh strainer with either a clean cotton kitchen towel, a coffee filter and two layers of cheesecloth. Pour the finished yogurt inside and let it drain for 2-6 hours, or until desired consistency.
Yogurt will keep in the refrigerator for 5-7 days.
Recipe Notes
Read the entire article on How to Make Coconut Milk in the Instant Pot.
You want to make sure the Instant Pot is clean for two reasons: the first is because you are fermenting food and you want to make sure there is no bad bacteria on your Instant Pot. The best way to do this is to put all of your equipment through the dishwasher right before use, or wash with hot and soap water. The second is because if there is any smell leftover on your lid or inner pot, which is known to happen in an Instant Pot, it will likely transfer to the yogurt. So clean it really well.
You heat the milk up for two reasons: the first is to kill of any bad bacteria, the second is because heating it up changes the protein structure of the milk and allows for the resulting yogurt to thicken up.
We are heating up the milk in a pot on the stove because we do not like the cooked milk solids that occurs when it is heated in the Instant Pot because it results in chunky yogurt. If you wish to use the function on the Instant Pot that brings the milk to the proper temperature you can do that.
You want your cooled milk temperature to be accurate before adding your culture because if it’s too hot, it could kill the live culture but if it is too cold it might disturb the fermentation. If you wish to speed up the process of the milk cooling down you can place the pot in a ice bath. Just make sure to watch the temperature as it will cool quickly, around 10-15 minutes depending on how cold the ice bath is. If you cool off the milk in ice in the IP inner pot make sure to dry it off thoroughly before using.
There may be a thin skin that has formed on the milk after it has cooled. This is normal, but we remove it to make for a smoother yogurt.
The longer you ferment the yogurt, the tangier it will be as the bacteria consumes all of the sugar and the more probiotic bacteria will grow. We tried the yogurt at 8 hours, which was not very tangy at all, to 16 hours which was a bit too tangy for us. We preferred the yogurt on the higher end of fermentation around 12 hours. However depending on the type of culture you are using it may give a different length of time, so be sure to check the instructions on how long to ferment the yogurt.
Depending on what yogurt starter you used will change how long you need to strain the yogurt to get thick greek style. If it goes too long and is too thick for your liking you can always add back in some of the whey.
Don't throw away the whey! It's full of protein. You can use it in smoothies or as cooking liquid in pasta, rice, potatoes, etc.
If at any point in the process your yogurt starts to smell bad, taste bad, or has any gray or pink liquid something has gone wrong and you will want to throw it out. Yogurt should be pleasantly tangy, but not taste “bad”.
Loading nutrition data...
There may be affiliate links in this post! By clicking on them, or purchasing recommended items I may receive a small compensation, at no cost to you! However, I only recommend products I absolutely love and use in my own home! Thank you for supporting Lexi's Clean Kitchen when you shop! See my privacy policy for more information about this, the information we save, and more!

Source: https://lexiscleankitchen.com/yogurt-in-instant-pot/
0 notes