
Last Seen Blogs

nawewinife
Untitled

eurolinguiste
Eurolinguiste


ascendtolichdom
The Lich Queen's Lair

sharingpillowsandcoldfeet
☼haylor☼
Text
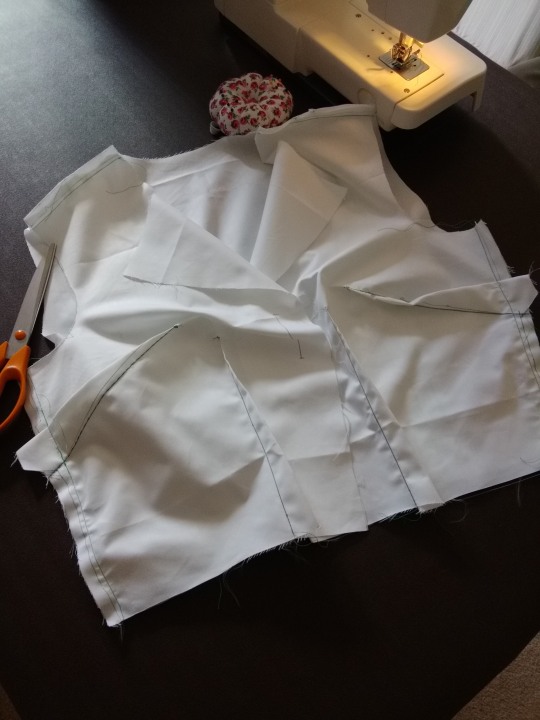
NewLook Ruffle Jumpsuit
I recently made a ruffle jumpsuit for my daughter using the NewLook 6444 pattern. I usually prefer to use PDF patterns and a projector - if I think I’ll make the item several times, I project onto plastic tablecloth sheets and use these as my pattern pieces. This is particularly helpful if you need to make adjustments to the pattern. I have a massive roll of plastic tablecloth from Amazon, and because it’s quite translucent in this case it was perfect for tracing the correct size off the pattern.
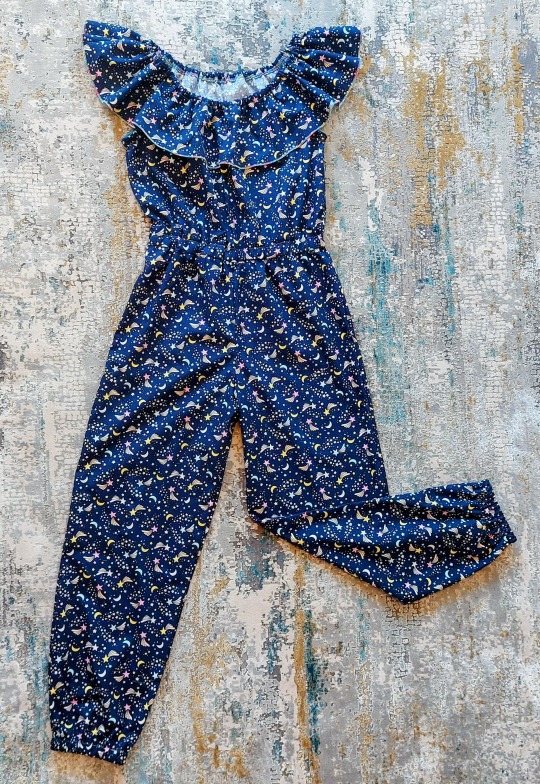
I was a little bit intimidated by the pattern at first because some of the steps looked a bit faffy, but it turned out to be a relatively quick sew. I made a few modifications, such as not using binding to make the elastic channel at the neck/shoulder. I found that this left a weird bit of ruffle at the top, so instead I overlocked the top edge and then folded over to make a hem and inserted the elastic there instead.
I also wasn't sure about the armhole binding, as it seemed bulky and distorted slightly. Next time I make this jumpsuit, I'm not sure I'll do the armhole binding in the way they recommended.
Overall, I'm really happy with how the jumpsuit turned out. It fits well, with a sensible amount of growing room. My daughter loves it too, and I'm sure I'll be making another one soon! Maybe in a shorts/playsuit style.
Notes on sewing:
Use a lightweight cotton fabric so that there is enough drape and the ruffle isn’t bulky.
The pattern suggested a very narrow hem at the bottom of the bodice ruffle, but that seemed a hassle and would have reduced the drape - instead I used my overlocker to do a rolled hem.
As noted above, I pinned the ruffle to the bodice (right side of bodice pinned to wrong side of ruffle) and then overlocked around the entire top edge. Then I folded over a 1/2” hem and used that as the channel for the elastic.
I used a piece of 1” wide bias binding (on the inside) to make a channel for the waist elastic, because I wanted to use a wider piece of elastic than suggested.
0 notes
Text
Heydays dungarees
It's Me Made May, and this year it's really easy to adhere to wearing something me-made every day (and not just because I make my own undies)... I'm pretty much living in these dungarees at the moment!

I'm so excited to share my latest sewing project with you! I really wanted some of the Lucy & Yak dungarees, but I'm just too darn tall and they don't make them in my size... Instead, I made these dungarees using the Heydays pattern from Waves and Wild.
The fabric is a navy blue needle cord, and I used a floral cotton accent fabric for the facings and pocket linings. The straps tie through loops, and they're so comfy and practical. For a finishing touch, I sewed a custom label with a gold heart into the front pocket.
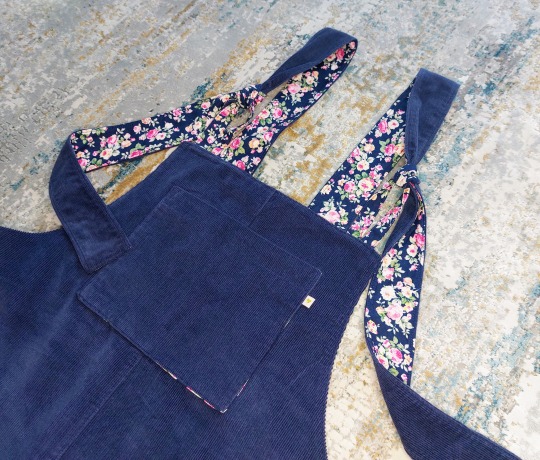
I'm really happy with how these dungarees turned out, I'll definitely be making more. If you're looking for a new sewing project, I highly recommend the Heydays pattern. It's easy to follow and the results are amazing! I’ll be making lots more of these. They also do a child-size pattern - my daughter has already placed an order for a rose pink pair!
Notes on sewing:
• I used the optional facing tutorial to draft a contrast facing, because it takes the bulk out of the hem around the bodice section. I forgot to adjust the loops accordingly, but I like the way they look so it's no problem.
• Again, I didn't like the bulk around the pocket edges so instead I lined them with the contrast fabric.
• I found some sweet little labels on Etsy with gold hearts, they look really cute sewn into seams and pockets - and they help home-made clothes look a bit more 'finished'.
• I extended both the body and the leg by a total of 6 inches, and then took an inch back out on the inner leg seam at the top - which also had the added benefit of taking out some of the bulk around the top of the leg.
0 notes
Text
Black stretch velvet wrap dress

I’m so excited to share my latest creation! I’m so pleased with this black velvet dress, made using the GBSB Wrap Dress pattern. The velvet fabric is luxurious, and the knee-length silhouette is flattering and versatile. The beaded embellishment on the shoulder adds a touch of glamour - I can’t wait for more opportunities to wear it out on the town!
Fabric: black stretch velour from eBay
Pattern: wrap dress from the Great British Sewing Bee
Beads and satin binding from my stash.
Sewn with my trusty Janome overlocker and finished with my Janome coverstitch.

Notes on sewing:
I only had 2m of this fabric, bought for a different project I abandoned. I was really careful with my cutting out! In an ideal world, I’d have added some length to the pattern for the waist ties, but this wasn’t possible with the fabric available.
In my haste to make the dress and get all the pattern pieces laid out, I messed up and accidentally laid the pattern out “upside down” so that the velvet nap strokes “up” instead of “down”. Aside from the tactile element for the wearer, not a disaster - but it does mean that it collects more fluff!
Next time I make this dress, I won’t bother with the binding - it’s far to stiff and alters the shaping of the dress around the neckline. Instead I’ll add an inch to the pattern around the collar and front, and finish the edges with a 1/2” hem.
The binding was a real faff to apply, and I didn’t like the finish. In an attempt to press and shape the binding around the neckline, I had a complete disaster. I pressed with a cool iron, through a towel - but the iron burped steam and damaged the velvet pile right in the front of the dress. It looked like a permanent splash of liquid on the front. In the end the only way to recover the situation was to deliberately and lightly steam-damage a wider area of the fabric, so that the single spot of damage was blended in.
I had already planned to decorate one shoulder with a beaded pattern, and this further distracts from the damage to the pile.
Definitely will make again, this time in a purple stretch velour.
#homesewing#wrapdress#greatbritishsewingbee#stretchvelvet#velvet#beaded#cocktaildress#janome#overlocker#coverstitch
1 note
·
View note
Text
Burrito Pillowcase
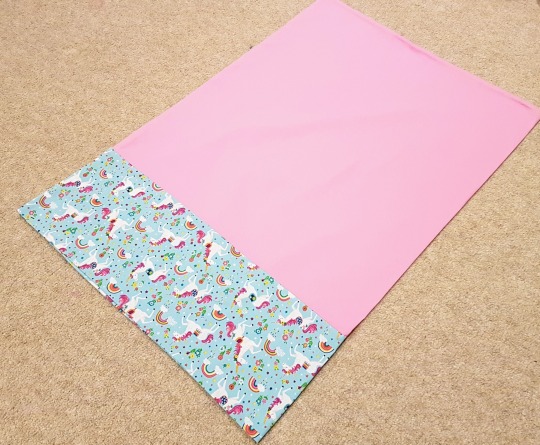
My youngest - now six - was delighted to receive a sewing machine for Christmas. It’s a pink midi-machine from Aldi and it’s perfectly sized for small hands. She needs to be supervised at the moment, although that won’t always be the case (when the time comes, I’ll get her a needle-guard). It’s a real machine, not a chain-stitch toy, with a decent number of stitch options.
To begin with, she made some very simple blankets for her beloved cuddly Bunny comforter, and last weekend we made a very simple “ruffle dress” for Bunny complete with a gathered frill, a hem, and elastic casing at the top.
Now she’s a bit more confident, we decided to learn a couple more skills by making this deceptively simple Burrito Pillowcase. These are so easy and great fun to sew!
To make one of these, you will need...
* For a wide contrast panel (as shown above) - a strip of patterned fabric 40″ across by 15″ deep, and a piece of coordinating plain fabric 40″ across by 24″ deep.
* For a narrow contrast panel - a strip of patterned fabric 40″ across by 9″ deep, and a piece of coordinating plain fabric 40″ across by 27″ deep.
If you’re sewing with younger kids, I’d suggest cutting all the fabric to size before involving them. Make sure you’re happy with the orientation of the fabric if the pattern has an obvious direction.
I would thoroughly recommend investing in a pack of wonder-clips - these are little plastic crocodile-clips used to pinch fabric together. They’re loads safer than pins where little fingers are involved!
The seams should all be sewn with a 1/4″ seam allowance. Press like mad after each seam is finished - it’s that pressing that gives home-sewing a professional finish.
1. Lie the patterned panel out on the floor, pattern side (”right side”) up.
2. Carefully place the plain fabric on top and clip/pin together along the long edge.
3. Now - make your burrito! Carefully fold / roll the plain fabric up until you can see the patterned piece underneath. Then make your burrito by folding the bottom, long edge of the patterned piece up and over your plain fabric roll.
4. Re-clip/pin the long edge so that the single layer of plain fabric is sandwiched inside the patterned piece. Your burrito should have the wrong side of the pattern showing on the outside.

5. Sew the long edge together, using a straight stitch, then finish the seam by using a zig-zag stitch along the raw edge.
6. Unroll your burrito - this is the fun part! Pull the plain fabric carefully out of the burrito until the whole thing turns the right way round.
7. A French seam will give this a really lovely, robust finish. Fold your pillowcase in half so that the right side of the pattern is on the OUTSIDE and the wrong sides are together. It should now look like a pillowcase, with the patterned band at what will be the top. Carefully match the side edge so that the patterned and plain pieces are neatly together, and clip/pin down the side (watch that alignment!) and along the plain bottom edge.
8. Sew the side and bottom edge together, using a straight stitch. Then carefully trim off half the seam allowance and cut diagonally across the lower corner. Turn the pillowcase inside out (so that the right side of the fabric is now on the inside) and press the seams out really carefully. Clip/pin down the side and along the bottom edge.
9. Carefully sew back down the side and along the bottom edge, again using a straight stitch and a 1/4″ seam allowance.
10. Turn the pillowcase back out the right way round and press once more to finish!
0 notes
Text
Sew Over It Charlotte Dress

I think the Sew Over It Charlotte Dress might be my most favourite dress pattern of all time! The wrap-style bodice is incredibly flattering, and the pleated shaping meant I didn’t need to do the dreaded full-bust adjustment. It was easy enough to add some length to the bodice. And it has pockets!!
I made a wearable toile in some pretty, printed chambray – initially intended as a summer dress but it proved sufficiently wearable for the office on hot summer days. I then made it in a beautiful black polycotton blend textured to look like linen (but without the creasing).
If you’re making adjustments to a pattern then a wearable toile is the way forward. Use an inexpensive fabric to ensure you’re completely happy with your tweaks and amendments before you go to town with a more expensive cloth.
My top tips for the Charlotte dress:
1. Press out every seam as you sew – careful pressing is what stops dresses from looking ‘home made’ instead of tailored. Invest in a decent tailor’s ham for shoulders and other curves (or make your own!).
2. Very carefully measure from your shoulder (on the top, where your collarbone intersects with the inside of your bra strap) down over your bust to your natural waist, and compare that with the length of the bodice piece. If you’re fuller in the bust you will need to add length (the pleating and shaping should negate the need for an FBA).
3. If you’ve amended the length of the bodice, don’t forget that you’ll need to alter the length of the zip to match!!
0 notes
Text
Projecting patterns
I was fortunate enough to receive an ultra short throw projector, and this has revolutionized my sewing. I’m able to cut out so much faster – but the process is laden with pitfalls if you don’t prepare properly.
My top tips for successful pattern projection:
1) There are loads of really good, reconditioned projectors on eBay, most of which have had previous lives as classroom projectors.
2) Join the Facebook projector pattern page, which is packed to the gunnels with guides on setting up and calibration. Correct calibration is the key!
3) Lots of pattern suppliers now do a projector pattern format. If they don’t, an A0 print-shop format will work just as well.
4) Religiously check your 1” squares. Every. Single. Time. Make a note of the correct zoom required to hit the sizing perfectly.
5) Check the pattern orientation – make sure you’re projecting each pattern piece in the correct orientation, especially if you’re using an A0 pattern (decent projector patterns will have all the pieces oriented correctly). The last thing you need is upside-down penguins on your lovingly made pajamas.
6) Stabilise your fabric and your pattern with weights. Loads and loads of weights. Making your own pattern weights is incredibly satisfying and you can never have too many.
7) Tailor’s chalk is your friend – cutting out is so much easier if you trace out the projected image with tailor’s chalk, before cutting with a rotary cutter.
8) Cutting a pattern piece on the fold? Mark the fold line on your cutting mat, align the projected image so that the fold line is on your marked line, then place the fabric along your marked fold line. If you try to project so the fold line is along the edge of your fabric, it will distort.
0 notes
Text
Sticky ginger flapjacks
Trying to get back into blogging after a ridiculous time away! Both children are now at school, which in theory gives me more time to cook and sew. In reality, of course, I’m constantly juggling work and parenting... even more so during lockdown where we were homeschooling as well.
Kids seem to have a constant need for snacks, and I’m certainly rather partial to a cup of tea and a sweet treat for elevenses. These sticky, gingery flapjacks seem reasonably healthy but are also very filling. The warm, gingerbread flavour is perfect for after school snacks on dreary autumn days.
Sticky Ginger Flapjacks
Ingredients: 125g of butter, 125g brown sugar, 3 tbsp golden syrup, 250g porridge oats, 1 tsp ginger, 1 tsp cinnamon, 2 dessert spoons diced stem ginger in syrup.
Lightly grease a suitable metal baking pan (I find this quantity perfectly suits two sponge cake tins). Put the butter, sugar and golden syrup in a bowl and gently warm in the microwave until the butter has melted. Stir in the spices and the stem ginger, and then stir in the oats until well mixed through. Pat the oat mixture evenly in the pans, and bake in the oven at 180C for 12-15 minutes.
Bring out and allow to cool down until set but still pliable, then tip out onto a board and chop into squares. If the flapjack is too warm when you do this, it will disintegrate - but if it’s too cold it will be impossible to slice without smashing. Store in an airtight tin
0 notes
Text
Miso Noodle Bowls
Lunchtime is where my plans to eat healthily fall apart. I’m always in a rush, either at work or at home, and the easiest thing to do is to grab something deliciously fatty and full of starchy carbs. Microwave mac and cheese is my temptress and my nemesis.
Like Irene Cara, I appreciate a Hot Lunch. I’ve started to prep these quick and easy miso noodle bowls in advance. The best result is to blast the noodle pots in the microwave for 2 minutes before adding boiling water. But they’re equally good with boiling water added, pot-noodle-style, for somewhat indecorous desk-top eating.
Miso Noodle Bowls
Ingredients: 2 nests of rice noodles or similar (the Sainsbury’s own brand ones are really nice), 4 spring onions, 1 large carrot, 1 large tin sweetcorn (in water), 100g bag baby leaf spinach, 600g cooked chicken/turkey (marinated if you’re feeling flash), Yutaka miso paste, tahini, Sriracha.
If I had time, I would prefer to use cooked chicken thigh, but it’s much easier to use 150g packs of cooked chicken or turkey.
Cook the noodles according to the instructions, drain and then rinse in cold water to cool. Finely slice the spring onions, grate the carrot, drain the sweetcorn. Divide up the noodles between 4 containers, and then layer the spring onions, sweetcorn and carrots on top. Spoon 1 heaped dessertspoon of Miso paste and 2 teaspoons tahini into one corner of each pot (and a nice squirt of Sriracha if you’re so inclined) and then add the chicken on top. Seal up and refrigerate.
Ideally, add a dash of water and warm in the microwave for 2 minutes, before tipping into a bowl and covering with boiling water. Or just add the boiling water. Stir and slurp.
0 notes
Text
Everyone loves a party dress!
Baby A is no longer a baby… she’s now a very headstrong and opinionated toddler. Despite my best efforts to focus the activities on a STEM agenda at home... she’s mainly interested in pink things, sparkly things, and princess things.
One thing we can both agree on is that everyone loves a party dress!
I really enjoy making clothes for the kids, especially when I can put together something which they like, and which fits them well, but which will also withstand being worn, enjoyed, and played in.
I’ve made few of these pinafore dresses for Amelia. The basis of the pattern is a Sew Magazine Flower Applique Pinafore dress – a very simple A-line pattern which is easy to wear.
A can dress herself in these dresses, which is a big thing for her (usually accompanied by the battle cry: “MY DO IT!!!”).
To add a bit more flair and wearability, I’ve amended the pattern by drafting a yoke piece, and extending the front ‘skirt piece’ by 5” in order to add 5 little box pleats into the centre.
I also added a facing, using the yoke pieces as a guide. Because I made these as Christmas party dresses, I hand embroidered each one with a Frozen-inspired motif so that A can be either Anna or Elsa as the mood takes her!

0 notes
Text
Le Grande Coq au Vin
I’m not sure how I’ve managed to allow 18 months to pass since I last blogged in earnest! Clearly juggling work and family has made for busy times. Happy times, but busy!
I’ve always been tempted junk food, and when I’m busy - and especially when I’m stressed too - it’s tempting to reach for something that is invariably as unhealthy as it is quick. Instead, I’m trying to plan the cooking around recipes that need minimal preparation and ideally can be cooked in one pot.
Le Grande Coq au Vin
Ingredients: one large onion, a generous teaspoon of Lazy Garlic, a 200g packet of simply cooked puy lentils, 100g tub of pancetta, pork stock cube, 500ml red wine, 750g turkey thigh fillet.
Dice the onion and sling in a lidded casserole dish with the garlic, stock cube, lentils, pancetta and wine. Nestle the turkey thigh into mixture, put the lid on and put into the oven at 130°C for 3 hours until the meat is cooked and falling off the bone. Carefully remove the bone, pull the meat apart and serve over fresh tagliatelle.
2 notes
·
View notes
Text
Clash of Heroes Hoodie
Like all small boys, W is tremendously keen on all things superhero!
He's a big lad for his age, and broad in the shoulder. A big issue I have with his clothes is that the sorts of things he finds comfortable and easy to wear are generally not available in his size. Luckily that's where the sewing machine comes in.
My latest discovery is just how easy it is to appliqué when sewing with jersey. The designs on this hoodie were drawn (in mirror image!) on to fusible webbing and ironed on to the wrong side of the jersey before cutting out assembling onto the front hoodie panels. Then I used a triple stretch stitch to carefully topstitch in place.
The lovely cotton-elastane jersey is from Tia Knight (via eBay). The hoodie pattern is the Double Trouble from the amazing Peek a Boo Pattern Shop. It's reversible, which allows W to effortlessly transform between his two favourite superheroes!

0 notes
Text
Quick-quick-slow Spicy Oriental Pork
Well, it’s been a fantastic year off… I’ve has two months with my (horribly swollen) feet up, watching Doctor Who box sets and making a quilt for W, followed by 9 months enjoying Baby A, playing with W, cooking, sewing, quilting and enjoying being a stay at home Mom.
All good things come to an end, and I’m back to work on Monday. I enjoy my job, and I’ve missed the office and my colleagues, so I’m looking forward to it but I’m under no illusions that juggling work and two kids will have some challenges.
One of the things I’ll be doing is digging out the slow cooker - we’ll be eating more meals like this…
Spicy Oriental Pork
Ingredients: one large pork tenderloin fillet, 2 dessert spoons sesame oil, 2 dessert spoons syrup, quarter cup Martini Bianco, quarter cup soy sauce, teaspoon dried chilies, teaspoon whole grain mustard, teaspoon ground ginger, teaspoon lazy garlic, teaspoon Oriental five spice.
Slice the pork fillet into half inch thick medallions, put into the slow cooker with all the other ingredients. Cook on high (stirring occasionally) for at least 4 hours until the meat is tender and the sauce thick and glossy.
Serve over wilted spinach and pan fried udon, with a nice cold Sapporo beer.
0 notes
Text
Simplicity 6184 fitted dress with pleated neckline
Having given up on the shirt dress, I decided to use the gorgeous summer cotton I bought from Fletcher's Fabric in Leeds Market and try out a different dress pattern.
The fabric makes for a nice summer frock; as it was so quick to make, next on my project list is to try a fully-lined version in a more sober crepe, for work.
Hacks:
1. Fitting the toile
This dress is softly shaped, with neckline pleats and waist darts. It was reasonably easy to adjust the waist and back length, and the cut already accommodated a fuller bust. The best tip I've learned is that if you're more amply proportioned, then measure ABOVE your bust, not under, and use that as your measurement when sizing.
I'm completely sold on making a toile, rather than just tissue fitting and adjusting on the fly like I usually do. I'm really glad that I did as otherwise I'd have made a right pig's ear of it...
2. Pleats
I sewed down the first inch of the pleat line as I wasn't sure I liked the look of the pleats falling loose straight from the neckline (and I was worried they'd shift about).
3. Bound seams
Ordinarily I would have used a French seam at the shoulders and bodice sides as the dress is unlined. Unfortunately, despite making a toile, I screwed up the fitting a bit and didn't have enough seam allowance left. Luckily I had some really pretty 3/4" satin bias binding in a contrast colour, and I couldn't resist going to town with it. Rather than do a true bound seam, I used the bias tape to make a faux French seam. I also did the same for the waist seam.
4. Zip
The pattern instructions have the facing attached before the zip. I never do this because it's a nightmare to unpick if the dress needs to be adjusted after the zip has been put in.
5. Facing
I did this last, binding the outer edge of the facing with a Hong Kong seam before attaching.
6. Hem
For a bit of contrast detail, I bias bound the hem to finish. To get a smoother line, I decided against my usual method and instead sewed the bias tape to the right side, folding to the back with a reasonable overlap (bit like a Hong Kong seam but with the fold turned in rather than laid flat out) and stitched in the ditch from the front.
0 notes
Text
McCall's 6891 - Toile toil
I have a couple of shirt dresses which I really like, so I’ve been really looking forward to shifting my project backlog and getting to grips with this vintage style dress.
McCall’s 6891 is a ‘perfect fit’ pattern, with markings and guidance to allow for a very tailored fit required for the vintage dress style. Usually I would be tempted to launch straight in but for the first time I decided to make a toile.

The fit instructions were really straightforward and easy to follow, but I’m really glad I made the toile first, because I just could not get the fecking thing to fit properly. When I took up sewing, a big part of it was because I struggled to get clothes I liked which fit my height. These days I’m also trying to fit to my postpartum frame, and I guess all of the adaptations required were beyond the constraints of the pattern - or more likely, beyond my ability to tailor it.
I’ve parked the pattern for the time being; who knows, it might fit fine in a year’s time when the physio and weight training finally work their magic on my mangled abdominals. And as I still have a bolt of summery pink fabric to play with, I’ve already run up a toile for a fit and flare dress in my pattern stack…
0 notes
Text
Simplicity 5316 dungarees: pattern hack
(Pattern now updated to Simplicity 1566)

This is one of my favourite patterns, and back in the day I made W some dungarees in a gorgeously soft denim. Baby A is now big enough for the cast-off dungarees, so I thought it was time to make her some of her own.
Since I started sewing again, the Internet community has become rich with sewing blogs and instructional videos, all of them fantastic. I’ve learned so much, and these days if nothing else I sew with much more precision and pay attention to the little details (washing and prepping my fabric, pressing out my seams as I go along).
With my basic sewing improved, I’ve felt a bit more confident trying out a few new things and this seemed like the right sort of straightforward pattern, ripe for a bit of tweaking. I really enjoyed the technical aspects of this one but it was as frustrating as it was fun, and there’s much I’ll do differently next time.
My dungarees pattern hacks:
1. Jersey fabric
The pattern is designed for soft, lightweight fabrics and micro fleece. This time I tried out gorgeously soft cotton jersey (eBay, seller TiaKnight), and it worked well - albeit requiring a full lining in place of the suggested facing. It helped enormously that I used a walking foot and twin ballpoint needle for topstitching.
2. Appliqué
Rather than zig zag satin stitch, at which I am useless, I used bondaweb and then a single needle triple stretch top stitch to secure.
3. Seams
Centre seams were serged, then twin needle topstitched at centre front and centre back, before serging side seams. I didn’t topstitch the side seams, but I wish I had. Next time…
4. Full lining
I did a full lining, made as per the outer. This was then faced with lightweight interfacing (cut to the pattern piece for the facing), and ironed onto the wrong side of the front and back pieces (after they had been serged at the centre seam but before they were topstitched). The lining shell was then inserted into the outer, wrong sides together, and tacked in place along neckline.
5. Bias bound seams
I’d originally planned to make my own bias binding, inspired by the fantastic instructional video from Made by Dana. But instead I found some gorgeous paisley 1" binding (eBay, seller RicketyRoseCrafts) and I really wanted a chance to use it. I zig zag stitched 6/8" from edge of neckline to secure the two layers together, trimmed 4/8" off (to remove seam allowance) and then applied the binding… I guess everyone has their preferred way to do this - I have yet to try my binding foot - instead I usually sew the binding to the wrong side first, then turn to the right side and topstitch. I completely screwed this up first time round; I forgot to trim off the seam allowance and had to redo the whole thing.
6. Elasticated ankle
For easier crawling! Serged lower edge, hem pressed up and topstitched, narrow elastic inserted and stitched down at either end.
7. Binding and snaps
The pattern suggests snap tape on the leg seams, but I find it impractical and fiddly - Baby A is usually far too busy attempting to escape mid nappy change to hang around for a strip of 20 snaps to be matched up. Instead, I used bias tape to finish the leg seams and then fixed Kam Snaps.
0 notes
Text
Chicken Chicken Rice Rice
One of the things we don’t do so much of these days is eat out. It’s a bit too much hassle, especially as Baby A is still a bit fussy about who gives her a bottle (i.e. only me!).
We don’t really do takeouts either, and as I still have some post natal chub to shift I’m trying to make healthier food choices than usual. So, what to do when I’m craving something different?
The rule to all my cooking is that it has to be simple, ideally using store cupboard ingredients, and I have to be able to prep quickly and put somewhere on a timer.
With these things in mind, I bring you two recipes, each serving 4 (or sorting out two dinners) and using the same ingredients: chicken legs and rice.
Piri piri chicken with spicy rice
Ingredients: 4 whole chicken legs (or mix of thighs and drumsticks), packet of piri piri seasoning and a roasting bag, 1 cup rice, 2 cups chicken stock, 1 tsp hot chili powder, 1 tsp paprika, 2 dessert spoons tomato purée, ¾ cup frozen sweetcorn.
Remove the skin from the chicken legs and put in the roasting bag with the piri piri seasoning, shake around and secure bag. Place in an oven dish and set up in oven for 50 minutes at 170°.
Put all the other ingredients except the cabbage into a rice cooker and stir to mix. Set off assuming cook cycle will take roughly 30 minutes.
To accompany: remove the outer leaves of a sweetheart cabbage, cut off the bottom and then cut in half. Remove the hard central heart from each half and then finely slice across the width. Once rice and chicken are nearly ready, stir fry the cabbage until tender. Crack open some beers and serve.
Chicken satay with coconut rice
Ingredients: 4 whole chicken legs, a roasting bag, ¼ cup TonTon teriyaki sauce, ¾ cup peanut butter, 2 tsp chili flakes, 3 tsp lazy ginger, 1 tsp lazy garlic, 1 dessert spoon sesame oil, 1 cup rice, 400ml can coconut milk.
TonTon teriyaki sauce is delicious and you will never regret keeping a bottle in your fridge. However Kikkoman teriyaki is more than acceptable. If you can’t get hold of either, or you’re avoiding gluten, then 50:50 (gluten free) soy sauce and Martini Bianco will do the job!
Whiz the teriyaki sauce, peanut butter (the unsweetened pure kind, cheap and wholesome from most decent gym supplement suppliers!), chili flakes, ginger, garlic and sesame oil together in a food processor. Add a generous splash of hot water as you go to get a decent smooth consistency of paste.
Remove the skin from the chicken legs and place in the roasting bag. Add in the satay paste and smoosh around the meat. Secure the bag, place in an oven dish and set up in the oven for 50 minutes at 170°.
Put the rice, coconut milk and ¼ can (i.e. 100ml) warm water into the rice cooker and stir well until the water, rice and coconut milk are well combined. Set off assuming that the cook cycle will take roughly 30 minutes.
Prepare the sweetheart cabbage as before. Plus more cold beer. Stuff face.
1 note
·
View note
Text
Home pie
So much time has passed since I last blogged: W is now at school and I'm on maternity leave with baby A. There's a lot to catch up on, and plenty of time to share it. But first, I'll break my blogging fast with a simple recipe for my most favourite food: pie. Ingredients: 900g chicken thigh, 2 large onions, 2 tbsp butter, 2 tsp lazy garlic, 2 tsp lazy ginger, 3 tbsp madras curry powder, 2 tbsp tomato puree, 250g carton of coconut cream, 200ml chicken stock, 2 tbsp cornflour. A couple of packs of ready made shortcrust pastry (because life's too short). Should make 4 decent sized pies. Finely dice the onion and gently sauté in the butter until soft. In the meantime dice the chicken thigh. Finely dice the ginger, and add to the onions along with the garlic, curry powder and tomato puree. Sauté gently and then add the chicken, turning to coat well. Add the coconut cream and stock, slowly bring to the boil and simmer until the sauce thickens. Leave to cool. Once cool, dissolve the cornflour in a small amount of water and mix well into the chicken and sauce filling. Roll out the pastry and line 4 small-ish pie dishes. Fill generously and place the pastry lid on top, crimping the edges (a little milk brushed around the edge of the lid will help to seal). Cut a small slit in the centre of the lid to vent, and brush the top of the pies with milk. Bake on a tray in a preheated oven at 170° for 30 mins. Best served with chips and champagne.
0 notes