shadydraws
🎨❤️
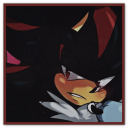
★ Shadow • 20+ • she/they • gamer • writer ★
960 posts
Don't wanna be here? Send us removal request.
Last Seen Blogs

trainingvoluptuousxipu401
Training Anchors brilliant blog 1237

brooklyn-is-boring
my brain

12thkhiladiiiiiii
12th khiladi

temporaliteas
bro we are beans

ninma
Ninma
Text

Hey you! 💚
I haven't grew Gum for YEARS!
2 notes
·
View notes
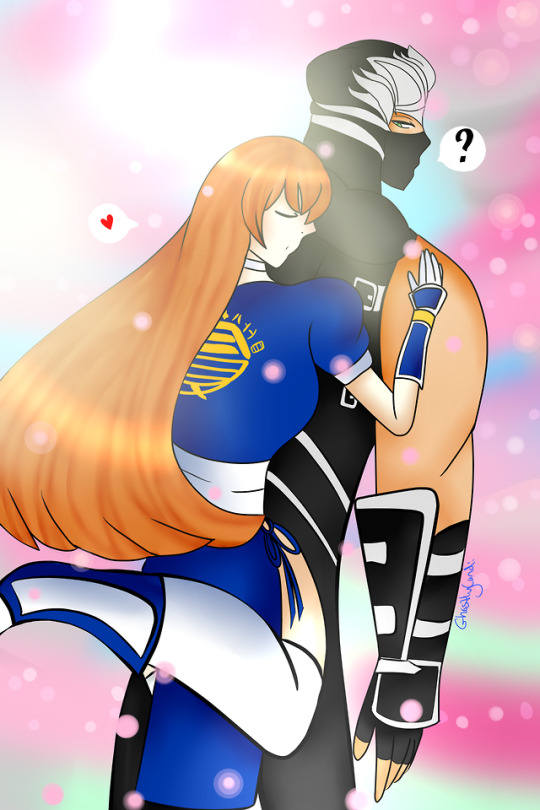
Text
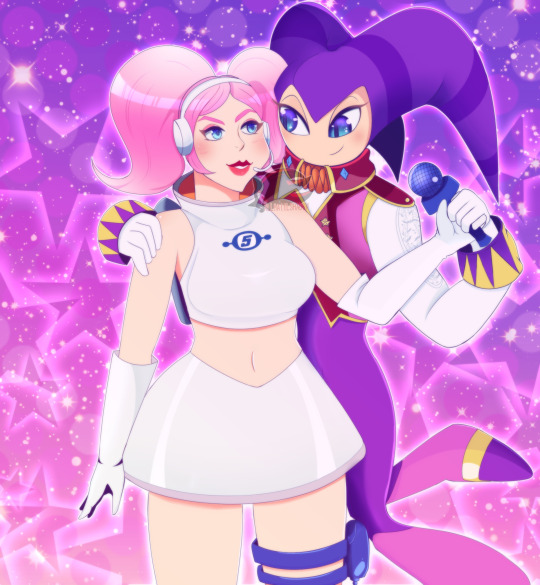
here's more of NiGHTS x Ulala. they're so cute together.
NiGHTS & Ulala belong to SEGA.
11 notes
·
View notes
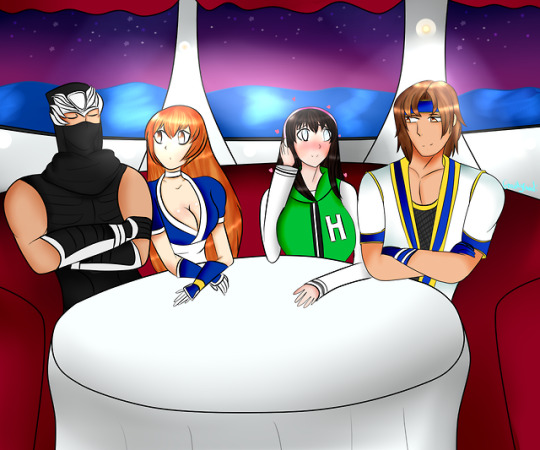
Text
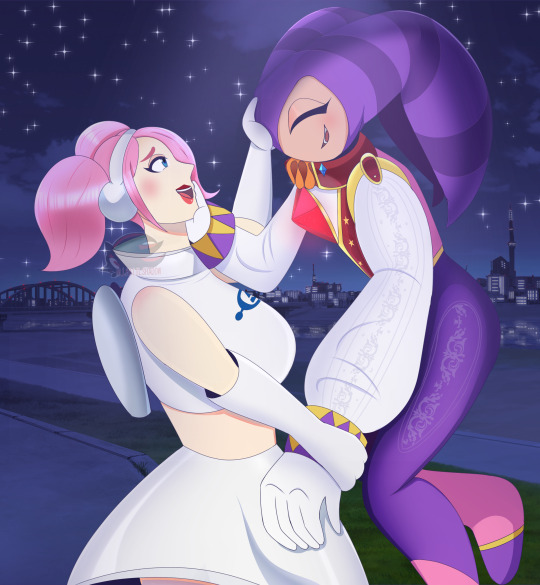
I realized I never drew my crackship until now.
all thanks to fluffy rps with a certain NiGHTS rper.
#myart#NiGHTS#Ulala#nightsintodreams#spacechannel5#sega#digitalartwork#digital#digialillustration#digitaldrawing#artistofinstagram#artistsoninstagram#art#nightsxulala
6 notes
·
View notes
Text
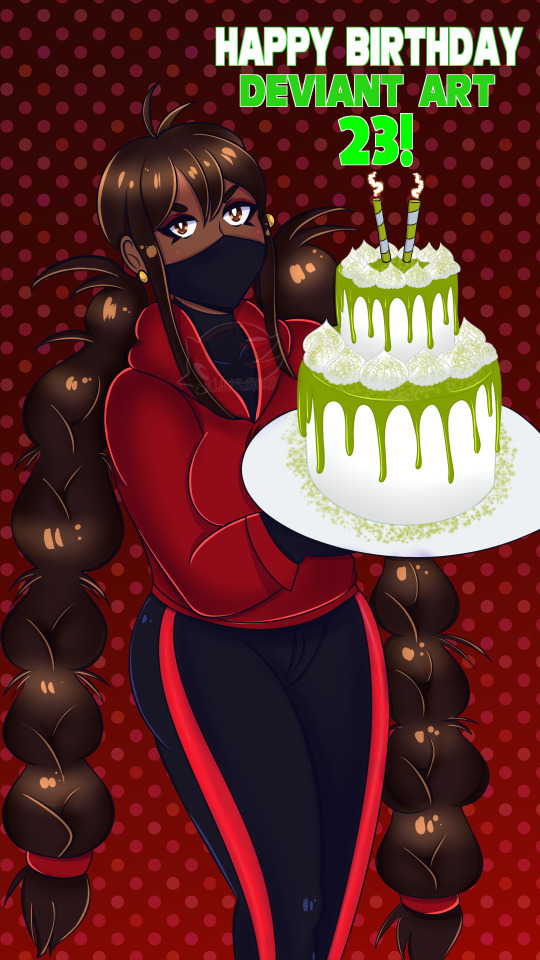
honestly wanted to draw my sonia for da's bday
#myart#digital#mystyle#artistsontumblr#deviantart#datutorialbirthdaycake#deviantartist#deviantartbirthday23
3 notes
·
View notes
Text

Drew Freddy and crew for their 9th birthday and since FNAF 1 is my favorite game i just had to draw in my Freddy & Crew aka Anthro AU.
Classic Freddy , Chica , Golden Freddy ,Marionette and Shadow Freddy by me
Classic Bonnie & Foxy by @GhostlyCandi
#fnaf art#fnaf#anthroart#anthropomorphic#digital#digitalart#freddy#furryart#myart#freddyfazbear#fivenightsatfreddys#fnaffanart#fnafart#fnaf1#witheredfreddy#fnaffurry#fnafanthroau#furryartistartsupport#fnaffreddyandcrew#fnafanniversary
5 notes
·
View notes
Text
Drew my ocs for year of the rabbit .
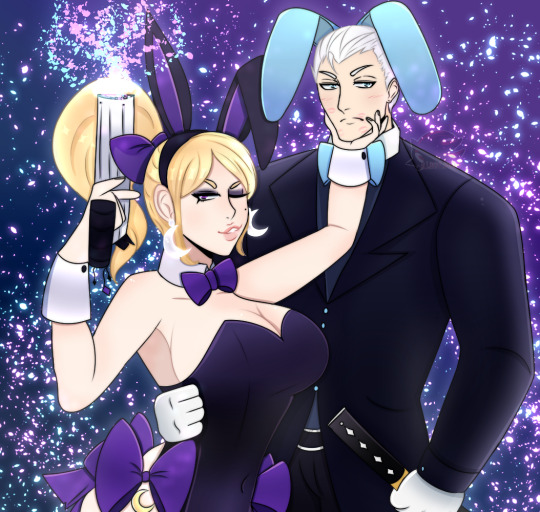
7 notes
·
View notes
Photo
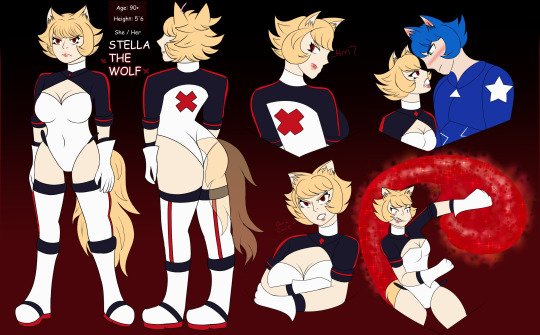
Anyway I wanted to share this Fandomless OC here because I love Stella very much. Inspired by Shadow , Ryuko and Gum making this triggered wolfie.
This is he 4th time I remade her except this time i given her a tail because back then I couldn't draw one for her.
Anyway I hope you like her better in this version compared to others.
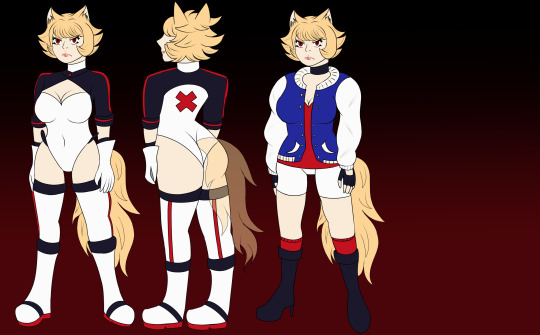
Stella the Wolf is a humanoid wolf and (mistakenly) looks exactly like Speed The Wolf despite being a female wolf instead of a male.
0 notes
Photo
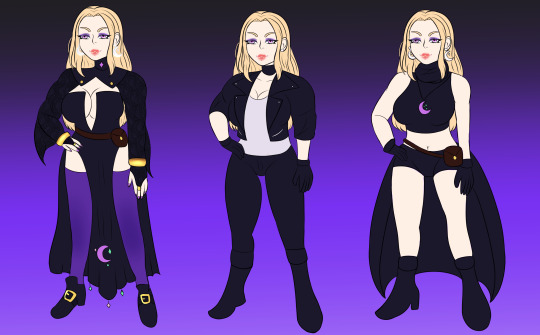

Another Fandomless OC here because why not ? Jennifer Blaze Is another favorite i wanted to redraw. Inspired by Trish, Bayonetta and the Charmed series in my childhood making this Blondie Witch though all the dark clothing can resemble them both.
This is the 3rd time I remade her because I feel she didn't look mature and mysterious as her character supposed to be.
Anyway I hope you like her better in this version compared to others.
#myart#oc reference#myoc#digital#drawing#mystyle#fandomless oc#fandomless original character#artistsontumblr#artsupport
1 note
·
View note
Photo
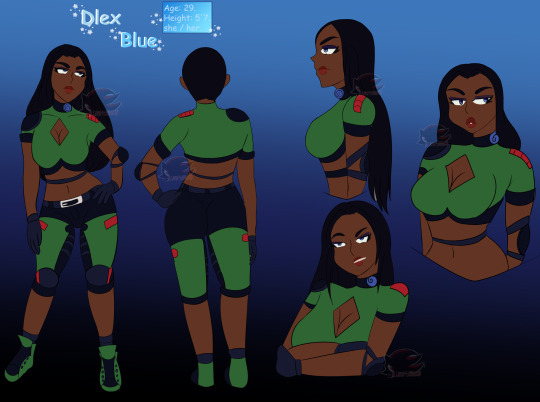
So this is my first OC / Fandomless OC Dlex Blue. Based on one of my favorite games of all time & its Timesplitters which i planned on making a story exactly like this verse for this woman her a bunch of other characters. I've been meaning to draw her for a very long time and she's been remade since I hated the old version of her so much.
The reference sheet was made by @ghostlycandiarts && more information will be added soon.
#oc#digital#myart#arists on tumblr#reference#digitalart#art support#allhaiilshadow#digital drawing#digitalillustration#myoc#oc reference#mystyle
1 note
·
View note
Text
mass icon tutorial PRESS J OR K TO SKIP POST.
make icons like really fucking fast and shit xoxo, if the images are too small for you to see, LIKE THE POST and then go to your likes and you can see it on the dash.
if you have photoshop cs5 or above here’s how to make icons so fuking fast. i’ll give you my actions / scripts. be aware i gave you a ear full under the cut :)
>>>>actions you need ( i personally made these but they should work for everyone )^^^ to install go to your actions tab found under WINDOW > ACTIONS then go to the top right button in the ACTIONs tab and click LOAD ACTIONS go to where you unpacked this actions and load them in. then have fun
>>>>script for making automatic icons
photoshop any version with both animation timeline & frame animation. [dl if these don’t work i’m sorry you’ll have to find your own dl link]
patience to get through the basics then you never need patience again.

LEVEL: BASIC, BEGINNER, EASY.
so a little bit of confusion occured on the last post so i’m going to walk you through it with pictures :)
illustrated tutorial under the cut for anon!
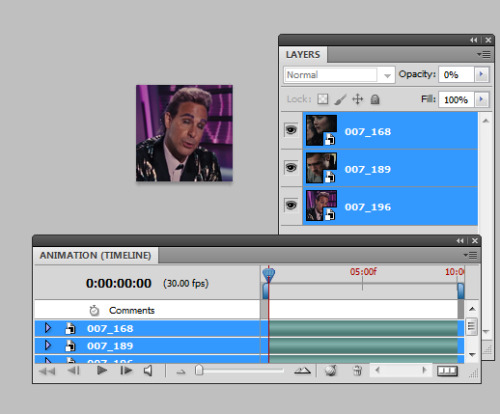
okay first things first make sure you have all your layers loaded in whether by dciom described in the readmore above this, or by making layers like i have here. all i’ve done is resized each screencap i drag in / pasted into look like a cute icon. then i move on to the next. nothing else happens here.
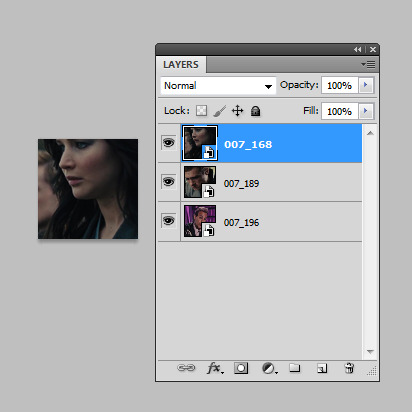
next open the timeline / animation window under this window up top on the file bar

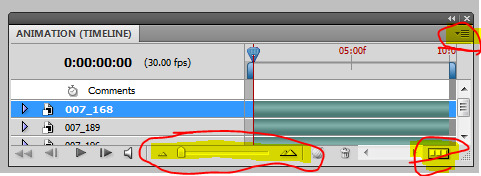
this thing will appear. if it says·‘create frame animation’ that’s good, click that, if it looks like mine FREEZE ( this should be in the action above but if not here’s what the actions doing for you ).·
first things first, that top right thing is where you find everything you need in this tutorial. the bottom right thing is how you get the create frame animation, and the long bar i’ve circles zooms in and out, it’s good for seeing if all your psd layers are the same length ( important for cs6 not a big deal for cs5 )
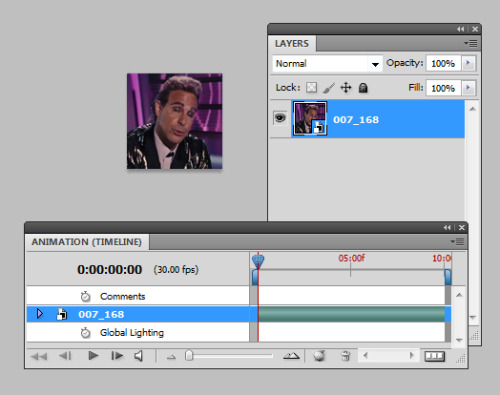
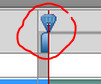
okay click·the three squares at bottom left
now it looks like this. that’s where we need it to be at to start this party.
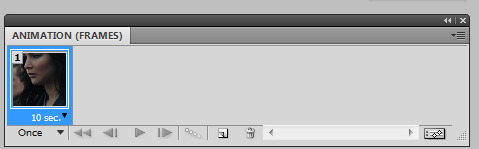
next click this·

and in the menu you should see CLICK THAT and let it work it’s magic
now your animation frames tmieline thing will look like this
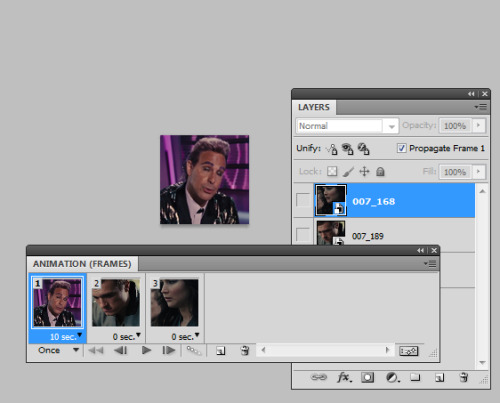

just because it’s annoying & will confuse you later change the first frame to 0 seconds as well. just click the little arrow and select 0.
HERE’S The tricky part for most people
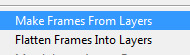
you’re going to go to the animation top right menu

click that and select all frames.
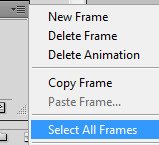
then using your keyboard do the shortcut CTRL+alt+A to select all the layers in the image.
now everything should be selected, all frames and all layers ( andyes that first frame should be a 0 not 10 seconds buti forgot to change it )
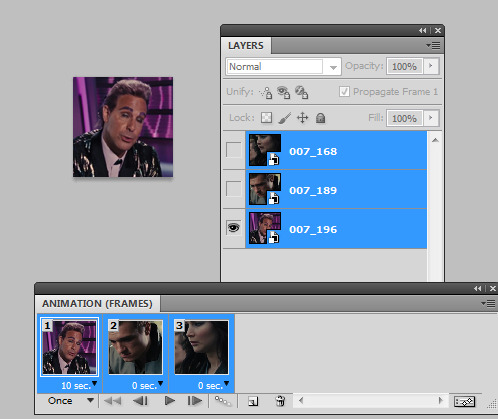
now you’re going to click this
and your ANIMATION FRAME WILL TURN INTO ANIMATION TIMELINE THIS IS CS5 SO CS6 WILL LOOK SLIGHTLY DIFFERENT
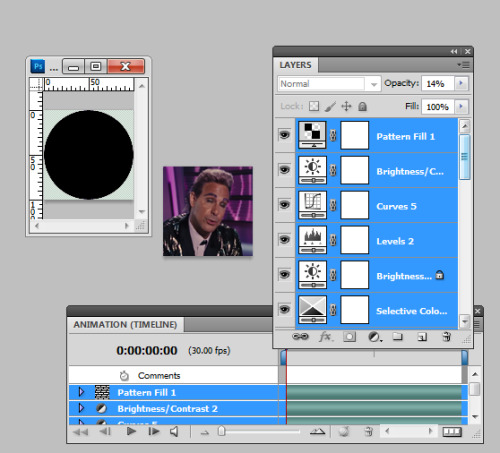
OKAY, now you’re going to without TOUCHING ANYTHING ESPECIALLY YOUR LAYERS GO TO filter: convert for smart filters.·this creates a smart object for your timeline. kind of like a really cool group folder
okay, now we’re ready. see how all the lines turned into one? that’s good news. now open your fav psd and drag it on top of the icons ·to do this select all the layers in the psd you need·and then drag them on top of your icon window. ( you can also create your psd right above the smart object just make sure you layers ands hit are all the same length on the timeline :)

now your icon layers should look like this
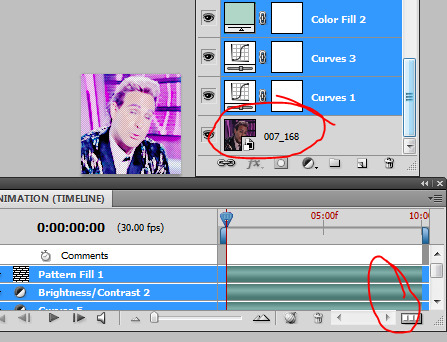
okay, all your lines need to be equal on the timeline bar so zoom out and make sure none are significantly shorter on it. you can also drag this back and forth to preview your icons. if you forgot to change the first frame it will look the same until like half towards the end. dont worry it doesn’t matter.
you can see above i have my psd over my smart object and all my lines are even. so onto the next step which is optional. drag a shape underneath your icons LIKE THIS, NORMALLY i use a circle but whatever im being lazy af
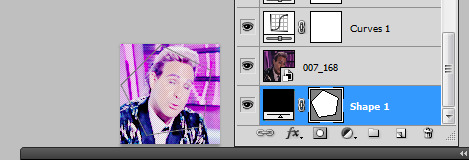
now, select all the layers ABOVE the shape ( click the bottom layer hold shift click top layer ) and then PRESS control + g TO MAKE A clipping mask!

almost finished, now you need to make your individual icons. to do this select all the layers, CTRL + ALT + A and then go to filter convert to smart object
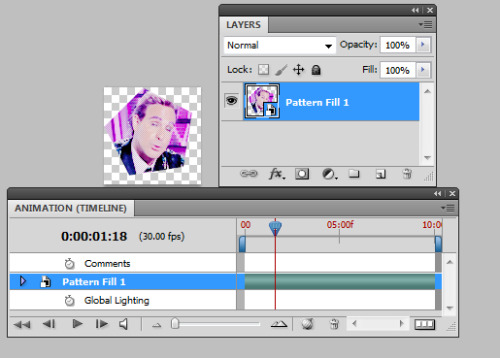
it looks lke oh shit we fucked up but no we did not. now you go back to the top right and click make layers from frames or it might say flatten frames into layers w/e yourversion says
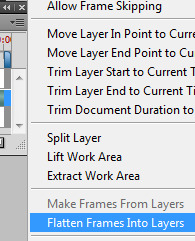
now you have this. delete the invisible bottom layer and you have all theicons you just made.
now to save them all automatically, go to·
FILE > SCRIPTS > EXPORT LAYERS TO FILES FAST
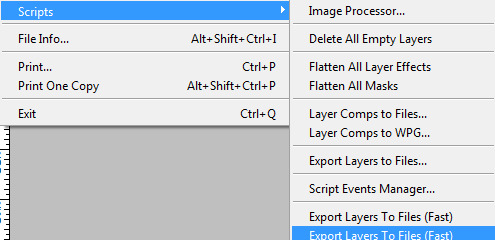
i have it twice because im dumb just ignore it. okay click that
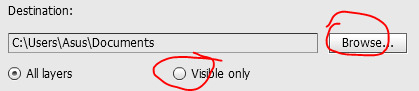
you’ll see this first, browse is wher you want the icons save. now we deleted the invisble layer but i always click visible only because you might accidentally save a bunch of shit you dont need other wise.
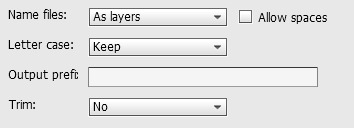
name files is preference related, i also rename my bottom and top layers 001 and then choose one of those to save as other wise it saves as frame 2323 blach blah
ALWAYS choose lower caseI DK WHY
output prefix is important for multi icon batches. UTILIZE IT
trim is always no, that just means it’ll cut dwn your layers so they have 0 transparency around them.·
FOR ANY ICONS THAT ARE TRANSPARENT USE THIS

OTHERWISE i recommend using jpeg because it loads the fastest on the internet.·
then click RUN·and youre done.
LASTLY do not click back into photoshop if you have other windows open because it’ll cause the script to malfunction. you can do othe stuff while it’s working like browsing the internet. it’ll automatically pop up when it’s done. so just let it chill.
don’t do more than 400-500 at a time if you have 4gbs of ram or less. you computer will freeze.
247 notes
·
View notes
Text
gradient icon tutorial! press j/k to skip.
for @chimeristic & i think a couple other people asked a bit ago but i forgot their urls!

it’s super easy okay! ( if you can’t see the images on my theme like the post and view through your liked posts. )
step one.
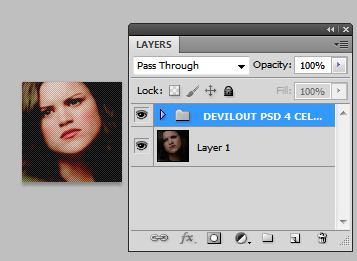
have a psd over your icon etc etc. this is beginning :D
step two.

choose the gradient option from this little icon under layers not through the adjustments window / tabs.
step three.
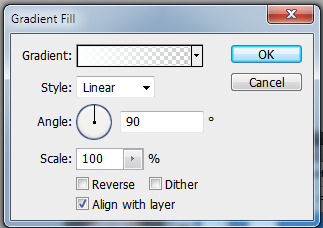
choose your stuff. for hayden we’re doing yellow. & we’ll change the direction of the gradient as well.
step four.

okay, so click the gradient, then it opens up the gradient editor, click the little tab there on the left an the color selector opens, choose yellow ( if it’s not already ) and then click ok and ok again. then i’m changing the direction of the gradient. so it looks like this.
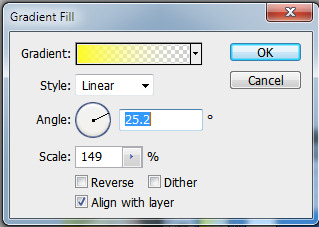
i put the scale at 149%, the angle 25.2, always linear, and the gradient we already changed. click ok.
step five.
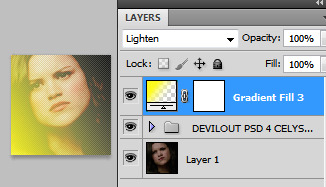
i set the gradient to lighten. and you can stop here if you want, or change the fill / opacity.
step six.
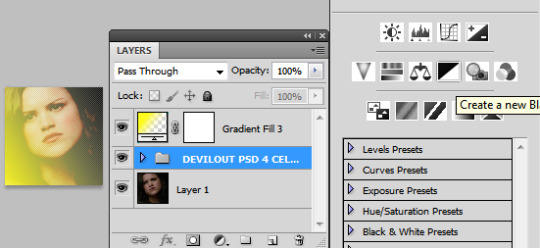
now if you want it to be mostly gradient then add a black and white gradient right underneath the gradient fill.
step seven.
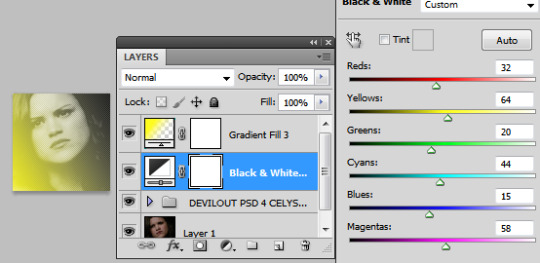
i just clicked the auto button. and boom!
questions are welcomed.
50 notes
·
View notes
Note
I've been trying to figure out pop up links for a while but can't seem to crack them. A tutorial would be very helpful, if you can? Thanks in advance.
pop ups are sort of a random thing that got popular. i’m not sure there is an official way to do them. the most popular is to use str wrs’ code that they’ve long since deleted because they’re tired of questions.
goes in the head tag
<br/> (function($){<br/>$(document).ready(function(){<br/>$(“a[title]”).style_my_tooltips({<br/>tip_follows_cursor:true,<br/>tip_delay_time:30,<br/>tip_fade_speed:300,<br/>attribute:“title”<br/>});<br/>});<br/>})(jQuery);<br/> <br/>$(document).ready(function() {<br/>//<br/>$(‘a.poplight[href^=#]’).click(function() {<br/>var popID = $(this).attr('rel’); //Get Popup Name<br/>var popURL = $(this).attr('href’); //Get Popup href to define size<br/>var query= popURL.split(’?’);<br/>var dim= query[1].split(’&’);<br/>var popWidth = dim[0].split(’=’)[1]; //Gets the first query string value<br/>$(’#’ + popID).fadeIn().css({ 'width’: Number( popWidth ) }).prepend(’<a href=“#” class=“close”>’);<br/>var popMargTop = ($(’#’ + popID).height() + 80) / 2;<br/>var popMargLeft = ($(’#’ + popID).width() + 80) / 2;<br/>//Apply Margin to Popup<br/>$(’#’ + popID).css({<br/>'margin-top’ : -popMargTop,<br/>'margin-left’ : -popMargLeft<br/>});<br/>$('body’).append(’<div id=“fade”>’);<br/>$(’#fade’).css({'filter’ : 'alpha(opacity=80)’}).fadeIn(); //Fade in the fade layer - .css({'filter’ : 'alpha(opacity=80)’})<br/>return false;<br/>});<br/>$('a.close, #fade’).live('click’, function() {<br/>$(’#fade , .popup_block’).fadeOut(function() {<br/>$(’#fade, a.close’).remove(); //fade them both out<br/>});<br/>return false;<br/>});<br/>});<br/>
goes in css tag
/* pop ups */.popup_block{ display:none; background-image: url(“); background-repeat: no-repeat; background-position:top left; float:left; position:fixed; width:200px; height:200px; top:50%; left:50%; z-index: 9999999999999;}*html #fade {position: absolute;}*html .popup_block {position: absolute;}#fade { display:none; position:fixed; left:0px; top:0px; width:100%; height:100%; z-index:999999999999; background:#000; opacity:1;}
this is how you write a pop up link anchor
#?w=200px“ rel="box1” title=“title of link” class=“poplight”>link1
this is what you put after the ending body tag before the last html tag
information here
21 notes
·
View notes
Video
vine
That friend that has to perform every song in the car
553K notes
·
View notes