
Last Seen Blogs

jasperwhitcock
facepunch
linzmushel
Lindsey Michele

omgdilipsoni
Jaipur News Today

entertainment
entertainment on tumblr
sarup
Sara the Corrupter
Photo
I'm in love

Dame Archer kicks McDougal’s Scots ass there in the rain at the Washington Midsummer Renaissance Faire - August 11, 2018 - Photo by Douglas Herring
584K notes
·
View notes
Text
I’ve reached the point with The Handmaid’s Take where part of me really does want to watch it, but I have to wait and read the recaps before each episode first to prepare myself and then ask if I’m in the right place to watch.
So far this season, the answer has been no.
11 notes
·
View notes
Text
If you’re European, in a couple of weeks you will be denied any and all access to fandom contents on Tumblr and everywhere else on the internet. Here’s why.
On June, 20th the JURI of European Parliament approved of the articles 11 and 13 of the new Copyright Law. These articles are also known as the “Link Tax” and the “Censorship Machines” articles.
Articles 13 in particular forces every internet platform to filter all the contents we upload online, ending once and for all the fandom culture. Which means you won’t be able to upload any type of fandom works like fan arts, fan fictions, gif sets from your favourite films and series, edits, because it’s all copyrighted material. And you won’t also be able to share, enjoy or download other’s contents, because the use of links will be completely restricted.
But not everything’s lost yet. There’s another round of voting scheduled for the early days of July.

What you can do now to save our internet, is to share these informations with all of your family members and friends, and to ask to your MEP (the members of the European Parliament from your country) to vote NO at the next round, to vote against articles 11 and 13.
Here you can find more news and all the details to contact your MEP:
https://saveyourinternet.eu
Also, sign and share this petition:
https://www.change.org/p/european-parliament-stop-the-censorship-machinery-save-the-internet?recruiter=50668942&utm_source=share_petition&utm_medium=twitter&utm_campaign=psf_combo_share_initial
We have just a couple of weeks to stop this complete madness, don’t let them dictating the way we enjoy our internet.
#SaveYourInternet now!
288K notes
·
View notes

Text
My past Part 1
So ... i dont write often a post actully i Never did it bevor but i wanna Talk about some shit i get through my past
but First Things First im 20 years old an from Germany i lived for 17 years in Hamburg and now i live in a smaller town 700 km away My english isnt very Well but i try My best
My farther left My mom and me as i was 7 maybe 8? I dont really remember.. and take all the Money from all Bank accounts. My mom and i were not at Home at this Point. He was drug addicted from cocain and some other shit... My mom dosent wannt to tell me more about it Even if i was older
My mom tried her best so we can survive becaus he left nothing for us he didnt pay Bills and the fride was empty as we came Home we were at a vacation for two weeks because My mom was a youth Carer (i
dont Know if this is corrcet pls Correct Me if im wrong)
So the next years was terrible... My mom became manic depressive
Sometimes she threw things at me and one Time a knife
So my childhood wasent very nice ...
i had/have also Depression and often dont Know how to Handel this Shit
Somedays i hate Myselfe so much i Cant Even discribe it...
I wanna tell you more about it later ...
5 notes
·
View notes
Photo
websites:
Animation World Network
Animation Backgrounds
Animation Magazine
Animation & CGI
Animator Island
Anime News Network
Cartoon Brew
Character Design References
On Animation
Reference! Reference! (free database for animation)
11 Second Club (monthly character animation competition)
tumblr blogs:
animationart
animationforce
animationtidbits
aspiretoanimate
calartscharacteranimation
disney-moments-sketches (Allen Ostergar’s blog, animator at Walt Disney)
drawingforsuckas
fuckyeahconceptart
storyboardresources
theanimationarchive
theartofanimation
wannabeanimator
resources/tips:
Animation schools: 1 / 2 (Top 50 USA) / 3 (Top 100 international)
Which animation school is right for you? (Ringling vs. CalArts)
Don’t want to/ can’t afford art school? you’ve got other options.
Animation Mentor: The online animation school
Art school exercises!!
51 Great Animation exercises
20 things you can expect as a traditional (2D) animation student that they never tell you
A Survivor’s Guide to Life Inside an Animation Studio
Animation basics: The art of timing and spacing
Animation Notes From Ollie Johnston
Animated chart of the basic principles of animation
10 Second tip: Always Anticipate
book: Animation: Learn How to Draw Animated Cartoons by Preston Blair
book: A System for Planning and Timing Animation by Glen Keane
book: Timing for animation by Harold Whitaker and John Halas
book: Gesture Drawing for animation by Walt Stanchfield
Basic 3D Animation Terminology
Digital pencil test!!
Keys to Emotion in Animation
Lessons from Disney’s Zootopia
Model Sheets central
The importance of Acting in Animation by Segio Pablos
Printable exposure/dope sheet
Phoneme Chart
Recommended reading for animation students and enthusiasts
The 5 Types of Animation
The Know-How of Cartooning
The Unofficial Truth about The Animation Industry
Why Disney Sends Its Animators To Life Drawing Classes
Walk/Run Cycles reference
What is Pixar looking for in Animators? (scroll down)
Portfolio Advice for The Disney Animation Internship
What is Rigging?
3D Rigging Terminology
3D Modeling Terminology
tutorials:
Animation for Beginners: Where do I start
Animation Physics (Video tutorials on physics for animation artists)
Animation tutorial part. 1 AKA “the secret of animation”
Appealing Poses in Animation
Background & Movement in TV
Blinking tips
Breakdown tutorial (middle frame between to keys)
Drawing & Composition for visual storytelling
Drawing for Animation
Drawing a Likeness
Animation fundamentals + tutorials
Filmmaking: Composition and Framing
Getting Shape Change
How to animate using photoshop
How to animate Characters in Perspective
How to Animate Head Turns
How to Draw Gesture
OpeenToonz tutorials masterpost
Overlapping Action and Drag
Portfolio tips / Making A Successful Portfolio
Lyp Sync tutorial
Line of action
Basics of good cartooning 1-12 by Sherm Cohen
Squash & Stretch tutorial
Squash and Stretch 2
Storyboarding tutorials by Sherm Cohen
The Illusion of Life: 12 Principles of Animation
Tilt, Flow & Rhythm
Underlying Structure When Animating Expressions
TVPaint tutorial: Uploading and Coloring Scanned Animation
supplies (traditional animation):
10 Essential Art Supplies for the Traditional Animator
How to Use a Light Table for Animation
Making a Simple Animation Lightbox
Peg bars, Animation Disk & Desk
softwares:
free
Blender (3D creation suite. It supports the entirety of the 3D pipeline: modeling, rigging, animation,etc)
Emofuri (animate using .psd files)
Google Sketchup (
Live2D ( animation/drawing software
OpenToonz (Studio Ghibli’s open source animation software)
Pencil2D (create traditional hand-drawn animation (cartoon) using both bitmap and vector graphics)
Renderman (Pixar’s free 3D rendering software)
Sculptris (Free digital sculpting tool by the makers of Zbrush
SculptGL (Online modelling program)
Synfig (2d animation using a vector and bitmap artwork)
paid
Zbrush (digital sculpting sw by Pixologic)
Mudbox (digital sculpting sw by Autodesk)
Cinema 4D (digital sculpting sw by Maxon)
TVPaint (2d animation)
animation studios:
Aardman (Bristol, UK)
Blue Sky Studios (Greenwich, USA)
Dreamworks (Glendale, USA)
Fox Animation (USA)
Imagination Studios/CN (Burbank, USA)
Industrial Light & Magic (San Francisco, USA)
Laika (Hillsboro, USA)
Luma Pictures (USA / Melbourne, Australia)
Nickelodeon Animation (Burbank, USA)
Pixar (Emeryville, CA)
Rise FX (Berlin, Germany)
Studio Ghibli (Tokyo, Japan)
Sony Picture Imageworks (Vancouver, Canada)
Sony Pictures Animation (Culver City, CA)
Walt Disney Animation (Burbank, CA)
Weta Digital (Wellington, New Zealand)
inspiration: worth watching short films
Coda by and maps and plans
Contre Temps by the Contre Temps Team
Duet by Glen Keane
DOG ENVY by Olivia Huynh
Fallin Floyd by il Luster
French Roast
Gravity by Ailin Liu
In Between by Gobelins
Jinxy Jenkins and Lucky Lou by Michael Bidinger and Michelle Kwon
My Big Brother by Jason Rayner
Night Light by Qing Han
Nephtali by Glen Keane
Nocturne by Kari Casady
Historia de un Oso by Gabriel Osorio
Home Sweet Home by home sweet home the film
One Bright Dot by Clément Morin
Stickboy by Giant Ant
SOAR by Alyce Tzue
Tsunami by The Animation Workshop
Thought of You by Ryan Woodward
Vagabond by The Animation Workshop
5 Gobelins Shorts That Pay Tribute To Women Animation Pioneers
67K notes
·
View notes
Text
Tsuyu vs Toga step by step

*Rising from the dark, he finally decided today was the faithfull day of the step by step*
Chapter 1, the references.
As an animator, one of the first thing i need is basicly references. Why? Well because you can’t learn a dance you’ve never seen, you can’t draw someone without knowing how he looks like, and you can’t animate a motion you don’t know.
So, for Tsuyu, i kinda pictured her having a kind of Muay Thai-y style, with maybe small karate parts, using a lot of kicks, and having a “solid” style.
For Toga, i thought that a kind of northern wing chun, maybe mixed with Zui quan, sometimes attacking with scratchs, and having a more “elusive” style would be more fitting of her personality.
My main reference was actress “Jeeja” Yanin Vismitananda, and her fights in respectively Chocolate and raging phoenix.
Let’s say that the Chocolate fights were more for Tsuyu, and Toga was more into Raging phoenix
https://www.youtube.com/watch?v=S2Lkl6HX19o
https://www.youtube.com/watch?v=bV-QOCV6LTA
https://www.youtube.com/watch?v=_0H0LUZROws
But once everything is said, still, i didn’t really pictured Tsuyu nor Toga to be martial art experts, so i had to see these references, but during the animation part they were only fragments of my motion library, stocked in my mind, to use, and to temper, but never to be copied and pasted.
Chapter 2 [part1], the storyboard
As an animator, my storyboards have a tendancy of being nearly animated, hence, this chapter will be pretty fast, as it is linked to the rough part.
Storyboarding is something i enjoy, but on this animation, what i really wanted to do was animating, so rather than actually do a storyboard, and then animating, i directly went to the rough part, and animated the whole motion straight on, cuting time to time, when i needed to have a new information, like space location, expression, etc.
The things i kept in mind, storyboard-wise were as it follow:
-The distance between what is filmed and my camera need to REALLY change between each shot, going from medium close shot, then long shot, then close shot, into medium long shot etc.
The point is to avoid weird transitions,like as if the camera had a small uncanny jump, this way you get really clear transition and your brain is not lost.
-Of course the 180° rule, but i mean, even people who are not into cinema know this rule so… Basicly the goal is to have the same character in the same part of the screen except if you actually see the characters change places within the same shot, and as you may have noticed, tsuyu and toga change their position a lot, but you always see them exchange within a shot, rather than during a cut
-having time to time close shot to see and focus on the character expression, on how they feel in order to feel both characters emotion and avoid having something too documentary-like,
-Having sometimes big large shot to understand space.
Chapter 2 [part2], The rough
Yeah, now let’s jump to the most creative part animation-wise, the rough animation!

Basicly you can find every informations from the finished product here (plus a small part at the end i thought i would do, but i was not really that much happy with it, and did not wanted to take too muche time on it).
As you can see, the drawings are kept to the utmost minimum, the goal being here to focus on the movement rather than the drawings, basicly, and it’s even more true on complicated characters such as BNHA’s, drawing the characters on model takes time, of course thou’ll have to take that time later on, but here, as i want to focus on movement, and only movement, working too much on the character would be useless.
At this stage, if, for exemple i wanted to change some movements, and already had a lot of details, i would have to throw a drawing that tooks me a lot of time, and redo an other that would takes the same amount of time, that’s why stickmans are better when working with movement, if one doesn’t work you just throw it, you’ve lost only 10 seconds, and you can do an other one in ten other secondes or less.
Once that part is done, the only thing i may change is the timing, and some small spacings, but as you ‘ll see, the movement stayed mainly the same.
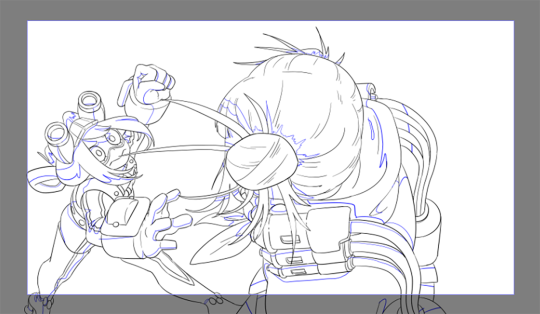
Chapter 3, the tie down.
Okay, now we go into the drawing part.

(as you can see at this point it gets harder and harder to get a gif that tumblr can upload without losing A LOT of quality on pixels and colors)
The work process i use during the tie down is kind of peculiar… And it was even more so on this one.
Usually when i tie down i do it in two parts, a first one where i just check the volumes, and a second one where i go back and put the characters on model, here, i jumped to the second part without doing the first one, i could go on and give excuses, but the main reason is: i was lazy.
Going really deep into the process could takes a lot of time, so to makes it short, i have a lot of theses things in my animation, i have one at each key
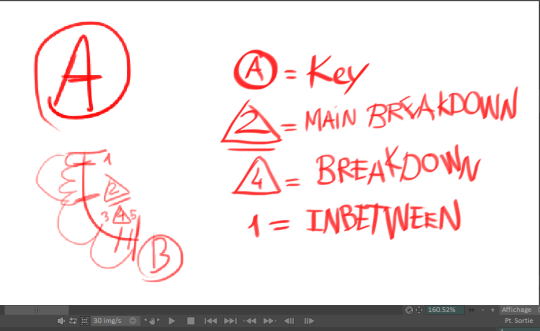
The idea is, i start drawing from the keys, they are the drawings that need to be the bests one, they are the one you’re going to feel the most during the animation, then i draw the breaks downs (if i have multiple breakdown between one key, i’ll mark the most important one, they’ll be the first one to be drawn), and then finally the inbetweens. the idea is, the lower you go, the less you draw, because at this moment, your drawings are starting to take a lot of time, and you still have the cleaning to do, so you want to avoid doing unecessary drawings.
Chapter 4, the cleaning.
Cleaning is hell. There’s nothing else to say.
Run from it, or die.
As i didn’t have assisting animator or anything i had to draw absolutly every last frame. This part took like 60%, or more of the work…
The process is the same than for the tie down, starting by the keys, finishing with the inbetweens…

(Now, doing gifs for tumblr starts becoming a nightmare.)
As you may have noticed, it’s also during that part that i do FXs, i don’t do a lot of roughs for FXs, once i have my characters, and know precisely where they are, doing FXs on top of that is really easy and don’t require a lot of time.
The tool i used to clean is TVPAINT’s default round brush, with a size of 1, i would have liked to have a smaller brush, but tvpaint have issues with them when it comes to coloring.
Well, the cleaning part is pretty much self explanatory, so, onto the next phase!
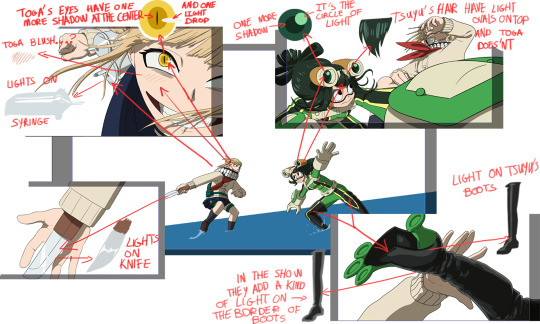
Chapter 5, Coloring, Shading, lighting.
This part is again, pretty much self explanatory (and now it’s impossible to make a gif for tumblr).
Coloring was neither hard, nor long, using TVPAINT, you have a tool called “lazybrush”, basicly it’s a tool that help you do the coloring super fast, you just do a brush stroke with the color you want in the place you want, and the software colorise the place just perfectly, with no hole in the coloring, no small pixel that exceed the lining, just perfect.
Shading was pretty much the same, once you have your character, just putting shadows is kind of refreshing, and does not take much time at all.
Now, what was actually tricky was all the additional lighting/Shading, small stuff you don’t always notice in the show, i had to look at how and where they put those small details.
Also, when i was doing this animation, Toga had only appeared at the end of season 2 so i didn’t had a lot of references except from the manga.
Once i had all of this done, i just had the background left before the compositing.
Chapter 6, a small talk about the backgrounds.
One of the main thing i wanted for this animation was to have simple backgrounds, something i could do in like one day, so i could be focusing on animation.
Thankfully, BNHA have lazy backgrounds, and their skies are especially perfect! I don’t even count the number of times the exact same clouds reappear during the three seasons.
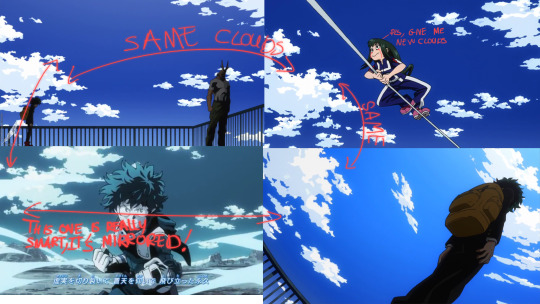
Well, my clouds weren’t that goods though, what i did was more “bubbly”, but hey, i’m no background artist.
Anyway the last thing needed was the compositing!
Chapter 7, the compositing.
To tell you the truth, i don’t have a lot of things to say about the compositing, it’s really technical, and i still feel i messed up a lot on that part.
Basicly, i aded the camera movements, smooth gradients on the characters, small rimlights, some blurs here and there.
Again i don’t know a lot about compositing so can’t really go on a lot on that part, but anyway, once everything’s done, all you’ve left to do is sleep a lot!
6K notes
·
View notes
Text
What Happend with Jaller Obrim?
Some changes to make to the RepComm rewrite regarding Besany’s major introduction scene:
Ordo almost shoots Besany. This creates a distrust in him from her that Ordo has to work past.
Despite knowing that the Crew is Republic and trying to find out the same thing she is, Besany does NOT automatically trust Kal and do as he says (honestly what the hell was up with that?). She’s in the hotel and she’s terrified like any sane person would be, extremely wary of all the people in their.
When Kal goes to make the caf, she moves out of fear of getting shot on sight, not because “he’s the Boss" or any bullshit like that. And Ordo calls him out on it.
81 notes
·
View notes
Photo

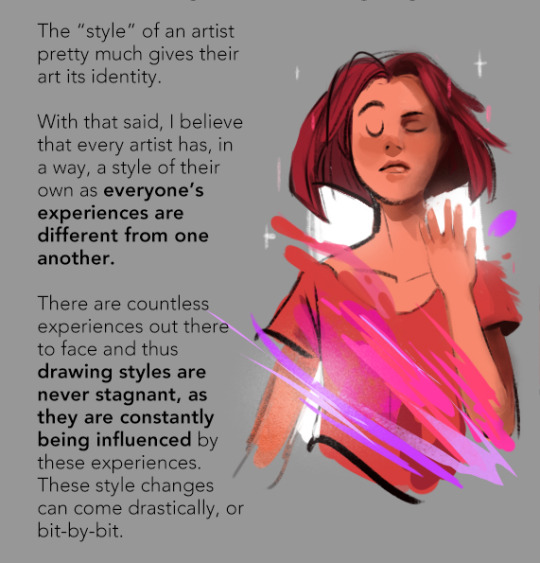


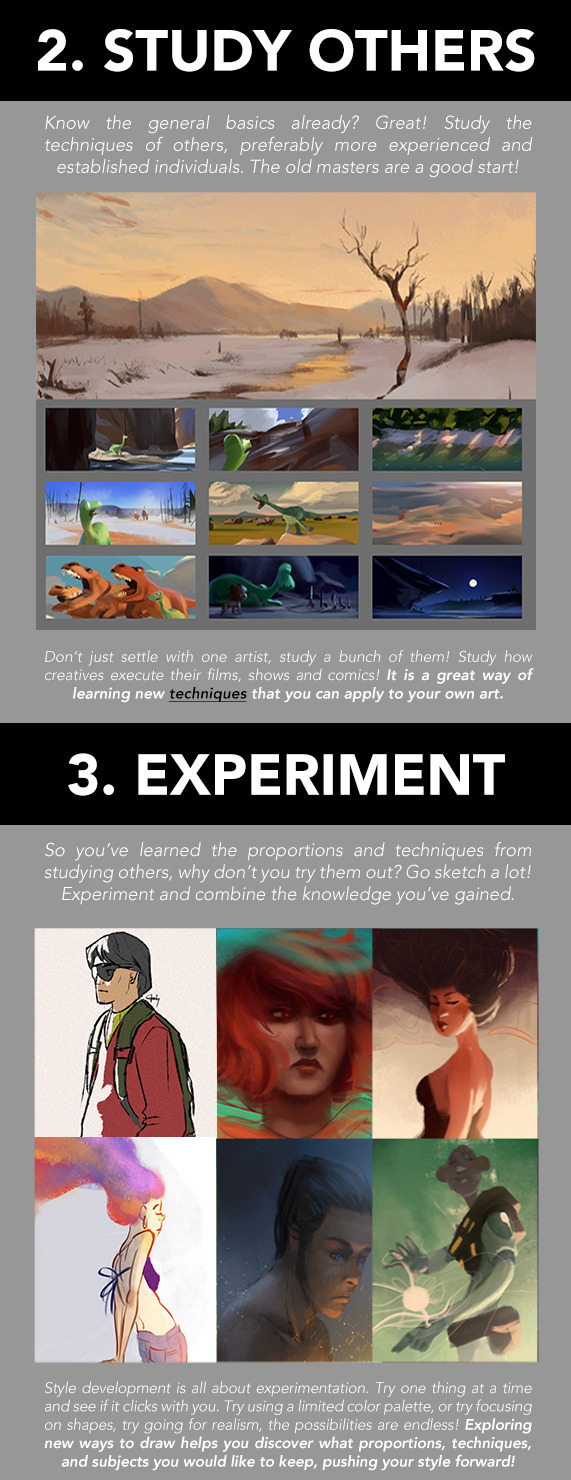
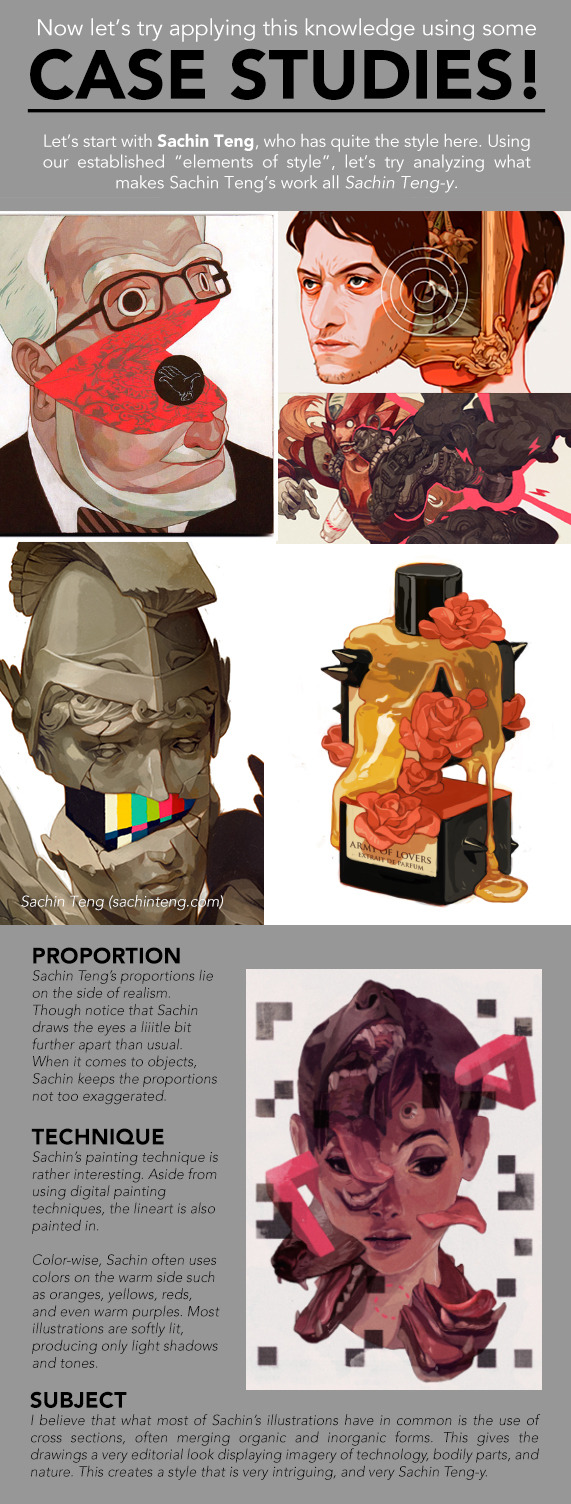


Feel that your drawings are stagnating? Maybe there’s something missing? For those struggling with their styles and finding inspiration, this might be the thing for you!
_________
The “How to Make Your Art Look Nice” Series
Lighting | Flow and Rhythm | Thumbnailing | Mindsets | Reference and Style | Color Harmony | Contrast
50K notes
·
View notes
Note
hello! can i ask for a tutorail in hands/arms and legs/feet?
Hey! Sorry for the late reply, I haven’t really had time to do the tutorial for you! But, I did one today. It’s kinda messy and not 100% anatomically perfect (I do several flaws myself) but I think I made some good points!
Arms:

Arms cannot be done without shoulders, so that’s why I will include them here. To know how one body part works, you need to understand the other parts too. I suggest drawing a stick figure, as shown above. Do it with shoulders and everything - don’t care about anatomy. Really, don’t - go mad! You can figure out how to deal with the anatomy AFTER you have figured how to draw the body freely.

I imagine most body parts to be shaped as tear drops, as shown above; especially the arms and legs. Draw them above the stick figure - don’t be afraid to overlap the teardrops. In fact, I suggest it! The best way to understand anatomy is to think of it as shapes and doll-parts.

After you’ve figured that out, do several, VERY tiny, small doodles like these. Go crazy - don’t bother with anatomy just yet. Do them also very quickly and so small you can’t think of the details. Just keep doing this until you sorta understand how arms work.

Here is a doodle of a “real” arm, and as you can see, how it’s shaped it resembles the teardrops above. A general rule is to constantly draw the body in curves - male AND female. NEVER draw a single line straight.
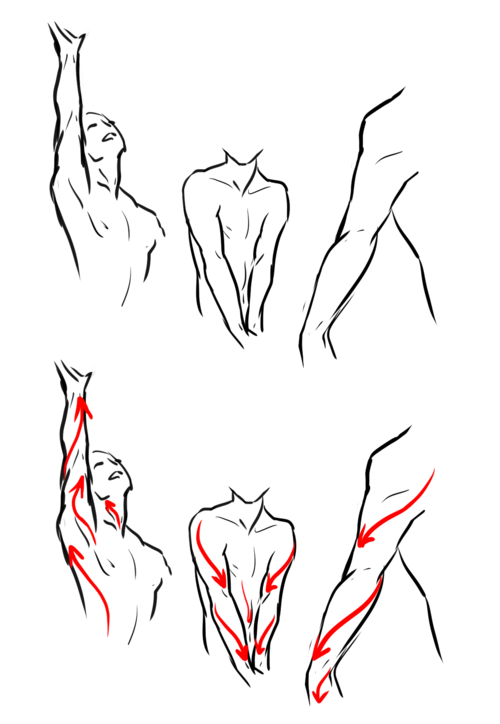
I mentioned before I thought it was important to include shoulders/other body parts to understand another. This is why. The body basically has a “flow” when you move. The red lines clearly shows the flow. This is also how you can create a dynamic pose: think of the flow. The muscles are formed that way to be able to function. Which reminds me, buy some good anatomy books. And I’m talking about more or less MEDICAL anatomy books - you think you won’t need it - but trust me, it’s more useful than you can imagine. I do NOT suggest buying “stylistic” anatomy books, like Christopher Hart (ugh NO), for example, as these can mislead you. Medical anatomy books CANNOT because they MUST be right.

And for the last part, here’s some “do’s” and “don’ts”. It’s important to remember the muscles between the neck and shoulders. Many, especially when drawing females, forget this. It’s true the most visible it is - the more muscular you will look. But even the most petite people have these. Your neck literally would not function if you didn’t have these supporters. Then, the arms below is just to show why it’s important to draw the body with curves. Many have probably heard “straight lines for males” which is a complete lie. They will look stiff and unnatural. Curves can both empathize muscles AND fat. Heck, even your bones aren’t straight.
Legs:

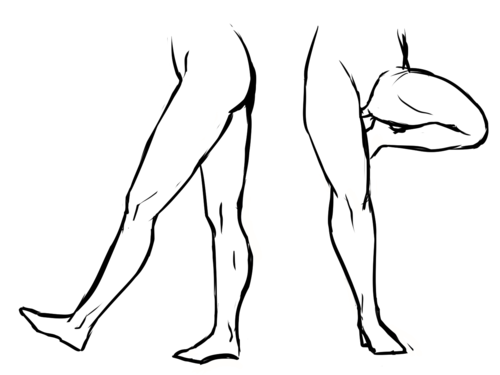
Legs certainly are the hardest. There’s a good reason for this; because they’re one of our most strongest muscles, and they are more or less dominating when it comes to poses (together with the spine). However, just like with the arms, draw a stick figure. I won’t suggest drawing them completely straight, as you can see here, as it will add weight. Do teardrops shapes. As for the hips - think of them as panties or briefs. This is not a MUST; but it will help; I think!

And just like the arms, do small doodles. Don’t be serious, play around until you get the idea.

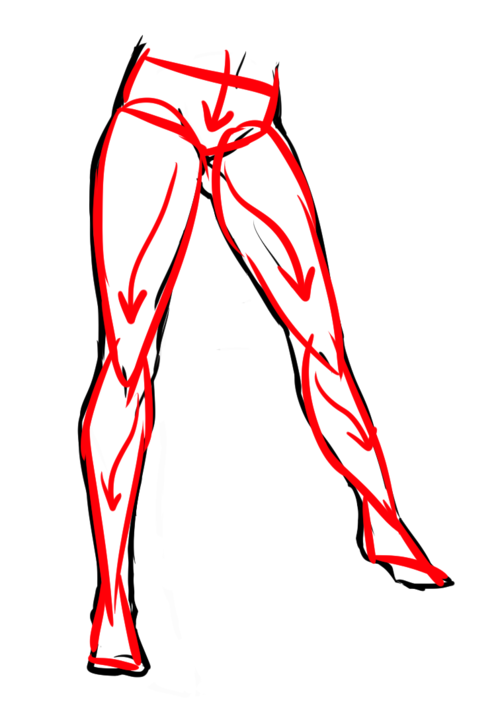
As you can see, these legs easily can be turned into teardrops even when they’re detailed like this.
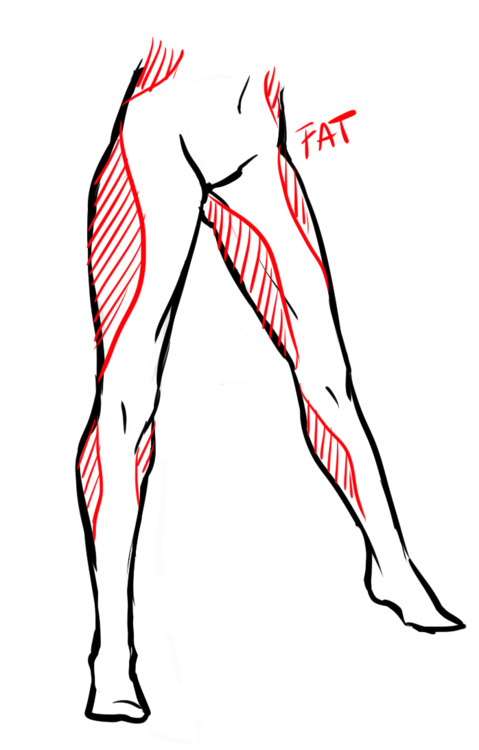
Now, what makes legs/hips interesting is that the way fat gathers there. Although not a must, seeing as we’re all different, females tend to get more fat there than men. Usually, however, it’s not at the SIDE of the hips, but at the thighs, calves and the “love handles”. (Excuse my english, aaah…) Women also tend to have bigger hips, but again, it’s not a must. It’s not uncommon to have small hips, either; or big hips for men, etc.
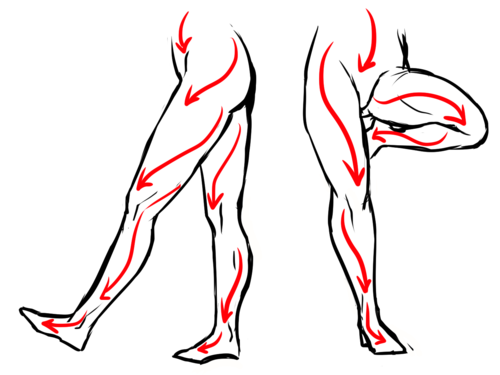
Of course, the legs too follow the “flow”!
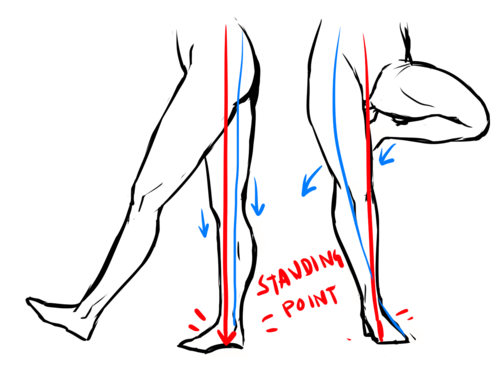
Something worth noting is the “Standing point” The standing point is basically a straight line, and the further away you are from the line; the more unbalanced you are. To create a dynamic pose you should avoid that line as much as possible. However, if you want to look balanced/realistic, have the one leg stand there for support. The leg to the left is balanced, as you can see one of the legs is taking all the weight; with other words, it’s the support leg-making it balanced. The legs to the right, however, are likely to fall over if she keeps standing like that! edit:


Now for some more do’s and don’ts. I already mentioned the barbie legs, invisible heels and micro-mini crotch in my previous tutorial, but these two are different. I see this mistake a lot; when you sit down, your thighs will become wider because you’re pressing all the fat to the sides. Now, this also depends on how you’re positioning your legs. How much it widens depends on how much fat you have in the first place; but it will always be there.
And then there’s this awkward “thigh gap”. Before I get any haters telling me how I “thin shame”, please, take a seat and read this. Good? Good. How much space you actually have between your thighs depends fully on how you’re standing, bending, angle, body type and everything else. However, the one to the left? Not likely.
Hands:

- Okay, I’m getting really lazy now; so I’ll be quick. Draw a rectangle. Sorta like this; it doesn’t have to be exactly like this - since hands can be shaped VERY differently. Just compare to your friends.
- Draw a little triangle attached to it.
- Now, the fingers! How long they should be and etc doesn’t really matter either. But if you’re unsure, draw them as tear drops, too.
- Now, flesh out the fingers! Starting to look like a hand, sort of.
- Then draw the details and fix things you didn’t like. I really don’t like the way this is drawn but I’m just tired right now.

Just like the legs/arms, practice by doing that simple figure really quickly.
Feet:
Okay, I’m getting really lazy. Plus, feet are SUPER HARD- I’m just going to say this: think of them as triangles. Overlap them; think of it as 3D!

Practice practice practice! And medical anatomy books. And photo references. And real-life references!
Hope this helped! \o/ As I said, I’m nowhere near perfect but, ahh, I tried.
Edit: Good damn did I make many typos
129K notes
·
View notes