
prophbuilds
Proph Builds
Straight Builds and Custom Mods by Erik Amill.
21 posts
Don't wanna be here? Send us removal request.
Last Seen Blogs

arigonall
Oh, That’s Gay

holisoymarcos
Sin título

projectkeppel-blog-blog
PROJECT K.

pretty-bratty
bratty. boyish. baby.

wisemonkey6172
Untitled
Text
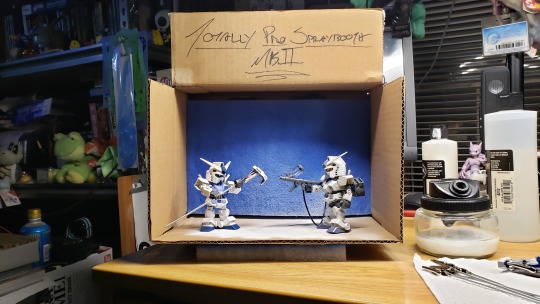
Totally Pro DIY: Spray Booth Mk.2
It’s been a joke with me that my gear is “Totally Pro". My dollar store brushes? Totally Pro. My craft store acrylics? Totally Pro. My makeshift SDCS box filled with cardboard scraps I use to hold my parts? Totally Pro.
All of it is just me doing what I can with what I got.
One area where this doesn’t really work well is my spray booth. It's a cardboard box that I used in the summer months to spray parts outside. It was - at best - a glorified windscreen. It is currently holding a bunch of random stuff as it’s too cold to do anything outside what with it being the middle of Winter where I'm at.
This left me with one option…
I needed to make a new Totally Pro Spray Booth.
The idea was simple: I needed an actual spray booth that I could use indoors with my acrylics. It had to have all the parts of a proper desktop booth without being big or expensive. I have been searching for something to fill this spot in my equipment for Years. My Art Desk has little to no room so most commercial booths are out of the question.
Even if it did, I needed something that could be packed up and put away no problem as I have little space to store things. Again, this knocks out most commercial booths out there.
Then there's the price. Small-ish desktop booths cost over $100 for the cheapest entries. You are getting $100+ worth of equipment for some of these but it's still too pricey for a bit of kit I'll use once in a great while.
On the Maker side of things, I’ve seen Plenty of DIY booths made from storage bins and bathroom vent fans and LED strips for lighting. Same with ones built from plastic foamboard. They're too big for my needs or needlessly expensive at some point in the process - usually the fan as it needs to be able to handle possibly flammable vapor.
Again, my biggest worry is Space – both packed and in-use. Those fans eat up the bulk of it. That particular way of building a booth was scrapped, too.
I needed a better solution.
Enter the Solder Fume Fan.
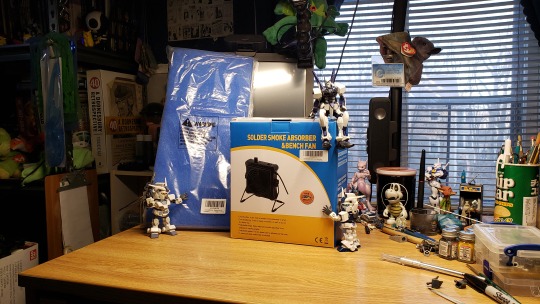
Although rare that I do electronics, I do love watching folks make stuff. I was going through some repair videos while writing one night and I noticed that the person was using a little boxy desktop fan – a 140mm computer fan in a little blue box with a filter - to pull the smoke away from them as they worked. It was a commercial product, too. Unlike a homemade piece, I could actually buy that.
This gave me an idea.
Find a cheap and super basic solder fume fan with a speed control. I toss that into a box big enough to hold a replacement booth filter. It's small enough to fit on the desk and I could use the fan elsewhere if I needed to.
And thus the Totally Pro Spray Booth Mk.2 was born! = D
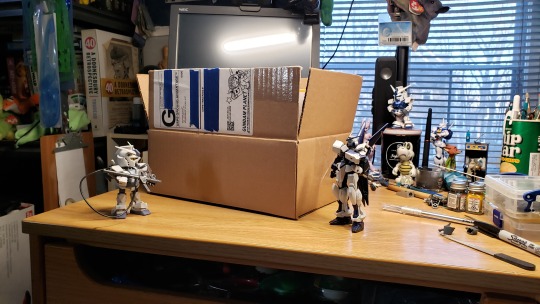
I had a small 12 inch by 8 inch by 4 inch box from the last batch of parts I’d bought from Gundam Planet. It's shorter than most spray booth filters but a pair of scissors made the filter fit.

The fan unit I bought has a little wire base so I planned that into the design. It keeps the box from sliding around. The unit has bump out on the front and back with one holding the thin charcoal filter. That’s the side that pulls air and the side I had to cut a hole in the box to fit. A little slice and dice later and I can stick the whole box onto the fan with a good mechanical fit. It acts as another air seal, too. The filter just goes right into the box and the thing is ready to rock.
The easiest part was holding the flaps open so I could use the thing. I just unbent some paperclips and slid them in-between the layers of the cardboard to make everything both stay open and easily removable when it’s time to pack it away.
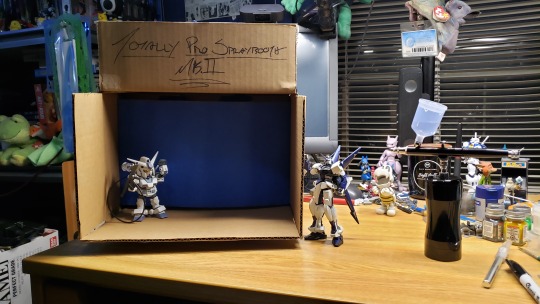
Now… you might wonder if this was a good idea. Well, the suction from the fan is more than enough at 2/3rds speed to draw the paint spray from my little airbrush. The filters catch any particulate that’s at risk of making my Art Desk a pain to clean (I placed a bit of paper behind it to check if it was doing the job I needed it to). The fan is theoretically Electrostatic Discharge (ESD) Safe so that should make it less of a fire risk.
The whole thing cost me like $50. Only extra thing I didn’t need to do was bring a different box to this project. You could literally buy the stuff and just use the box it shipped in.
Overall, I’m happy with this. It works like I need it to. I can now use my airbrush on stuff and in the comfort of my own home, no less!
Totally Pro equipment, indeed. = )
0 notes
Text
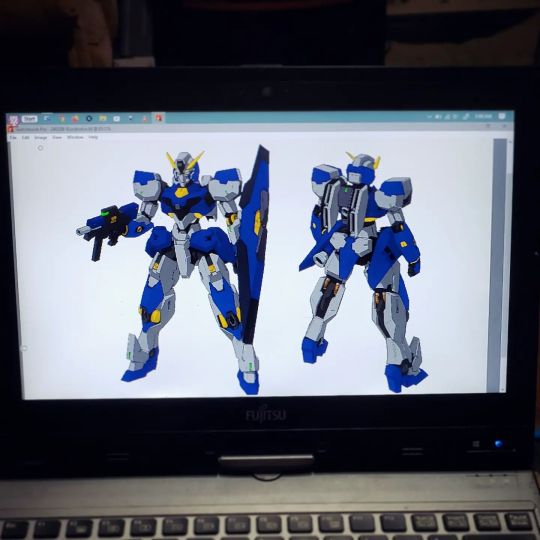
After carefully draining the color from the original promo artwork (again), I took another go at planning the paint job.
This time I remembered to set the original art as the base, the "Painting Model" art to Multiply & lock them so I didn't accidentally work on those layers. I popped my colors in-between them so I could both see the changes I wanted to make alongside the kit's original colors.
I think I like where it's at for now. Next step is to build the thing & see if I'm still down for painting it afterward. = )
#Gunpla #Gundvovla #ColorTest
5 notes
·
View notes
Text
A little something something I decided to pick at after A Lot of work trying to drain all the color from the Gundvovla's official artwork. Something I'll definitely post up later for folks as a coloring book style page.
I know it's probably the Cartoonist in me but doing a color test like this helps me get in the ballpark of where I want to take a paint job & if it's even a good idea before mixing and/or buying paints. = )
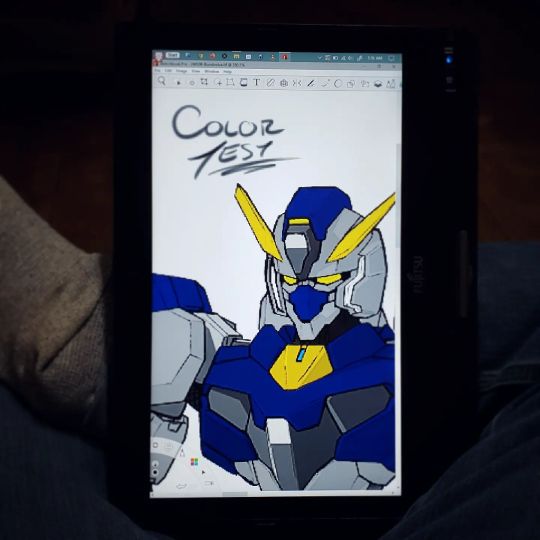
Spent some time tonight planning out how I want to paint my Gundvovla kit. I like the goldenrod (a stand in for metallic gold) but I'm oddly not sold on the blue this time. o.O
#Gunpla #Gundvovla #ColorTest
8 notes
·
View notes
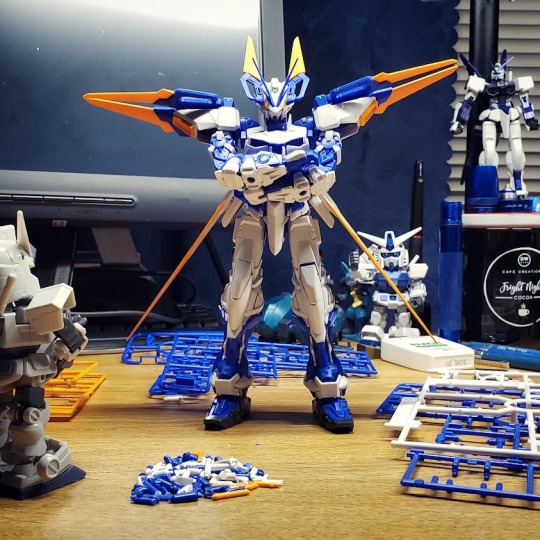
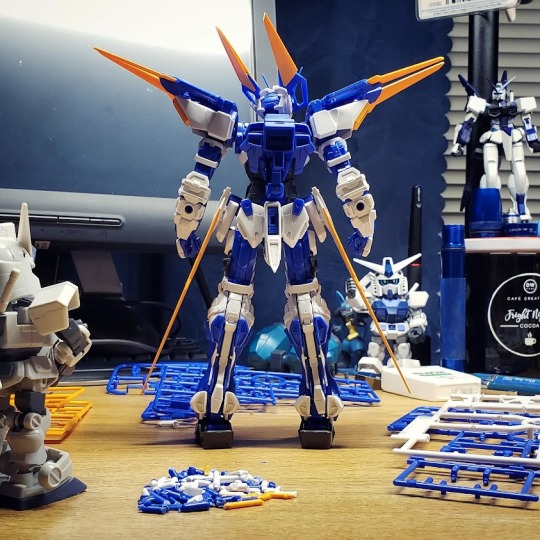
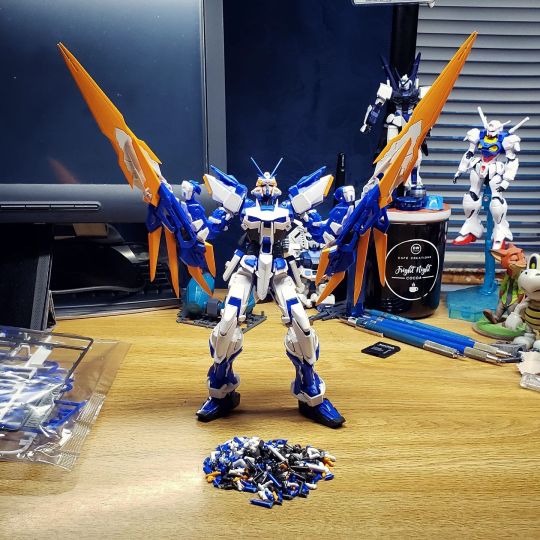
Text
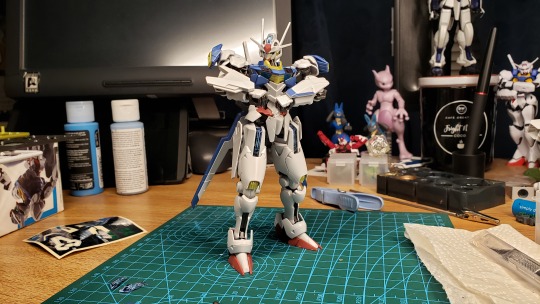
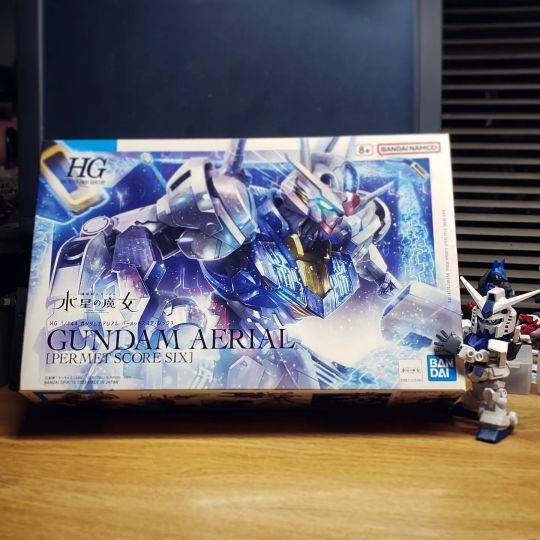
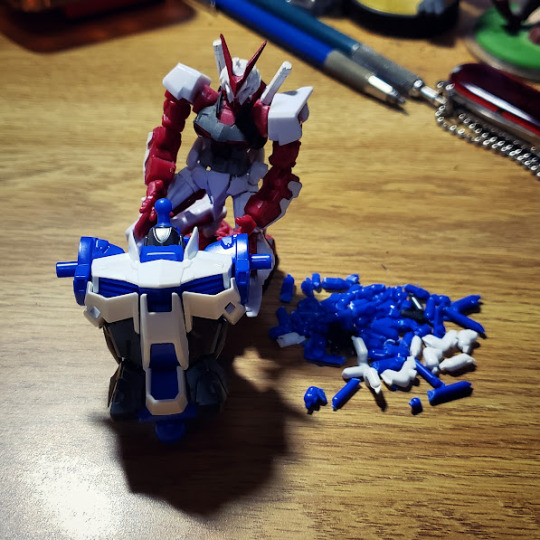
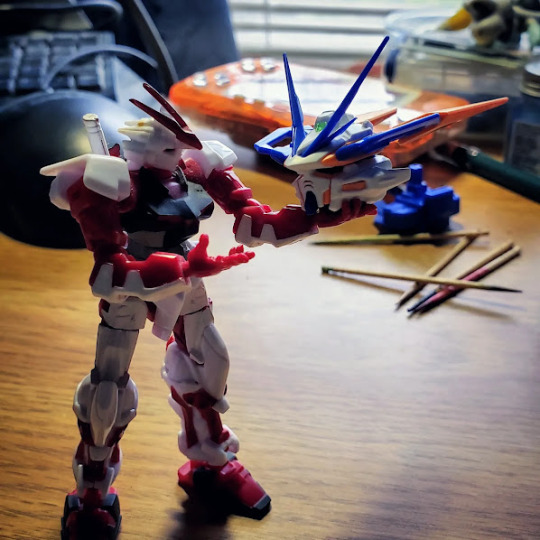
XVX-016 Gundam Aerial [Permet Score Six] – A Review
If you follow my blog, you’d see that I’d recently started in the one MGSD Freedom kit.
You also probably noticed that this Isn’t a review of that kit.
Well… here's the thing. The MGSD is very much an MG kit. I wanted to just do a nice quickie build and there’s nothing better than an HG to scratch that itch without eating up a majority of my time.
So I popped over to my Leaning Tower of Gunpla, snatched the second newest kit off the top and snapped it up. Here's my review of the P-Bandai exclusive HG Gundam Aerial [Permet Score Six].

I’m not going to mince words… the Aerial is just a very solid kit. It snapped up easy, the color separation is excellent and it has only a few flaws in when it comes to the use of C-clip style attachments on the ankles. It's very much a New Kit and it holds up very well.
Comparing my build to reviews of the regular Aerial from others, I can honestly say that this is a kit for folks that want the alternate colors. If you’re the person who like things like the Trans-Am active versions of the Gundam 00 kits, the powered down version of the Gundam SEED kits or the Many many alternate color versions Bandai like to make of other kits… this is for You. If you want an Aerial for your collection... this is a pass.
With that out of the way, it’s on to the rest of the build!

In the box were the expected runners for the Aerial kit. Nothing really new or surprising from what you could find in the basic version. The only extra piece is the Not-A-Base nameplate that was added for display. It’s a Really nice clear blue nameplate with plenty of holes for displaying the shield bits… if you have the extra pieces for that. There’s not much the “Runner" it comes on so you can use that for plastic to make your own. There also isn’t any parts/pieces for a proper base. It is just a nameplate… but I’ll get to all that at the end.
The colors of this kit are neat. The standard Aerial is the classic Gundam color scheme – White, Blue, Red and that odd slightly orange-y Yellow with Dark Grey for the “metal” bits. For the Permet Score Six, Bandai tweaked things a bit but not in an extreme way. The white is a bit greyer. The blue and red parts are a bit more subdued and sneaking toward an almost royal tone. The orange-y yellow is the thing that’s changed the most out of the classic batch. It's now a kinda’ fluorescent yellow-green with a metallic sparkle to it. Same kind of change was made to the dark grey parts. They printed those in the standard metallic Gun Metal Grey that Bandai uses for their “metal” parts.

The big noticeable change from the standard Aerial (and what makes it a Permet Score Six version) is in the clear parts. The Red and Smoked Clear bits are now Blue and Clear with little Blue Sparkly bits respectively.
So how was the build? It was relatively smooth. This was going to be a bog standard straight build but I did come across a small issue. On the Aerial are little bits on the chest that a normally done up in that smoked clear. Since those are now done in the a clear plastic with bits of sparkly blue pieces in it, it goes from being a noticeable part of the chest design to looking like you forgot a piece.
The quick fix I came up with was to use a mix I was going to use on another project of florescent blue and glow-in-the-dark blue acrylic paint. Since these are nearly completely clear parts, I just dropped a little bit of the paint on the back to make it visible without ruining the original sparkly blue effect that Bandai was going for in the plastics.
This brings me to a bit of an odd part when it comes to the big “Special Piece” that is kind of the trademark for the 'Witch from Mercury’ line - the embedded decal.
On the standard Aerial, this is a nice clear with the glowing red Permet effect embedded in the back. This is actually a plus considering the clear plastics on those parts are a smoked color. This lets you see the colors clearer than if you used the reversed metallic stickers on the chest pieces. With this version of the Aerial, the plastics don’t have the extra added smoked color. In fact, it barely has anything beyond a smattering of blue sparkles. Using the special reversed metallic stickers on the plastic works just the same as the special gimmick piece only with that extra sparkle to it.

For mine, I’m going to keep the stickered plastic parts installed on the kit and keep the gimmick parts on hand elsewhere as this is actually a viable option for this version of the Aerial.
Overall, this is a solid kit. I love the slight color changes Bandai made but I’m also one of those builders who actively seeks out Alt Colored kits. As of the writing of this review, I have an RX-78 Mk2 on my pile that’s done in the "Real Type" colors. I like having kits that are slightly changed from the originals. I also paint my kits from time to time so that’s not a terrible surprise. What makes it so I wouldn’t outright recommend folks buy this kit over the regular Aerial is what’s not there.
There's nothing that screams Premium Bandai in this P-Bandai kit.
Here are the changes in a nutshell:
A Slightly shifted color scheme.
Almost completely clear plastics.
Blacklight reactive green effect parts for the beam sabers and the gun.
A clear blue nameplate that could be used as a base.
A sticker sheet with some nice tech/warning decals, the title in black on white (Possibly for the nameplate for some reason?) and a whole set of large logos for the various factions from the show.
That’s it. That’s not really “P-Bandai”. That’s like a Gundam Base Exclusive – enough changes to make the trip worth it but nothing to terribly amazing that the average builder would feel like they’re missing it from their collection. Hell, even the box art (as beautiful as it is) is the standard style for a regular release. P-Bandai box art is nice but monochrome and generally clear kits or have extra parts and pieces or are straight up kits you can’t get elsewhere like the GP00 Engage Zero or a basic RG Astray Blue Frame that isn’t tricked out with more blades than a knife shop.
If this kit came with Anything extra – A pair of open hands like the ones that come with the (sold separately) Mirasoul Flight Unit, posts to make the Not-A-Stand Nameplate into an actually usable stand, maybe some waterslide decals (?) – then I'd say it's a valid option and it’d feel more like a P-Bandai release. As it stands… the best I can say is buy it if you want the Aerial in with blue Permet parts. If not, you can totally buy the regular Aerial kit and not miss anything important.
Still! This was fun build. If alt colors are your jam and you don’t mind paying the P-Bandai tax, I say go for it. If you’re like me and you have "Plans", this is kind of a must buy so you can have the whole family looking proper. = )


12 notes
·
View notes
Text
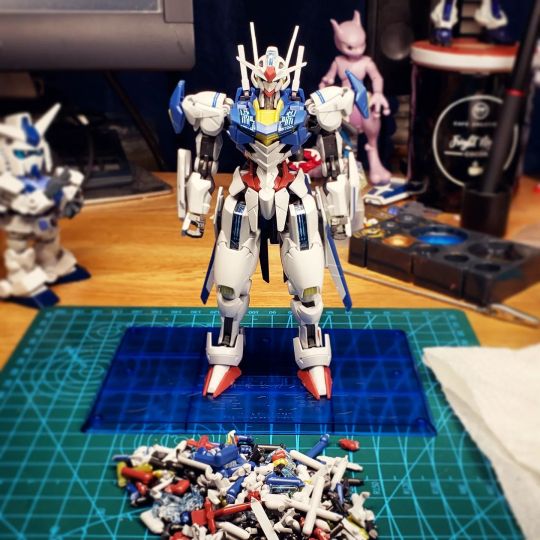
And DONE! >.<
I'll do the write up later but the short answer is it's a solid kit w/ a small but neat change to the regular version.
#Gunpla #HG #GundamAerial #PermetScoreSix
18 notes
·
View notes
Text
I Know I still have the MGSD Freedom to finish... but I'm down for something I can knock out real quick tonight. o.O
#Gunpla #HG #XVX016 #GundamAerial #PermetScoreSix
11 notes
·
View notes
Text

I was gonna' pull from my deeper backlog but yeah... No.
It's Time. = )
#Gunpla #MGSD #ZGMFX10A #FreedomGundam
18 notes
·
View notes
Text
MBF-P03D Gundam Astray Blue Frame D – A Review
Looking back over the kits I’ve built over the years, I think this is the longest one has been in some sort of active build without being some kind of over-the-top mod. Started in April of 2022 and finished in May of 2023. It’s not because of it being particularly hard or complicated. No… it's from something far less fun. My shoulder just isn’t what it used to be.
That said… this very pointy boy was one heck of a fun kit to make. = )
Here’s my review of the MG Astray Blue Frame D.
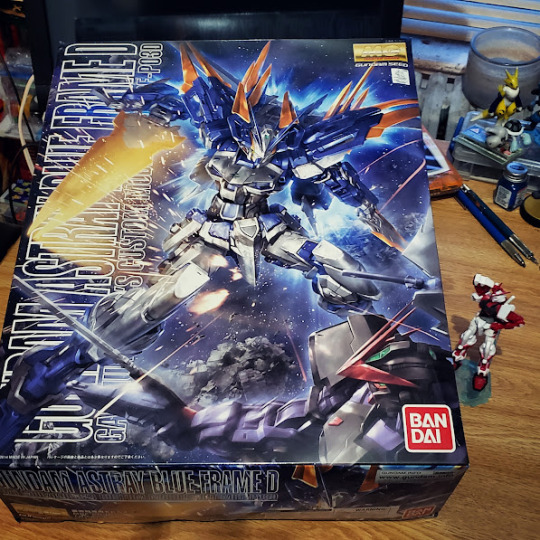
So… I Think it was either my birthday or the Christmas of 2019 that my friend gave this big ol' box. It was the fist time I've had in my possession a proper Master Grade kit. It was the MG Astray Blue Frame D – one of the few Blue Frame Astrays that Bandai like to release and the something that wasn’t just another Red Frame like they REALLY Like to release.
I’m a fan of the Astray line and a sucker for them Blue Frame so this was a very nice surprise for me. It took a while to finally get around to it but, a couple of days before my birthday in April of 2022, I decided to start in on it. I’ve built 1/100th sized kits before and I used to build model planes with my Dad back in the day so neither the size nor the amount of parts really threw me. No… it was my shoulder that got me.
I’d start working on the kit for a night and, by the time I had the arms or the torso built, my right shoulder (My drawing arm) would Burn like some kind of weird twist on a G Gundam special attack. Instead of it telling me to defeat folks, it would angrily tell me to stop. I’d pack things up in the box and park them on my scanner – a tool I need regularly to, you know… scan the artwork for my comic – and that's where it lived until I either needed my scanner or I felt up for working on it again.
‘Cause nothing keeps a kit on your mind like having to physically move a box of parts out of the way just about every week. = P


Smash cut to yesterday. I'd just finished up a recent Story Bit and I’m taking a break to do stuff like research things, practice drawing an old character in my Comic style and just trying to check things off my list. I also finally got my hands on the unobtaniaum that is the MGSD Freedom Gundam – a kit I swore I would start until I finished the Blue Frame. And that’s how we got here.
So what can I say about this build… Well, MG’s are definitely a different beast from the HG’s and SD kits I’ve been building. It really has more in common with the older military kits I built with my Dad as a kid than the ones I’ve built as an adult. Everything is so nicely detailed that I’m almost tempted to go through this thing an paint it. Thanks to the excellent color separation on the parts that could have that done for them, I wouldn’t have to paint much.
The part that kills me a bit is there is So Much that’s hidden. There are inner frame details and on parts like on the inside of the armor that are pretty much just there for one person and one person only: The one putting the kit together. It's just a joy to make. = )
The flexibility is pretty great, too. Like my SDCS kits, it can balance on one foot without drooping or needing extra supports. In fact, the only time I could put this thing into a pose that it couldn’t handle was when I added the Striker Pack on the back. Even then, it was only a few non-standard poses. If I was hard up for it, it comes with a simple solid stand.


The Astray Blue Frame D is a Very pointy kit. Plenty of swords and stabby bits. It is one of those kits that kinda’ requires some extra touches. Aside form the traditional metallic camera and eye stickers (which don’t quite make sense 'cause the eyes and head camera are a lovely clear green), it comes with some nice and simple dry transfers and a sheet of mediocre stickers for if you want to go the MG-style warning stickers galore. Although I plan to come back and do some panel lining later, I’m probably going to avoid the stickers. The dry transfers look to be mostly for the weapons system and I have better water slide warnings than what it came with.
All in all, this was a fun build. If you dig the Astray kits and want something with more swords than the fanciest of Exias, I highly recommend it. It has the articulation you’d expect from a more modern Master Grade and a level of detail that is just fun to deal with. = )


3 notes
·
View notes
Text
Can you believe this? I Finally got one! = D
I still have another build to get out of the way (the still unfinished MG Astray Blue Frame) but I'm doing this one next. Although I've seen a lot of good from others, there's a solid chance this won't be a fully straight build. I definitely want to see what all I need to do for any small touch-ups.
Needless to say... this should be Fun. = )

Ha HA! After seeing so many other folks' builds (and this being essentially unobtainium for a hot minute), I finally got one of my own.
Props to Gundam Planet for the quick shipping. = )
#Gunpla #MGSD #ZGMFX10A #FreedomGundam #IGotOne
3 notes
·
View notes
Text
I'm gonna' build it tonight. = )
Unlike the last few, I'm not going to spark a broadcast on this one. I want it to be a chill build and I'm also planning on running stuff that's 100% going to get caught by Twitch and YouTube so... Yeah.
To the TR-1! >.<
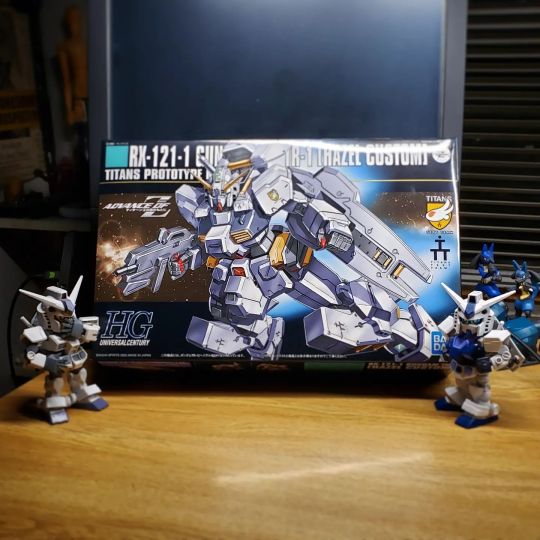
I know I have a backlog. I know I have active builds & mods. I know I have a Woundwort waiting.
That said... I could not deny The Chonk. >.<
#Gunpla #HG #GundamTR1 #HazelCustom
8 notes
·
View notes
Text
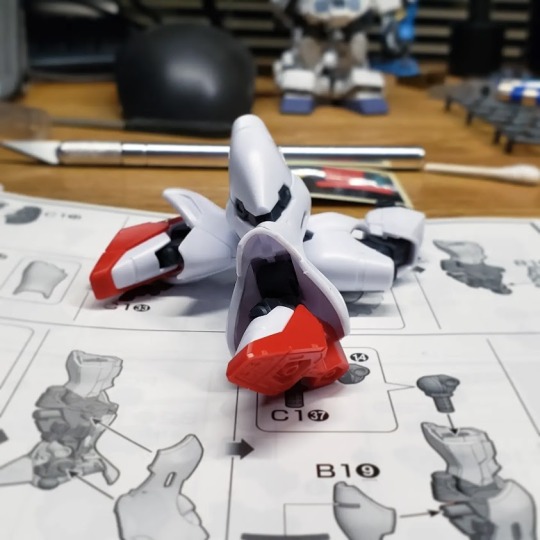
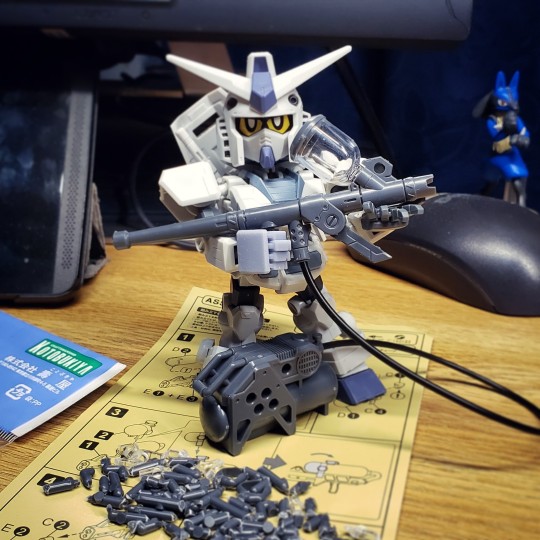
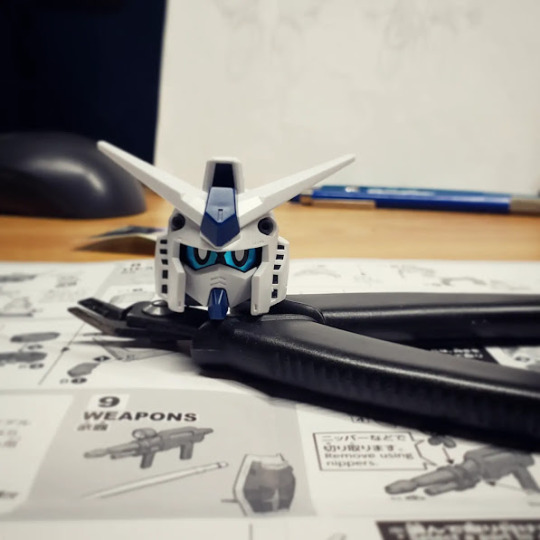
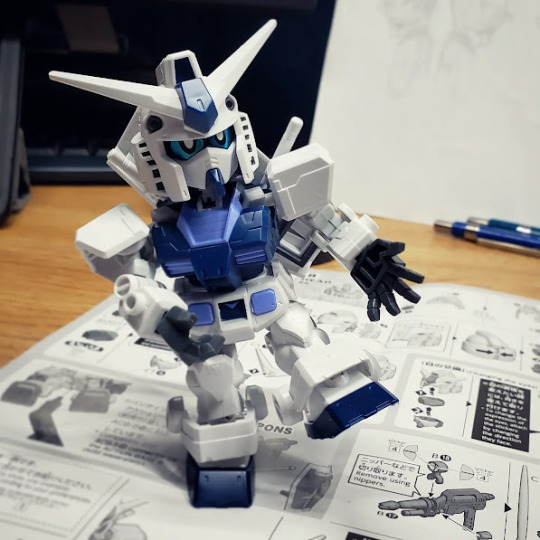
HG RX-78 MS00Z Gundam GP00 [Engage Zero] – A Review
Pre-ordered in October. Shipped out in March. Missed the mentioned arrival date by a Day as the tracker didn’t bother to update when it was delayed thanks to *Gestures at the recent chaotic weather* all of this “Totally Normal" March weather system.
That’s right! That monochrome box can only mean one thing: My P-Bandai exclusive Engage Zero has Finally Arrived! = D
What follows is the basics of the build. It was a fairly easy and smooth build that was pretty fun. So sit back, get comfy and enjoy the read. = )
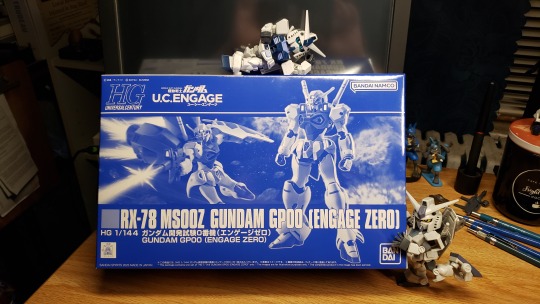
So here’s the deal... I pre-ordered this on the US Premium Bandai website back in October. The thing about P-Bandai (especially the US site) is that kits tend to sell out fast. This means that, when the Engage Zero went up for sale, I jumped on it ASAP.
Turns out I really didn’t need to as I’m Pretty Sure you can still order a kit from the US P-Bandai site at the time of this posting. o.o
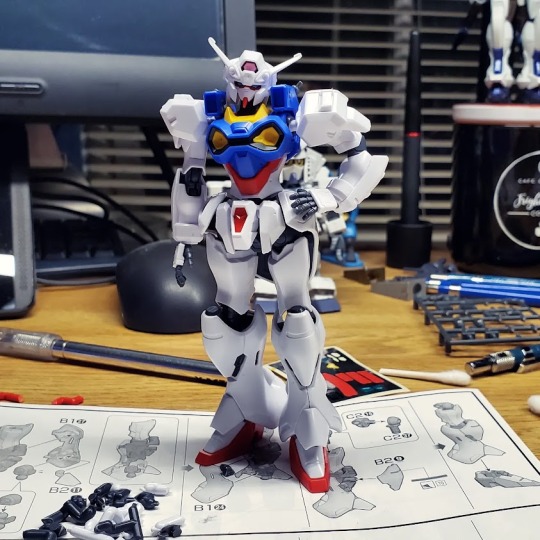
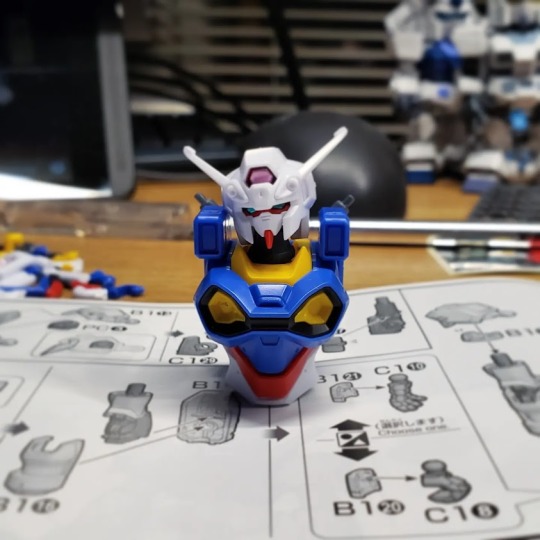
Anyhoo! Now that I got this kit in and got the change to build it, I'm really happy I didn't risk the wait. The Engage Zero is a neat little kit. The story is it’s supposed to be a Federation/Zeon joint creation and you can tell in the build. The head and body have a lot of design cues from the classic RX-78. The colors are very much Gundam Mk.II inspired. The limbs are VERY Much inspired by Zeon suits. It sports a back skirt similar to the Qubeley with some Neo-Zeon flavored arms and legs. The beam rifle has a Gundam SEED feel and the shield looks like it’d be at home in Gundam AGE.
As for the build… it has a handful of color stickers. It’s not a Terrible amount, but it does have some to add some red bits to the arms, legs and Gigantic space backpack. The only stickers I used were the eyes, a handful for the lenses and I tried for the classic Gundam “Crotch V-Fin". See... this is an area that – in the past - questioned if it really needed a large sticker for. Most times, the bulk of sticker is the same color as the plastic piece you’re putting it on with only the V-Fin being different. Well… this kit came with Just the V-Fin.
To give you an idea of the size of the this detail: It’s so small on HG kits that you can just leave it blank and the natural highlight and shading of any kind of light setup will make it pop and noticeable.
This kit comes with this teeny tiny fiddly little golden metallic sticker for Just the V-Fin. I tried for a few minutes trying to line it up on the piece and get it to wrap around like it should and Yeah! Nope. I took the thing off. Although this was kinda’ sorta' planned to be a straight build, I’m adding that to the list of things to be painted in later. This kit looks great on its own and will look better with some panel lining. It also has a lot of very nice open space that’s just begging for some decals and detailing.
Enjoy some in-progress shots! = D
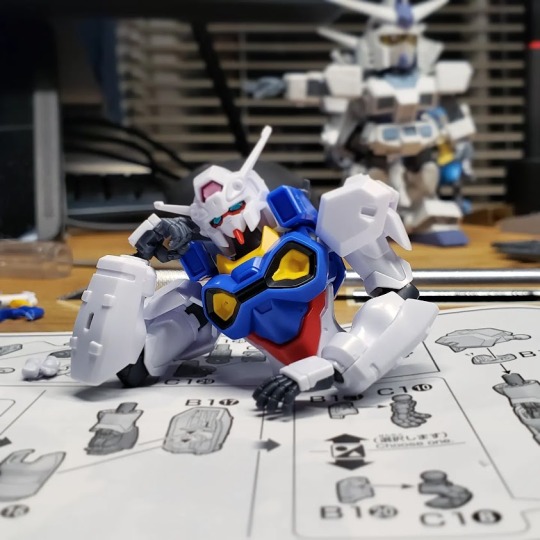
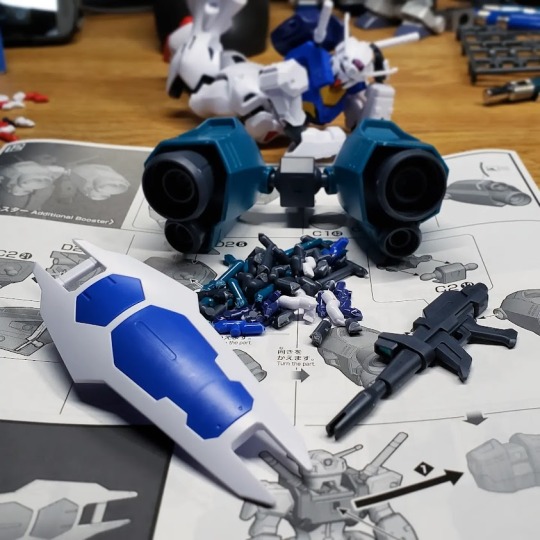
Final Thoughts: I love it. It's a very feminine looking kit without going the full "Not Sailor Moon" distance that the Nobel Gundam goes. The color separation is great with only a handful of parts needing stickers. Although it comes with a whole thing of polycaps, it hardly uses any. Instead, it has a lot of plastic on plastic joints. Whether this is a good thing or a bad thing, I’ll find out in time.
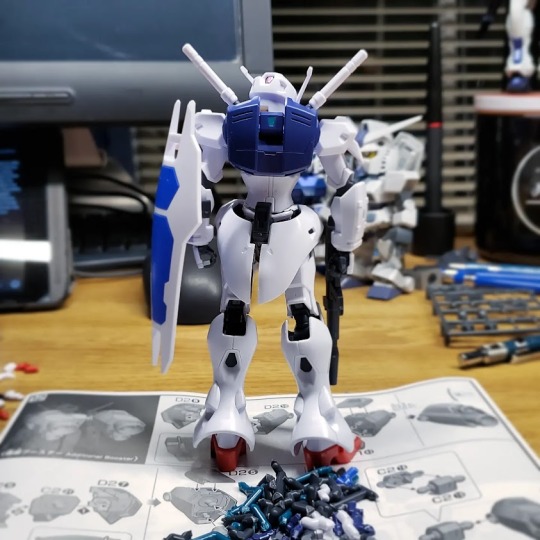
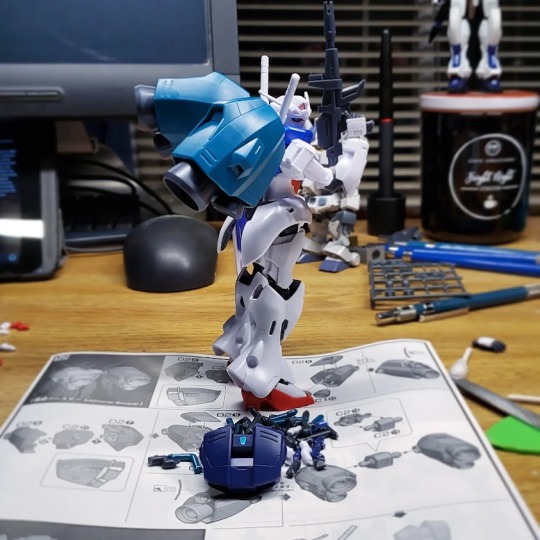
The poseability on this is top notch. Massive space backpack aside, it’s well balanced and can hold a fair number of poses. As others have pointed out, the shoulder armor prevents it from getting its arms to go straight out. Like anything, a little bit of sanding would improve that but it’s not a deal breaker by any means.
It also does something I rarely see from Bandai – It has a set of open hands, holding hands and a custom trigger hand for the rifle with backing parts for the whole set. That’s Two pairs for basic hands and a special trigger hand with Five backs so you don’t have to loot them from the others just to use them. = )
Overall, I’m diggin' the Engage Zero. It was a relatively simple build with a nice payoff. I Might try to mod the back to accept something beyond the single post backpacks but, for now, it’s a nice little kit.
12 notes
·
View notes
Text
Kotobukiya MSG Weapon Unit RW021: Water Arms - A Quickie Review
I recently picked up Kotobukiya’s Water Arms weapon kit while doing some shopping on Amazon. Seeing the style of the water gun in it, I couldn’t resist getting it for my Desk Toys.
Having picked up the MH05 Mega Slash Edge in the past, I know the handles can be a problem. They’re usually just a little too big for basic Bandai hands but it’s a relatively easy fix.
That said... here’s a quick look at the two items in this pack! = )
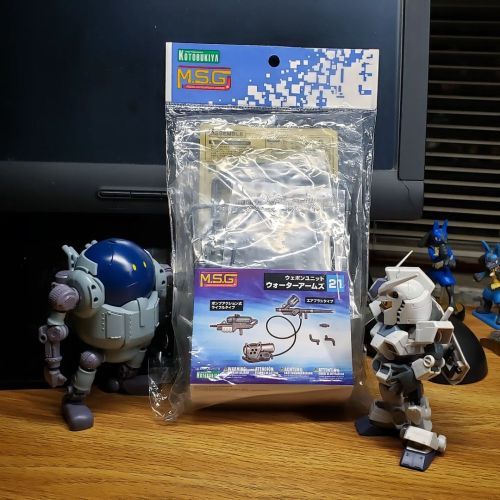
The Not-A-Super Soaker:

First off... I Love that I was wrong about the clear parts on this kit. They are crystal clear and ready to either be dyed or painted or whatever you do to color your clear plastic parts. = )
The shape is very much reminiscent of the old Larami pressurized Super Soakers or one of the abundant knock offs from the time. The pump handle slides, too, so you don’t have to have it in the resting position all the time. Thanks to the dark gray plastic and the minimal contact points, the nub marks are not too terrible.
A little polish on the clear and a little paint on the body (and yeah... it Really needs paint) and you got a solid little squirt gun. = )
- -- - -- ~ -- - -- -
The Weaponized Airbrush:
This is very much as thing that Needs paint.
The airbrush is a cute little thing with plenty of little built-in detail bits on it. Same with the air compressor. Both are just as super simple to build as the Not-A-Super Soaker.
My only minor gripe with it is the somewhat fixed handle is really stuck in close to the very much fixed post for the air hose. It Is “technically” an airbrush so they can’t really move the air hose input but that handle is Tight.
- -- - -- ~ -- - -- -
My Verdict:
If I had the chance to get Just the Not-A-Super Soaker, I’d get another set in a heartbeat. Both are really fun goofy pieces that need the lightest of paint to make them pop. Thankfully, I have the stuff for a good Super Soaker 50 paint job.
Now I just need to pick up some of Kotobukyia’s Frame Arms optional hands. I wanted to for a different kit but I Think it may just be needed if I get any of the other Water Arms kits.
They have a couple with proper clear green and yellow squirt guns and water balloons. = )
1 note
·
View note
Photo
Going to snap this up tonight. I needed an add-on for some of that sweet sweet "Free" shipping over on the Amazon and this was what happened to catch my eye.
No way I, an old guy with both the fond memories and the actual items, could pass up the opportunity to give my Gunpla a Super Soaker. = )
I'll do a bit of a write-up for folks after I'm done. I love the MSG weapon kits but I know they're built more toward Kotobukiya's really neat looking Frame Arms stuff so the scale is off and the handles tend to need some fixing.

Did I really Need a new set of random “Weapons” for my desk toys? No.
Did I really Want this particular package w/ a weaponized airbrush/compressor combo & “Legally Different” Not-a-Super Soaker? Absolutely. = )
#Gunpla #Plamo #MSG
https://www.instagram.com/p/CpEji5IuiXi/?igshid=NGJjMDIxMWI=
2 notes
·
View notes
Photo
So! Poking around in a box, I found one of my oldest Gunpla. We're talking a 2000 reprint of a late 90's Wing Zero kit. Normally, this would be bogged down w/ stickers. This one... well, let's just say this is my attempt at a paint job.
This was - and may still be - a straight up paint job. It's not super posable but it can transform into Bird Mode. Although it was neat to find it in this fairly complete condition, I'm still not sure if I want to actually work on it yet.
Just a quickie fun look back at a neat kit from back in the day. = )
Wanna’ see something neat? This Wing Zero is quite possibly my oldest surviving kit. Note the half done paint job & lack of stickers. = )
#Gunpla #GundamWing #WingZero #OldKit
https://www.instagram.com/p/CozUXXVO4qz/?igshid=NGJjMDIxMWI=
3 notes
·
View notes
Text
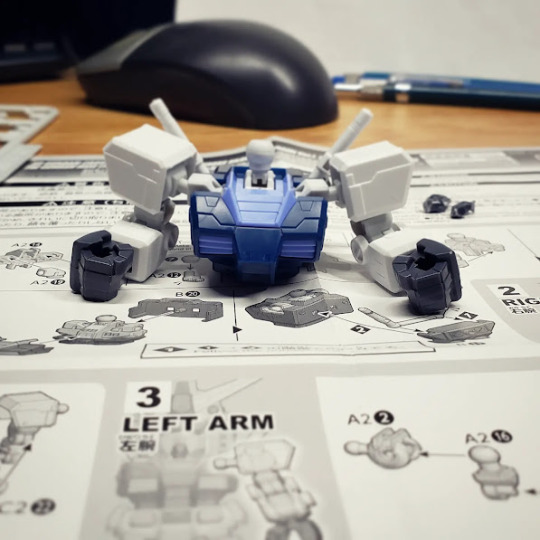
SDCS RX-78-2 Gundam (Gundam Base Colors) - First Build of 2023
First build of the year is one I'm more than familiar with yet still somehow managed to trip me up. I have a love of the Super Deformed Cross Silhouette line of Gunpla so, when the recent online Gundam event came up, I decided to toss a special color version in with another order I had. After a bit of waiting, that order came in a couple of days before the writing of this and I couldn’t wait to get started.
Without further ado… here's the write up for my SDCS RX-78 Gundam (Gundam Base Colors).

The basic unboxing was pretty standard. Seeing this is like my… 7th(?) SDCS kit and my 5th RX-78, I was well versed in this and had a solid idea as to what to expect… or so I thought. o.O
Things this very nice blue kit did right:
1) No extra parts. Both the book and the runner only had the basic larger CS-style frame. It seems to be a standard runner – the A2 runner – and it lacked any of the smaller SD parts to make this particular kit the smaller version that find in other Cross Silhouette kits.
2) The colors! I knew this was the “Gundam Base” version of the kit. This means it’s rocking a lot of blue tones. The main hue being a very nice dark blue. I have a G-Base colored Haro so I Kinda’ knew what to expect but those kits are just funky ball-shaped mascots. This looks Way better with the bright white armor parts offset against the weird grayish off-white of the frame most RX-78’s I’ve built have come with. The key is a cornflower blue (a light blueish purple) that was used for the chest vents and hip panels. It makes the whole thing work. = )
What it did wrong:
1) Still just the old RX-78 runners. It may have nicer colors but it’s still the old runner. This means you will need some cutters to take off the hands and the beam rifle. They bumped up those connections beyond the rest of the kits and it’s impossible to simply pop off like the rest of the pieces.
2) No extra parts. See… I did a broadcast for this and I always make a backup recording for possible time-lapse shenanigans. When I got the leg section of the build, I noticed I have one less foot frame part. I thought it had fell off the runner in transit and I yeeted it into the middle distance when I went to move the bags out of the way. Nope! It was missing from the start. Having the SD parts would’ve actually been a Good thing this time around.
Time for a sweet Photo Montage! = D


With a little luck, I managed to dig out some replacement feet frame parts and fix that aspect of the kit. It was a fun little build that came out great. Being a straight build, I stuck (Ha!) to just the included stickers. I did keep to a long running tradition with my kits and left the stickers off of the shield. The cross is supposed to be in that cornflower blue like the chest vents and skirt panels. It’s just that it’s a very complex set of tickers to cover that complex shape. I rarely use complex stickers on my kits as they never live up to a nice paint job or, like in this case, the raw plastic. I also left off the Gundam Base branding ‘cause… yeah. I like the shop and their choice of colors. I have no intention of slapping their logo on my Gundam. It makes it feel like an 80’s plastic smock and mask costume kit where you’re not dressed as Orko from Masters of the Universe. You’re dressed as Orko wearing a shirt with his face on it for some odd reason. o.o
Needless to say... this is going to be part of my desk toys alongside my (now fixed) G-3 kit. I Might just see if I can max out this frame and get the expansions for it. That will make it ever-so-slightly taller and give it a more mobile set of hips. A task for a later date.
Anyhoo! If You want a neat little G-Base exclusive SDCS RX-78 kit of your own... you might be out of luck unless you can make it over to Tokyo, know someone who can or P-Bandai adds it to their next Gundam Online sale.
0 notes
Link
Alrighty! First livestream in Ages and I'm going to waste it listening to podcasts and snapping up one of my new kits. = )
The stream proper starts - In Theory - around 10pm Eastern. I'll be spending some time before that trying to remember what all these buttons do and looking for my tools again.
2 notes
·
View notes
Photo
Now that the kits are in, I gotta' remember to update the sidebar!
Bonus: I'm making it a "Thing" to make - at the very least - the SD into a proper post. As in, it'll be the first fresh build here. I'll do my best to snap pics or do a video of something as I go along. = )
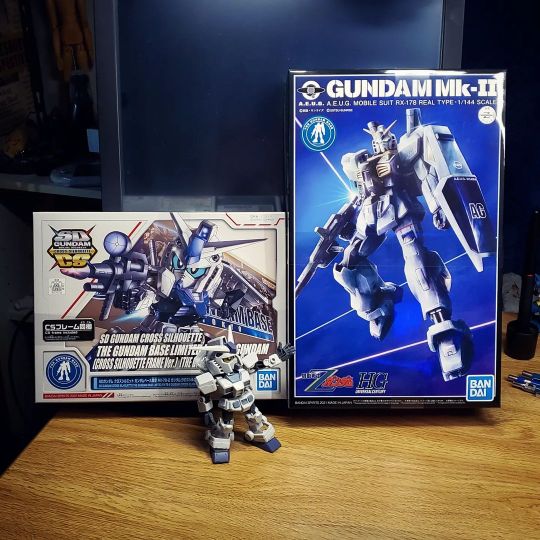
Ha HA! I Finally got my hands on the Mk.II Real Type. Nothin’ says lovin’ like a kit that’s pretty much molded in the colors you slap on everything & yet another SDCS Gundam. = )
#Gunpla #SDCS #RX78 #GundamBaseLimited #HG #Gundam #Mk2 #RealTypeColor
https://www.instagram.com/p/CoGLdc2LFkZ/?igshid=NGJjMDIxMWI=
#Gunpla#SD#SDCS#RX-78-2 Gundam#Gundam Base Limited Colors#HG#RX-178 Gundam Mk-II#21st Century Real Type Version
4 notes
·
View notes