
olivortizart
Methods of Inquiry
my work from my Methods of Inquiry class winter 2020 w/ Endi Poskovic
45 posts
Don't wanna be here? Send us removal request.
Last Seen Blogs
dontneedanothertomarryblog
butterbeers: AFTER DARK
she-x-addict
To Infinity and Beyond

farmerbuju
Untitled

soulwitched
look at the stars, look how they shine for you
dontneedanothertomarryblog
butterbeers: AFTER DARK
Text
A Short Artist Reflection
The work that I’ve made this semester I’m very proud of! Out of the three, I’m probably the proudest of my Body Extension, then the Sequence project (also because I loved working with my group), and then the remapping project. Aside from ranking them, I enjoy them all quite a lot. However, to make this a better reflection I will reflect on them separately.
Sequence:
For the sequence project, I really loved learning more about video editing. I also genuinely loved doing the filming of the video!
It was a great project from start to finish! Figuring out the idea, storyboarding, finding audio, props, and costumes! Also, our group dynamic was very exciting and fun, which helped the process immensely.
Body Extension:
So this project took me ages to get done, mostly because it was difficult to continue working with the same motivation transitioning to quarantine while dealing with other classes. However, I’m glad I took my time because the final result I’m very proud of. I think this is a great project to have because it is so unique, yet it has such a personal and real connection to me.
Remapping
This project I enjoyed creating because I was able to learn more about photoshop/digital drawing! I like this project because when I look at it, I really see my semester perfectly. I also enjoyed toying with the symbolism in the environment to properly reflect my emotions.


Overall, I have cherished my time working in Methods of Inquiry and I’m enthusiastic about the work that I’ve been able to create in the class!
5 notes
·
View notes
Text
Final (Re)Mapping Reflection !!
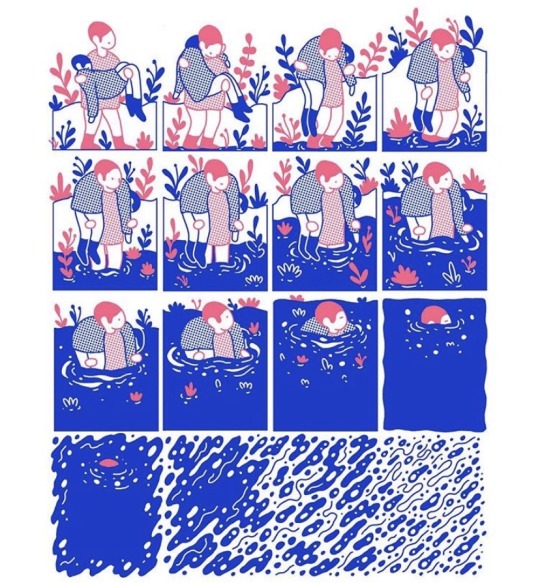
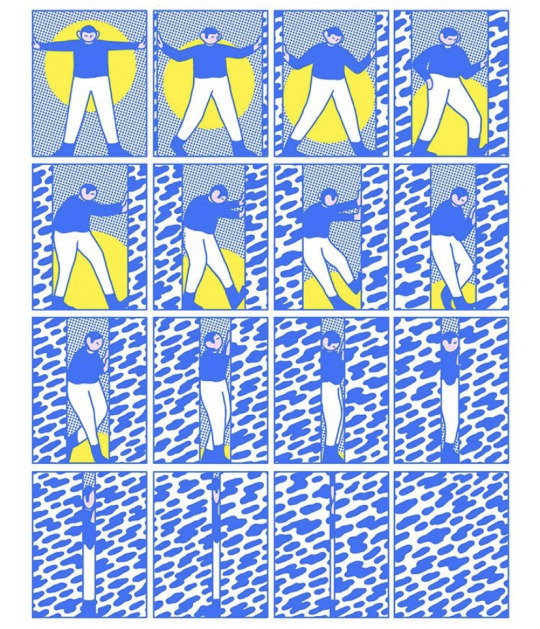


Okay so in this group of photos I’ve included two comics from the artist that inspired this style of comic (@evanmcohen)
And when I look at my final product versus his it makes me realize that mine is much harder to understand from afar.
I’ve come to the conclusion that my comic has two aspects that make it harder to understand compared to Evan’s
1. I think it’s because I have so much more detail than he does
I tried to make each drawing simple but I guess I got away from myself, I think I added too much color and background
2. I have a much longer story
So now that I’ve looked at my comic and his I’ve also realized that in his comics he’s usually one telling one action/story. He spreads that action/story over all of his frames in a very gradual manner so when you look at all of them together you aren’t overwhelmed.
I am telling a story that has 2 peaks and 2 valleys
So essentially I’m telling 4 stories from my semester.
4 stories in 16 frames is a lot more chaotic than 1 story in 16 frames
-
Hindsight 20/20
so if I were to do this project again I would make each set it’s own comic
Set 1 would be a comic about my anxiety slowly taking over (night and snow falling/freezing)
Set 2 would be a comic about finding hope and excitement again (day, snow stopping, and finding the people at the bonfire)
Set 3 would be a comic about a sudden force upturning all the new potential and reflecting (night, the people leaving, the wind blowing out the fire, and rain falling)
Set 4 would be a comic about hope gradually reentering my life and happiness blooming (day, rain stopping, grass growing, flowers blossoming)
If I would have separated my story like this then I would have had an easier to understand comic,, or at least more of what I was aiming for. I might actually redo this comic later and use the format I outlined above!!
Overall! I’m happy with final result! Even though it’s not exactly what I wanted, I still enjoy it ! and I think it does cover the story I wanted to tell! :)
Thanks for looking at all my spam! Sorry it took me so long to post it all again!
4 notes
·
View notes
Text
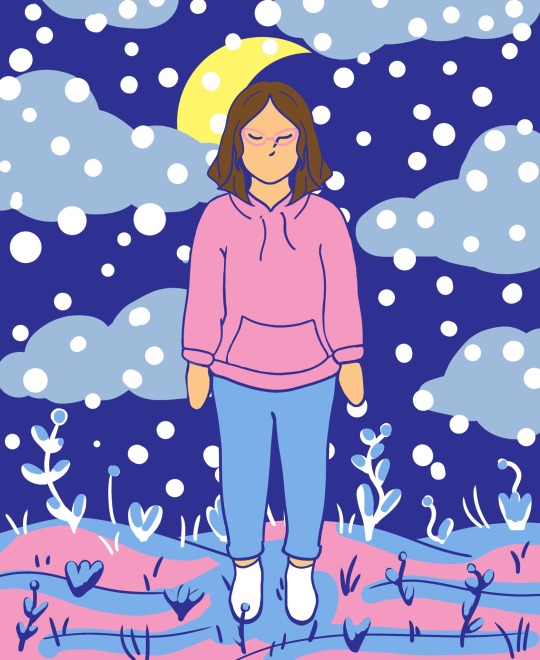
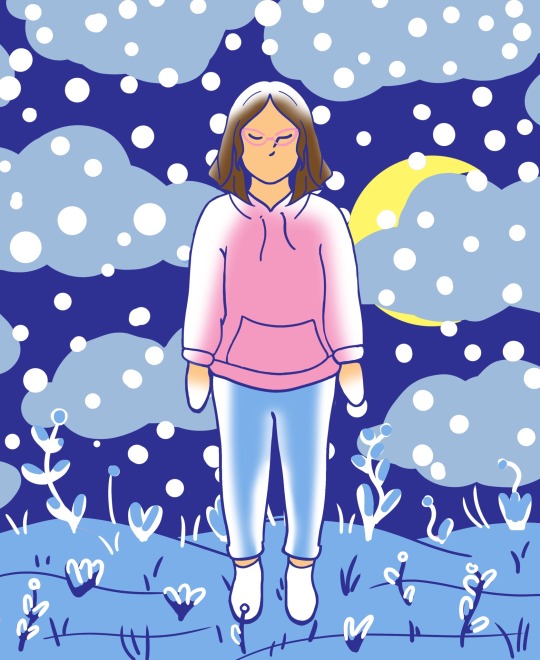
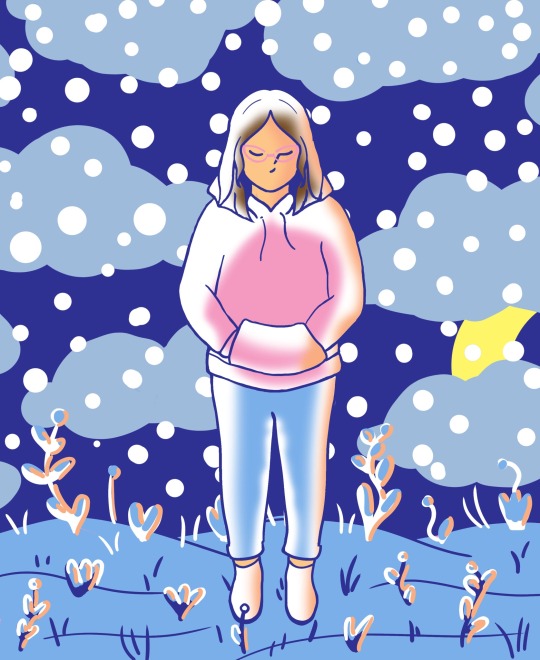
FINAL (Re)Mapping !


So here are all of the sets together!!
I assembled them in three different ways !
White background
I think the first version is the best to show the work for what it is, you can clearly see each frame and also the blue outline that they each have
Blue background
This format I think is the best for telling the story because the outlines fade away and I think flows best.
Video
Then I created this because I thought that it would be interesting to see the story in a video format. I do enjoy the style but I prefer the comic format more to tell the story (also you can see more clearly some errors that I made moving from frame to frame)
Altogether I’m satisfied with the final product!! :) however! I will reflect more in my next post !
5 notes
·
View notes
Text
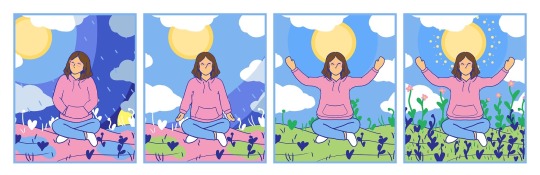
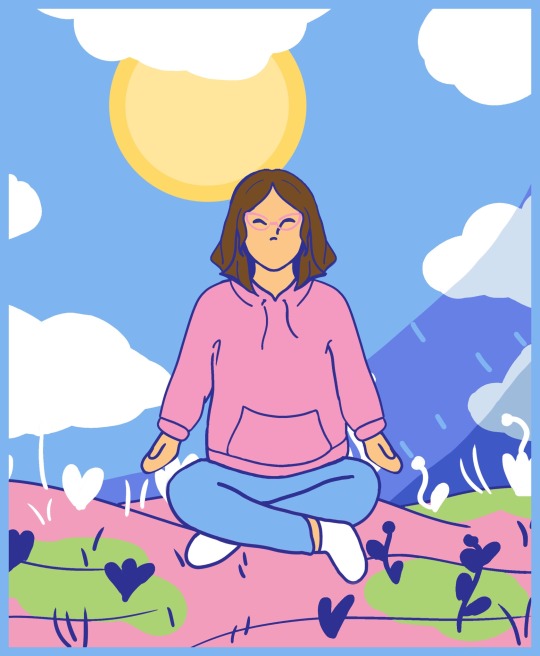
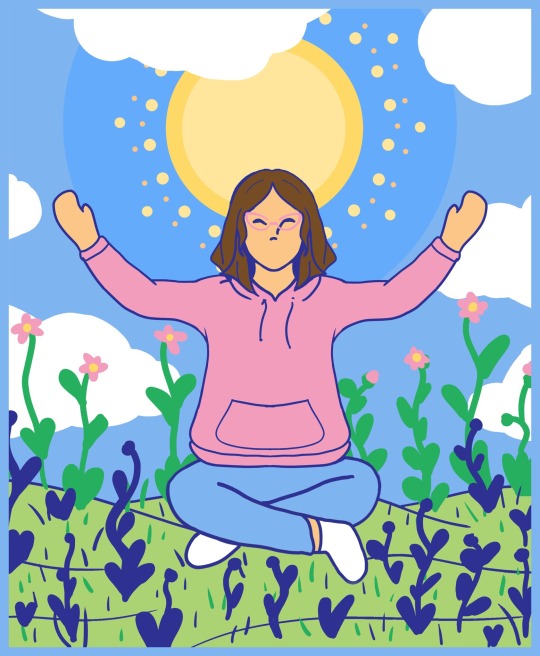
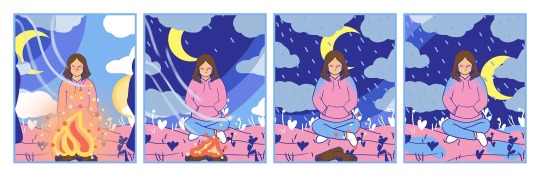
(Re)Mapping - Set 4 of 4 !


Description
In this set I see the sun rising, the rain stops, flowers and grass start to grow and I start feeling more at peace/secure/happy again
Meaning
So this set is basically me becoming adapted to staying at home. I have steadily become more hopeful for the summer and all the fun projects I can do once school is over
Also with the past week it has rained a lot and outside has become very green and happy! I genuinely feel like that last frame :) I love nature and green is my favorite color (along with blue) so when I go outside and I see blue skies, green grass, and green buds on the trees it makes me very excited and happy :)
4 notes
·
View notes
Text
(Re)Mapping - Set 3 of 4 !


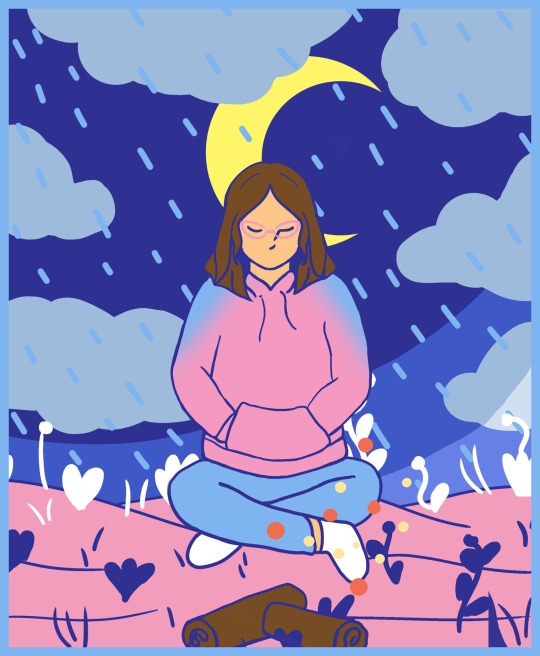
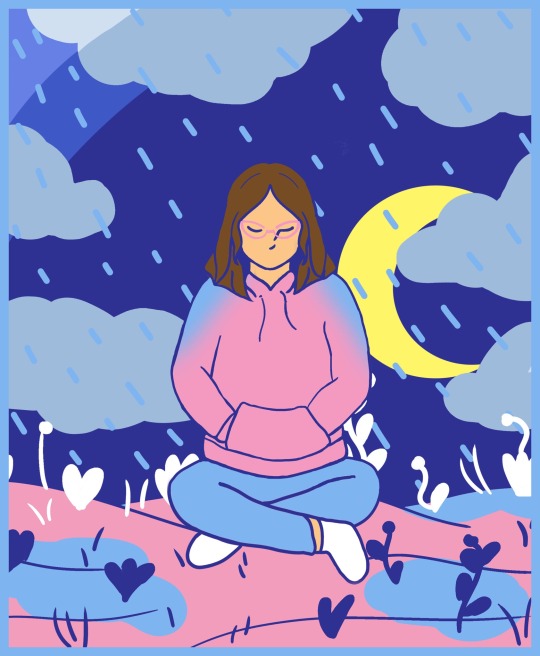
Description
So in this set I am sitting with a group of people but them they leave very suddenly
The wind comes and blows the fire out
Rain starts falling and puddles form
Meaning
Okay so this set represents the sudden disappointment of having to leave school also leave the new happiness I had just found!
The wind = the corona virus basically
The fire = happiness
The moon = sadness
The people = having a community / have them leave you
The rain = reflection on my situation
2 notes
·
View notes
Text
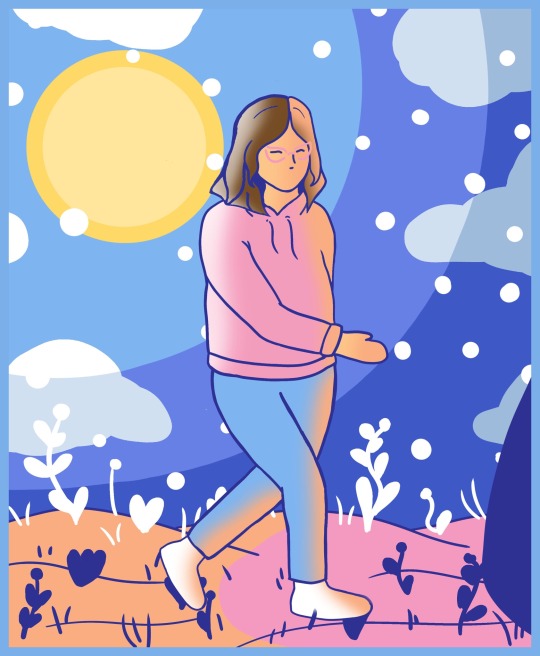
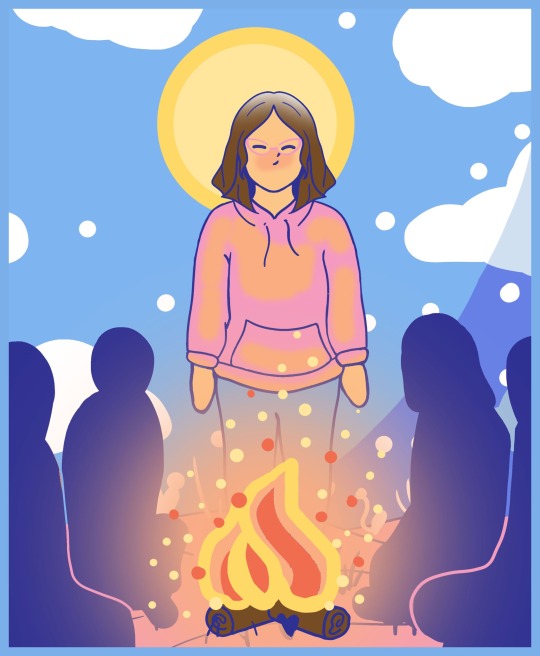
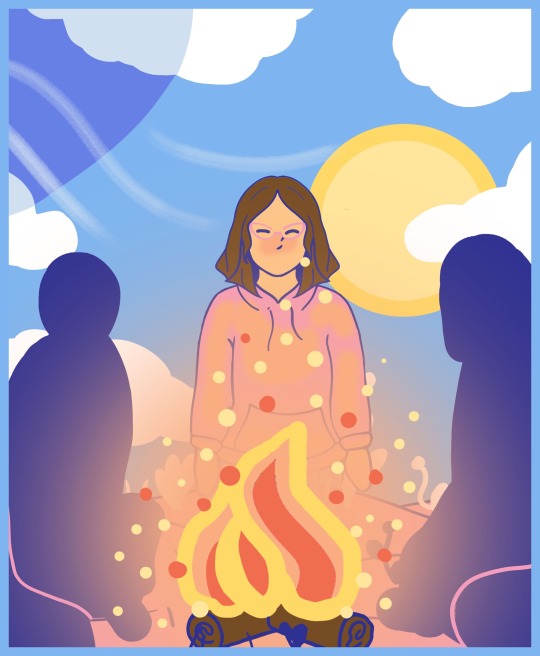
(Re)Mapping - Set 2 of 4 !
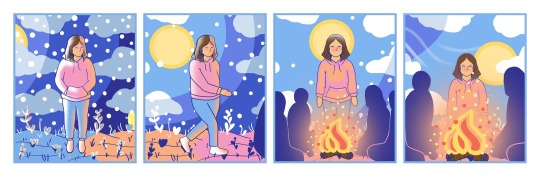
Description
Okay so! For this set my character is walking to a near by bonfire. There are some people at the fire and I get happy and sit down.
the snow stops
The sun rises
The glow of the fire increases
This set is supposed to represent finding hope and excitement! (The fire glow and the people’s silhouettes would represent that)
However, in the last frame you do see the indication of some wind entering which would be the sudden disappointment/feeling alone
Meaning
So this set is supposed to be about me finally feeling more comfortable with my life at school because I was coming out of my shell more with some friends and being just more happy in general!
—
I did take screen recordings of me making each set but for some reason my computer couldn’t make it smaller / I couldn’t put it in premiere pro :/ so I won’t be able to really show the process..
4 notes
·
View notes
Text
Last minute Remapping Spam
Okay Hi! So I didn’t post yesterday because I was busy with other things but i’m about to spam my tumblr with all of my process for my remapping project!
The first of the spam is this little post
--
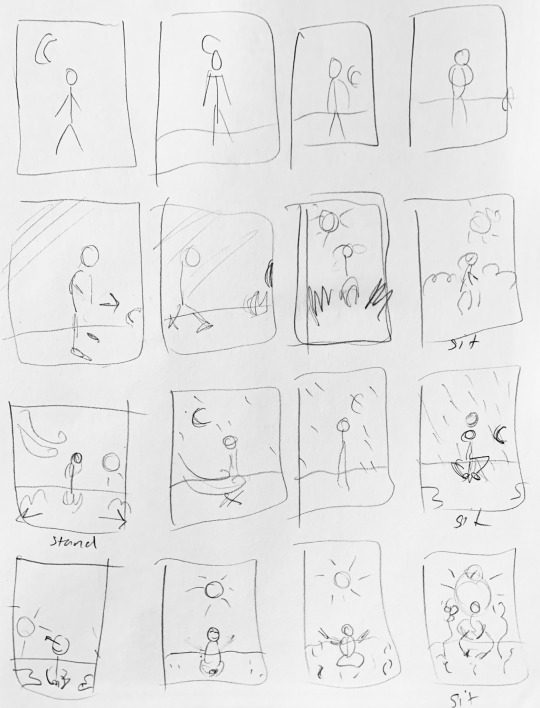
Okay so once I started drawing I got concerned about all the different poses I would need to make my character
To help clarify what I was going to do I made a little drawing/diagram that outlined all the poses I thought I would need

okay i’ll be back to post my next set!!
3 notes
·
View notes
Text
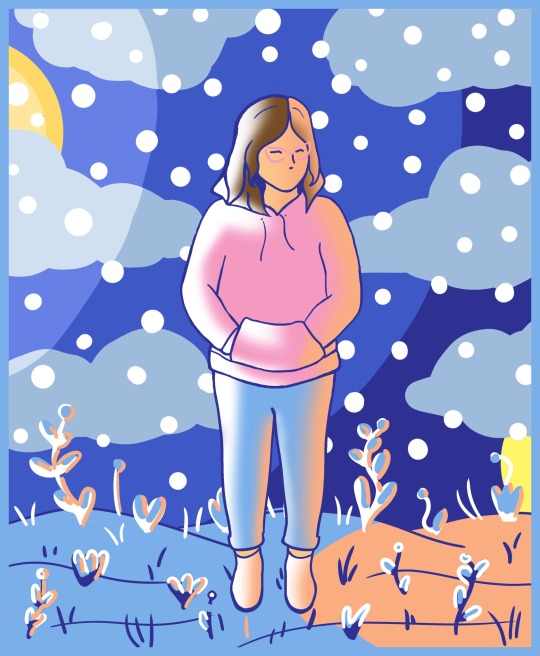
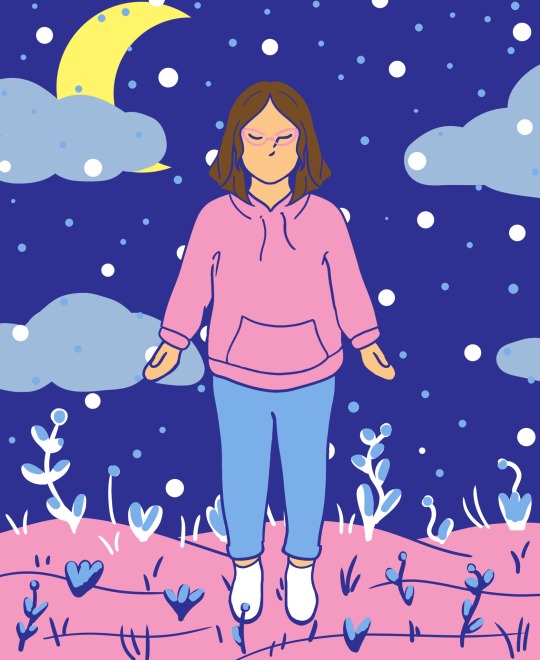
(Re)mapping - Set 1 of 4 !
Here are the first 4 frames of my 16 frame comic!
This set is meant to be dwelling on the anxiety and the feeling of isolation I felt at the very beginning of this year
I showed this by
me looking down and slowly having my body go into myself.
The cold and snowy weather increasing
The clouds filling the frame
The moon setting
However in the 4th frame you can see the orange glow of the fire that will be introduced in the next set ! (The fire is hope!)
As a side note I think this set has an interesting parallel to my body extension! In the comic I am slowly drawing into myself just as my body extension emphasizes when closed! :)
my closed body extension to simplify it a lot, basically represents me feeling sad and that is what this set is suppose to represent too!
I think if my comic self was wearing my body extension it would be closed and i’d be standing up, but then as the frames continue I would slowly move to it being closed and sitting down in the full bubble
okay I’m gonna stop now though because I’m not supposed to be talking about my body extension anymore! But I thought it was interesting and wanted to share🤗
-
To talk more technically, and more about the process behind this :::
The color palette:
I wanted it to be cool colors mostly because it’s supposed to be a cold temperature
Then I decided to use only a few colors because when I looked at the artist that inspired me, he used very limited color palette (sometimes only two colors!)
This limited color palette I think helps focus the attention onto the story being told so thats mostly why I wanted to do that
The clothing:
I chose this outfit because I wanted it to be an outfit that I wear a lot and a fairly simple one
I usually wear jeans and a hoodie with white sneakers.. so I thought it was a perfect outfit for my character
Then I have this screen recording of me drawing/ figuring out what I’m doing to show my process ! I’ve only done one other real digital drawing project before so making this project I’ve had to google quite a bit and just take some extra time to figure things out.
I’ll be back tomorrow with the next sets!🤗
4 notes
·
View notes
Text
The Initial Planning / Refresher of Remapping Project
okay so I know I haven’t talked about my remapping project like at all on my blog yet but I have a lot that I will be posting tonight/tomorrow.
First, before I get into things, here is a slight refresher on my plan for the remapping project::
In my proposal I talked a lot about how I wasn’t sure how I was going to be able to capture all the emotions I felt this past semester, I landed one a small comic format, similar to the sequence project because the comic will be going in order of the emotions I felt
The words I used in my proposal were: anxiety, hope, excitement, disappointment, feeling alone, reflection, and then hope again.
Those are all the things I would like to capture in my comic
To start planning my idea, I wrote these words down and thought of ways these emotions could be represented in a nature environment.
(Also as another refresher, the artist that inspired me to use the format uses a sort of surreal nature in his comics to express emotions)
So this is what my final notes were:
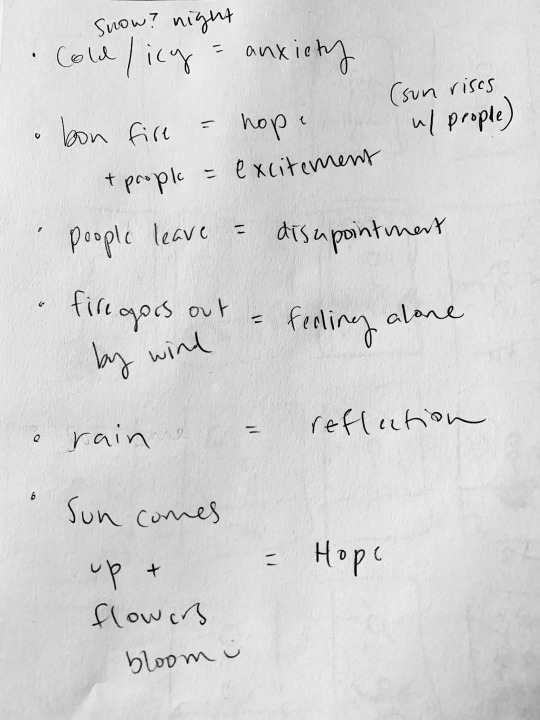
Cold or icy = anxiety
bonfire + people = hope + excitement
the people leave = disappointment
fire goes out by wind = feeling alone
rain = reflection
sun comes up and flowers bloom = hope
I also drew the little squares to help me remember a bit more. I know that these drawings / notes aren’t very helpful in describing my ideas to other people but they are for helping me understand what I’m doing.
Basically I’m telling my story in 16 frames and they come in sets of 4.. here is a better explanation of my idea:
Standing alone [night]
Cold and snowing [night]
Snowing harder /Freezing [night]
Glow of a near by campfire = hope [night]
Seeing the fire! [sun rising-day]
Walking to the fire [day]
There are people around the fire! Not alone! [day]
Around the fire with others [day]
Others leave and wind comes [sun setting]
Wind blows the fire out [night]
Starts to rain [night]
Raining harder and sitting down [night]
Sun rising and looking up! [day]
Embracing the sun’s light/warmth [day]
Flowers start to come out of the ground [day]
Sitting in the newly grown garden, happy [day]
ROUGH DRAFTS / FIRST WORK
Okay so after I had my first planning done I opened photoshop and just started drawing to see if I could get what I liked
The first drawing was just way off (left photo) and i decided to ditch that one. I also have a screen recording of me drawing it
The second drawing basically became my first frame except I later added the clouds and the moon. Then I also have a screen recording of this too but because tumblr only lets me post one video per post I only included the first recording of the roughy draft.
I chose this recording because I think it shows the most exploration with how I was going to approach this project. I will post the other video in my next post !

Altogether though! These are the two rough drafts I made before jumping into the actual drawings and then those are my notes I made before making my drafts!
Next I’m going to post the first of the 4 sets ! :)
4 notes
·
View notes
Text
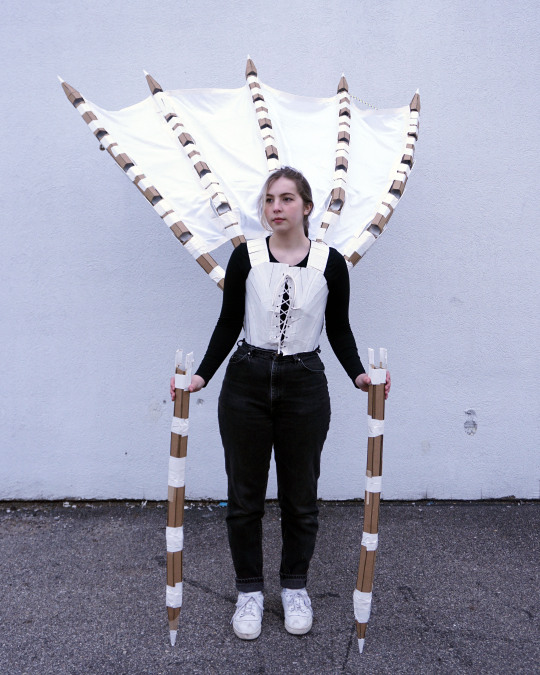
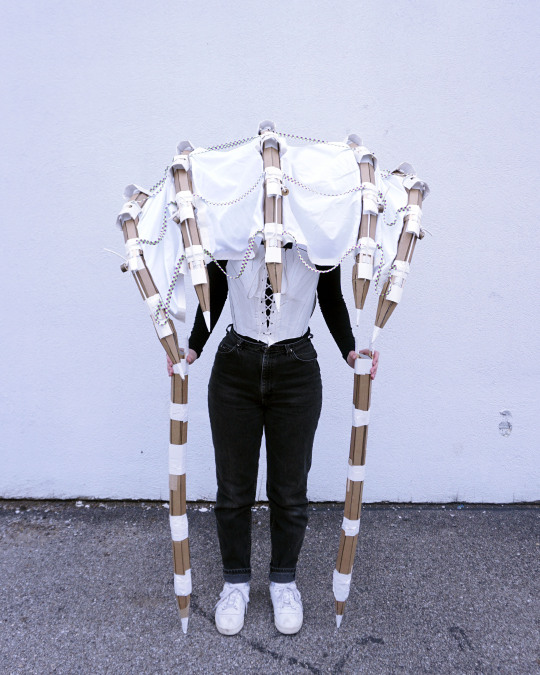
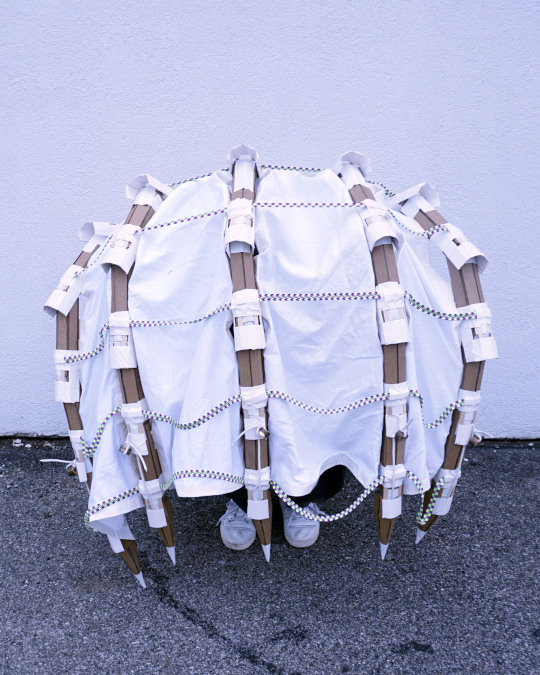
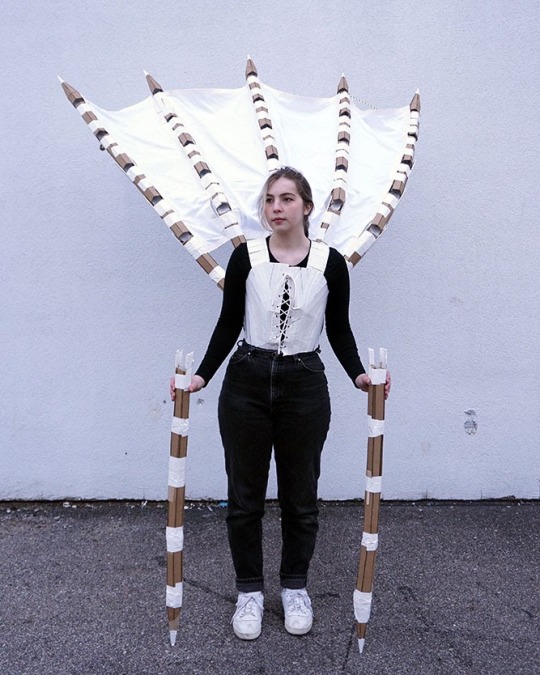
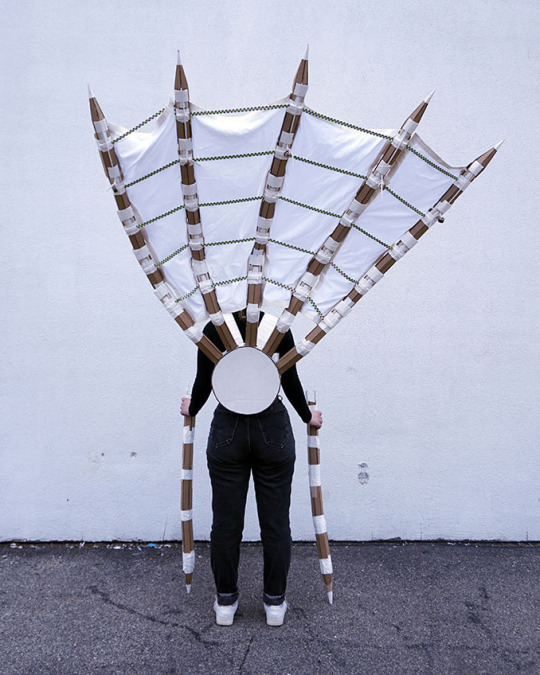
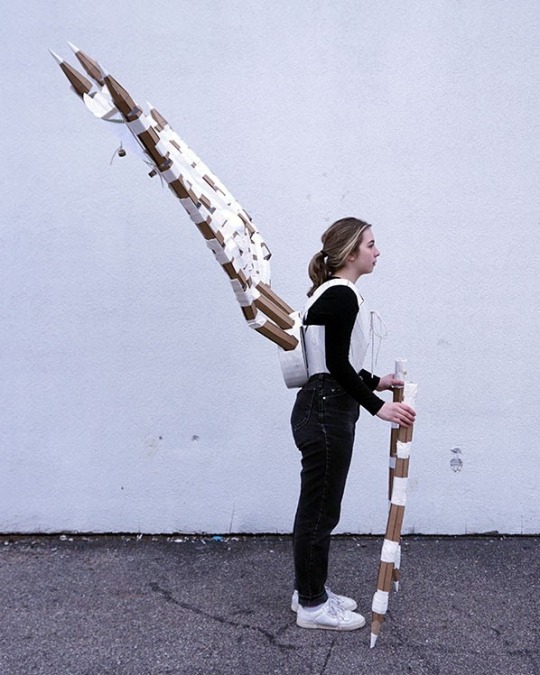
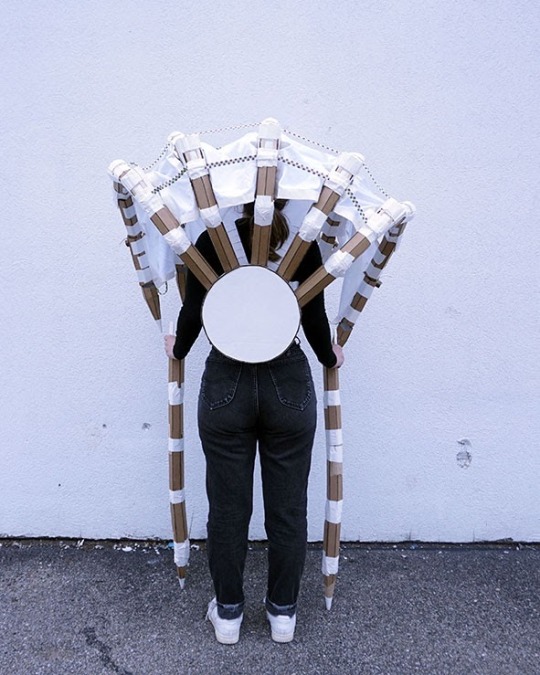
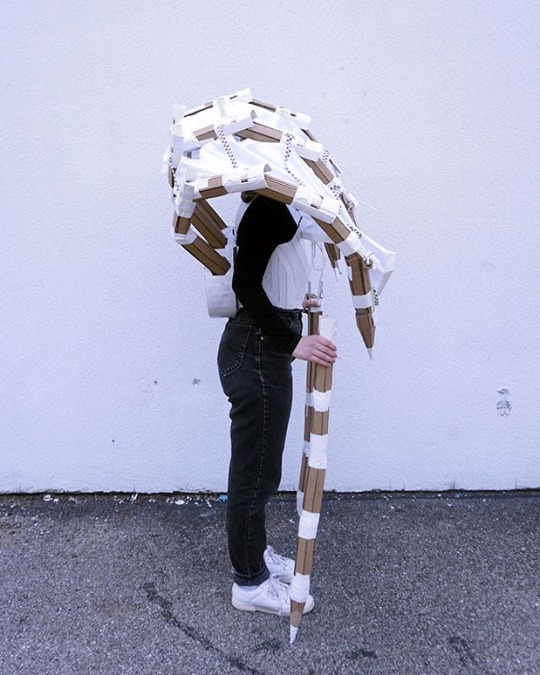
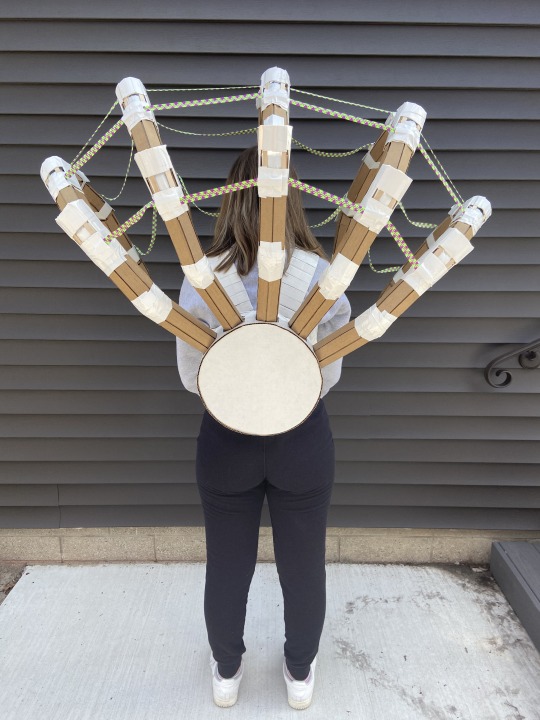
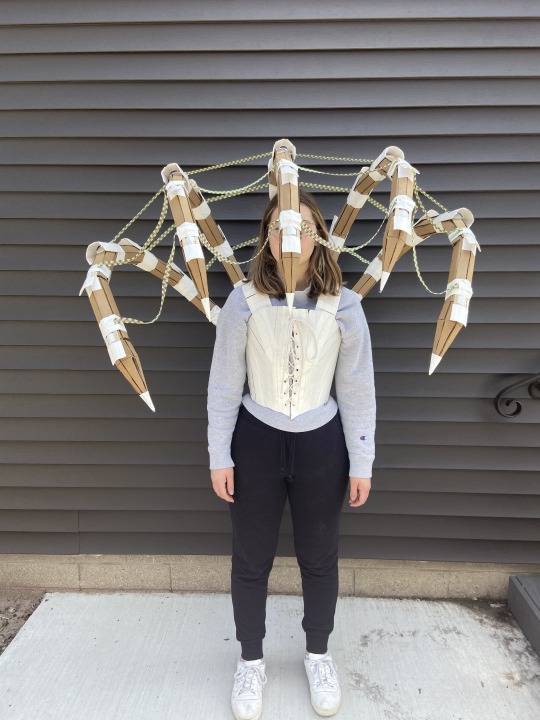
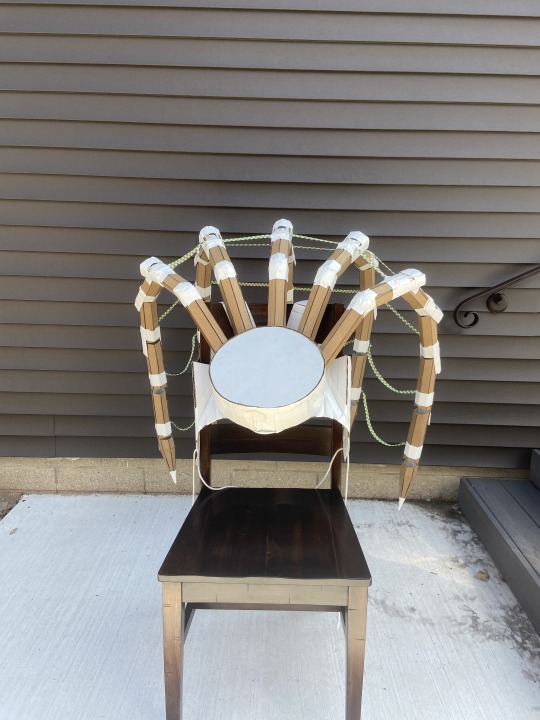
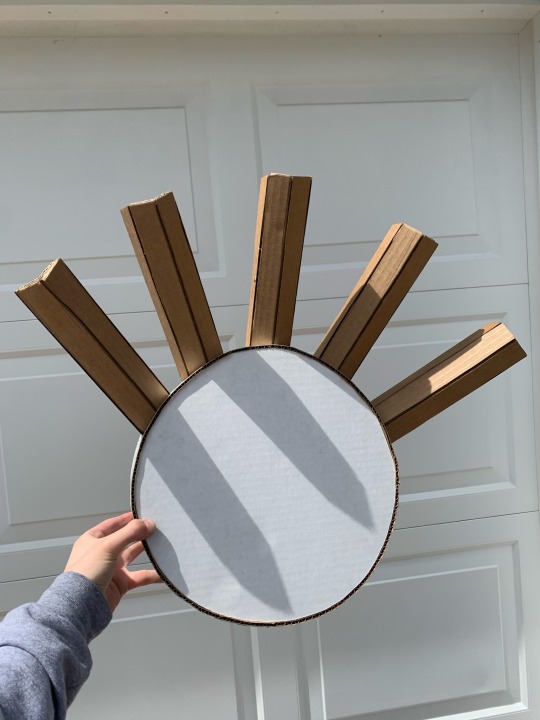
The last of my body extension journey! (pt.2)

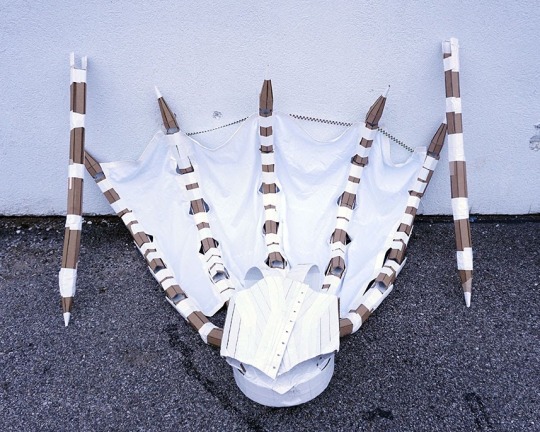

Here are the detail photos I took!
I don’t have much else to say about this project I obviously have gone on long enough about it !! But to conclude this assignment I really enjoyed it! And I think it achieved enough on what I wanted
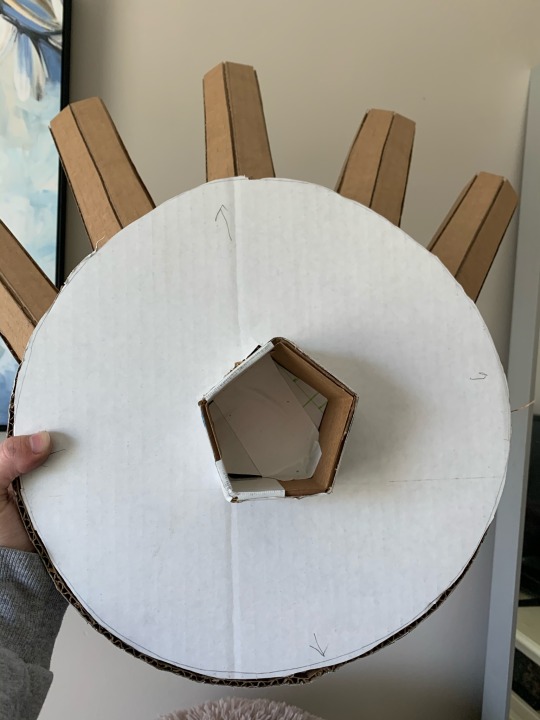
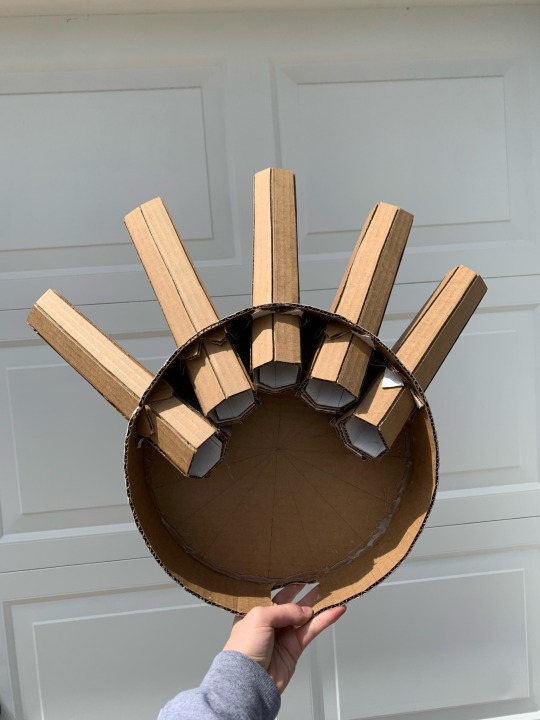
To give a quick recap about what my body extension was meant for:
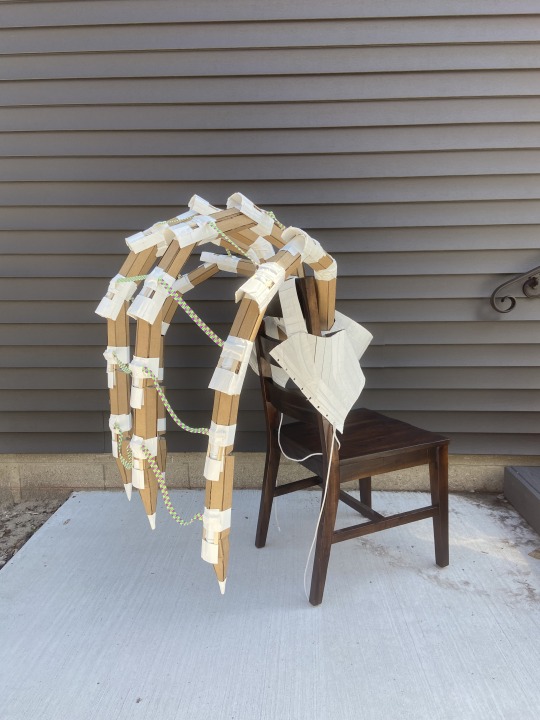
Open Fan = my ideal self, confident/outgoing
Closed Fan = insecurity, wanting space, isolated
I think my body extension is an extension of my personality and sense of self, I also think with the amount of work I put into it, it is an extension of my brain now too !
I really enjoyed making this even though it was very frustrating sometimes. I’m glad I never gave up and I think if I made a second one it could be even better!
Okay! I will be back later to update on what I’ve done with my remapping 🤗🤗
6 notes
·
View notes
Text
the last of my body extension journey! (pt.1)


Okay so I’m pretty sure this next set of posts will be the last you’ll see of my body extension !! As sad as that is lol
So yesterday my mother and I drove around town to find a nice large white wall for us to take photos/film my body extension.
We eventually found one and got out of the car to document! It was very cold out and windy so that made it extra tricky to film and take photos.
I edited them in photoshop to try and brighten them up more and even out the temperature (they were quite blue.. still kinda are😬)
But anyways I really like how the final photos turned out :))
I wanted to take more photos to give more context to the meaning behind the piece but because it was so windy out and we were under a slight time restraint we ended up leaving.
Maybe if I have more time later I will take those photos ! But for right now I have just this regular documentation ! Detail photos in the next post!
11 notes
·
View notes
Text
Hello again!
Updates!!
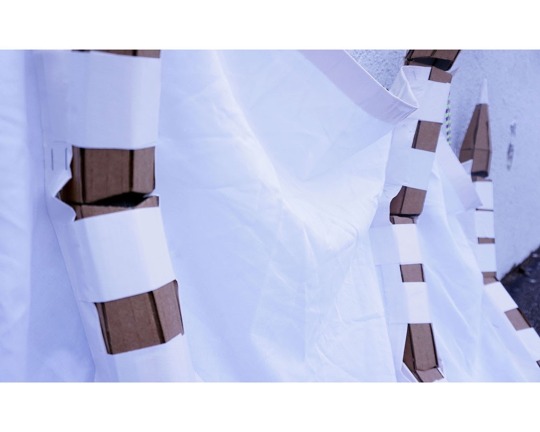
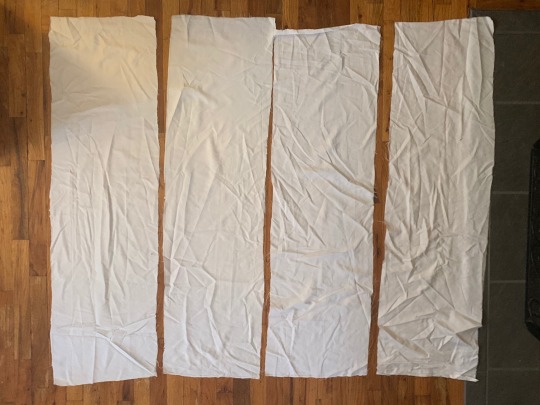
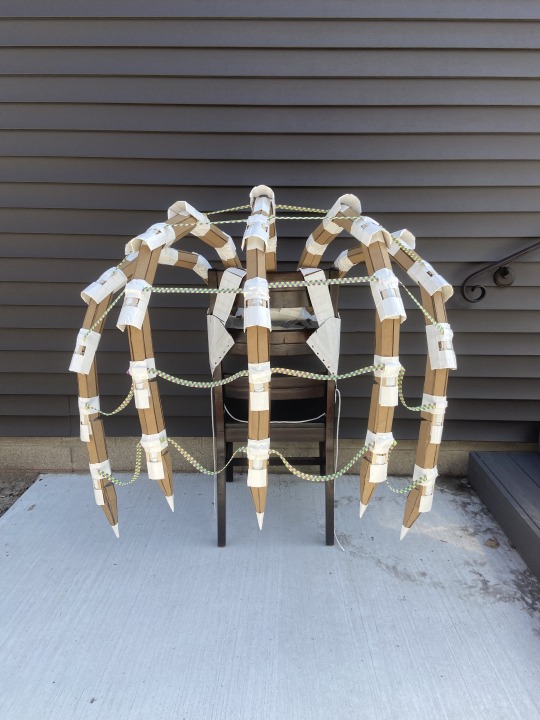
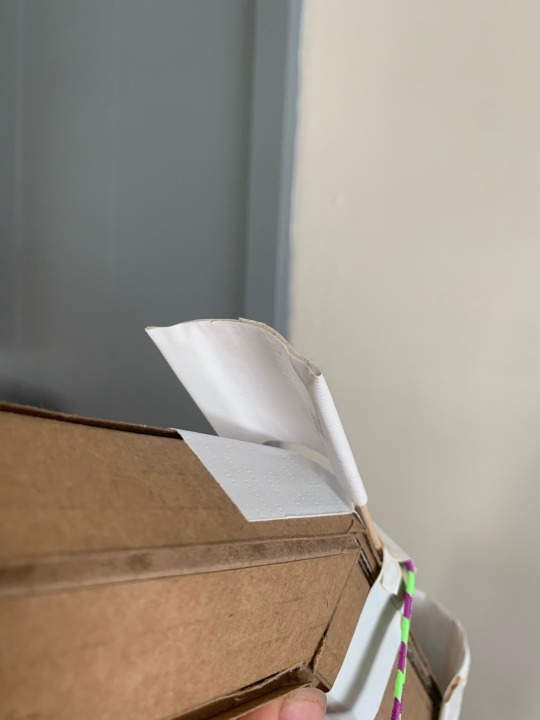
So yesterday and the day before I attached the fabric to my body extension and I also tried to attach the ropes.
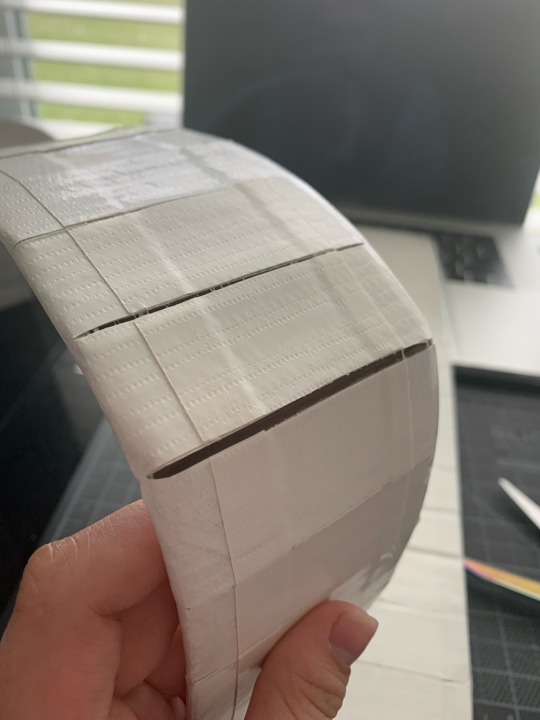
The fabric was difficult to figure out but I ended up getting it! (I had to go to the store and buy more duct tape!)
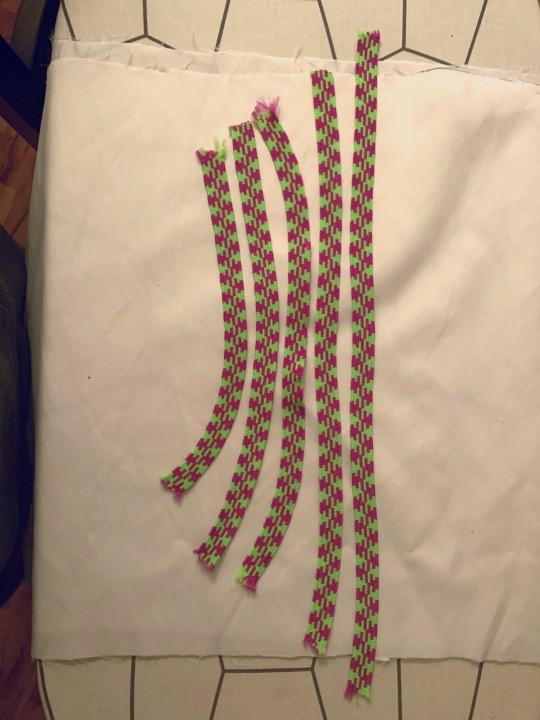
Then for the ropes...
I put them on but then they did not work..
At first I thought it was because the fan/arms had become too heavy with all the attachments but the more I thought about it I realized that it wasn’t the weight it was the angle I was pulling.
I put a little drawing I made in my notes to explain better... the purple is the body extension, the black is the ropes, the yellow arrows are the direction the ropes should be pulled, and the blue is the direction I was pulling them.

This is because when I attached all the arms I put them angled. If I would have attached them all straight up and down it probably would have been easier to pull up.
I might be wrong!
I’m not 100% sure this is the issue but it’s sort of the conclusion I’ve landed on.
MY SOLUTION::
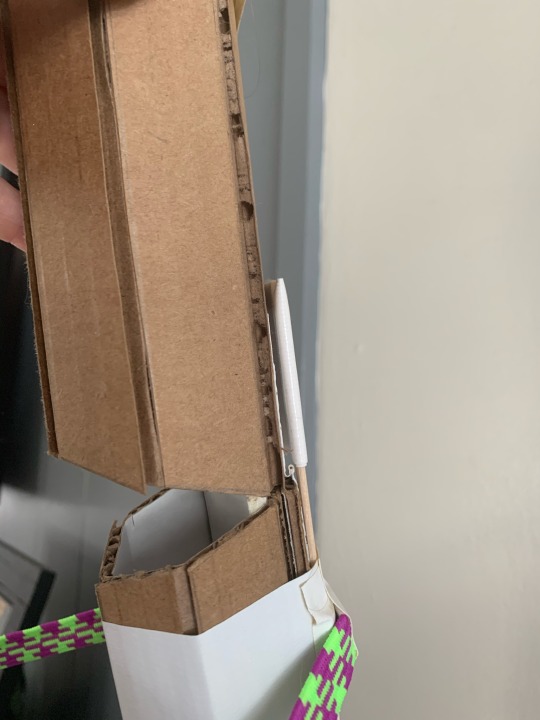
So!! Instead of using the ropes I’m made some extra little arms with the left over pieces I’ve made! I used the popsicle stick stoppers on each side to give the extra arms some hold.
I will use these to just push my fan open instead of pulling it!
Photo of the extra arms:
When I push the fan open the weight holds its open.
To make sure it stays open I actually had to add a little weight to the top of the fan. To be sure I used spoons at first but then I replaced them with some other weights we had from my grandpa. I attach these to to the left over ropes.
Photo of the new weights:

I’m kind of disappointed that my ropes didn’t work but I think if I wanted to make another one I could figure it out and make it even better!
But overall I still really like it and here is a video that my mom took yesterday to try it and see if everything works and I love it :) I feel like the extra arms make me look like a hermit crab lol and then when the whole thing is open it’s like a peacock tail! The video is a little clunky but that’s just because it was the first time I was trying it lol but for my final documentation it will be more smooth
Altogether I’m satisfied with the final product and I’m moving onto the final documentation. I’ve also been doing some work on the remapping project but I haven’t posted about that yet! More updates will come later 🤗🤗
7 notes
·
View notes
Text


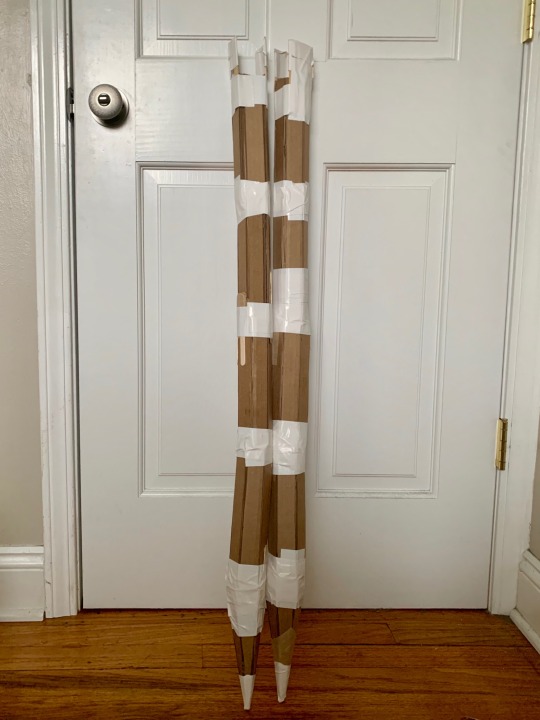
PART 4 - SUNDAY 4/26 & MONDAY 4/27
So like I said in the last post I attached the arms and added more popsicle stick supporters on Sunday. It was late so I didn’t take a picture of it then, so this is what it looks like now.
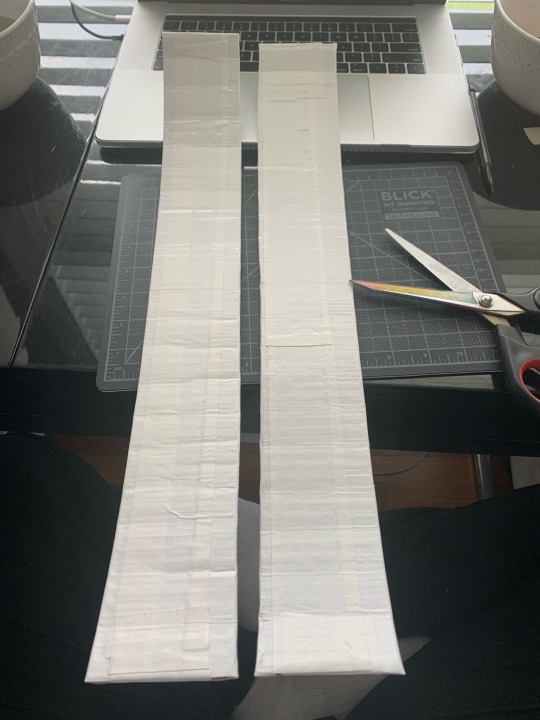
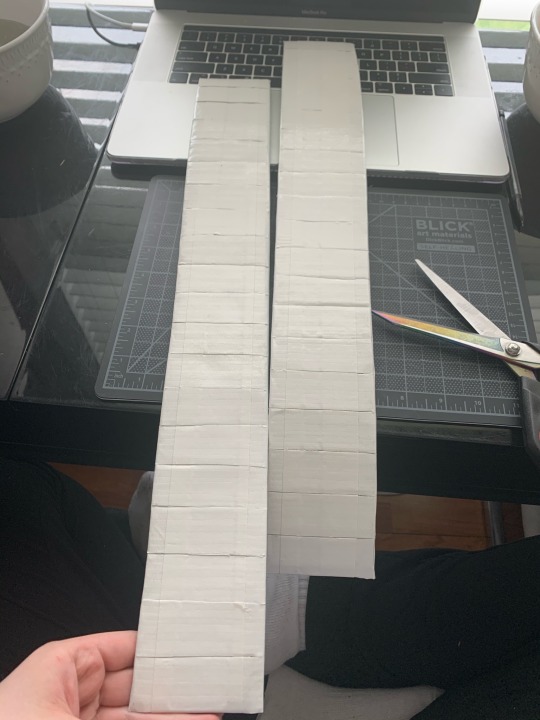
On Monday I attached the elastic pieces (16” to 8” pieces going in increments of 2”) and I also had to reattach some arms because they broke off.. I put them back one with more duct tape so they are secure now.
On Monday I also cut and ironed some fabric but they ended up being too small so I have to cut more so they fit better.
—
✨✨WHAT I HAVE LEFT✨✨
So I’m really happy with what I have right now :) all I have to do is attach the fabric and thread the ropes through the popsicle sticks and I will be ready to go! I’m going to see if I can finish it tonight and then do the final documentation tomorrow!
Thanks for looking at my updates! Sorry I left all my posts til now!!
5 notes
·
View notes
Text


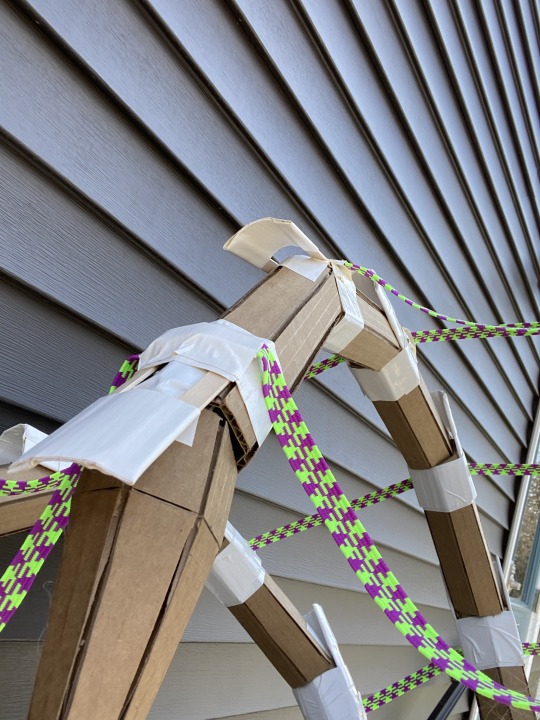
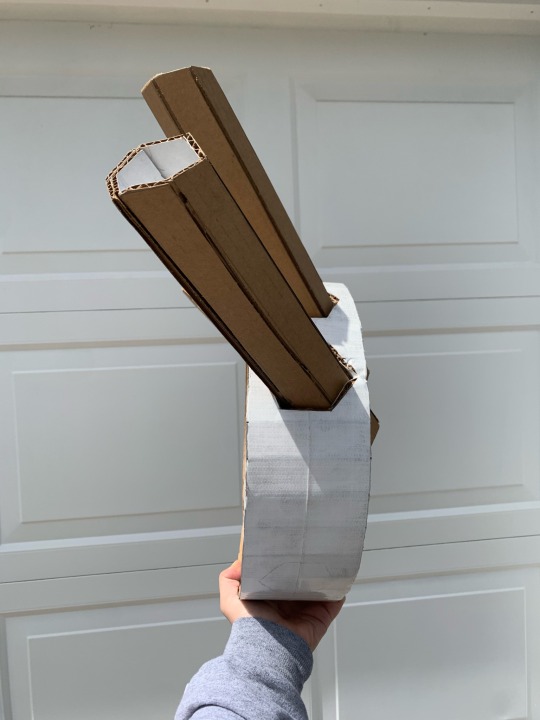
PART 3 - SUNDAY 4/26
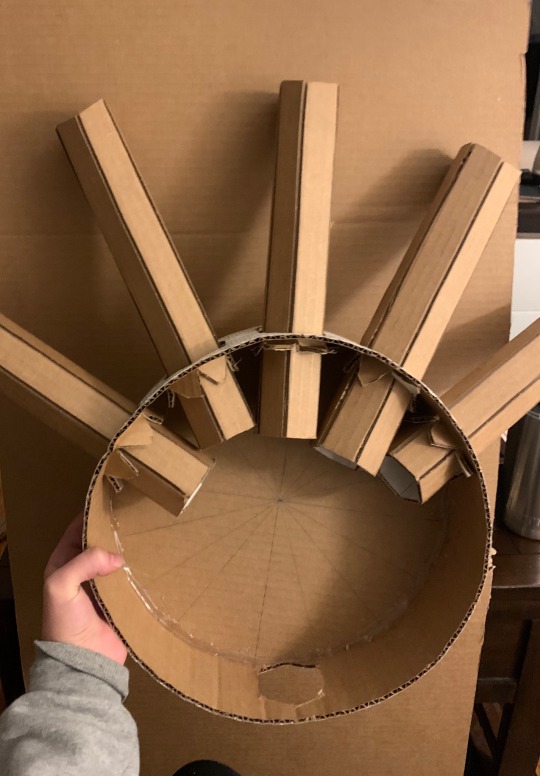
okay so this is the last part of Sunday’s work that I have pictures of however I did do a lot more - I attached the whole arms! and I also attached more of the popsicle stick joint stoppers
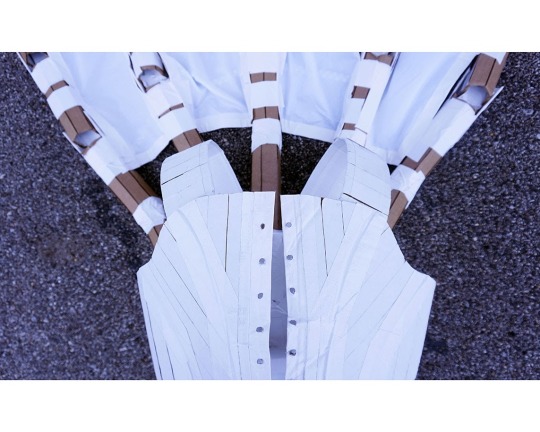
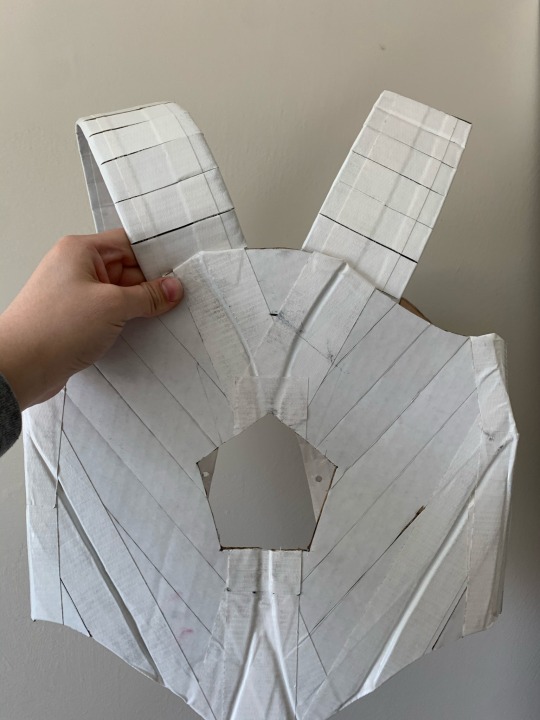
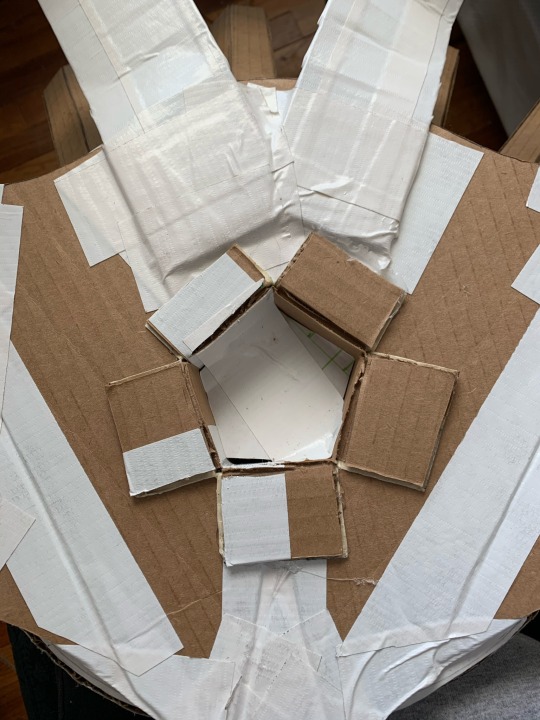
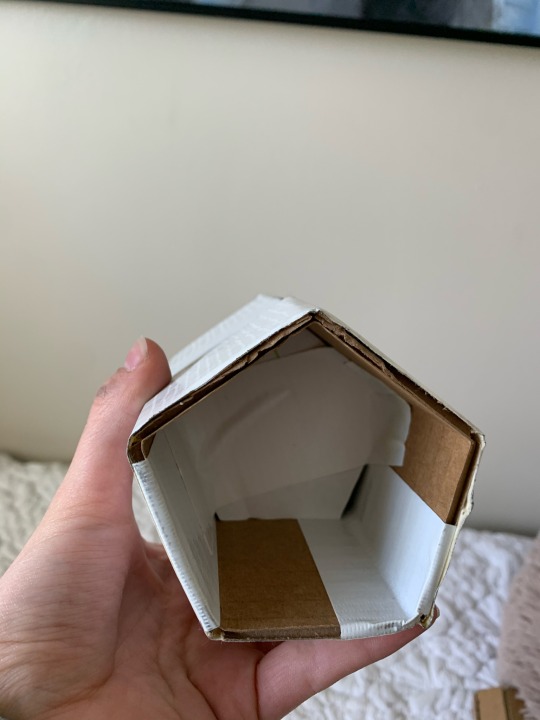
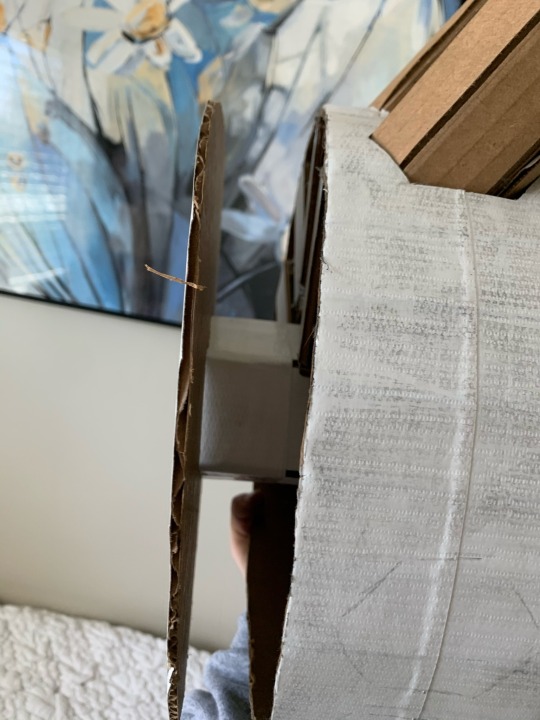
But!! For these pictures! This is how I attached the cylinder to my corset.
So I cut a pentagon shaped hole in my corset but before I did so I put the corset on and had my mom mark where the tip of the pentagon was on my corset just to make sure that everything would line up properly!
Once the hole was cut I hot glued the back of the corset and stuck it on the cylinder! I also used some duct tape on the bottom and top edges to secure it even more :)
Then once the corset was on the cylinder/ supporting post I cut the sides of the post and glued them down to the interior of the corset which I think helps connect them very well :)
4 notes
·
View notes
Text
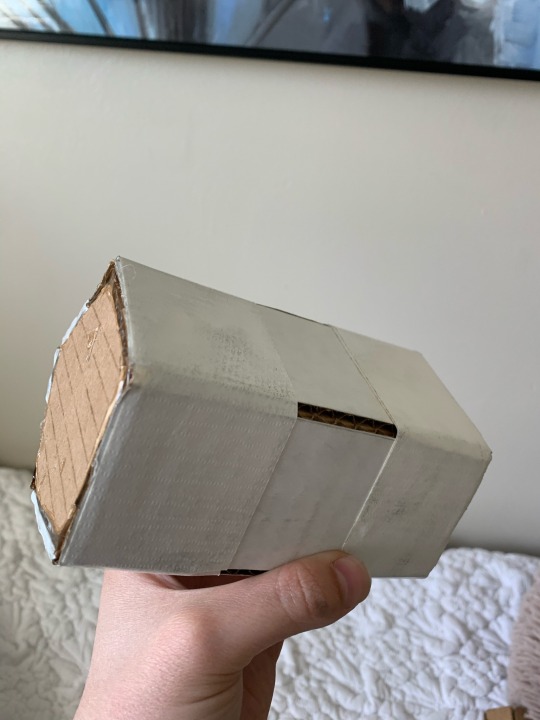
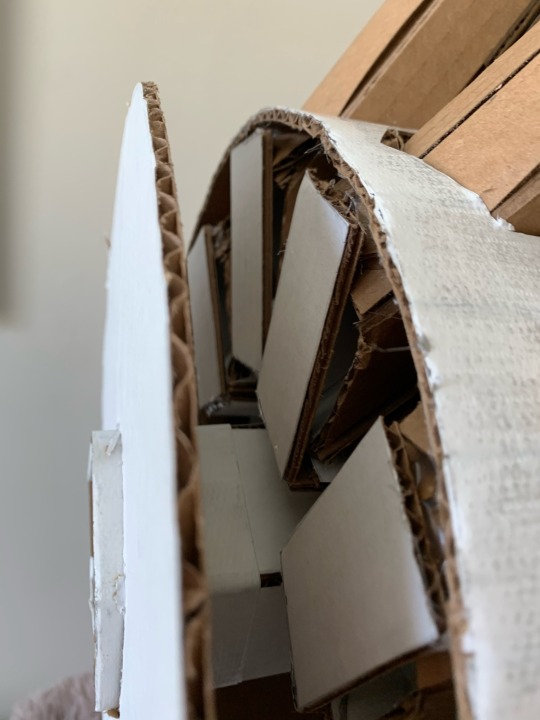
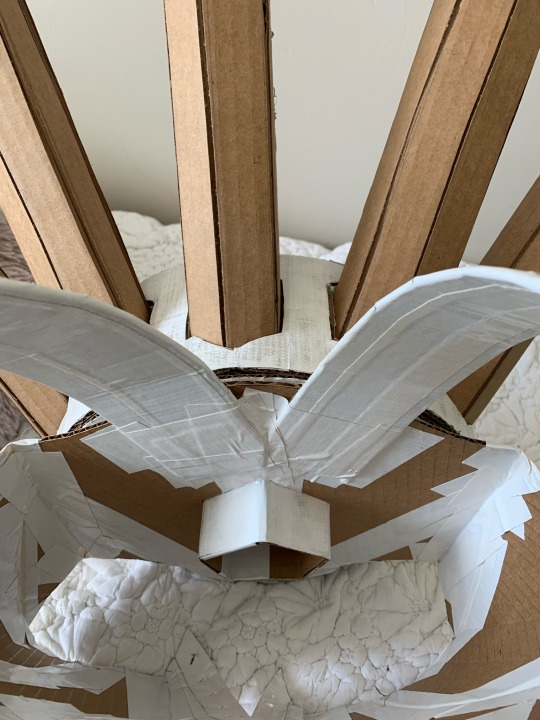
PART 2 - SUNDAY 4/26
okay so this is my favorite part of this piece :))
So in the first three photos you can see that I used two different 90 degree pieces to help secure the wedges/joints even more. The white surface will be hot glued to the other circle cover.
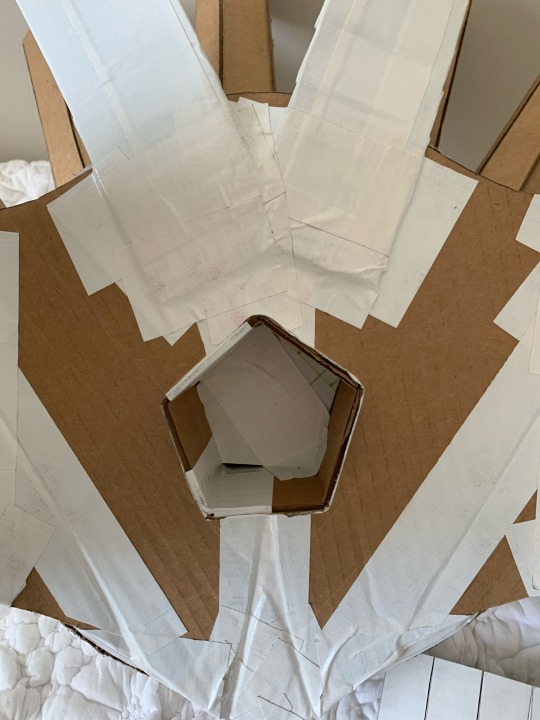
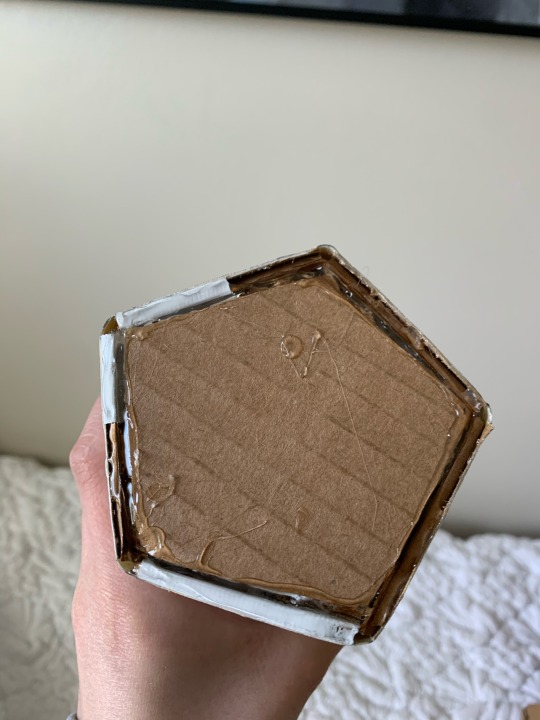
Then in the next set of photos you can see how I cut away at some of the cardboard to make room for a center support post of sorts
This center post is in the shape of a pentagon for extra support.
Inside of this post there are two flat pentagons that help keep it strong: one in the middle and one on the end. This end surface is then hot glued to the interior of the cylinder.
Then I took the other circle of the cylinder and cut a pentagon hole in it. This was then put over the center support post and then glued into place.
Overall!! A LOT of work went into the cylinder on my back and it was covered up all nicely within a the white cylinder and I’m proud of it :)
Next you’ll see how I attached it to my corset.
3 notes
·
View notes
Text
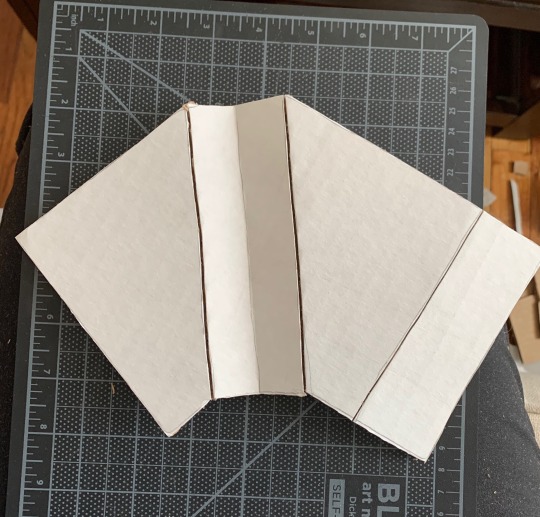
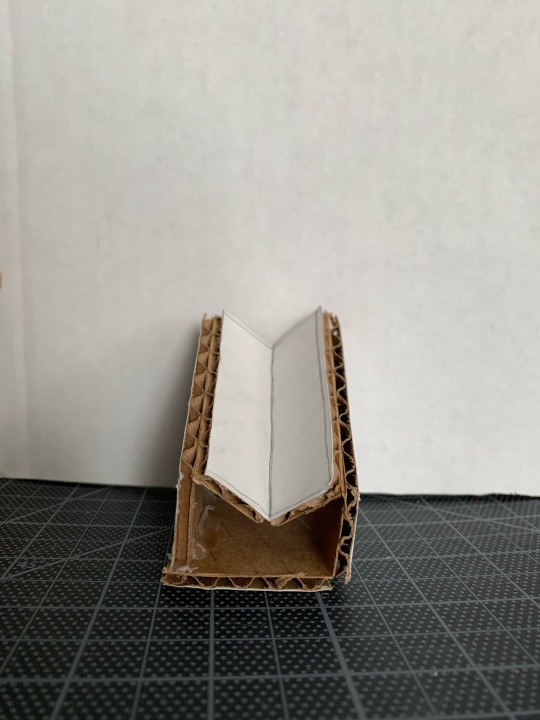
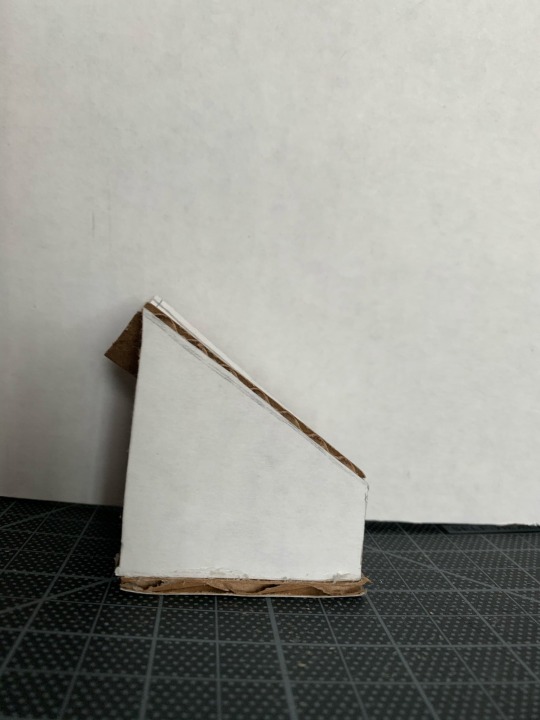
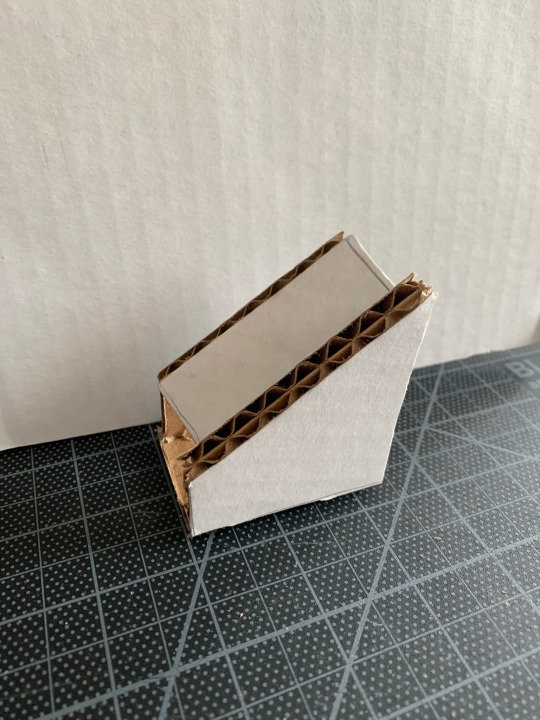
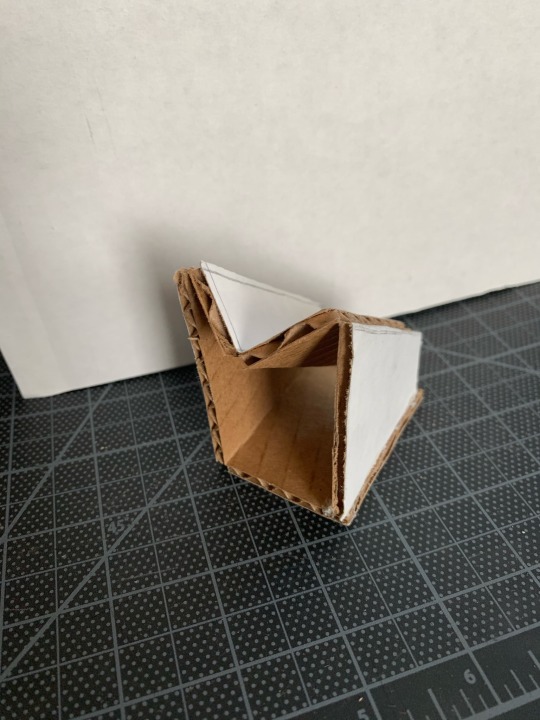

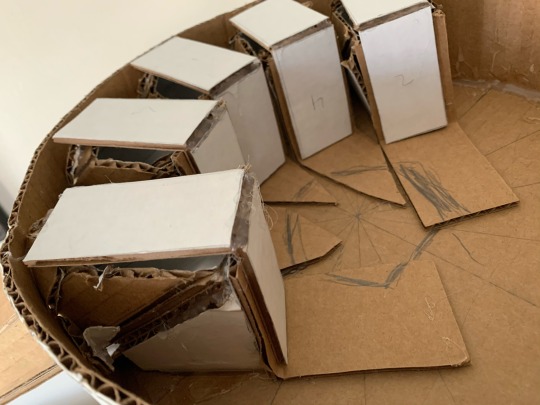
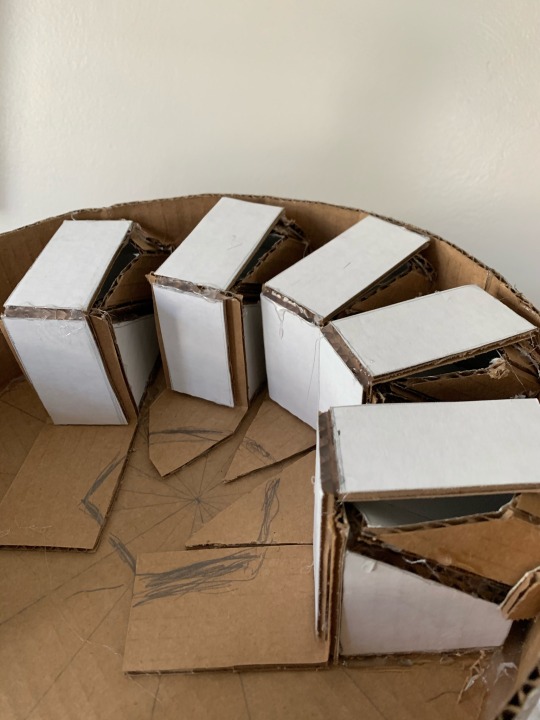
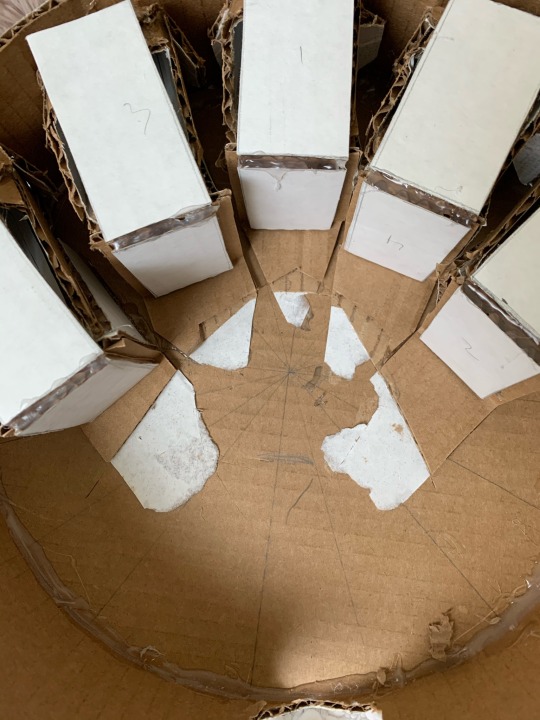
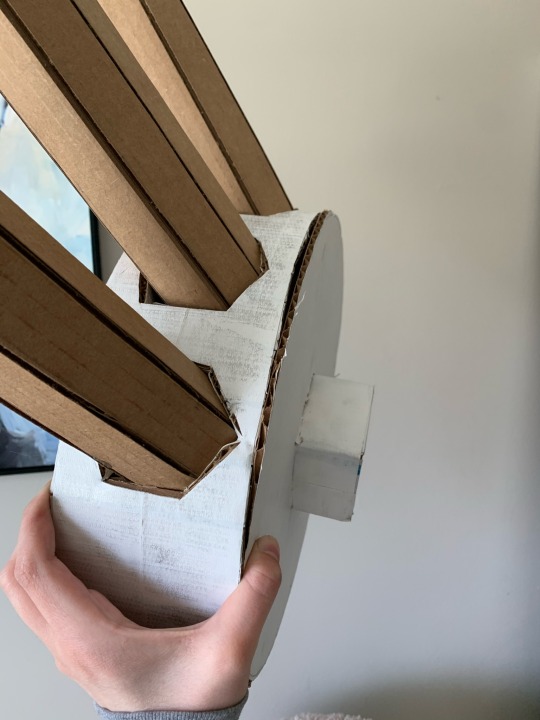
PART 1 - SUNDAY 4/26
So I have to divide Sunday into multiple posts to accurately show the work I did.
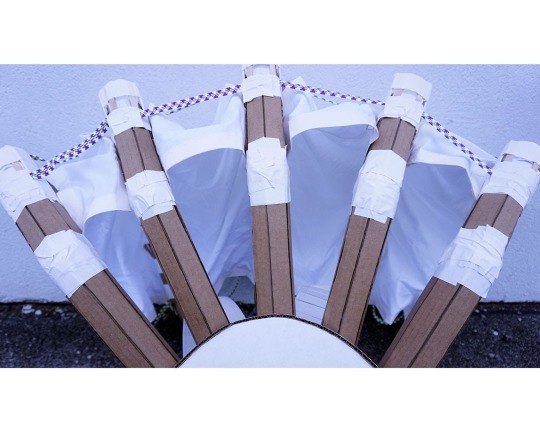
In these 10 pictures I show how I created a special wedge to hold my arms in place.
I needed them to be secure on back obviously but I also needed them to go outwards. I need them to go outwards because that way when the arms open and close they won’t hit my head or shoulders.
These little wedges basically make sure that the arms are spread apart and angled properly.
The last photo shows how I cut the joints and to make sure that they don’t go past the surface of the cylinder.
3 notes
·
View notes
Text


SATURDAY 4/25
okay so Saturday I did a lot of miscellaneous work
I made
• reinforced shoulder straps (and attached them but I forgot to take a picture of that alone on the corset)
• popsicle stick / duct tape joint stoppers (pictured already on the body extension... again I forgot to take a picture of those alone... but I made a ton of them)
• 12” joints (rather than the original 8” ones) (I also forgot to take a picture of those alone but you can see them already inside the cylinder here)
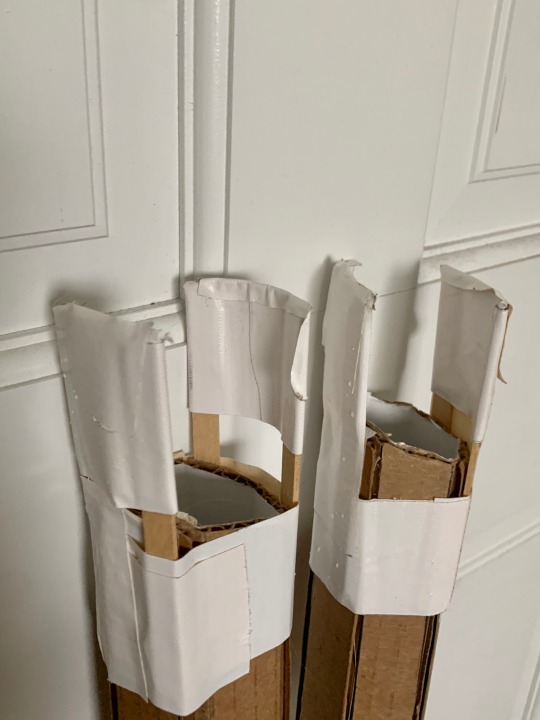
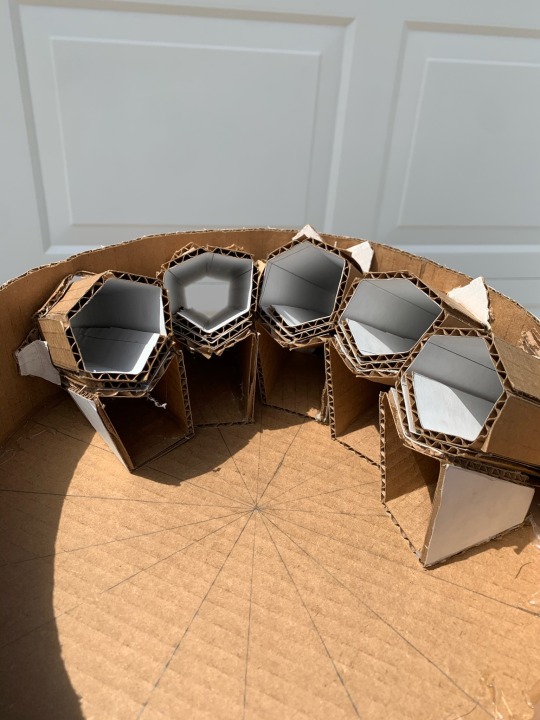
• the cylinder that holds everything together and that will be attached to the back of the corset (pictured with the joints inside of it)
• I also cut the “cupholder” ish holes in the cylinder to put the 12” joints in (you can see that I messed up a bit on the bottom but that was later patched up with some duct tape)
so that’s a lot of crazy stuff I did on Saturday and I don’t have the best documentation of it but I think you can still understand what I did with the pictures I have :)
3 notes
·
View notes