
ngpixel
NGPixel
Web Developer & Music Composer
31 posts
Don't wanna be here? Send us removal request.
Last Seen Blogs

velourialavender-blog
Dizzy Business

fionnf
Cogito

king-of-katz
Meredith Katz

adamldavis
Adam L. Davis

Video
youtube
Solo Piano Arrangement of Bowser’s Castle theme, composed by Koji Kondo.
8 notes
·
View notes
Video
youtube
Solo Piano Arrangement of Chim Chim Cher-ee West Wind, as featured in Saving Mr. Banks, originally composed by the Sherman Brothers.
2 notes
·
View notes
Text
How to find out why nginx fails to start
When nginx fails to start, it is most likely due to an error in your configuration file. Fortunately, it is quite simple to parse the configuration file for errors.
Simply run the following command:
nginx -c /etc/nginx/nginx.conf -t
Your configuration will be parsed and any error will be displayed and suggestions to fix the error will often be displayed as well.
2 notes
·
View notes
Text
How to bypass Bell Fibe Hub and use your own router
While Bell Fibe is quite fast, their modem isn't so great. It has freezing/reboots issues and should you want to have more control over the router, you're basically stuck with the options Bell gives you.
Fortunately, you can simply bypass Bell Connection/Home Hub ( the black Sagemcom box) and use your own router for the internet connection. The Bell Connection/Home Hub continues to provide TV services as usual. This is also useful for people that don't like Bell being able to see your whole home network. While the instructions below are for ASUS routers, you can pretty much use any router that let you specify custom VLANs (Tomato and DD-WRT firmwares both provides this feature).
Note that this guide only applies if you have FTTH (Fiber-To-The-Home). If you don't have an ONT (white Bell box where the Fiber connects), you cannot use this guide!
Let's start: Note that you will need a gigabit switch (around 20-30$, any cheap 5-ports switch will do the job). In my case, I use a D-Link Gigabit 5-ports switch.
A - Disable Internet services in the Bell CONNECTION/Home Hub
A.1 - Browse to http://192.168.2.1/ and login using your hub credentials.
A.2 - Nagivate to the Internet tab. Set both User ID and Password empty. Click Save.
A.3 - If not already done, disable all wireless networks under the Wireless tab. Your router should manage wireless networks, the Bell hub will no longer be able to provide internet.
A.4 - Navigate to the Advanced Settings tab, then Services. Make sure Internet + TV option is selected, and the dropdown next to it is set to DHCP.
A.5 - Reboot your Bell hub. Wait for it to come back before proceeding below.
Your TV should still work, make sure it is still the case. Note that Bell sets both User ID and Password with new values under the Internet tab. This is normal, leave it as is.
B - RE-ARRANGE NETWORK TOPOLOGY
Re-arrange your network to correspond to the following schema:
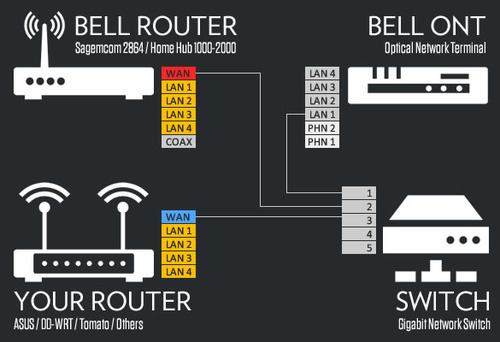
- Your computer should be plugged into LAN 1 of your router. Plug other wired devices into LAN 2-4 of your devices. - Should you have extra TV receivers, leave the wireless access point plugged into LAN 1 of your Bell Hub. Nothing else should be plugged in the LAN ports of the Bell Hub! You can also plug the TV receivers directly into the LAN ports of the Bell Hub using a wired connection, hence removing the wireless access point completely. This only applies to the Wireless TV receivers, the PVR should stay connected via the coaxial cable! - Do not plug other network devices into port 4-5 of the gigabit switch, they won't work!
You should have TV working fine to this point. If not, reboot your Bell Hub and your TV terminals. Internet should not work yet, this is normal!
C - CONFIGURE YOUR ROUTER TO ACCESS THE INTERNET
C.1 - Browse to http://192.168.1.1/ and login using your router credentials.
C.2 - Navigate to LAN > IPTV in the control panel. Note that while we change settings in the IPTV tab, your router won't have anything to do with your TV services. This is simply where the VLANs are configured, including the Internet VLAN.
C.3 - Set the following options:
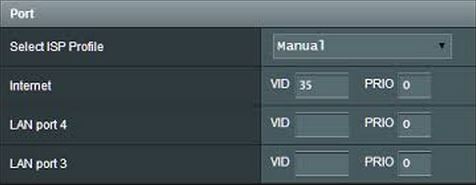
VLAN 35 is for Bell Internet services, while VLAN 36 is used by the Bell Home Hub for TV services. We are basically telling the router to communicate with Bell over VLAN 35 for Internet services, while TV services are travelling through their own pipe via VLAN 36, unaffected by internet services data.
C.4 - Click the Apply button and wait for the router to update.
C.5 - Navigate to WAN > Internet Connection.
C.6 - Set the Connection Type to PPPoE.
C.7 - Optional - Set the Connect to DNS Server automatically to No. Fill in DNS Server 1 and 2 using the following addresses:
8.8.8.8
8.8.4.4
C.8 - Under Account Setting, set the username and password provided by Bell for your Internet connection. Username should have the following format: b1xxxx##
C.9 - Leave other fields as default and click Apply. Wait for your router to update.
You should now have a working internet connection! If not, reboot your router.
D - ENABLE PORT 3 AND 4 ON ROUTER
This section is ASUS router specific. By using the IPTV profile configuration, you most likely have a non-working LAN port 3 and port 4 on your router. The VLAN values cannot be set to VID 1 on the IPTV setting page. It forces you to use a value higher than 2. This is fine when the IPTV is used on port 3 and 4. However, in our case, we simply want to define a different VLAN for the WAN port while keeping the standard LAN functionality on all LAN ports. In order to fix this, you need to enable SSH access under the Administration > System. You can now connect via SSH to your router. (You can use an SSL client such as Xshell or Putty) Use your router IP (192.168.1.1 by default) and use your router administration login. Once you're in, type the following commands in order:
nvram set switch_stb_x=0 nvram commit reboot
Your router will now reboot. Upon getting back online, you should now be able to use LAN port 3 and 4 as normal. The IPTV function on LAN ports has been disabled, while keeping the WAN functionality active. All LAN ports are now part of the same VLAN.
1 note
·
View note
Text
Balanced vs. Unbalanced audio, TS vs. TRS connectors explained
I recently came across a noise problem while recording audio. After some research, the cables used were the issue. In this article, I will explain the 2 different cables/connectors and when you should use both.
Unbalanced audio (TS, RCA)
It is usually used in consumer audio products. It is cheaper but can easily be affected by interference. The connectors for unbalanced audio are TS (Tip-Sleeve) and RCA. TS connectors are characterized by having only 1 black ring.
Balanced audio (TRS, XLR)
Used in professional audio. They costs a bit more but significantly reduce noise and interference. This is why balanced cables makes more sense when audio is transported over a long distance. The connectors for balanced audio are TRS (Tip-Ring-Sleeve) and XLR. TRS connectors are characterized by having 2 black rings. XLR connectors are much bigger and features 3 metal pins.
Which to use?
It all depends on your equipment actually. For example, my Motif XS has unbalanced outputs, so using unbalanced cables with a TS is the best solution as using balanced cables wouldn’t improve anything. For connecting my audio interface to my compressor, I use balanced audio cables (with TRS connections) because the output is balanced. I was previously using unbalanced cables and this is where the humming noise would get introduced. As soon I switched to balanced cables with TRS connectors, the problem went away. Finally, I connected my compressor to my speakers using again balanced audio cables but this time, with XLR connectors.
Can I use unbalanced cables on balanced output, and vice-versa?
Yes, however, you might notice noise (or “hum) in your audio by using unbalanced audio cables on a balanced output. On the other side, using balanced audio cables on unbalanced output is pointless, as there won’t be any difference.
1 note
·
View note
Text
How to fix slow Visual Studio + TFS
Upon installing Visual Studio 2012, I found out that all operations related to TFS (such as adding a new file, check in/out, etc.) were incredibly slow and would freeze the application for quite some time. If this is the case for you, try this solution:
Edit the Visual Studio config file found in C:\Program Files (x86)\Microsoft Visual Studio 11.0\Common7\IDE\devenv.exe.config
and locate the following line:
<system.net>
Right below (above settings, NOT under), insert the following line of code:
<defaultProxy enabled="false" />
Your visual studio should now be more responsive!
0 notes
Text
Enable Aero Glass over Remote Desktop in Windows Server 2008 R2
Using Remote Desktop to connect to a Windows Server 2008 R2 session will usually result in an old looking Windows classic theme, even if the client is fully capable of displaying the Aero Glass theme. While it’s not a simple option to enable, it’s still possible to enable full Aero Glass support over Remote Desktop.
Requirements: A Windows 7/Windows Server 2008 R2 client (the machine you connect from) and a Windows Server 2008 R2/Windows 7 host (the machine you connect to). The host doesn’t need any special hardware requirements, as long as the client supports Aero Glass. Note that you can connect from a Vista client to a Vista host as well, but any other combination is not supported.
1) First, we need to activate the Remote Desktop Services role in the Server Manager utility. To do so, open Server Manager (Start Menu > Administrative Tools > Server Manager) and click Add Roles.
2) At the role selection screen, select the Remote Desktop Services role and click Next.
3) At the Role Services screen, select only the Remote Desktop Session Host service, leaving everything else unchecked, and click Next.
4) At the Authentication Method screen, select Require Network Level Authentication and click Next.
5) Skip through the Licensing Mode and User Groups screen leaving all options by default.
6) Once at the Client Experience screen, you must select all the options (Audio and video playback, Audio recording redirection and Desktop Composition). If the Desktop Composition option is greyed out, continue with the steps below anyway and then follow the instructions at the end of this article after your first reboot to enable Desktop Composition in the Group Policies. This is common on servers connected to a domain.
7) Continue the wizard and complete the installation. You will be asked to restart the machine once completed, do so. Note that after the reboot, you will get a “Remote Desktop licensing mode is not configured” warning popup. Ignore it for now.
8) Now we need to activate some features which are not installed by default in a Windows Server environment. Open Server Manageronce again and click Add Features.
9) Select the Desktop Experience and Quality Windows Audio Video Experience features. Continue the wizard installation.
10) Once the new features installed, we need to start a few services. Start Services (type services.msc in your Start Menu) and locate the service Themes. Right-click on it and select Properties.
11) Change the Startup type to Automatic and then click on the Start button below. Wait for the service to start and close the window.
12) Open Server Manager once again and expand the Roles item in the left sidebar, then Remote Desktop Services and click on RD Session Host Configuration. In the main screen, right-click the connection “RDP-Tcp” and select Properties.
13) Navigate to the Client Settings tab. Uncheck the Limit Maximum Color Depth option as well as any options checked in theRedirection list (no checkbox should be selected). Click OK to apply.
14) You can now return to the desktop, right-click and select Personalize.
15) Select the Windows 7 theme under Aero Themes. You should now get the full Aero Glass experience.
16) Now to fix the annoying licensing popup. Open Server Manager and click Remove Roles. On the Server Roles screen, uncheck theRemote Desktop Services role and complete the wizard. Yes, as crazy as it sounds, it will not disable Aero Glass but simply remove the role management panel, which we don’t need.
Note: Before connecting to a remote desktop, make sure to enable Desktop Composition (under Experience tab) in your remote desktop settings as well as 32bit colors (under the Display tab), otherwise you won’t get Aero Glass even if it’s enabled on the host.
Manually activate Desktop Composition: If the option to choose Desktop Composition during the role installation is greyed out, you must manually activate it in the Group Policy. Open gpedit and enable the “Allow desktop composition for remote desktop sessions” policy found under “ComputerConfiguration\AdministrativeTemplates\WindowsComponents\Remote Desktop Services\Remote Desktop Session Host\Remote Session Environment”.
Enjoy!
0 notes
Text
Sharepoint 2010 – How to launch the new/upload file dialog from Javascript
If you need to brand Sharepoint to the point of hiding the ribbon, you might want to still have some functions available via custom buttons in your interface. For example, if you have a document library/list and want to create a new folder or upload a document, you would need to have a custom button in your interface to do so.
The problem is how to actually launch the Sharepoint modal dialog to use these functions from Javascript. Fortunalty, Microsoft provides the Sharepoint Object Model for Javascript which exposes most of Sharepoint functions to the client side (as long as the logged in user has access obviously).
Important: In the code below, the ctx.listUrlDir variable is used to determine the relative path to the NewForm.aspx file. The variable is actually declared automatically as long as you have the list/document library webpart displayed on the page. Otherwise, you need to replace that variable with the relative path to the NewForm.aspx file.
List – Create New Item
SP.UI.ModalDialog.showModalDialog({ url: ctx.listUrlDir + "/NewForm.aspx?IsDlg=1", title: "Create New Item" dialogReturnValueCallback: function() { window.location = window.location.href; } });
Document Library – Upload New Document
var exppath = getQSParameterByName('RootFolder'); SP.UI.ModalDialog.showModalDialog({ url: ctx.listUrlDir + "/Forms/Upload.aspx?IsDlg=1" + ((exppath != null && exppath.length > 2) ? '&RootFolder=' + exppath : ''), title: "Upload a document", dialogReturnValueCallback: function() { window.location = window.location.href; } });
The getQSParameterByName function code is provided at the end of this post.
Document Library – Create New Item of Custom Type
var exppath = getQSParameterByName('RootFolder'); SP.UI.ModalDialog.showModalDialog({ url: ctx.listUrlDir + "/Forms/Upload.aspx?ContentTypeId=0x012000bd2db3db2b004dda815269e70974b696&IsDlg=1" + ((exppath != null && exppath.length > 2) ? '&RootFolder=' + exppath : ''), title: "Create New Custom Type Document", dialogReturnValueCallback: function() { window.location = window.location.href; } });
You must replace the value of the ContentTypeId parameter with your own!
The getQSParameterByName function code is provided at the end of this post.
Open in Windows Explorer (IE only)
CoreInvoke('NavigateHttpFolder', exppath, '_blank');
In most cases where a Sharepoint modal is involved, you can replicate any built-in function of the ribbon by looking at the URL called (via Firebug) and adapting the scripts above.
The getQSParameterByName function:
function getQSParameterByName(name) { var match = RegExp('[?&]' + name + '=([^&]*)').exec(window.location.search); return match && decodeURIComponent(match[1].replace(/+/g, ' ')); }
0 notes
Text
CSS/jQuery Selector – ID with a dot
I had an issue today while trying to use a jQuery selector on simple div with ID “Ribbon.Read-Title”. This specific selector (#Ribbon.Read-Title) usually means that we are matching the ID “Ribbon” have the class “Read-Title”. But trying to match the ID “Ribbon.Read-Title” will simply not work with this selector. This is also true for a CSS selector.
The workaround is to escape the dot with a backslash. So in the above example, you would use selector #Ribbon.Read-Title to match the specific ID “Ribbon.Read-Title”.
Note: Contrary to what some people believe, using a dot in an ID or Name attribute is totally valid and accepted, as specified by the W3C. However, it’s easy to confuse the default selector behavior for dots.
0 notes
Text
Guide to Early Cancellation Fees (ECF) in Quebec
Note: All the info found on this page should be accurate as of October 11th 2011. However, you should ALWAYS confirm with your service provider for any fees or processes involved in getting out of a contract / early upgrade. Also, this guide only apply to contracts made AFTER June 30th 2010 in Quebec ONLY. If you are in another province or your contract was signed BEFORE July 1st 2010, the rules are different and you should have a look the their terms & conditions found on your service provider’s website.
So you got in a 2/3 years contract with a cellphone service provider (Fido/Rogers/Bell/Telus/Virgin) and you’re now looking to cancel your contract or upgrade to a new phone early in your contract. In the past, you usually had to pay astronomical fees in order to cancel your contract. Fortunately, since July 1st 2010, in Quebec ONLY, a new bill (Bill 60) changes the rules of early cancellation fees (known as ECFor DECF). For some reasons, it seems to be a complete mystery as to how these new rules work. It’s not explained anywhere on any service providers. So I did some research and talked to a few representives to get the details right. So here’s how it works:
The formula is: [rebate] – ( [rebate] * [complete months elapsed] / [contract length] )
Example
So let’s say you bought an iPhone 4 16GB on July 30th 2010 on Fido.
The unsubsidized price of the iPhone 4 16GB is 649$. But you only paid 159$ for it because of the 3 year contract.
So 649$ – 159$ = 490$. This is the rebate Fido gave you (490 $). In the event you would cancel your contract right away, themaximum fee you could pay is 490$. Service providers cannot charge you more than the rebate they gave you in the event you cancel your contract at any time.
The whole formula is based on this number. Now divide the rebate by the length of your contract (in months).
For a 3 year contract (36 months), you should do 490$ / 36 = 13.61$. This is the amount that is withdrawn from the rebate for every month you complete.
So if you cancel after 2 complete months in your contract, the maximum fee you will have to pay is 462.78$ (= 490$ – ( 2 x 13.61$ ) ).
The longer you stay in the contract, the lower the maximum fee will be. Obviously, after 36 months, the amount reaches 0$.
So to get back to the formula I wrote earlier, if you cancel after 12 completed months in your 3 years contract, the ECF you will need to pay is:
490 – (490 * 12 / 36) = 326.67$
What is ECF and DECF?
ECF (Early Cancellation Fee) and DECF (Data Early Cancellation Fee) are usually both present if you have Voice + Data plan. The rebate explained earlier is usually split in 2. For the iPhone 4 16GB on Fido, the ECF is 200$ while the DECF is 290$ (for a total of 490$, the maximum fee a service provider can charge you!). If you cancel your contract completely or ugprade to a new phone early, simply follow the formula outlined above as the ECF and DECF is combined.
However, should you want to cancel only the Data plan while keeping your Voice plan, you will need to pay the DECF only. You will need to confirm with your service provider for the exact amount as the ratio is different for every phone and provider. For example, if you want to cancel your Data plan after 12 completed months (of your 3 years contract) and the DECF is 290$, the maximum fee you can pay is:
290 – (290 * 12 / 36) = 193.33$
The same formula applies to Voice plans (ECF).
What if I didn’t get a rebate on the phone/equipment?
In the event you want to cancel a contract but you didn’t get any rebate for the cell phone equipment, the maximum fee you can pay is the lesser of 50$ or 10% of the total amount yet to be paid for the services. For example, let’s say you have a monthly plan of 30$ and you want to cancel after 12 months:
10% of (24 months remaining * 30$ plan) = 72$
But wait! 72$ is exceeding the maximum fee of 50$. Therefor, 50$ is the maximum to paid during a cancellation.
Conclusion
Hopefully, this makes it easier for Quebec residents to understand the new bill concerning early cancellation fees.
Like I said earlier, make sure you contact your service provider to confirm the fees to be paid if you cancel / early upgrade.
As we all know, these companies are experts at hiding fees in every corner…
0 notes
Text
How to install Windows 8 on a VHD (or Windows 7/2008 R2)
In this guide, I will explain how to install Windows 8 on a VHD (Virtual Hard Disk). This methods lets you have a second (or many more) bootable operating systems without having to dedicate a complete partition for every OS installed (and without affecting your current Windows installation!). A VHD is essentially a complete partition contained within a single file on the disk. Don’t want that OS anymore? Simply delete the .VHD file and you’re done. Quick and simple.
Now where VHD becomes handy is in testing the new developer preview builds of Windows 8. Note that this method will work on future builds of Windows 8 (Beta, RC and final) as well as Windows 7 and Windows Server 2008 R2. For the purposes of this guide, I’ll assume you currently have Windows 7 installed natively on your machine and want to install the Windows 8 Developer Preview on a VHD. Before we start, you should have already burned the installation ISO of Windows 8 to a DVD or made a bootable USB installation media.
A) Create a new empty VHD
A.1) Launch the Computer Management console (found in Control Panel > Administrative Tools).
A.2) Right-click on Disk Management (under Storage) and choose Create VHD. (Note: You might need to click on Disk Management first, then wait for it to load before you can have the contextual menu with the Create VHD option.)
A.3) Enter the location of the .VHD file. I HIGHLY recommend to place this file on the root of any disk. Note that you will need to remember the path of this file for use later in this guide.
A.4) Enter the disk space (80GB is usually good for most uses) and choose the Fixed size format.
A.5) Click OK and wait for the VHD creation to complete (displayed in the window footer). It usually takes about 5-15 minutes to complete.
B) Install Windows 8 on the VHD
B.1) Reboot the computer with the installation disk (or USB drive) inserted and boot from it.
B.2) On the first installation screen, choose the language options, then click Install Now.
B.3) Accept the license agreement and then choose Custom Installation.
B.4) On this screen, a list of available partitions/disks are displayed. But it’s missing the VHD we created earlier. This is because we need to attach it first.
B.5) Press SHIFT + F10, a command prompt window will appear.
B.6) Type the following command: diskpart
B.7) Then type the command (replace win8.vhd with the name of your VHD): select vdisk file=C:win8.vhd
—> Got an error? This is because the drive letters may not be assigned in the same order as in Windows. Fortunately, the setup lists them starting from letter C and going up. So try the command again but this time using D:win8.vhd, then E:win8.vhd, etc. until it works.
B.8) Once you get a successful message, type the command: attach vdisk
B.9) Once your VHD is attached, type exit, then again exit to close the command prompt.
B.10) On the screen, click the Refresh button. After a few seconds, your VHD should now appear in the list.
B.11) Select the VHD and click Next. (Note: A warning might be displayed at the bottom saying Windows can’t install to this drive. Ignore it!)
B.12) Continue to install Windows 8 as usual, following the on-screen instructions.
And you’re done! The whole Windows 8 OS is now contained within a single isolated file on your disk.
During the boot process, you will have the option to choose between your Windows 7 or Windows 8 installation. Simply select the OS you want to use!
0 notes
Text
Hyper-V – Remote desktop to your own host limitations
In order to boost our development capabilities at work, we recently moved an Hyper-V solution on a VHD host. The host system is a standard Windows Server 2008 R2 system (running from a bootable VHD). We then use Hyper-V to create virtual machines with various configurations for development purposes.
Hyper-V and its basic virtual VGA adapter
The great thing about Hyper-V is that you can boot your VMs and let them run in the background. Should you need to see what’s going on (like a real monitor attached to a physical PC), you can use the built-in “Connect…” feature to see the VM screen. Hyper-V is using abasic VGA adapter to achieve that, which results in a 4:3 low resolution display of the VM. If you’re using that remote screen for development purposes, it’s quite counter-productive and annoying. Which is where the standard Remote Desktop (mstsc.exe) comes handy.
Isn’t that great when your host and VM can’t talk to each other?
The first thing I get while trying to connect to a VM running on my host is a “Not found” error. Sure enough, my VM has network access and so has my host. My colleagues can ping my VMs (and vice-versa) just fine, but impossible to ping the host from the VM or the VM from the host.
Don’t put your VMs on the same network adapter as your host…
Turns out it’s not a good idea to use the same network adapter for Hyper-V and your host. Even though your VMs have completely different and unique MAC and IP address, the packets are still trying to get in and out of the same physical interface which is a no-go. The solution was to use a second PCI-Express gigabit card (or a PCI) to add a second physical network adapter. The host is using the main network adapter while Hyper-V uses the second adapter. Now it all works perfectly.
I’ve seen some complex tutorials about creating local loopbacks adapters with NAT translation in order to use only 1 adapter and frankly, it doesn’t seem work the effort and it might affect performance in the end. So there you go, use 2 physical adapters for Hyper-V.
0 notes
Text
Mac App Store – “You have updates available for other accounts” bug
I had a rather major issue with the Mac App Store concerning the updates. In the Purchases tab, I could see the apps I had previously downloaded but when I clicked the Update button for each of them, I would get the error message “You have updates available for other accounts…” inviting me to sign in into the “other” account. The problem is that I only have 1 Apple ID and always used this ID.
After contacting the Apple Support, all I got was a totally useless response about re-installing iTunes and that might fix the problem. Even though I knew iTunes had absolutely nothing to do with the Mac App Store, I still followed their instructions and re-installed iTunes. Guess what, it didn’t fix the issue at all. Thanks for your support Apple…not. A few posts in Apple support forums have suggested deleting the apps and re-install them. While it works, it’s not really convenient.
It turns out the issue is related to Spotlight. Apparently, the Mac App Store use the Spotlight index to find which applications are installed on your Mac. So if for some reasons the spotlight index is empty, corrupted or disabled, the Updates tab will always be empty and you’ll get the error message discussed above every single time you try to update your apps. Depending on what makes your spotlight index buggy, there’s various fixes:
Solution 1 – Spotlight works but the index is incomplete or empty:
1) Open System Preferences > Spotlight
2) Under the Privacy tab. Add your Macintosh HD (or whatever your main hard disk is called) to the list.
3) Close the window. Wait a few seconds. Then go back to Spotlight settings and remove the entry you just added.
4) The spotlight index should now begin to re-index completely. (A dot will fade-in/out inside the Spotlight icon in the taskbar)
5) Wait for it to finish and then launch the Mac App Store. You should now see updates in theUpdates tab.
Solution 2 – Spotlight indexing is disabled (frequent on Mac OS X Server)
1) Open a Terminal window.
2) Type the following command: sudo mdutil -i on /
3) A message saying “Indexing enabled.” should appear after a few seconds.
4) Close the Terminal window and the Spotlight indexing should now start automatically. (Again, a dot will appear inside the Spotlight icon during the indexing process)
5) Wait for it to finish and then launch the Mac App Store. You should now see updates in theUpdates tab.
It would be a good thing for Apple developers to check if the spotlight index is OK before displaying a completely useless error message to the user…
0 notes
Text
Sharepoint 2010 – Tableless webparts guide
If you tried to create even simple page layouts, you probably noticed the mess Sharepoint creates with tables when placing webpartzones and webparts in the page. While searching about a way to remove completely these tables, I found an interesting solution by David Schneider, which removes tables completely but creates a new whole set of issues with Sharepoint. While the tables are removed around webparts and webpartzones, it breaks functionality of the ribbon in lists and some ajax functionnality on default Sharepoint controls. Not really convenient.
Fortunately, with the help of a colleague, we found a way to remove the tables only on defined webpartzones. Zones marked with a property called tableless=”true” will be stripped from their tables while all other Sharepoint controls won’t be affected at all.
So what needs to be done in order to get this functionnality? Follow these steps:
1) Copy the following modified C# code (notice the tableless property that was added to David Schneider’s solution) in a file called AKS_WebPartZone_Adapter.cs and place it in the AppCodedirectory under your server root directory (like C:Inetpubwwwroot orC:InetpubwwwrootwssVirtualDirectories80).
using System; using System.Data; using System.Configuration; using System.Web; using System.Web.Security; using System.Web.UI; using System.Web.UI.WebControls; using System.Web.UI.WebControls.WebParts; using System.Web.UI.HtmlControls; using System.Text; using System.IO; using Microsoft.SharePoint; using Microsoft.SharePoint.WebPartPages; /// WebPartZone Adapter /// Created by David Schneider /// http://blog.sharepoint.ch /// Based on AKS namespace AKSAdapters { public class AKS_WebPartZone_Adapter : System.Web.UI.Adapters.ControlAdapter { protected override void Render(HtmlTextWriter writer) { bool inEditMode = false; System.Web.UI.WebControls.WebParts.WebPartZone wpz = Control as System.Web.UI.WebControls.WebParts.WebPartZone; if (wpz != null && wpz.Attributes["tableless"] != null) { SPWebPartManager swpm = (SPWebPartManager)SPWebPartManager.GetCurrentWebPartManager(wpz.Page); inEditMode = !swpm.GetDisplayMode().AllowPageDesign; } if (inEditMode) { // Render the WebPartZone writer.Indent++; writer.AddAttribute(HtmlTextWriterAttribute.Id, wpz.ID); if (!String.IsNullOrEmpty(wpz.CssClass)) { writer.AddAttribute(HtmlTextWriterAttribute.Class, wpz.CssClass); } if (wpz.LayoutOrientation == System.Web.UI.WebControls.Orientation.Horizontal) { writer.AddAttribute(HtmlTextWriterAttribute.Class, "AspNet-WebPartZone-Horizontal"); } else if (wpz.LayoutOrientation == System.Web.UI.WebControls.Orientation.Vertical) { writer.AddAttribute(HtmlTextWriterAttribute.Class, "AspNet-WebPartZone-Vertical"); } writer.RenderBeginTag(HtmlTextWriterTag.Div); writer.Indent++; // Render the web parts if (wpz.WebParts.Count > 0) { WebPartCollection wpColl = new WebPartCollection(wpz.WebParts); foreach (System.Web.UI.WebControls.WebParts.WebPart wp in wpColl) { writer.WriteLine(); writer.AddAttribute(HtmlTextWriterAttribute.Class, "AspNet-WebPart"); writer.RenderBeginTag(HtmlTextWriterTag.Div); wp.RenderControl(writer); writer.RenderEndTag(); // Div writer.Indent++; } } writer.RenderEndTag(); // Div writer.Indent--; writer.WriteLine(); } else { // If we are editing the page --> render the web part as usual. base.Render(writer); } } } }
2) Edit the compat.browser file which in the AppBrowser directory located in your server directory and add the following piece of code after the opening tag:
3) In your page layouts, add the property tableless=”true” to all your WebPartZones.
Your pages will then be free of tables without affecting core Sharepoint functionality such as the ribbon and other editing functions. Enjoy.
0 notes
Text
Windows 7 – Fix the explorer not auto-refreshing bug
One of the most irritating bug still present in Windows 7 is explorer not auto-refreshing when creating a new folder or copying/moving/renaming a file. The apparent cause to this problem is when you map network drives in My Computer. Turns out the fix is quite simple (or at least it worked for me):
1) Open My Computer and click Organize > Folder and Search Options
2) Under the View tab, uncheck the Hide protected operating system files (recommended)option.
3) On your desktop, you should now see 1 or more Desktop.ini files. Delete all of them (no, it won’t break your system, they are auto-generated).
4) Reboot your computer. Problem solved!
Note: I still get the bug when copying or moving files from a network drive but anything done locally on the computer seems to work again.
You might want to re-check that setting in Folder and Search Options once you’re done.
0 notes
Text
C# – Keep user settings between versions
Unless you’re using the ClickOnce deployment method for your applications, user settings are usually not transferred when updating to a new version of a C# desktop application. There’s in fact a quick and simple way to always keep the settings between versions.
The trick is to call the .upgrade() method your app settings object. The system will look for previous versions of your application in the App Data directory and copy the user settings to the new version automatically.
Properties.Settings.Default.Upgrade();
But now we have a problem. How do you know when the upgrade method should be called? As we don’t want to upgrade everytime the application is started, but only the first time after an upgrade. The solution is to create a new user settings variable that will be used to determine whether an upgrade is required. You can either make it a string and save the current application version, or make it a boolean and set it to True by default. I personally find the boolean method easier to use and this is the one I will explain below:
In your application load function (private void Window_Loaded in WPF), simply use this code:
if (Properties.Settings.Default.UpdateSettings) { Properties.Settings.Default.Upgrade(); Properties.Settings.Default.UpdateSettings = false; Properties.Settings.Default.Save(); }
It is important to place this code before anything else that use the user settings in the load method. In the above example, UpdateSettings is the user setting variable I created and set toTrue by default. When the application launch, it will check whether the UpdateSettings variable is set to True. If it’s the case, it will perform an upgrade. We then set the variable to False so that it doesn’t perform an upgrade the next time. Finally, we save the new settings. Why does it work? Because we set the user setting to True by default which will only occur after a new installation of the application.
Enjoy!
0 notes
Text
Sharepoint – Masterpage User Controls Limit
If you insert more than 10 user controls in a masterpage, you might get an error similar to this:
The page ‘/path/somefile.master’ allows a limit of 11 direct dependencies, and that limit has been exceeded.
You can easily increase that limit as it is actually set in your sharepoint web.config:
1) Browse to C:inetpubwwwrootwssVirtualDirectories
2) Open the folder corresponding to your Sharepoint website.
3) Edit the file web.config
4) Do a search for “safemode“.
5) Change the property DirectFileDependencies from 10 to a value your choice.
6) Do an iisreset command and you’re done!
0 notes