
n9655387cgtool
MadnessCGToolKit QUT 2017-2018
CG ToolKit Work by Garry Wu (QUT 2017-2018)
31 posts
Don't wanna be here? Send us removal request.
Last Seen Blogs

hmicorp
HMI Corporation | Revenue Cycle Management Company

marvel-and-chicago-fan
Bucky And Steves Fav

piningeddiediaz
you don’t get to tell me about sad
jaxoncohen
Jaxon Cohen Originals

bucksbisexual
roa
Text
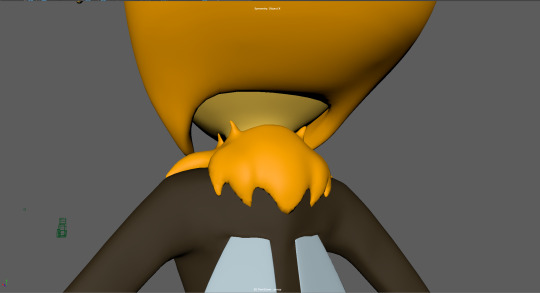
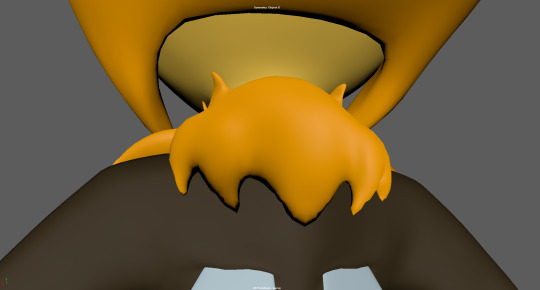
A2 - Attempted Hair Updates
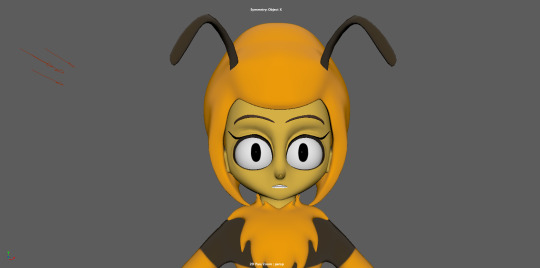
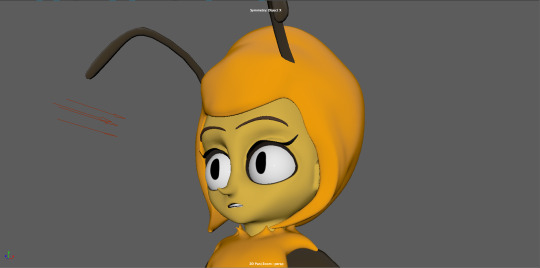
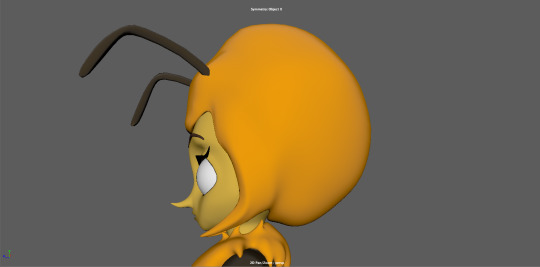
After some extra feedback from peers, I’ve decided that the hair still isn’t relatively convincing enough from where I’ve left off.
So I decided to update it further by ‘flattening’ parts of the pointy bits on the side to make it appear more defined, as well as making them drape down more so that it appears like they’re being affected by gravity.
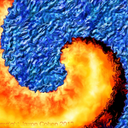
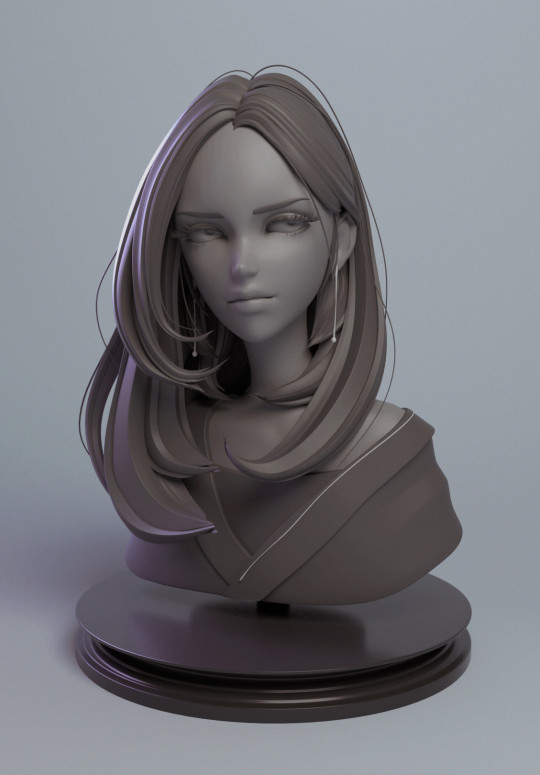
My decision to flatten the areas around the ‘sides’ was loosely based on my observations from a sculpted character bust that me and Sorin found on Pinterest (see below); sculpted by Adam Esat on ArtStation.
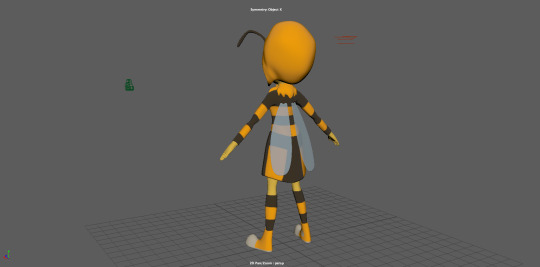
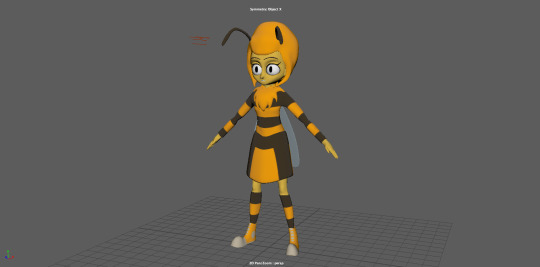
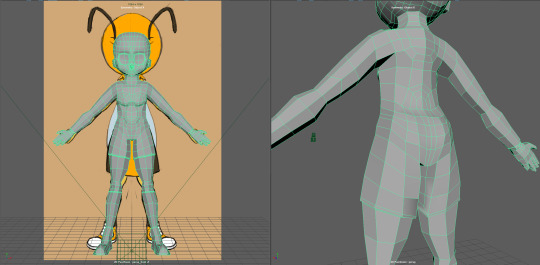
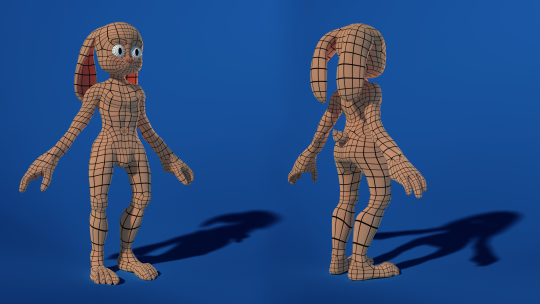
Here are some three-angle views of my model with the latest adjustments, except for the changes to the shoes.
0 notes
Text
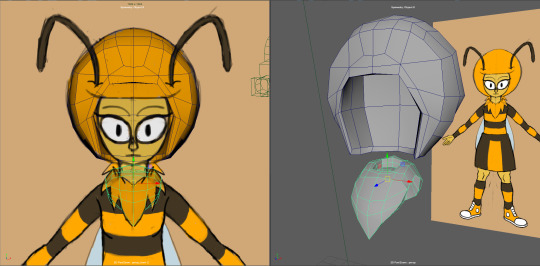
A2 - Finalisation and Turntable Render
youtube
Here is my rendered turntable of the final version of my Honeydoo model, including a wireframe render. (Use this link if it doesn’t appear above: https://youtu.be/DOnKmIxNraQ)
I used the PDFs provided by Thomas in his Advanced Animation Production, composition workshops to help me get it set up. Although I was unable to get render layers working properly, which is something he too had trouble with.

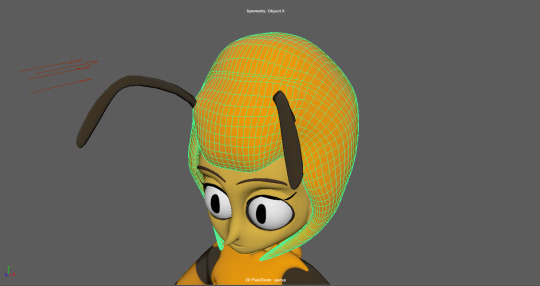
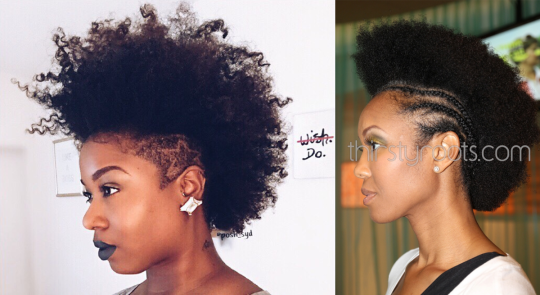
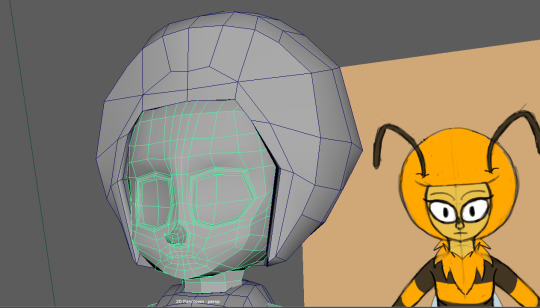
I’ve made adjustments to the mesh, especially around the hair in order to make it appear less like a helmet. I’ve attempted this by making her ears slightly visible, making the overall shape of the hair less ‘perfectly round’ as well as basing the side profile on that of actual afro hairstyles (see reference far below).
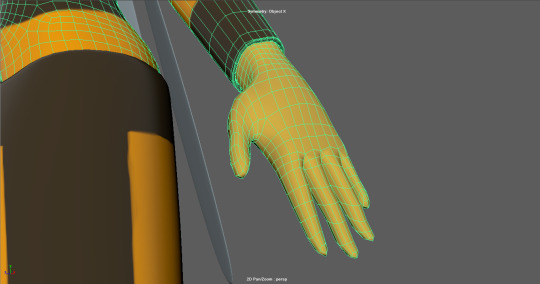
I’ve also updated her hands so that there’s an extra loop at where the fingers begin and I’ve moved the thumb down to a more natural position.
Ideally, I reckon they could use a lot more edge loops for extra definition, however since this is smoothed version (for sculpting) from the low-poly model, it might be best if I just did this by revising my low poly model with what I’ve learned from my first sculpt-modified version.
I’ve also made attempts to create an updated version of the model with additional detail, especially on the shoes. The arms have also been slightly updated to appear less sausage-like.
Unfortunately, I decided not to feature it in the turntable due to complications involving the UVs and having to painstakingly redo the texture, as you can kind of see with the texture on the shoe.
1 note
·
View note
Text
A2 - Finalisation and Blendshapes
sketchfab
Here is my finalised version of Honeydoo on Sketchfab.
youtube
As a bonus, I also did a quick deformation test of one of the points on Honey’s mane. The pivots aren’t ideal, probably because I didn’t add enough joints, so it’s really easy to break.
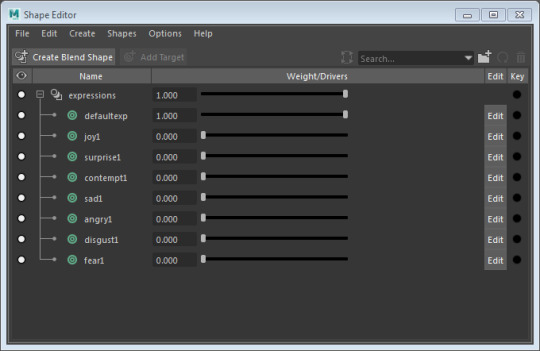
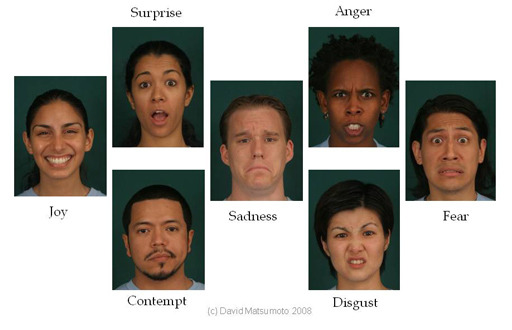
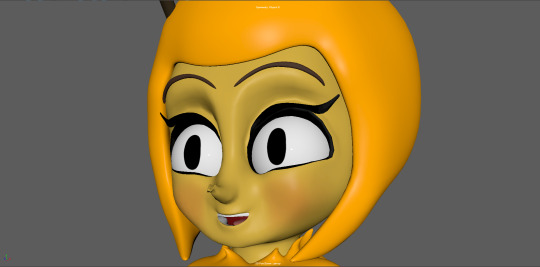
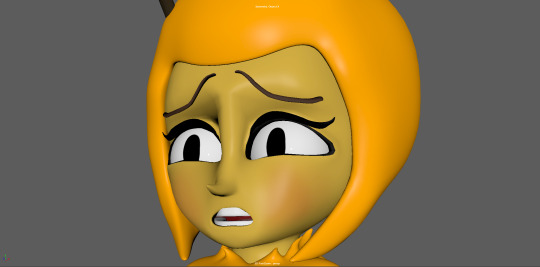
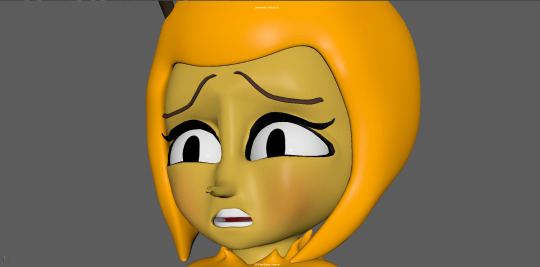
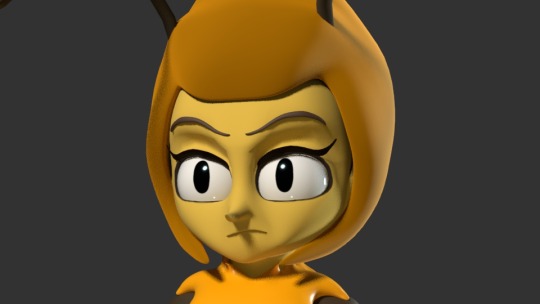
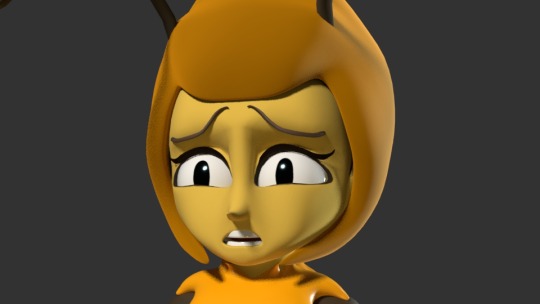
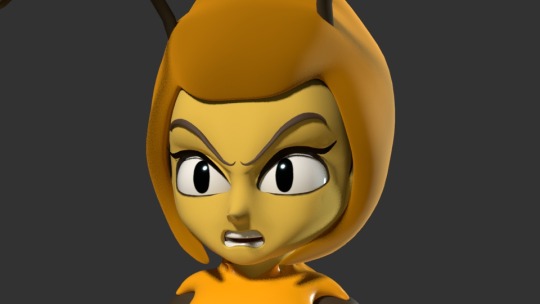
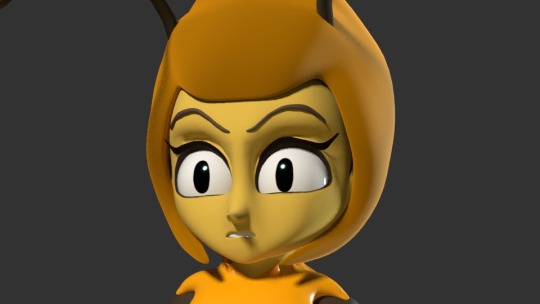
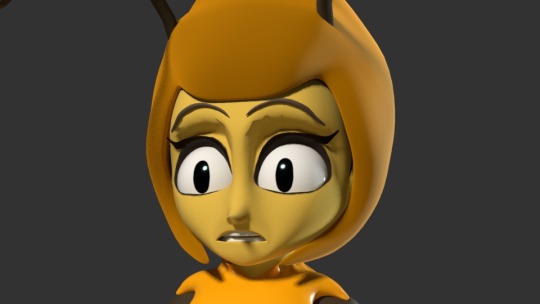
Here is a list of blendshapes I produced for Honeydoo to test her facial deformation. They’re based on the 7 universal expressions, as opposed to the modular facial system I had for Perry. They’re kind of based on the diagram shown on the lower image.
I gave her a ‘default exp(ression),’ which closes her mouth, which I had originally modelled open.
youtube
Here is a video demonstrating the blendshapes in action.
I was originally hoping to just animate and playblast them like I did with Perry. Unfortunately, the blendshapes seem to glitch out when animated, resulting in the shading changing in a way that makes Honey appear uglier and uncannier (see ‘laugh lines’ and cheeks below), as well as the very tip of the nose being unable to move.
Sorin would give me additional feedback for the expressions by reminding me to make the jaw movement more obvious; keeping the upper teeth still and pushing the shape of the eyes further.
Sorin also mentioned that the eyelashes and their relation to the eyes tended to appear blocky. He pointed out that it was likely because of my decision to make the eyeliner a seperate material (shared by the lashes), as opposed to sharing it with the skin.
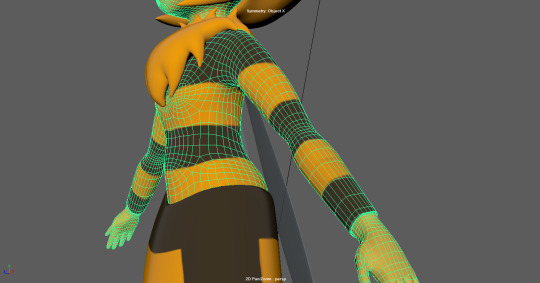
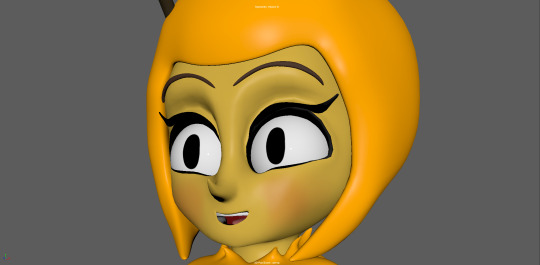
As such, I updated the model so that the entire face mesh uses one material. Below are some renders of the seven universal expressions with my corresponding update.
youtube
When working on the renders, I noticed some issues involving the geometry when that I did not notice before, without lighting, such as shadow artifacts on the chin and odd rims around the lip.
I also wanted to point out that the hair materials seems to be considerably darker and less saturated than the mane for some reason, despite sharing the same material. It later turns out that the wrong hair material was used and there’s somehow two of them in my Maya file.
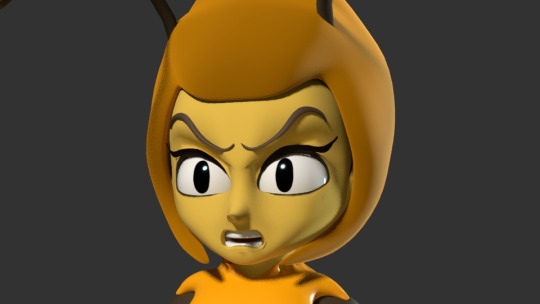
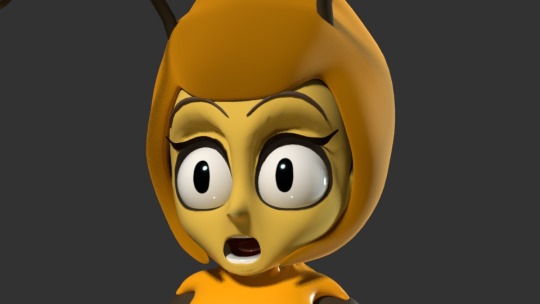
Below is a collection of higher quality stills of each expression.


0 notes
Text
A2 - Normal map baking attempt and texturing in Substance
Before I began texturing in Substance, I had the idea to save on performance by using a lower poly version of the mane and having it normal-mapped with the high poly version.
Unfortunately, it didn’t succeed, since the normal-map version ended up with having just as chunky shading as without it.
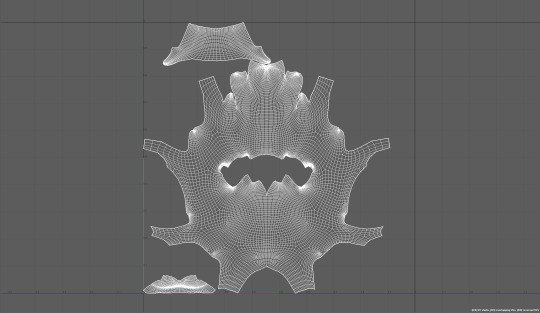
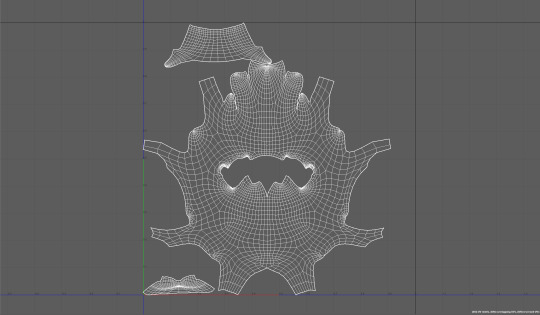
Here is my retopologised mane’s UV map. It’s in high poly, so it took a while to do, due to the performance impact it had on my computer. Hence why I wanted to work with the lower-poly version.
I had to redo it with the low-poly version, since

Here’s my first attempt at normal mapping, based on Autodesk’s Transfer Maps editor instructions. It’s blocky and defeats the entire purpose of normals. I’m not entirely sure what caused it, but it did take a while with the settings I used, so it was a considerable waste of time.
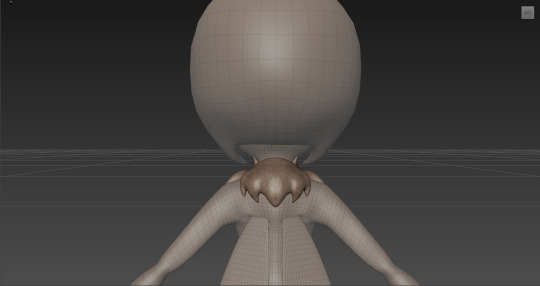
Here is the low poly mane as it appears from behind without the normal map. It’s pretty chunky around the lower areas, with the points.
Here’s the same area with what I consider a successful normal map. However it is only slightly less chunky than what I had before.
Here is the front. As you can see, there are major seams from the underside of the mane from my UV mapping. It’s here where I felt that normal baking would not be an effective solution for improving the visuals of the model, whilst maintaining good performance.
It would probably be better just to add more edge loops, that go around the back side of the mane, though that might cause complications on the front and sides by adding heaps of detail that might be difficult to manage or even also impact performance.
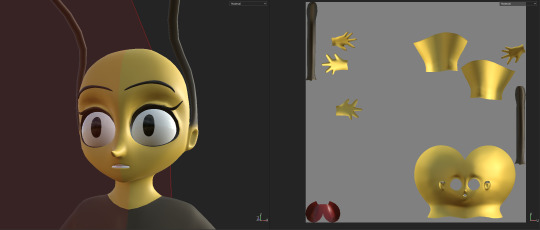
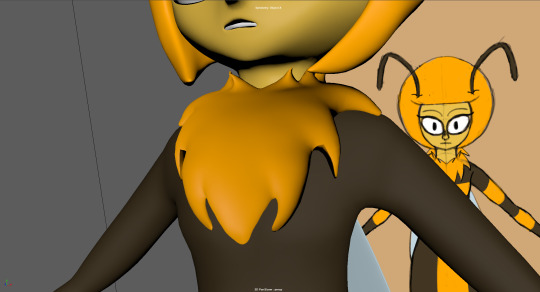
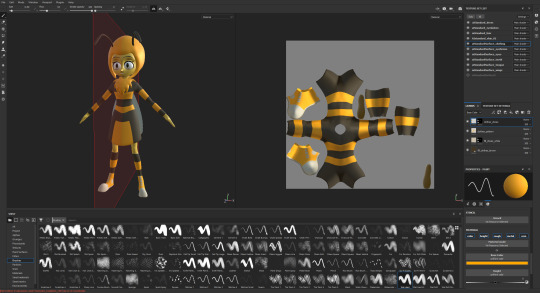
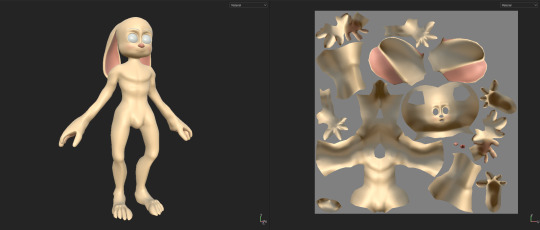
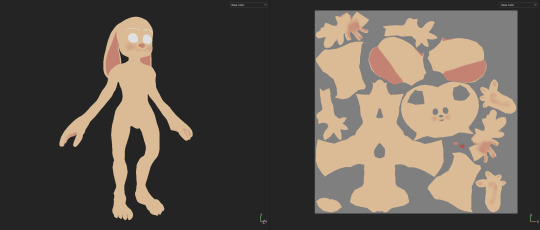
Here is my texture in Substance for Honey’s head/face. The brown, ‘insect’ part of her antenna transitions from skin on her ears.
I also redid the eyes to be larger from previous, since I felt that she might look more appealing from the side if her pupil was more easily seen. The eyeliner shares the same material as the lashes and is assigned directly to the faces themselves, as opposed to being part of the face/head texture.
Also note my updates to the eyebrows’ thickness, so that Sorin doesn’t have to bring it up as much in the future.
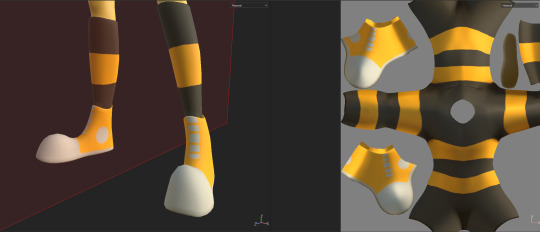
Here are the shoes. As observable, I feel that the lack of detail turned out to be much more consequential than I anticipated. Since they didn’t look as appealing as I hoped, appearing relatively flat with just the texture.
I wasn’t completely sure how I wanted to handle the 3D detail of the shoes, hence why I didn’t really bother with them in the first place.
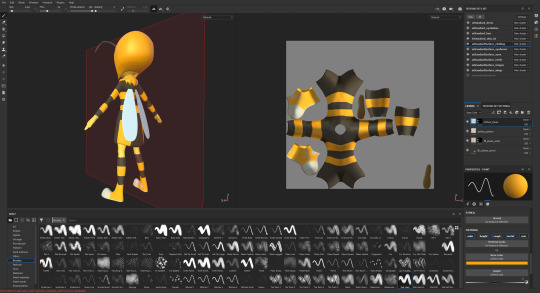
Here are the textures for the rest of the clothes, front and back. The skirt has its own separate material and UV map.
At some stages, I had to make tweaks to the mesh as well as the placement of some of the materials. Thankfully, Substance was able to maintain my progress when I updated the mesh during those incidents.
However, if I were to do anything that changed the UVs, Substance may not be able to keep my texture, even though I knew that a representative mentioned that Substance is able to retain progress as long as the brushwork was done in 3D.
At this stage, since it’s up to par with my reference sheet, the model is generally finalised, although I may consider making further tweaks to the hair somehow, since some people still find it easy to mistake for a helmet.
0 notes
Text
A2 - Sculpting finalisation and retopology
After taking into Andrew’s advice on always enabling tessellation and having gentler use of the smooth and bulge tools; as well as being gentler with the grab tool in general. I was finally able to sculpt a mane that (although resembled some kind of weird starfish, sea creature) I was pleased with because it stayed true to my reference sheet.
So I brought my sculpted model, at the lowest division setting, from Mudbox back to Maya to retopologise the mane and make and final tweaks before sending it to Substance Painter for texturing.
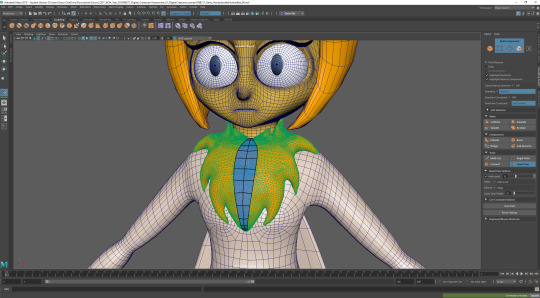
Here is the very start of my retopology process, using Maya’s quad draw.
As you can see later into my sculpt, I hid the body mesh so it didn’t get in my way. I would later hide more and more of the meshes, such as the hair and the teeth as I worked my way into the centre.
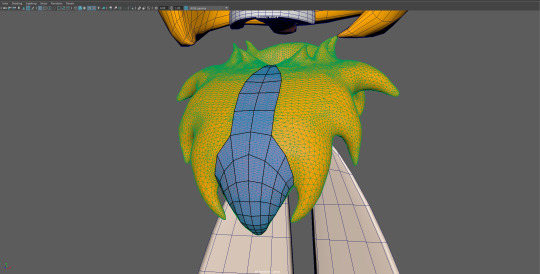
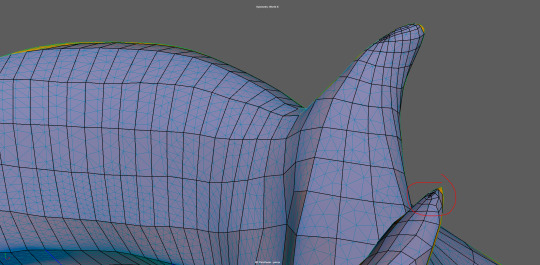
The points/fluffs were going to be tricky, especially in regards to handling the topology flow and their relationship with one another across the mesh.
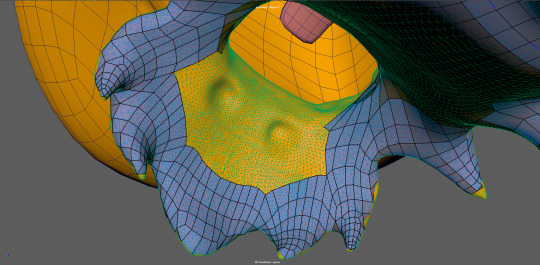
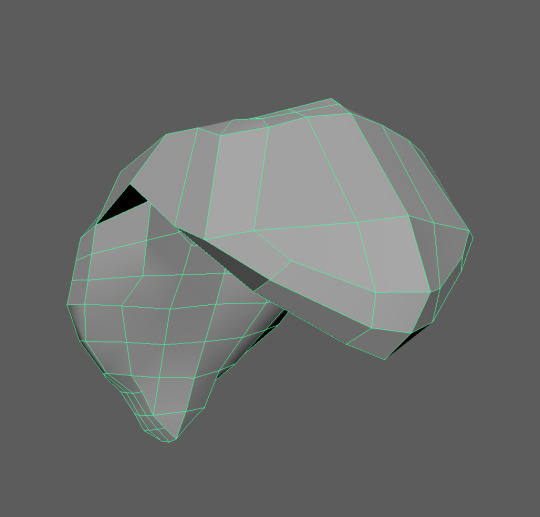
As you can see in these two images, I began running into major issues with the centre edges merging into each other and Maya’s symmetry feature becoming unreliable. This is when I attempt to relax the edges along the geometry or add additional edge loops near the the centre-most edge.
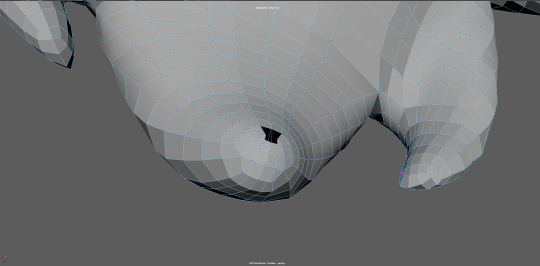
Note the faceless edge at the centre of where I deleted them in order to fix them.

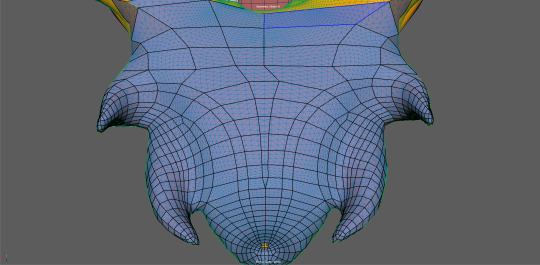
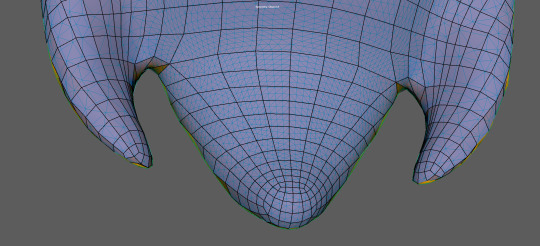
Here is the topology as it appears again, with the hole filled in, smoothed. When unsmoothed, the mesh appears perfect, but it is revealed there are overlapping vertices.
youtube
Here is a video showcasing the symmetry ‘merging’ issue in action.
At one stage I managed to work around the issue (see lower image) by temporarily disabling symmetry, relaxing the area a bit and then re-enabling it, followed by mirroring the mesh so it’s truly symmetrical again.
Unfortunately, as I continued working on the topology, that’s when what’s depicted in the video started occuring again.
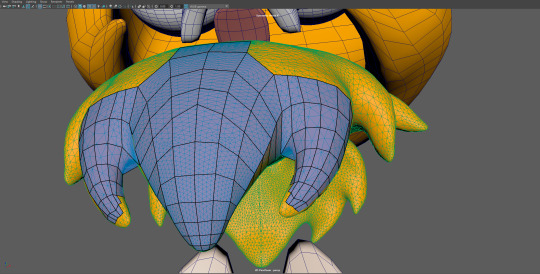
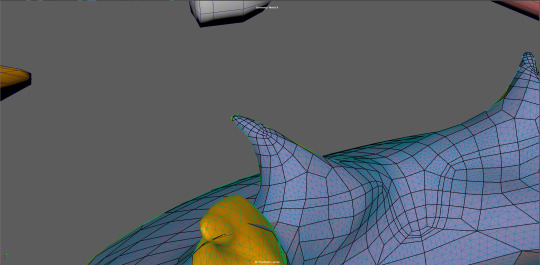
Here is the topology continuing through to the back of the mane.
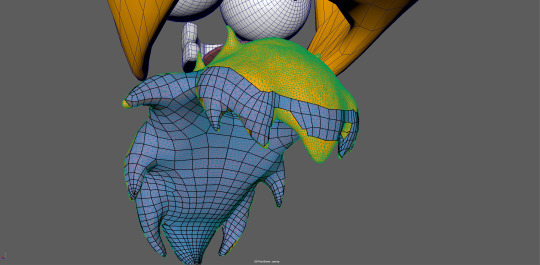
Here is it progressing into the rear underside. Note the two bulges I accidentally left from sculpting. These would not be reflected within the retopology.
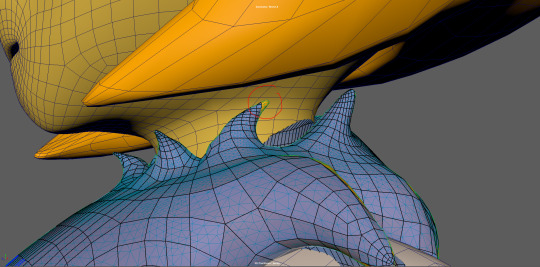
Here is my progress towards retoplogising the ends of the points. As shown, I began facing difficulties involving triangles and n-gons when trying to solve them.
The usual solutions were to add more edges (which can make the model more resource-intensive and harder to work with) and to redirect some of the edges to make more of a proper loop.
Here’s an example of the topology on one of the fluffs, near Honey’s neck, showcasing a half-loop.
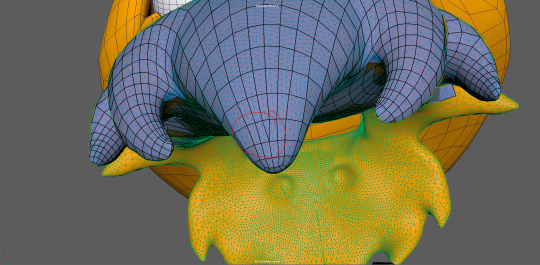
Here is my first completed version of the toplogy. I wasn’t pleased with how one of the points didn’t take its full shape properly, so I went back to retopologise it. Mainly with the addition of more loops and edges.
As you can see the geometry is very tight after adjusting the topology. Potentially more so than what’s preferable, but it’ll probably have to do.
Here is an overall view of the mesh, with a smoothed version of the retopologised mane, before I export her into Substance for texturing.
I had to re-UV map her body, since Mudbox eliminated her UVs for some reason, despite not really changing any of the topology there.
#assessment 02#KNB217#Digital Creatures#Honeydoo#quad draw#retopology#sculpting#sculpt#Mudbox#human character
0 notes
Text
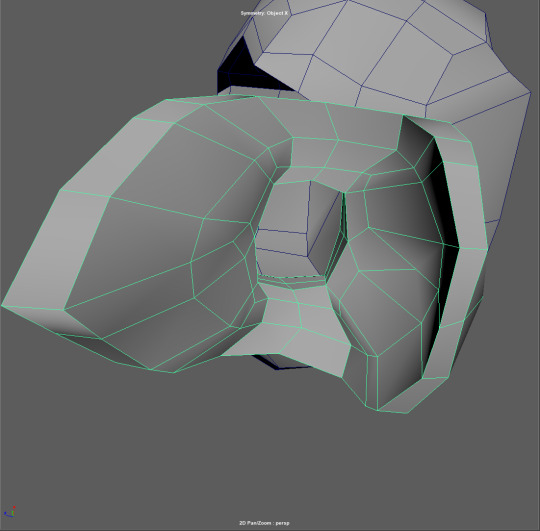
A2 - Last minute additions and initial sculpting phase.
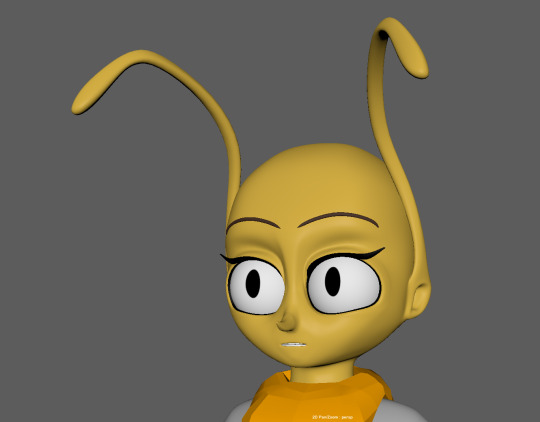
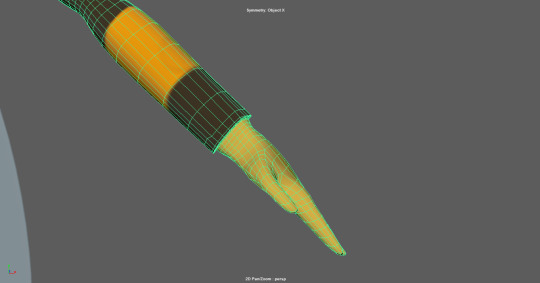
Initially I was planning on modelling Honey’s ears/antennas in Mudbox, via tessellation sculpting.
However I decided that it was too much unnecessary effort, since they weren’t supposed to appear particularly detailed and the quad-draw process would undo most of the work I did with retopology earlier. I’ve modelled the antennas with the ends straight, like in my reference sheet so they can be curved when rigged.
Sorin made another comment about her eyebrows being too lacking dynamics, with the uniform density. Just like he did with Perrys, which makes sense, since they’re copied and pasted from him without change.
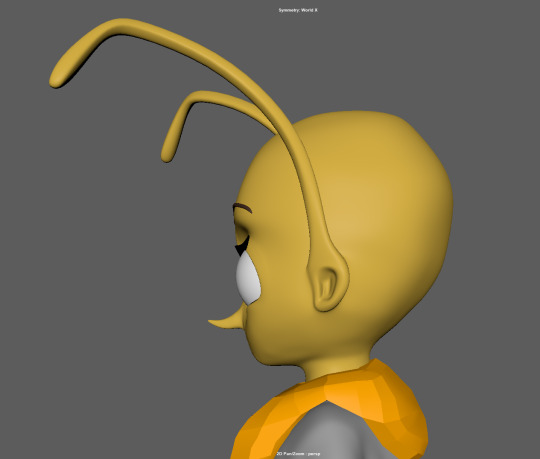
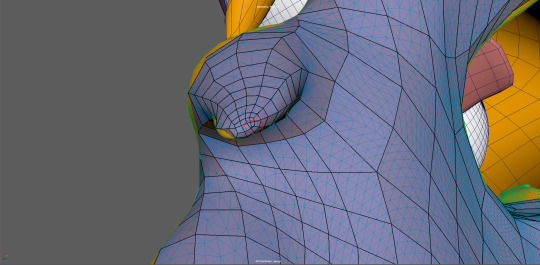
I’ve modelled a relatively simple ear cavity, which looks a little odd with the lighting/shading, since some of the edges are probably too sharp and tight than what they should be. Thankfully, it’s mostly hidden for the sake of this assessment and I can smooth it during sculpting.
I’ve made her ear appear ‘thick’ in order to make it appear more like it can support the weight of the antennas.
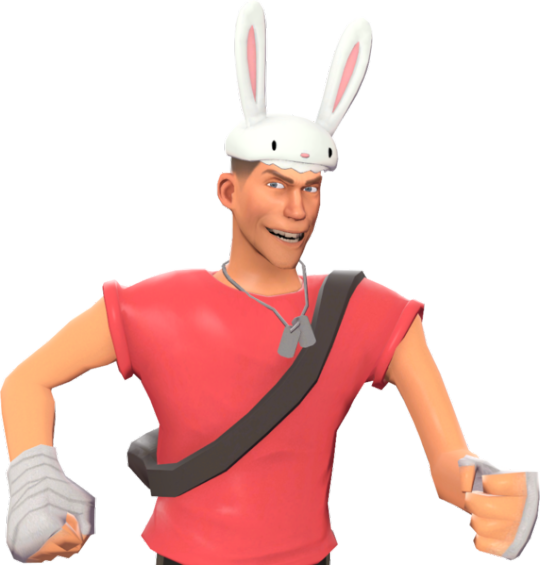
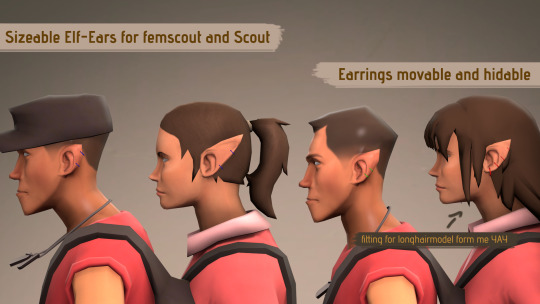
I used images of Team Fortress 2 characters (lower images) as reference to help me define the form of the cavity. Originally I had the cavity ‘point towards’ the face, to be more realistic. However, the shading looked more unusual that way hence why I changed it to something simpler.
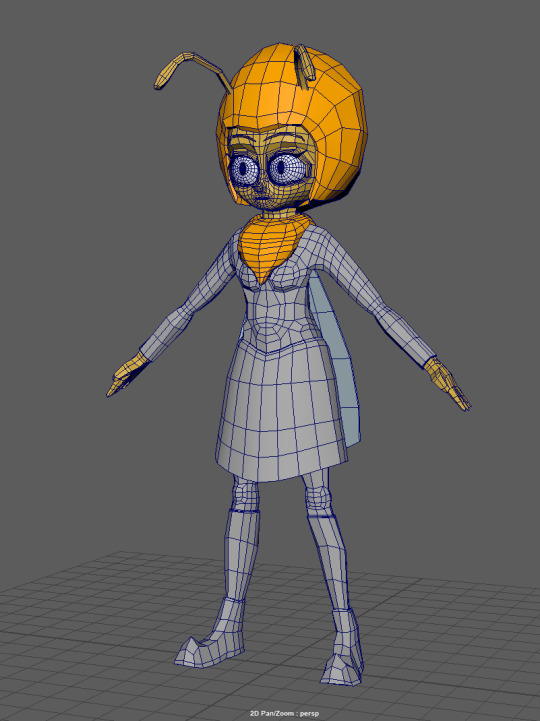
Here is the overall view of the mesh before I put her into Mudbox.
My export process is the same as the previous post, smooth, duplicate then export. However, with Andrew’s help, we confirmed that the cause of the ‘twitching tool issue’ was from conflicting ‘contact’ from exporting the mesh with separate parts.
The alternative solution, without combining the mesh, was to use the lock feature on the parts that I wasn’t working on whenever I’m sculpting.

Here is the updated UV with the antennas and ears included.
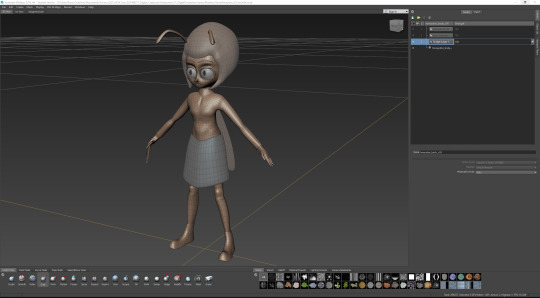
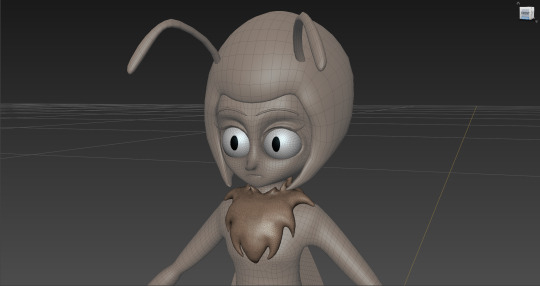
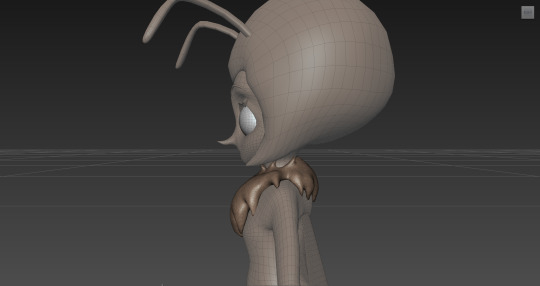
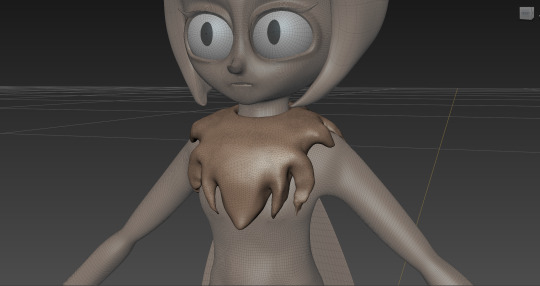
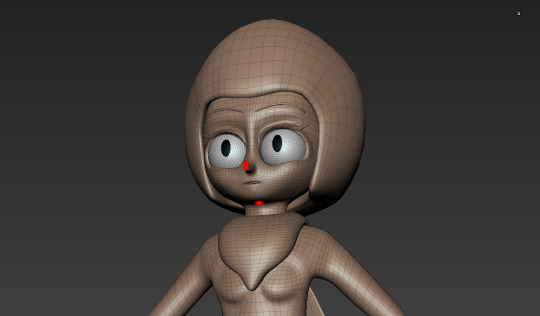
Here is the an overall view of my first sculpting pass, in progress.
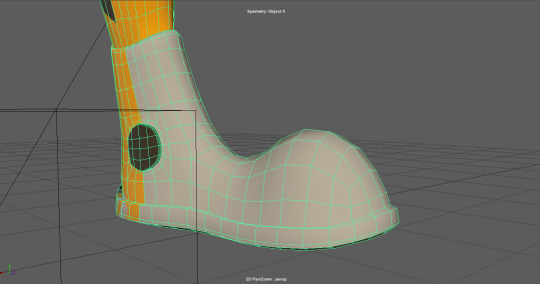
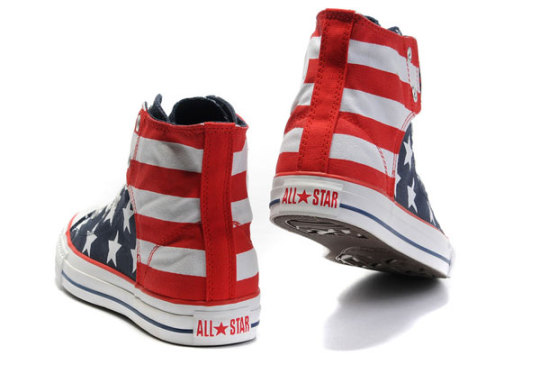
I mainly focused on getting the general shape of my character right, with most of the tweaks at this stage being in the hair (so it no longer looks like a shoddy helmet), the fingers and the chest (so she looks more like she’s wearing a shirt). I’ve also tweaked the shoes a bit, so the proportions are a bit more balanced and convincing; using references such as the lower image.
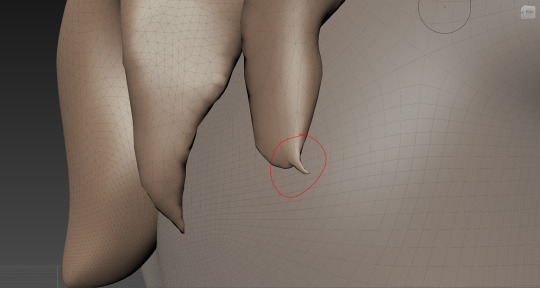
As you can see, the mirror functionality on the tools I used, failed to maintain its consistency on the other side shown by the grotesquely broken and stretched fingers on her right.
I plan on using Mirror in Maya to fix this, since Mudbox’s mirror feature is restrictive and would require more effort to clean up.
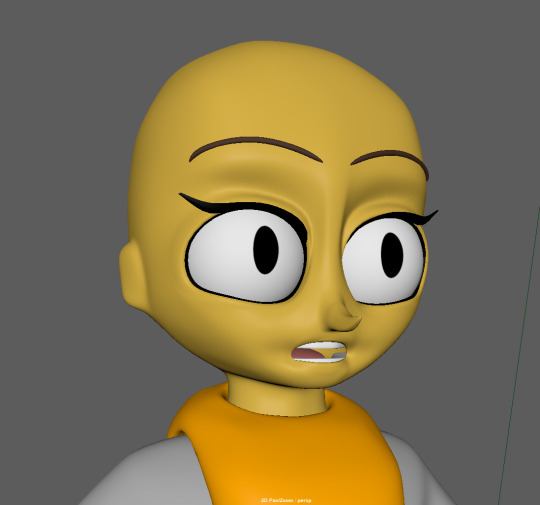
I also began attempting to sculpt her mane, using the tessellation feature, however my first pass turned out messy. Since not only is it poorly skewed but is also appearing too detailed and thus inconsistent with the rest of the character.
I also ran into some pretty bad ‘pinching’ issues with the ends of the points on her mane, where there’d be too much densely clustered definition in such a tiny area.
Smoothing it usually made the pinch tinier and worse, while bulging tended to ruin the established shape of the point and smoothing over it sometimes resulted in it reverting back to an unwanted pinch. So it often turned into an annoying, counterintuitive tug-of-war process.
Andrew’s solution was to ALWAYS use tessellation with my tools and go over it with a gentle (low tool strength) bulge and smooth process for more control.
#KNB217#Digital Creatures#Assessment 02#Honeydoo#Human Character#Mudbox#Sculpting#Base Mesh#Smoothing
1 note
·
View note
Text
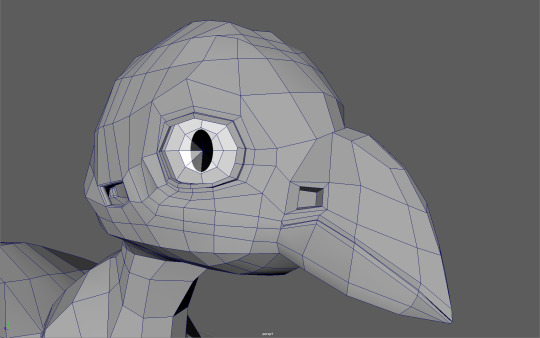
A02 - Preparing Base Mesh for Sculpting
Despite the fact that I’ve gotten the base mesh at a stage where I’m happy with its appearance/detail, there’s still plenty of work to do in order to get the mesh ready for sculpting and bits of detail where I still haven’t covered yet.
Here’s a little impromptu test I did with Honey’s lip-posing capabilities. She’s a bit harder to get right than Perry, since she’s much more human-like, and has a lot more detail clustered into one little area. She pretty much requires me to make sure her lips curve around her teeth, or else she’d look weird.
Whereas with Perry, if his lips were ‘flat,’ he’d still look relatively appealing, although not as good as if they were curved as well.
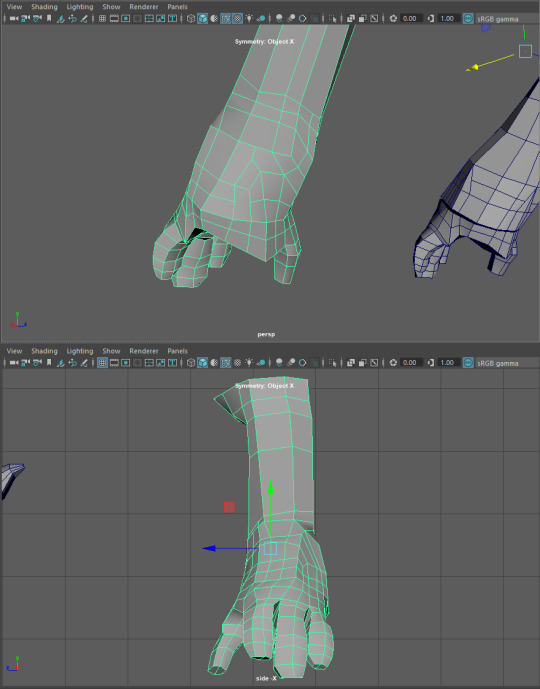
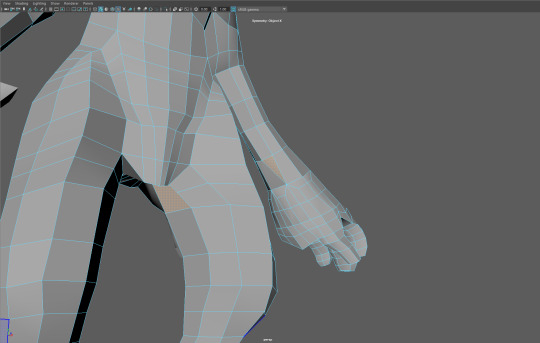
I’ve also gone ahead and revised Honey’s forearm/hand, so that her palm faced downwards by default. I felt that the way I had it on my reference drawing, although easier to model, was going to complicate rigging and posing, so it was best that I changed it to what was standard.
This impression was based on my observations on Danny Mac’s Zbrush tutorials, since he would have his character’s hands face downwards:
youtube
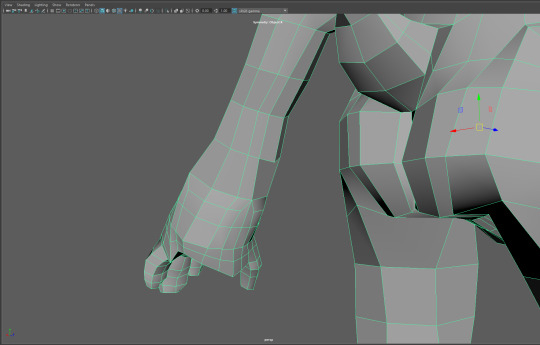
My process for rotating the hand downwards, involved detaching the forearm (as opposed to the hand itself, as not only was it more unnatural but also more difficult), and rotating the mesh 45 degrees in relation to its central pivot.
Doing so moved the positions of the edge loops, so when retopolgising, I had to add some new edge loops and delete an existing one, primarily around the upper chest, with one of the new ones going downwards towards the legs.
Initially, I thought this was going to give me more problems, with excess detail, but it serendipitously solved an existing one in the process. This is shown by the screenshot above, where the triangle from the previous post now has a proper quad taking its place, from the fingers’ new, lower edge loop.
There was also one last triangle above the nose, between the eyes, that I felt compelled to eliminate as well. This was leftover from me creating half-loops for Honey’s nose area.
There may be another more effective solution to this, but I’m currently not entirely sure.
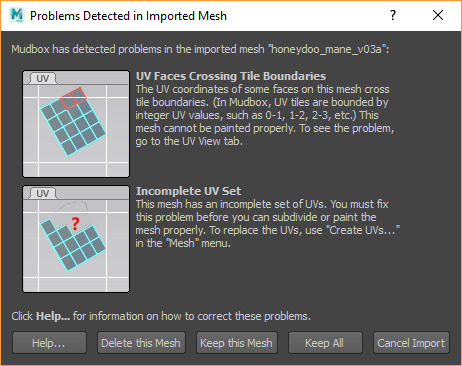
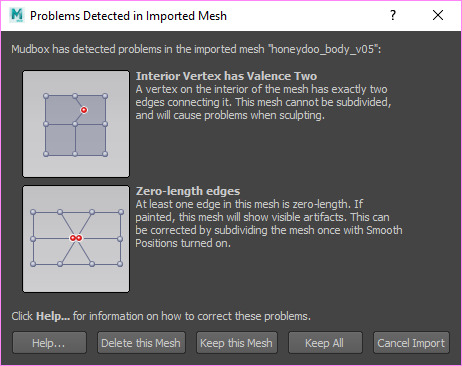
Now that I’m content with the mesh, it was time to bring it into Mudbox for sculpting. My process for exporting is to smooth the meshes, duplicate them and then export them to .fbx, with the smoothing and tangent boxes under the geometry section ticked.
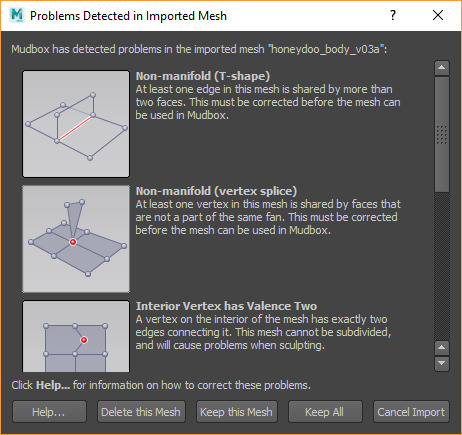
However, as shown above, I encountered numerous errors with my meshes, concerning things that I forgot to give attention to during finalisation. Particularly incomplete UVs and a bunch of unwanted duplicate, vertexes leftover from a glitchy mirroring process.

During my UV mapping process, I encountered a major issue around the armpit/breast areas, likely resulting from Maya’s attempted fixing of non-manifold geometry, which is necessary for the unwrapping process.
This is the exact same issue I had with the Perry model and was just as tedious and messy to clean up as with before; dragging and connecting the same vertexes into place for up to 5-6 times repeatedly in order to get the geometry normal again.
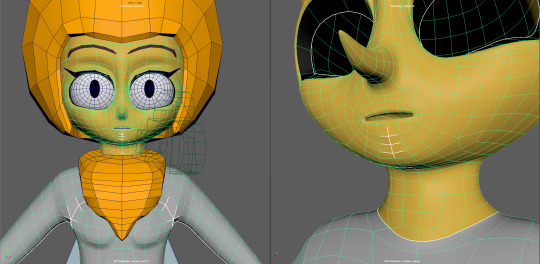
The areas with the overlapping, duplicate vertexes were mainly around the chin (as seen above) and the back of Honey’s scalp. They also affected Honey’s mouth cavity as well.

Here is an internal shot of an unwanted triangle inside Honey’s armpit-breast area, that might be directly responsible for the non-manifold geometry issue, since it as also present with Perry as well.
My solution, like with Perry, is to create a vertex in the middle and connect it to exterior vertex of the mesh (lower image).
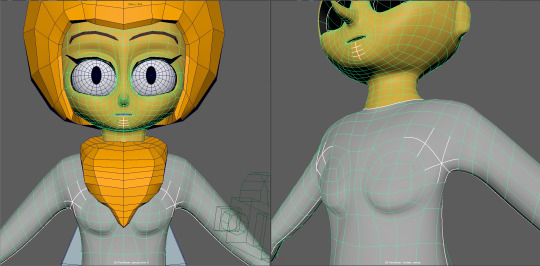
Here is the affected area now fixed, so I can proceed with the UVs.
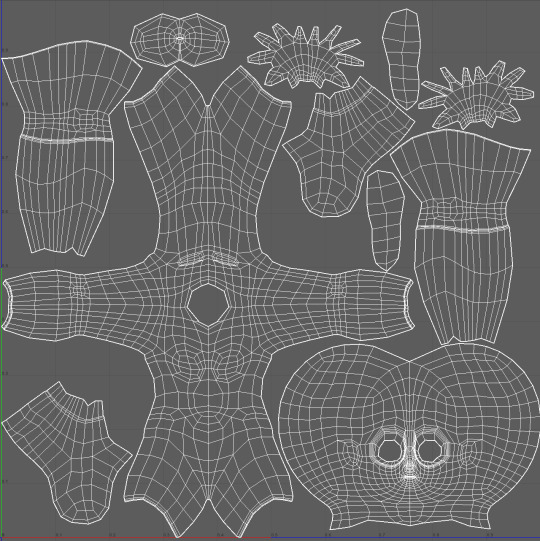
Here is the UV for Honey’s body. I’ve made UVs for each and every single one of her meshes; from the mane and hair to the lashes and brows (the latter of which are far more simpler than what’s necessary).
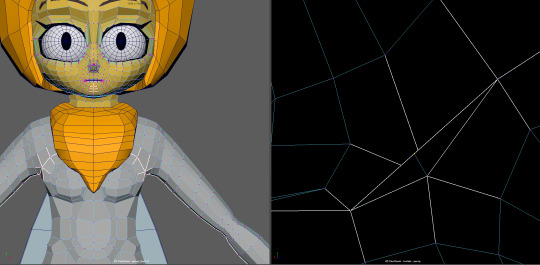
Just when I thought I was done with the overlapping vertexes on the face, more seemed to reappear, especially when I had to mirror her body again in order to fix the non-manifold geometry.
It doesn’t help that they’re hard to find until the last minute, where they’re highlighted in red by Mudbox. They’re almost like a cancer in the modelling process, especially if there’s too many to be managed.
youtube
After sorting out the UVs and broken vertexes, I discovered that my export process was resulting in weird, ‘twitching’ in the tools that rendered the program superfluous for sculpting.
My solution was to combine the entire mesh into one, which I was kind of reluctant to do, since it gave me less individual control over the subdivisions. However, it’s actually not that problematic, since the skirt needs to have the same amount of divisions as the body in order to fit properly.
0 notes
Text
A02 - Finalising the Base Mesh continued
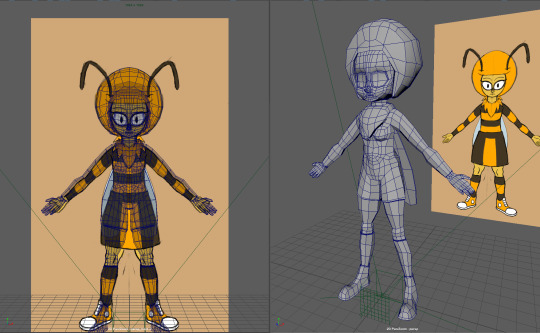
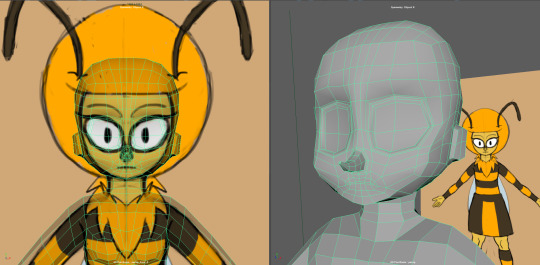
Continuing from where I left off, I’ve begun to model the base meshes for the hair, the scarf/mane and the wings, as seen above.
Here is my solution for the n-gons inside Honey’s mane. It’s a bit stretched at the moment, but I was thinking I could get away with it, since I’ll be refining it during sculpting in Mudbox and redrawing the topology as required.
However I’ve later decided that the base mesh needed a whole lot more work done on it before I moved onto the sculpting phase; especially on the face, which I feel, and was recommended, needed to be brought up to the same standard as the Perry model. Although I originally had that in mind with the sculpting phase.

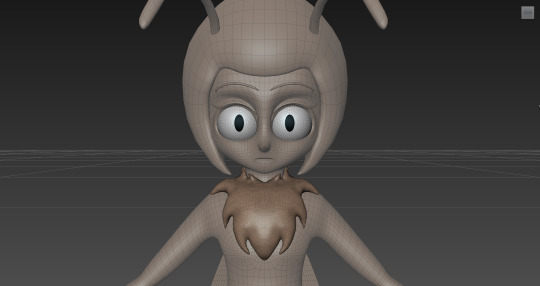
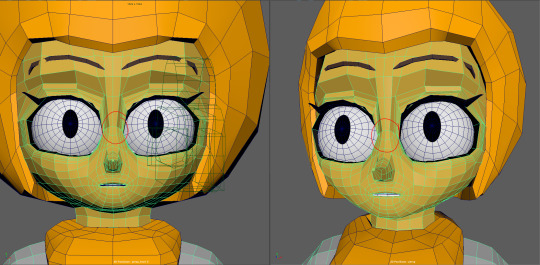
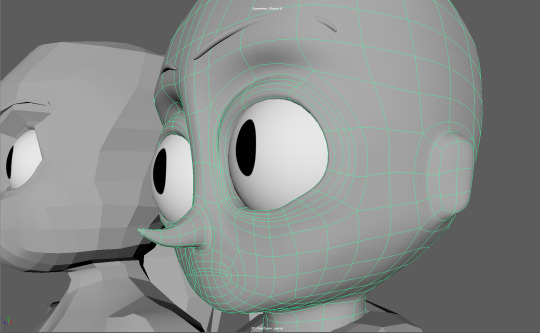
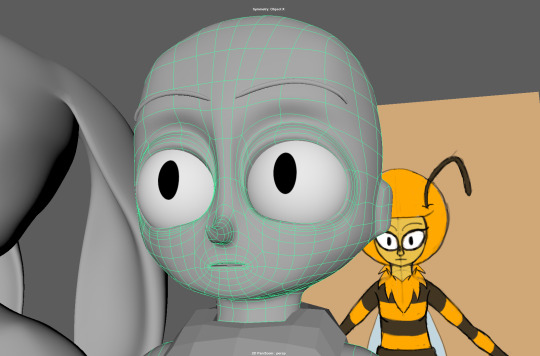
So I decided to add eyes and revise the topology of Honey’s face, based on what I learned from modelling Perry the Rabbit.

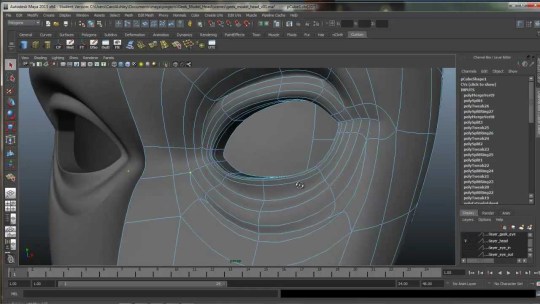
Here is a smoothed (preview), close up of Honey’s eyes, showing the work I did for the eyelids. The upper eyelid fold is loosely based on a still reference I acquired from a YouTube video tutorial series (lower image) about character modelling, when I was searching for “Pixar Eyelids.”
Honey’s eyelids are far more pronounced than Perry’s and they look more obviously Caucasoid, while I felt Perry’s appeared more racially ambiguous, despite my intentions to make both characters primarily Caucasoid.
Work needs to be done to ensure that the eyelids have a uniform slope along the vertices, otherwise if they’re wonky, they’ll look unintentionally wrinkled.
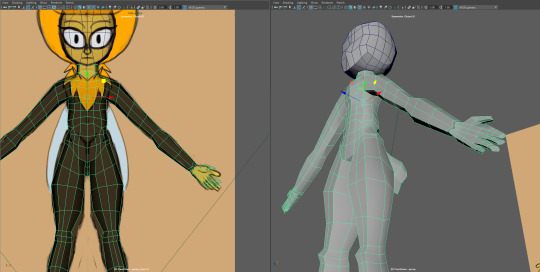
Here’s another view of Honey’s face, showing the eyelids more from the side, as well as further updates to the topology, especially around the mouth-nose area and the side/back of the head, so that it flows more intuitively. I’ve also added some additional edge loops leading to the bottom of the eye in the process, which will require moving around in order to preserve that round eye shape.
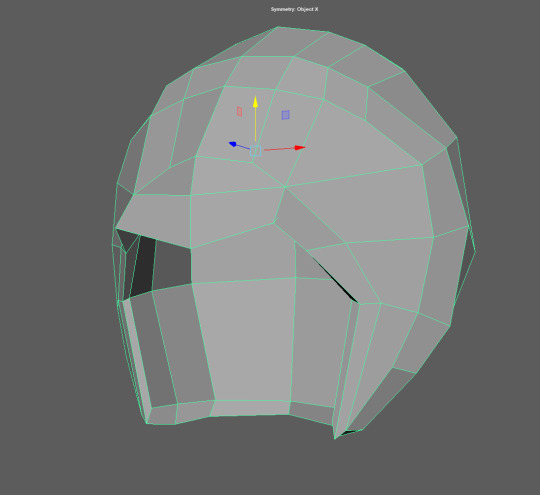
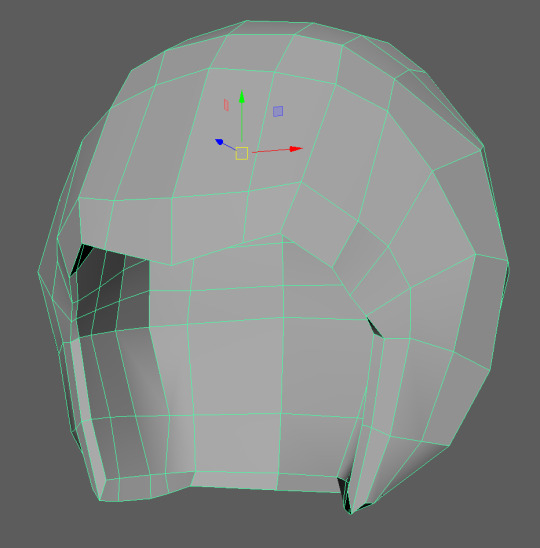
I’ve also decided to put some attention towards re-topologising her hair mesh, which is kind of like this weird, unappealing ‘helmet’ at the moment. This is to ensure the sculpting process goes a bit better with more intuitive edge flow, since I anticipated that all the unnecessary half-loops could complicate the process and limit the mesh’s flexibility.
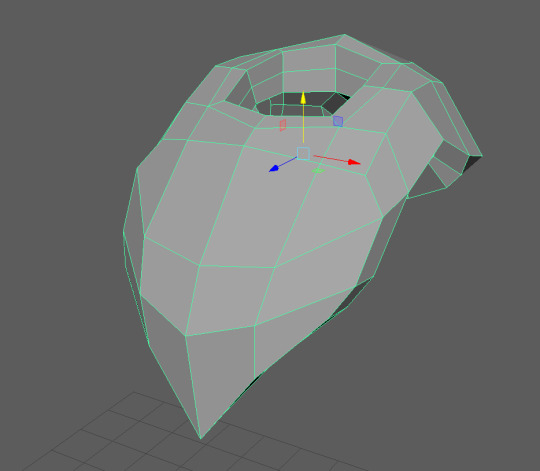
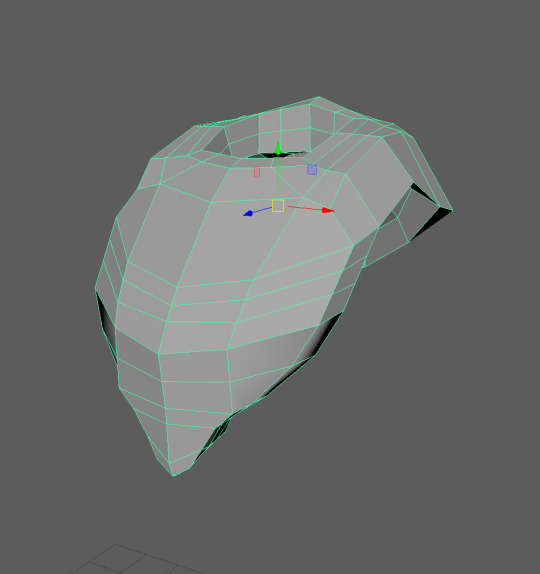
Same applies for the mane-scarf mesh, which is a bit uneven at the moment.
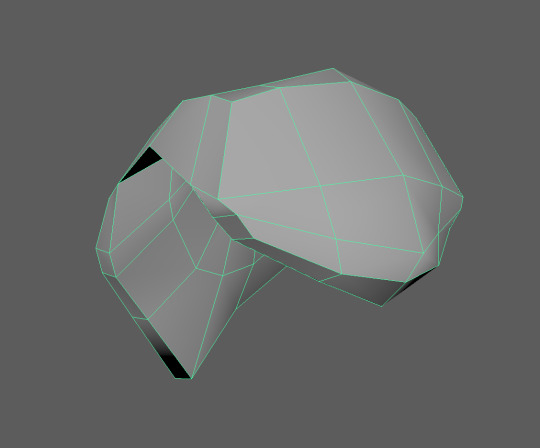
Here are the back views of the same mesh.
I later modelled a mouth cavity, with altered copies of the teeth and tongue from my Perry model added.
Originally I had a whole lot more edge loops inside Honey’s lips, but I later removed most of them, bringing them down to the same amount as Perry’s, since they made mouth-posing a lot harder and more distorted.
I then modelled some eyelashes for Honey, based on a flat-plane, referencing the relatively simple, Grandma’s House Lucy eyelashes to get an idea of how to produce them.
Clipping issues can easily arise from having them make close contact with the eyelids, especially when they don’t have the same amount of edge loops (which I might update) and when they don’t have the same colour as one another.
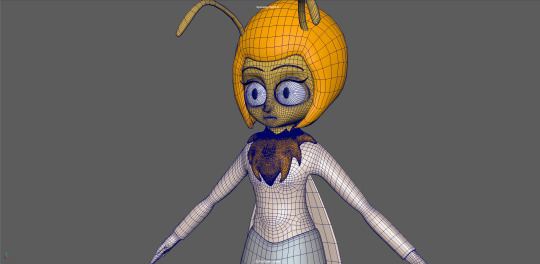
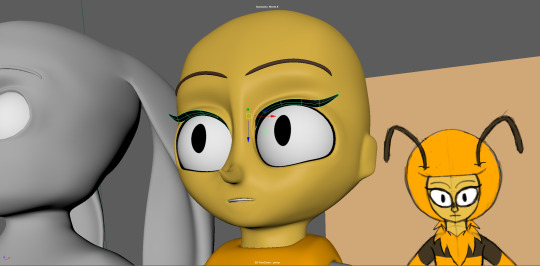
So I began to colour parts of the mesh accordingly to get an idea of what Honey would look like without the plain old, grey Lambert; adding eyeliner with the inner-most eyelid faces in the process. Something that helps with the clipping issues on the eyelids a bit.

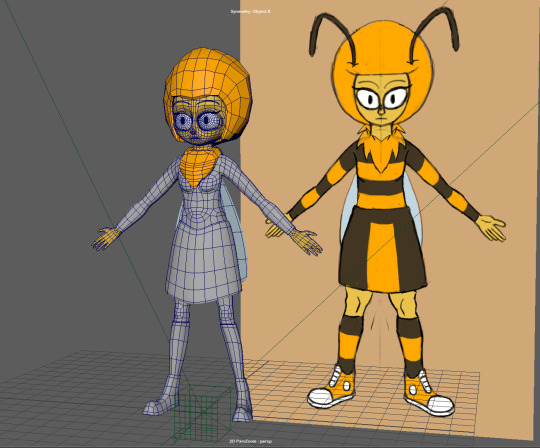
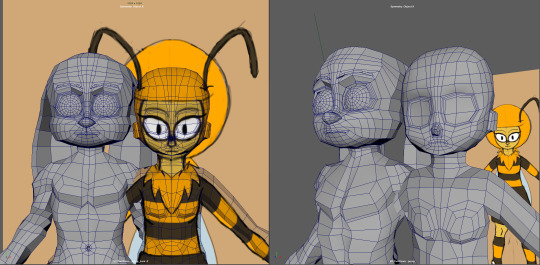
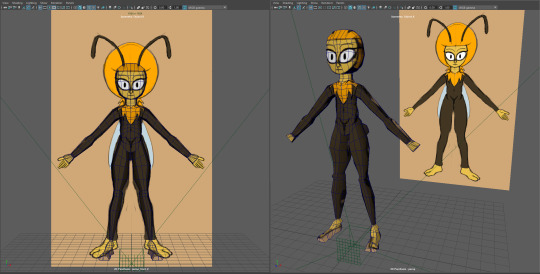
Here is an upper-body shot of the mesh with corresponding, single-colour materials and the updated hair/mane base meshes.
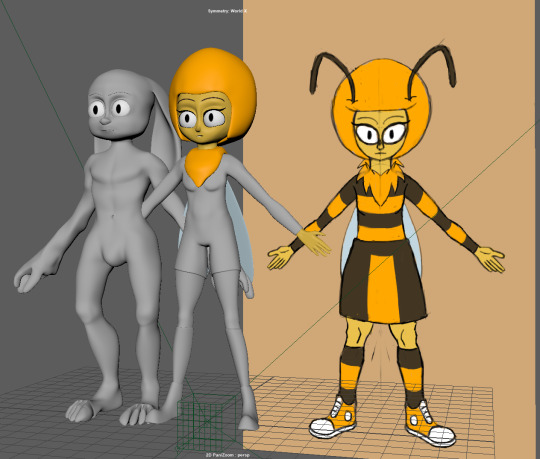
Same as above, except full body shot.
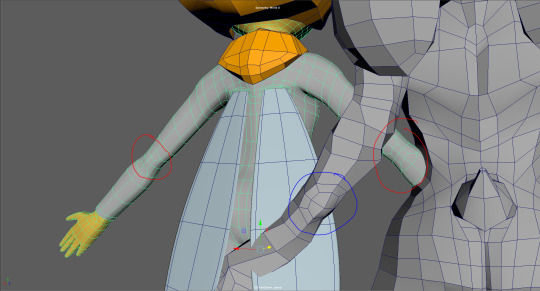
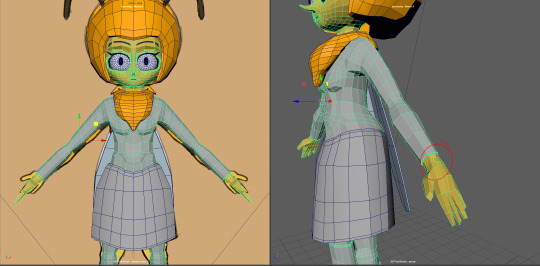
I’ve also updated Honey’s back topology a bit as well, deciding to add ‘elbow loops’ (circled in red), just like how I had with Perry later on (circled in blue).
Folds/circle loops for where the wings come out have been added as well, so they look more organic.
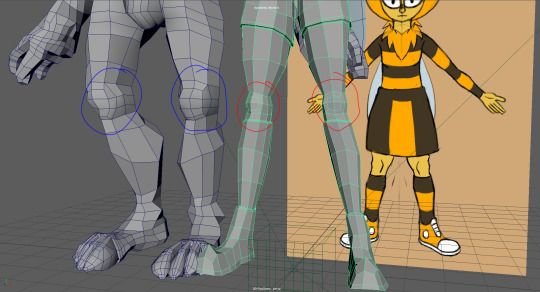
Ditto with the elbows above, except with the kneecaps. The extra geometry could be useful during rigging. I may need to add an extra loop or two, like I did with Perry’s in order to achieve more of a kneecap-appearance.
Finally, I’ve decided that the base mesh needed a skirt to go along as well. Something that I was also kind of planning to do in Mudbox, but I ultimately decided that it wasn’t the right program for that kind of work.
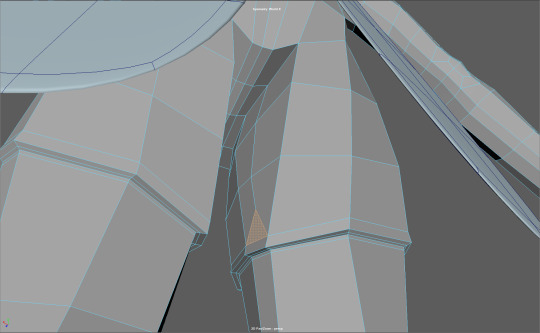
Meanwhile, Andrew during this week’s tutorial recommended to solve the extra polygons on the thigh with a single triangle. As opposed to the half-loop that I had before, due to how unnecessarily odd he felt it was and because he felt that it was in a relatively obscure area.
It helps that I have the dress to also hide it as well.
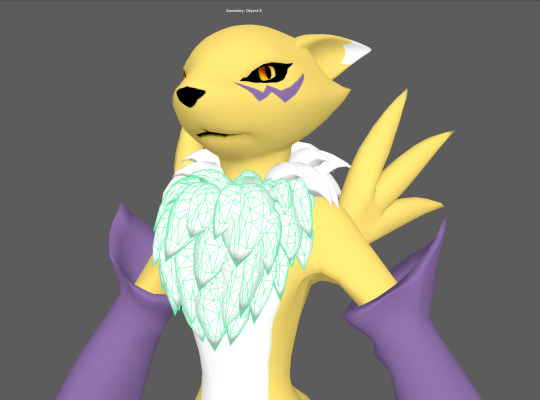
Meanwhile, I’ve been thinking about how I was going to approach properly sculpting/modelling Honey’s mane. So I looked back at an older model which I’ve known for quite a while as a reference.
It’s a model of the anime character, Renamon, produced by KP-ShadowSquirrel; who has a similar mane, if not inspired that of Honeydoo’s. Upon inspection, it seems that ShadowSquirrel has modelled the mane in a way involving layers of closely overlapping, slightly modified duplicate ‘shards.’
This is something I’ll need to consider when sculpting/modelling Honey’s mane, since starting with a simple, flat base mesh may not be enough or it may even be the wrong approach in the long run.
#KNB217#Digital Creatures#Honeydoo#Human Character#Assessment 02#Base Mesh#Maya#Retopologising#Retopology#Model Blocking#Updates
0 notes
Text
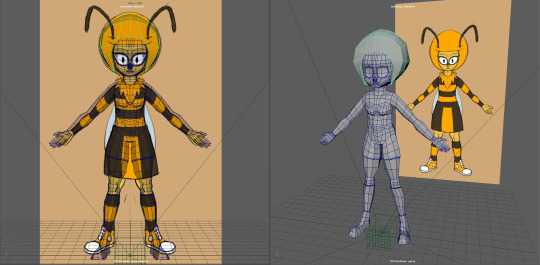
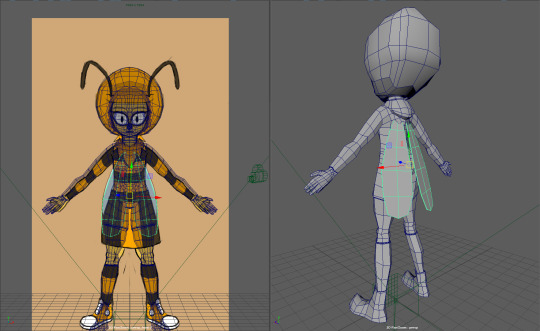
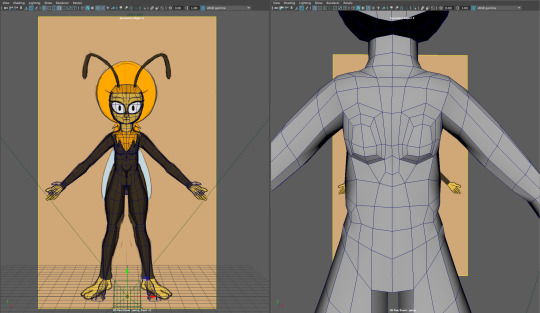
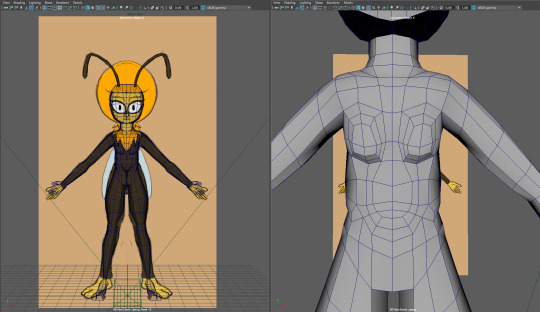
Assessment 02 - Updating the Reference Sheets and Finalising the Base Mesh
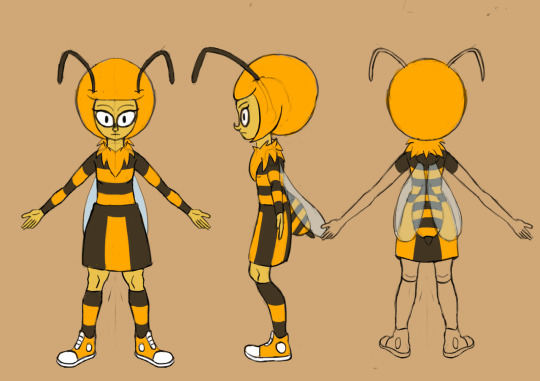
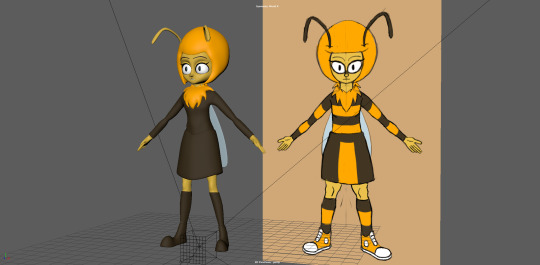
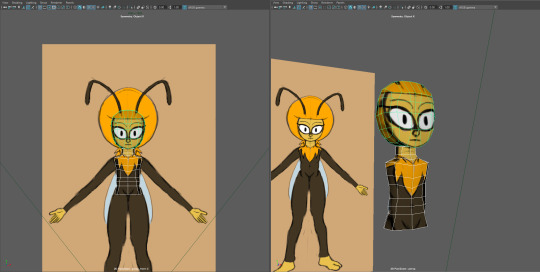
Here I’ve updated my reference sheet for Honeydoo to have her wear clothing, as well as feature my new ear-antenna design as well.

As such, I’ve begun updating my base mesh to feature the clothing, such as the converse-high tops, socks, as well as a pair of boxer shorts underneath her skirt; complete with detail loops and creases. Same goes with the sleeves of her shirt.
Previously, I had an ‘insect abdomen’ tail on her back. But I later ended up removing it because not only did I feel that it may detract considerably from the human aspect of this assessment but also make modelling her bottom a lot more complicated, especially since I extruded it way too low and pretty much on her butt area.
I later updated this same area with a much less pronounced butt, since she’s supposed to be wearing boxer shorts underneath her skirt.
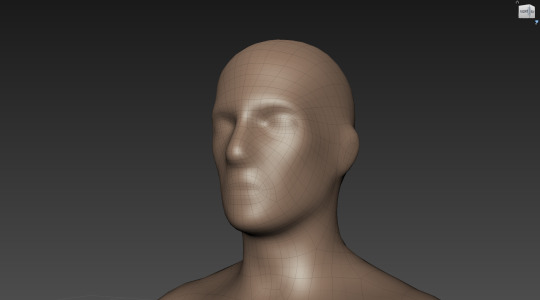
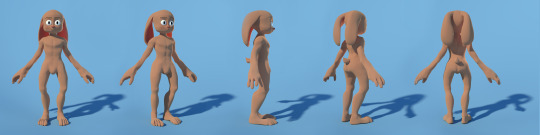
I also began to define her face/head a lot more as well, using Autodesk’s human base mesh in Mudbox (mid-image) to determine how much detail I need before I start sculpting.
While I did start out working without much reference, besides the Mudbox one, I did eventually reference from my existing Perry model, so I don’t have to figure all the topology out myself. However, because I started out without referencing Perry, I feel that I’ve got slightly better results, such as reduced polygon stretching around the mouth.
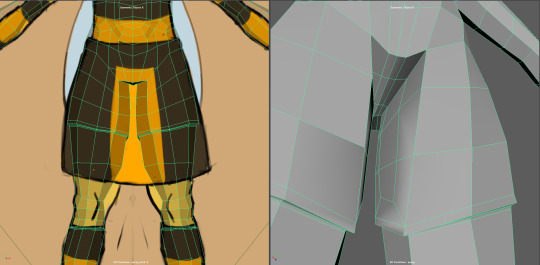
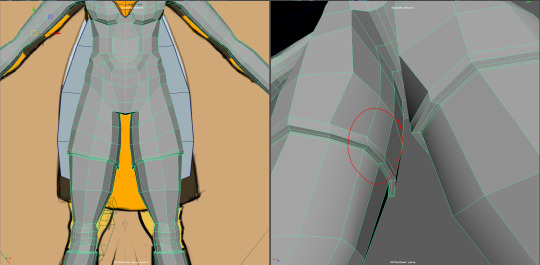
One of the aspects that give me a hard time would have to be figuring out how to do the topology of the area between the thighs properly. This is how I’ve currently got it, with the edge looping back around and being supported by the lower ‘corners’ of her trousers.
It’s probably not very accurate this way, but my main concern was ensuring I can get as much of the topology as quads as possible. I’ll probably have to redraw the topology after sculpting anyway.
My next step is to probably make a base mesh for her mane/scarf as well as her hair.
#KNB217#Digital Creatures#Honeydoo#Human Character#Reference Sheet#Maya#Model Blocking#Base Mesh#Updates
1 note
·
View note
Text
Assessment 02 - Box Modelling the Base Mesh
Before I enter the sculpting phase, I’ve decided to produce my own base mesh, through box modelling in Maya, in preparation for the process.
Here is the start of my blocking process. As you can see, I’ve set up a projection material, based on my knowledge of Rob’s character modelling workshops.
Although I also needed to look at a video from YouTube in order to recall exactly how to do it, since you need to right click on ‘file’ -> ‘create as projection’ in order for it to work when you select your texture/image.
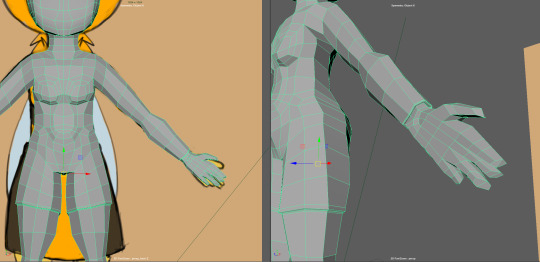
Here I have progressed through the legs and am about to do the hands. I don’t have the feet turned towards the same direction as the concept art as I don’t really find it all that necessary.
This is the hand blocked out, with my solution to the n-gons around the wrist.
Here is the torso being blocked out, with the breasts being defined. As you can observe, the topology solution for the edge vertically intersecting the breasts isn’t ideal, since it ends in an odd location, just before the bellybutton.
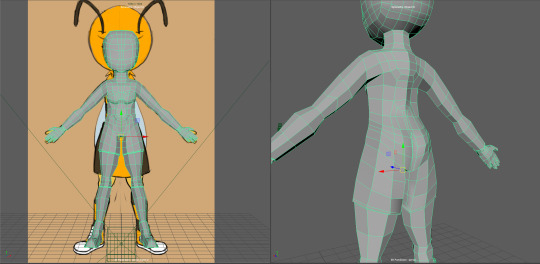
Here is the updated version, which circulates the belly-button area and properly defines the abdominal area.
Currently, the mesh is being blocked out with the character naked. I should probably consider modelling Honey with clothes on for a change of direction from what I did with my Perry the Rabbit model.
0 notes
Text
Assignment 02 - Human Based Character Design

The character I’m submitting for my second assessment is an anthropomorphic bee, teenage bee named Honeydoo. Her name is an affectionate, alternative spelling of ‘Honeydew’ that forces people to use the American pronounciation. She’s been a bit of a long-time brainchild of mine, much like Perry the Rabbit. In fact, she’s supposed to be Perry’s female partner in crime.
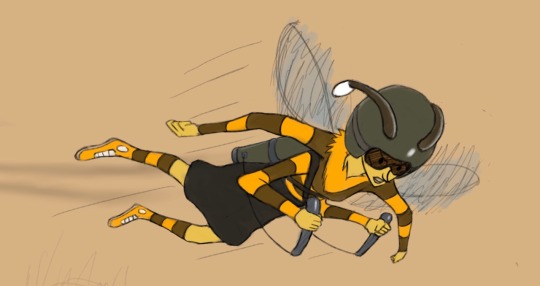
The topmost image above is a quick expression sheet that I sketched of Honey, with two arms and relatively simple antennas, coming from her skull. The lower image is a much earlier drawing of her with four arms, flying a custom, prototype military jet pack.
This drawing also shows my earlier antenna design, which was much thicker and had relatively large baubles at the end. I later revised this because it was more awkward and unnecessarily difficult to draw; same went with the four arms, because having wings and antennas is already enough ‘invertebrae’ for a vertebrate.
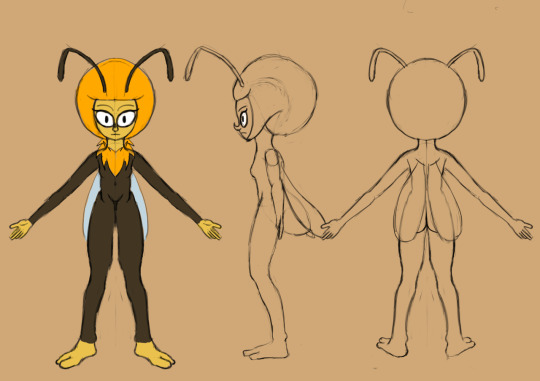
Here is my first reference sheet for Honey. I decided to draw her in perspective, after my experience with Rob’s 3D character modelling workshops. Since he was teaching a sculpting workflow, which I was keen on getting experience with, where he recommended having the reference drawings be in perspective as it was more well rounded and physically accurate.
Also note, how I decided to draw her naked, with a thin layer of brown hair covering her body for anatomical purposes. Something upon reflection may not have been entirely necessary.
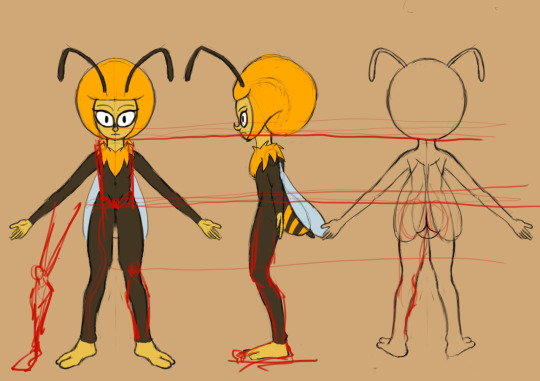
This is Sorin’s Feedback on the reference sheet drawings. He commented that the overall anatomy is completely off and unappealing. This was due to the lack of rigidity in the structure as well as the odd proportions (small, high torso).
The only reference I used for the drawing was Stephen Peck’s Atlas of Human Anatomy, specifically that one diagram of female bodies across the ages. The decision to make the torso small and high was probably derived from my misinterpretation of young female anatomy from wanting a cartoon style, subconsciously influenced by the likes of Equestria Girls and anime at my expense.
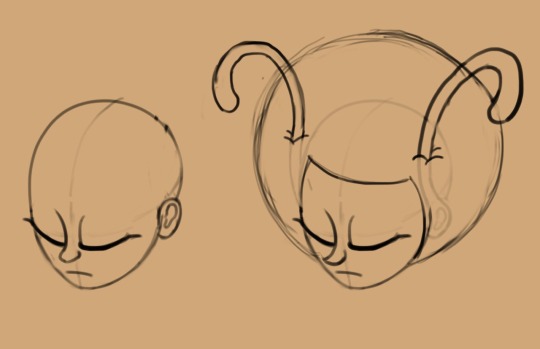
Here are my drawings showing further planned revisions for Honey’s antennas, where I’m planning to make them based from her ‘ears’ rather than protruding from her skull, which seemed less intuitive. This also allows me to give her human ears, thus better meeting the requirements for a human design for this assignment.
I was also considering making a ‘pure human’ version of Honey, hence the drawing on the left, just in case.
0 notes
Text
Finalised model of Perry the Rabbit
sketchfab
Here is the Sketchfab upload of my finalised Perry model for assessment 01 of QUT Digital Creatures.
A custom subsurface scattering map was used, based on an inverted ambient occlusion bake I made, to help make it apparent that he has skin and fat in place of fur without overdoing it.
I also made updates such as adding a belly button and revising his butt a bit, so it doesn’t look as absurdly tight. I also changed his groin area to kind of bulbous shape, so it didn’t look as odd as previously, while still roughly fitting the profile of male genitalia.
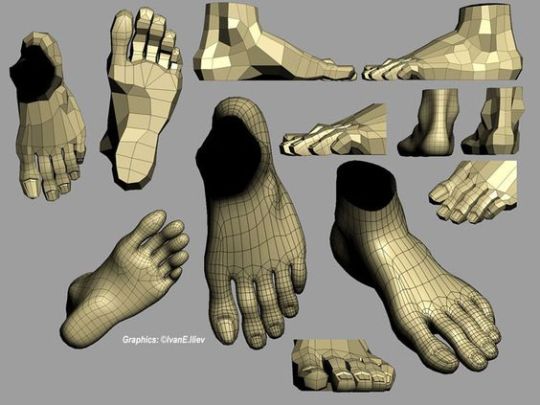
His feet, especially the heel have also been revised to be more anatomically correct, based on reference, such as the one just below, which is an expanded version of a previous foot reference I used.
youtube
Here is my Arnold-rendered, 3D turntable of Perry, showcasing another example of the subsurface scattering effect on his skin, with 3-point lighting.
Unlike the Turkey model, which was rendered in a flat, single-coloured skybox with no ground plane. I experimented with using a special, ‘render bowl’ to allow for drop shadows and gradients.
Here is a still version of that same turntable, stitched up in Photoshop as a reference sheet.
Here is a wireframe version of the front and back 3-angle views. Note how the colours, especially the blue appears different. This is because I had raw colour export enabled when rendering the wireframe version. I thought it looked cool, due to the subtle graininess it had to it.
1 note
·
View note
Text
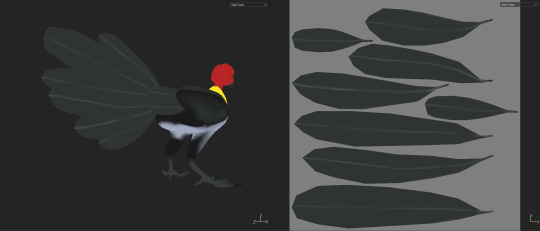
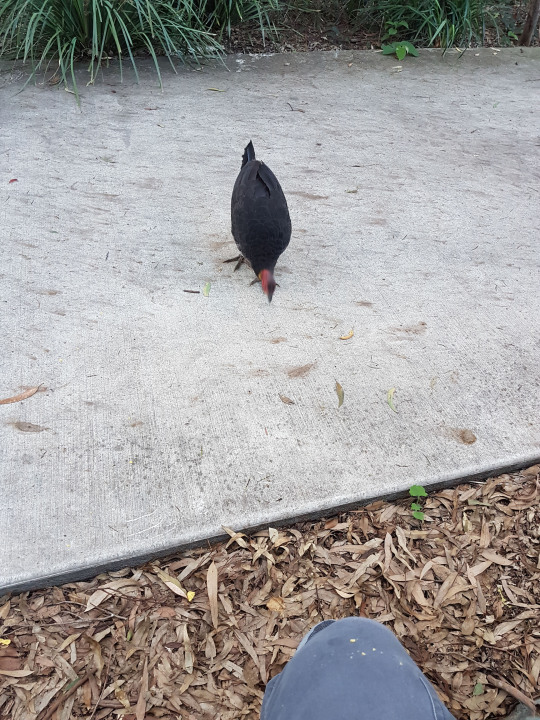
Finalised Turkey Model
sketchfab
Here is my Finalised Turkey Model on Sketchfab for the Assessment 01 Submission.
I updated the feather textures to be consistent with the body’s. However, the white stem (rachis) that I have painted on was a bit tricky to get right in Substance Painter, especially when my hand gets jittery.
I also updated the feet with warmer colours to be accurate to actual brush turkeys and to contrast the darker or vibrantly bright colours shades of the body/head.
youtube
Here is a deformation test that I did with one of the turkey’s legs. Due to how much trouble Maya’s weight painting tools were giving me and how time-consuming it is to achieve the most effective weight topology, this was all that I have time for.
youtube
Here is my 3D turntable of the Brush Turkey model, rendered in Maya, with 3-point lighting.

Here is a still version of the turnaround. I originally considered maintaining a 16:9 aspect ratio, by keeping the 3-angle views large, with the side, back and front views kept smaller. But I later felt that the inconsistency was not worth the trade-off for a more conventional aspect ratio.
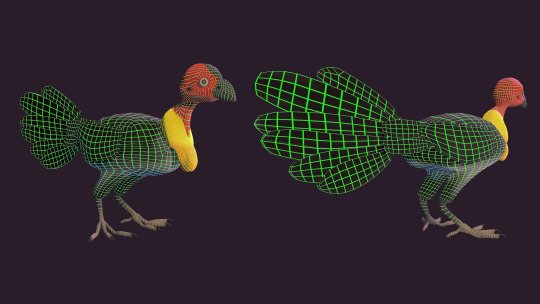
Here are some wireframe renders I produced using the 3rd method of this Pluralsight tutorial: https://www.pluralsight.com/blog/tutorials/rendering-wireframes-maya-3-methods-make-models-stand, which involves unitizing the UV (so that each individual face uses the entire texture map) and using a flat, box ramp shader to produce the lines.
I then put the wireframe layer over the regular layer, using the multiplier blend mode, or in this case, the colour range to mask out the background since multiply would darken the green.
I was originally thinking of using the second wireframe rendering method, involving toon shaders, but it had too much of a performance hit on my viewport to be workable.
#KNB217#Brush Turkey#Digital Creatures#3D Turnaround#Sketchfab#Australian Wildlife#Final#Blendshapes#Deformation Test
0 notes
Text
Perry Substance Painter Texturing and Blendshapes
Here is my texture pass for Perry in Substance Painter. In this pass, I focused on getting more precision, definition and appeal that what I had previously from Photoshop.
The areas where his skin is thinner, such as the innards of his ears, his palms and soles of his feet are more distinct. Although it may be slightly better if they (soles and palms) were just a little more subtle.
I also added a subtle blush to his cheeks, for a more lively, appealing and youthful appearance as well as the innards of his lips to distinguish them from the rest of his face and make them slightly less ‘clay-like.’
Substance’s tendency to have the brush cross over to other shells or the other side of the same shell gets pretty annoying when I was working on the innards of the ears, the mouth and the nose.
It’s less of an issue with the eraser tool for some reason, but nonetheless it’s still there. There doesn’t seem to be any clear solution to this, since it’s kinda hard to describe in a Google search.
Here is some preparation work I did for blendshapes, based on the teachings in Andrew’s Tutorial/video. His approach was to have seperate models for each blend shape and use the ‘blendshape’ function to ‘merge’ them into the main, default model.
However, I ended up preferring to produce the blendshapes from the same, one default model, through the shape editor since it was quicker and I felt it was more organised and less likely to fail if you decide to update the model.
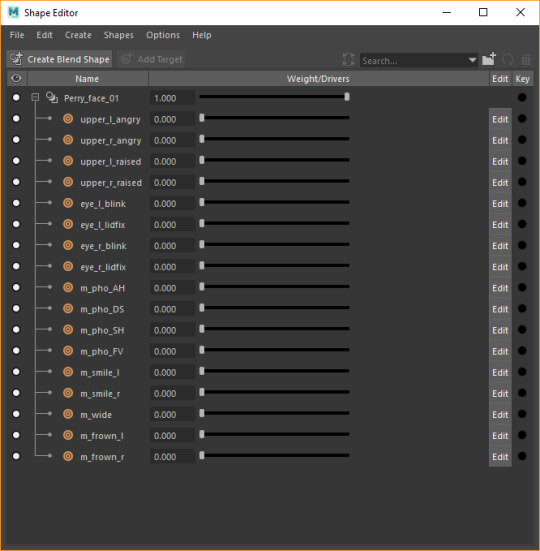
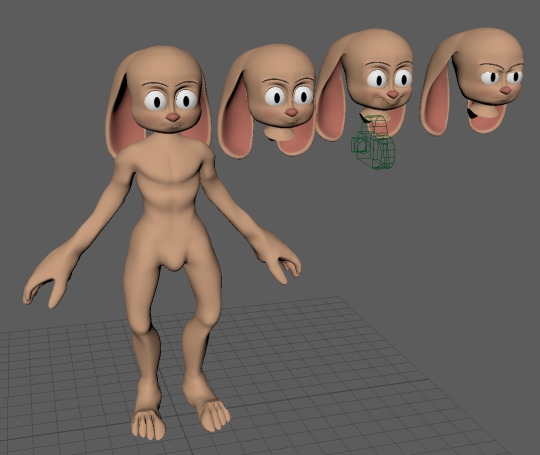
Here is a screenshot showing the numerous blendshapes I created in the shape editor with Perry’s head.
Because I was having so much fun playing around with Perry’s face, I basically got caught up into the swing of it. Creating an expressive 3D character has basically been my dream in High School, since 2012 and I was basing my approach on how they did it with the TF2 video game characters, which I was a huge fan of at the time.
Note how I have a ‘fix’ target for the eyelids. This controls how ‘forward’ the lids go in relation to the eye, which is useful during opening and closing since the geometry would clip through the eye, in between 0 to 1, without adjustment.
youtube
Finally, here is a blendshapes test animation I made to demonstrate my model’s facial flexing capabilities. I like to think of it as ‘Perry being informed he has only 12 seconds to live before he dies of a spontaneous heart attack.’
youtube
Same as above, except with topology/wireframe visible for analytical purposes.
#digital creatures#knb217#maya#Perry#anthropomorphic rabbit#facial expression test 3D#blendshapes#Substance Painter#Texturing
0 notes
Text
Brush Turkey model texturing in Substance Painter
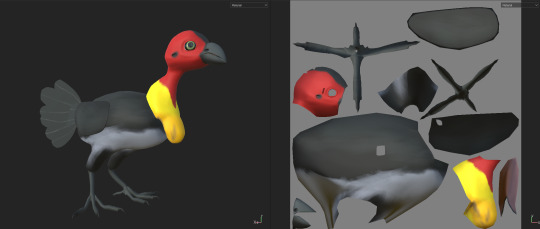
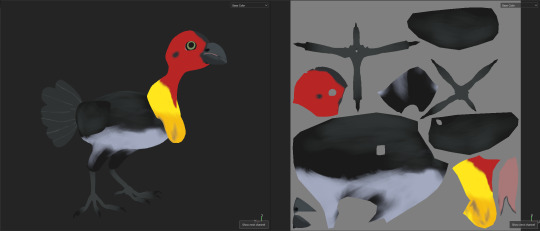
Here is my first attempt at texturing the Turkey model in Substance Painter. I used a ‘wet-style’ brush for most of the painting. The top image shows the texture with lighting and materials enabled, with the variations in roughness visible.
There are variations in the shade of the black feathers on the Brush Turkey’s body, with lighter variations being less saturated and darker ones being more.
I also added some patches of dirt on the turkey’s wattle, but they look a bit odd due to the symmetrical nature of the model. So having just a little bit of it helps work around this.
Here is a view of the turkey’s feather textures and a closer up view of it in 3D. They’re a bit awfully flat in appearance, since I haven’t added any transparent, alpha effects and due to the lack of variations like the rest of the body.
This is due to me not being entirely sure how to make them more appealing, but that could just be what’s me necesssary since the lack of variation is making them inconsistent with the rest of the body.
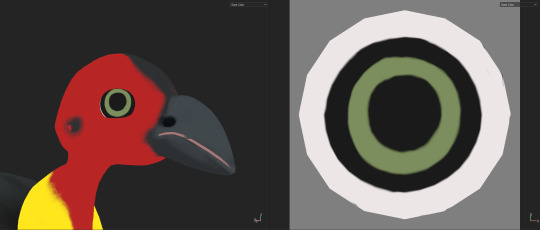
Here’s a view of the turkey’s eye texture, which I also did in Substance. A problematic approach, since Substance doesn’t really have much in the way of precision drawing that could help in this regard, so I had to draw the iris using just brushes.
You may notice how oddly open the turkey’s beak is, after being smoothed. This is because I didn’t add enough extra loop edges around his lips, which will be corrected in an updated version.
0 notes
Text
Near-Finalisation and UV Mapping of Brush Turkey model.
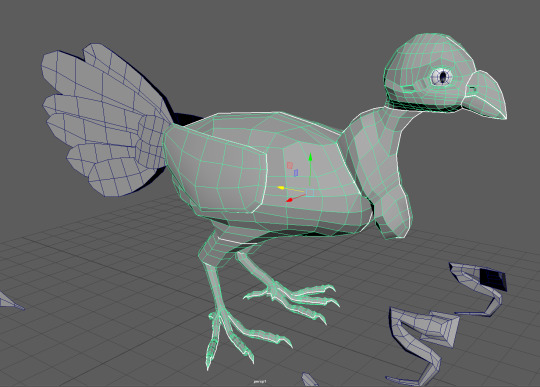
After having Sorin confirm with me that he’s okay with me simplifying the Brush Turkey’s wings to more of a simple flap than a complex wing composed of numerous, flat feather models, in order to save time (and because it was my original plan anyway) I’ve decided that the Turkey model is now at a finalised state.
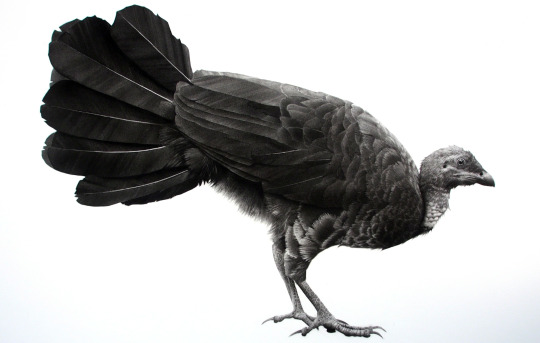
Sorin also advised me to slant the wing slightly upwards, based on his observations, as well as some new reference images such as the black and white drawing, above.
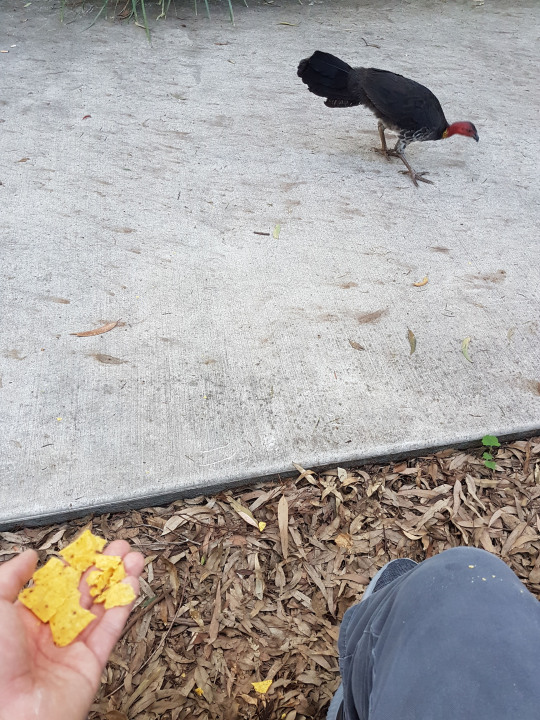
I also decided to add two extra, ‘stray feathers’ to the end of the wings to still feature a 3D aspect of ‘feathery form’ to the wing. This is based on my own observations, especially after taking some photographs from a brief, close encounter of mine, involving a bag of Doritos and heaps of mosquito bites, as seen from the photos above.
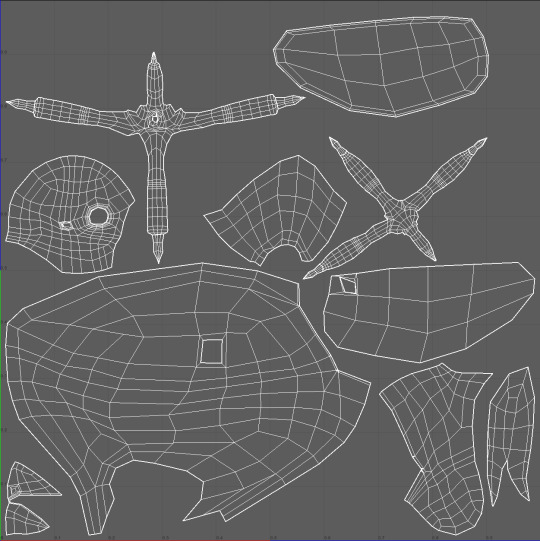
After getting the form to a satisfactory state, I’ve gone ahead and prepared some UV Maps for texturing, based on what Andrew went through in his video tutorials, which was relatively simple enough, considering how UV mapping tended to be time-consuming with non-organic objects in my previous experience.
The main problem was maintaining symmetry without wasting UV space and losing the shells of the other side. The solution was to work only on one side and mirror it when I’m done so that when using the layout feature, I don’t end up with duplicates that unnecessarily clutter up space.
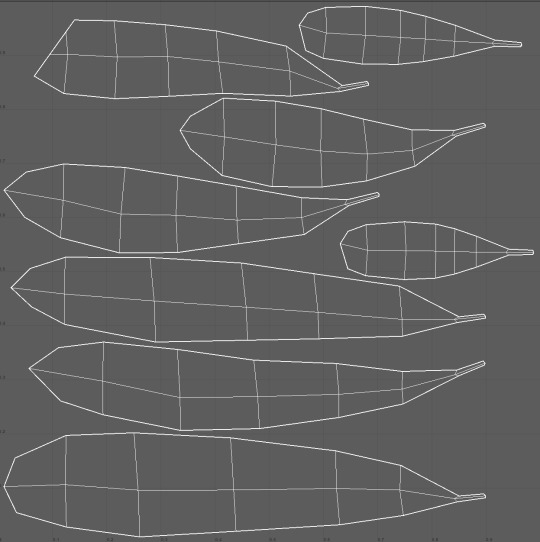
I also did the UV maps for the feathers, separately, all on their own texture map. It’s also here where I figured out one of the feathers (the top left one) was too sharp and angular for its own good, so I ended up correcting it and unfolding it again later on.
Sorin also pointed out that the Brush Turkey’s face had a distinctive ‘rim’ around their eye, which we extruded, as well as improving the definition of the general topology (making sure edge loops weren’t too stretched where they shouldn’t be, like between the head, neck and body).
This rim not only helped to convey the creature as a more convincing brush turkey but also eliminated the difficulties I was having with posing the eye since the thickness and density of the turkey’s skin are now defined in relation to the eye it encapsulates.
I later added extra edge loops to the turkey’s eyelid to ensure that he was capable of blinking.
0 notes
Text
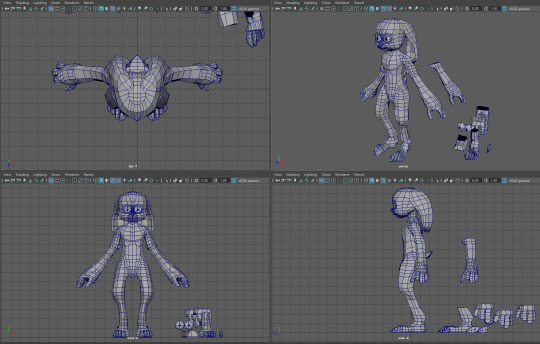
Solving the N-gons on Perry’s Hand
There were multiple attempts in correcting the n-gons and ensuring the loops of the hand don’t overwhelm the entire arm.

My first attempt, without any feedback, which also involved detaching the hand from the arm again for the sake of clarity (which ultimately backfired) was deceptively successful at first.
However it was soon to be discovered as unfinished and confusing; resulting in an impromptu, upwards spiral that threatened to consume the rest of the arm. This is likely due to inconsistencies with working with the arm and hand detached as well as my beginner experience with character modelling.
My second attempt, also without feedback, was more successful and controlled. With the dense areas going no further than 4 horizontal loops. Unfortunately, there was one particular edge that stumped me and it wasn’t until I took a break that I was able to improvise a solution, since experienced feedback is not available on demand.
There also n-gons on the body, particularly around the legs that also stumped me as well.
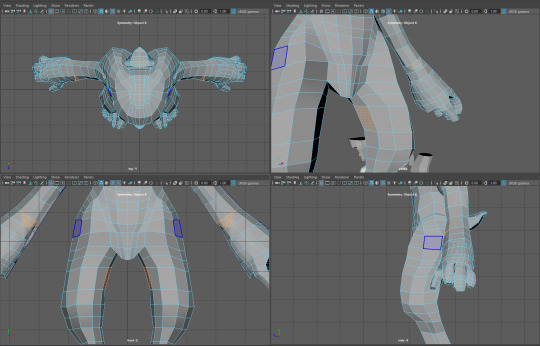
Here is my improvised solution to that one edge loop on the arm that stumped me, highlighted by the selected faces. Note how I highlighted the face on the leg to focus on the n-gon in that particular area for feedback purposes.
Ultimately, it wasn’t until I received feedback from Sorin and Matt, as well as taking another break, that I was able to find a more suitable breakthrough for managing the n-gons between Perry’s arm and hand and on his thigh as seen on this screenshot.
It was this approach that eliminated the discrepancy/gap between detail on his forearm, that the previous had, which Sorin recommended me to remove. Even preferring that I had kept that triangle instead.
You may also notice that I’ve changed the pose of his arms to be closer to 45 degrees as Sorin suggested it would be better for the rigging stage.
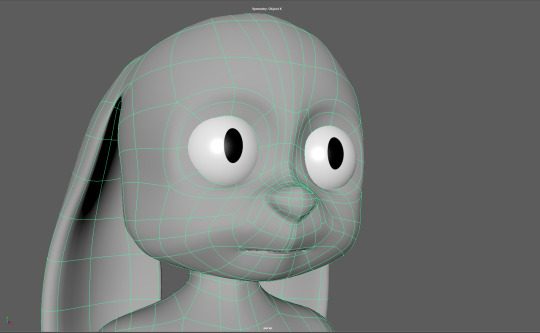
My next step is to properly define Perry’s head and face so he’s appealing and not deformed or creepy.
0 notes