
Last Seen Blogs

cakey510
Jazzy510

v-sharikoff
Ukraine is super! Ukraine is an exclusive!

kolczykizlote585
kolczyki złote 585

barounce5
The Life of Hessellund 995

fredwkong
Fred W. Kong's Stories
Photo
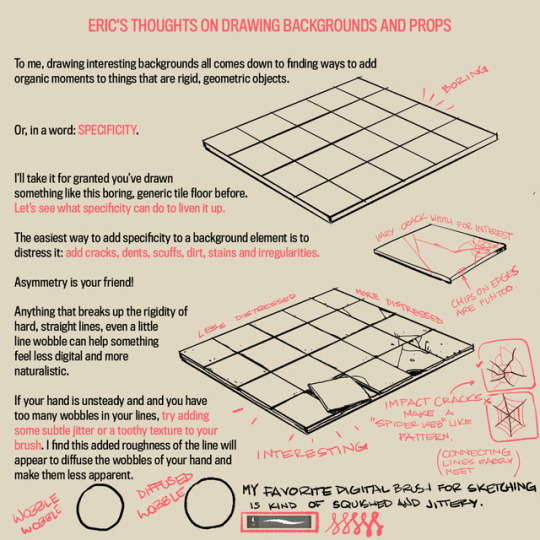

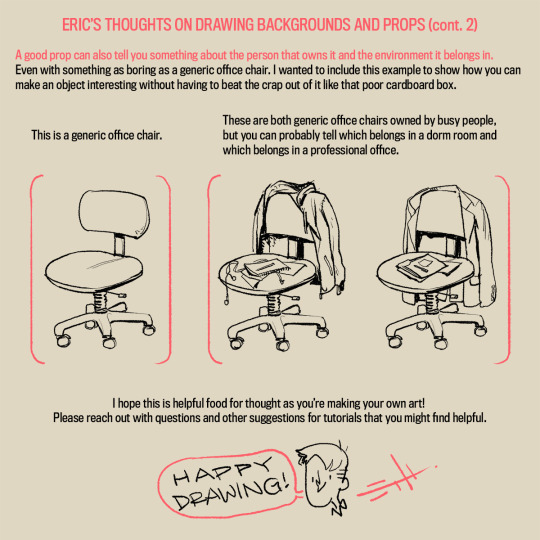
A long time ago an anon asked my thoughts about drawing backgrounds, so I finally got around to putting this together. It’s more prop-centric, but it still represents my philosophy to backgrounds.
I’ll try to do something more about drawing actual background spaces in the future! Please let me know what you think, if anything is unclear, or if you have suggestions for other tutorials you might find helpful!
84K notes
·
View notes
Photo
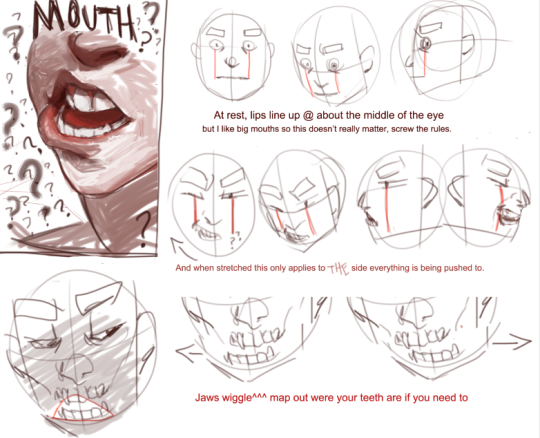
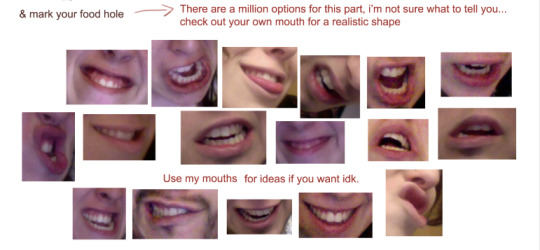
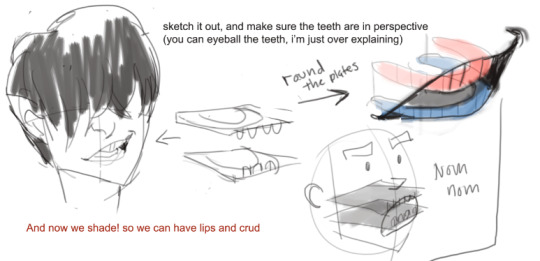
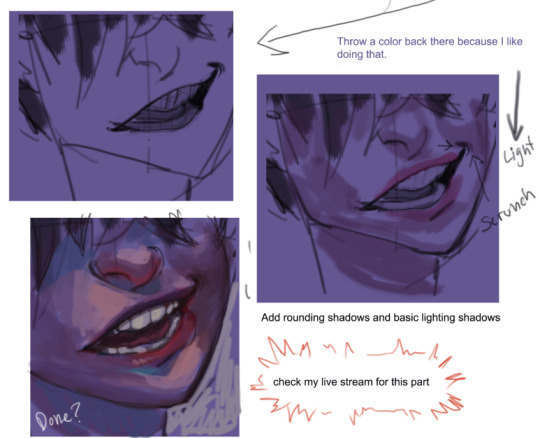
The Lip Tutorial~~~
The final part is on my Livestream the first minute is me trying to remember how to use it.
I also answered some asks:
Keep reading
104K notes
·
View notes
Photo


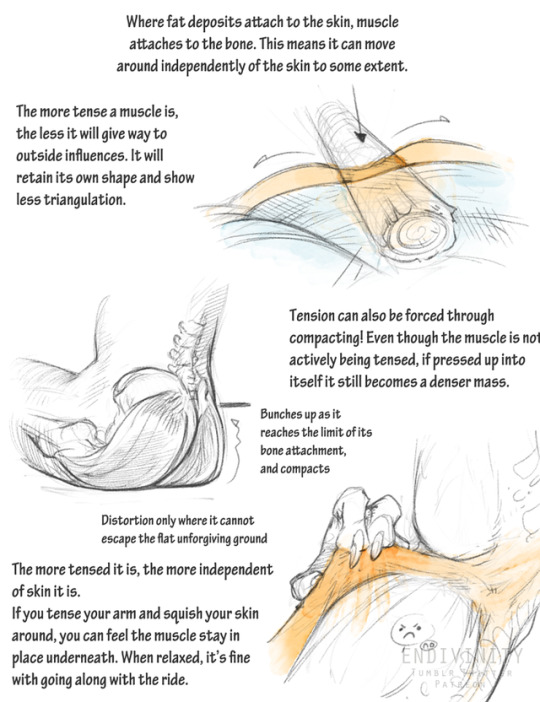
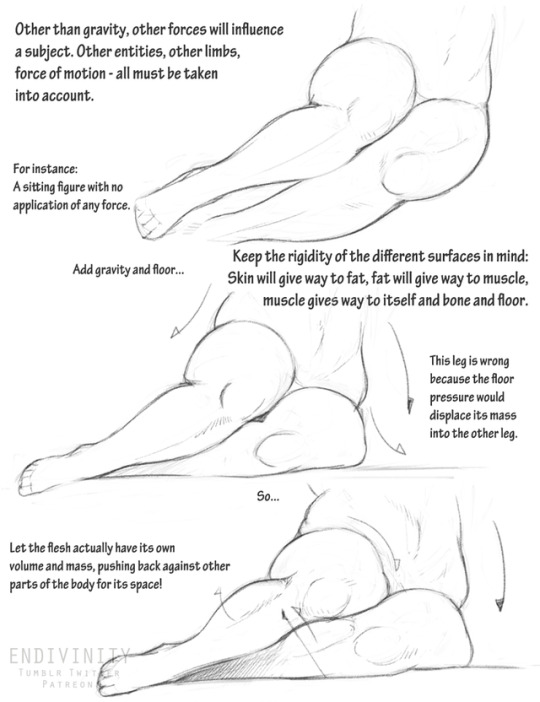
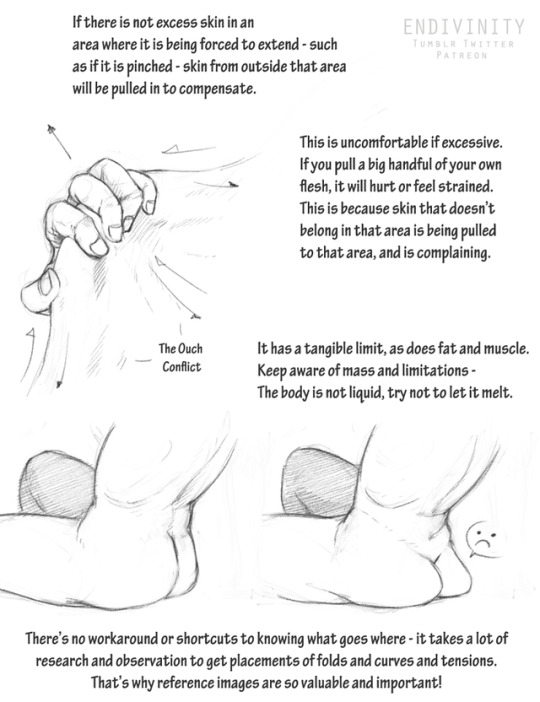
A tutorial on meatspace I made for my patrons last year! Making things exist in the same space believably is a difficult process, but hopefully this will help drawing softbodied subjects interacting together a little easier!
36K notes
·
View notes
Note
how do i learn how to storyboard comics
1. set the panels
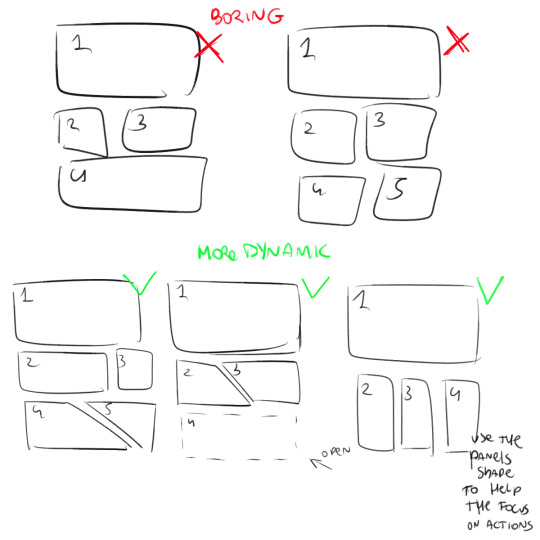
the first version is the easier but also boring for the eye, the sequence rectangular-square-square and repetitive, try to use diagonal cut, open space and vertical cut to help the movement of the story and action.2. use movement to tell the story
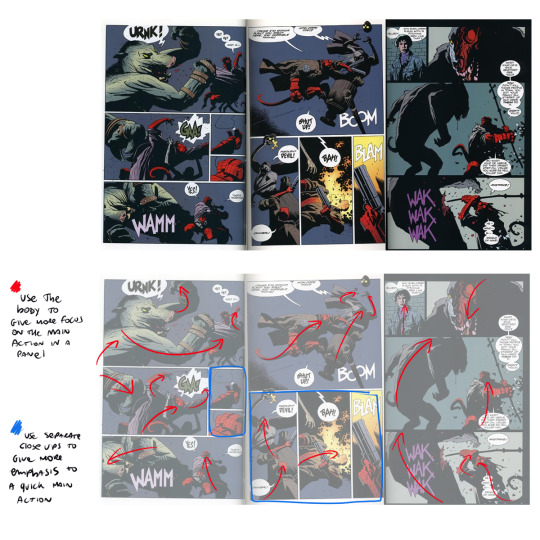
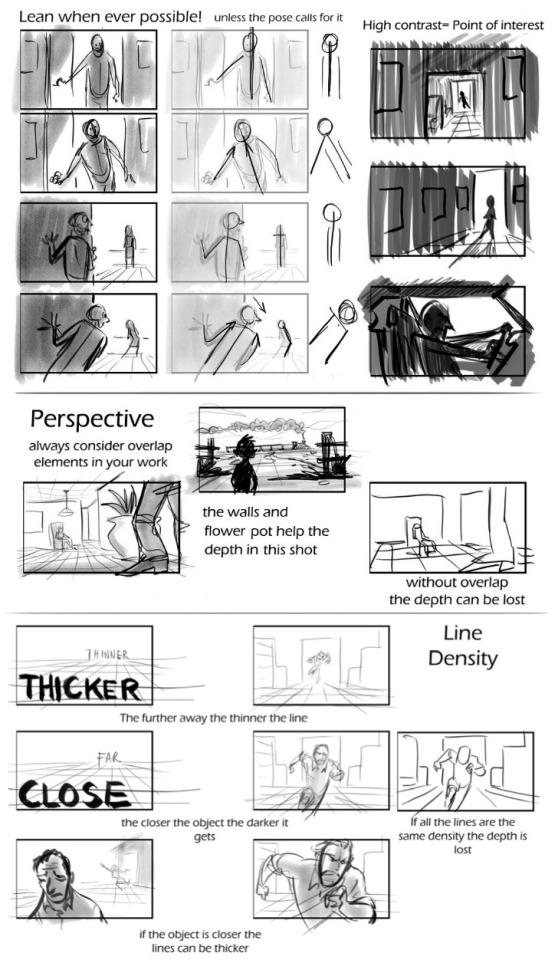
3. Pose, Perspective and Line density
4. Framing and Silhouettebeing the file too big it’s a link format
In my opinion, those are the main rules to make a good storyboard. If you need more help ask awayMOD.gif
49K notes
·
View notes
Text
For artists who have problems with perspective (furniture etc.) in indoor scenes like me - there’s an online programm called roomsketcher where you can design a house/roon and snap pictures of it using different perspectives.
It’s got an almost endless range of furniture, doors, windows, stairs etc and is easy to use. In addition to that, you don’t have to install anything and if you create an account (which is free) you can save and return to your houses.
Examples (all done by me):


Here’s an example for how you can use it


326K notes
·
View notes
Photo
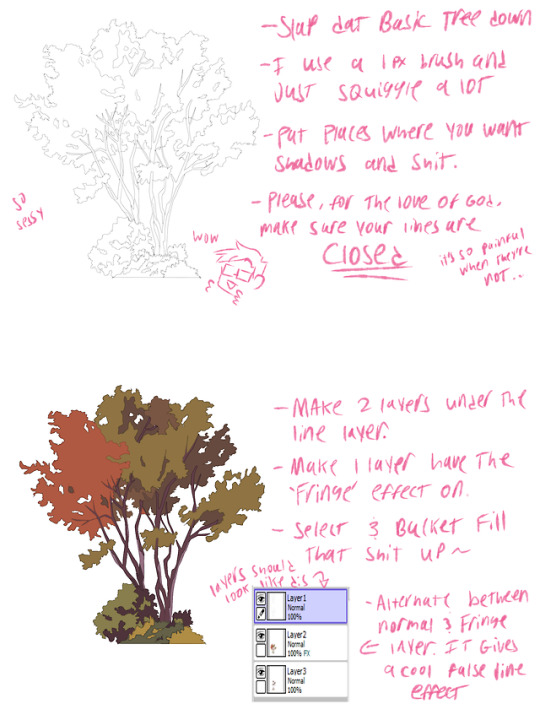
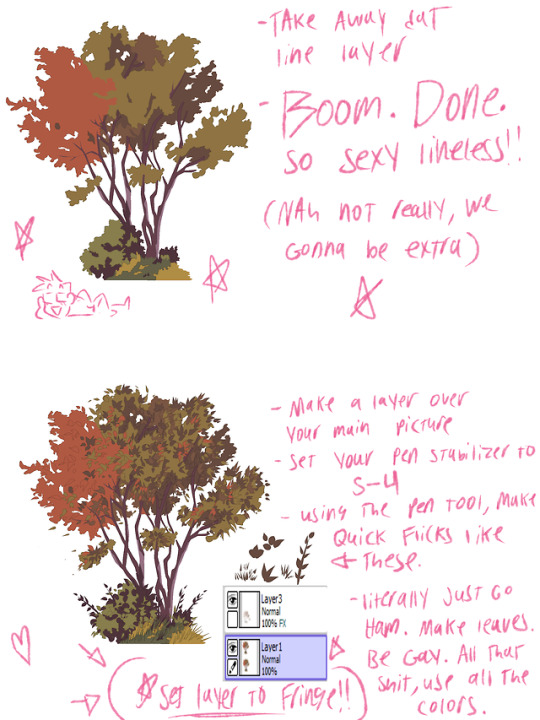
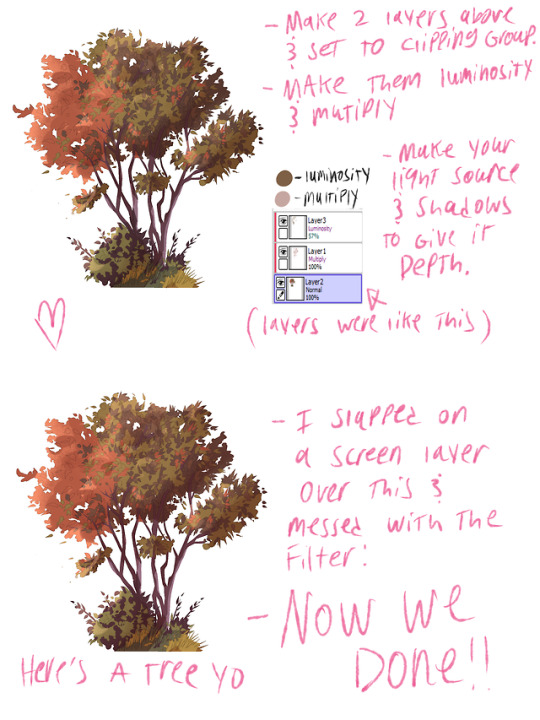
Please excuse my shitty handwriting, I didn’t feel like waiting for photoshop to boot up so here’s how I do all my plant shit!!! Hope this helps!!!
4K notes
·
View notes
Photo

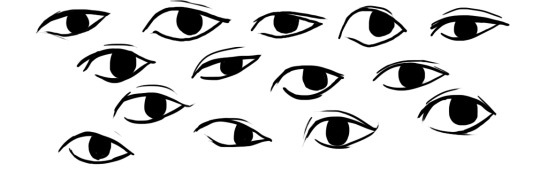
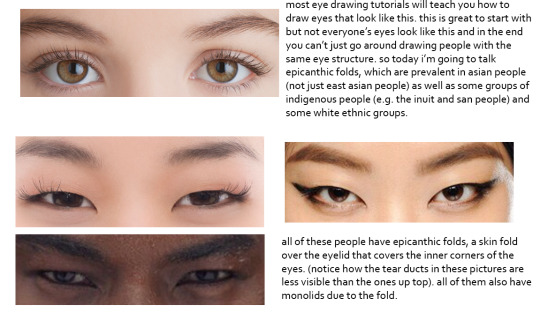


this was gonna be a tutorial and i guess it still is but if anything it’s just a really long and drawn out “essay” on drawing people with epicanthic folds. one of my biggest pet peeves is people drawing asian people exclusively with the same type of eye they’d give white people or anyone else who typically doesn’t have the fold! however i know that most people are taught with the standard white person eye (google image search for “eye” and it’ll all be pictures of white people’s eyes) so learning to draw epicanthic folds is a consciously learned thing.
therefore i bring you this, which attempts to break the mechanics of epicanthic folds down into something that’s a bit easier to digest and implement in your own art!
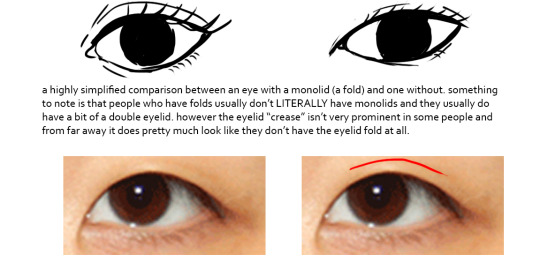
style can be argued i guess but it’s not that hard to stylize eyes with folds if you do proper observation and research. eyes with epicanthic folds are as diverse as eyes without so it’s not like you have to adhere to a strict model for them (although many people think that you have to) and all it takes to distinguish the two in stylized art (and even in semi/realism once you think about it) is a few lines! like i said this is a learned process but it’ll make your asian characters (and characters of other races even) a bit more interesting and believable.
57K notes
·
View notes
Text

this is not entirely complete (as in I didn’t put in as much time into painting the example as I usually do), but I did a sort of tutorial for you that might be useful for you? :) it got kind of long so I’ll put it under a cut :>
Keep reading
56 notes
·
View notes
Photo
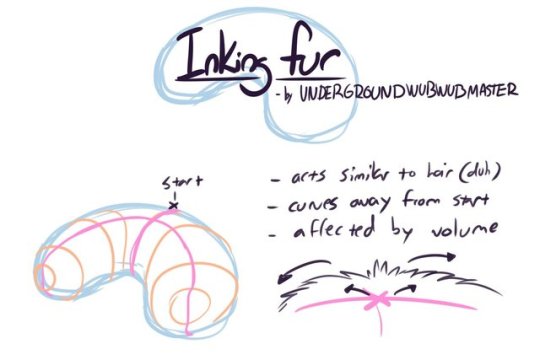
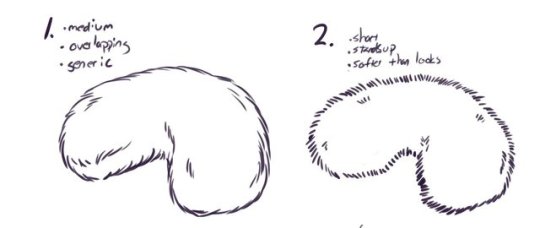
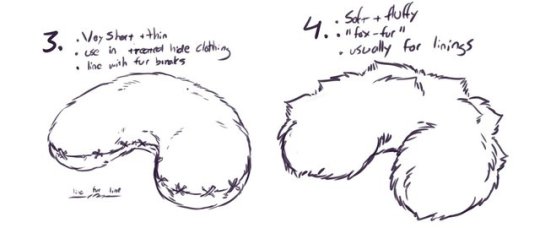
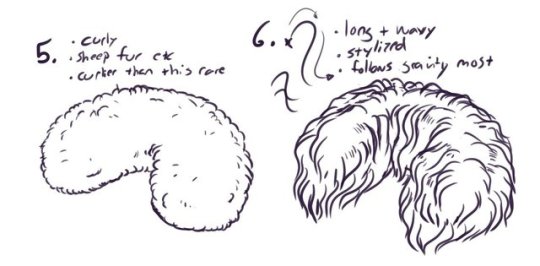
Some different looking furs to keep up diversity in design.
Obvs not all types but maybe most common ones.
976 notes
·
View notes
Photo

Daisuke Ueda for Harper’s Bazaar Men Thailand Spring/Summer 2015 by Natth Jaturapahu.
316 notes
·
View notes
Photo
[BTS] Daisuke Ueda for Harper’s Bazaar Men Thailand Spring/Summer 2015
199 notes
·
View notes
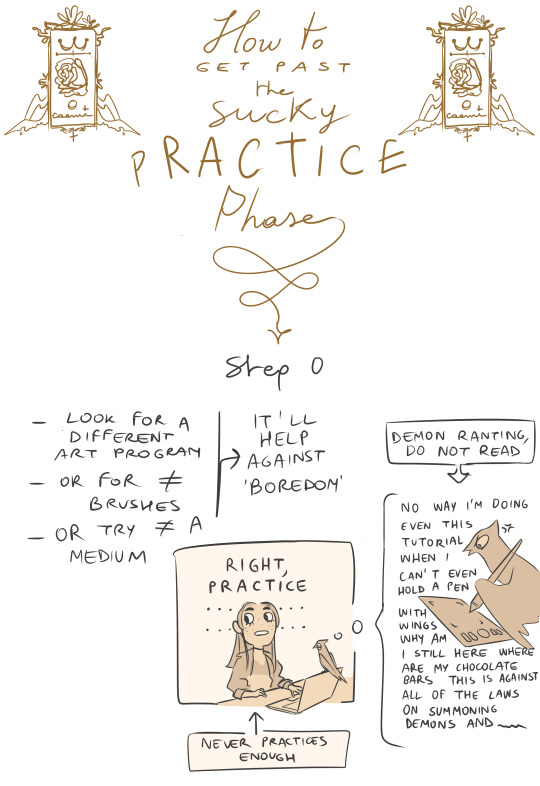
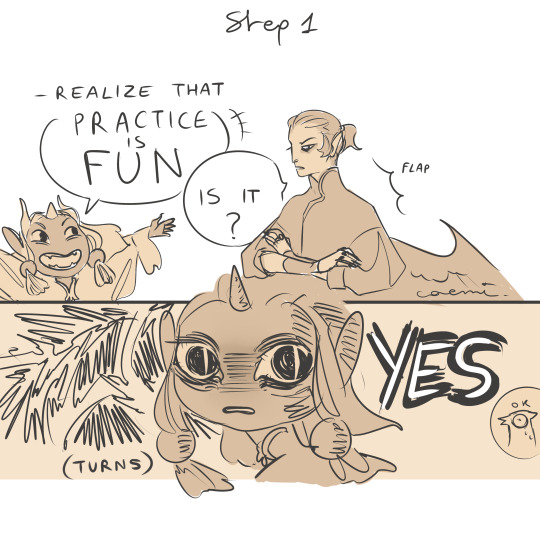
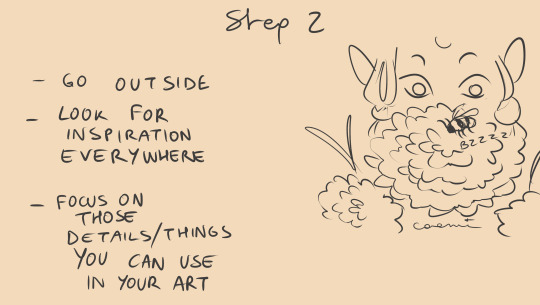
Note
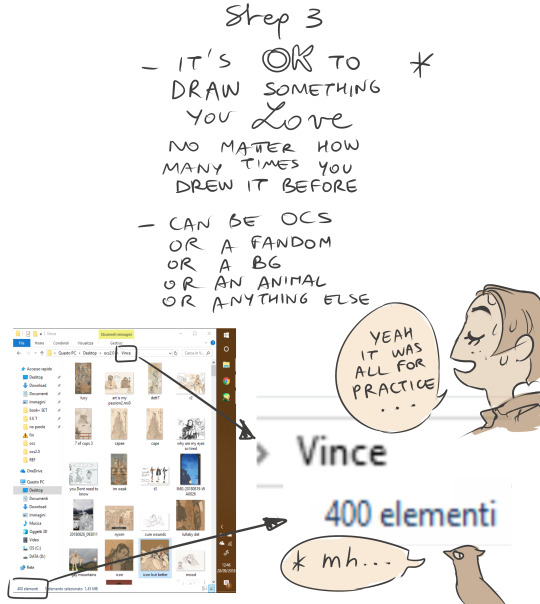
Tips for a beginner artist who is in the sucky practice phase? Other than more practice lol
994 notes
·
View notes
Text
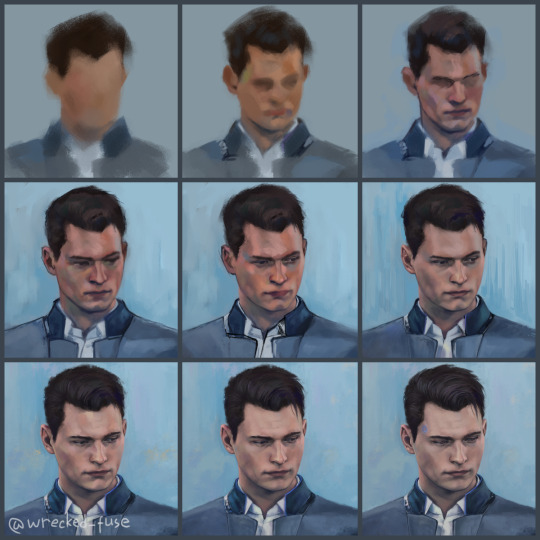
🔼step by step and process animation🔽
dth tag
1K notes
·
View notes
Photo
Quick silk robe process gif, I might do a tutorial on this so let me know if you’re interested!
2K notes
·
View notes
Text

So you might be saying: Lion why a guide on drawing black people? Well young blood it’s because a lot of people cant…seem…to draw…black people..Amazing I know.
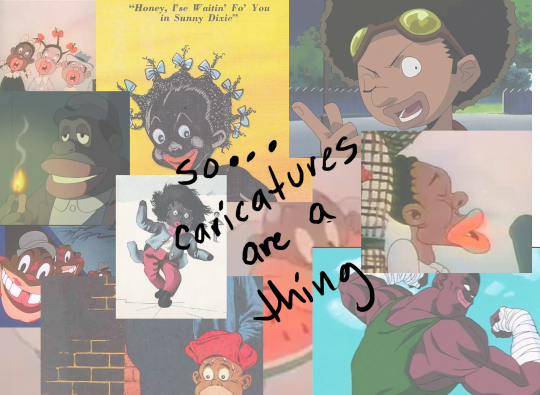
Racist (caricatures) portrayals of black people have been around forever, and to this day people can’t seem to draw black people like they are human. If your artwork resembles any of the above even remotely your artwork is racist and offensive. If you try to excuse that as a stylistic choice you’re not only a terrible artist, but racist too!!! Congrats.
Whitewashing is also a problem. A lot of people refuse to draw black features on canonly black characters. While this example isn’t colored, lightening the skin-tone of a character is also considered whitewashing. So lets start with features!

Now all black people have different noses thats a no-brainer, but black noses tend to have flatter bridges, and wider nostrils. Please stay from triangular anime noses and small button noses. Your drawings should not depict black people with abnormally large noses. (Especially if you do not draw other characters this way)
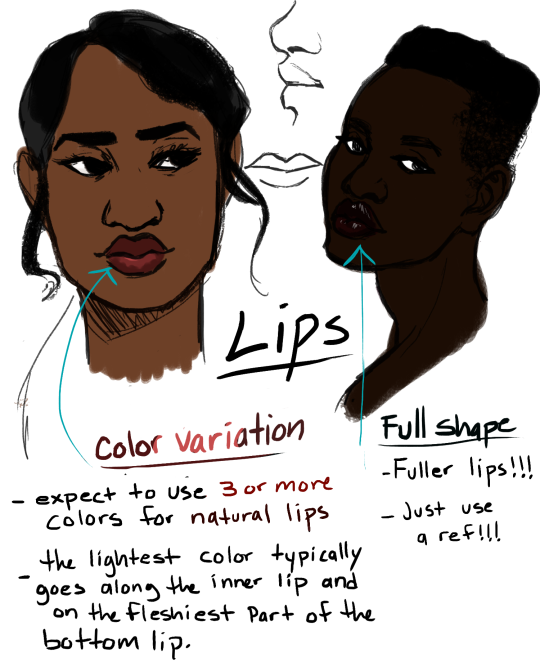
If you feel like the way you draw lips on black characters is offensive or resembles a caricature,it probably does and you should change it. ABSOLUTELY AVOID PLACING LIPS AT THE BOTTOM OF THE FACE.
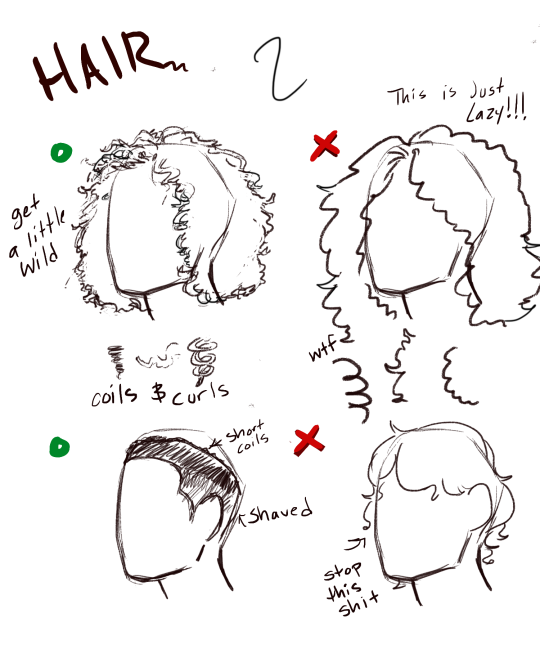
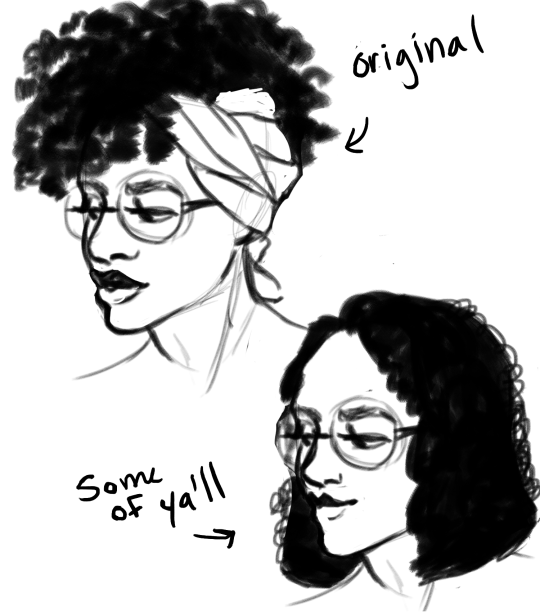
Hair is so diverse! Please get used to drawing braids, locs,kinks and coils! If you can learn to draw ringlets and long waves you can learn how to draw black hairstyles.

Add clips! Learn how to draw baby-hairs and never be afraid to add color Pinterest and Google are free my dudes! Also try using square brushes for blocking in coils.
OK THAT’S ALL YOU GUYS
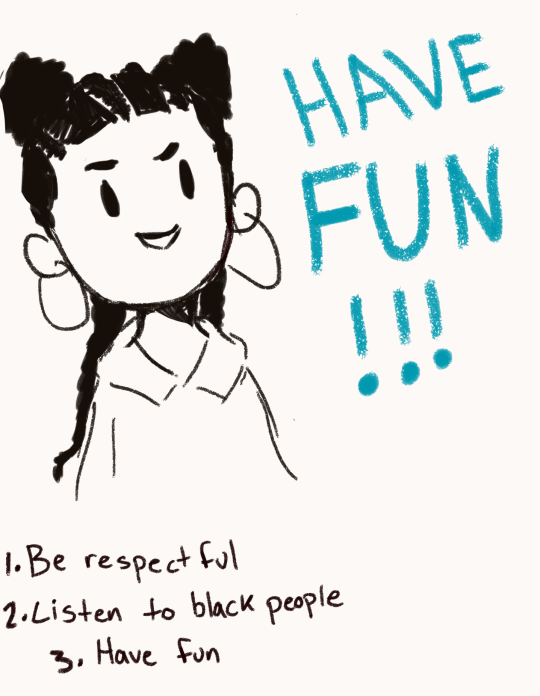
P.S Take a screenshot of hate/ ignorance in the comments and dm it to me for 10% off a commission
125K notes
·
View notes
Photo

hey there! sorry that this reply is coming so late - i just finished my semester so i finally have time to properly answer this.
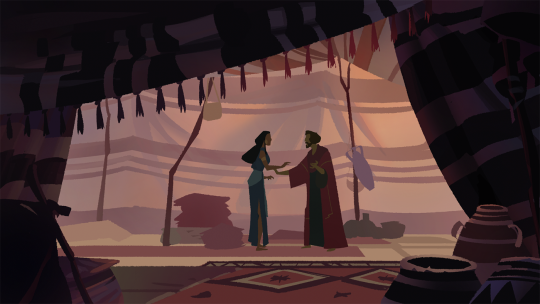
studies can cover anything you’re interested in - it’s good to have an idea of what you want to accomplish when you set out to do them. in the case of my prince of egypt studies, i wanted to study lighting/color schemes in various environments and times of day.
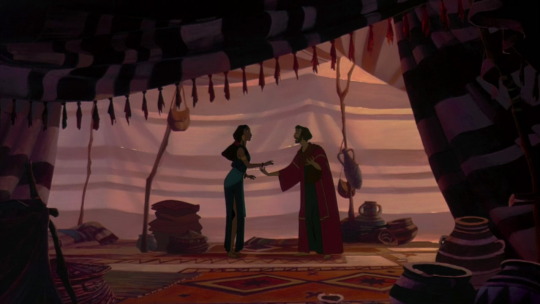
this scene provides an example of lighting within a tent - the objects, figures, and foreground are largely in shadow, set against the cloth. i was also fascinated by the variants in hue in the cloth and the subtle shifts in value there.
the way i approached these studies was through simplification - i wasn’t interested in fully rendering the environments, i was interested in getting across light/shadow and color. i tried to use techniques that would emphasize that.
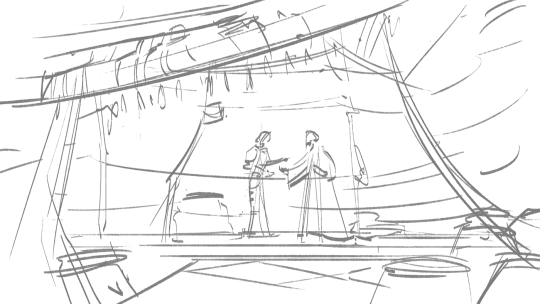
step 1 - sketch: quick and loose, just to get an idea of where important landmarks will be.

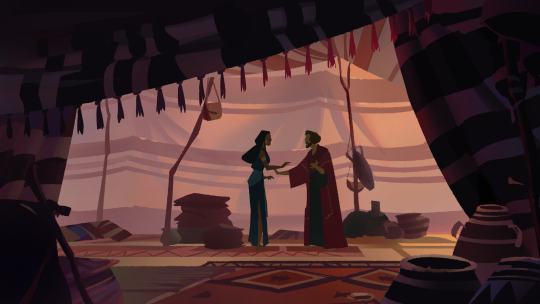
step 2 - blocking: at this stage color is secondary to getting shape and silhouette to read. i use a flat textured brush to fill all the shapes out. every color here is on a separate layer so i can easily go back and adjust them. (tbh this stage could be a lot looser but it’s fun to try to match the original in terms of shape imo)
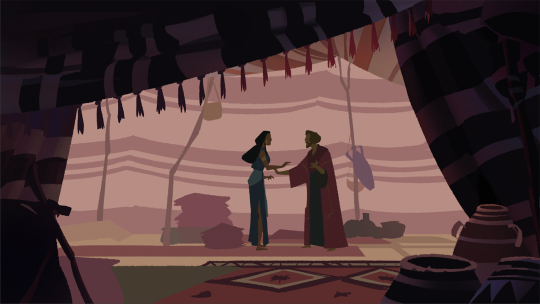
step 3 - painting: once you’re silhouettes are locked down you can start matching the colors and values of the original image. for this i use the same flat textured brush at varying opacities and the gradient tool. i bring in new colors like the blues and the reds of the cloth at low opacity to smoothly integrate them into the setting. since all the layers are separate, it’s easy to move from background, middle ground, or foreground depending on how you want to go.
being able to match color takes practice and patience - it’s good to do a lot of quick studies to train your eye (no color picking from reference!). this technique can also work with photos, but studying from animation (especially 2D animation) gives you the benefit of working from a subject that has already been simplified in a thoughtful way. exaggerations in color and lighting also tend to be easier to notice and digest imo.
ultimately i encourage you to work in the method that feels most natural to you, but i hope seeing my process was helpful in some way. best of luck!
679 notes
·
View notes
Text
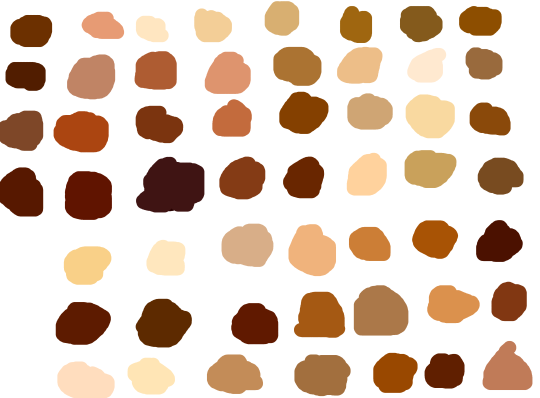
skin color ref because some of yall non-black poc and whites keep fucking up as if yall don’t know there’s other shades of brown when u racebend for woke points or something
(non-black artists please reblog)
184K notes
·
View notes