
istolemyfriendsfood
Dreamer372
98 posts
Last active 2 hours ago
Don't wanna be here? Send us removal request.
Last Seen Blogs

0ld-m4n-y40i
William "Old Man Yaoi" Afton

cowbuild
Cowbuild
houseaeducan
annexing kirkwall fanpage

dangerousdan-dan
The rest is void

megaachyuth-blog
Untitled
Note
can you explain how to do animations on csp? or do you know any good tutorials on how it works? im a bit confused
Animation in CSP can be a bit confusing (and daunting) since it’s nothing like Animate CC, Photoshop or ToonBoom. It’s pretty much has it’s own interface and quirks so it’s gonna take a while before you get use to it and start customizing it to your liking.
I don’t really know much about tutorials since I’ve learned everything on my own as well as finding very few books explaining CSP animation. Unfortunately, those books are only in Japanese and my skills aren’t at a level where I could fully translate everything. Though, I’m sure you can easily find some tutorials by a simple Google search.
Since you asked, I’ll just show you how I go about animating in CSP and set up my files such (if that’s okay and helps you).
Document Setup
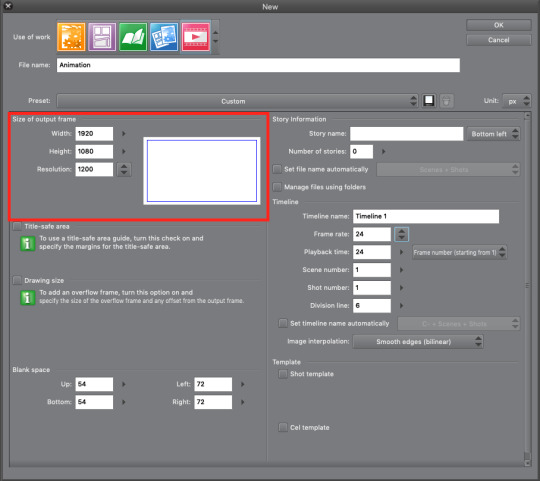
So, when you open CSP you go to the Animation section and plug-in what dimensions and resolution you want. I normally use 1920x1080 (that’s standard for most video and TV) with 1200dpi. You don’t have these specific numbers though.

Once the document is set and ready you have your canvas and all that jazz. This is my workspace setup for both illustration and animation.
Red - Canvas
Pink - Timeline
Blue - Color Set
Green - Auto Actions
Orange - Layers
Color sets and auto actions are great to cut down on time for coloring and clean-up. However, I’m still learning Auto Actions myself so I can’t give a full explanation on how to use them. But really, you don’t really need Auto Actions unless you’re doing some serious clean-up and color work. Color Sets can be downloaded ) for free through CLIP Assets. If you search animation on Assets, it should pop up with no issue.

CSP actually updated today, so, the timeline tool bar has changed quite a bit.
Red (from left to right) - New Animation Folder, New Animation Cel, Specify Cel, Delete Specified Cel
Blue - Onion Skin (allows you to see previous and next frame simultaneously while animating)
Green (from left to right) - Edit Timeline, New Timeline
Pink - Brand new Camera feature (I’m learning this one too)
Making Cels in Layers Window
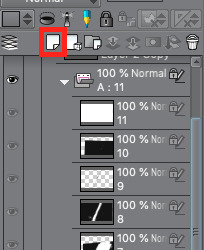
When you create an animation folder (through the Timeline tool bar), you can also add cels by pressing the new layer icon (highlighted in red above). Make sure you’ve selected the animation folder beforehand or else it won’t some up on the timeline.
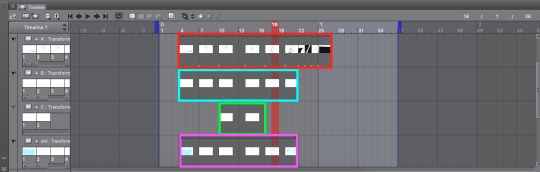
Animating on the Timeline

One long rectangular box on the timeline represents 1 frame of animation. So, 2 boxes equals 2 frames of animation, 3 boxes equal 3 frames, etc, etc. Personally, I always make my key animation frames on 4s (4 frames) since it just has a steady movement. Once I finish the key frame animation, that’s when I start messing around with the timing like above.
Blue - 3s
Green - 4s
Pink - 2s
Red - 1s
This part comes with a lot of tests, meaning I export a ton of gifs to see which timing I like best. Once you get the hang of it, it’ll start to feel like secondhand nature.
Layering Key Frame Animation
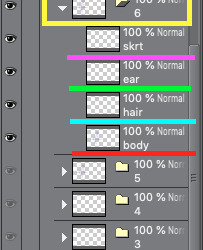
I love layers. I love to abuse layers so much. It’s just much easier to organize everything when using layers. In fact, the technique is regularly used in anime to cut production cost and time. You ever wonder how anime characters can talk but only their jaw moves while everything stays? Layers. There’s one layer where they only animate the jaw moving while there’s a secondary layer that’s essentially a still image. For this section, we’ll use my She-Ra animation as reference.

If you look at the upper left corner, you’ll see a bunch a circles with scribbles like A1, A2, B5, C3, etc written. These are different layers I made for the animation. A is drawn in black for She-Ra’s body, B is drawn in yellow for her hair and C is drawn in red for the lighting effect of her sword (another Japanese animation technique). By working in layers, I can make edits faster and easier. Also, this method is really helpful for overlapping action (i.e. She-Ra’s hair). It would be such a pain to have it all on one layer and trying to avoid finished line work (or worse having to redo it all). Below is how this animation is layer:
Red - A (Body)
Blue - B (Hair)
Green - C (Lighting Effect)
Pink - Blue shadow (this is a guide for if I ever wanted to bring this piece into color)
Another application of this layered animation is my recent Owl House piece below.
Within the animation folder, you can create a sub folder that can contain multiple layers at once. The cool thing about this is that the sub folder ends up acting like an animation key frame. Take note below how the sub folder has layers that break up the characters into its essential parts (C folder was Eda so it was one for her body, one for hair, one for earrings and one for her skirt). Again, super helpful when you have stationary animation (like a lip sync or eye blink). Or, for looped animations like this where you can reuse frames.
Camera
So as I’ve stated before, this camera feature is new so I don’t have much information or notes on it yet. To create a camera in CSP you go to the Animation tab > New Animation Folder > 2D Camera Layer.

To enable the camera function, you need to select the animation folders that you’re going to use and press this icon (highlighted in red) on the Timeline toolbar.

Once that’s done, those animation folders will have a lock icon appear next to them (highlighted in blue). Make sure to put the desired animation folders into the Camera folder (highlighted in red) or else the effect won’t show up. Here’s the same She-Ra animation but with the camera effect applied:

There’s so much I still need to learn about this function but overall it’s pretty cool so far. Maybe in the future I’ll do a more in depth tutorial about CSP animation since the program is up and coming in the animation industry. But until then, I hope you found this helpful!
5K notes
·
View notes
Video
529K notes
·
View notes
Photo

“Though my soul may set in darkness, it will rise in perfect light;
I have loved the stars too fondly to be fearful of the night.”
A little doodle for one the most beautiful lines from any poem, The Old Astronomer.
140K notes
·
View notes


Text
*tries not to think about how manipulative gertrude’s language with gerry is and how she knows exactly what she’s doing in regards to what she knows about his history and health & how she was very tactical about the shit she said to him, how she weaponized sarcasm to lie to him by telling the truth — and she knows that mary keay never really lied.*
*deliberately ignores the fact that mary most certainly yelled. shuts my eyes to the way that gerry withdraws when gertrude does, too. turns my back on the way she let it go quicker than he’s probably used to, and how he probably didn’t know how to wrap his head around that.*
*goes out of my way to ignore that it’s because all of it is mixed in with what is definitely genuine fondness which only makes the way she DID take advantage of him worse and all that much harder to separate.*
*plugs my ears to the way that so much of what she said equates to weird taunts and foreshadowing that We know about and that he May even have had creeping suspicions about but would never have guessed at fully because How Could He Really Know, his memory is Going because he’s got a fucking brain tumor and he’s not gonna fully question her despite the baseline of basic distrust because he’s got a lifetime of trauma from another old lady that surely explains it, right? he’s just wired to be wary. at least some of it is all in his head, right?*
*thinks anyway about how as much as gerry needed the reprieve from mary, he did not need the way that gertrude toyed with him and actively used those vulnerabilities against him before she ended up forcing upon him a fate that she has now actively told him would be worse than death when he asked her because he was clearly afraid of it. when there was no one else for him to ask, and so he had to either trust her enough to stay put or have enough doubts that he felt how he used to feel. not much of a choice between those, is there.*
*thinks about how he needed something and he got just a scrap of something by following her around but he sure as hell did not need that.*
1K notes
·
View notes


Photo

fuck it, posting all of them ghgghhk ep 162 got me fucked up,,,
5K notes
·
View notes
Photo

the first n̷̳̯̕i̶̛̘͐g̶̣̞̼̾h̴̹͎͒ț̴̤̙̅ (sequel???? to [x])
4K notes
·
View notes
Photo


So that Gerry Keay guy huh?
He’s pretty great.
@themagnusarchives
3K notes
·
View notes


Audio
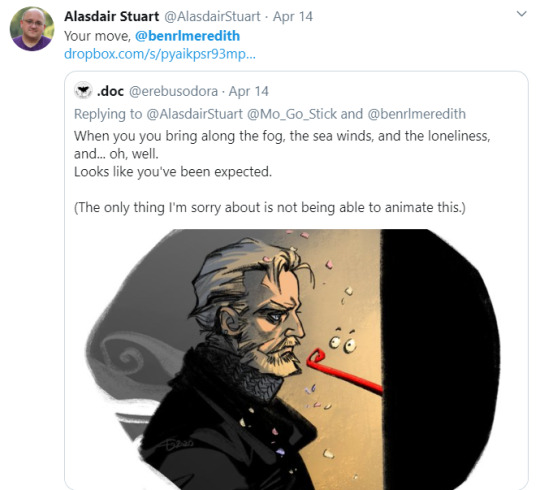
alasdair stuart and ben meredith have FAR too much power i’m sobbing (original art here)

9K notes
·
View notes
Video
(had to repost cause it wasn’t coming up in tags)
this originally was going to be a strictly self-indulgent edit since my page is slasher dedicated, but this is probably one of the edits I’ve ever put the most effort into-
anyway, I love Jonathan Sims with all of my being
POSSIBLE SEASON 4 FINALE SPOILER WARNING
ART USED IN VIDEO CREATED BY: @roboomic and @jayceart
110 notes
·
View notes
Text
[thinks about the fact that we pretty much only hear about agnes from the perspectives of people who wanted things from her] [thinks about how her story is a tragedy primarily because she was denied since birth any agency + freedom + compassion by people who saw her as a tool before anything else] [thinks about the fact that we never hear agnes herself speak] [thinks about how her voice is stripped from her story both literally and symbolically] [thinks about the fact that the people who hurt her get to tell her story instead] [cries a little]
2K notes
·
View notes
Photo
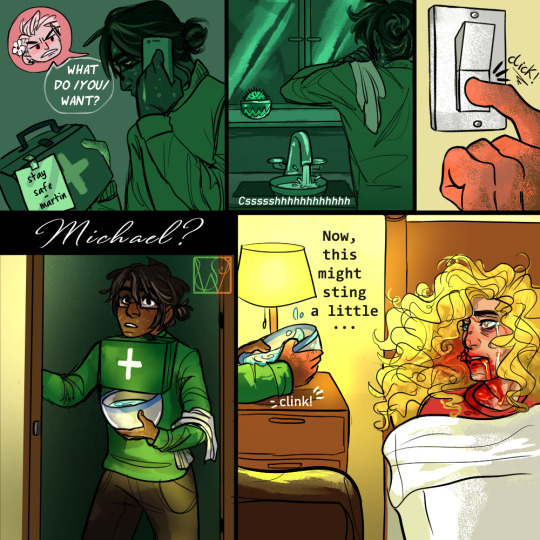


Here it is finally, Part 3 of my Michael Survives AU! It was really fun working on different colouring styles and an abstract piece this time around!
Read the rest here: Part 1 | Part 2
[Do not repost & please reblog if you want to see this continued! <3]
@the-magnus-archives-wiki
1K notes
·
View notes
Photo

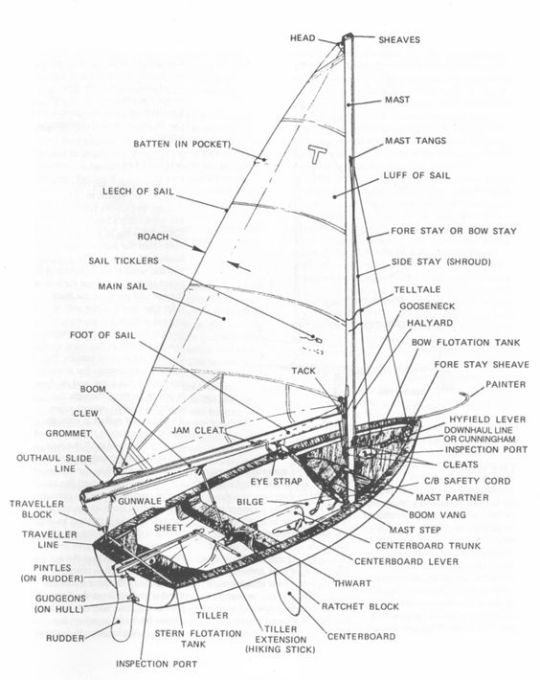
Types of Ships
Parts of the Ship
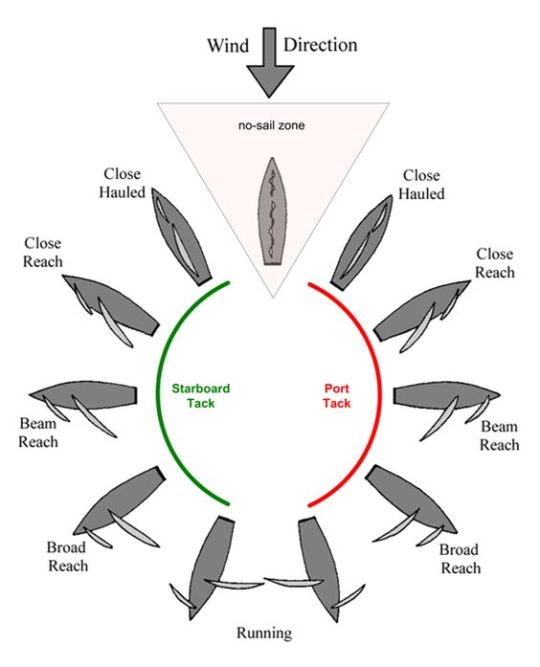
Wind Directions
Sides of Boats
60K notes
·
View notes
Audio
Lyrics
I can’t blame you for feeling down
‘cause I am not a liar
But if you’re low, take a walk around
and if you’re cold, sit by the fire
Make a list of what we’ve got left
Although it’s shorter than before
Doesn’t mean that it matters less
If anything, it matters more
And all the bands sing,
“I’d die without you”
Like that’s the height of romance
Kind of funny just how fast we both knew:
it sounds much sweeter in the abstract
But stay safe out there
Hope is in such poor repair
Stay safe out there
And come back home when you can find your way back home
So make that stupid joke again
‘Cause there is bravery in laughter
I’ll set it up and we can both pretend
we have a say in what comes after
And in the movies, it’s all so clear:
Good prevails and cue the soundtrack
We tell the stories we need to hear
Like we can get what we have lost back
But stay safe out there
It’s half an order, half a prayer
Stay safe out there
And come back home when you can find your way back home
Come back home if you can find your way back home
Come back home if you can find your way back home
1K notes
·
View notes
Photo
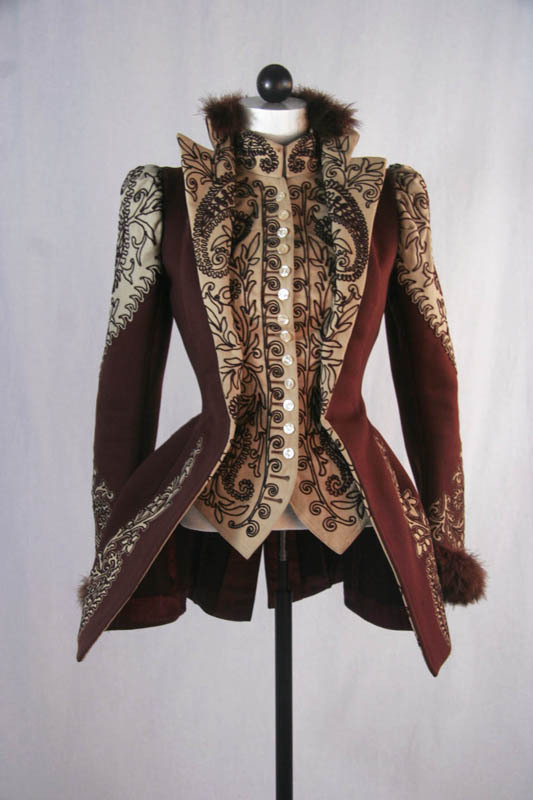
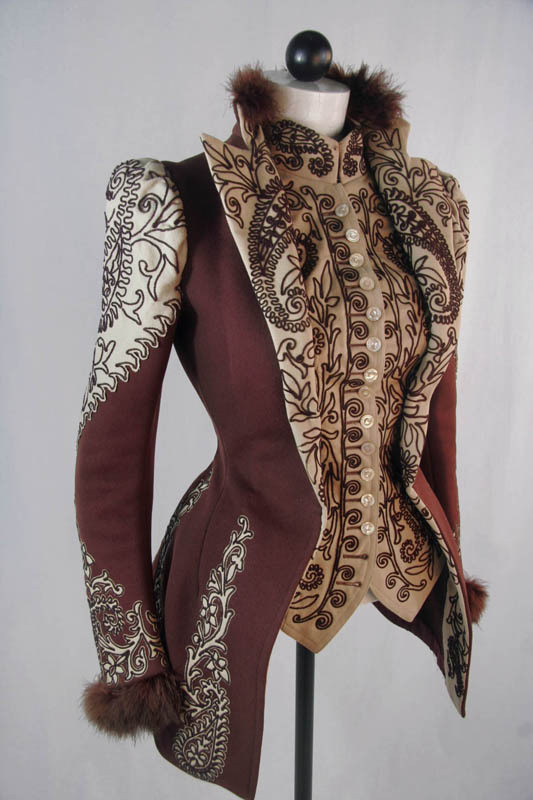
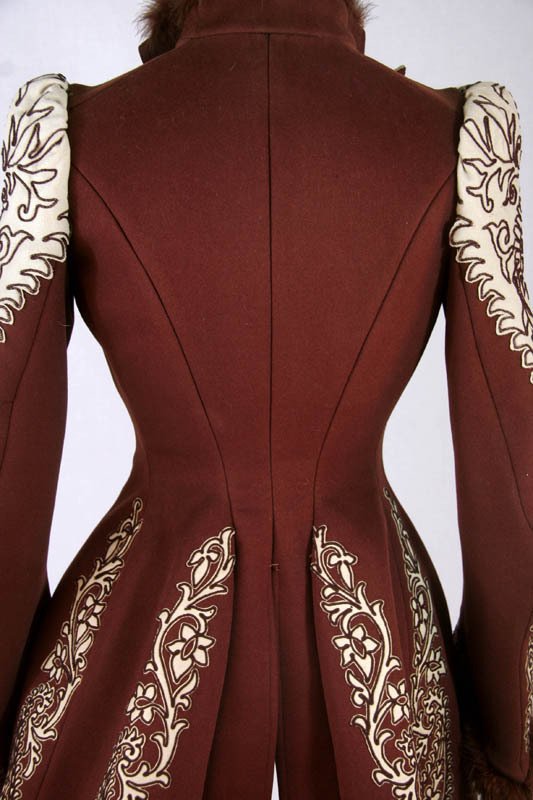
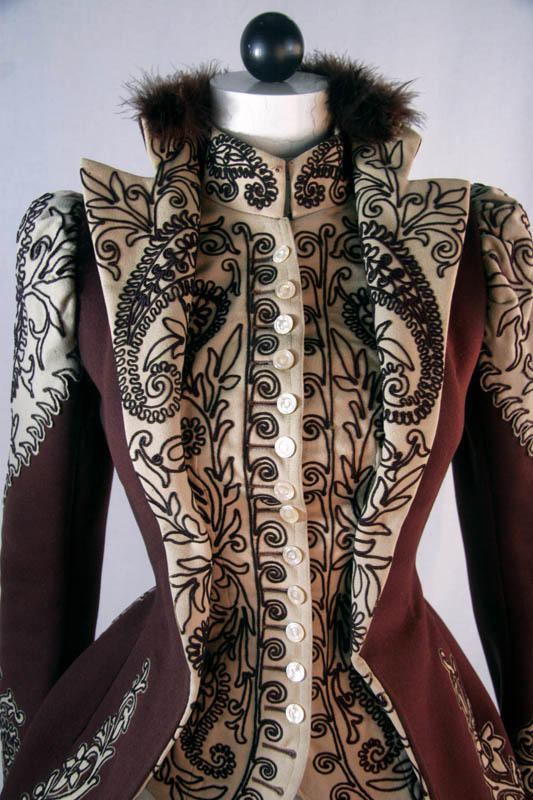


Machine Embroidered Jacket, ca. 1890s
Owned by Jessie Mason Webb
via NDSU
28K notes
·
View notes