
inb380-n9493841
INB380 - n9493841 - GET THERE Individual Dev
36 posts
Don't wanna be here? Send us removal request.
Last Seen Blogs

loudkittydefendor
Veneer and Velvet fan

icarfish
theflyingfish

aurguries
bets on losing dogs

qveliot
•••

redacted-coiner
The Stations Broadcasting
Text
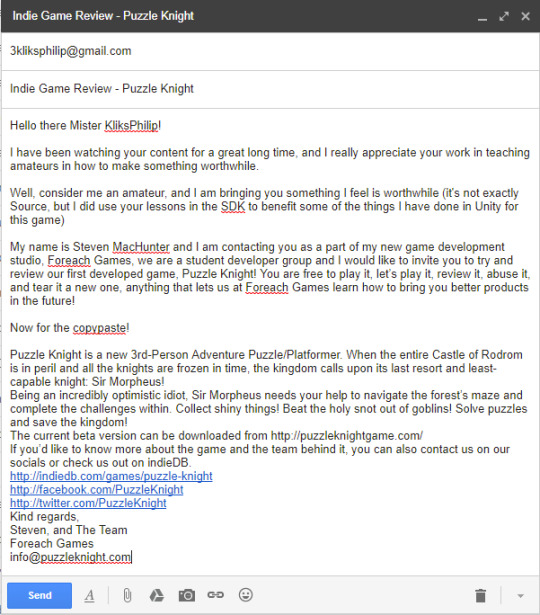
Week12 - Correspondance and Review Requests
This is just a short post detailing my efforts at sending Review Requests to different people:
This is an example of the email at I had sent to 3KliksPhilip, someone who I believe would be incredibly honest and useful to aiding our quest for Game Development.
As for a list of people I have sent emails to:
3KliksPhilip (YouTube)
ACG (YouTube)
ProJared (YouTube)
Risk_Metrics (IndieDB)
Ofihombre (IndieDB)
howabout (IndieDB)
Epecb (IndieDB)
MikeMaxFR (IndieDB)
MRWHISKERSXD (IndieDB)
JoeHer (IndieDB)
I did spend some time personalizing each email slightly, and finding people to send them to. I would hazard a guess at a max of 15 minutes per person, for a total of 2 Hours of work.
TIME TAKEN: 2 Hours
0 notes
Text
Week 12 - Particles For Days - (18/10/17)
This week was about finally making the particles for the boss better than the standard. First up though, I want to make the game more efficient by turning off some particles when they are no longer needed.
Harder than I expected, but I managed it.
TOTAL TIME: 30 Hours
Particle Efficiency:
OLD:
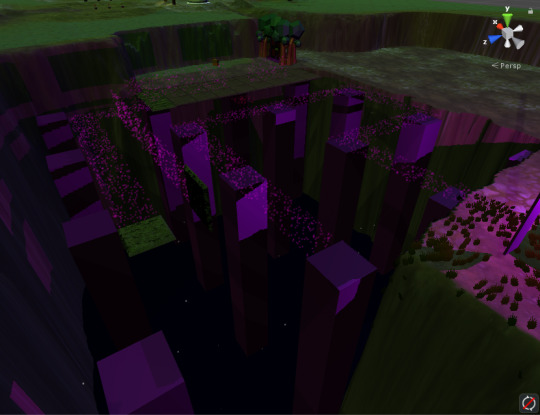
You can see that all the particles (especially the shadow particles) and the lights (especially the lights for the jumping puzzle) are always on, no matter where the player is relative to them.
NEW:

You can see, as the player approaches the jumping puzzle, the lights turn on, and as the player leaves the shadow puzzle the particles for the platforms turn off.
CODE:


EXAMPLE: Jump Puzzle

This is the jumping puzzle, as you can see the green box that coves the section and a bit of the entrance is the trigger zone that turns the lights on or off.
Organising the scene files to get all the lamps that are scattered around the scene into one neat prefab also took a very long time.
OLD:

NEW:
You can also see the boxes in the new image, they control some of the lights to turn on and off when needed.
TIME TAKEN: 9 Hours
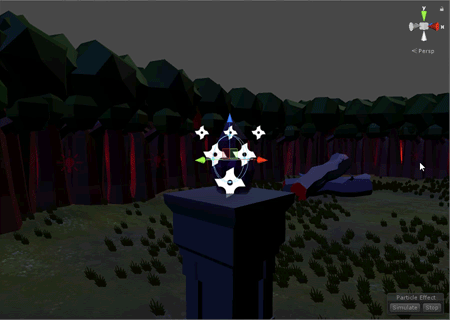
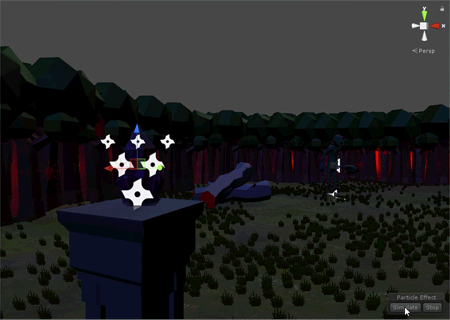
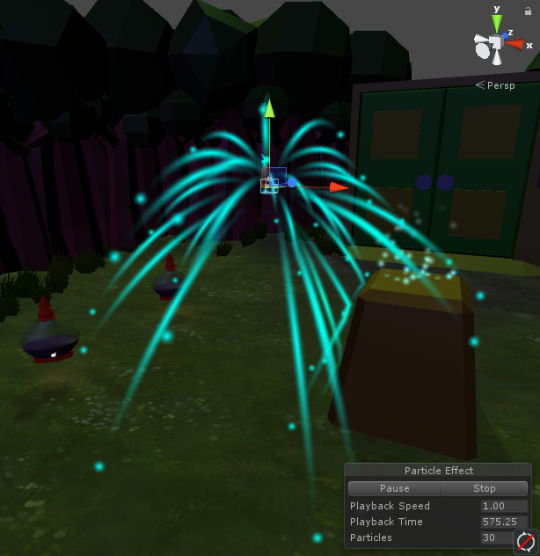
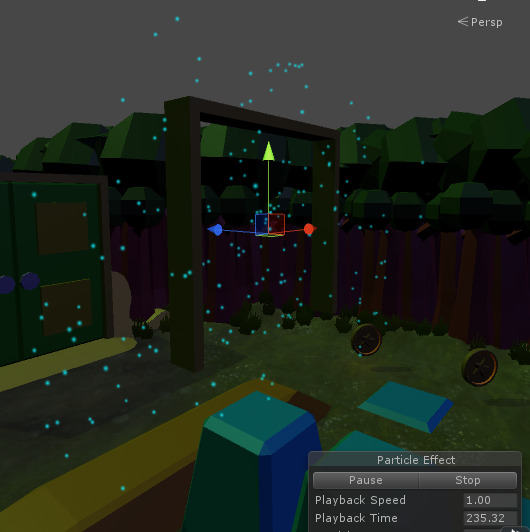
Boss Particles! Hell yeah!

So this is what took up the majourity of my time, getting these particles to look right.
OLD:

NEW:
The particles are a new type of particle that I created with code, I had to learn how to change each particle and add acceleration to them.
Note the particles are in two parts, the particles on the pylons and the particles on the boss. The particles on the boss requires different code to account for scaling. First lets look at the code for the particles which rush to the boss from the pylons.
CODE: The particles on the pylons, and the particles rushing to the boss from the pylons


This is the fun bit:
Here is an example of the pylon particle effects, the first image is the particle effects with no target (so it defaults as the target being itself):
And here is what it looks like when it targets something else (also, adding a trail to it and some noise in the movement):
For the particles on the boss himself, eh, there’s not really anything special, it just rescales with the boss is all.
Here’s a look at what the boss particles look like on the model in t-pose:

I put a variation of the particle prefab on each bone of the Boss, which means that the particles on the boss will follow the Boss’ bone movements whatever he’s doing.
And here is the code, the important bit anyway:

You see here that it simply rescales the box shape to fit with the scale of the boss.
That is all.
TIME TAKEN: 19 Hours
CORRESPONDENCE:
I spent some time sending emails to possible reviewers this week, click here for a bit more of a break down.
TIME TAKEN: 2 Hours
0 notes
Text
Week 11 - Disappointment - (11/10/2017)
The theme for this week was disappointment apparently, I didn’t do as much work on this as I wanted to at all.
BUT here’s what I did:
TOTAL TIME: 16 Hours
Jump puzzle polish
OLD:

NEW:

Time taken: 6 hours
Hub wisps:
The wisps used to guide the player in the hub were essentially destroyed in the Great Rescaling of 2017, and haven’t really been fixed until this point. Particle Man on the case.
Not very noticeable here. But the wisps pointing to the jump puzzle (top left) and the shadow wisps pointing to the shadow puzzle to the right are now back in session.
Time Taken: 1 Hours
Pendulum Swing Enhancements:
This took up the majourity of my time, trying to relearn trigonometry to the point of getting the swing to look more like a pendulum, and less like a failed programmer.
Here’s the comparison:
OLD:

NEW:

And of course, some code, with the featured deprecated code as comments if you were wondering!

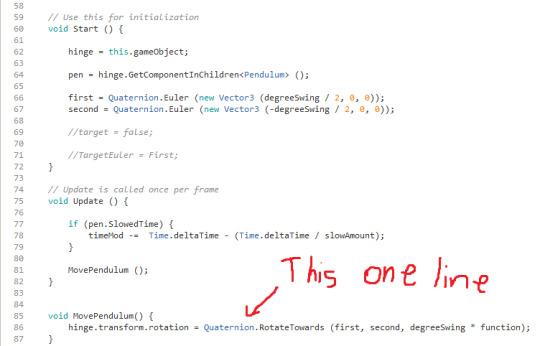

Time Taken: 9 hours
0 notes
Text
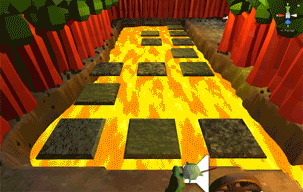
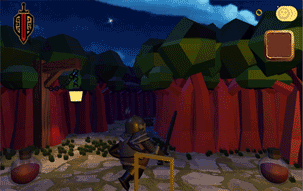
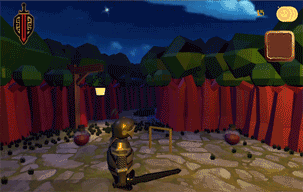
Week 10 - Jump Puzzle Enhancement - (04/10/2017)
I made the jump puzzle look beautiful. This week was focused around making the jump puzzle look fantastic with particles and a better shake system.
TOTAL TIME: 30 Hours
Team dev day;
I’ll mention in passing, Bryn has more details.
Time Taken: (1000 - 1800) 8 Hours
Particle effects:


TIME TAKEN: 6 Hours
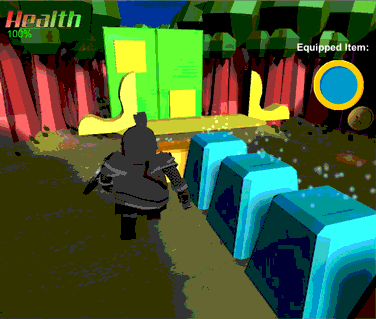
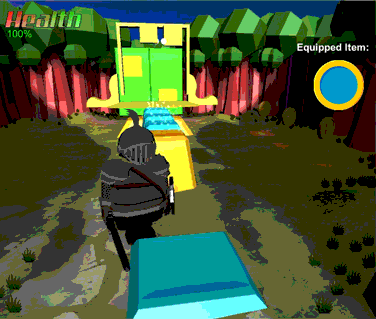
Jump Puzzle OverHaul:
OLD:

NEW:

OLD:

NEW:
OLD:

NEW:

OLD:
NEW:
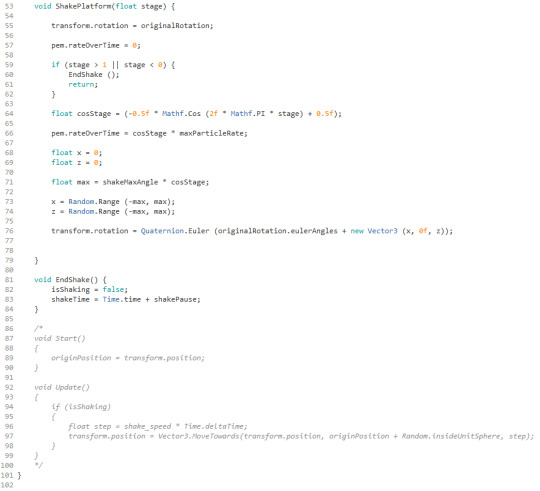
CODE:
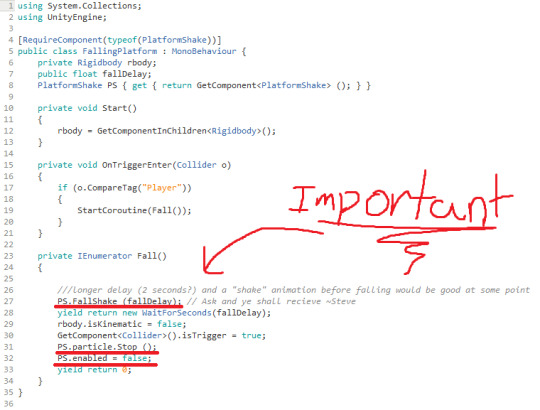
PlatformShake class:
Controlling the platform jitters, with bonus original code at the bottom.

Changes in the FallingPlatform class:
These changes allow the platform to shake vigorously before falling.
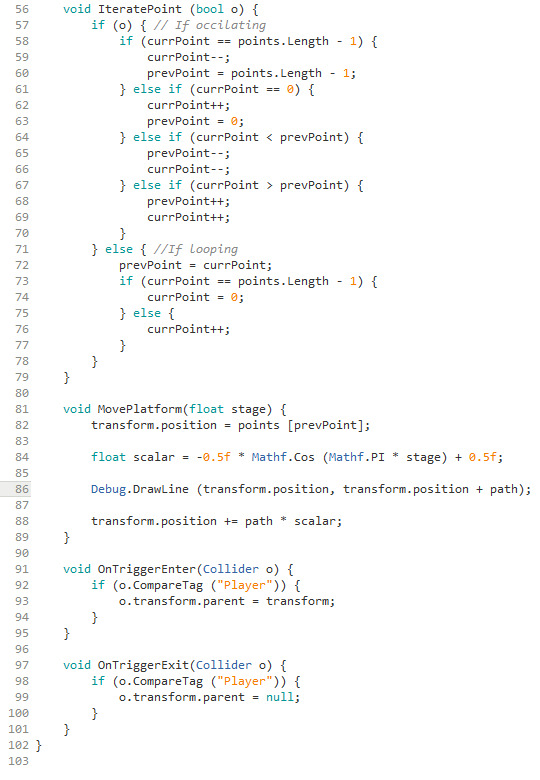
MovingPlatform Class:
This class controls the platforms that move in the Advanced Section

TIME TAKEN: 16 Hours
TOTAL TIME: 30 Hours
0 notes
Text
Week 8 - Summary - (20/09/17) - Jumping and Issues
TOTAL TIME: 26 Hours
1- Jump Fixing
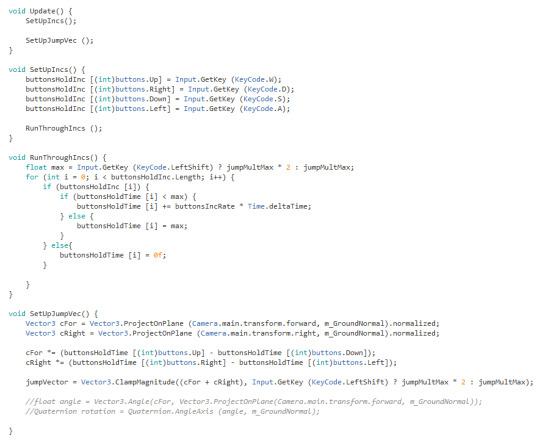
After battling with the user control and animator to make a non intrusive method for handling the jumping, I decided that I would go for a maximum intrusion solution. Essentially writing the jumping code from the ground up. The horizontal movement is not defined by the speed of the character, rather the time the player holds the button down.
OLD:

NEW:

TIME TAKEN: 8 HOURS
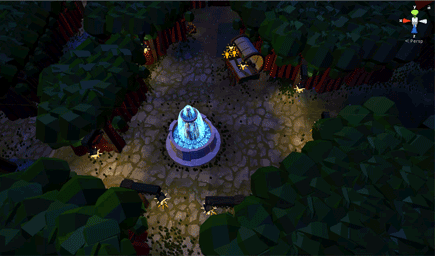
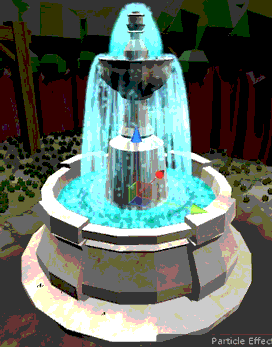
Fountain Particles:
The particles looked like trash, so I tried to fix it up a bit.
Time Taken: 4 Hours
THE STAR OF THE WEEK: Camera Chasing

Essentially, code that allows the camera to run between points and display a path of sorts, this also means that we can have a pre-game scroll through the land in the start screen.
CODE:
CAMERA CHASER class; the class that manages the camera’s movement.
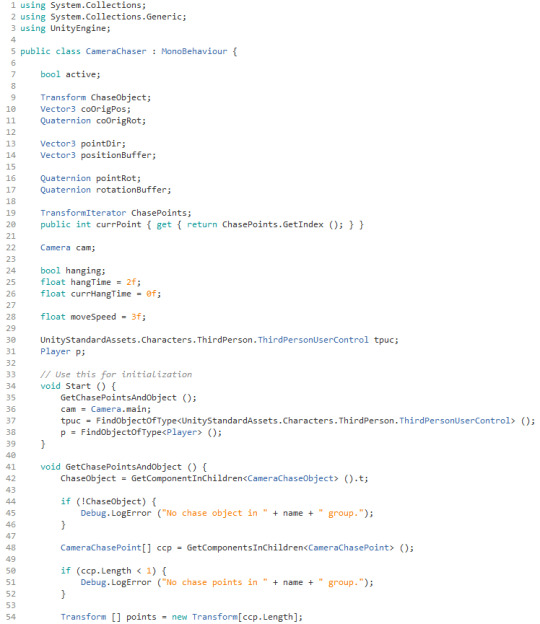


TRANSFORM ITERATOR a fabricated class that easily allows me to iterate through a Transform array.
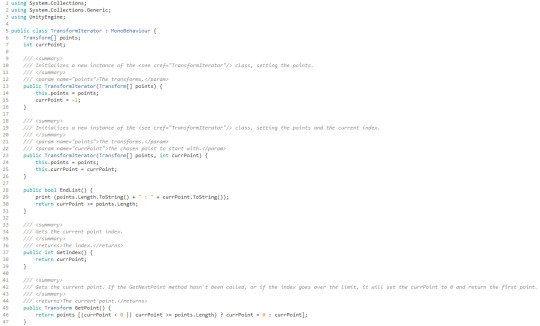


TIME TAKEN: 14 Hours
TOTAL TIME TAKEN: 26 Hours
0 notes
Text
Week 7 - Perspective Puzzle Completion - Bug/Particle Fixes - (13/09/17)
TOTAL TIME: 22.5 Hours
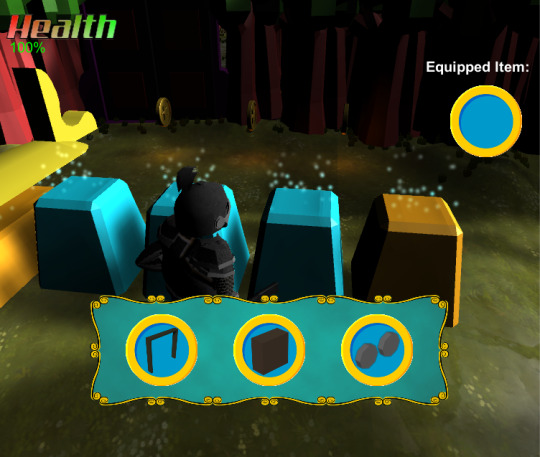
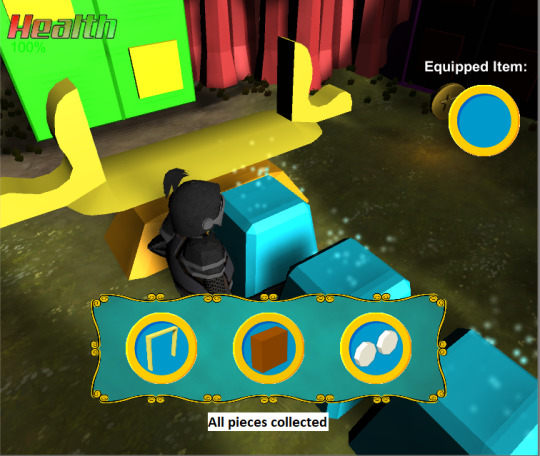
Puzzle Door Completion:
Uncollected puzzle pieces are in darkness.


Gifs of action:
Total Time: 11 Hours
Shadow Puzzle Particle Fixes:


There were also errors with various particle systems around the map. Fixing them was tedious.
TOTAL TIME: 8 Hours
Boss Enemy Rescaling Issue:
Sean had described that the code he designed has a little bug where if the player was to activate the other pylon when one pylon was retreating, the boss would scale abruptly. I fixed up the code pretty simply after a while of testing.
In the Pylons code:

In the Boss code:

TOTAL TIME: 2 Hours
Perspective Puzzle Camera Bug:

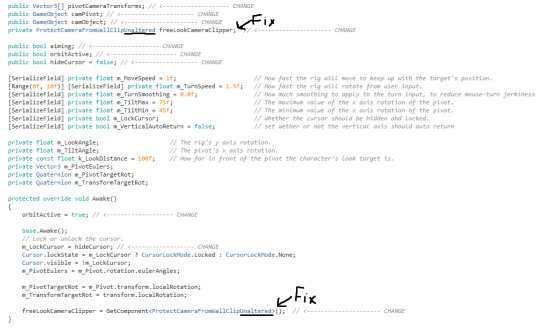
When I updated to the most recent git commit, the perspective puzzle had this error, where the pieces would be out of line, and the puzzle wouldn’t complete.
This was due to a class change on the camera rig setup:

Once I found the source of the error, the fix was simple:
TOTAL TIME: ~1.5 Hours
0 notes
Text
Week 6 - Summary - (6/09/17)
I let my team down this week.
TOTAL HOURS: 22
(Most of the time was spent with errors and ignorance, I had to redo last week’s work because I didn’t frikkin save the scene file.)
Hours taken getting back to previous point: ~6 hours.
New effect:
Note it collides with the scenery and has firework like trails.


CODE:


Notable change: Empty piece is now a clone instead of a single object.
0 notes
Text
Week 5 - Shadow Puzzle Polish - Perspective Door Polish - 30/08/17
TOTAL HOURS: 30
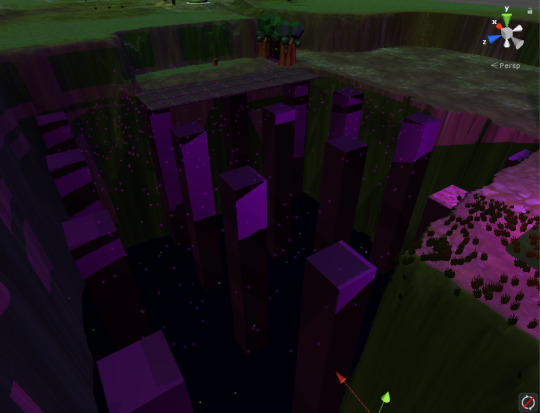
Shadow Puzzle Polish:
OLD
NEW
ISSUE: Shadow particles can give away path of puzzle:
FIXED: Changed particles to have less particles, less life, random direction, more noise, and more speed
CODE:

The BroadcastMessage function calls this code, which is on each particle instance:

DEPRICATED CODE: Trying to figure out a way to copy all the data of a particle system to the ones on the platforms, before figuring out to spawn a prefab of a particle on the platforms themselves.
TIME TAKEN: 13 Hours
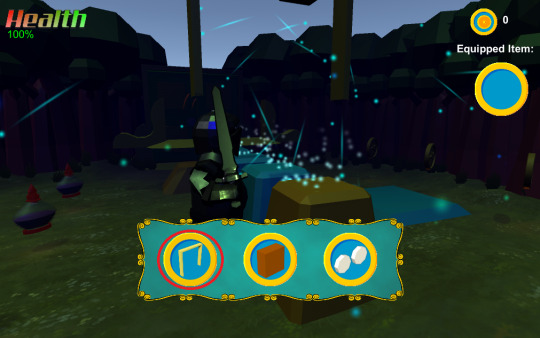
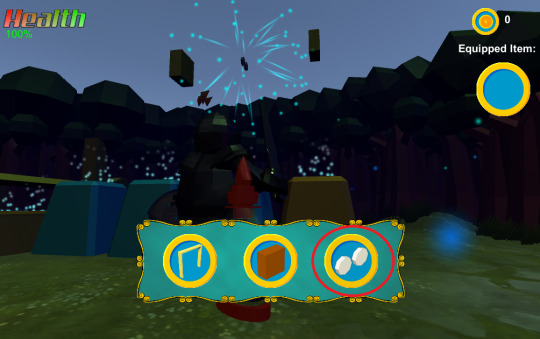
Perspective Door Updating:
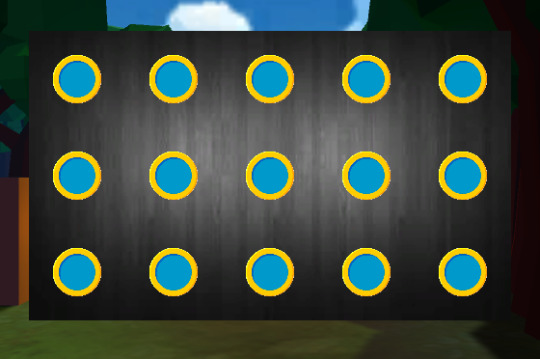
Updating the perspective door to use a piece choosing method as opposed to a piece pushing method:
Door, no pieces nor piece blocks
Door, with new piece blocks and pieces:

See the models rescaled.
Perspective Demo:


New particle effect that appears when you select which piece to put where:
CODE:
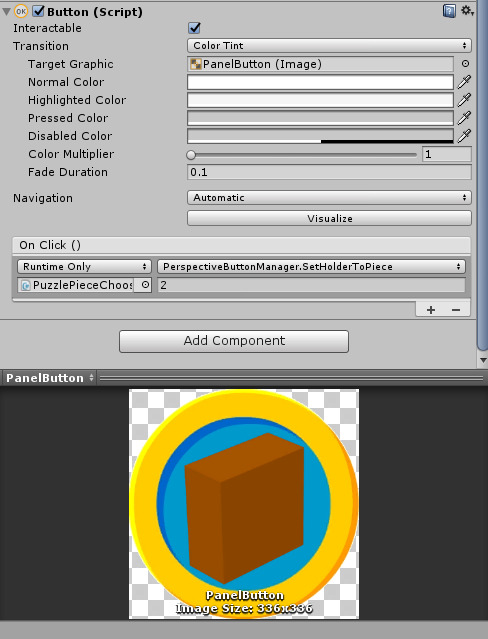
PERSPECTIVE PUZZLE
The code that handles the entire puzzle, and issues to check if the puzzle has been completed or not.

PERSPECTIVE PIECE MANAGER
The code that handles the umbrella methods, that affect each of the pieces.
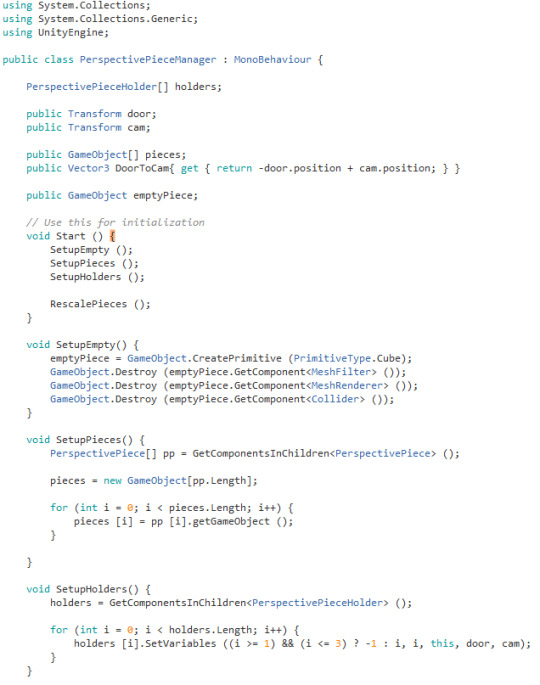

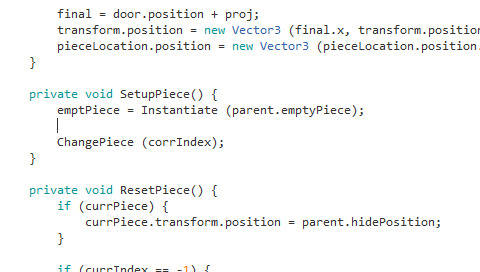
PERSPECTIVE PIECE HOLDER
The class that handles the singular pieces and the piece locations, it handles all the specific functions related to the pieces themselves, as opposed to the puzzle at large:

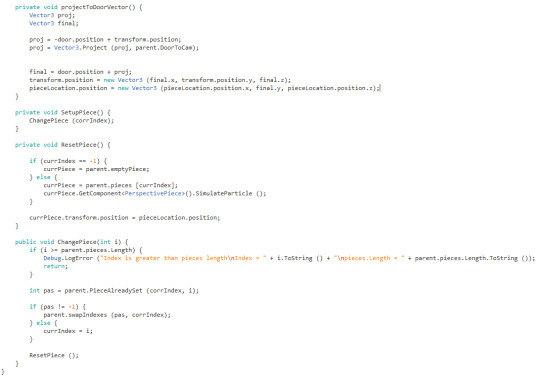
PERSPECTIVE PIECE
The code that handles the particles activate upon relocation.

TIME TAKEN: 17 HOURS
TOTAL TIME TAKEN: 30 HOURS
0 notes
Text
Week 5 - Shadow Puzzle - Look and Feel changes - 23/08/17
I am so pissed off right now, thanks a frikkin bunch for losing my last post Tumblr, by crashing my entire chrome. Alright let’s do the entire thing again.
I am 38 40 hours without sleep. I am running on 10 hours of sleep before hand, 3 cups of green tea, and 1.5L of energy drink. I am not going to analyse anything, I’m just going to dump pictures and times.
UI CHANGES:
Old:
New:

New UI Modules:


TOTAL TIME TAKEN: 7 hours
WORLD LOOK AND FEEL:


TIME TAKEN: 4 Hours
SHADOW PUZZLE IMPLEMENTATION:

This is the path of the shadow puzzle

This is a little example of the pendulum working.
HERE IS CODE


Here is some pretty particles:

TIME TAKEN: 14 Hours (A fair chunk fighting with the level design)
TOTAL TIME TAKEN: 25 Hours
UI: 7 Hours
World look and feel: 4 Hours
Shadow Implementation: 14 Hours
0 notes
Text
Week 4 - Meeting
I was away all week on a convention, so I could not do any programming work. I did however attend the meeting in which we had discussed the next items that we need to complete.
A list of those items follows:
DELIVERABLE:
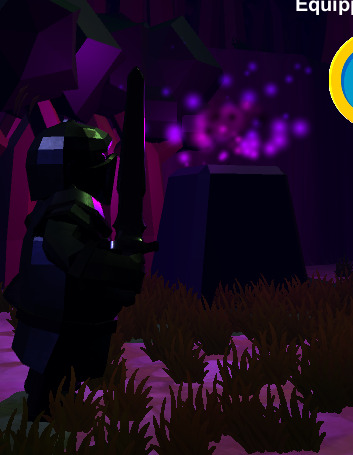
Boss Fight - How should it happen? We all seem to agree on the gag of one big guy that takes a single hit, followed by many little guys that appear after that and attack the player.
Level assets - Those that have been modeled need to be merged, remaining ones need to be modeled but are basically decoration at this stage.
AI is to be completed this week.
Shopkeepeer designed, will be modeled from existing grunt model.
Time Power now works in the build (pressing Z key), and has a visual effect.
Need to fix the lighting on the scene.
BUG FIXES:
New movement system on Morpheus - Bug discovered where Morpheus’ sword goes through his character model when running. Colliders discussed. Adjusting the animation was agreed upon.
NPC Rigs are to be fixed so that they don’t bend the models incorrectly.
POLISH:
Jumping puzzle is being extended as more things are added to it. Cannons need to be fixed so that they actually hurt the player. These will probably be replaced with Ranged Enemies later, will see how testing goes.
Time power visual effect could be changed
UI needs to be redesigned, can’t stay on the default stuff from Unity.
Adding Hint Signs to the map is a good idea, as last critique showed.
Total Hours: 2.5
0 notes
Text
Sem 2 - Week 3 - Shadow Puzzle - 06/08/17
This week I need to get the shadow entities thing into being a puzzle for the player to solve. This included a bit of fixing up of the code and setting out a scene for the shadow entities to be placed.
New Additions:
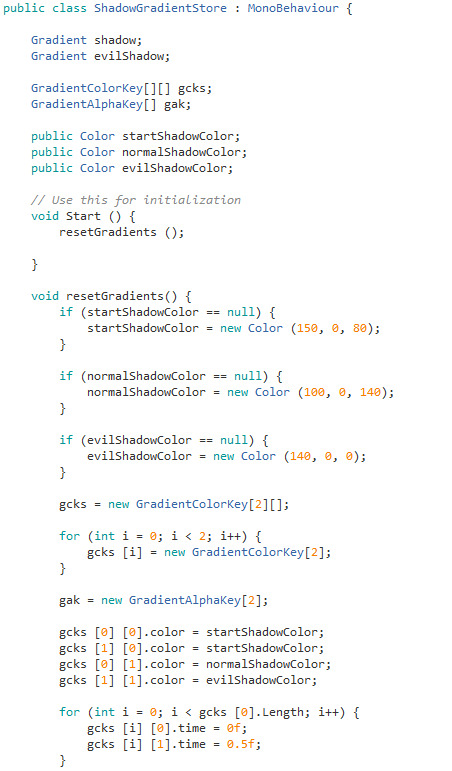
Candle Light Store -

This is a derivative of the Light Store class, which stores the lights, this class is different because it makes the lights flicker just a little bit, to give the illusion of an open flame.
Shadow Bridge-
This is the shadow bridge (deactivated) the pieces of the bridge will disappear when the light falls on them. And only when shadow falls on them does it appear. The following is an image of what it looks like in game:
All the blocks that aren’t the pillars are invisible, and it’s not until the player goes in front of the light that they figure out what the light is there for:

After that the player will then walk around to see if they can reveal the rest of the pathways:

And so on until they attempt the puzzle themselves. The next part of this puzzle is to make the functionality for a block/object that can be pushed along a certain axis or plane, and how to make the knight push them cleanly.
0 notes
Text
Sem 2 - Week 2 - Summary
Total Time: 22 Hours (+2.5 at a convention)
Proof:
youtube
Posts:
Start post, meetings, task outlines: 3.5 Hours (2.5 at a convention so eh.)
https://inb380-n9493841.tumblr.com/post/163685648187/sem-2-week-2-shadow-entities-260817
TASK A - Make Shadows efficient: 8 Hours
https://inb380-n9493841.tumblr.com/post/163687672672/sem-2-week-2-task-a-efficient-shadow
TASK B - Apply Shadows to enemies: 13 Hours
https://inb380-n9493841.tumblr.com/post/163688598417/sem-2-week-2-task-b-shadow-enemies-10817
Shadow Entities Testing Environment Build:
https://www.dropbox.com/s/vjy4480s5aroouu/ShadowEntityTest.zip?dl=0
0 notes
Text
Sem 2 - Week 2 - TASK B - Shadow Enemies - 1/08/17
Oh boy, a lot of things, and not much sleep at all.
This task felt like a massive let down almost, as I had spent a good few hours trying to figure out how to apply the shadow entity code to an enemy mesh that is being modified by the animations, but I was unsuccessful.
I started this endeavour 10am on the 1st.
It is now 6:30 am on the following day.
I completed the tasks at 3am, the rest of the time was spent on writing up my work of the last week. Without further ado, here is a video:
youtube
This video proves that the shadow entities can be mapped to the enemies and the enemies be affected, and also that the shadow code is incredibly optimised. Have some pictures:

This was my initial issue with the enemies. I wanted to make the rays cast to the individual vertices on the mesh of the model. However, the mesh isn’t lined up exactly with the model’s display. Because a certain modeler didn’t apply the transforms and scales to the mesh. >_>

Another issue I was having was that the mesh wasn’t updating to the current display, it was just the static mesh of the object. At this point I don’t know how to obtain the edited mesh that is being displayed, and research has given me no head.

Oh look it’s my schedule. How did that get in there?

Eventually, I had decided to forgo using the model’s mesh as the vertices, and instead used a sphere mesh that’s wrapped around the character to fit them as best it can. It’s simple, effective and is proven to work.

Here is an example of the debug screen when I have a tonne of entities and enemies going all at once, with three lights in the scene no less.
Time Calculation:
Beginning: 10am (1/08/17)
End: 3am (2/08/17)
Goof Off Estimate: -4 hours
Total Today: 13 hours
Total Cumulative This Week: 22 Hours
0 notes
Text
Sem 2 - Week 2 - TASK A - Efficient Shadow Entities - (30/07/2017)
Right, so, this Task is set for trying to make the shadow modifier far more efficient than previous.
PART 1 - Design efficiency algorithm
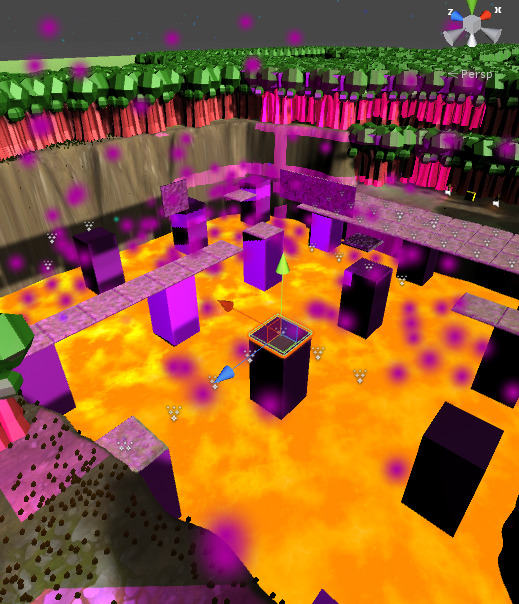
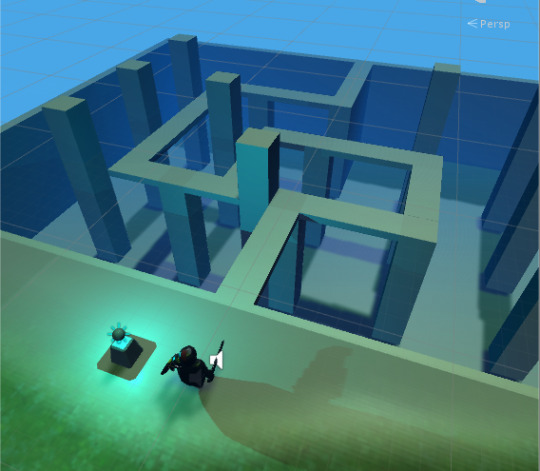
The biggest issue with the current version of the shadow entities code, is that it checks every single vertex on the model and casts a ray from the light to the vertex to see if anything is in between them. Resulting in a test picture of this:

As you can see, the red lines are checking every vertex on the sphere, including the ones that are furthest away from the light. This is incredible wasteful, as the vertices furthest away would have vertices in front of them that the light could just as easily check. The challenge is to figure out a way to only check those vertices facing the light. Chief examiner has suggested the use of ‘Stencil Ray Casting’ but all the documentation I found pointed to pixel stencils on 2D planes, so I formulated my own way of checking the points:
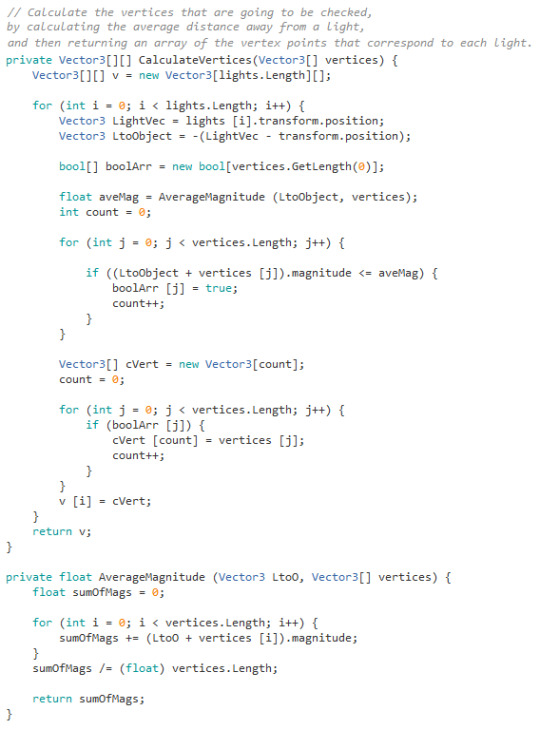
So, the code works like this;
Every frame the code calculates the vector from the object to the light, and then sets to find the average magnitude.
The average magnitude is found by getting the LightToObject vector, adding a single vertex to it, and then finding the magnitude of that line and adding it to the previous value. This will end up with a sum of all the vectors which can be easily divided by the amount of vertices to get the average.
Once the average is found, it checks each vertex to see if it is shorter than the average, if it is, it sets the vertex’s index in a boolean array to true, and adds one to a count.
Once all the vertexes are iterated though, a vertex array is created with the length of the count, and then the vertexes are iterated through one last time to add the vertexes that will be checked to the created array.
The array is then returned.
This should end up with an array that is a bit less than half the amount of vertexes in the model; containing vertexes that are only on the side of the object pointing towards the light.
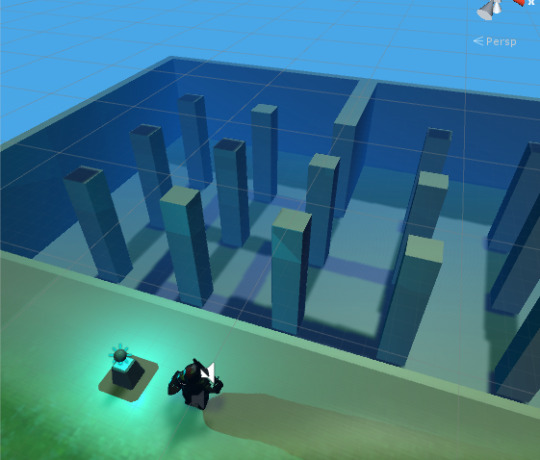
You can see the end result here, drawn with an irresponsible about of Debug.DrawLine:

So, the sphere object is completely shrouded in shadow, which means it is visible and interactive. The red lines indicate the checked rays, pointing to the vertices that are checked. The white lines on the sphere are the vertices that are checked (the line goes from the center of the sphere to the surface because you can’t draw dots in unity). The grey lines on the sphere indicate the vertices that are not checked, as they are further away from the light than the other vertexes.
PART 2 - Make sure the code stops at first light
Pretty easy and self explanitory, as soon as a ray cast is found that doesn’t hit any objects from the light to the entity, stop checking the vertices. The line with the red arrow is the proof.

PART 3 - Implement varying light count
This is actually done in two parts, with one part outside the shadow modifier code. The first part is in a different segment called the ‘Light Store’, there’s a boolean value that can be set by any instance of the LightStore class and derivatives, that the shadow entities look for to see if they need to update their light array.

That boolean (and also the light array) can be set by any class that inherits the LightStore class, the second part is in the shadow modifier script itself;

As you can see, in the shadow entities’ update method, it constantly checks if the lights need to be updated. and if it does, it will retrieve the current light array. (which is the standard all light array, provided that the virtual method isn’t overridden).
TIME CALCULATION:
Beginning: 10am
Ending: 10pm
Estimated breaks: -2 hours
Total Time on Task: 8 Hours
Cumulative Time This Week: 9 hours
0 notes
Text
Sem 2 - Week 2 - Shadow Entities - (26/08/17)
This week is go time, we all had an in-depth meeting, as well as attending an indie game developer convention, to better understand what we each needed to accomplish for the week.
The total time spent on these was about 3.5 hours added up (2.5 at the convention).
This week’s theme was improving the shadow enemies that was a single topic back in last semester. In that build however, it was incredibly inefficient and only allowed about 10-20 shadow entities on the screen before it became really laggy. So I spent all of this week figuring out a way to make the shadow entities far more efficient, and applying that to actual characters.
The tasks I had set out were as follows;
TASK A - Make the shadow entities efficient
Design an algorithm that chooses only a few vertices to check.
Make sure that the function stops at the light that first sees the model
Make the shadow code work with a varying amount of lights
TASK B - Make the shadow entities work with enemies
Apply the shadow code to an enemy
Figure out how to make the mesh work with updates
Failing all, make a liable solution for now
Let’s get down to business.
0 notes
Text
Week 13 Summary
The theme for this week was, “Don’t push yourself Steven”
I did one task and attended the meeting.
PROOF:
youtube
TASK:
Click here for details
Hours: ~12 Hours
Meeting:
Hours: ~1.5 Hours
TOTAL TIME SPENT:
~13.5 Hours
0 notes
Text
Puzzle Knight Development - 30/05/17 - Perspective Puzzle Finalization
A lot of work accomplished in one day. As a short summary; this is what I’ve done.
Accomplished:
Scrapped original block pushing system
Developed grid based piece movement system
Made the randomization grid based
Fixed wall aesthetic
Created block pusher greedy behaviour
Proofs:
youtube
Tasks:
1. Scrapped original pushing system
The original block pushing system used a deprecated method of just making the block go a certain distance away from the character when pushed.
This added situations where the blocks could be pushed forever, and even off the edge of the world. This could cause complexity problems with the puzzle, the randomiser had a nasty habit of placing puzzle pieces behind the door, and the while loop associated with making sure that doesn’t happen would hang the game.
With this in mind, I decided to scrap the current, ‘point vector’ pushing system in favour of a grid based system. (Which will also allow me to make an actual grid to put the pieces on)
2. Developed Grid
So, to solve my dilemma above, and to make the randomisational aspects easier to compute, and the piece moving easier to limit.
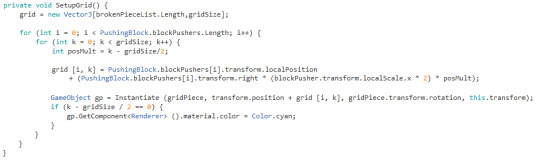
Okay, in this code, which makes the grid, you can see 4 distinct sections; the first section instantiates the grid array, as a two dimensional array of Vector points, which is the number of puzzle pieces long and gridSize wide.
The second section sets up the for loops to iterate over the data to set the grid values. Posmult is the position multiplier, which is used to figure out how far away the grid areas are, for each iteration of k.
The third section sets the value of the vector coordinates to be the center of the piece pusher, times a right vector of the size of the piece pusher, and the posmult.
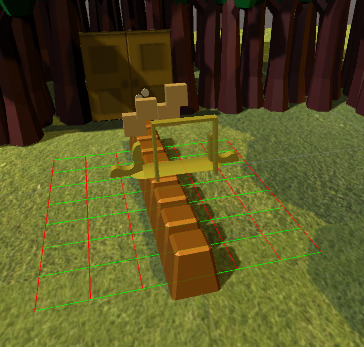
The last section instantiates and places the grid piece which is the actual grid the player sees. Below is an example of the grid:
3. Randomized Using Grid
In using the grid technique, it was quite simple to make the pieces randomise on them.

This is the randomising code. All it does is choose an x position between 0 (inclusive) and the amount of block pushers (exclusive) and a y value between 0 and the gridSize. Then it will set a boolean to determine if the code would have to be repeated or not.
It will then check if the chosen grid location already has a block on it, if it does then it will recursively run this code until it reaches a state that’s acceptable. If it doesn’t it will set the grid location to be the x,y positions, then update the occupied grid locations variable, and lastly, update the block’s point position.
4. Fixed Wall Aesthetic
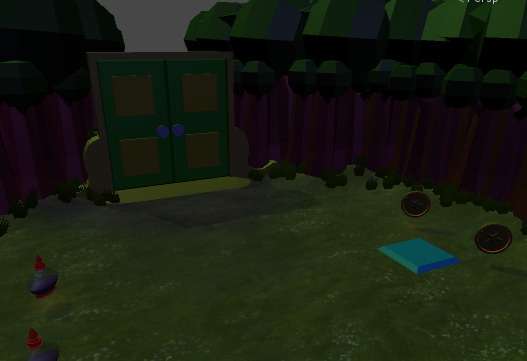
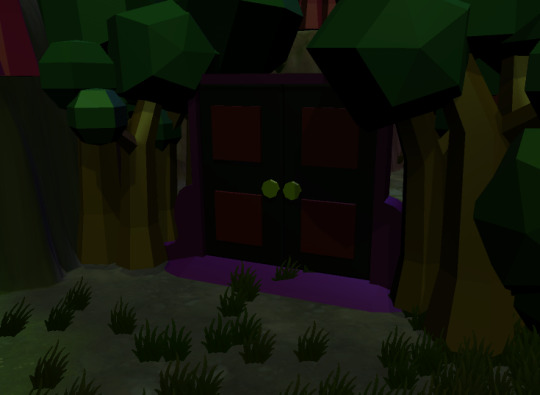
The plain white wall wasn’t that good to look at, so I made the surroundings of the puzzle to be more fitting for the environment:
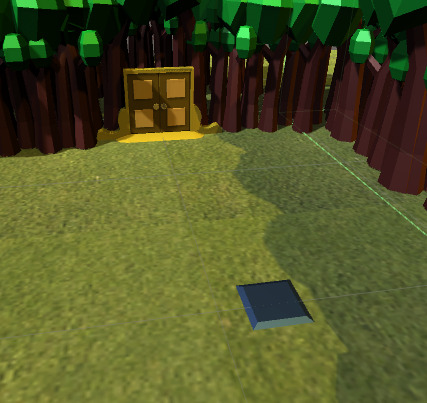
This is what the puzzle looks like when not initialized yet, note the trees as the surroundings.

And this is what the puzzle looks like when waiting for the player, all in all, it blends in with the scenery well and sets a good scene.
5. Made the Block Pushers Greedy
The final task that I had given myself this week was to make the pushers ‘Greedy’ in the sense that the block will only move if the player is looking at the block.

I had accomplished this by creating an empty game object for a copy of a transform, turned it to look at the player, got the angle of that empty game object and the forward vector of the player, and measured how far off of complete opposites the angle is. It the angle was greater than 45 degrees off from completely straight then the block isn’t pushed.
You can see that in the latter part of the code, if the method above doesn’t succeed, then the movement script just cancels out.
Time Taken
Clock time: 1400 - 0300
Task times:
Task 1: ~0.5 hours
Task 2: ~ 4 hours
Task 3: ~ 2 hours
Task 4: ~ 0.5 hours
Task 5: ~ 5 hours
TOTAL TIME: ~12 Hours (maybe 11 hours)
0 notes