graphics4games
3D Computer Animation - Ellis Crossley
22 posts
Don't wanna be here? Send us removal request.
Last Seen Blogs

0bloodxdrugs0
LEAKEDxSNIPPETS

hariprakashy
Hari Prakash
plaid-n-converse
My Blog

whitill
.
herogardn
» 𝐒𝐓𝐀𝐆𝐄 𝐒𝐄𝐋𝐄𝐂𝐓.
Text
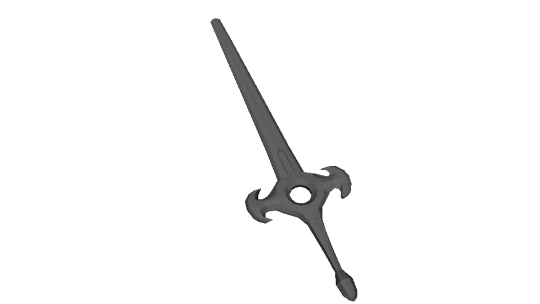
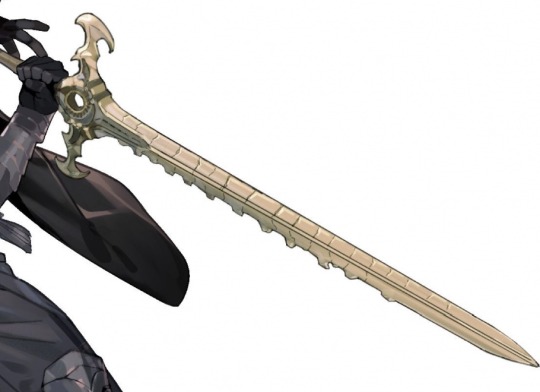
Sword of the creator progress #7 - Final product

Overall, I think i’m very happy with the final product here, especially considering my past experience with any modelling software is non existent. I learned all i know about modelling from this very production process and while the modeling on my prop is fairly simple within certain areas, I feel like the texture, bump mapping and animation still stand out.
I think the texture alone is quite honestly quite ugly on its own, especially when you look at the original texture PNG. Yet the intricate scratches and chips added by the bump mapping make the texture seem a lot more believable as bone and the overall stylized look is exactly what I was trying to get for the final render.
Texturing aside though, I think by far the most effective aspect of the final prop has to be the animation. In no way is it perfect, there are a few key frames which are unnatural and the whole look of a disembodied hand is just strange. However, for a first year and first ever attempt trying Maya or any 3D modelling whatsoever, I still think the animation is very fluid.
Throughout the swing and in general just how the hand holds and carries the sword, the overall weight is really believable. The way the hand uses the swords own weight and momentum to carry it into both the swings feels really natural, and after spending hours and hours on this process i’m glad the effort translates to final render.
The hardest part of the process was by far was the animation also, it simply felt like a very hostile and complicated process to get stuck into for total beginners and the amount of complexity you can go to is really intimidating. Working from imagination alone is near impossible so a reference is vital. Once I had said reference however, mapping out my key frames became a lot simpler and working from that step forward, the process sped up a great deal. Spending most of my time manipulating tangents on the graph editor, I worked by far the hardest trying to get a natural progression between these key frames and i’m very happy with my final product.
I do wish that I spent a little more time improving the base model and adding more detail within areas where the polygons are very visible, like the very center for example. Yet considering this modelling was done within the very early stages of my experience with Maya and there was little time to return to it during the more intensive later stages I think I can overlook it to appreciate what did work well.
Looking back over the whole module, I think the most stimulating session would be the animation session. Having the freedom to go out and find the information for ourselves actually helped me learn quite a lot. It was really useful to see just how many user created guides and tutorials there are out there, and just how easy to follow they are. In the future just knowing these resources exist is going to help me immensely whenever I get stuck and i’m confident ill find the answer i’m looking for.
0 notes
Text
Sword of the creator progress #6 - Animation
Moving onto the animation process the first step I took was to create a reference to inform the key frames. The animation I had in mind was for a hand to enter the frame, pull my sword from a pedestal and slash from side to side a couple times. While I thought this was relatively simple, locking down the key movements proved to be incredibly time consuming.
Especially when it came down to how the hand twisted and rotated from pull to swing it took a great of time just studying the video and locking down these subtleties.
Also, trying to convey how the sword pulls from the stone and gradually loosens and speeds up toward unsheathing it was an aspect I really wanted to nail. That key movement is such an iconic thing you see across so many games I knew it would just be very strange if it felt stunted and awkward.
Yet luckily, in the final animation I think this is by far the best thing about it. I think I even captured how the hand recoils adjusting to the weight and this weight is really felt in how the sword is handled and swung from side to side.
The only section where I think this the weight is a little hard to read is through just how fast the hand progresses from unsheathing the blade to swinging it. If there was more time and emphasis on the recoil as its pulled from the pedestal I think the weight would have felt much more consistent.
0 notes
Text
Sword of the creator progress #5 - Texturing

After taking the UV snapshot into photoshop and reducing its opacity to give me a set of guidelines to paint within, I started to push forward with the texturing process.
As this sword was based upon an existing sword from the Fire Emblem: Three Houses game, there were a vast range of references to inform this texture. The "sword of the creator" is quite an unusual case in that the blade is actually made out of bone as opposed to the typical reflective metal you would expect for a sword.
Therefore the texturing here played quite a vital part in communicating this unique factor and I think overall it went quite well. Especially within maya itself, the texture with a bump map to accompany it communicates the cracked and uneven texture of bone really well.
I did take some creative liberty with the handle because I wanted a visually striking grip to differentiate from the constant bone texture across the whole sword, the blue fabric has a contrast that I think really pulls the whole model together.
0 notes
Text
Sword of the Creator progress #4
After finishing the modelling process, the next immediate step was to commence the texturing, of which the first step was to UV unwrap my sword to create a viable guide to paint over within Photoshop.
This step quite honestly did not take a great deal of time thanks to how flat my object was, allowing me to create a planar map operating on the X range, looking directly down onto the model. Once I had created this projection the only step I had to take was to select the top most faces and deselect the opposite side, breaking the UV map into the top half and bottom half of my sword.
Shown below is the final result I will take into Photoshop, invert the colours and start to paint over the UV snapshot using the lines as a guide.

0 notes
Text
Rendering session reflection
Within our first session introducing us to rendering props as a whole, our aim was to select a topic from a wide range provided by the tutor, find out as much information as possible form a range of sources; with a focus on utilising the library, and deliver this information to our team members.
The topic in question we had to find out about were the different rendering methods and engines - advantages and drawbacks of Arnold, Mental Ray, Software, Hardware.
After completing the session we had compiled a concise list of features for each engine and method, and the disadvantages that went hand in hand -
Maya Software - CPU works slower but much more effective at rendering complex scenes, more stable, higher quality renders, easy to use, simpler setup doesn't use ray tracing not
Maya Hardware – Good way to test render a scene, Hardware GPU can work fast, more prone to crashes, cannot produce sophisticated effects e.g. advanced shadows and reflections, particle effects
Mental Ray – Software renderer not as high-quality materials, less realistic, realistic rendering, physics-based simulation of lighting, complicated to use
Arnold – newer version, simplified version default, CPU renderer, unbiased renderer everything is calculated, much more accurate but slower, more realistic materials, uses Monte Carlo ray tracing for global illumination (most realistic lighting)
Overall I feel like I did learn quite a bit through the process of psychically finding out the information myself, however, due to the focus on utilising the Library I found the process very difficult to begin with. Many books were heavily outdated by several years and it was difficult to find a concrete opinion on the engines compared to one another and it was more so books dedicated to a particular engine.
If i repeated this process again I would most definitely diversify my sources from the very beginning and not underestimate asking others knowledgeable in the subject, its much easier to find trustworthy opinions in person and phrase your question correctly than it would be searching that question into Google for example.
0 notes
Text
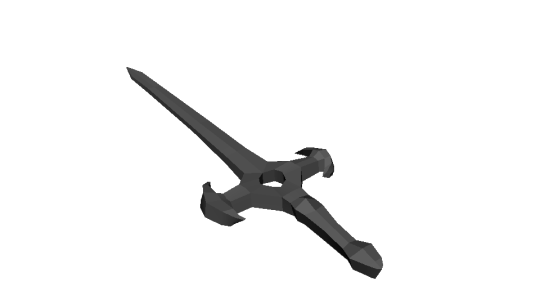
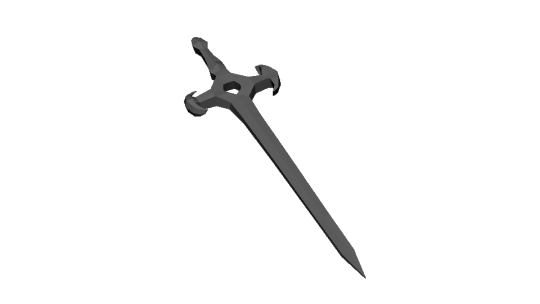
Sword of the creator progress #3
At this point I feel the modelling step within the prop creation process is finally complete, the swords overall form resembles my reference a great deal and I spent many hours refining small details which really pulls the model together in my eyes. Most prominently I think the jagged edges of the sword and the deformations the create across the entire blade makes the model vastly more interesting overall.

The main approach I took toward adding these details was simply adding edge loops around the more organic, curved forms such as the handle of the sword and pulling away from the low poly look for a more refined one. The hardest part of the process overall was most definitely the central section of the sword. I found that adding edge loops to refine the curvature only created a very complicated topology, a vast amount of triangle faces also which are taboo within modelling props.

0 notes
Text
Sword of the creator progress #2
After I had my planar extruded object in the very basic shape of my sword I started to manipulate the vertices using quad draw to refine the overall shape as much as I could, especially around the protruding handles, the initial shape I had lacked the three dimensional form I wanted, looking excessively blockier than the rest of my model.

By deforming the vertices around the handle through an admittedly long process, I started to capture the shape I was aiming for, showing much more of a gradual curve around the furthest protruding parts as opposed to the sheer drop it used to be.
The blade and handle provided much less of a problem overall, simply demanding some time dedicated toward adjusting edges and similarly manipulating vertices and at this point I am fairly happy with the progress I have made. I am in no position to start refining smaller details however and still need to focus on capturing the basic shape throughout the entire model.
0 notes
Text
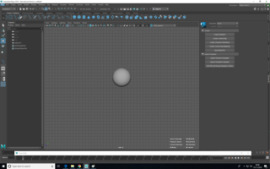
How do I do path animation and where should I use it?
To start using path animation you first have to obviously create a model to animate, so in my case i’m going to use a simple poly sphere for simplicity’s sake.

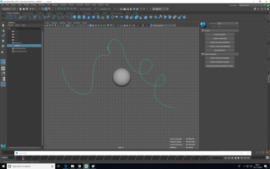
Once you have your model its onto creating your animation path, and the tools to do so can be found on the curves/surfaces tab. For my path i’m going to use the draw line tool fourth along the tab along the top.
Using the side camera view i’m going to create a simple winding path for the ball to follow.

Once you have created you path you’ll notice that the colour change form red to green.
To connect your object to this path you will then need to first select your object, the shift click your path, selecting them both.

Within the animation window you’ll find a tab along the top called constraints, within the drop down menu you'll find the option motion paths, select this and click attach to motion path.
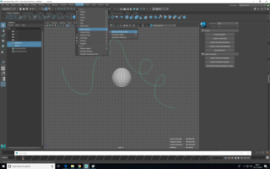
Within the tear away menu there are lots of options you can edit, such as how long this animation will last along the time slider, the main thing to remember is to keep the follow box checked.
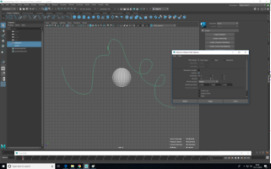
Once you’ve done all of the above all you need to do is press play on your time slider to view your objects animation.
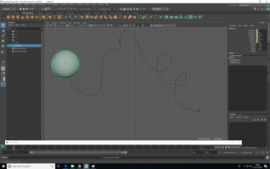
These animations alone are fairly simple, yet when used in combination with other animations can be fairly effective for certain objects. The main thing to use path animations for is described by the name itself, objects that follow a select path in real life movement, like a car following a winding road for example or a fly circling an object.
0 notes
Text
Rigging Tutorials reflection
After watching both of the basic rigging tutorials I feel like at the point I am now I cannot say that I have a perfect grasp of the process as a whole, simply watching a tutorial without being able to put it into context with your own model makes the lessons learned difficult to consolidate and really commit to long term memory.
Despite the negatives however, I do feel this format works incredibly well in learning about as complicated of a program as Maya is. Because these video tutorials will always be there and provide a clear almost step by step process of how to rig your prop, it means you can refer back to them at whatever point you need them most.
For example, once I am happy with the model I am making for this module, in my case being a sword modeled after the Sword of the creator from the fire emblem franchise, I can say with certainty that I will refer back to these very videos and follow them with Maya open alongside as I work on rigging my prop.
Overall I have to say that the tutorial format works incredibly well for the way I like to work and their availability whenever I need them is invaluable.
0 notes
Text
Sword of the creator model progress


To begin with modelling my sword, I simply started with a cube and utilised the extrude tool to capture the basic shape form the hilt of the sword to the tip of the blade. Once I has this basic shape, I made this object live and created the topology on top of it, drawing the individual faces along the live model and simplifying its overall form from the admittedly complicated initial model.
Once I had the complete model I then selected all of these faces and extruded them upwards, making a basic 3D object from that topology. At this point within the process i’m starting to manipulate the vertices to add much more detail to the model overall, also using the cut tool to make much more detailed overall form.
0 notes
Text
Maya sculpting tool
To begin with the sculpting tool you first have to create an object large enough for the sculpt tool to really take affect, I recommend mostly to start with a sphere just to experiment as its much clearer the affect the varying brush tools have.
Once you have your object, its important first off to understand a couple vital things about how to manipulate your brush, the first being how to change your brush size and this is controlled by holding down B + holding down left click and dragging both left and right to increase or decrease its size.
To decrease and increase the intensity of the brush, this is controlled by holding down M + holding down left click and dragging up and down to increase and decrease.
Another interesting tool to keep in mind is the freeze tool which allows you to paint areas of your object in blue, locking them in the position they are so they will not be affected by any of the sculpting you do to the areas surrounding this frozen area.
The first tool within the sculpting tool kit, is ironically the sculpt tool, this tool is useful within the very early stages of modelling to get the very basic shape of what you intend to model, dragging with left click to “moves vertices in a direction determined by the average of all normal's within the boundary of the tool cursor”.
The second tool along is the smooth tool, as the name suggests smooths the vertex positions in relation to one another along a surface, most useful for when you have sculpted a very uneven surface and need to level it out into a much smoother plane and one I really liked when counteracting how uncontrolled i was with the sculpting tool, correcting overly protruding and uneven features.
The third tool along is the Relax tool, this is very similar to the smooth tool in smoothing a surface yet in contrast to the smooth tool it does not affect the original shape, most useful when improving the topology of an object which improves processing speed and rendering speed among a range of other advantages.
The fourth tool along is the grab tool, which as the name suggests, grabs the vertices within the brush reticule and moves them to whatever position and direction you drag, most useful in making small adjustments to the overall form of the object, especially when using a small brush I feel its really good for making minute but important details.
The fifth tool along is the pinch tool which pulls the vertices inward toward the centre point of the brush, useful in defining a sharp edge or crease like defining the blade of a sword for example, yet something I find quite difficult to use effectively and cant picture how i could use it outside of those very specific cases.
The sixth tool along is the flatten tool which is similar to the smooth tool in smoothing the surface of an object, yet this tool levels them to a common, completely flat plane.
The seventh tool along is the foamy tool which is very similar to the sculpt tool which manipulates the overall form of the object yet does so in a much softer and smoother way, useful when you need to manipulate the basic shape of your object yet want to do so in a much less chaotic way than the sculpt tool.
The eight, ninth and tenth tools after are the spray, repeat and imprint tools, which all utilise stamps which are preset patterns you can import to Maya, stamping and repeating these patterns along the surface yet aren’t necessarily too useful in modelling a simple prop at least in any way I can find. I found that any time i used these tools it never produces a result I could work with.
The eleventh tool is the wax tool which builds up areas on a model while adding or removing material from the surface of your object.
The twelfth tool is the scrape tool, this tool removes overly protruding or sharp features along the surface of an object, similar to the smooth tool in levelling a plane.
The thirteenth tool is the fill tool, this tool acts similar to the scrape tool yet levels the gaps in between overly protruding or sharp features along the surface of an object, pulling them upwards to create a level plane.
The fourteenth tool is the knife tool, which quite simply cuts directly into an object, using a stamp preset to calculate how the cuts appear.
The fifteenth tool is the smear tool which works similarly to the grab tool almost yet pulls the vertices selected along a tangent or perfect angle in the direction you drag.
The sixteenth tool is the bulge tool which pulls the vertices up and away from the main object as if in spheres, displacing the region beneath the tool to create a bulging affect.
The seventeenth tool is the Amplify tool which operates in the exact opposite way to the smooth tool, further enhancing the uneven surface and pulling out those protruding features even further.
Overall I feel like I've really genuinely learned all of the basics of sculpting within Maya and what each and every tool does and how they can be used. There are a few tools I find difficult to use ore more generally find an effective use for them but being completely new to Maya I realise there’s no way i’m going to master them within a day. For those reasons i feel like id give myself around 60 to 70%, I started knowing nothing about them yet came out of the session having all of the basics down.
0 notes
Text
Maya tutorial reviews
First off I feel the tutorial video made by Kacper and Daniel walking through the shortcuts within Maya was by far the most clear and easy to follow among all of them, detailing one by one the specific keys to press to open certain quick menus and on top of just that, whats possible in utilising that menu.
While menu shortcuts aren’t necessarily what is going to allow me to understand 3d modelling itself, I feel just knowing my way around Maya, and the quickest way too will ultimately speed up my process when it comes to creating my own project.
https://benjaminhudson.blogspot.com/2019/09/maya-tutorial-3d-navigation-and-movement.html?m=1
Another absolute favourite of mine has to be this tutorial on simply manipulating the camera and movement tools. Again while its not developing my skills in the actual act of 3d modelling, I feel like I genuinely have control over the basics after watching both of these. To begin with after id created my object ill be honest i just tried to left click and drag to move the camera, obviously to no avail whatsoever. After watching this though and the tutorial beforehand i feel more than prepared to start learning and just playing around in Maya.
And side note, its just funny as hell so how couldn't you like it.
0 notes
Text
Maya basic poly modelling tutorial review
https://www.youtube.com/watch?v=FCK8hoi9GMM
This video tutorial covers the basics of modelling in Maya, delivered at a steady pace that can be followed at one’s own pace as its video format allows for pauses and rewinds.
The tutorial covers the basic controls and keyboard shortcuts:
-camera views
-different tools
-moving/rotating objects
-transforming/scaling objects
-manipulating vertices/edges
-extruding
-explains the principles of extruding - “maya has created a second face right on top of this face”
-cautions of extruding - “a third face hidden somewhere”, “hidden faces”
-different ways of extruding: scaling faces
The creator addresses the audience as beginners. While this is a great introduction to modelling in Maya for beginners, it may appear too basic for more experienced users.
This is overall a clear and effective tutorial, which is part of a larger series with many tutorials available that are easily accessed on Youtube.
0 notes
Text
Ted talk - 3 Rules to spark learning
In Ramsey Musallam’s Ted talk he again criticises many teachers approach to teaching. Being bound by format, sticking to a revision book and a specific page number, telling students to read and recite the hard information does nothing but deter students from actually learning, associating this learning with boredom and nothing more.
Musallam instead believes in a different approach to teaching based around 3 key principles, the first being to inspire curiosity. there is no bigger motivator to learn than to feel genuinely perplexed by what you are seeing, want to find out more and put context to those experiences.
Secondly is to embrace trial and error, don’t focus on the failure, punish it and call attention to it yet include it within the learning process as key mistakes to move on from.
And finally is to encourage reflection, to look back on that trial and error with the intent to learn where your mistakes were and and formulate the knowledge within those textbooks for yourself.
0 notes
Text
Ted Talk - How to learn from mistakes
https://www.ted.com/talks/diana_laufenberg_3_ways_to_teach
In Laufenberg’s ted talk she mostly criticises current societies outdated approach to educating, within schools within universities within almost every educational centre. In the days before the emergence of the internet it was essential that students come to class, learn from and take in the knowledge that a teacher or expert has, considering their knowledge as correct and remembering it beat for beat. Yet in today's age when the information is so easily accessible to us all the concept of there being a “correct” answer or single point of definitively right knowledge is outdated. There are a million ways to learn, a million places to refer to and the current ages infatuation with training students to stick to one method, to one source of knowledge only encourages feelings of failure, of being wrong when your answer or knowledge doesn't fit the format or test they deliver.
Instead Laufenberg thinks its vastly more valuable to allow students to explore those vast resources for themselves and learn within what context interests them most. This encouragement drives students to use their own voice and take their failures or missteps as a learning experience, not something to feel ashamed about. This method of learning develops genuinely inspired and knowledgeable students, not robots bound by a specific format that can only regurgitate knowledge they have been told is correct.
0 notes
Text
Procrastinator Ted Talk
https://www.youtube.com/watch?v=arj7oStGLkU
The key points made by Tim Urban within his talk revolve around being a procrastinator and how that affects his overall work flow within almost everything he does. Using a monkey as a visual representation he explains that we all have a rational decision maker within our heads that is constantly being distracted by easy tasks that give us instant gratification like eating or sleeping for example. While some tasks that give instant gratification can be considered rational, most often these tasks aren't essential and simply disrupt your workflow or ability to tackle harder tasks that ultimately demand the most attention, leading to you pursuing leisure when it isn’t appropriate.
These harder tasks only then receive the attention they deserve when there is a deadline looming over you, instilling fear and panic within you which then drives you to complete the task within a very short space of time, most often to a very poor degree also.
That is the first form of procrastination and the form that most people make reference to and talk about most, yet there is another vastly more dangerous form of procrastination which revolves around tasks that don’t have a looming deadline, like running your own business for example. These broader, more complex tasks in life can be pushed back and ignored for vastly longer amounts of time, and in some cases ultimately forever which is what leads to much stronger feelings of unhappiness and regrets in life.
All of the points he laid out within the video honestly really spoke to me, of course most people have prior knowledge and grasp on short term deadline based procrastination and every beat he hit was completely correct in my mind. Yet the point that stuck out to me most was his reference to that second form of procrastination about the wider goals in life, and I have to admit i’m incredibly guilty of that. There are many things I've ultimately wanted to achieve like starting an art account on twitter for example to start sharing my work and potentially gaining an audience yet I’ve pushed it back for years and years because that has no deadline, its a self driven desire and nothing more so there’s no one or no one thing depending on me to go through with it. The fear of starting something has been enough to push it back and unaddressed I imagine it could continue to be ignored until its too late to start and become a huge regret in my life yet putting it into context like this has showed me that the desire to do it alone should be enough to motivate me, enough to stop the procrastination cycle and will most definitely be something i genuinely look into starting this very day.
0 notes