
gardeninginfoonline
Gardening Info Online
Gardening Info Online is a great place to find out information about gardening tips, landscape ideas, vegetable growing, lawn maintenance and much more. Make your flowers, trees, shrubs and garden beautiful!
Check out our Website
Gardening Info Online
Blogger
Tumblr
Wordpress
G+ Page
Youtube Channel
Gravatar
Twitter
Delicious
Diigo
Evernote
GetPocket
GDrive
OneNote
Medium
AboutMe
Instapaper
Disqus
Facebook
Alternion
FlavorsMe
PaperLi
55 posts
Don't wanna be here? Send us removal request.
Last Seen Blogs

midwifethings
Świat Położnej

kingdorothea
lavender menace

multifandom-miracle
Absolutely Insaney

circleboat4
제목 없음

annahemmings14
FrankenStorm
Text
What You Need to Know about Growing Onions
Need help with how to grow onions in your garden? Understanding how onions grow and what conditions help them thrive will give you the best shot at growing large, healthy, and flavorful onions.

gardeninginfo-online.com gathered essential information and tips on growing big, healthy, and flavor-packed onions.
Growing Onions
Onions are a surprisingly easy vegetable crop to grow. They are typically planted early in the spring and can be harvested from midsummer through the fall. Whether you plant your onions from seed or sets, there are some valuable tricks that make a startling difference between an excellent onion crop and a disappointing one. Below is what you need to know about growing onions so that they are healthy and delicious:
1. How Long do Onions Take to Grow?
An onion’s growth typically requires 100 to 175 days before reaching maturity. In other words, onions take about 3 to 4 months from planting to harvest. If you want spring onions (green onions), harvest them 3 to 4 weeks after you’ve planted your sets.
2. What Month Should Onions be Planted?
In spring, plant onion sets outdoors as soon as the ground can be worked, usually in late March or April (when temperatures are no longer likely to go below 28°F). In spring, start onion seeds indoors about 6 weeks before transplanting them to the ground (once the soil reaches at least 50°F).
3. What is The Best Soil for Onions?
Onions grow best in well-drained soil with a 6.0 to 7.0 pH and high in organic matter. Apply phosphorus (P) and potassium (K) according to soil test recommendations.
Note: Basic soil tests identify its organic matter quantity, its pH, and macronutrient (nitrogen (N), phosphorous (P) and, potassium (K)) levels. These standard tests only provide information on soil characteristics.
Tip: Contact your local Cooperative Extension office. Most state universities provide top-quality, affordable soil testing services through their Cooperative Extension Service.
4. How Much Sun do Onions Need?
To grow large onion bulbs, they need to get enough daylight hours. Onions need full sun and at least 13 to 16 hours of light daily during bulb formation.
5. How Much Water do Onions Need?
Onions need about 1 inch of weekly water. Stick your finger in the soil near the plants – if you can’t feel moisture up to one inch, it’s time to water. In a typical 12-week growing season, irrigate with one inch of water once or twice a week, depending on the amount of rainfall.
6. How Many Onions Will One Plant Produce?

One bulb will produce one onion. Sets can be planted 2 inches apart if harvested as scallions or ‘green onions’ or 4 to 6 inches apart if allowed to mature into a full-sized cooking onion.
Note: By cutting off the bottom of an onion bulb and planting it in soil, you can grow an onion from cuttings. With time, patience, and water, you can grow an onion from an onion bottom in 90 to 120 days.
7. How do I Get My Onions to Grow Bigger?
Growing larger onions depends on a few factors, including:
Choosing the Right Variety (Onion varieties are typically divided into long-day, short-day, and intermediate-day).
Planting them on Time (Planting onions late will result in underdeveloped, smaller bulbs).
Control Weeds
Water and Fertilize
Note: Like other plant and vegetable species, your onions will grow better if given optimal conditions to thrive.
8. Which Onion Variety is Right for My Garden?
Long-day onions need about 14 to 15 hours of daylight to bulb (far northern regions). Short-day onions need 10 hours of daylight (far southern regions). Intermediate-day onion varieties are the most adaptable, requiring 12-14 hours of sunlight before starting to bulb.
9. Should Onions be Fertilized?
Yes. Onions are heavy feeders with shallow root systems, so adequate soil fertilization is essential for a high-yield onion crop. A nitrogen-based fertilizer (ammonium sulfate or ammonium nitrate) can be applied (one cup per twenty feet of row).
Note: The first fertilizer application should be about three weeks after planting, then continue with applications every 2 to 3 weeks.
10. Should You Soak Onions Before Planting?
You can undoubtedly plant onions without soaking them, but soaked onions will sprout more quickly. You can also soak onion seeds before planting to encourage their germination.
Note: Soaking onions in compost tea will give them added nutrition and increased protection from disease.
11. Will Onions Reseed Themselves?
Yes. Onions and scallions are self-seeding vegetables. These biennials overwinter and, in the spring, flower and produce seeds. You can collect these seeds or allow the plants to re-sow where they are.
Growing Onions in Your Garden
In this article, you discovered essential information on growing onions in your garden and answers to frequently asked questions.
Knowing what conditions onions require to flourish in your garden will help you grow larger and more flavor-packed onions in your home’s garden.
Ignoring basic onion growing requirements will leave your garden struggling to produce a healthy onion harvest.
Sources:
ohioline.osu.edu/factsheet/hyg-1616
extension.umn.edu/vegetables/growing-onions
extension.unh.edu/blog/2020/10/how-do-i-get-my-onions-grow-bigger
growingwithnature.org/perennial-onions/
The post What You Need to Know about Growing Onions appeared first on http://gardeninginfo-online.com.
0 notes
Text
How To Keep Weeds Out of My Garden
Avoid spending all of your gardening time pulling weeds. Knowing how to keep weeds from growing in your garden will help you devote your time to growing your beautiful flowers, vegetables, and fruits.
gardeninginfo-online.com gathered information on why weeds grow and the measures you can take to eliminate them in your garden and prevent new ones from taking root.
Why Do Weeds Grow?
Weeds will grow when there is space for them to do so. A thickly planted garden reduces available space for any weeds to grow in. Any bare or thin garden space at the end of the growing season should be tilled and seeded with a cover crop to protect it in early fall (September).
Note: Weeds can be significant agents of soil conservation. Weed roots can quickly stabilize erodible soil and create air and water channels in the soil. Some more robust weed roots penetrate so deeply that they reach nutrients otherwise unavailable to garden plants.
Pulling Weeds
The first order of business for any garden type is to pull any pesky weeds already growing. It is crucial to get them out of your garden before they go to seed. Here’s how to do it:
Start by breaking up the soil where the stem meets the top of the garden bed
Grip the bottom of the weed and pull firmly straight up to remove it by the roots
Note: Pulling weeds before planting provides your plants the room to lay and grow a strong and healthy root system. Weeding before mulching allows for better soil quality that will aid in keeping your garden healthy. Mulching also helps prevent weeds from emerging.
Tip: Use a three-tine cultivator to loosen the soil and free the weed’s roots. If you can’t get the roots, taking off the head will be your best option to prevent the weed from seeding.
How Does Mulch Prevent Weeds?

Mulching your garden prevents weeds in different ways. New weed seeds need dirt to grow, and a thick layer of mulch helps keep the seeds from reaching the soil. As for the seeds or roots already in the soil, mulch blocks sunlight (one of a weed’s essential necessities). Other benefits include:
Mulch instantly adds rich color and a manicured appearance to your landscape’s garden beds, along the foundation of your home, and around trees and shrubs (increasing curb appeal)
Improves your garden soil
Protects against severe or unexpected temperature changes
Conserves and protects the soil’s moisture
Tip: Mulch reduces the amount of evaporating water from your soil, significantly reducing your need to water your garden plants.
Chemical Weed Control
Most herbicides present significant health risks to humans, pets, and wildlife when such chemical substances are inhaled or ingested. It is highly recommended to exhaust all other weed control methods before investing in chemical treatments. Other methods include:
Tip: Vinegar kills weeds permanently and is a good alternative to synthetic chemicals. Distilled, white, and malt vinegar are all efficient in stopping weed growth.
Preventive Weed Control
Preventive weed control refers to any control method aiming to keep weeds from establishing in a cultivated crop, a garden bed, or a greenhouse. Some examples of preventative weed control would be:
Using certified weed-free seed
Only transporting soil, wood chips, hay, or mulch that is weed free
Making sure gardening equipment is cleaned before moving from one location to another
Filtering irrigation water (prevents weed seeds from traveling in the water)
Mechanical Weed Control
Mechanical weed control refers to any technique involving the use of garden equipment to control weeds. The most frequently used is tillage.
Naturally Occurring Weeds
Weeds are considered opportunistic plants and will grow when soil, water, temperature, and sunlight conditions are favorable. Weeds can grow in the smallest cracks in roads, sidewalks, or driveways. Weed seeds can lie dormant in the soil for years, waiting for optimal conditions, and can grow anywhere there’s room.
Garden Weed Removal
In this article, you discovered essential information about why weeds grow in your garden, what you can do to remove or kill them, and how to keep new ones from growing.
Knowing how to get weeds out of your garden and preventing their growth will help you grow stronger plants with more beautiful flowers and cultivate healthier fruits and vegetables through the growing season.
Ignoring the need to eliminate weeds in your garden can leave you in the embarrassing predicament of having a garden full of weeds and not the plants you wanted.
Sources:
forages.oregonstate.edu/nfgc/eo/onlineforagecurriculum/instructormaterials/availabletopics/weeds/control
hgic.clemson.edu/factsheet/controlling-weeds-by-cultivating-mulching/
extension.uga.edu/publications/detail.html?number=C1144&title=Weed%20Control%20Options%20for%20the%20Home%20Vegetable%20Gardener
extension.illinois.edu/blogs/good-growing/2020-04-02-starting-garden-weed-management
The post How To Keep Weeds Out of My Garden appeared first on http://gardeninginfo-online.com.
0 notes
Text
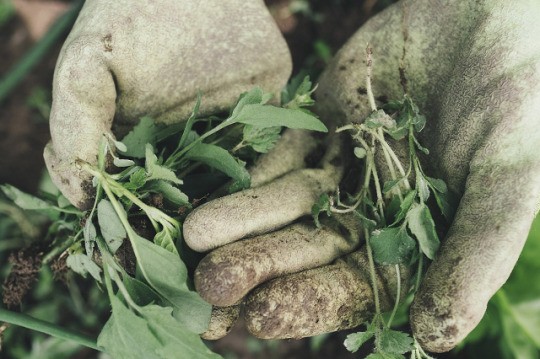
Essential Garden Worms
Prevent your garden from declining or dying from poor soil structure and a lack of biodiversity. Knowing how garden worms are essential to your soil and garden livelihood will help you take better care of what is above ground and below it.

gardeninginfo-online.com gathered the following information on garden worm’s importance, selection, and care.
Good Garden Worms
No doubt about it, earthworms, nightcrawlers, and red wrigglers are the best garden worms. These soil specialists burrow their way through your garden’s soil, aerating it, fertilizing it, and increasing water penetration.
Earthworm information (Lumbricus terrestris) – Earthworm bodies are comprised of ringlike segments or annuli. These segments are covered in tiny bristles (setae) used to move and burrow. These worms typically dwell in rather shallow soil and moist leaf litter. Their bodies are characterized as being “a tube within a tube,” with an outer muscular body wall surrounding a digestive tract. As they burrow, they consume or process soil, extracting essential nutrients from decomposing organic matter like leaves and roots.
Earthworms are vital to soil health and to the plants growing in it because they transport nutrients and minerals from below to the surface through their waste deposits. A healthy earthworm will consume up to a third of its body weight in a day.
Nightcrawler information (Lumbricus terrestris) – Nightcrawlers are larger earthworms that burrow deeper into the soil. Nightcrawlers get their name from their nighttime feeding habits. As they burrow into the ground, they feed off of organic matter, like fallen, decaying leaves and dead grass, making them herbivores. At night, these worms will grab their food from the surface and burrow underground with it when feeding.
Note: Nightcrawlers are the most coveted worms for fishing.
Red Wriggler information (Eisenia fetida) – This is a species of earthworm adapted to decaying organic material. These worms are the most preferred type of worms for composting. Red wrigglers live two to five years, making them a prime selection when compared to other earthworm species.
Red worms, unlike nightcrawlers, are typically red. If these worms stretch their bodies, you can see the stripes on their skin that also make them known as tiger worms.
Where Do I Get Earthworms?
You can purchase earthworms from nurseries, garden supply stores, and bait shops. Consider the following when buying garden worms:
Ask to see a handful of worms
There should be worms of all sizes (they’re reproducing and growing)
The worms should be moving around vigorously
The soil should not stink from decomposing material
You should not see any dead or white worms
Note: Once home, you can spread them around in your garden or compost pile without worrying. They will naturally know where to go and what to do.
Soil for Worms

There is some debate over which soil type is best for your garden and its worms. As for the worms, they require moisture to live since their bodies are 80% water, but since they also breathe through their skin, too much water can drown them. Your worms prefer well-drained loamy soil.
Soil and pH – As for your garden, most plant, fruit, and vegetable species will thrive in moist, well-drained loamy soil. The only potential challenge between your garden and its worms is to adjusting and maintaining a pH value between 6.0 and 7.0.
Worm Food – While your worms will get the vast majority of what they require from the soil, here are some items for them to feast on:
Vegetable scraps
Fruit and vegetable peelings
Tea leaves or used bags
Coffee grounds
Vacuum cleaner dust
Torn-up newspapers, egg cartons, or corrugated cardboard
Crushed egg shells (helps control the pH balance)
Not Worm Food – When enriching your soil, the following items should be kept from entering your compost pile or your garden soil. They can alter the soil’s composition and pH to unhealthy or lethal conditions for your worms.
Cat and dog feces
Diseased or insect-infested plants and trimmings
Lemon, lime, orange, or other citrus peels
Onions and garlic
Meat, fats, grease, or bones
Butter, lard, stocks, etc.
Plastics and plastic-coated paper
Bread or yeast products
Tip: The only smell your garden soil or compost pile should have is a slightly sweet and pleasant earthiness that should only be noticeable when working in the garden or when the compost bin is open. Something is wrong if you notice a putrid or rotten smell or your worms attempting to crawl away from the garden or out of the bin.
Essential Worms for The Garden
In this article, you discovered essential information on the importance of worms, how to select healthy worms, and how to care for them.
Integrating healthy worms into your garden or compost pile will create better, more aerated, and nutrient-sustaining soil while increasing its biodiversity.
Ignoring the need for worms in your garden soil could leave it nutrient-poor, compacted, and incapable of sustaining any plant, fruit, or vegetable species.
Sources:
nrcs.usda.gov/sites/default/files/2022-10/Earthworms.pdf
epa.gov/recycle/composting-home
extension.unh.edu/blog/2020/12/should-i-put-earthworms-my-garden
kids.nationalgeographic.com/animals/invertebrates/facts/earthworm
The post Essential Garden Worms appeared first on http://gardeninginfo-online.com.
0 notes
Text
Top 7 Outdoor Hanging Garden Plants
Avoid a dull and lifeless patio or outdoor living space. Knowing which outside hanging plants to use around your patio will help you create a warm, beautiful hanging garden with incredible flowers and an abundance of birds and pollinators to watch and enjoy.
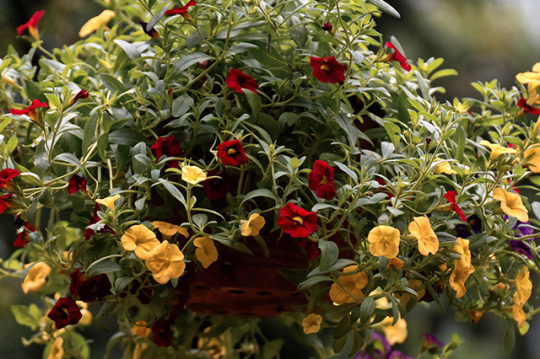
gardeninginfo-online.com gathered species, flowering, planting, and growing information on 7 of the best outdoor hanging garden plants.
1. Begonia (Begonia)

Begonias are attractive perennial herbs with soft, succulent stems and white, pink, red, orange, or yellow flowers.
Flower – Begonias can be found blooming from early summer until the first frost. Some varieties will bloom all year.
Soil Requirements – This species grows best in light, fertile, well-drained soil
Sun Preference – Begonias flourish in part shade (4 to 6 hours of morning sunlight)
Water Needs – Water every two to four days and more frequently when grown in full sun
Hardiness Zone – 2 through 10 (when grown in colder zones 2 through 8, they should be overwintered indoors)
2. Petunia (Petunia)
Petunias are annual flowers that have captivated gardeners with their funnel-shaped flowers with crisped, curled, waved, and doubled variations. The flower’s colors appear from pink to red, lavender, purple, peach, white, cream, and yellow.
Flower – Some petunia varieties grow with a pendulous, cascading habit that makes them more suitable for hanging gardens and window boxes.
Soil Requirements – This species grows best in light, fertile, well-drained soil
Sun Preference – Petunias perform best when located in full sun all day.
Water Needs – A thorough watering once a week is sufficient for this plant species
Hardiness Zone – 2 through 11 (when grown in colder zones 2 through 8, they should be overwintered indoors)
3. Geranium (Pelargonium)
These plants thrive in bright, sunny climates and tolerate moderate to regular watering when planted in well-draining soil. Geraniums are relatively low-maintenance plants and excellent choices for container or hanging gardens.
Flower – Geraniums are abundant bloomers whose bright flowers will blossom from spring until fall.
Soil Requirements – The ideal soil for geraniums is loose with plenty of organic matter
Sun Preference – Most geraniums need a location in full sun (6 to 8 hours)
Water Needs – Check soil weekly and water when the top inch is dry
Hardiness Zone – 3 through 9
4. Strawberry (Fragaria × ananassa)
Strawberries are low-growing herbaceous flowering and fruiting plants with a fibrous root system and a crown from which arise basal leaves. The leaves are compound with three leaflets, sawtooth-edged, and usually hairy.
Flower – Strawberry plants usually begin flowering in late spring, and it takes about four weeks from flowering to ripened fruit.
Soil Requirements – Strawberries grow best in a deep, sandy loam soil rich in organic matter
Sun Preference – Ten or more hours of daily sunlight is ideal, but this species needs six hours minimum of direct daily sunlight
Water Needs – Strawberries require water equivalent to 1 to 1.5 inches of rain per week
Hardiness Zone – Strawberries can be grown as perennials in zones 5 through 8 or as cool-season annuals in zones 9 through 10
5. Spider Plant (Chlorophytum comosum)
The spider plant is among the easiest plants to grow. When grown indoors, it is highly effective in removing harmful chemicals from the air, like carbon monoxide, xylene, formaldehyde, and toluene.
Flower – Spider plants occasionally develop small white flowers at the ends of long arching stems. Often times these flowers are short-lived and inconspicuous.
Soil Requirements – The ideal spider plant soil is loamy, moist, and well-drained
Sun Preference – Spider plants are a low-light species and grow best with 3 to 4 hours of indirect daily sunlight
Water Needs – Water spider plants about once a week
Hardiness Zone – 9 through 11
6. Lobelia (Lobelia erinus)
This showy perennial is typically unbranched but may exhibit slight branching. The erect, 2 to 3-foot stems produce lavender-blue, tubular flowers crowded together on the stem’s upper end. Showy, bright blue, purple, rose, or white flowers are in the axils of leafy bracts and form an elongated cluster.
Flower – Lobelia blooms prolifically for months, with a trailing, spreading, or bushy habit ideal for containers and hanging gardens.
Soil Requirements – This species thrives in a good, fertile, reliably moist soil
Sun Preference – Lobelia performs best in full sun to partial shade (4 to 6 hours of daily sunlight)
Water Needs – Once established, this plant is drought-tolerant and requires watering twice a week during dry periods
Hardiness Zone – 2 through 10
7. Verbena (Verbena)
Verbena (also known as vervain or verveine) is an herbaceous flowering plant. It may be either annual or perennial, depending on the species you choose to grow.
Flower – This species blooms all season long. Verbena looks just as beautiful weaving through garden beds as it does spilling from pots, window boxes, and hanging baskets.
Soil Requirements – Verbena thrives in soil amended with compost but can adapt to many soil types as long as there is good drainage
Sun Preference – Verbenas require a location that receives full sun throughout the day
Water Needs – This species thrives with approximately one inch of water once per week
Hardiness Zone – 7 through 11
Hanging Garden Plants
In this article, you discovered essential species, planting, growing, and flowering information for 7 easy-to-grow outdoor hanging garden plants.
Knowing which outdoor hanging garden plants to grow around your outdoor living area will help you create a beautiful, cozy, and inviting space that benefits pollinators, birds, your guests, and your loved ones.
Not knowing the best hanging garden plants will leave your outdoor spaces barren and less colorful than possible.
Sources:
hgic.clemson.edu/factsheet/begonia/
extension.umn.edu/flowers/growing-petunias
gardeningsolutions.ifas.ufl.edu/plants/ornamentals/geraniums.html
extension.umd.edu/resource/growing-strawberries-home-garden
hort.extension.wisc.edu/articles/spider-plant-chlorophytum-comosum/
gardening.cornell.edu/homegardening/scene3417.html
aggie-horticulture.tamu.edu/archives/parsons/96promotions/verbena.html
The post Top 7 Outdoor Hanging Garden Plants appeared first on http://gardeninginfo-online.com.
0 notes
Text
5 Tall Flowering Plants
Tired of short flowers that are hidden by other plants, or out of sight where no one can appreciate them. Knowing which flowering plants grow tall will help you create a stunning garden with highly visible blooms.
gardeninginfo-online.com gathered essential species, planting, and growing information on five incredible and tall flowering plants.
1. Sunflower (Helianthus)

Annual sunflowers have a large, robust flower head, typically with a large, nearly black central part made up of thousands of tiny florets that later become seeds set in a spiral pattern. The petals typically appear bright yellow, while some varieties can be orange or red shades.
Soil – Sunflowers thrive in more alkaline soil (6.0 to 7.5 pH) and prefer nutrient-rich, well-drained soil. Ensure your soil is weed-free before planting this species.
Sun – Sunflowers require full sun (6-8 hours of direct sunlight daily).
Mature Height – Typical sunflowers grow from 6 to 10 feet tall, with some species reaching 15 to 20 feet.
Blooms – Annual sunflowers will bloom through summer and into autumn (until the first frost).
Hardiness Zone – 4 through 9
2. Lavender (Lavandula)
Perennial lavender plants are typically small, branching, and wide-spreading shrubs with grey-green leaves and long, vibrant flowering shoots. Leaves can be simple or pinnate, measuring 1 to 2 inches. Flowers bloom on shoots that can reach 8 to 16 inches. The flowers can bloom in white, pink, blue, violet, and purple shades.
Soil – Lavender plants thrive in alkaline soil (6.7 to 7.3 pH) and prefer nutrient-rich, well-drained soil. Lavender does not tolerate any excessive soil moisture or humidity.
Sun – Lavender plants require full sun (6-8 hours of direct sunlight daily) but can benefit from afternoon shade in hotter climates.
Mature Height – This species typically grows 20 to 24 inches tall, including its flower stalks.
Blooms – Flowering can occur in May (in regions with mild summers and winters). Another flush of blooms can appear in June, followed by a final bloom in late summer or early fall.
Hardiness Zone – 5 through 9
3. Dahlia (Dahlia)
Dahlias are tuberous perennials, and most have simple leaves that are segmented and toothed or cut. Dahlias are popularly used in wedding arrangements and bouquets. Some of the most popular flower colors include red, orange, yellow, purple, white, and green. Astoundingly, blue is the only color dahlias do not appear in.
Soil – Dahlias will thrive in well-drained, loosened “dirt” soil with a 6.5 to 7.0 pH.
Sun – This species does best in full sun (6-8 hours of direct sunlight daily).
Mature Height – Typical dahlias grow from 4 to 5 feet tall.
Blooms – Dahlia flowers can appear in an impressive variety of colors and range in size from “petite” 2-inch blooms to giant 15-inch flowers.
Hardiness Zone – 8 through 10
4. Coneflower (Echinacea)
Echinacea purpurea, more commonly called “purple coneflower,” is a coarse, hairy, herbaceous perennial native to moist prairies, meadows, and open woods of the central to the southeastern United States.
Soil – The coneflower species thrives in nutrient-rich, well-drained soil with a 6.5 to 7.0 pH.
Sun – This species requires full sun (6-8 hours of direct sunlight daily) but will benefit from afternoon shade in hotter climates.
Mature Height – Typical coneflowers grow from 2 to 4 feet tall.
Blooms – Coneflower blooms from June through August and can appear in pink, red, orange, white, and yellow colors. Most varieties have large single-petaled blooms.
Hardiness Zone – 3 through 9
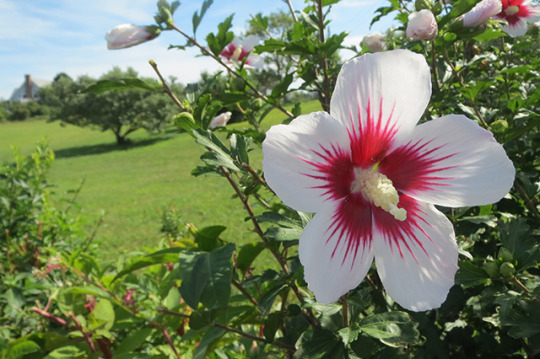
5. Hibiscus (Hibiscus)
Perennial hibiscus leaves are ovate, simple, and 8 to 10.5 cm long. They are spirally arranged around a long stalk. The flowers are bisexual, large, and showy, grow up to 25 cm wide, stalked, and rise singly from the upper leaf axils. The five free petals joined at the base may be white, yellow, or red color.
Soil – Hibiscus grows best in well-drained soil, amended with organic matter. Hibiscus prefers acidic soil with a 6.5 to 6.8 pH.
Sun – Hibiscus does best in full sun (6 to 8 hours). They will grow in partial shade, but maximum growth and flowering will suffer.
Mature Height – Typical hibiscus will grow from 3 to 8 feet tall.
Blooms – With its showy, whorled flowers, this plant regularly attracts butterflies and hummingbirds. These tropical plants come in a wide range of striking colors, including: red, yellow, pink, orange, peach, coral, and white.
Hardiness Zone – 5 through 9
What is the Tallest Perennial?
For your garden, the tallest perennial flowering plant is hibiscus. Plants typically grow from three to eight feet tall, especially if grown in rich, well-drained soil with ample moisture.
Note: The swamp gum, or Australian mountain ash (Eucalyptus regnans), is native to southeastern Australia. The tree can reach heights over 375 feet and is the tallest angiosperm (flowering plant) species.
What is the Longest Flowering Perennial?
Coneflower is a perennial herb that blooms all summer long and is native to North America’s midwestern and southeastern regions. It has significantly tall stems, bears single pink or purple blooms, and has a central purple, orange, or brown cone. The large cone is a seed head with sharp spines.
Tall Flowering Garden Plants
In this article, you discovered 5 tall flowering plant species’ planting, growing, and flowering information to help you grow a striking garden full of thriving color.
By knowing which tall flowering plants to grow in your garden, you can create an eclectic scenery that benefits your senses, pollinators, and environment.
Not knowing which plants grow taller can leave your garden lacking aesthetic diversity and make it appear pretty montonous.
Sources:
extension.umn.edu/flowers/sunflowers
gardening.cornell.edu/homegardening/scene9108.html
plants.ces.ncsu.edu/plants/dahlia/
hortnews.extension.iastate.edu/coneflower-purple-echinacea-purpurea
hgic.clemson.edu/factsheet/hibiscus/
The post 5 Tall Flowering Plants appeared first on http://gardeninginfo-online.com.
0 notes
Text
Poisonous Garden Plants to Avoid
Avoid growing a toxic garden that’s surrounding your landscape, wildlife and loved ones. Knowing which plant species possess toxic traits will help you grow a healthy garden friendly to your surrounding environment.

gardeninginfo-online.com gathered crucial information on identifying what plants are poisonous to humans and wildlife.
1. Deadly Nightshade (Atropa belladonna)

The deadly nightshade is a perennial plant with long, thin branches. Its leaves are oval-shaped with smooth edges and pointed ends. They grow on the plant’s thin branches in an alternate pattern and are poisonous. The most distinctive feature of this plant species is the purple flowers with reflexed petals and a yellow cone at the center, which blooms from late May through August.
Hardiness Zone – 5 through 9
Associated Danger – All parts of this plant are toxic, but the sweet, purplish-black berries that are attractive to children pose the most significant danger. Symptoms of poisoning include rapid heartbeat, dilated pupils, delirium, vomiting, hallucinations, and potential death from acute respiratory failure.
2. Oleander (Nerium oleander)
Often called rosebay, this Mediterranean native is characterized by its tall shrubby habit and its thick lance-shaped opposite leaves. The flowers are borne in terminal clusters and may appear in a rose color, rarely white or yellow.
Hardiness Zone – 8 through 10
Associated Danger – All parts of Nerium oleander (leaves, flowers, stems, twigs, and roots) are toxic. Oleander poisoning can adversely affect the heart, nervous system, stomach and intestines, eyes, and skin.
Note: Cut stems release a sticky latex that can severely irritate the skin. Wear gloves when you handle clippings or remove the plant altogether.
3. Tobacco (Nicotiana tabacum)
This is a plant with leaves containing high levels of the addictive chemical nicotine. After harvesting, tobacco leaves are cured, aged, and processed in multiple ways. The resulting products can be smoked (in cigarettes, cigars, and pipes), applied to the gums (as dipping or chewing tobacco), or inhaled (as snuff).
Hardiness Zone – 2 through 10
Associated Danger – Those who plant, cultivate, or harvest tobacco are at high risk of suffering from nicotine poisoning, known as “Green Tobacco Sickness.” This illness causes severe nausea and vomiting that can lead to hospitalization.
4. Rosary Pea (Abrus precatorius)
Also known as coral bean, crab’s eye, jequirity bean, and prayer bead, Rosary Pea is an ornamental, twining, woody vine reaching heights of 10 to 20 feet when supported by other plants or trees. This plant’s leaves are alternate, compound, and feather-like, with small oblong leaflets. Its flowers are numerous and appear in the leaf axils along the stems.
Hardiness Zone – 9 through 11
Associated Danger – Abrus precatorius is highly toxic and can be fatal if ingested. In its native range, the plant’s roots are used to induce abortion and relieve abdominal discomfort. One of the most deadly plant toxins, abrin, is produced by this species.
5. Castor Bean (Ricinus communis)
Castor bean is a fast-growing perennial large shrub or small tree. This is an evergreen herbaceous or semi-woody species. This robust, tender plant can grow to 40 feet tall, developing woody stems over time in frost-free climates.
Hardiness Zone – 9 through 11
Associated Danger – Ricin is a poison found naturally in castor beans. If castor beans are chewed and swallowed, the released ricin can cause injury. Potentially lethal doses reported for children and adults are three beans and four to eight beans, respectively.
6. Water Hemlock (Cicuta maculata)
Water hemlock has small, white flowers that grow in umbrella-like clusters. Side veins of the leaves lead to notches, not to tips at the outer margin. Poison-hemlock stems have reddish or purple spots and highly-visible streaks.
Hardiness Zone – This species is common throughout the north temperate zone.
Associated Danger – Water hemlock is the most violently toxic plant in North America. Only a small amount of the plant’s toxic substance is required to produce poisoning in wildlife, livestock, or humans. The toxin cicutoxin, acting directly on the central nervous system, is a violent convulsant.
7. White Snakeroot (Ageratina altissima)
Growing 1 to 3 feet in height, white snakeroot is an upright, many-branched perennial with smooth (sometimes hairy) stems and fibrous roots.
Hardiness Zone – 3 through 8
Associated Danger – The leaves and stems of white snakeroot contain tremetol, which is toxic to both animals and humans. Tremetol is an accumulative toxin that takes time to build to toxic levels. The toxin directly affects the heart and causes severe muscular degeneration, loss of coordination, tremors, and an irregular heart rate.
Avoid These Poisonous Garden Plants
In this article, you discovered which plant species are poisonous and sold never be planted in your garden.
Avoiding poisonous plants in your garden will help you support surrounding wildlife while protecting your loved ones from potential poisoning.
Allowing poisonous plant species to flourish in your garden puts wildlife, your pets, and your loved ones at risk of severe illness, hospitalization, or worse.
Sources:
csuvth.colostate.edu/poisonous_plants/Plants/Details/60
plants.ces.ncsu.edu/plants/atropa-bella-donna/
florida.plantatlas.usf.edu/plant.aspx?id=1758
plants.ifas.ufl.edu/plant-directory/abrus-precatorius/
hort.extension.wisc.edu/articles/castor-bean-ricinus-communis/
extension.umass.edu/landscape/weeds/cicuta-maculata
uaex.uada.edu/yard-garden/resource-library/plant-week/Eupatorium-rugosum-Ageratina-altissima-Chocolate-White-Snakeroot-11-15-2019.aspx
The post Poisonous Garden Plants to Avoid appeared first on http://gardeninginfo-online.com.
#Poisonous Garden Plants#Deadly Nightshade#Oleander#Tobacco#Rosary Pea#Castor Bean#Water Hemlock#White Snakeroot#Garden#Gardening
5 notes
·
View notes
Text
How To Attract Birds to Your Garden
Prevent growing a plain and boring garden without any bird attractions. Knowing what birds are attracted to will help you get the right plants and features in your garden to keep them coming around through the seasons.
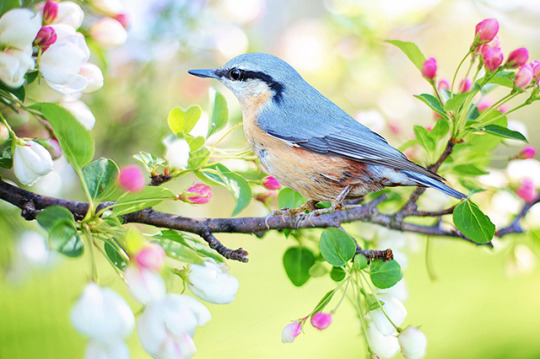
gardeninginfo-online.com gathered information on what plants, features, and food you can add to your garden to attract multiple bird species.
Birdbaths and Water Features
Water is essential for bird survival, and while a simple birdbath can provide ample space for drinking and preening, more elaborate designs like birdbath fountains have many benefits and can attract more birds to any yard and garden.
Since birds find moving water practically irresistible, fountains are a great addition for you. Any type of fountain or water pump will work well. However, solar-operated fountains are the perfect choice because they eliminate the need for extension cords, electrical outlets, and can be easily moved anywhere the sun shines.
Note: Since running or falling water naturally humidifies the air, birds will want to sit close to it. When installing your water feature, create areas for your feathered visitors to land or perch, hydrate, and rest.
Tip: The most attractive birdbaths and water features will mimic nature’s natural birdbaths and water flows like puddles and shallow pools in slow streams.
Bird Feeders

Besides water, birds will also frequent locations where they know food is readily available. Here are a few ways to attract birds with food:
Hopper Feeders – A hopper bird feeder is a type of feeder that holds birdseed in a “hopper” and dispenses it into a tray at the bottom of the hopper. As birds consume the seed, the hopper replenishes the bottom tray, aided simply by gravity.
Hopper feeders are attractive to most birds, including:
finches
Jays
Cardinals
Buntings
Grosbeaks
Sparrows
Chickadees
Note: This type of feeder is also a squirrel magnet.
Peanut Feeder – Peanut feeders are typically shaped like a tire or tube, which can be loaded with peanuts (with or without the shell). These feeders can also be found in round wreath shapes. These types of bird feeders have openings that make birds (and sometimes squirrels) work to get the peanuts out. Blue jays, nuthatches, and woodpeckers particularly love peanut feeders.
Sugar Water Feeder – Sugar water feeders are extremely popular and are typically found in a few standard shapes, including glass bottle, tube, flower, and round dish. Regardless of the shape you select, this type of bird feeder is an irresistible magnet for those incredible hovering hummingbirds.
Log Feeder – Log feeders are amazing if you are looking for an inexpensive DIY project. Take a small log and drill a few medium-sized holes in the side. These holes are for stuffing suet or peanut butter for the birds to eat. Such logs provide a natural perch and are great for woodpeckers, blue jays, and nuthatches.
Nyjer Feeder – These feeders are commonly found as mesh or sock feeders. Due to the nature of these feeders, look for one with a seed catching tray at its bottom. This feature helps prevent the extra mess and wasted seeds from falling to the ground. The seed tray will catch any uneaten fallen seed and provide the birds with an additional opportunity to feed. These feeders are known to attract finches, sparrows, and chickadees.
Note: Nyjer is a small, thin, black seed from the African yellow daisy (Guizotia abyssinica). While commonly referred to as thistle seed, it is not related to the thistle plant.
Flowering Plants
Another way to attract birds to your garden is to grow the flowering plants they love. The following are a few of the most popular flowering plant species that attract birds.
Sunflower (Helianthus spp.) – Plant this easy-to-grow annual in full sun near windows and watch migrating songbirds devour their seeds.
Daisy (Bellis perennis) – These garden favorites form an abundance of nutritious seeds vital for finches, sparrows, cardinals, and towhees winter survival.
Virginia Creeper (Parthenocissus quinquefolia) – This vine produces a fruit that is a vital food source for winter birds, like mockingbirds, woodpeckers, and blue jays.
Shrubs with Berries for Birds
Planting shrubs in your garden and around your landscape can offer vital refuge for multiple bird species. Planting berry-producing shrubs gives birds the added benefit of a nutritious meal while taking refuge in its branches. Consider the following species:
Elderberries (Sambucus) – Elderberries are a group of plants that are ideal for birds. They flower in late spring and are covered with large clusters of berries throughout the summer.
Holly (Ilex) – Hollies are a group of plants that specialize in attracting birds. The added bonus is that with the festive and abundant red berries, this species announces the coming of winter and the holiday season.
Lilac (Syringa) – Lilacs are crucial for their blooms because they provide an abundance of nectar early in the season when food supplies are scarce for hummingbirds. Hummingbirds love the nectar just as much as humans love lilac’s intoxicating fragrance.
Attracting Birds to Your Garden
In this article, you discovered information about which garden features, plants, shrubs, and feeders are best at attracting birds.
By attracting birds to your garden with water features, plants, and shrubs, you are providing them with water, nutrients, and shelter.
Ignoring the need to attract birds to your garden will leave you with a plain and monotonous landscape.
Sources:
ny.audubon.org/conservation/choosing-bird-feeder
bellarmine.edu/faculty/drobinson/holly2.asp
mortonarb.org/plant-and-protect/tree-plant-care/plant-care-resources/plants-and-shrubs-that-attract-birds/
nationalgeographic.com/books/article/top-10-plants-to-attract-songbirds
The post How To Attract Birds to Your Garden appeared first on http://gardeninginfo-online.com.
0 notes
Text
Gardening Tips for Beginners
Prevent the embarrassment of a failed or disease-ridden garden. Knowing some basic gardening knowledge will help you grow a vibrant and healthy garden.
gardeninginfo-online.com gathered the following tips and information on growing a vibrant, colorful, and healthy garden.
Best Gardening Tips for Beginners
Starting a garden can seem like a daunting task, and to a certain degree, it can be. The following tips will help you prepare your garden bed, time your planting, and help you choose the best plant species for a vibrant and healthy garden.
1. Know Your USDA Hardiness Zone
One of the very first things to do for all gardeners is to know in which hardiness zone they will be planting. Basically, the higher the zone’s number, the warmer the climate. So if your plant is hardy to zone 5 and you plant it in zone 6, it will survive in your garden. However, if you plant it in a zone 4 garden, it will not survive in that region’s winter.
Locate your hardiness zone using the interactive map found at planthardiness.ars.usda.gov
2. Plant Selection
Now that you know your hardiness zone, you can safely choose which plant species you want in your garden. Some popular selections include:
Vegetables – Lettuce, carrots, cucumbers, kale, and peas
Herbs – Basil, mint, dill, thyme, lavender, and oregano
Flowers – Azaleas, begonias, roses, daisies, and marigolds
Tip: Temperature or sun-sensitive plants can be planted in containers and moved indoors or to more appropriate locations when needed.
3. Map Your Garden
Mapping out your garden will help you visualize which plants are going where and what adjustments you need to make for them to thrive. Add as much detail as possible to your garden map and refer to it when needed. Include the following data:
What species
Soil pH
Water
Sun
Tip: Include any special requirements your plants may need
4. Know Your Frost Dates
You need to know your area’s last spring frost date, so you don’t risk killing your plants by putting them out prematurely. It’s also important to know your first fall frost date so you can collect your harvest if you are growing vegetables and herbs. This also gives you a time frame for moving your plants indoors or outdoors to prevent frost damage.
Determine your first and last average frost dates by entering your zip code at almanac.com/gardening/frostdates
5. Garden Soil
The ideal garden soil consists of equal parts of sand, silt, and clay. This soil type is called “loam” or “loamy.” Loamy soil has a perfect balance, holding moisture but also draining well. It allows oxygen to reach plant roots and is rich in organic matter.
Tip: Your soil pH can be adjusted by adding agricultural sulfur to make alkaline soils more acidic or agricultural limestone to make acidic soils more alkaline.
6. Water Requirements
A typical flower or vegetable garden requires a minimum of an inch of water per week. Under normal conditions, this should leave the soil soaked to about 5 or 6 inches deep.
Note: Some plant species will require more frequent watering.
Tip: Ensure that your soil drains well but remains moist so your plant’s roots can get the water they need without developing root rot.
7. Mulch Requirements
It is commonly recommended to lay between 2 and 4 inches of mulch in the garden bed. If you want mulch that decomposes quickly, introducing nutrients over time, wood chips are a good selection.
Tip: One of the most effective ways to control weeds, retain moisture, and regulate soil temperature in your garden is to add a thick layer of organic mulch over the soil.
8. Sun Requirement
Depending on the plant species you want to grow, you will need to know how much sun it requires. You will likely have different areas getting different sunlight intensities in larger gardens. Consider the following to guide your planting locations:
Full Sun – These plants need a minimum of 6 hours of direct sun per day
Part Sun – Plants will thrive with 3 to 6 hours of direct sun per day
Part Shade – Plants require 3 to 6 hours of sun per day but must be protected from the intense mid-day sun
Full Shade – These plants require less than 3 hours of direct sun per day.
Tip: Planting in containers will allow you to move your plants around according to their needs.
Gardening Tips
In this article, you discovered crucial information and tips to help you grow and maintain a vibrant garden.
Knowing what to plant and how to care for your garden will help you create the perfect environment for a spectacular array of flowers, plentiful vegetables, and continuous beauty through the growing season.
Ignoring your garden’s needs and basic care can result in poor plant development, stunted growth, disease, and weed overgrowth.
Sources:
purdue.edu/hla/sites/yardandgarden/gardening-tips-for-beginners/
extension.illinois.edu/blogs/good-growing/2020-04-01-starting-garden-soil-management
extension.missouri.edu/news/tips-on-watering-your-garden-4683
cals.arizona.edu/yavapai/anr/hort/byg/archive/mulches2013.html
The post Gardening Tips for Beginners appeared first on http://gardeninginfo-online.com.
0 notes
Text
5 Must Have Vegetables in Your Home Garden
You don’t have to grow a dull vegetable garden full of vegetables that no one wants to eat. Knowing which vegetables to grow in your home garden will keep your family fed, healthy, and happy.
gardeninginfo-online.com gathered growing information on 5 easy-to-grow vegetables for your home garden, their needs, and when to harvest them.
1. Lettuce (Lactuca sativa)
Lettuce or Lactuca sativa is a leafy annual or biennial plant in the Asteraceae family grown specifically for its leaves used as a salad green. The lettuce plant can vary in size, shape, and leaf type(depending on the variety), but generally, this plant’s leaves will form a dense head or loose rosette.
Uses – Lettuce can be eaten in many ways besides being chopped up in a salad. Here are a few of those alternatives:
Juice or green smoothie
Lettuce wraps
Topped like a cracker
Layered into spring rolls and wraps
Seared or sautéed
Grilled
Braised
Sun Requirements – Ideally, lettuce plants need at least 6 hours of sun per day. However, lettuce will still grow if it receives less than that.
Soil Requirements – Well-drained sandy loam soils with a loose consistency and organic matter help this leafy vegetable thrive.
Ideal Soil pH – Soil best supports lettuce growth with a 6.0 to 6.5 pH.
Hardiness Zone – 2 through 11
Expected Harvest Time – Leafy lettuce varieties can reach maturity in as little as 30 days but can be harvested when they reach your desired size. Other lettuce varieties need 6 to 8 weeks to reach harvesting size.
2. Tomatoes (Solanum lycopersicum)
Tomatoes are usually found to be red, scarlet, or yellow. However, green and purple varieties can be cultivated, and they vary in shape from spherical to oval and elongated to pear-shaped. Individual fruits contain at least two cells or chambers filled with tiny seeds immersed in a jellylike mildly acidic pulp.
Uses – Tomatoes are beloved for their culinary versatility. Here are a few ways fresh tomatoes can be used:
Caprese Salad
Gazpacho
Bruschetta
Sandwich Topping
Salsa
Pasta Sauce
Lasagna
Sun Requirements – Healthy tomato growth and fruit production require eight hours of direct daily sunlight.
Soil Requirements – Tomatoes will thrive in loam and sandy loam soils, but these plants will grow in nearly all soil types except heavy clay.
Ideal Soil pH – Tomato plants thrive in slightly acidic soil with a 6.2 to 6.8 pH.
Hardiness Zone – 2 through 11 (tomato plants will keep growing until the first frost).
Expected Harvest Time – Tomatoes will typically be ready to harvest in 60-85 days after planting seedlings in your garden.
3. Peppers (Capsicum)
Peppers are vegetables with variable shapes, sizes, and colors. Pepper varieties can grow green, red, yellow, orange, or even black fruits. Its taste can vary between sweet and spicy.
Uses – Here are a few ways garden-grown peppers can be used:
Stuffed with Tomato Couscous
Bell Pepper Cornbread
Roasted Pepper & Butternut Squash Soup
Roasted Red Pepper Soup
Turkey Stuffed Bell Peppers
Sun Requirements – Pepper plants need at least 6 to 8 hours of daily sunlight.
Soil Requirements – Peppers prefer rich, sandy, or loamy soil, which keeps the ground well-drained and warm.
Ideal Soil pH – Peppers thrive in slightly acidic soil with a 6.5 to 7.0 pH.
Hardiness Zone – 9 through 11 (must be shielded from frost in colder zones)
Expected Harvest Time – With ideal growing conditions, peppers will typically be ready for harvest within 70 to 80 days.
4. Cucumbers (Cucumis sativus)
The cucumber plant is an annual with a rough trailing stem. Its hairy leaves have three to five pointed lobes, and the stem bears branched tendrils. Its five-petaled yellow flowers are unisexual, and the cucumbers are a long, thin vegetable with tough, green skin and wet, semi-transparent flesh.
Uses – These are a few ways garden-grown cucumbers can be used:
Pickle them
Make frozen treats
Add them to smoothies
Toss them in drinks
Make gazpacho
Add them to a stir fry
Sun Requirements – Cucumbers thrive in full sun but will grow with just 5 hours of daily sun.
Soil Requirements – Cucumbers do best in loose sandy loam soil. However, they can be grown in nearly any well-drained soil.
Ideal Soil pH – Cucumbers thrive in slightly acidic soil with a 6.0 to 6.5 pH.
Hardiness Zone – 4 through 12
Expected Harvest Time – This species requires a long growing season, and most varieties are ready for harvest in 50 to 70 days from planting.
5. Brussels sprouts (Brassica oleracea var. gemmifera)
Brussel sprouts are a cultivar of cabbage in the Brassicaceae family grown for their edible tiny leafy green buds, resembling mini cabbages. The plant has long, smooth leaves which can be green to purple in color and are arranged alternately on the stem.
Uses – Usually served as a side dish, here are some more ways Brussels sprouts can be prepared:
Roasted Brussels sprouts with garlic
Oven-roasted Brussels sprouts with balsamic vinegar
Holiday dinner side vegetables
Roasted Brussels sprouts accompanying butternut squash and cranberries
Sun Requirements – Brussels sprouts require a minimum of 6 hours of daily sunlight for optimal growth.
Soil Requirements – This vegetable can be grown in nearly any well-drained, fertile soil.
Ideal Soil pH – Brussels sprouts grow best in soil with a pH between 6 and 7.
Hardiness Zone – 2 through 10
Expected Harvest Time – Brussels sprouts are typically ready for harvest 90 to 110 days after planting.
Garden Vegetables
In this article, you discovered several popular and easy-to-grow vegetables for your home garden, what they require for maximum growth, and when they should be harvested.
Growing your own vegetables can be rewarding with a large harvest, food on your table eliminating store-bought vegetables, and just better-tasting food.
Not planting vegetables in your home garden will leave you dependent on your grocery store’s supply chain availability, exposed to potential chemical consumption from insecticides, and inferior vegetable quality.
Sources:
extension.umn.edu/vegetables/growing-peppers
extension.umd.edu/resource/brussels-sprouts
extension.uga.edu/publications/detail.html?number=C1034&title=Growing%20Cucumbers%20in%20the%20Home%20Garden
njaes.rutgers.edu/fs678/
hgic.clemson.edu/factsheet/lettuce/
The post 5 Must Have Vegetables in Your Home Garden appeared first on http://gardeninginfo-online.com.
0 notes
Text
How To Attract Bees To Your Garden
Prevent your garden from infertile or dying plants due to not being pollinated. Knowing how to attract bees to your garden will help it grow strong and beautiful.
gardeninginfo-online.com gathered information on why bees are needed for healthier plants, how to attract them, and what to avoid.
Why Do We Need Bees?
Bees play a significant role in local, state, and national agriculture. They meticulously pollinate crops, increasing yields and supporting the honey industry. Bees are so incredibly essential that millions are spent each year renting beehives to pollinate crucial crops.
Over one-third of all the food we consume relies on bee pollination. Approximately 90 percent of all flowering plants require pollinators to survive. In agriculture, roughly a third of pollination is accomplished by honeybees. Almonds, carrots, melons, apricots, pears, apples, prunes, plums, onions, avocados, kiwi, blueberries, and so many more depend on bee pollination to yield their fruit. Without these pollinators, the majority of these crops would simply disappear.
Your garden benefits from healthier, more resilient plants, and for those growing vegetable gardens, you can look forward to increased harvest size and health.
What Attracts Bees?
Every garden (including yours) needs pollinators, and bees are among the most efficient. Without bees, flower production would be severely limited and, as a result, even fewer fruits and vegetables. Since bees contribute so much to the livelihood of a garden, it is worth your time and effort to make your garden an inviting destination for them. Consider the following:
Flowers – Bees are highly attracted to blue, purple, violet, white, and yellow flowers. Flat or shallow blossoms tend to attract larger bee species because pollen and nectar are more easily accessed.
Plant flowers in large clusters. Bees are more likely to return to highly visible flower beds. It is vital to plant a variety of flowers that bloom from late winter through late fall (different bee species are active at different times of the year). Wildflowers and native plants will supply bees with an excellent source of pollen and nectar.
Flowering Fruits and Vegetables – Planting vegetables like zucchini and tomatoes or fruits like cherries and strawberries (species that blossom before bearing their fruit) are excellent for attracting various bee species.
Water – Bees need water to hydrate themselves, cool down their hives in the summer months, and dilute their honey in the winter. Provide a shallow watering station somewhere in your garden and watch as bees stop for a drink.
Ground Cover – Planting ground cover like clover, coleus, and wild thyme can offer bees a safe place to hide and rest between feedings and flights.
Shelter – While some assume that bees only live in hives, the vast majority of them are actually solitary. Creating a safe nesting habitat in your yard (near your garden) will help your region’s native bee population thrive.
This shelter can be constructed from material like wooden blocks with holes, hollow bamboo shoots or reeds tied together, or piled-up wood shavings, all serve as excellent nesting materials.
Ground nesting bees require protected bare patches of slightly compacted soil to excavate and populate brood chambers.
Garden Location – Like many of the plants, shrubs, and trees we grow, bees tend to favor sunny locations over shaded ones and require shelter from strong wind.
What To Avoid in Your Garden
While bees are resilient and highly adaptable, they are not indestructible and can be adversely affected by the following:
Pesticides – Many pesticides (even those labeled organic) are acutely toxic to bees and result in their death. Pesticides containing Carbamates, organophosphates, chlorinated cyclodienes, synthetic pyrethroids, and neonicotinoids are highly toxic to bees.
An alternative to pesticide use is the release of predators like ladybird beetles (ladybugs) and birds that will quickly and efficiently decimate many pest infestations.
Drought – Keeping your garden well-watered will help prevent plant death and create an “oasis” for crucial pollinators like bees during times of drought.
Vinegar – Some homemade pesticides and herbicides include vinegar in their ingredients. Bees cannot handle vinegar exposure, causing their death almost instantaneously.
Note: Bees and other insect pollinators like butterflies, wasps, and beetles are being challenged by the same environmental changes as other wildlife species, including habitat loss, non-native invasive species and diseases, pollution, and climate change.
Bees in Your Garden
In this article, you discovered why bees are so important to agriculture, how to attract them to your garden, and what you should avoid.
Knowing how to create an inviting ecosystem that supports pollinators like bees will help your garden thrive and support your local bees.
By not trying to attract bees to your garden, you are adding to the stress bees already face and could contribute to the failure of entire hives.
Sources:
beespotter.org/topics/beegarden/
gardeningsolutions.ifas.ufl.edu/design/gardening-with-wildlife/gardening-for-bees.html
cms.business-services.upenn.edu/morrisarboretum-blog/303-agriculture-and-bees-what-consumers-need-to-know.html
valenciaextension.nmsu.edu/documents/bee-friendly-garden-list.pdf
The post How To Attract Bees To Your Garden appeared first on http://gardeninginfo-online.com.
0 notes
Text
5 Good Bugs for Your Garden
Prevent harmful insect infestations from causing your garden health to decline. Knowing which garden bugs are beneficial will help you cultivate a healthier and more robust garden.
gardeninginfo-online.com gathered information about 5 good garden bugs, the insects they feast on, their preferred plant, and how to protect them.
Beneficial Garden Insects
Not all insects mean you or your garden harm. In fact, there are several insect species that prey on other destructive insects and even those that strengthen your garden’s health by serving as pollinators. The following are some of the insects you should welcome into your garden:
1. Ladybugs (Coccinellidae)
Ladybugs are small insects and usually rounded in shape. Their wing covers (elytra) can be seen in yellow, orange, or red, typically with small black dots on them. Some ladybug species are solid black, and all of them have black legs, heads, and antennae.
Diet – Ladybugs voraciously devour plant-eating insects, like aphids, and in doing so, they help protect plant and crop health. Ladybugs lay hundreds of eggs amidst colonies of aphids and other plant-eating pests.
Favorite Plant – Their favorite plants include marigolds, geraniums, sunflowers, calendula, cilantro, and dill.
Shelter/Protection – You can buy or build a ladybug shelter then hang or position it near any of the plants mentioned above.
Lifespan – Adult ladybugs live up to one year.
2. Praying Mantis (Mantodea)
Mantises are an order of insects containing nearly 2,500 species. Mantises can be found worldwide in temperate and tropical wooded and garden habitats. They have triangular heads with bulging eyes supported on flexible necks.
Diet – Gardeners and farmers worldwide welcome mantises because the insects they consume are often detrimental to gardens and crops. In addition to insects like crickets and grasshoppers, their appetite extends to spiders, frogs, lizards, and even small birds.
Favorite Plant – Praying mantises are attracted to plants like fennel, marigolds, and dill.
Shelter/Protection – Praying mantises like to hide in plants and grassy areas.
Lifespan – A praying mantis will live approximately 6 months in the wild and up to two years in captivity.
3. Bees (Anthophila)
Most bees are found to have short, thick bodies covered with hair and, like all insects, six legs and three body parts, including a head, a thorax, and an abdomen. The thorax, in turn, has three segments, each with a pair of legs. A small waist connects the thorax and abdomen. Only female bees have stingers.
Diet – Honey bees spend most of their lives collecting pollen and nectar from flowering plants, including milkweed, dandelions, clover, and many flowering trees. It is the workers that forage for food, consuming as much nectar from each flower as they can while subsequently pollinating the plants they visit.
Favorite Plant – Among sunflowers, daisies, honeysuckle, mint, clover, lilacs, lavender, and wisteria, bees are attracted to and will pay multiple visits to most flowering plants and trees.
Shelter/Protection – Bound hollow reeds or simple cardboard tubes placed in sheltered areas are a perfect habitat for solitary, hole-nesting bees.
Lifespan – The lifespan of a typical worker honey bee ranges from 30 to 60 days.
4. Dragonflies (Anisoptera)
Dragonflies have long, delicate, transparent wings, with some having light yellow coloring near the tips. Their bodies are long and slender, and they have short antennae. Dragonflies are very colorful, agile, and indiscriminate predators.
Diet – Adult dragonflies will consume any insect they can catch. They usually prefer eating mosquitoes, flies, gnats, and mayflies. However, their diet can include butterflies, moths, bees, and even other dragonflies. Dragonflies will eat their own weight in insects daily. This insect is extremely agile and catches its prey while in flight.
Favorite Plant – Dragonflies typically breed around water. Their offspring need places to hide, and they love submerged and floating pond plants (eelgrass, baby pondweed, water lilies, and lotus flowers).
Shelter/Protection – Dragonflies will seek shelter from wind, rain, and predators in densely-branched trees and shrubs, thick ground vegetation, evergreens, or even a tree cavity.
Lifespan – Dragonflies can live from 10 to 60 days on average, with some adults reaching as much as 6 months with ideal weather conditions.
5. Butterflies (Rhopalocera)
A butterfly is a flying insect with a small body and large, often colorfully patterned wings. Butterflies are closely related to moths, which also have large wings in proportion to their bodies and antennae. A butterfly is distinctive because of its relatively large size and beautifully “painted” wings. The life of butterflies is closely bound to flowering plants, shrubs, and trees on which their larvae (caterpillars) feed on, and their adults pollinate, feed on, and eventually lay their eggs on.
Diet – Because of straw-like mouthparts (proboscis), butterflies are almost completely restricted to a liquid diet. Butterflies use their proboscis for drinking nectar from flowers. While plants like dill, fennel, and milkweed provide sustenance for butterfly larvae.
Favorite Plant – Butterflies prefer nectar and pollen-rich blooming plants like wildflowers and multiple flower varieties. Blooming annuals, perennials, and shrubs provide a continuous supply of nectar and pollen throughout the growing season.
Shelter/Protection – Butterflies look for shelter from the rain when the skies start to grow dark and periods with strong winds. They effortlessly cling to the underside of leaves, climb deep into tall grasses, or hide themselves in rock cracks or deep fissures in tree bark.
Lifespan – Most butterfly species can live for 4 weeks, with some living several months and even fewer reaching 1 year.
Beneficial Garden Insects
In this article, you discovered several beneficial garden insects, the bad insects they eliminate, their preferred plants, and how to help them thrive.
Attracting and supporting beneficial insects in your garden will improve plant integrity, your garden’s overall health, and prevent nuisance insects from causing a catastrophic infestation.
Allowing bad insects to thrive in your garden will result in unhealthy, damaged, infested, and dying plants.
Sources:
extension.uga.edu/topic-areas/animal-production/bees.html
uky.edu/hort/butterflies/all-about-butterflies
gardeningsolutions.ifas.ufl.edu/design/gardening-with-wildlife/dragonflies.html
today.tamu.edu/2021/12/03/are-ladybugs-harmful/
texasinsects.tamu.edu/praying-mantis/
The post 5 Good Bugs for Your Garden appeared first on http://gardeninginfo-online.com.
0 notes
Text
7 Herbs for Your Hanging Garden
Avoid planting slow-growing, inactive or unattractive herbs in your hanging garden. Knowing which herbs grow best in a hanging garden will ensure you harvest fresh herbs consistently.
gardeninginfo-online.com gathered information about seven popular herbs that thrive in a hanging garden environment.
Why Hanging Gardens?
Since ancient times when the Hanging Gardens of Babylon were deemed one of the world’s seven wonders, hanging gardens have been a popular go-to for home gardeners with limited space.
Whether you have hanging pots and containers along the border of your balcony or a wall-mounted series of indoor planters, the following seven herbs will flourish while providing fresh, tasty, and aromatic seasonings for your food.
1 – Lavender (Lavandula)
Lavender is a perennial flowering herb that’s native to the Western Mediterranean. Different varieties of lavender plants flourish in different hardiness zones. Still, most of the lavender species are hardy in Zones 5 to 11.
(Full sun and well-drained soil) Lavender thrives in low to moderately-fertile soils. Avoid amending the soil with organic matter before planting. Lavender will perform best in neutral to slightly alkaline soils.
Harvesting lavender flowers in early spring will allow the plant enough time to produce another round of blooms in late summer to fall.
2 – Dill (Anethum graveolens)
Dill is an annual herb belonging to the celery family and is the only species in the genus Anethum. Dill is grown widely in Eurasia, where its leaves are used as an herb, and its seeds are used as a spice for flavoring food. Being rich in antioxidants and an excellent source of vitamin C, magnesium, and vitamin A, dill may possess multiple health benefits, including protection against heart disease and cancer. This species is hardy in zones 2 to 11.
(Full sun and moist, well-drained soil) Dill thrives in slightly acidic soil, rich in organic matter. Growing dill indoors is possible, as long as you provide enough light.
Indoors, dill plants should be located where they will receive at least 5 to 6 hours of direct sunlight daily. Your dill should be ready for harvest within 8 weeks after sowing the seeds.
3 – Basil (Ocimum basilicum)
Basil is a culinary herb in the Lamiaceae family. Basil is native to tropical regions from Central Africa to Southeast Asia. This tender plant is used in cuisines worldwide. There are multiple basil varieties and several related species, also referred to as basil. Most basil species are hardy to zones 10 to 11.
(Full sun and moist, well-drained soil) Basil plants thrive in rich soil with lots of organic matter, such as compost, and require a pH of 6.0 to 7.0.
Begin harvesting basil at any time by clipping fresh young leaves as needed. If you want to harvest whole stems, make your cut just above a pair of leaves, and the ensuing new growth will occur at the cut point.
4 – Chives (Allium schoenoprasum)
Chives belong to the same family as onion, leeks, and garlic. They are a tough, drought-tolerant perennial reaching about 10-12 inches in height. They tend to grow in clumps from underground bulbs and produce fine, round, hollow leaves. This species is hardy to zones 3 to 9.
(Full sun and moist, well-drained soil) Chives thrive in soil rich in organic matter. A soil pH kept between 6.0 and 7.0 is best. This species tolerates light shade but thrives with six to eight hours of direct sunlight daily.
Harvest your chives throughout the growing season to prevent the leaves from toughening and to encourage the formation of new bulbs. Cut leaves at the base about an inch above the soil.
5 – Cilantro (Coriandrum sativum)
Cilantro, also known as Chinese parsley, dhania, or coriander. All parts of this plant are edible, but the fresh leaves and the dried seeds are the parts most traditionally used in Mexican and Indian cooking. This herb species is hardy to zones 2 to 11.
(Full sun – until summer then partial sun – and moist, light, well-drained soil) Cilantro will grow best in airy, light, fast-draining soil with perlite or sand mixed in to increase its drainage. In a container, you should use a premium potting mix with a 6.5pH rather than regular garden soil.
The best time to harvest cilantro leaves is in the morning. Harvest them once a week or take individual leaves when needed.
6 – Mint (Mentha)
Like basil, mint is a genus of plants in the Lamiaceae family or mint family. Mint is a creeping plant that sends out shoots underground, and most varieties of this species will grow as a perennial in zones 3 to 8.
(Full sun or part shade and moist, well-drained soil) Mint is a vigorous grower that likes organically-rich soil with a neutral pH of 6.0 to 7.0.
Harvest mint foliage at any size by pinching off stems. For a large harvest, cut the whole plant to just above the first or second set of leaves.
7 – Rosemary (Salvia rosmarinus)
Also a member of the Lamiaceae family, rosemary is a shrub with fragrant, evergreen, needle-like leaves and white, pink, purple, or blue flowers. It is commonly used as a flavoring in a variety of dishes, like soups, casseroles, salads, and stews. This species is hardy to zones 7 to 10.
(Full sun and moist, well-drained soil) Plant rosemary in loamy soil maintained at a pH between 6.0 and 7.0. Add fertilizer or organic material to the soil each spring for enhanced growth.
Harvest rosemary in the spring or summer. Rosemary grows most vigorously at this time, making it the best time to harvest. Take 4 to 6-inch sprigs from branch tips for culinary use and strip the leaves off the stems. Avoid pruning more than a third of the plant at one time.
Hanging Herb Gardens
In this article, you discovered 7 of the more popular herb species that thrive in hanging gardens and their individual growing requirements.
Planting a hanging herb garden makes it so you can harvest fresh flavor and seasonings throughout the growing season and, in some cases, year-round.
Trying to grow all your herbs in the same place with the same conditions will likely cause stunting, wilting, and premature plant death.
Sources:
agrilifeextension.tamu.edu/library/gardening/dill/
plantvillage.psu.edu/posts/3937-lavender-growing-lavender-indoors
extension.umn.edu/vegetables/growing-basil
web.extension.illinois.edu/herbs/chives.cfm
canr.msu.edu/news/the_short_sweet_life_of_cilantro
gardeningsolutions.ifas.ufl.edu/plants/edibles/vegetables/mint.html
plants.ces.ncsu.edu/plants/salvia-rosmarinus/
The post 7 Herbs for Your Hanging Garden appeared first on http://gardeninginfo-online.com.
0 notes
Text
9 Garden Makeover Ideas on a Budget
Prevent your garden from looking ugly and unkempt. Knowing how to spruce up your garden with an inexpensive makeover will help you maintain it as a neighborhood showstopper.
gardeninginfo-online.com gathered information about 9 easy and cheap ways to makeover your garden.
Garden Makeover
Your garden makeover doesn’t have to include expensive fixtures and overpriced landscapers. Most changes and updates can be DIY and surprisingly inexpensive. The following are simple ideas to help you put a new face on your garden:
1. Use Hanging Baskets and Pots
Baskets and pots can solve your space problem if your garden is challenged for space, while naturally brightening up any outdoor environment, and you don’t need an expert gardener to plant in them. There’s a wide variety of hanging baskets and decorative pot types for all budgets.
2. Grow Plants from seed
The absolute cheapest way to grow a thriving garden is to sow your own seeds. Whether you choose flower seeds or vegetable seeds, remember to look over and consider the seed packet size. Some packets may contain more seeds than you can sow in the average or small garden in a year.
Note: To give your seeds and plantings the best chances for vigorous growth, see how to make your own soil at gardeninginfo-online.com/how-to-make-organic-soil/
Tip: Find seeds at home improvement centers, online retailers, or DIY stores.
3. Define Your Lawn’s Perimeter
One of the most straightforward and inexpensive ways to transform your garden is to trim and shape the lawn around it into a clearly defined shape. Popular designs include something like a circle, a square, or a rectangle. Just mark it out with string, chalk, or paint. Then use a spade to cut away the excess grass. Finally, use bricks, stones, or other lawn edging to further define the separation of your lawn from other components of your yard.
Note: This is not a challenging project and should only take an afternoon to complete.
4. Paint the Background
If your fences, shed, or structures surrounding your garden are looking abandoned or run down, give them a new coat of paint and brighten up the garden. There are many wood paints and stains available in a variety of colors and qualities. It’s recommended to use paint specifically for wood protection to ensure your fences or sheds are protected from the elements and prevented from undue aging.
Tip: The color you should select is black, or the darkest available color that compliments your home’s design.
This is a great (and inexpensive) garden idea to create an immediate impact. And don’t forget, you can give your plant pots a makeover by painting them too.
5. Use Containers for a Patio Garden
No lawn or garden space? Your solution may be container gardening. This gardening style is an effortless way to get your garden looking beautiful with blooming and hanging flowers and is especially ideal for patios, balconies, or other paved areas. Containers can restrict root growth, so an even water supply and good drainage system are essential for vigorous growth.
6. Attract Birds
If it’s garden ideas for wildlife that you desire, you could place or hang a bird feeder, build a birdbath, or install a birdhouse. The more birds you can attract to your outdoor space will increase your chances of being serenaded by the bird songs of your little visitors. This is great for your overall well-being. In fact, some research demonstrates that listening to singing birds can help lower stress and fatigue, and combat anxiety.
7. Completely Transform Your Garden with Lights
Outdoor lights provide a fast, simple, and cheap way to bring an attractive glow to your garden or outdoor space. Solar garden lights are popular and readily available in multiple quantities, colors, styles, and intensities, or you can select battery-operated outdoor lights, which include string lights and lanterns.
Tip: If you’re using fairy or miniature lights, you can thread them through trees or shrub branches, line them along fences and outdoor furniture, or suspend them from fixtures in your yard for an eclectic evening appearance.
8. Install a DIY Pond
Another great and effortless way to attract wildlife to your outdoor space and garden is with a pond (and it won’t cost you very much at all). First, collect pebbles and stones, then dig a hole in the designated area, protect the bottom of the hole with a pond liner, and hide/cover it using the pebbles and stones. Finally, fill it with water to create a pond.
9. Gravel Pathways
Gravel is a much more affordable surface than paving for pathways and patios. To lay it in place, start by marking out the area, remove loose soil and grass, pin down a permeable membrane to stop any weeds from coming through, and spread gravel over it. A depth of 2.5 to 3cm works very well. Typically, a large bag of gravel will cover around 200 sq.ft.
Read more about installing a gravel pathway at gardeninginfo-online.com/how-to-make-a-garden-path-with-gravel/
10. Bonus Idea – Plant Trees
Considering their beauty, size, and longevity, trees are an inexpensive way to modify the appearance of your garden. And just a few trees will make a difference to the look of your entire landscape. Try small trees like crab apple or a citrus fruiting variety. Three or four trees should be more than enough for the average-sized garden.
Cheap Garden Makeover Ideas
In this article, you discovered multiple inexpensive ways to update or completely makeover your garden space.
By keeping your garden fresh and diverse, you will have more flowers blooming and will be harvesting more from hardier plants.
Neglecting your garden can lead to ugly overgrowth and a space full of weeds and undesirable insect and animal inhabitants.
Sources:
gardeningsolutions.ifas.ufl.edu/design/outdoor-living/walkways.html
extension.oregonstate.edu/news/create-garden-pond-wildlife
pss.uvm.edu/ppp/articles/birds.htm
web.extension.illinois.edu/containergardening/hanging.cfm
The post 9 Garden Makeover Ideas on a Budget appeared first on http://gardeninginfo-online.com.
0 notes
Text
How To Care for Your Potted Christmas Tree
Prevent your potted live Christmas tree from dying in your home. Knowing how to handle and care for a potted evergreen or pine tree can help you prevent a fire and keep your tree thriving through the holidays.
gardeninginfo-online.com gathered information about the benefits of a potted, live Christmas tree, how to bring your live Christmas tree indoors, when to move it back outdoors, and care tips to help you keep it flourishing beyond the holiday season.
What Is A Potted Christmas Tree?
As you shop for a live, potted Christmas tree, ask the merchant if the tree was:
Container-grown or
Dug up and potted
This information is crucial in helping you understand the health and vigor of the tree you are purchasing. Container-grown trees have a root ball that grew and developed in the container and are said to be stronger than a root system that was dug up and replanted.
Basically, what you are purchasing is a temporary houseplant, and there are some simple rules to follow that will help you keep it alive and thriving.
Live Potted Christmas Tree Care
Like any other potted tree or plant, there are things to do that keep them in good health. In the case of live potted Christmas trees, here is what you can do to care for them and keep them flourishing:
Purchase a Healthy Tree – Before buying your tree, check it for the following:
Signs of yellowing or drying out
The presence of fungi, decay, or rot
Evidence of boring insect activity
Note: Avoid heavily damaged, poorly formed, and generally sick or droopy-looking trees.
Live Christmas Tree Acclimation – Don’t make the mistake of buying your tree and immediately bringing it into your home. This temperature-controlled environment can cause the tree to go into shock and die. Instead, Find a place in your garage or a shed adjacent to your home and let it get accustomed to new temperature variations. Three to four days should do the trick.
Water Your Tree – Water your tree with just enough cold water to keep the soil damp. The intent isn’t to saturate the soil, rather to keep the roots moist and cool.
Note: Under watering your tree will leave it brittle and dying. Overwatering your tree will cause root rot and rapid tree death.
Tree Location – Your tree’s location in your home will significantly influence its capability to survive the holiday season. The following heat sources can accelerate the tree’s desiccation and increase the potential for the tree’s death or fire ignition:
Space Heaters
Heat Radiator
HVAC Vents
Fireplace
Windows in Direct Sunlight
Note: The more quickly you can get your tree out of your home, the less it will acclimate to the indoor environment and increase its readjustment to your area’s hardiness zone.
Fast In and Fast Out – From the time you move your tree indoors, you have 12 to 15 days before you should get it back to where you initially acclimated it. The longer the tree remains indoors, the more difficult it will be to keep it alive after planting it outside.
Tip: Timing is everything. Bring your live tree indoors the weekend before Christmas and move it back out immediately after your holiday festivities.
What Are The Benefits of a Live Potted Christmas Tree?
If you have decided to use a live potted Christmas tree this season, congratulations! Here are a few of the amazing benefits you will get with it:
After serving as your Christmas tree, you get to plant it outside and enjoy it for decades to come.
Using a live, fresh tree significantly reduces fire hazards presented by artificial or cut trees.
Live, potted evergreen trees have an amazing scent that is nearly impossible to replicate. Rather than burning a candle or using another type of artificial pine scent, you will get it naturally from your Christmas tree.
Start a new family tradition of selecting the tree, then choosing a location to plant it after the holidays.
The tree becomes a conversation topic. “How cool is a live potted tree?”
If you keep it potted, you can use it multiple seasons (once the tree reaches over six feet in height, hauling it indoors may become impractical)
Note: When choosing a live potted tree, you are helping the environment by reducing the amount of plastics and artificial materials making their way to landfills
Tip: Once your tree reaches over 6 feet tall with a heavy root ball, consider planting your tree out in the yard or garden where it will get plenty of sun. If you lack room for such a tree, check with your community officials for tree donation programs to public properties or parks.
Potted Christmas Trees
In this article, you discovered what a live potted Christmas tree is, how to care for one, and when to return it to its environment.
By using live potted Christmas trees, you are being proactive in promoting a healthier environment and adding a touch of charm to the holiday season.
The use of artificial trees exacerbates the environmental problem of undesirable plastics going to waste dumps and incinerators.
Sources:
gardeningsolutions.ifas.ufl.edu/plants/trees-and-shrubs/trees/living-christmas-trees.html
extension.unh.edu/blog/2019/11/living-christmas-trees
canr.msu.edu/news/living_christmas_trees_another_real_tree_option
The post How To Care for Your Potted Christmas Tree appeared first on http://gardeninginfo-online.com.
0 notes
Text
5 Tips for Making Your Garden Magical
With everything going on in the world, gardening has become the hobby of choice for many who have been forced to stay at home due to social distancing restrictions. Research on urban gardening shows that people who cultivate their own gardens develop healthier habits. They’re less stressed, eat fresh produce, and exercise more often.
As humans, we usually turn to the natural world when we want to heal. Being outside helps us manage our complicated feelings and get out of our own headspace — which is amazing by its very nature. To further tap into the powers of nature, here are five tips to make your garden more magical:
Plan the layout first
Before doing anything to change your garden, it’s important to clear it first. Get rid of overgrown plants, deal with uneven ground, and identify any pests to avoid more work down the line. You don’t want to work with a wild and messy garden; you need a blank canvas if you’re going to undertake any sort of successful project.
Once you’ve prepared the space and figured out any restrictions, begin designing your garden. You can include a small table, a gate, an arch, or even a corner to meditate. You can also create sections in your garden by making pathways. These pathways can be made of stones of the same size, or you can have fun with it and use different shapes and sizes in a more creative manner.
Try moon gardening
Gardening by the phases of the moon is a concept that has been around since humans began growing food. This ancient growing theory suggests that the water in the ground and in our plants are affected by the gravitational pull of the moon, just like the ocean tides. This means that when the tides are highest, seeds will likewise absorb more water.
To practice moon gardening, you’ll need to rely on a calendar to watch out for the best days to sow, plant, or weed. As a general rule of thumb, all crops aboveground should be planted when the moon is waxing, while root crops do best when the moon is waning. In the last quarter of the moon cycle, gardeners should concentrate on improving soil quality with compost, mulch, and manure teas. Also, avoid planting until the new moon.
Choose ‘magical’ plants
For centuries, people have believed that certain plants carry special properties. While it’s difficult to imagine that a branch can bring you luck, ward off evil spirits, or throw you onto the path of true love, many herbs and plants do promote health. And you may want to choose these “magical” plants for your garden. Fortunately, there are many resources on this topic.
You can visit websites online, or better yet, read a book on magical herbs. These books feature hundreds of herbs and plants from all over the world, and they’re pretty comprehensive with illustrations, common names, and uses. Some powerful plants include rosemary, calendula, mint, basil, lavender, chamomile, sage, and lilacs. Adding these plants and flowers not only enhances your garden with scents and textures, but also attracts pollinators like bees.
Craft furniture or practical outdoor pieces
You don’t need to buy the latest garden furniture to make your space look magical. Upcycling old furniture is a fun, creative, and sustainable way to decorate your garden. You can look in your attic or basement to see if there’s anything you can use; with sandpaper and paint, you might be able to transform an old bed into a garden bench.
If you really want to challenge yourself, why not build a unique addition to your garden? A DIY outdoor pizza oven, for instance, allows you to turn your space into a social area as well. Although you might need a permit and a few hundred dollars to create one, it’s magical to use something you’ve built specifically for your backyard.
Make it your own
For a truly whimsical garden, add personal touches here and there. You can hang fairy lights or lamps to brighten up the space at night. You could also place crystals and miniature statues on the ground. Whichever you choose, try to partially conceal some of the objects within garden beds or around a bend in the path to surprise your visitors.
Lastly, it’s important to maintain your garden. As romantic as it might sound to let everything grow wild, you will need to add mulch or fertilizer to keep plants growing. Pruning overgrown bushes in late winter or early spring also helps you to get rid of any diseased, infested, or dead stems and branches, which could affect other plants. Without pruning, the bushes will make your garden look much shabbier. By taking extra care to design and care for your garden, you’ll feel its magical effect on you in no time!
The post 5 Tips for Making Your Garden Magical appeared first on http://gardeninginfo-online.com.
0 notes
Text
How to Build a Raised Garden Bed
Prevent poor drainage, compacted soil, and intrusive weeds from reducing or destroying your raised garden’s production. Discover how building raised garden beds can increase your harvest and protect your garden.
gardeninginfo-online.com gathered information about how you can build a raised garden bed and the many benefits they give to your garden.
Building a Raised Garden Bed
Building a raised garden bed can be an extremely gratifying project and can be accomplished in a number of ways. Here, we’ll address building an above-ground raised garden bed. Before you get started, consider the following:
Tools You Will Need – You will be building an open box to be filled with soil and plants. The following tools will come in handy:
Pencil or Marker
Tape Measure
Sandpaper (rough grit
Saw (circular or handsaw)
Drill
Bits (should match the size of your screws/fasteners)
Wood Glue
Mallet or Hammer
2 Sawhorses or a Work Table
Paintbrush/Roller
Paint or Stain (for the boxes exterior)
Impermeable box lining (for protecting untreated wood or wood treated with preservatives)
Shovel
Garden Trowel
Hose/Water Source
Tip: Use screws to build your boxes. Due to the soil, plants, and water weight they must carry, you will find that screws will firmly keep your boxes together. Boxes constructed with nails will likely loosen and potentially collapse over time.
Note: Wood used for this project should be pressure-treated and aged (if available), eliminating the need for chemically treated wood, stains, or paint.
Material You Will Need – Here’s a shortlist of the materials needed to build, fill, and properly protect your raised garden bed:
Wood (See Note Below)
Garden Stakes
Landscape Fabric
Garden Soil
Tomato Cages/Plant Supports
Vegetable/Herb/Plant Seeds or Seedlings
Note: Cedar is the best wood to use for garden beds because cedar is naturally rot-resistant. Western red cedar is commonly used, but white cedar, yellow cedar, redwood, and juniper are also high-quality choices for outdoor construction projects like raised garden beds.
New pressure-treated woods are considered safe. While many suppliers discourage using pressure-treated wood where the preservatives may leach into the soil, becoming a component of the food grown in the garden. A common recommendation is to use a waterproof liner between the treated wood and the soil.
Raised Garden Bed Construction
The more planning/preparation you put into your garden bed(s), the more efficient you can build them. Before doing any cutting or drilling, consider the following:
Make a detailed sketch or graphic design of garden bed dimensions, location, and plant content
Use your sketch to produce a shopping list for the wood, fasteners, braces, etc. that will be used to construct your garden bed(s)
Once you have all the materials and tools you’ll require, follow these instructions:
Measure your wood and mark where you need to cut
Measure one more time to verify your measurements and how many cuts will be required
Separate the wood either by lengths or by pieces
Number or label each piece so you know which direction and position it should be placed in
Assemble one corner of one box, move to the next corner of the same box until the box is fully assembled
Drill holes before inserting screws to avoid splitting your planks
Use wood glue wherever adjoining surfaces meet (wipe excess glue away after tightening)
Dig away 1-inch of soil (where the bed will be at ground level), so it will be sunken about an inch beneath ground level
When suspending or elevating a garden, drive the legs 10 to 12-inches into the ground for superior stability
Fasten your garden bed liner to its interior
Stain or paint the bed’s exterior
Watch this video to see how a raised garden bed is assembled.
youtube
Once your garden bed is built, and the paint has dried, add your soil and plant your bed.
Note: If you find such DIY projects too challenging, check with your local garden center for prefabricated garden beds that only require assembly, placement, and filling
Raised Garden Bed Location
To attain the best plant health and productivity, most vegetable plant species should receive a minimum of eight hours of full sun each day. The more sun your plants receive, the better, so it makes sense to build your raised garden beds in the sunniest part of your yard.
Avoid shaded, low, wet locations where the soil could stay soggy. Because your garden will need to be watered during the growing season, you’ll want your garden(s) close to a relatively easy access water source and garden hose.
Tip: Wherever you decide to put your raised garden beds, there should be enough space to effortlessly move between them during planting, weeding, harvesting, and general maintenance activities.
Note: If your raised beds are placed on the ground (with or without a built-in bottom), observe the following:
Remove any grass or perennial weeds from the location
Loosen native soil to a depth of 6-10 inches (improves drainage)
Level the soil that will support the bottom of the box or intermingle with the garden bed’s soil.
And if your raised garden beds will stand on legs or stilts above ground level, keep the area beneath the garden beds trimmed and clear from debris.
Raised Garden Bed Soil
Soil is of the most essential ingredients for a resilient and healthy garden. Raised beds offer you an immediate advantage over a regular garden because when you fill your raised bed, you can fill it with a soil blend superior to the native soil in your yard. Soil that’s loose and rich with nutrients, organic matter, and biodiversity will allow your plant’s roots to grow freely and ensure that they have access to the water and nutrients they need to sustain healthy growth.
For further reading on making or developing the best organic garden soil, visit gardeninginfo-online.com/how-to-make-organic-soil/
What Do You Put in The Bottom of a Raised Garden Bed
The bottom of a raised garden bed should be a layer of grass clippings, leaves, wood chips, straw, or other organic material. Any cardboard should be placed on top of that layer (between the bottom of the bed and the soil. The organic material will turn into compost, while the cardboard will prevent weeds from joining your plants.
Other materials you can safely put at the bottom of your raised garden bed include:
Newspaper
Burlap
Leaves
Nothing
Tip: Avoid putting layers of inorganic material, rocks, or gravel at the bottom of your garden bed. This can result in the formation of a water table beneath the soil, leading to root rot and other disease developments.
Raised Garden Beds
In this article, you discovered information and tips on how to build a DIY raised garden bed and the benefits they offer your garden.
Using raised garden beds will help you produce healthier, more abundant vegetable crops in your home garden.
Using native soil to plant and cultivate a vegetable garden leaves you susceptible to dealing with nutrient-poor or compacted soil, leaving your garden with poorly developed plants and a severely reduced harvest.
Sources:
gardeningsolutions.ifas.ufl.edu/design/types-of-gardens/building-raised-beds.html
agrilifeextension.tamu.edu/solutions/raised-garden-beds/
sfyl.ifas.ufl.edu/media/sfylifasufledu/miami-dade/documents/landscapes-amp-gardening/Building-a-Raised-Bed-Vegetable-Garden-The-Easy-way.pdf
canr.msu.edu/news/starting-a-raised-bed-garden
The post How to Build a Raised Garden Bed appeared first on http://gardeninginfo-online.com.
0 notes
Text
Successfully Grow These 5 Vegetables Indoors
Prevent the consumption of subpar vegetables treated with pesticides and other chemical agents. Knowing how to grow your own vegetables indoors will give you complete control over how they are grown and when they are harvested.
gardeninginfo-online.com gathered information about 5 vegetables you can successfully grow indoors pesticide-free.
Growing Vegetables Indoors
Growing your own vegetables indoors eliminates the questions and doubts of their origin, what chemicals were used in their production, and how long they sat before reaching you at the market. Frankly, who wouldn’t love to simply reach out and snip their vegetables right off the growing plant for a meal.
Here’s how to easily grow 5 popular vegetables indoors:
Growing Lettuce Indoors
Pots or Trays – Lettuce is quick-growing and shallow-rooted, dispensing the need for a deep container. Two to four-inch deep perforated trays are ideal.
Plant Placement – For year-round harvesting, keep in a location sheltered from sudden temperature swings and freezing temperatures
Light Requirement – Place your lettuce crops in a location that gets 12 hours of bright light each day in a south-facing window or bay window. If you don’t have enough light coming through your window, grow your crop under grow lights.
Ideal Temperature – For optimal growth, keep the room at temperatures of 60-70°F with a 10°F drop at night. This will promote steady growth.
Soil Requirements – Use a seed starting mix rather than potting soil or garden soil.
Sowing Seeds (Spacing) – Sow your seeds by gently pressing them into the soil’s surface, then mist to keep moist. Most lettuce varieties can be spaced relatively closely1 1/2 inches apart.
Water Needs – Keep the soil evenly moist. Lettuce, being 90% water, may need to be watered every other day. For seedlings, it’s best to water from the container’s bottom using a watering tray.
Mulching – A light layer of mulch will keep the soil cool, reduce or eliminate weeds, and keep leaves clean by preventing soil from splashing on them.
Fertilizer or Manure – Lettuce grows best in soil rich in organic compost.
Growth Rate (Time to Harvest) – Germination should occur within about a week. Allow the plants to grow at least five to 6 inches before harvesting. Cut or pull the outer leaves; the center of the plants will continue growing. Lettuce bolts (goes to seed) quickly in hot weather.
Cost of Seeds – Lettuce seeds can be found by the ounce or by the pound. You can find lettuce seeds varying from $6 to $9 per ounce and $38 to $43 per pound.
Popular lettuce varieties that can be grown in the same manner include:
Batavia Lettuce
Endive
Frisée
Romaine
Butter Lettuce
Watercress
Chrysanthemum Greens
Oak Leaf Lettuce
Note: If grown in ideal conditions, lettuce can be grown and harvested continuously throughout the year.
Growing Spinach Indoors
Pots or Trays – When growing spinach, depth is more important, as these roots will grow deep. Select pots or growers at least six inches deep with drainage holes at the bottom and fill your pot(s) with moist, well-draining soil.
Plant Placement – For the spring and summer months, place your container(s) where they will get indirect light. During the fall and winter months, you can move your pots to window sills as the sunlight is less intense and days are shorter.
Light Requirement – Spinach plants do not need much sunlight, but they still require enough light for photosynthesis. When plants are light-deficient, foliage growth will be stunted and appear chlorotic (yellowing). An LED grow lamp will help supplement any light deficiencies.
Ideal Temperature – An optimal growing temperature ranges between 50? F to 60? F.
Soil Requirements – Spinach grows best in well-drained soil rich in organic matter like compost and with a pH of 6.5 to 7.
Sowing Seeds (Spacing) – Sow spinach seeds ½ inch deep. Sow seeds 1 inch apart. Later, thin seedlings to 6 inches apart and use the thinnings in salads.
Water Needs – Water spinach until the soil is moist but not fully wet. Keep the water off spinach foliage and make sure the soil is draining normally. Sitting water may cause the plants to develop fungal diseases or root rot.
Mulching – Spinach plants don’t get very tall, so heavy mulching can be impractical. A layer of mulch applied on each side of the row can help the soil retain moisture.
Fertilizer or Manure – Composted manure well-blended with the soil.
Growth Rate (Time to Harvest) – Spinach needs 6 weeks of cool weather from seed sowing to harvest.
Cost of Seeds – Spinach seeds can be found by the ounce or by the pound. You can find spinach seeds varying from $6 to $9 per ounce and $38 to $43 per pound.
There are so many spinach classifications, but they fall under three main varieties with many more sub-varieties. In proper conditions, these varieties can be grown indoors:
Savoy Spinach – If you stay in a very cold climate, this is the variety you want to grow. It does very well in cold conditions but requires persistent cleaning due to the crinkled leaves it produces. Typically, they are very productive. Bloomsdale and Regiment are some well-known sub-varieties of the savoy spinach.
Semi-savoy Spinach – Unlike the savoy spinach that grows really low, the semi-savoy variety grows a bit taller. As a result of the height, mud splashes are less frequent, and it does not produce as many crinkled leaves as the savoy variety. Common sub-varieties include Catalina, Indian Summer, Tyee, and Teton. The most interesting thing about this variety is that it is disease and bolt-resistant.
Smooth-leafed Spinach – In contrast to the other two varieties, the smooth-leafed spinach is the easiest to clean, as it produces leaves that do not crinkle. Space and Red Carnival are common examples of this sub-variety.
Growing Microgreens Indoors
Pots or Trays – With shallow roots, two to four-inch deep perforated trays are ideal.
Plant Placement – When microgreen seeds germinate, set the containers on a sunny windowsill to encourage growth.
Light Requirement – Microgreens are flexible and grow well on a sunny windowsill. For maximum growth, 4-6 hours of sunshine per day is required, but if that is not available, a simple LED grow light will supplement their needs.
Ideal Temperature – Microgreens will grow ideally at room temperature (around 70° F)
Soil Requirements – Indoor potting soil (soil-less mix) is among the best choices for growing microgreens at home.
Sowing Seeds (Spacing) – Scatter evenly over the soil, then cover with a thin layer of soil. Read the seed packet/label to see if there are any special instructions.
Water Needs – Keep your planting medium damp. Promote healthy growth by watering from the bottom of the tray. Pour water into the tray and allow it to be absorbed by the roots and planting medium.
Mulching – Because of their dense growth, microgreens do not require mulching.
Fertilizer or Manure – Water-soluble fertilizers are recommended when needed.
Growth Rate (Time to Harvest) – Under optimal conditions, you should be able to harvest your microgreens in just under two weeks. The plants are typically ready for harvesting once they have two ‘true’ leaves (Herbs grown as microgreens tend to be slow-growing, maturing in 16–25 days.)
Cost of Seeds – Microgreen seeds can be found by the ounce or by the pound. You can find microgreen seeds varying from $1 to $2 per ounce and $12 to $17 per pound.
Note: When a seed germinates, it produces cotyledons, which look like small leaves. After the cotyledons appear, ‘true’ leaves will follow. At this point, the plants will be about two inches tall. Use a pair of scissors to snip a cluster just above the soil line. Once you have cut the microgreens, you can rinse them gently and dry them with a salad spinner (or kitchen towel) to prevent wilting.
Growing Scallions (Green Onions) Indoors
Pots or Trays – Grow scallions in just about any type of container, pot, or box. The root system is quite shallow, and the plants do not take up too much room.
Plant Placement – For the fastest growth, place scallions in a bright, sunny spot receiving 6-8 hours of sunlight per day.
Light Requirement – Scallions will grow well in lower light conditions. The quality of the plants won’t suffer, but they will slow their growth.
Ideal Temperature – Keep moist and maintain at a temperature of about 65-75°F.
Soil Requirements – A nutrient-rich, well-draining potting soil amended with well-decomposed compost is ideal for scallions. Scallions prefer a soil pH of 6.0 – 7.0.
Sowing Seeds (Spacing) – Sow scallion seeds one to two inches apart and a quarter of an inch deep.
Water Needs – Scallions need evenly moist soil throughout the growing season. Provide the onion plants with about 1 inch of water weekly. For optimal plant growth, the soil does not need to be soaked or soggy, but it should be moist.
Mulching – Light mulching (half-inch) with organic material will suppress weed growth and retain moisture.
Fertilizer or Manure – Fertilizers high in nitrogen, like fish emulsion, will keep them green and growing vigorously.
Growth Rate (Time to Harvest) – Seedlings emerge in 7-14 days, and plants are ready for harvest after 60 to 80 days.
Cost of Seeds – Scallion seeds can be found by the ounce or by the pound. You can find scallion seeds varying from $12 to $17 per ounce and $80 to $90 per pound.
Tip: For store-bought scallions, you can cut off the tip with the roots and place it in a glass with about an inch of water. When the roots are 2 or 3 inches long, plant them in potting soil in a shallow container. You can then harvest the green tops and let the plant continue to grow or use the entire green onion.
Growing Tomatoes Indoors
Pots or Trays – You can start your tomato plants in trays. After one month of growth, transplant seedlings to large pots 8-12 inches deep (minimum).
Plant Placement – Tomato plants like a lot of light. So when growing them indoors, place them by your brightest window.
Light Requirement – Tomatoes require 6-8 hours of full sun per day.
Ideal Temperature – Tomato seeds germinate fastest at temperatures between 70° and 80°F. After germination, the plants will thrive in temperatures between 65° and 75°F.
Soil Requirements – Tomato plants perform best in loose, rich, and well-drained soil.
Sowing Seeds (Spacing) – Sow tomato seeds one to two inches apart and a quarter of an inch deep. After one month of growth, transplant to individual deep containers.
Water Needs – Early in the growing season, morning waterings are recommended. As plant sizes increase, you may need to water your tomato plants twice a day. Tomato plants grown in containers will need 2-4 inches of water a week.
Mulching – Considered by many growers, the best tomato mulches are pebbles, bark mulch, or straw.
Fertilizer or Manure – Two weeks after planting, begin watering weekly with a soluble fertilizer. Use a balanced fertilizer with a 1-1-1 ratio such as 20-20-20 until the plants begin flowering. Once flowering, switch to a high potassium fertilizer. Most fertilizers blended for tomatoes are already in these ratios.
Growth Rate (Time to Harvest) – It usually takes indoor tomato plants 60 to 80 days to produce fruit (about the same time as they do when grown outdoors).
Cost of Seeds – Tomato seeds can be found by the ounce or by the pound. You can find tomato seeds varying from $18 to $22 per ounce and $115 to $125 per pound.
Note: Manure (composted bovine, chicken, worm, etc.) makes an excellent soil amendment, especially as a pre-treatment before planting.
Tip: Find the perfect spot. Tomatoes won’t grow indoors unless the indoor conditions mimic those of an outdoor garden.
Pros and Cons of Gardening Indoors
When gardening indoors, you are ultimately in control of all aspects of the plant’s growth and environment. You maintain its water, soil quality, and manually fertilize the plants. A big plus is that your plants are not at the mercy of unpredictable weather or outside wildlife and insects, giving you plants that could produce vegetables year-round.
However, growing edibles indoors does have some challenges, including getting light levels right, a lack of pollinating insects, and little to no wind. Adequate air circulation is crucial for flooding plants with carbon dioxide as well as pollinating any flowers. Also, no matter if you are inside or out (or how careful you may be), some pests and plant diseases can reach your indoor growing activities.
Here are a few tips to keep in mind if you’re considering growing vegetables indoors.
Use good quality potting mix, not garden soil – mixes dedicated to potting usually have vermiculite or perlite, allowing for better drainage.
Be sure to choose containers (deep or shallow) that have ample holes to allow for adequate drainage and are sized correctly for the plant species you are growing (shallow and rooted greens typically only need about a 2-inch depth, while deep-rooted tomatoes will need at least 12 inches of soil).
Consider supplemental lighting (grow lights) if your home doesn’t offer enough natural light (intensity or duration).
If you’d like to try your hand at a more ambitious project (growing mangos indoors), visit gardeninginfo-online.com/growing-mango-tree-indoors/
Indoor Vegetable Gardening
In this article, you discovered indoor growing information on 5 easy-to-grow vegetables, giving you complete control over what is used to produce them.
Growing your own vegetables offers your diet more fresh, chemical-free options that can easily be harvested year-round.
Continuing to consume store-bought vegetables may leave you exposed to harsh pesticides, disease-causing bacteria, and sub-par quality produce.
Sources:
ucanr.edu/blogs/blogcore/postdetail.cfm?postnum=42533
exclusives.ca.uky.edu/2020/hort/bring-your-garden-inside
web.extension.illinois.edu/gpe/case1/c1a.html
extension.usu.edu/archive/can-you-grow-tomatoes-in-the-winter
The post Successfully Grow These 5 Vegetables Indoors appeared first on http://gardeninginfo-online.com.
0 notes