dxpaminx-blog
Dopamine Resources
Welcome to Dopamine Resources, if you use any of our resources, please do not forget to leave your reblog and like.♡
257 posts
Don't wanna be here? Send us removal request.
Last Seen Blogs
creepypastabookclub
New episodes every other Friday
vegantanya
Tanya
creepypastabookclub
New episodes every other Friday

entityarchivist
entityarchivist
mrchalkyy
Rory : )
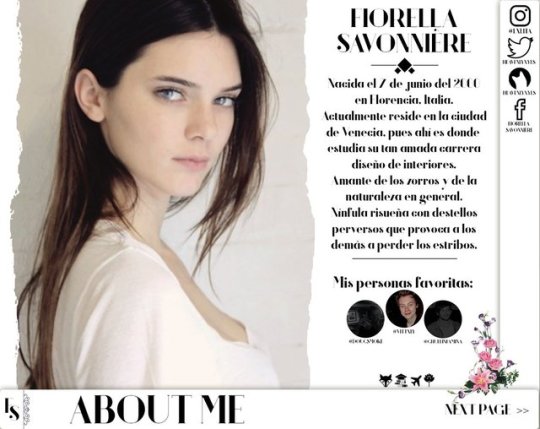
Photo


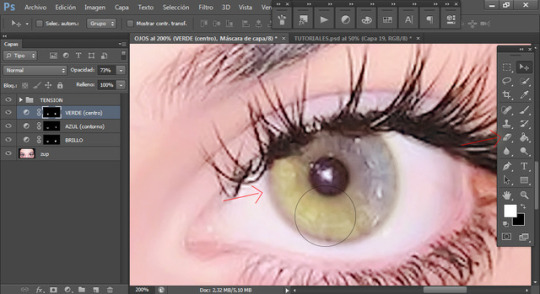
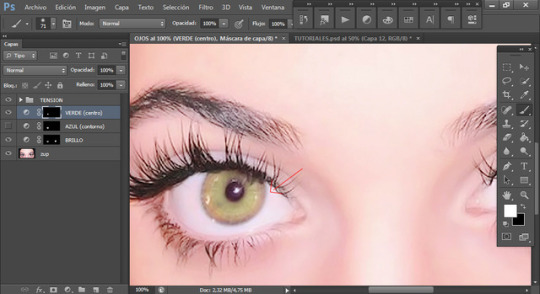
⠀⠀⠀⠀⠀⠀ CÓMO COLOREAR LOS OJOS DE DISTINTOS COLORES (parte 2).
5. Podrás jugar con la opacidad y el relleno, depende de cómo tú lo quieras.
6. Para la otra opción será lo mismo, solo que de un lado colorearás de un color y del otro, de diferente color.
7. Con el mismo borrador irás difuminando.
8. Ya que tengas ambos colores bien puestos, si quieres podrás cambiarlos y se quedarán en su lugar, no tendrás que hacer el prodecimiento de nuevo.
♡ Reblog/like if you like it.
Lolita.
18 notes
·
View notes
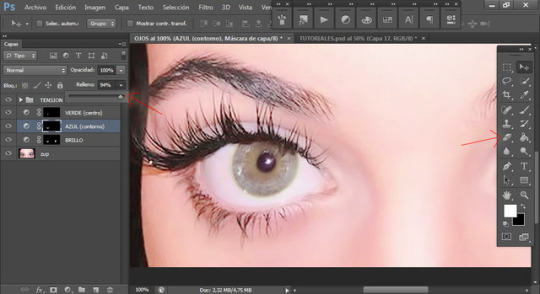
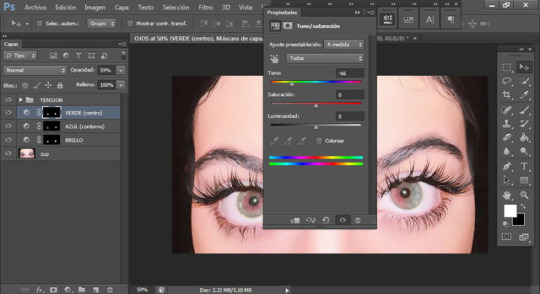
Photo
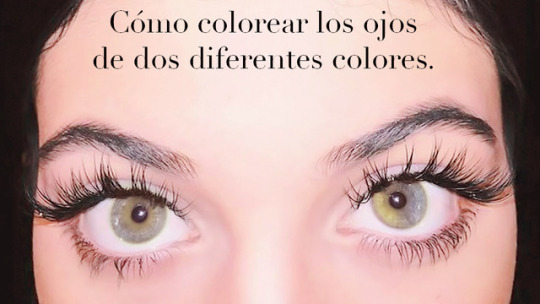


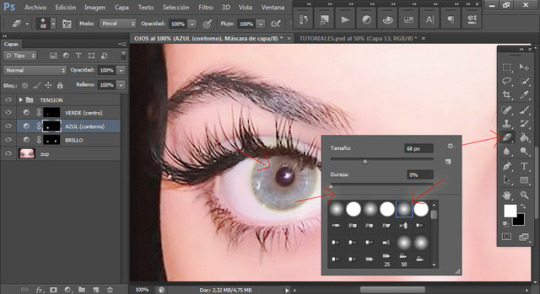
⠀⠀⠀⠀⠀⠀ CÓMO COLOREAR LOS OJOS DE DISTINTOS COLORES (parte 1).
1. Ya cuando tengas los colores seleccionados, podrás colorear el primero, que será el que va en el contorno, no importa si coloreas de más.
2. El siguiente paso será colorear el centro del ojo con el otro color.
3. En la capa del color del contorno comenzarás a borrar el sobrante que quedó en el centro, utilizaremos un borrador sin nada de dureza y del tamaño de la pupila (un poco más grande) para que se pueda difuminar bien.
4. Yo modifiqué uno para quedara aún más difuminado.
♡ Reblog/like if you like it.
Lolita.
18 notes
·
View notes
Photo


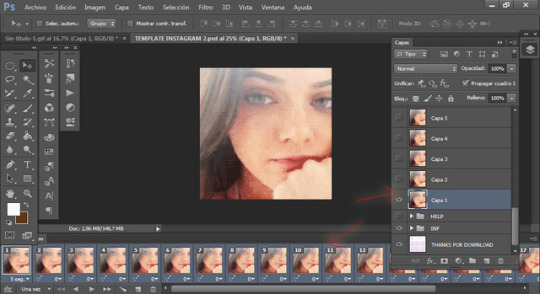
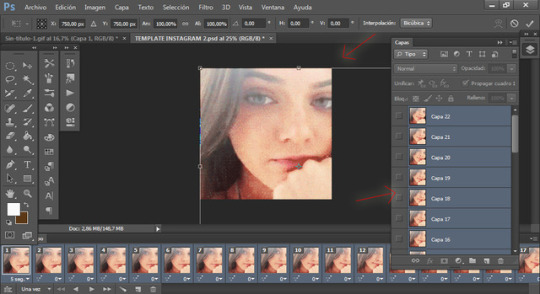
⠀⠀⠀⠀⠀⠀ HOW TO EDIT A GIF IN A TEMPLATE, SECOND TUTORIAL (PART 2)
7. Podrás acomodar el gif donde tú gustes, ya sea en el icon o como una foto normal.
8. Conforme vayas escogiendo las capas de la línea del tiempo, se irán cambiando algunos detalles en las capas normales, por lo que deberás checar todo como verás a continuación.
9. En la foto aparece sin el template, por lo que por tu cuenta deberás darle visibilidad a la capa.
10. Si quieres que el gif aparezca en el icon, deberás crear un círculo con la Herramienta Polígono, ajustar el tamaño al icon y sobre esa capa poner una foto. En la capa de la foto, con tu botón derecho del mouse te saldrá la opción 'Crear máscara de recorte' le darás a esa y ya está (las capas del gif deberán ser SOBRE el círculo)
11. Puse otro gif repitiendo el mismo procedimiento, al igual que unas fotos y cambié la información.
♡ Reblog/like if you like it.
Lolita.
14 notes
·
View notes
Photo

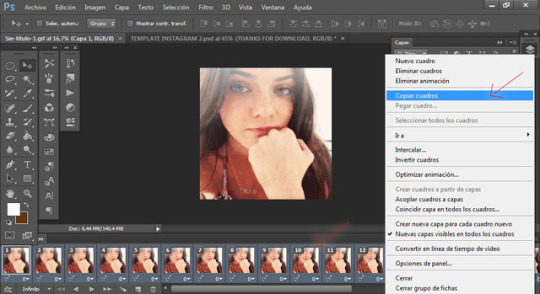


⠀⠀⠀⠀⠀⠀ HOW TO EDIT A GIF IN A TEMPLATE, SECOND TUTORIAL (PART 1)
1. Del lado derecho de nuestra línea del tiempo nos aparecerá este icono, escogeremos la opción de 'Seleccionar todos los cuadros' y después cuando seleccione todos los recuadros, tomaremos el de 'Copiar cuadros'.
2. En otro archivo donde tengamos ya nuestro template de Instagram, clickearemos en la opción de 'Crear línea de tiempo de vídeo'.
3. En la esquina inferior izquiera aparecerán tres recuadros, nos iremos a ese.
4. Y nos llevará a otro panel. Como lo hicimos antes, seleccionaremos la opción de 'Pegar cuadros'
5. Nos aparecerá otro recuadro, tendremos que clickear la segunda opción.
6. Como ven, nuestro gif (anteriormente editado) ha sido copiado a nuestro archivo del template. Con la tecla Shift, seleccionaremos todas las capas del gif y con Ctrl+T le cambiaremos el tamaño.
♡ Reblog/like if you like it.
Lolita.
16 notes
·
View notes
Photo


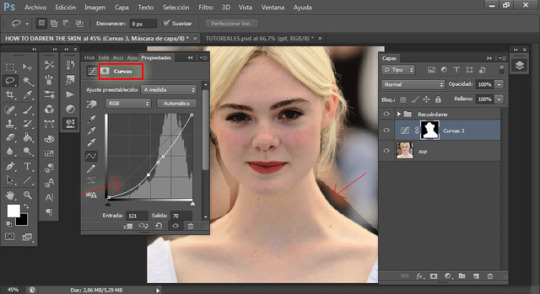


⠀⠀⠀⠀⠀ HOW TO DARKEN THE SKIN.
1. Con la herramienta lazo, seleccionaremos toda la piel visible.
2. Nos iremos a Ajustes>Curvas y moveremos la delgada línea que aparece en medio, de preferencia hacia abajo si lo que quieres es oscurecer el tono de piel.
3. En la misma capa borraremos la zona de los ojos.
4. Si ha quedado muy oscura, puedes arreglarlo en la misma zona de capas.
1. With the lasso tool, we will select all visible skin.
2. We will go to Settings> Curves and move the thin line that appears in the middle, preferably down if you want to darken the skin tone.
3. In the same layer we will erase the area of the eyes.
4. If it's too dark, you can fix it in the same layer area.
♡ Reblog/like if you like it.
Lolita.
13 notes
·
View notes
Photo


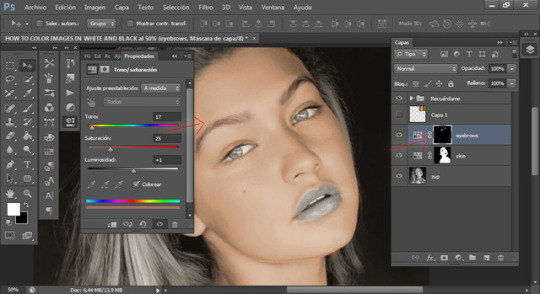

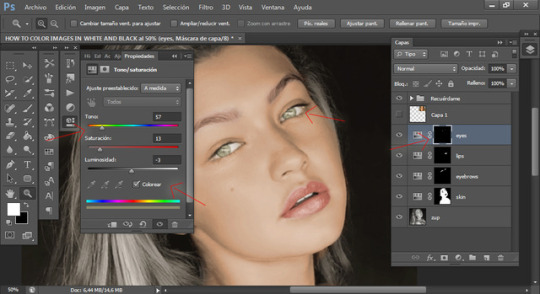
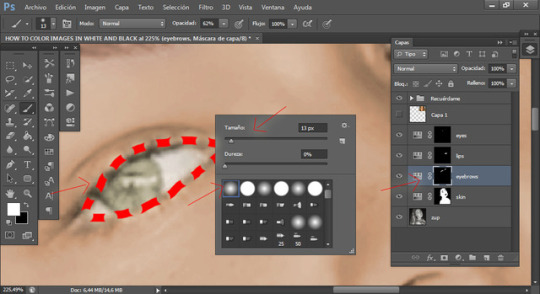

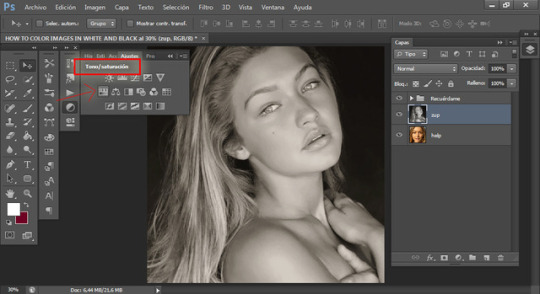
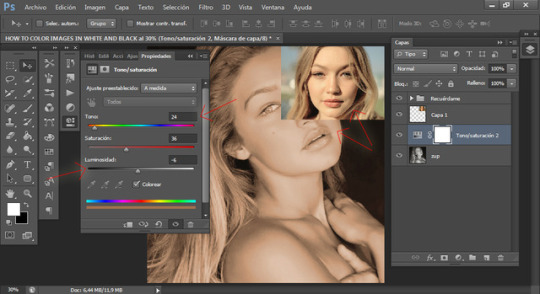
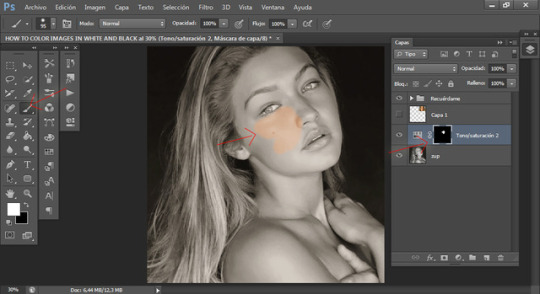
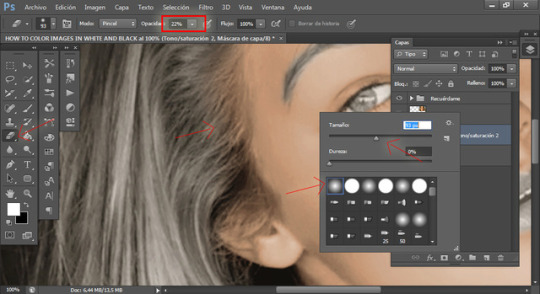
⠀⠀⠀⠀⠀ HOW TO COLOR IMAGES IN WHITE AND BLACK (PART 2)
6. Haremos otra capa de Tono/saturación, pero ahora buscaremos un tono marrón para las cejas.
7. Para los labios, ojos y cabello repetiremos el mismo procedimiento.
8. En la zona de los ojos, nos iremos a la capa de las cejas y solo colorearemos el contorno de los ojos, para que las pestañas no se vean tan opacas.
6. We will make another layer of Hue / Saturation, but now we will look for a brown tone for the eyebrows.
7. For the lips, eyes and hair we will repeat the same procedure.
8. In the area of the eyes, we will go to the layer of the eyebrows and only color the eye area, so that the eyelashes do not look so opaque.
♡ Reblog/like if you like it.
Lolita.
15 notes
·
View notes
Photo

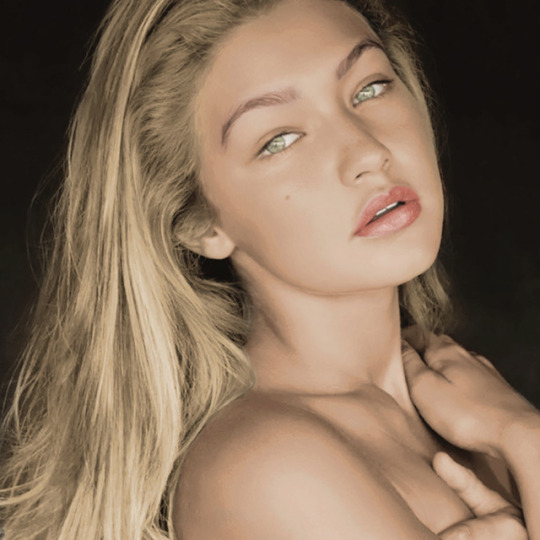

⠀⠀⠀⠀⠀ HOW TO COLOR IMAGES IN WHITE AND BLACK (PART 1)
1. Abriremos una capa de Tono/saturación.
2. Al tener el recuadro, clickearemos la parte que dice 'Colorear'.
3. Moveremos las distintas flechitas hasta encontrar el color y tono de piel que más se parezca al original. Yo para eso me ayudé con una foto de ella a color.
4. Con Alt+I, la capa se invertirá y seleccionaremos la herramienta Pincel, coloreando la piel, saltándose la zona de las cejas, ojos, labios y cabello.
5. Para las zonas donde empieza el cabello, al pincel le bajo la opacidad y la dureza, para que se difumine bien y se vea un poco más real.
1. We will open a Hue / Saturation layer.
2. When we have the box, we will click the part that says 'Coloring'.
3. Move the various arrows until you find the color and skin tone that most resembles the original. For that I helped with a picture of her in color.
4. With Alt + I, the layer will be inverted and we will select the Brush tool, coloring the skin, skipping the area of the eyebrows, eyes, lips and hair.
5. For the areas where the hair starts, the brush lowers the opacity and hardness, so that it diffuses well and looks a little more real.
♡ Reblog/like if you like it.
Lolita.
16 notes
·
View notes
Photo
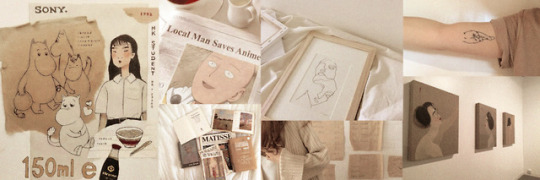

⠀⠀⠀⠀⠀ BEIGE HEADERS.
♡ Reblog/like if you like it.
Lolita.
#headers#beige#beige headers#collage headers#aesthetic headers#layouts#twitter headers#edit#photoshop#lolita
115 notes
·
View notes
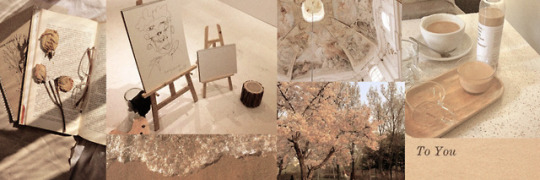
Photo

⠀⠀⠀⠀⠀ PSD; FAME.
⠀ You can download it here.
♡ Reblog/like if you like it or download it.
Lolita.
26 notes
·
View notes
Photo
⠀⠀⠀⠀⠀ TEMPLATE BLOG 1 IN PNG.
♡ Reblog/like if you like it or download it.
Lolita.
107 notes
·
View notes
Photo

⠀⠀⠀⠀⠀ TEMPLATE BLOG 1.
⠀ You can download it here.
♡ Reblog/like if you like it or download it.
Lolita.
22 notes
·
View notes
Photo

⠀⠀⠀⠀⠀ PSD; WOLVES.
⠀ You can download it here.
♡ Reblog/like if you like it or download it.
Lolita.
14 notes
·
View notes
Photo


⠀⠀⠀⠀⠀⠀ HOW TO INSTALL FONTS.
1. En nuestras descargas, abriremos el font.
2. Nos llevará a otro recuadro y seleccionaremos el font con el .ttf al final.
♡ Reblog/like if you like it.
Lolita.
7 notes
·
View notes
Photo
⠀⠀⠀⠀⠀ PACK FONTS 7.
⠀ You can download it here.
♡ Reblog/like if you like it or download it.
Lolita.
24 notes
·
View notes
Photo

⠀⠀⠀⠀⠀ PSD; SOFTCORE.
⠀ You can download it here.
♡ Reblog/like if you like it or download it.
Lolita.
13 notes
·
View notes
Photo

⠀⠀⠀⠀⠀ PACK ADHESIVE TAPES AND BROEKN SHEETS.
⠀ You can download it here.
♡ Reblog/like if you like it or download it.
Lolita.
18 notes
·
View notes
Photo

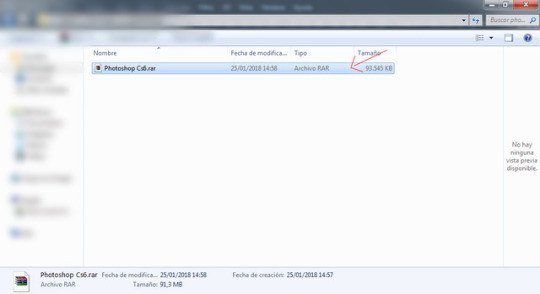


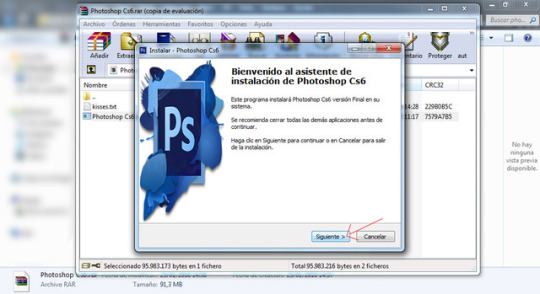
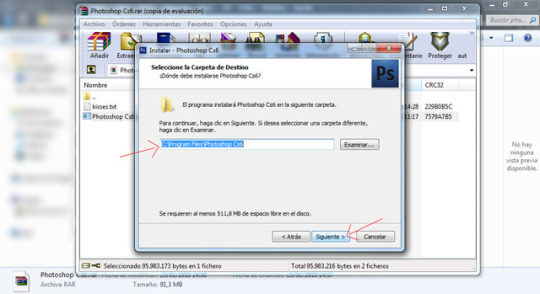

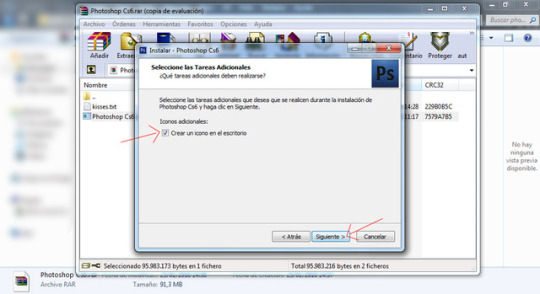

⠀⠀⠀⠀⠀⠀ HOW TO INSTALL PHOTOSHOP CS6 PORTABLE.
1. Cuando ya esté descargado el archivo, lo abrirás.
2. Te saldrá un recuadro así y le daremos click donde dice Photoshop Cs6.
3. Se descargará y te abrirá otro recuadro de Ps.
4. Colocarán su idioma y ustedes tendrán que rellenar lo demás hasta instalarlo.
1. Once the file is downloaded, you will open it.
2. You will get a box like this and we will click where it says Photoshop Cs6.
3. It will download and open another box of Ps.
4. They will place their language and you will have to fill in the rest until installing it.
LINK PARA DESCARGAR PHOTOSHOP.
♡ Reblog/like if you like it.
Lolita.
34 notes
·
View notes