dandeland
Maggots 4 Rent
I have no idea what i’m doingshe/he/they 19yearsnormal human person (presumably)Tinky art in pfp by @blueberry-bar
5716 posts
Don't wanna be here? Send us removal request.
Last Seen Blogs

melynen
Ooh, shiny~!

kamikaze030
Untitled

thecinemaniaclife
The Cinemaniac Life

a-winnie-or-a-freddie
Hey all you hot potatoes out in Mashland
Text
Step by Step Guide to Animating a Head Turn

Click here to Watch the Full Video Tutorial: http://bit.ly/2eyVAgo
Hey guys. I am providing you with the full blog article that shows you how to animate a head turn. Now if you enjoy this tutorial, you can be able to watch the full video tutorial on my website. Please like and reblog this post. Thanks!!
Introduction
Learning how to animate head turns is an important skill that every animator should master. As an animator, you will be given various situations where a head turn is necessary for the performance of a character.
For example: if you have a boy that is using his cellphone, and all of a sudden hears an explosion that is behind him.
The most natural thing for the character to do is to quickly turn his head to see where the sound came from.
The ability to animate the head turn in this situation would help the performance of the cartoon character.
This is the major reason why I decided to create this step by step tutorial that will show you exactly how I animate head turns.
Step 1: Draw your Thumbnails
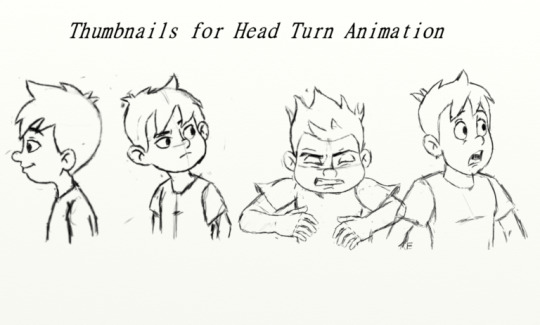
The first step that I usually take before I create any animation is to first draw thumbnails. Thumbnails are simple drawings that shows the story behind your animation.
For example: when you look at my thumbnails for this tutorial, you will see that the story is about a boy who is looking at the left side of the screen.
However, the boy hears a sound that causes him to turn to his head.
As the boy looks towards the direction where he hears the sound, he quickly realizes that he is seeing something that is shocking.
This causes the boy to dip his head down, and quickly lift up his head with a shocked expression on his face.
The reason why I always start off my animations with thumbnails is because it gives me a rough idea of what drawings will be used in the animation.
This technique is effective because it prevents me from spending several hours drawing unnecessary images that won’t be used in the animation.
Step 2: Draw the Key Frames
The next step is to draw the key frames for this animation. Key frames are basically a series of drawings that tell the audience the story behind your animation.
For example: The thumbnails for this animation are a perfect example of key frames because they tell the story of a boy who is shocked by what he sees.
Key Frame #1
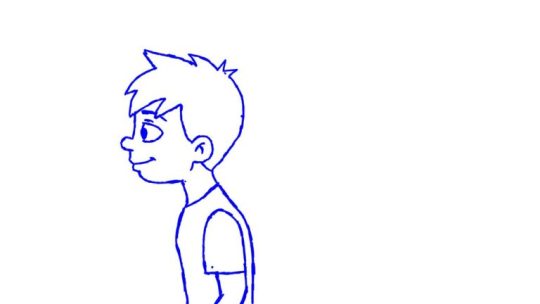
In this key frame, I drew the character in its side profile view. This key frame is important because it is the first frame that establishes the volume of the character.
This means that the next key frames should maintain the same body proportions as this drawing.
Key Frame #2

In the second key frame, the character is looking towards the direction where he first hears the sound. If you now look at the face, you will start to see more of the character’s left side.
This includes the face, and the rest of the whole body. At this moment, the character is currently looking at something that is shocking.
Key Frame #3

The shocking event in key frame 2 is what causes the character to dip his head downwards. This frame is an anticipation pose for the shocked expression that will happen in the next key frame.
An anticipation pose is a drawing that helps the audience to predict what will happen next.
For example: If a boxer is about to punch his opponent, he will usually pull back his arms before landing the punch.
The drawing where it shows him pulling back his arm, would be a good example of an anticipation pose.
This is because the audience can predict that he is going to punch his opponent.
Key Frame #4

In this last key frame, I drew the character with a shocked facial expression. This is an important key frame because it will ultimately cause the audience to wonder why is he so shocked?
Step 3: Draw your Breakdowns
After I drew my key frames, I began to draw the breakdowns for my head turn animation. Breakdowns are drawings that help you transition from one key frame to another.
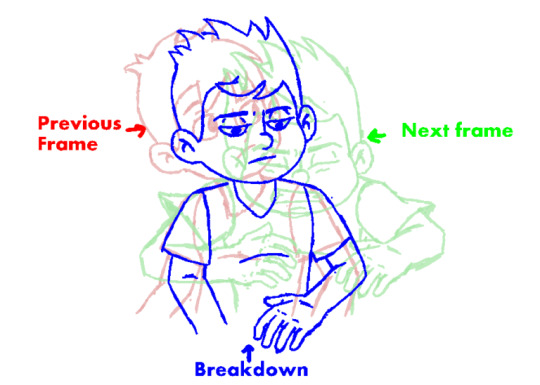
Breakdown #1

Before I begin talking about my breakdown animation process, I needed to let you know about onion skinning.
Onion skinning is an animation feature that shows you the frames that come before and after your breakdown image.
This tool really comes in handy when you are animating because it helps you to quickly figure out where you should place your drawings.
Now as I was drawing the breakdown, I made sure to dip the head and close the eyes of the boy. I did this because when a person turns their head, they naturally tend to dip their head, and close their eyes.
Breakdown #2
As I was flipping through the second key frame and the third key frame, I noticed the hair in key frame 2 is completely still. However in the next frame, the hair is standing all the way up.
So in my breakdown, I drew the hair slighting going up. This helped the character’s hair to look like it was gradually lifting up as I flipped towards key frame 3.
Breakdown #3

When I was flipping through key frame 3 and 4, I noticed the hair in key frame 3 was standing up. However in key frame 4, the hair is back to it normal design.
After thinking about the motion, I made the decision to drag the hair of the character as he was lifting up his head.
This choice was based on the reality that when a person quickly moves their body upwards, the hair will naturally tend to drag behind.
The additional benefit of dragging the hair is that it prevented it from feeling very stiff.
Step 4: Timing your Animation
Once you have drawn your keyframes and breakdowns, it is now time to time your animation. Whenever you are timing your animation, you basically trying to figure out how long should each drawing should last on the screen.
Typically animators tend to animate at 24 frames per second. So this means that if I pressed the preview button at this time, I would be unable to view the animation because the speed would be too fast.
So to solve this problem, I usually tend to duplicate each drawing for several frames. This make it easier for me to judge how long each pose should stay on the screen.
Step 5: Understanding Timing charts
After I fully timed my animation, I usually draw timing charts. Timing charts are small charts that are usually placed at a corner of an animation frame. These charts are designed to help the animator determine the speed of a moving object or character.
Even Spacing Timing Chart

In an even timing chart, the drawings are evenly spaced between each other. This means that when you play the animation, the drawings will move at a constant speed.
When I looked at the chart, I decided to draw the circles in this sequence:
I first drew circle 1 and 4
Then I drew circle 2 and 3
I first drew circle 1 and 4 because I needed to establish the starting point and endpoint for my animation.
After drawing circle 1 and 4, I then drew circle 2 and 3. I made sure that both circle 2 and 3 were evenly spaced between circle 1 and 4.
This even spacing technique is usually used for things that may move at a constant speed like an assembly line in a plant.
However the downside of using this spacing is that character’s movement tends to feel feel robotic. This is why I prefer using their a slow in or slow out timing charts.
Slow- In Timing Chart

In a slow in timing chart, you will always have more drawings towards the end of the animation. This means that when you preview the animation, the circle will start to slow down towards the end of the line.
This slow in technique is used to slow down the speed of your character or object.
When I looked at this timing chart, I choose to draw the circles in this exact sequence
Circle 1 and Circle 6
Circle 2
Circle 4
Circle 3 and 5
I first drew circle 1 and 6 because I needed to establish the starting point and endpoint for my animation.
After drawing circle 1 and 6, I then drew circle 2 because it was halfway between circle 1 and 6. If you look at the timing chart, you will notice that drawing #2 should be halfway between 1 and 6.
The next circle that I drew was circle 4 because it was halfway between 2 and 6. As I continued drawing I made sure that circle 3 was halfway between 2 and 4.
Finally I wrapped by the animation by drawing circle 5 halfway between 4 and 6.
Slow- Out Timing Chart
Finally the last timing chart you will see is the slow out timing chart. In this timing chart, you will notice that there more drawings in the beginning of your animation than towards the end.
This technique is used to increase the speed of your character or object.
I looked at the charts, in order to figure how I should draw the circles. I soon decided to draw them in this sequence.
Circle 1 and 6
Circle 5
Circle 3
Circle 2 and 4.
This sequence is very similar to the slow in chart, however this time you will have more drawings in the beginning of the animation.
Step 6: In-between your Head Turn
Now that you have a good understanding of how to read timing charts, it is now time to use them to create in-betweens.
In-betweens are drawings that are in-between your key frames and breakdowns. Since in-betweening is a lengthy process, I decided to only look at the most important in-betweens in this animation.
In-between #1
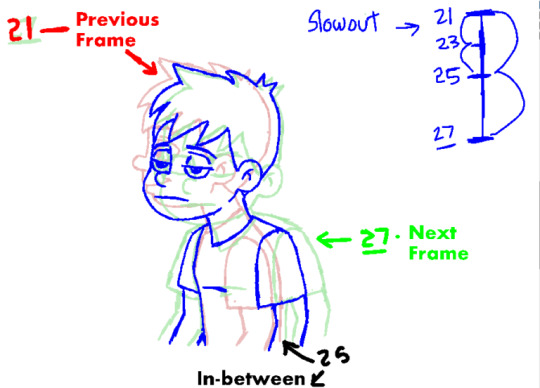
Before I drew in-between #25, I looked at the timing chart to clearly see where I should place the drawing. According to the chart, I knew that the in-between should be halfway between 21 and 27.
So I decided to draw the nose to be exactly half way between the nose in frame 21 and frame 27. The advantage of drawing the nose first is that it makes easier for me to draw a head that follows the timing chart.
In-between #2

In this in-between, I flipped through the previous frame and next frame. I noticed that the eyes were closed on frame 27, but on frame 33 they were completely open.
This meant that I should make sure that the eyes were halfway open as the character turning his head. I did this because the timing chart wants to me to applying this halfway spacing for the entire body.
In-between #3
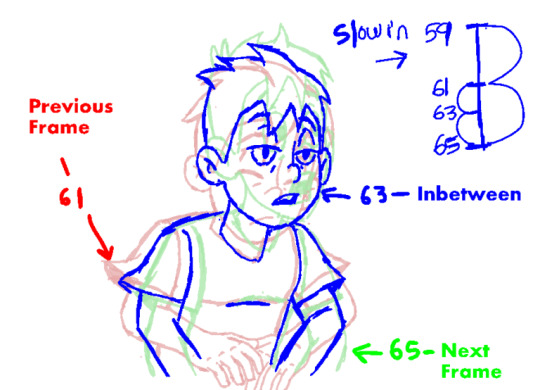
This particular key frame caused me to really use my animation skills. You see as I flipped through frame 61 and 65. I discovered that the hair on frame 61 is still dragging, However on frame 65, the hair has returned to its normal design.
I concluded that the best way to draw this in-between was to drag part of his hair, and have the other part going up. As I flipped through the frames, I was able to make it look that I hair transitioning back to it’s normal design.
In-between #4
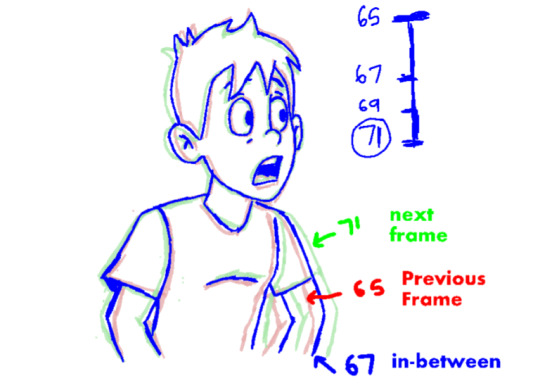
After several hours, I finally came toward the last timing chart for this animation. As I looked at the slow in timing chart, I knew that frame 67 should be halfway between 65 and 71.
So I simply wrapped up this animation by placing the breakdown halfway between frame 65-71.
Step 7: Preview your Final Animation

It is finally time to preview the head turn animation. You will notice that the animation is much smoother than the first head turn preview.
This is because I drew all the in-betweens that were required for the animation. You will also notice that the use of the timing charts increased the appeal of the animation.
This is because humans and other creatures don’t generally move at a constant speed. Their movement tends to either slow down, speed up, or use a combination of slow in and slow outs.
Conclusion
Congratulations on learning how to animate a head turn. I hope that you mastered the two most important lessons about animating head turns.
The first lesson is that you should always dip the head, and close the eyes of character as they are turning their head.
This is important because people tend to dip their heads and close as their eyes as they turn their heads.
The second lesson is that you should use a slow out at the beginning of a head turn. However as your character is about finish the head turn, he or she should start to slow down.
If you apply these two important principles to your head turns, your head turn animation will become more believable.
If you enjoyed this tutorial, please share it with you friends.
Sign up for my newsletter, so that you can stay updated whenever I release an animation tutorial on my blog.
24 notes
·
View notes
Text
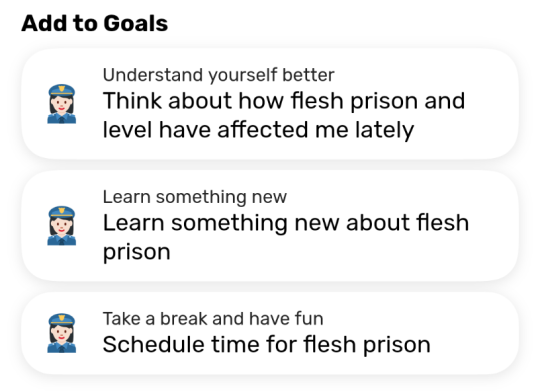
I got a mental health wellness app and decided my first entry was going to be about a videogame I played that day

47K notes
·
View notes
Text
theres a popular brand in canada called no name brand and it manufactures everything you can imagine in a grocery store and it kind of makes me feel like im in a world no one bothered to do much world building for
46K notes
·
View notes
Text
Ok i know im on break from tumblr but fucked up thing that just happened: I just saw my IRL friends artwork on pinterest, instagram screenshot WITH THEIR USERNAME CROPPED OUT. And i dont have instagram, the way i recognized it as hers was that SHE SHOWED ME THE SKETCH LAST YEAR and it drew my attention like ‘oh hey that looks like G’s piece- oh it is she finished it thats so cool- WAIT A FUCKING SECOND.’ Like first of all what the hell. Second of all what are the odds of me coming across that in the wild? Ofc ive let them know but like. I havent browsed pinterest in months and then i get on while procrastinating and BOOM STOLEN ARTWORK
0 notes

Text
Yeah well how about me when i outside your home loading a perfectly ripe cranium-sized cantaloupe into my elaborate melon trebuchet aimed directly at your window. Okay?
had a dream where i ate a cantaloupe slice and it actually tasted good. a shame it tastes like shit in real life
58 notes
·
View notes
Text
Wrong. Its called that because its the melon that tastes so good that once you have a bite of its sweetness you know you’d have the most beautiful summer wedding and a touching ceremony with this flavor, and thus you ‘Can’t Elope’ with it. 🍈
had a dream where i ate a cantaloupe slice and it actually tasted good. a shame it tastes like shit in real life
58 notes
·
View notes
Text
Taking a break from Tumblr till finals are done, see you then!
2 notes
·
View notes
Text
Guy who says “im going to enjoy this” in a dark/evil tone before eating a tasty meal
0 notes
Photo

my calendar said it was on the 28th but chabad.org said it was today so
59K notes
·
View notes
Text
this may or may not be a fantasy writing exercise for me. please reblog
#oooh well ops post is the one that came in my feed since i follow polls sooo#im giving op#the blank scroll#this is fun
18K notes
·
View notes
Text

people are sharing this on insta again so here’s the version with the font i made 🥰💖
available as a postcard in my shop!
4K notes
·
View notes


Text
No see results option, I'm forcing you to perceive yourself. rb for more results plus
21K notes
·
View notes