
cutmytitsintopieces
This is my last resort (against chronic backpain)
32 posts
Last active 60 minutes ago
Don't wanna be here? Send us removal request.
Last Seen Blogs

tvgymleader
you're challenged by gym leader JCC!

the-spirit-of-yore
The Spirit Of Yore

le-cafe-du-jour
Le Cafe du Jour

fredstumbler
Untitled

athleticplayground
The Blog of Athletic Playground
Text
A Guide to…
Content: post-surgery tips, stages of healing and how to treat your skin accordingly, cupping therapy, little drawings to explain everything I'm trying to say :)
Introduction:
Hi everyone, last month I had breast reduction surgery (yay!) so it's about time to deal with the aftermath. To prevent any movement restrictions or tissue pain from the scars that are maturing right now, it is vital to start with this process as soon as possible.
These are not cosmetic recommendations and if you yourself experience any impairment of wound healing or post-op infections, please speak to your surgeon about your personal wound treatment. Especially when it comes to chest related surgeries, the probability of such problems increases.
In this post, I will focus on the chest area, but these methods can be used on any scar (e.g. from a hip-TEP or arthroscopy). Especially if you experience hyper-/hyposensitivity around the sutures, be extra careful with the scar mobilization to decrease any chance of popping them back open. I recommend using a hand mirror to inspect your sutures before starting with the treatment.
Step 1: Around the scar
First things first, you cannot immediately start with these techniques. In the first few weeks, your body is already busy enough producing fresh tissue to fill up the wounds and fight inflammation, so fiddling around with the sutures would be too much of a good thing.
I recommend starting scar care after the third week post-op. The inflammation and swelling should be worn off by then, if not, any wound healing deficit will delay the process. See a doctor, please 😳
But how do I know that my tissue is ready? Well, the general rule of thumb is that if the scar care feels wrong or makes you anxious, you should act slow and careful. Less is more. Also:

Without even touching the suture yet, you can prepare your skin e.g. if you still have plaster strips and can't even access the area.
Level 1: Push the skin towards the wound from all sides without touching it. Go in sections and use a single finger. This movement will relive the tension on the skin without risking damage.
Level 2: Push the skin towards the wound and circle back to the beginning without pulling on it.
Level 3: Press down the suture/plaster strips with one finger and pull the skin away from it with another.
Level 4: If all methods are possible without complications, combine them and simply use circular motions along the wound.

@My chest mutuals: The wound is going to look intimidating, especially around the areola (if the incision affected it) but don't fret. If you want to step back from the big scars, try working on your drainage points or any old scars first and practice the movements!
Furthermore, in this specific area some points are under a lot of tension, please use a mirror when massaging them.

Tips: Massage daily for ~5 minutes without wearing your binder/compression bra/splint, of course. Always use an ointment or (coconut) oil as grease to lower the tension on the skin. To avoid straining the tissue, please adapt any movements to your level of pain.
Step 2: On the scar
When your wound is fully closed and all scabs have fallen off, you can move on to this step. The motions you learned previously are simply repeated on the scar itself. How intensely you decide to go in depends on your sensitivity and the firmness of the tissue.
Even if it sounds a bit brutal, to soften up already dead (=scar) tissue one needs to destroy/tease it a bit on a tolerable scale.
Level 1: Perform straight and circular motions on the scar itself.
Level 2: Pinch a section of the scar and try to gently "lift it off". When lifted, the sections can also be moved in different directions or rolled between your fingers.
Level 3: For a more intense treatment, use your fingernail or a Gua Sha tool. One finger holds down a section of skin and the other drags the scar outwards. You don't want to reopen the wound with this or risk bleeding, but if you notice little red-purple dots around or on the scar, the method is working correctly. This bruising shows that possible adhesions of the tissues have been released.

Tips: Massage daily for ~5 minutes. If the mentioned bruising does show up, wait until it eases down to try Level 3 again.
Step 3: Cupping
If you are new to cupping therapy or never heard of it, you should definitely watch a video about it and look into any possible side effects for yourself. There are no real contraindications regarding this method, but if one is using blood thinner for example they should sit this one out.
To put it bluntly, cupping therapy is not a mythical, ancient healing practice that pulls the bad blood out of your body or whatever. It is ancient, I'll give you that, but the process behind its effectiveness is simply a vacuum. Just like in the prior steps, you want to release any possible pathological adhesions of the tissue and every so often your fingers are simply not strong enough to achieve this.
To be clear, this step is not mandatory at all but often yields good results when it comes to stubborn scars. Also, wait at least six weeks until you try it!
As you can see in the video, there are different types of cups. Use the ones made from silicone (you can get them very cheap online) or sometimes even at the drug store 🤷♀️. For smaller scars, you should look for a set with various sizes to pick the most fitting one.
Cupping also increases circulation in the treated area and can help to regulate the sensitivity of your skin again. A stinging sensation like being poked with a needle is normal to experience but anything more like ripping or excessive pain is too much. Try less suction or go back to the other steps.
Static: Squeeze the cup (the more you do so, the more tension will be on your skin) and put it on a firm section of the scar, then release. Wait until the cup falls off or gets too uncomfortable.
Active: Using less pressure, place the cup down again and move it along the scar. For this step, as always recommended, use oil or lotion.

Tips: I suggest utilizing this method once a week until you are satisfied with the result. Just as before, you should wait for possible bruising to heal before trying it again. Also, try cupping the surrounding skin generously - some tissue adhesions are found in the nearby fascia (e.g. top surgery -> pectoral area + ribcage)
Conclusion:
Daily scar care after any kind of surgery is crucial to prevent limited mobility or complications regarding the connective tissue. I mainly made this post for people who may be unable to discuss this topic further with their doctor or physiotherapist.
Any other procedures after the scar has matured fully like microneedling, chemical peels, lasers etc. can also be used to improve its appearance, but for your personal post-op treatment at home these instructions should be more than sufficient.
If you have any questions or notes on this post, please let me know!
Thanks for reading 🤍
7 notes
·
View notes
Text
i’m having top surgery in 2.5 months!! if anybody has any advice or lists of things i need, i would super duper appreciate it <3 i’m starting to collect tools and prepare my spaces :3 i have quite a sensitive/immunocompromised body, so if anyone has had top surgery with a similar situation, i would love to hear about your experiences! :))
18 notes
·
View notes
Text

Things are under control now but man... that was scary
40 notes
·
View notes
Text
A Guide to…
Content: post-surgery tips, stages of healing and how to treat your skin accordingly, cupping therapy, little drawings to explain everything I'm trying to say :)
Introduction:
Hi everyone, last month I had breast reduction surgery (yay!) so it's about time to deal with the aftermath. To prevent any movement restrictions or tissue pain from the scars that are maturing right now, it is vital to start with this process as soon as possible.
These are not cosmetic recommendations and if you yourself experience any impairment of wound healing or post-op infections, please speak to your surgeon about your personal wound treatment. Especially when it comes to chest related surgeries, the probability of such problems increases.
In this post, I will focus on the chest area, but these methods can be used on any scar (e.g. from a hip-TEP or arthroscopy). Especially if you experience hyper-/hyposensitivity around the sutures, be extra careful with the scar mobilization to decrease any chance of popping them back open. I recommend using a hand mirror to inspect your sutures before starting with the treatment.
Step 1: Around the scar
First things first, you cannot immediately start with these techniques. In the first few weeks, your body is already busy enough producing fresh tissue to fill up the wounds and fight inflammation, so fiddling around with the sutures would be too much of a good thing.
I recommend starting scar care after the third week post-op. The inflammation and swelling should be worn off by then, if not, any wound healing deficit will delay the process. See a doctor, please 😳
But how do I know that my tissue is ready? Well, the general rule of thumb is that if the scar care feels wrong or makes you anxious, you should act slow and careful. Less is more. Also:
Without even touching the suture yet, you can prepare your skin e.g. if you still have plaster strips and can't even access the area.
Level 1: Push the skin towards the wound from all sides without touching it. Go in sections and use a single finger. This movement will relive the tension on the skin without risking damage.
Level 2: Push the skin towards the wound and circle back to the beginning without pulling on it.
Level 3: Press down the suture/plaster strips with one finger and pull the skin away from it with another.
Level 4: If all methods are possible without complications, combine them and simply use circular motions along the wound.
@My chest mutuals: The wound is going to look intimidating, especially around the areola (if the incision affected it) but don't fret. If you want to step back from the big scars, try working on your drainage points or any old scars first and practice the movements!
Furthermore, in this specific area some points are under a lot of tension, please use a mirror when massaging them.
Tips: Massage daily for ~5 minutes without wearing your binder/compression bra/splint, of course. Always use an ointment or (coconut) oil as grease to lower the tension on the skin. To avoid straining the tissue, please adapt any movements to your level of pain.
Step 2: On the scar
When your wound is fully closed and all scabs have fallen off, you can move on to this step. The motions you learned previously are simply repeated on the scar itself. How intensely you decide to go in depends on your sensitivity and the firmness of the tissue.
Even if it sounds a bit brutal, to soften up already dead (=scar) tissue one needs to destroy/tease it a bit on a tolerable scale.
Level 1: Perform straight and circular motions on the scar itself.
Level 2: Pinch a section of the scar and try to gently "lift it off". When lifted, the sections can also be moved in different directions or rolled between your fingers.
Level 3: For a more intense treatment, use your fingernail or a Gua Sha tool. One finger holds down a section of skin and the other drags the scar outwards. You don't want to reopen the wound with this or risk bleeding, but if you notice little red-purple dots around or on the scar, the method is working correctly. This bruising shows that possible adhesions of the tissues have been released.
Tips: Massage daily for ~5 minutes. If the mentioned bruising does show up, wait until it eases down to try Level 3 again.
Step 3: Cupping
If you are new to cupping therapy or never heard of it, you should definitely watch a video about it and look into any possible side effects for yourself. There are no real contraindications regarding this method, but if one is using blood thinner for example they should sit this one out.
To put it bluntly, cupping therapy is not a mythical, ancient healing practice that pulls the bad blood out of your body or whatever. It is ancient, I'll give you that, but the process behind its effectiveness is simply a vacuum. Just like in the prior steps, you want to release any possible pathological adhesions of the tissue and every so often your fingers are simply not strong enough to achieve this.
To be clear, this step is not mandatory at all but often yields good results when it comes to stubborn scars. Also, wait at least six weeks until you try it!
As you can see in the video, there are different types of cups. Use the ones made from silicone (you can get them very cheap online) or sometimes even at the drug store 🤷♀️. For smaller scars, you should look for a set with various sizes to pick the most fitting one.
Cupping also increases circulation in the treated area and can help to regulate the sensitivity of your skin again. A stinging sensation like being poked with a needle is normal to experience but anything more like ripping or excessive pain is too much. Try less suction or go back to the other steps.
Static: Squeeze the cup (the more you do so, the more tension will be on your skin) and put it on a firm section of the scar, then release. Wait until the cup falls off or gets too uncomfortable.
Active: Using less pressure, place the cup down again and move it along the scar. For this step, as always recommended, use oil or lotion.
Tips: I suggest utilizing this method once a week until you are satisfied with the result. Just as before, you should wait for possible bruising to heal before trying it again. Also, try cupping the surrounding skin generously - some tissue adhesions are found in the nearby fascia (e.g. top surgery -> pectoral area + ribcage)
Conclusion:
Daily scar care after any kind of surgery is crucial to prevent limited mobility or complications regarding the connective tissue. I mainly made this post for people who may be unable to discuss this topic further with their doctor or physiotherapist.
Any other procedures after the scar has matured fully like microneedling, chemical peels, lasers etc. can also be used to improve its appearance, but for your personal post-op treatment at home these instructions should be more than sufficient.
If you have any questions or notes on this post, please let me know!
Thanks for reading 🤍
#top surgery#breast reduction surgery#reduction surgery#surgery tips#top surgery recovery#scar care#tw scars#medical advice#cupping therapy#shitty art#physical therapy#is this considered nsfw#my european mind can't comprehend people being upset by nude bodies#this is educational#and also just a doodle#so pls chill tumblr#medical ressources#post op#digital art#lgbtq community#trans pride#top surgery advice
7 notes
·
View notes
Text
Alright I finished the other side now and it's manageable. I strongly recommend soaking the strips in oil (like coconut oil) beforehand but one way or the other, the glue will rip the upper layer your skin and the scabs off. So give your sutures enough time to heal!
Just removed my plaster strips and one spot started bleeding again 😢 nooooo
2 notes
·
View notes
Text
Just removed my plaster strips and one spot started bleeding again 😢 nooooo
2 notes
·
View notes
Text
Surgery tip: As it turns out, your skin doesn't like having to wear a binder 24h a day, so remember to use lotion on your shoulders and upper back!
1 note
·
View note
Text
Doc: "Your wounds are healing very nicely, start with the scar care!"
Also doc: puts another layer of plaster strips on the wounds for extra support
0 notes
Photo
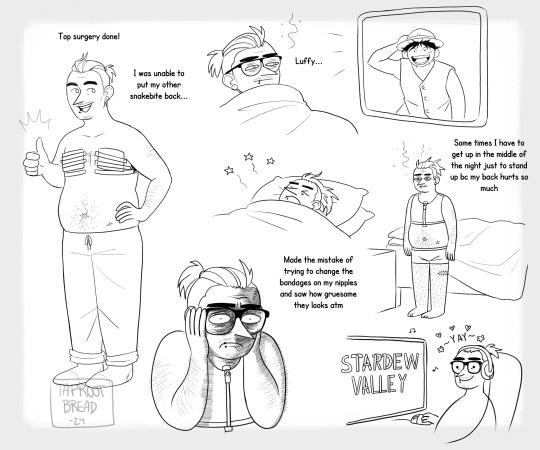
The adjustment period has been interesting so far to say the least.
182 notes
·
View notes
Text
Surgery tip: press your hands against your sutures if you have to sneeze or cough
2 notes
·
View notes
Text
Surgery tip: if your bandages or plaster strips get damp, just blow-dry them on a low setting
3 notes
·
View notes
Text
IV fun facts:
hurts like hell when they put it in
the solutions they give you are at room temperature, so they will always feel cold and cool your hand down (either warm yourself up with your other hand or wrap a sweater around it)
every time you get a new solution, it will burn a bit at the start
the little access tube in your hand or arm gets entangled everywhere (your food, your clothes, the faucet)
removing the tube doesn't hurt at all
12 notes
·
View notes
Text
Surgery tip: invest in cough drops. After they shove that tube down your windpipe you're going to be dried out 👀
2 notes
·
View notes
Text
My boobs are burning, I'm full of IVs and my right nipple looks kafkaesk. I'm so happy I did this! 0 regrets 🌈⚡🌞
2 notes
·
View notes