
Last Seen Blogs

beyonddarkness
Beyond Darkness

rickrolledriordan
Nova Lenahan

ribhinnog
wanderlust;

notyourhetloki
notyourhetloki

kiviak
My life My Thoughts
Text
Flutter Firebase CLI | Connect Flutter With Firebase with Single Command
Step 1: Create Flutter App and Firebase Instance
How to connect Latest Firebase with flutter
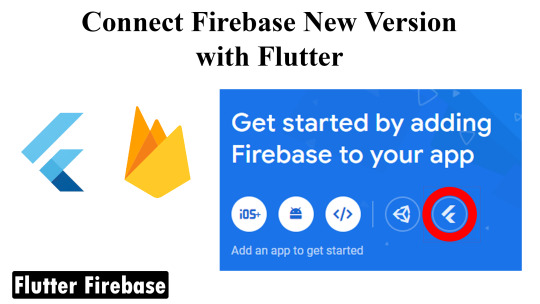
Learn how to connect firebase's new version with flutter using flutter firebase cli. We will install flutter firebase cli which will help in connecting android, IOS, macOS, and Web to firebase using a single command.

Install Flutter
In order to connect Firebase with flutter, you have to install flutter first. In order to install flutter watch this video, here you will learn how to install all the necessary Files, Tools, packages, Emulators, Extensions, and IDE. Watch this detailed video it will help you.
https://youtu.be/a3XkVqRQjZs
Create new Flutter Project
In order to Connect Firebase with Flutter, We will need a flutter App so, we can connect this app With firebase.
To create a new Flutter App run the following command in the window terminal in any directory.
Flutter new app_package_name
this will create a flutter demo project with will be the default counter App.

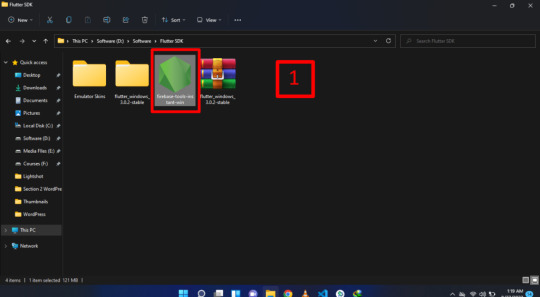
Default Flutter App
When we run the above command we will get flutter App which will look like this with a simple UI design having appBar and bottom Navigation Button. By Pressing the Plus button it will increment the counter and change will be shown in the UI.

Create Firebase App
Firebase New Version provides an easy way of connecting the flutter App with Firebase. Firebase CLI Provides a single command with the help of which we can connect our flutter App to Firebase Android, IOS, macOS, and Web platforms.
The first step is to log in to the Firebase console and create a firebase App with a name related to your flutter app so that it is easy to manage and organize the firebase app.
Google FIrebase Console

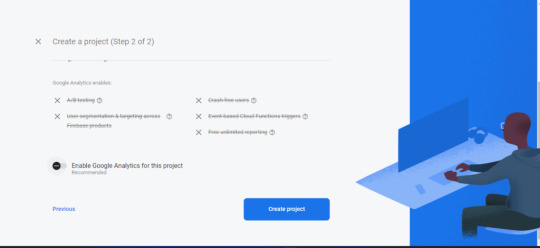
Analytic Setup
Google Analytics is used for Apps to be published to the play store. As we are connecting firebase to flutter App using Firebase CLI so I will turn off Google Analytics for it. If it is needed in your case, switch the button.
Progress Bar
When we click on that create project button the creating process of the firebase App will start and you can check the progress made through the progress bar. After the creating process is completed, you will be redirected to the firebase App page.

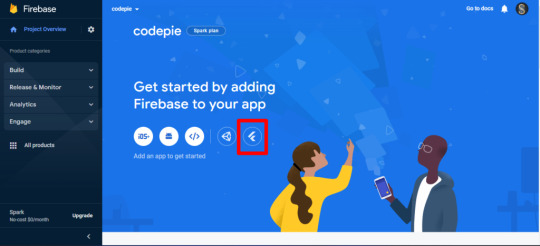
How to connect Firebase new version with flutter
After creating the firebase project, you will be redirected to the project page. Here click on that flutter logo and this will lead you to the firebase connection phase with flutter.
Step 2: Download and Install Firebase CLI
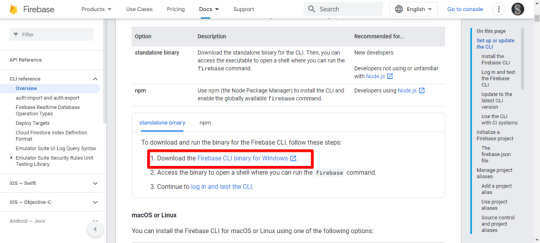
Download Firbase CLI
On Firebase Connection Page, the first step is to download and install Firebase CLI. After that, We have to install flutter SDK and Create Flutter Project. As we have already installed flutter and created the flutter project so we will take start with downloading and installing flutter Firebase CLI. So let's click on that firebase CLI.
Get Firebase CLI

Choose the Operating System
After clicking that Firebase CLI anchor text, it will redirect you to the Firebase CLI page. Here you have to choose the Operating System, for which you want to download and install firebase CLI. In this post, I will download for windows Operating System so, I will click on the window.

Download Firebase CLI
When we click on the Any Operating System Option Button it will move us to the download section of Firebase CLI for the selected Operating System. When I click on the window button, it redirected me to this anchor text to download Firebase CLI.
If you click on that Anchor text, the download popup will show up, then select the directory in which you wanted to place that executable file. After selecting the directory, Click on that start button and the download process will start.
It will take some time to download depending upon your net Speed. The faster the net speed the fast it will download.
Download Latest Firebase CLI for Windows

Install Firebase CLI
When the download process completes, the next step is to install Firebase CLI. So double-click on that firebase CLI executable file.
This will Open Command Prompt for the installation, Configuration, and Authentication of Firebase CLI. It will take some time to make things ready for you, wait for some time in order to set up the envirenment completed for you.

Install Firebase CLI
After making all the setup ready for you the next screen will show a message to you to accept for Firebase CLI which is Needed for Firebase CLI to collect usage and error reporting information.
So replay with "Y" to allow the access and take start will installing and authenticate Firebase CLI

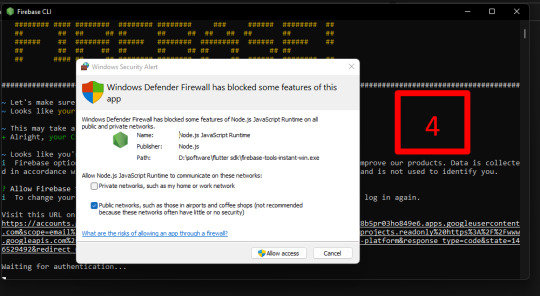
Window Defender Firewall Access to Firebase CLI
Firebase CLI need access to some Feature which is blocked by the window firewall, this access may include access to a browser for authentication of your firebase account with Firebase CLI. So click on the allow access button, to install Firebase CLI Correctly.
Authentication of Firbase CLI
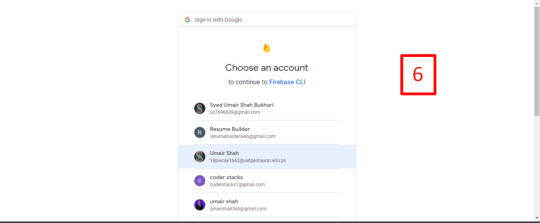
The next step is to authenticate firebase CLI with the account with which you have created that firebase project. So whether click on the following link in the terminal or your browser will be redirected to the authentication page Firebase CLI.

Authentication Firbase CLI with Gmail Account
Now Authenticate Firebase CLI with your Gmail account with which you have created the firebase App. Make sure you have selected the correct Gmail account otherwise you would not be able to connect that firebase App with flutter.
Firebase CLI Access to Firebase Account
In the next step, it will show a message for access to the Firebae account. Click on allow a button to allow access to firebase.

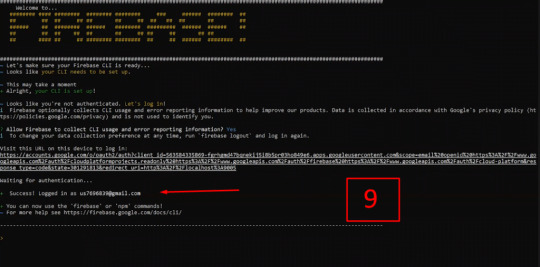
Firebase CLI Access Success Message
If firebase CLI successfully connected to your Firebase, then it will show this kind of login Success Message.
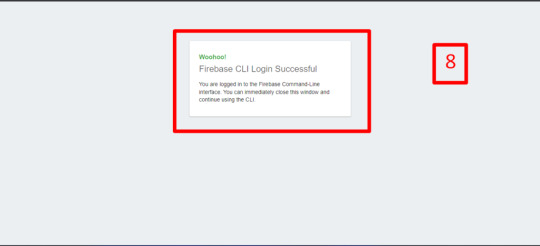
Firebase CLI Access Success Message in Terminal
Also when you come back to the terminal you will get a success message there and there will be the email name with which you have login firebase CLI
Step 3: Node Js Download and Install
Download Node Js
The Next step is to download Node Js. With help of Node Js, we will be able to install Firebase Packages and Dependencies. So search for Node Js Download and Click on the Firest Link Which will redirect you to the home page of Node Js.
Visit Node Js Offical SIte

Choose Your Operating System for Node Js
In the Next Step Choose the Operating System for which you want to install Node Js. Make Sure you have downloaded the Node Js File for the correct Operating System otherwise it will show an error and you would not be able to install it.
.
Download Node Js For Windows
So I will click on the window Icon, and the download pop-up will show. Here you can select the directory where you want to place that Node Js Executable File.


Install Node Js
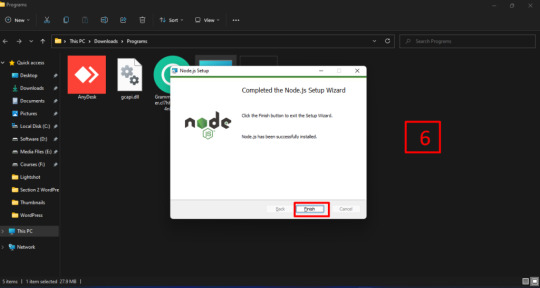
When the installation process is completed then, the next step is to install Node Js.
The installation of Node js is very simple as you have to double click on that executable file and the installation pop-up will show.
To install Node Js Click on the Next button, Proceed with the Next Button Each time. During Installation Process you can select the directory for the node js, where you want to install node js.
So Proceed with next in each step and don't change the default setup last you get that installation button, Click on the Install button, and Node js Will be installed on your Device.
When the installation has been completed, then click on the Finish button to close this window.


Step 4: Download and Install Firebase tools
Download and Install Firebase Tools
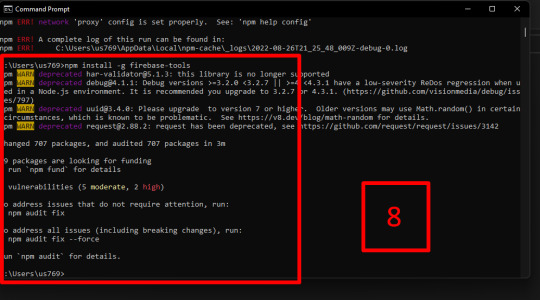
Open the Terminal and type the following command which will help in the installation of firebase tools packages. Make Sure you have opened a new terminal because in the previous one it wouldn't work. This may fail sometimes due to network issues. Try Again and Again and finally, it will install all the firebase tools that are required
npm install -g firebase-tools
this will install firebase tools on global which will enable you to connect any flutter app with firebase.

Install Firebase Tools Successfully
If the Firebase tools are installed correctly then you will window on this type. So our firebase tools are installed correctly and we will move toward the next step.
Active FlutterFIre-CLI
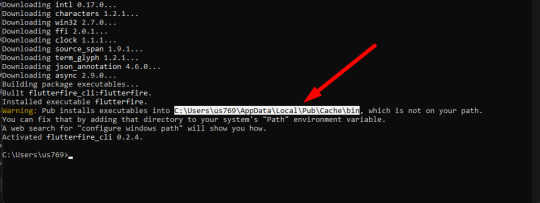
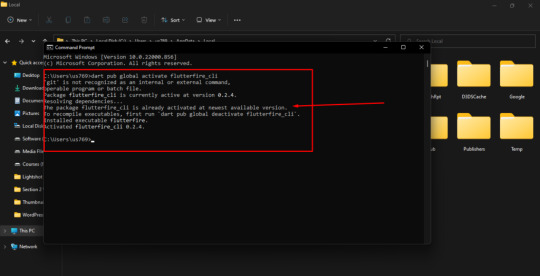
Open the new terminal window and type the following command. The will enable FlutterFire-CLI which will help in connecting any flutter App with Firebase
dart pub global activate flutterfire_cli

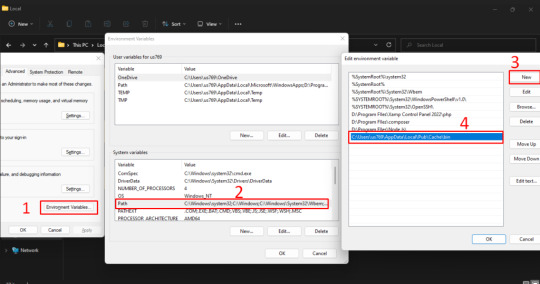
Add FlutterFire Path to System Variables
This will provide you with the Flutter Fire and we will add this path to System Path variables. So copy this Directory Path
Add Path
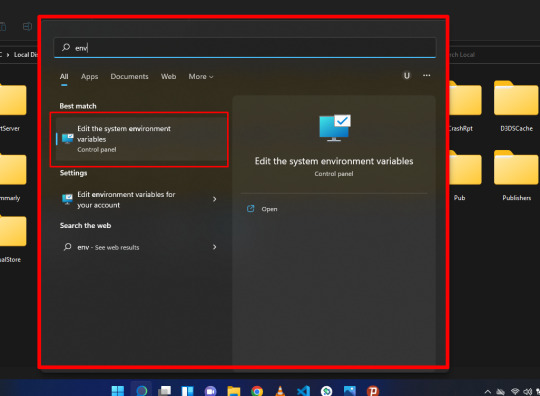
To Add a path search for env and you will get this icon with text Edit the System Environment variables. Click on this Icon.
1) Click on Environment variables
2) Under System Variable select path and click on that edit button.
3) Click on New and a New line will be added the paste the Flutter Fire Directory here and Click on that Ok button.
Also Proceed with Ok button to click these windows.
Flutter FIre Command
Then Run the Flutter FIre Command Again and This time you get no Issue, We have successfully Made setup for FIrebase new version for Flutter
Connect Flutter App With Firebase New Version
Back to the Firebase and Copy this Command. It will be like the following command. With help of this single command, we will be able to connect Firebase with flutter and we would not be making these configurations for firebase again and again.
flutterfire configure --project=myapp-59f4d

Run FIrebase Command
To Connect Firebase App with your flutter App run your copied command in root directory of your project and it will start fetching and connect you flutter app with firebare. In same window you will get options, choose Android and Press ENTER.

Connect Flutter Android, IOS, macOS, and Web using single FIrebase Command
This Will connect your Android, IOS, macOS, and Flutter Web App with Firebase using a single command. Now Each time you want to connect Flutter App with Firebase you will paste a single command and it will connect your Flutter App with firebase for multiple Platform
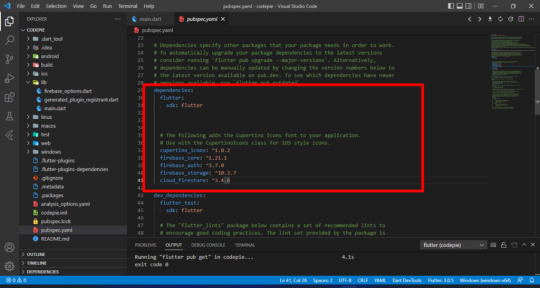
Add Firebase Packages in Pubspec.YAML FIle
Now Copy the Below Firebase Package and Paste it into your project pubspec.YAML file under dependencies. With help of these dependencies, we will get access to firebase for storing and fetching data.
firebase_core: ^1.21.1 firebase_auth: ^3.7.0 firebase_storage: ^10.3.7 cloud_firestore: ^3.4.6
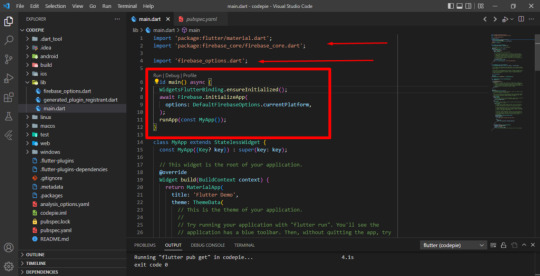
Edit main.dart FIle
Now Copy the following code and replace it in your project main.dart file. In the following Code, We Initialize Firebase with is async call.
void main() async { WidgetsFlutterBinding.ensureInitialized(); await Firebase.initializeApp( options: DefaultFirebaseOptions.currentPlatform, ); runApp(const MyApp());}
Edit main.dart FIle
Now if you back to the project console in firebase, it will show your firebase is connected with the multi-platform flutter app. So this was all about connecting firebase's new version with flutter using Firebase CLI single command.
Read the full article
0 notes
Text
Flutter tutorial for Beginners | Flutter AI App

Flutter Rotten Apple Detection - Flutter AI App
In this video, I have built Flutter Rotten Apple Detection App which is Flutter AI App and I have used AI Model in Flutter to Detect the Rotten Percentage of Apple. This is Flutter Tutorial for Beginners and provides the concept of how to use the AI model in a flutter App.
https://youtu.be/fBqObfoSjVg
Let's what we will build - Flutter AI App
We will have Flutter AI App will be have the option to detect rotten apple live and show us the percentage of apple rotten. We will provide different rotten apple image in teachable machine and set various classes for it and on the basis of these classes our Flutter AI App will predect the percentage.

Create Flutter Project - Flutter AI App
First we will create flutter project by running the following command
flutter create rotten_apple_detection
This will create flutter project for us and we will take a start will building Flutter Ai App. We will remove the demo code which is demo increment app with simple UI.
Flutter Image Picker Package - Flutter AI App
We will use flutter image picker plugin to get Rotten apple image and Detect the Rotten level of the Apple. Flutter Image Picker flugin is used to get image in various formate like Uint8List, File and More.
To Install Flutter Image Picker Plugin run the following command in the terminal of your Project and Package will be added to your Flutter AI App.
flutter pub add image_picker
If you want to read more about Flutter image Picker Plugin Click on this Button
Flutter Image Picker Plugin
Teachable Machine
Teachable Machine is a helpful Web based AI tool for Learning AI Model. It build AI Model whichi can be accessed by Anyone and Easy to use. In this Flutter AI Project, We will use Teachable Machine to generate Rotten Apple Model for Flutter. We select different for various classes and import sample image. WIth help of these limited image with can get high
If you want to read more about Teachable Machine Click on this Button
Teachable Machine
Source Code
We would like that you should check our project source code and learn how all these steps works and it is realy helpfull for flutter beginners to learn flutter and Flutter AI Project. We have difference Flutter AI Project Repository you can check on github profile. To get Project source code click on the following link button.
Github Source Code
Read the full article
0 notes
Text
How to build QRcode generator using JavaScript

How to build QRcode generator using JavaScript | Javascript Project Tutorial 2022

A QR Code (Quick Response code) is a two-dimensional square
barcode that can store encoded data. Most of the time, people use the QR Code
to link to their website URL (any text/string can be generated in QR Code)
Link to YouTube Tutorial: https://www.youtube.com/watch?v=hJBJdbjHARU
Github link: https://github.com/umairshah143/qrcoder-generator-in-javascript
The Project has how to generate QRcode in JavaScript along with How to Copy Images to the clipboard in JavaScript and download images with JavaScript. Showed the demo of
the final result with accurate functionality
Code for QRcode generator using JavaScript
To generate Qrcode will get that input value from the user and set it into a variable. Then provide two things to QRCode() function, one that blocks where we want to show QRcode and the other that input value from the user and some configuration like setting the width, height, color dark, color light, and correct Level. We made calls to that QRcode generator function when the user click that submit buttonfunction QrcodeGenerator(){ var inputElement=document.getElementById('site_Url').value; let qrcode=new QRCode(document.getElementById('qrcode'),{ text:inputElement? inputElement:'https://www.resumebuilderweb.com/qr-code-generator',
width: 250, height: 250, colorDark: "#000000", colorLight: "#ffffff", correctLevel: QRCode.CorrectLevel.H });}
Read the full article
0 notes
Text
Target class controller does not exist - Laravel 8
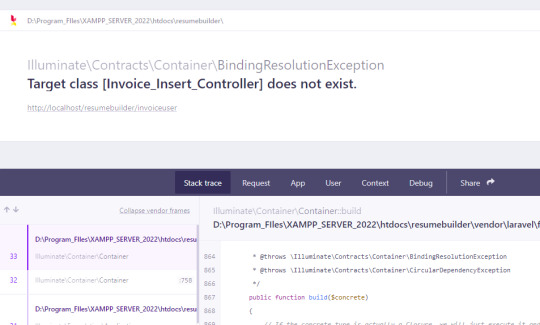
Target class controller does not exist - Laravel 8 solved.
Laravel 8.x version show shows the error 'Target class does not exist.'. The old version has no issue and for the new version, there are two methods to fix it.
- The First is To uncomment it from Service Provider
- The Second is to use a full Path to the controller in Route
Method-I: Uncomment the AppHttpControllers
The First Method is to uncomment the line 'protected $namespace = 'AppHttpControllers';' from RouteServiceProvider.php in App/Provider directory. Open the mentioned directory and check for the above line. This Will Solve the issue of 'Target class does not exist.'.Uncomment the following line and Refresh your site. It will be fixed.

If The Issue is Still not fixed then try to add this line of code to the following section as shown in the image->namespace($this->namespace)Add the following line of code and Refresh your site. It will be fixed.

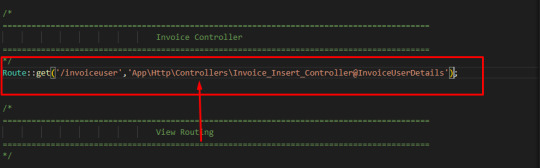
Method-II: Use Controller Full Path in Route
The Second Method is to use a full path link to the controller in Route. When Creating Route for the controller provides the full path to the controller. Just Check Below.Example:Route::get('register', 'AppHttpControllersApiRegisterController@register');
Read the full article
0 notes
Text
How to install flutter in windows 10 and install flutter in vscode & android studio

In this video I have covered how to install flutter in windows 10. I have download git and install it then install flutter and create flutter project. Then I have installed android studio and SDK and AVD tool. Then run demo project and Install Will vscode.So I have Installed flutter in android studio and vscode in window 10
In this video I have covered how to install flutter in windows 10. I have download git and install it then install flutter and create flutter project. Then I have installed android studio and SDK and AVD tool. Then run demo project and Install Will vscode.So I have Installed flutter in android studio and vscode in window 10
Table of Content:
00:00 intro 00:44 how to install git on windows 10 02:20 how to install flutter sdk in android studio in windows 10 03:21 how to change path environment variable windows 10 for flutter 04:00 create flutter project in vscode and android studio 04:50 how to install android studio on windows 10 05:50 android sdk and avd setup 06:30 install android studion sdk platform and tools 07:50 android studio virtual device setup 08:40 run flutter project in android studio 09:00 download and install visual studio 10:00 run flutter in visual studio code 10:17 visual studio code extensions for flutter 10:40 run flutter project in visual studio code 11:20 install flutter on window 10 11:23 please subscribe to our channel and like the video Topics covered: 1. How to install flutter in windows 10 2. install flutter in vscode & android studio ------------------------------------------------------------------------------------------------------------------------------------------------------- Learn Web Development How to create WordPress site ------------------------------------------------------------------------------------------------------------------------------------------------------- WordPress dashboard and Post menu for Beginners | WordPress Tutorial 2 | For Beginners 2020 | 😱🙆🤔✌🌎 Link:https://youtu.be/uX7bU0sEGCk ------------------------------------------------------------------------------------------------------------------------------------------------------- Overview of WordPress Dashboard for Beginners | WordPress Tutorial | Learn WordPress in 7 minute |🙆🙆 watch video : https://youtu.be/Poy5asufNXE ------------------------------------------------------------------------------------------------------------------------------------------------------- WordPress Media Page Comment and Appearance Menu in Detail|For Beginners |WordPress Tutorial 3 watch video:https://youtu.be/uU4J2m3k8Mw ------------------------------------------------------------------------------------------------------------------------------------------------------- How to create WordPress site locally on your PC using Desktop Server watch video link ::https://youtu.be/1rlCKmYqjug ------------------------------------------------------------------------------------------------------------------------------------------------------- graphics Design Face Slice Effect in Photoshop cc 2020 watch video:https://youtu.be/cI_7HEJEL2w ------------------------------------------------------------------------------------------------------------------------------------------------------- Liquify and Brush tools in Adobe Photoshop cc 2020 using a model picture watch Video: https://youtu.be/Q9iX-NKvcPk ------------------------------------------------------------------------------------------------------------------------------------------------------- Circular Pitch Stretch Effect in Photoshop cc 2020 Photoshop tutorial watch video :https://youtu.be/Xp135pax8XQ ------------------------------------------------------------------------------------------------------------------------------------------------------- how to mockup logo in Adobe Photoshop cc 2020 using PSD file or EPS Files mock up | Tutorial watch video: https://youtu.be/FO5epmizbTg
Read the full article
0 notes
Text
how to install wordpress in xamp | xampp wordpress | wordpress installation

how to install wordpress in xamp
In this vidoe I have shown how to install wordpress in Xamp on local host. The installation of WordPress is completed in Three steps. For Local WordPress install xamp server is needed. The Combination of Xamp Wordpress helps in installing wordpress on local host.
In This Video I have Described the Following Topics: 1 How to install WordPress on Local Host 2 How to install WordPress on PC 3 How to Install WordPress on Window 10 4 how to install wordpress in xampp 5 how to install wordpress in cpanel 6 how to install wordpress on localhost 7 how to install wordpress locally 8 how to install wordpress in xampp in hindi 9 wordpress installation 10 wordpress website development 11 wordpress installation
In this video you will learn how to install WordPress on local host using Xamp server. Before Proceed I would like if you can help us by subscribeto our channel and Our video are amazing and will help you a lot in Future.
There Three Steps to install WordPress on your local host.
- First Download Xamp and install it.
- Second Step is download WordPress and Extract to the htdocs folder.
- Third Step is to Install WordPress and configure Database.
Step 1:
So Proceeding with Step one go to your Favorite browser and Search of Xamp server and Click the very first link. It will open Xamp official Site and you can download Xamp from there. Here you will find different version and for differentOperating System like Window, Linux and Mac. Just find your Operating System and Download it. I have Window so I Will download for Window.
As I have Already Download it so I will cancel the Download.
After the download go to the download directory and Double click on installation File. Just simply go for Next and Next and chose your Installation Directory. You have to Select and remind about it as you have to extract WordPress files there. You can create new folder for installation files and Select that folder. Then proceed with next and next again and your installation will start.
As I have already install it so I will cancel it.
Now Step 2:
Just open your favorite browser and search for WordPress download.
This is the WordPress Official site and you can download various plugins and other tools from here. Any kind of help can be there related to WordPress.To download WordPress just Scroll Down and Click on Download WordPress. It will start WordPress zip file download.
As I have Already download it so I will skip the download and start to extract in to xamp server so that we can proceed without wasting your time.
Now Proceed to the Xamp server installation directory you have choose during installation. Find there Htdocs folder and Copy the WordPress zip file Here.
So this is my WordPress zip file I have downloaded from WordPress dot org
So create new folder and rename it by the site name you want to create. In my case I will create new folder and rename it as Web Development with any space in folder name. Copy that WordPress file and past it your site folder in my case folder is web development.
Extract it here and in a minute it will extract there then just delete the zip file. As there is no need of it there now.
Now open the WordPress folder you have extracted from zip file and Select all the files and folder there and move it wed development directory just simply go back and paste there. Then delete the empty WordPress folder.
Third Step:
The Third step is to Install WordPress. So in start menu search for xamp and double click on it. Xamp will open then just simply click on start option of Apache when it turn from yellow to bellow the it work fine and MySQL Also. Then in new tab search for localhost slash your website name as mine is web development so I will type it.
The Install process will start now just click Continue after selection your Site language Then let’s go Then for database just put data and if it does not work then you can follow along the new method I am telling about.
- WordPress database name: mine just web development and you can provide name after your site name
- Username will be “root” no other than root. Otherwise it will show error.
- Password must be empty so leave it as empty.
- Database hostname must be local host so leave it as local host.
- And Table Prefix what you want I will name jus wp dev underscore
In my case it shows database error and if it is showing in your case you can follow along otherwise wait to next step after I set the database configuration. So just click on Xamp server open in your taskbar. There just click admin in front of My SQL.Then Click on new in top left on screen
- database name: mine just web development and you can provide
- name after your site name.
- leave other as default and click create.
- Then for create table
Table name can be what you want I will name jus wp dev without any space.
Then click on go
Now open the web development folder where you have WordPress files and check for wp config sample dot php.
Open it and down in database name provide the name you have provide for database name in MySQL just check it. It will appear there. So write your database name there.
- Rename user as root
- Password should be empty
- Then check for table prefix after scrolling in same file.
- Name as you have provided there is database I have write there wp dev so you can set according to your once.
- Then save the file by the name of wp config dot php and remove the sample word in same website directory.
- Now go back to the installation tab of your browser and remove other leave as localhost slash, your site name
- Then click on continue
Now it Works Just Provide site details here
- Provide your site name
- Username
- Password
- And emails
- Then click on install WordPress
So your done
WordPress is install and Now login to your site. Now this is the default dashboard of your WordPress site now you can create site from scratch but installing various themes plugins, Design pages and Posts.
Hence WordPress is install on your local host.
If you want to learn web development then we have courser web development course on channel check for html css JavaScript. It is one of the best course for beginner to learn web development.
If this video has help you in creating WordPress on local host then please support us by simply like the video and subscribe the channel you will get more informative videos like that.
Read the full article
0 notes
Text
Highest paying freelance skills 2021, How to earn money online, Fiverr seller

This video Have information about Highest Paying Freelance Skills in 2021. The video have main focus on Top Skills to make money online and have tipsabout how to earn money online as a fiverr seller. The have point the skills for fiverr how to make money.
Table on Content:
00:00 Overview of Fiverr
01:00 fiverr keyword research and fiverr gig seo
01:40 Fiverr SEO Gigs
02:00 Fiverr Web Development and WordPress Website
02:40 Fiverr Game Development Gigs
03:00 Pakistan Fiverr Freelancers
03:20 Fiverr SEO Gigs
03:40 Fiverr Mobile App Development, React Native vs Flutter
04:39 Fiverr Logo Design Gigs for Graphics Designer
06:00 Fiverr Data Entry Gigs and SEO
07:00 FIverr Gigs Rank and SEO
07:30 Sucess on Fiverr Freelance
08:00 Fiverr Top Skills for Freelancing
09:00 Recommended Skills for Fiverr
10:00 Fiverr Course and Fiverr tutorial For Beginners
10:30 Subscribe To Our Channel For Fiverr course, Tips, Gigs,SEO,and Learn
10:40 Thanks for Watching
Cover Topics :- 1. How to make money 2. fiverr app 3. fiverr freelance 4. fiverr account creation 5. fiverr website 6. fiverr par account kaise banaye 7. fiverr course 8. fiverr data entry jobs 9. fiverr tutorial 10. fiverr gigs for beginners 11. fiverr se paise kaise kamaye 12. fiverr for beginners 13. how to make money online 14. how to make money online in pakistan 15. earn money online 16. make money online 17. online earning in pakistan
Read the full article
0 notes
Text
how to rank youtube video , youtube seo tools , ytseotools

Youtube SEO
In this vidoe I have showed how to rank youtube video. I have Described that how to SEO Youtube video. I have Recommended the Best Youtube SEO Tools to rank your video. These ytseotools will help you to grow your channel Fast and Get More view and Subscribers on youtube.
Youtube SEO Video:
Topics:
I have covered the following topic in this video:
1 how to seo youtube video
2 how to rank youtube videos fast
3 How to get more views and subsribers
4 youtube monetization
5 youtube videos
6 youtube studio
7 youtube keyword research
8 youtube video ranking
9 seo for youtube channel
10 yt seo tool
11 youtube seo kaise kare
12 youtube seo tutorial
13 youtube seo 2021
14 youtube seo tips
15 how to rank on youtube
Hello Guys
I hope you’re well and good.
Youtube SEO Tutorial:
In this video I am going to show you how to rank your video on YouTube. I will show you how to write your titles description tags and thumbnails in order to rank video on YouTube. The Best SEO Tools Google Keywords Planner we are going to use.
Google Keywords Planner:
So just Open google Keywords planner in new tab and click on Discover New Keywords. My Video is about how to install WordPress on local host so I will search for it. You can search according to your needs.
So I will check the keywords which have high monthly search rate and low competition.
So I will copy these keywords and Past in title section of video
I have searched about some keywords in google keywards planner and check there search rate on monthly bases and those which have high I copied and past in title. You can use maximium of three keywords. First keywords must be long, the second one medium and the third short. Your title must words range must be form 60 to 80 words.
Youtube Video Description:
In description the first three line of description should contain the short summary of video and all the three keywords in titles should be used in first three lines. You can add extra but the title keywords are important and compulsory for ranking your video on youtube.
The next in description I will tell the I have covered the following topics and search for some keywords related to the video and provide numbering to the keywords. So YouTube will doesn’t consider it as illegal. The keywords I have search in google keywords Planner. Select High Search Keywords copy and paste here.
Keywords In Description
Just write 10 to 15 keywords there and later we will use it in video tags
Now copy these all, I have to add these suggested keywords From Vid I Q. Now paste the copied keywords and delete the numbering and put comma characters between two keywords so it can be separated into many keywords and there might be no repetition.
Youtube Keywords Tags
Now also add other suggested keywords from vid I Q.
Now copy the title of video and separate it into keywords.
I will copy some other video links and support links and will paste it in the video description.
Youtube Video Thumbnail:
Now the thumbnail of video matthers a lot so you have choose attractive thumbnail so that it will show what your video have and what it offers. You can create your thumbnails in Photoshop or illustrator.
You can Design online through conva dot come. Search for it.
Then search for youtube thumbnails and select which best suit you. Just edit it according to your desire one and download it form here simply. They provide recommended size thumbnails for youtube.
Thumbnails in Photoshop
I have created already in photoshop I will select it and upload. After Upload I will Save the video so the changes may be saved.
Google Keywords Planner is the best SEO tool for video ranking and the father of all other extension and tools
If you have learn something then please support up we will support you with amazing content. So Please subsribe to our channel and like and share video with your friends.
Read the full article
0 notes
Text
How to run Flutter App in Chrome | English | Unable to connect to Chrome debug port error fixed
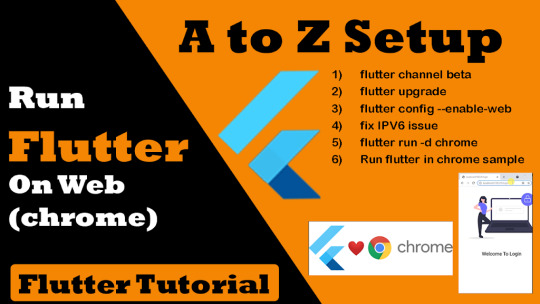
How to run Flutter App in Chrome
To Run Your Flutter Project in Chrome Click on Terminal in Visual studio or move to that directory in command prompt and type flutter Channel beta and press enter.
Watch Video on Youtube:
Step 1) First Create a flutter project using : # flutter create *your app name* //// Flutter Web //// https://flutter.dev/docs/get-started/web Step 2) Commands are :
To Run Your Flutter Project in Chrome Click on Terminal in Visual studio or move to that directory in command prompt and type flutter Channel beta and press enter.
# flutter channel beta
# flutter upgrade
# flutter config --enable-web
Step 3) # Local host error fixed for chrome in flutter # disable ipv6 for chrome to run flutter
we will this step if you are getting this error
Unable to connect to Chrome debug port: 56044SocketException: OS Error: The remote computer refused the network connection., errno = 1225, address = localhost, port = 56051
Now Again type flutter run -d chrome or flutter run command and select 1
Your project Will Open in New chrome Window:
This will run your Flutter App in Chrome and then you can Inspect using: # Press Shift+Ctrl+i # Select device in the top bar # Now select the device in which you want to view your app (preferred Pixel 2)
Read the full article
0 notes
Text
What is difference between SQL and MySQL? Why is MySQL used? What are its features?
Difference between SQL and MySQL
SQL is a query Language for various relation in MySQL whereas MYSQL in relational database. MySQL uses SQL query like create update delete insert alter and other to perform operation.
Why is MySQL used?
Read the full article
0 notes
Text
Laravel to check whether user is login or not and Get user data from login session using laravel Auth

Laravel Get Login user data by Auth::user()->id:
Note:
You have to read all the instruction carefully so I can you help in solving your problem.
Step 1: Migrate Database and Write code for Table
First Run command php artisan make:migration contacts;
Then write code like that according to your project database migration.
contacts database migration code:
Read the full article
0 notes
Text
What is database engine? What purpose does it serve? How many types of engines are supported by MySQL? Which database engine is most commonly used and why?
What is Database Engine:
Database Engine is software at the backend of MySQL which support SQL (CRUD) queries to manage data in database.
Purpose does Database Engine serve:
It has two main functionality of storing and query processing. The Storage engine write and retrieve data into to the disk. The Query processors accept the query, processes the query and execute SQL command.
Types of engines are supported by MySQL:
There are two Main engines MySQL supports are transactional and non-transactional. The default storage engine is innodb and we can change it.
Database engine is most commonly used:
Oracle Database Engine is most commonly used because it is supported by Oracle Corporation itself and provide various help for Cloud, Document Store, Graph DBMS, Key-value storage, BLOG, and PDF Storages.
Read the full article
0 notes
Text
Using the insert command, populate all the records in member, type, entry, team, and tournament tables in SQL

SQL Select Query: The Select Query is used for fetch data from database. We use many other attributes with select keywords to fetch specific data from database table.
Read the full article
0 notes
Text
What is the difference between SQL and MySQL? Why is MySQL used? What are its features?
Here are the primary differences between SQL and MySQL:
· While SQL is a language used for operating different relational databases, MySQL boasts of being the first open-source relational database in the early 90s.
· SQL is a query language, whereas MySQL is a relational database that uses SQL to query a database.
· You can use SQL to access, update, and manipulate the data stored in a database. However, MySQL is a database that stores the existing data in a database in an organized manner.
· SQL is used for writing queries for databases, MySQL facilitates data storing, modifying, and management in a tabular format.
· SQL does not have support for any connectors. However, MySQL comes with an integrated tool – MySQL workbench – for designing and building databases.
· SQL follows a standard format wherein the basic syntax and commands used for DBMS and RDBMS remain pretty much the same, whereas MySQL receives frequent updates.
· SQL supports a single storage engine, but MySQL supports multiple storage engines and also plug-in storage engines. Thus, MySQL is more flexible.
· In SQL, the server remains independent of the database, which means that you can perform other operations on a database during a data backup session. On the other hand, in MySQL, you can perform a data backup by extract SQL statements. However, unlike SQL, in MySQL, the server blocks the database during a data backup session, minimizing data corruption chances when switching from one MySQL version to another.
· In terms of data security, the SQL server is much more secure than the MySQL server. In SQL, external processes (like third-party apps) cannot access or manipulate the data directly. While in MySQL, one can easily manipulate or modify the database files during run time using binaries.
· SQL is not an open-source language. Naturally, if you experience any issue, you cannot expect community support. Instead, you’ll have to rely on Microsoft SQL Server support. Contrary to this, MySQL being an open-source platform, offers rich and robust community support.
Main Features of MYSQL:
Easy to use
MySQL is easy to use. We have to get only the basic knowledge of SQL. We can build and interact with MySQL by using only a few simple SQL statements.
It is secure
MySQL consists of a solid data security layer that protects sensitive data from intruders. Also, passwords are encrypted in MySQL.
Client/ Server Architecture
MySQL follows the working of a client/server architecture. There is a database server (MySQL) and arbitrarily many clients (application programs), which communicate with the server; that is, they can query data, save changes, etc.
Free to download
MySQL is free to use so that we can download it from MySQL official website without any cost.
It is scalable
MySQL supports multi-threading that makes it easily scalable. It can handle almost any amount of data, up to as much as 50 million rows or more. The default file size limit is about 4 GB. However, we can increase this number to a theoretical limit of 8 TB of data.
Speed
MySQL is considered one of the very fast database languages, backed by a large number of the benchmark test.
High Flexibility
MySQL supports a large number of embedded applications, which makes MySQL very flexible.
Compatible on many operating systems
MySQL is compatible to run on many operating systems, like Novell NetWare, Windows* Linux*, many varieties of UNIX* (such as Sun* Solaris*, AIX, and DEC* UNIX), OS/2, FreeBSD*, and others. MySQL also provides a facility that the clients can run on the same computer as the server or on another computer (communication via a local network or the Internet).
Allows roll-back
MySQL allows transactions to be rolled back, commit, and crash recovery.
Memory efficiency
Its efficiency is high because it has a very low memory leakage problem.
High Performance
MySQL is faster, more reliable, and cheaper because of its unique storage engine architecture. It provides very high-performance results in comparison to other databases without losing an essential functionality of the software. It has fast loading utilities because of the different cache memory.
High Productivity
MySQL uses Triggers, Stored procedures, and views that allow the developer to give higher productivity.
Platform Independent
It can download, install, and execute on most of the available operating systems.
Partitioning
This feature improves the performance and provides fast management of the large database.
GUI Support
MySQL provides a unified visual database graphical user interface tool named "MySQL Workbench" to work with database architects, developers, and Database Administrators. MySQL Workbench provides SQL development, data modeling, data migration, and comprehensive administration tools for server configuration, user administration, backup, and many more. MySQL has a fully GUI supports from MySQL Server version 5.6 and higher.
Dual Password Support
MySQL version 8.0 provides support for dual passwords: one is the current password, and another is a secondary password, which allows us to transition to the new password.
Disadvantages/Drawback of MySQL
Following are the few disadvantages of MySQL:
MySQL version less than 5.0 doesn't support ROLE, COMMIT, and stored procedure.
MySQL does not support a very large database size as efficiently.
MySQL doesn't handle transactions very efficiently, and it is prone to data corruption.
MySQL is accused that it doesn't have a good developing and debugging tool compared to paid databases.
MySQL doesn't support SQL check constraints.
Read the full article
0 notes
Text
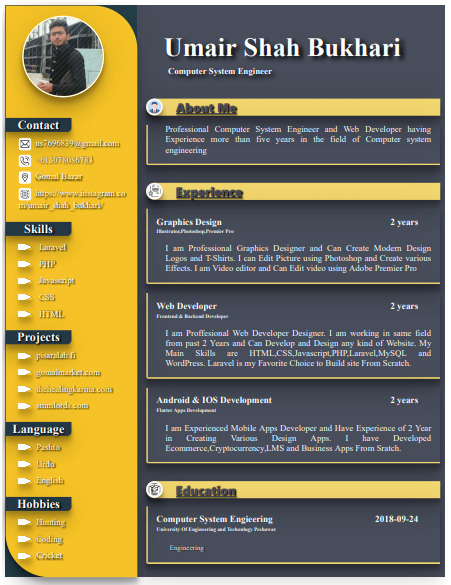
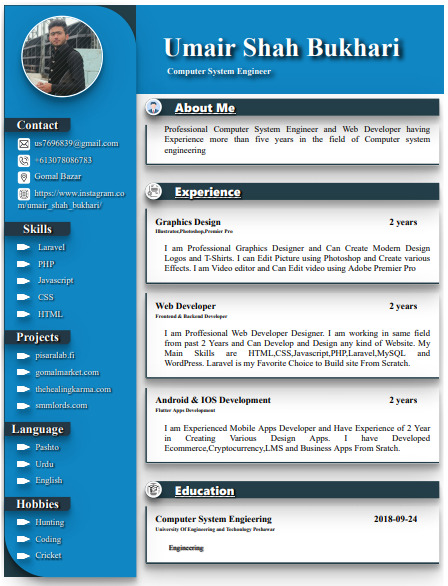
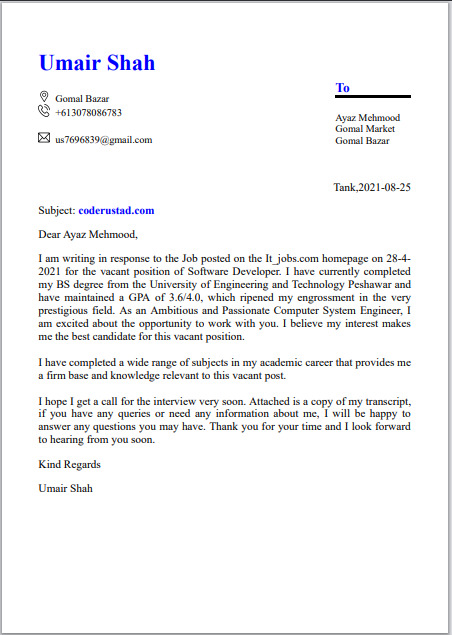
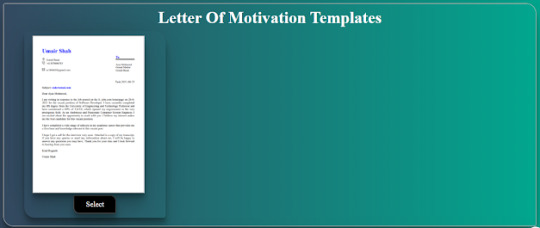
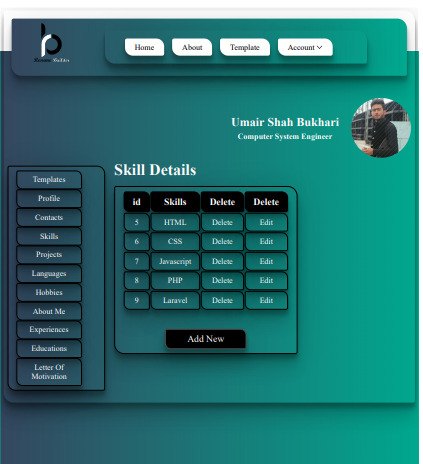
Professional Modern Design Resume or CV Builder with Resume Templates and Letter of Motivation Template For Job
Resume Templates:

Letter Of Motivation Templates:
Website URL: Resume Builder

About Website Features


Live Demo
Buy Script
Resume Generator:
It is an online platform for a student, a graduate or an undergraduate. Who can take great advantage from this website, which is a best source for creating a Resume and Letter of Motivation.
Why is Resume Generator the best free resume builder online?
Our resume builder provides:
Professional resume templates with basic, modern, and creative styles
A complete and filled out resume regardless of your work history, skill set, or education
A free critique from a resume expert
The ability to build, print, and download your resume for free in minutes
What should I put on my resume?
There are five main sections that every resume should include: Contact Info, Resume Introduction, Professional Experience, Education, and Skills. Keep in mind that, depending on your industry, your resume may need to include additional sections. For example, nurses should include a section about their professional licenses and certifications — which you can easily add in our resume builder. To learn more about what to put on your resume, visit our how to write a resume guide.
Why do I need different resumes for every job application?
No two jobs are exactly alike. Even if you apply for two positions with the exact same title, it’s extremely likely that each company highlights different skills and traits in their job descriptions. That’s why we recommend that you tailor your resume to address the specific requirements in the job description before you send out your application. Usually this would be a headache for job seekers, but our resume creator allows you to build fully customized resumes in just minutes.
What if I need cover letters for my resumes?
If you need matching cover letters for your resumes, then you’ve come to the right place. Along with our resume generator, we also offer a state-of-the-art cover letter builder. The best part is that if you sign up for a Resume Genius account, you get unlimited access to both! In under ten minutes you can have a matching resume and cover letter, and be ready to apply for your dream job. We also recommend that you check out our free cover letter examples and expert guide on how to write a cover letter.
Which resume builder template should I use?
Choose a resume template based on your personal preference and the impression you want to make on hiring managers. We design every template so that it’s flexible enough to suit any industry, level of experience and education, or skill set. No matter which template you choose, you can be confident that it’s optimized to highlight your unique experiences and abilities — and that hiring managers will like the way it looks.
Are there any good resume examples that I can look at?
Yes, we offer an extensive library of free resume examples, covering all the students requirements, job titles. Whether you aren’t sure what to include in your resume, or you just need some inspiration to get started, we highly encourage you to read a sample from your industry.
What is a Resume?
Resume means a summary. It could be a summary of a document, summary your professional life, summary of your professional career.
A resume (also spelled résumé) is a formal document that serves to show a person’s career background and skills. In most cases, it’s created in order to help a candidate to land a new job. A traditional resume consists of a professional summary, work history, and education sections. It works like your job hunt marketing document.
Purpose of a Resume?
• To introduce yourself to employee
• Present your qualification
• Secure an interview
• Showcase your experience, education, skills in a standardized format which is easy for recruiters to read
• It is definitely a must have
• You can’t expect to be invited to a job interview
• Usually sent along with a cover letter.
Resume Formatting tips:
• Set one-inch margins on each side of the page.
• Go for single or 1.15 line spacing.
• Use the legible font for a resume and keep it 11 or 12pt.
• Present your contact info in a separate resume header.
• Divide your document into easy-to-navigate resume sections.
• Describe your experience in the form of bullet points.
• Leave enough white space for a balanced resume layout.
What to Include on a Resume?
• Contact information: Your name, phone number, email address, and optionally relevant social media handles, such as your LinkedIn profile. In most cases, leave your address off your resume.
• Resume profile: A short summary of your skills and proudest accomplishments. It tops your resume and serves as your job bio.
• Work experience: The meat and potatoes of your job application. It’s where you tell your career history. Your job titles, company names, duties, and years worked—these go into this section.
• Education on a resume: Your school names, degrees, major/minors, and optionally— GP
Read the full article
0 notes