canary3d
Canary3d Art
I'm an artist in digital and analog media, eternally learning. cdrama & other fandom sideblog: https://canary3d-obsessed.tumblr.com
50 posts
Don't wanna be here? Send us removal request.
Last Seen Blogs

towfrancisca
Going to California
ferris-is-tired
🌈{Ferris-Wheel Studios}🌈
k3ltron
k3ltron
dxndxrxvxbe
'BREAKING'
therapyandfolklore
therapy and folklore
Note
(2 / 2) In addition to all its other considerable merits, I used to watch it instead of drinking, which was I thought such a healthy coping mechanism! If it is at all in your power to put it again between me and various ethanol solutions, could you please?
...and here's my Untamed masterpost, with tons of stuff linked up. My fanvids are all the way at the bottom. Here's to vicarious consumption!
https://canary3d-obsessed.tumblr.com/post/647051630988115968/master-post-the-untamed
11 notes
·
View notes
Note
Dear Canary, there used to be a fanvid for the Untamed which I thought you made yourself? Where everybody drank wine, I mean booze, set to the Waters of March. It's deleted from yt. Is there any way I could see it again, ever? Do you have it? Could I somehow bribe you by gifting a translation to you on ao3, or ten, into a language you are unlikeely to have any interest in...? (1/2)
No bribe needed! It got taken off of youtube due to a copyright strike (*shakes fist at tencent*) but it's alive and well here on tumblr. Here's the link:
17 notes
·
View notes
Photo
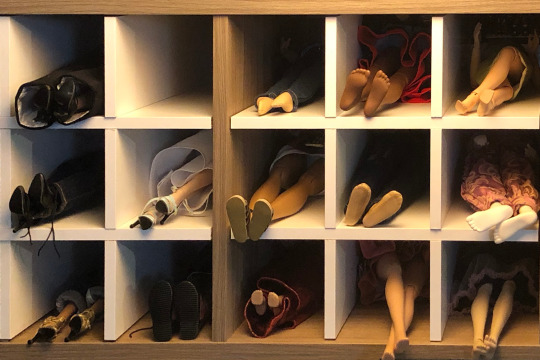
The more I organize my doll collection the more I feel like a serial killer
8K notes
·
View notes
Video

Inktober 2022: “Nest”
16 notes
·
View notes
Photo

Inktober prompt: Trip
pose references by adorkastock https://www.adorkastock.com/hub/
9 notes
·
View notes
Note

LMFAO I–
Every time someone mentions a number in this show I have to pretend I'm watching local theater. Like, when they accuse Wei Wuxian of killing 3000 cultivators at nightless city...only the invisible ones I guess?
if you want more of my insanity, btw, the fun stuff is on my sideblog, @canary3d-obsessed
3 notes
·
View notes
Text

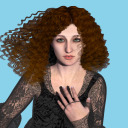
Portrait done in Adobe Fresco & Apple pencil. I use the velocity-taper vector pen, which is my favorite digital ink pen in any app. Colored with Fresco's watercolor & eraser, which gives me the combo of loose color & occasional sharp edges that I like--the eraser is basically doing the job of frisket, but without having to plan in advance.
This is based on a reference photo from museumapp aka sktchy. Members upload selfies into the app to inspire other members' art works; it's fun and everything links together so you can see the inspiration photos with the associated artworks.
https://museumapp.co/Vzh99C
29 notes
·
View notes
Text
MKV to MP4 batch conversion
I found a good method for batch converting mkv to mp4. VLC wasn’t doing the job for me (it stopped batching entirely, and its encoding was slow, and it was doing something weird to the files so they were coming up garbled when I’d open them in photoshop). And handbrake is hard! I want a one-click solution, so I went with this method that uses ffmpeg.
https://community.adobe.com/t5/premiere-pro/problem-with-mkv-format/td-p/10248788
Here’s a link to the original comment on the adobe forum, but since that’s probably impermanent I also grabbed the text. Credit goes to adobe forumite basil1891, who is obviously a mensch. The link they provided to get ffmpeg has gone away, so I snipped it, but you can get the sources at ffmpeg.org, and I got a good .exe at https://www.gyan.dev/ffmpeg/builds/
[quote]-----------------------------------------------

basil1891 Enthusiast , Jun 02, 2019
Maybe converting is the easiest, but hardly the best way, imho. I'd just remux files instead of converting. ffmpeg can do it nicely
How to:
place the .mkv's in a separate folder along with ffmpeg.exe
in notepad create a pair of .bat files there:
StartRemux.bat with a string:
for %%F in (*.mkv) do remux_settings_.bat "%%F"
remux_settings_.bat with a string:
ffmpeg.exe -i %~d1%~p1%~n1.mkv -c:v copy -c:a copy %~d1%~p1%~n1.mp4
Now you can just run the StartRemux.bat, and in a minute you'll get your videos in .mp4 container, without losing quality and time. If you like, you can change .mp4 to .mov in the settings. Sometimes it's needed ( as in case when .mp4 does not allow uncompressed audio).
p.s. Important note - those .mkv filenames should not have spaces, or wont work.
------------------------------------------------[end quote]
I’ll add that I got an error in my original directory, but when I created a root-level directory with no spaces in the name, it worked fine there. I just converted 30+ mkv’s cleanly with this method and am a happy camper :)
24 notes
·
View notes
Text
periodic reminder that I am boring on main, the fun is all on @canary3d-obsessed
Hi followers and visitors! This is just a housekeeping note to say this is my very niche art-process blog and if you followed me because of my c-drama/the untamed/guardian stuff, that is all on my sideblog, http://canary3d-obsessed.tumblr.com so maybe follow that instead/too ?
27 notes
·
View notes
Text
Old-Timey Snapshot Effect

Do you ever want to turn a gif (or any image) into a vintage sepia photo? Here’s one way to do it. First, help yourself to my template png, right here:

Instructions are behind the cut!
This template, incidentally, is based on photos of my dad & his friends from 1947, and all of the colors in the palette are sampled from one photo. These wavy-edged photos were pretty normal around that time--these are a college student’s snapshots, nothing fancy.

Ok, so these instructions are for a gif in Photoshop, but you can adapt them to a still image & any image-editing app. (I’m assuming you already know the basics of gifmaking).
1. Drop the template on top of the top layer of your gif. Resize the whole canvas to make room for the border (I use the crop tool for this--just drag the handles outward and it enlarges the canvas)
2. Use the magic wand to select the light border area. Make a new empty layer and fill it with the lightest color in the palette, or whatever color you want for your border.
3. Create a new empty layer underneath your border layer. Pick one of the darker colors in the palette with the dropper - we’re going to use this to colorize with. (We’re not using the hue/sat adjustment layer for colorizing because it’s imprecise)
4. Fill the layer with the color, at an opacity of anywhere from 50 to 100 percent, depending on how much of the original color you want to keep. I filled it at 70 percent opacity for this gif of Wu Xie. 100 percent can flatten it out too much, so I like the effect better with some of the original color in it. Use the fill command’s opacity setting for this, not the layer’s opacity, or it won’t apply to all your frames.
5. Select all of the frames of your gif - frames, not layers - and while they’re selected, change the color layer to “color” blend mode. (Otherwise it just changes it for the current frame, which is maddening.)
6. Ok, all that’s left is to add a tacky shadow effect! Use the magic wand to select *outside* your border on your border layer.
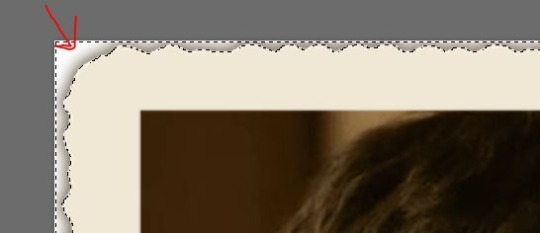
7. On the selection menu, invert your selection, so it has the whole photo-print area selected (the wavy edge area and the “photo” area).

8. Put all of your image layers into a layer group, if you haven’t already. (Select all the image layers and click the button circled in red in the pic) This group needs to stay below your photo effects & border, and below any adjustment layers, as shown in the pic.

9. Click the mask button (circled in blue in this pic) to create a layer group mask -- the area outside of your “photo” border should be transparent now.
10. Still on the selection menu, use “modify...border” to change the selection to a border. I’d make it around 10 pixels, but you’ll need to experiment based on the scale of your image.

11. Create a new layer under your border layer, over your color layer. Choose the darkest color from the palette and fill the selected area at 100% opacity.
12. Choose your shadow layer and run a gaussian blur filter. I used a radius of 7 pixels.
13. Put a new layer at the bottom of the stack & fill it with plain white, or with whatever else you want for the background.
14. Delete the template layer, save your PSD file (you DO save PSDs of your gifs until you’re sure you’re done, RIGHT?) and then resize & bake out your gif.
46 notes
·
View notes
Video
I’m liking the pencil behavior in Adobe Fresco quite a lot. I’ve been noodling around with different iPad drawing apps, since I have frequent insomnia and drawing in bed is a good way to wind down. I hate that I like Adobe’s product! Argh! I mean, I’m already paying for the CC subscription, and I like Adobe in spite of their expensiveness, but I kind of don’t want everything I use to be in the Adobe ecosystem. (I also am an Allegorithmic subscriber, which has become Adobe, so it’s inevitable, I guess).

Wang Zhuocheng–> Jiang Cheng, Adobe Fresco, Ipad & Apple Pencil
17 notes
·
View notes
Text
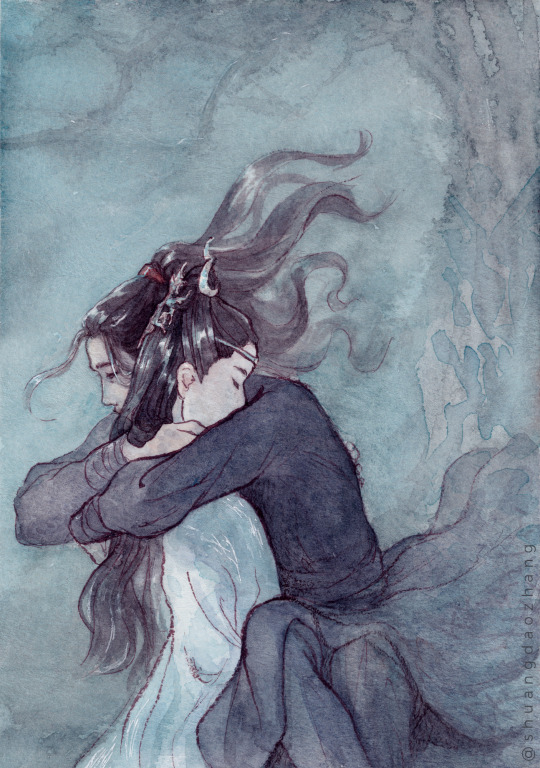
it's one year (plus three days because i'm disorganised) since i started watching the untamed!!! probably about time to draw the actual main characters, i should think.
(yep contrary to what some reblog tags on my other posts may tell u, this is my first wangxian art :P 🎉)
this has alt text! longer description under the cut.
Wei Wuxian falls, his hair and dark clothes billowing behind him, into the waiting arms of Lan Wangji, whose white robes gleam in the blue moonlight. Wei Wuxian wraps his arms around Lan Wangji's neck with a wistful smile. Lan Wangji tucks his face into the crook of Wei Wuxian's shoulder, closing his eyes in a peaceful expression. Behind them, the tree Wei Wuxian had climbed is suggested in loose strokes.
Ink and watercolour on paper.
5K notes
·
View notes

Text
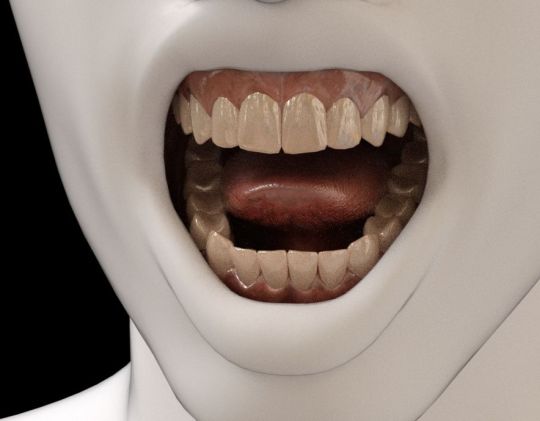
I’m very slowly working on my first human texture set since 2002 or so - back when a painted 1024x1024 texture with no bump map was a hot seller. I’m starting off making things that aren’t the main skin, while I try to figure out the best workflow for the more important parts. Here’s the inside of the mouth. I’ve got the reflection turned up a bit too high on the teeth, and the tongue tip needs a little more work. I like the shiny gums and tongue, though, and overall I’m pleased with the maps.
2 notes
·
View notes
Photo

Trying out Clip Studio Paint...I like the “running color edge watercolor” brush quite a lot. I haven’t found a pen preset that I like yet, but I’m still in the early stages of trying everything out. The interface is nice and straightforward; I didn’t have to read anything to get started, which is always a plus.
23 notes
·
View notes
Text

Installed:
Zbrush
Cinema 4D R14 w/ Riptide, Undertow, and XFrog plugins
Cinema 4D R20 & R21 w/Quad Remesher plugin (if R21 is stable, will remove R20)
Substance Painter, Designer, Alchemist,
Corel Painter 2017
Poser 2012
Marmoset Toolbag 3
Rebelle 3
Davinci Resolve
Moment of Inspiration (Trial)
about 40 little utility programs
and
MalwareBytes
Photoshop plugins will have to wait until another day; I’m cooked!
New PC Installation Log
Setting up my new PC is exciting but also a bit tedious because I have a LOT of stuff to install. So much that I took today off work to do it. I’m going to keep a running log here.
Installed:
Chrome
OneDrive (reconfigged to use external drive #1) (network throttled)
Office365
GoogleDrive (reconfigged to use external drive #2) (network throttled)
Dropbox (reconfigged to use external drive #3) (network throttled)
Adobe Creative Cloud App
Illustrator
Photoshop
Audition
Premiere
Acrobat Pro
Daz Install Manager
Daz Studio
Next: text editors, file handling utilities, image and movie viewers, device drivers.
13 notes
·
View notes
Text
Protip: keep all your install files and associated key files in a folder on your cloud storage; sync that folder down to your PC first and install from there. Keep all your serial numbers in a spreadsheet on your cloud storage. I keep everything in the cloud since a hard drive crash back in 2017.
Installed:
Winrar
3dConnexion SpaceMouse
Total Commander
Spacemonger
Scrivener
Notepad++
Irvanview
Wacom Tablet
Razer Macro Keyboard
Next: 3d programs, painting/drawing programs
New PC Installation Log
Setting up my new PC is exciting but also a bit tedious because I have a LOT of stuff to install. So much that I took today off work to do it. I’m going to keep a running log here.
Installed:
Chrome
OneDrive (reconfigged to use external drive #1) (network throttled)
Office365
GoogleDrive (reconfigged to use external drive #2) (network throttled)
Dropbox (reconfigged to use external drive #3) (network throttled)
Adobe Creative Cloud App
Illustrator
Photoshop
Audition
Premiere
Acrobat Pro
Daz Install Manager
Daz Studio
Next: text editors, file handling utilities, image and movie viewers, device drivers.
13 notes
·
View notes