beginningdrawing
Drawing Basics for Everybody
14 posts
Don't wanna be here? Send us removal request.
Last Seen Blogs

latte-ella
Artistic screechhhh

kycair
Untitled
xvnattvx
Zapomniana

plvtogurl
plvtogurl

wolfcyrus
Untitled
Text
I promise I still want to do this blog but I don't want to possibly use any examples I turned in for class before they're graded and the last graded assignment was turned in over 2 months ago, I have 7 more projects so far to share and I'm going a little nuts here, I'm sorry.
However I do think I'll be significantly changing one assignment and totally eradicating another (our current assignment is drawing with ink washes and that's a media technique lesson that I don't think makes sense for this blog and I'll do a different type of value-building assignment - probably hatching and stippling - in its place)
By the way I haven't given up on this blog or anything it's just that the professor has *just* given us back our grades on the modified contour assignment so we've had huge amounts of downtime.
29 notes
·
View notes
Text
By the way I haven't given up on this blog or anything it's just that the professor has *just* given us back our grades on the modified contour assignment so we've had huge amounts of downtime.
29 notes
·
View notes
Note
do you have any interest in people uploading pictures of their own drawings following the assignments you post?
I do very much want to see what people are drawing and I also want other people to see what people are drawing, I'm thinking about making a sideblog for constructive criticism and review but I'm also trying to figure out the best way to do that.
I'm a bit hesitant to take submissions to this blog because I want this blog to remain very easy to navigate with minimal posts so that it can be a good reference for future users. I'm kind of thinking about a sideblog where people can make submissions, but I personally dislike that because then the sideblog becomes OP of those pieces, not the people who drew them. I'm also kind of thinking about making a sideblog where I could make posts about each assignment and people could reply or reblog with their work for the assignments.
I'm not sure, what do you think?
4 notes
·
View notes
Text
Assignment Three: Gesture
Gesture drawings are fast, fluid drawings that are done in a very limited time and are meant to capture the essence of a subject more than its form. People primarily think of gesture drawings as a way to capture action, but gesture drawings can also be made of inanimate objects, emphasizing the weight and lines of the object more than the actual shape.
These are quick drawings! You shouldn't spend more than a minute on any drawing for this assignment, so if you've been frustrated with hours-long assignments this is going to be a good break for you!
The purpose of this assignment is to begin to recognize the way that our eyes and brains understand motion and weight; you are trying to see what it is in a motion that communicates to you that it *is* a motion or what it is in an object that communicates weight or presence, and you are attempting to get the bare bones of those concepts down on paper.
Instructions:
Using a soft drawing implement (either charcoal or a crayon) and an overhand grip, draw a moving subject in 60 seconds or less. Try to make the drawings relatively large (no more than 6 subjects on a single page of printer paper) and work quickly and with a loose hand.
You are not attempting to draw the outline of the subject, you are not looking for shape, necessarily, you want to communicate motion. Do this by using heavy strokes to denote the weighty parts of the subject and lighter strokes for parts that are more free-flowing.
Examples:
One really excellent way to get reference to use for this assignment (if you can't go out in person and people-watch) is to use gifs of action on tumblr. Select a short gif of someone doing sports or dancers or a scene from a movie and use that to work from. See below for examples of both drawings and the gifs that I used as reference.
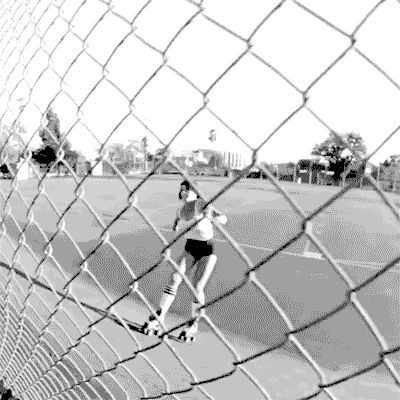
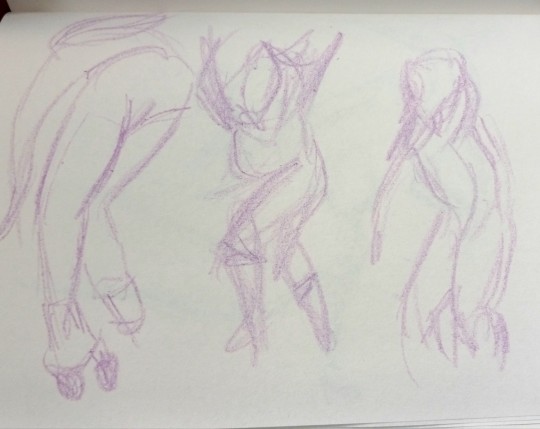


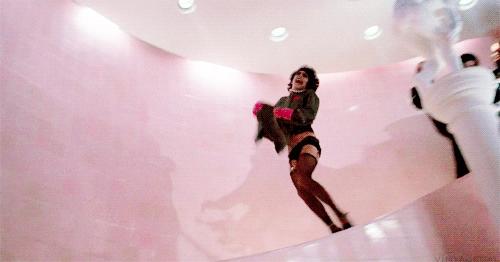
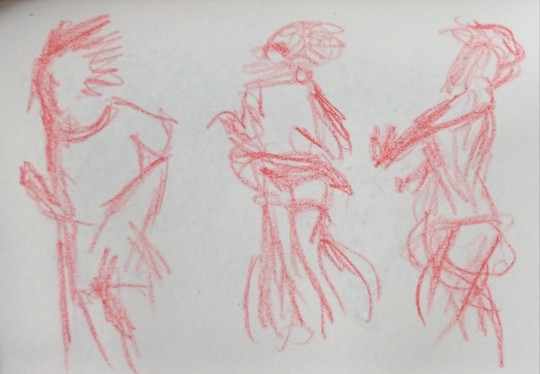
I particularly like using gifs for this because it lets you reference the motion without being as stiff as a photo, but the loop means that you can check and re-check to see what part of a motion has the most weight or visual impact.
Once you have done some gesture drawings of moving subjects, find an inanimate object and draw it in the same way, placing emphasis on the visually heavy or physically weighty parts of the image instead of on the form of the object.


377 notes
·
View notes
Text
Art Tips Two: Drawing What You See Vs. What You Think You See
The first significant assignment for my drawing class was to do a modified contour drawing of a building, spending at least 4 hours on the drawing. For a modified contour drawing, you are supposed to keep your eyes on the subject about 95 percent of the time, looking at the paper only occasionally to place your pencil or check the lines you are making; it is a type of drawing that really reinforces the connection between what your eyes are seeing and what your hand is drawing. It's less about creating realistic art and more about hand-eye coordination.
It's quite clear that many students in my class did not understand the assignment. I've drawn something similar to the things I've seen submitted and will be comparing it to the drawing that I did for the same assignment.
But let's start with the fact that brains are very weird and one of the things that's so weird about them is that we spend a lot of time not seeing.
Most people don't process 100% of the full detail of the things they see around them in day-to-day life. If you were to process that much detail about everything all the time, you would be constantly overstimulated by it. So your brain takes shortcuts and sort of fills in the details instead of processing every single thing. It looks at a sidewalk and says "okay, I know what a sidewalk looks like, no need to render all the shadows unless something breaks the expected pattern because a break in the pattern might mean a trip hazard."
This is very useful in day to day life! People who have trouble tuning out details of sounds and sights and sensations often find themselves overwhelmed and frustrated. It's a good thing that you are likely not seeing every tiny little irregularity in the bricks in your walls or the fibers of your clothing.
However, seeing precise detail is important for representational drawing.
Because this is a *beginning* drawing class, it is about learning the basics of drawing what you see, not stylizing images or creating art from your imagination, so the very first lessons are about how to see what you want to draw. Blind Contour drawings are almost entirely about seeing and hardly at all about drawing, and Modified Contour is about *mostly* seeing and only somewhat drawing.
When people (adults especially) begin to learn to draw, they often want to draw what they think they see (the world with the details their brain has sanded off) and not what they actually see. Sometimes this is because they think the things they think they see look "better" (more intentional) than the things they think they see.
(As a side note, my cartooning professor liked to tell a story about doing commercial illustration for a sock company; he drew an accurate, realistic foot for the ad and it got sent back he asked what was wrong with it and they said "nobody is going to buy socks when they're on such ugly feet". The next ad he sent featured a simplified, cartoonish foot and was accepted with the feedback "much better, much more realistic" - we often see stylized things as more real than real things because we spend so much time eliding what the real world looks like)
Okay, with all of that in mind, here is a drawing similar to what many of my classmates turned in next to the drawing that I turned in.
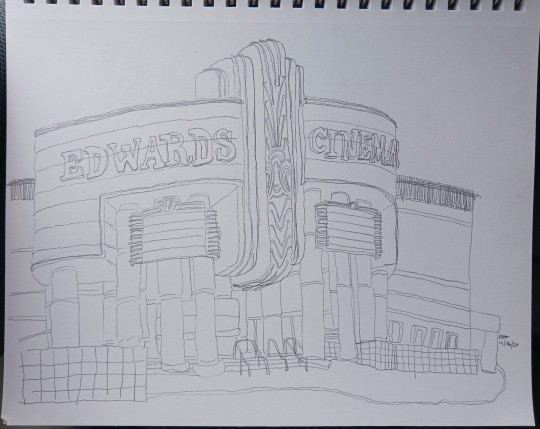
The first one is full of things that the artist thinks they see. It has trees that don't look like real trees, but do somewhat look like the idea of trees that people get from cartoons. It has sidewalks that don't look like real sidewalks, but look like how your brain thinks a series of evenly-sized concrete slabs on flat ground should look. The artist knows a little bit about perspective, and as such has drawn straight lines aimed at a point on the horizon to show distance, but you would almost never see that many straight lines in an apartment complex. They have scribbled in some grass, but those scribbles are a signifier that there is grass in those spaces, not a representation of what the lawn area actually looks like. This is a drawing from someone who saw the assignment "draw a detailed building" and 1) ignored the time requirement and 2) was not aware that the purpose of the assignment wasn't to draw what a building looked like in their mind, it was to draw the lines on a building that they actually saw.
My drawing is certainly not a fully accurate representation of the building I was drawing; the perspective is wonky and the whole thing ended up being very cramped compared to the actual building, but it is much more representational than the first drawing because it was completed by very slowly following the lines that I saw and putting them down on paper.
I'm not trying to mock the other students in this class, this isn't me being mean or trying to show off that I'm more skilled, this is a constructive criticism that I wish I could offer to the other students but that I will share here instead for the people who want to learn and may be running into this issue as the assignments continue.
This is the difference between drawing what you think you see, and trying to draw what you actually see. And also putting in the time; unfortunately a lot of students just clearly didn't spend the time on this. If you don't have the time or focus for a four-hour drawing it's better to work on several smaller drawings of simpler objects in 5-10 minute increments than it is to rush through one big drawing and fill in the gaps with details that aren't there.
If you are trying to learn to draw, learning from the basics is the best way to do it, which sometimes means forgetting what you already think you know.
You don't know perspective, you don't know shading, you don't know what trees look like, you don't know what a sidewalk looks like. When you're learning to draw, don't assume that you know what these things look like, and instead draw what you actually see.
47 notes
·
View notes
Note
When doing the outlines, are you supposed to focus only on that or is it okay to listen to music or a podcast in the background?
Whatever is going to make it easiest for you! I usually listen to podcasts when I'm drawing but sometimes I want to listen to music and sometimes I'll get on the phone with a friend and draw as we chat.
In general I actually think that it's better if you do art with distractions around because that's good practice for doing art in various spaces; there's no guarantee that you're going to always have access to a quiet studio environment or a space without anyone in it.
So please, listen to podcasts, listen to music, do whatever is going to make it easy and pleasant for you to draw! Art should be fun, and if it feels boring and tedious to draw in silence with no distractions then you're not going to want to do as much art.
(for the record, in my cartooning class the professor would play any animated movie that a student brought in to watch on a TV up front while we worked on assignments. In my technical watercolor class the professor brought in a record player and played various genres of instrumental music; most of the basic drawing classes I've taken have had no music or talking while students were working, but they were classrooms with dozens of people so they were far from silent. I had a lot of trouble with the drawing classes because I found them understimulating.)
13 notes
·
View notes
Text
Art Tips One: Tool Grip
Think about how you hold a writing implement. You probably use a fairly firm grip low on the barrel of the tool so that you have very fine control on the marks you make, and you likely have the heel of your hand sliding along the paper as you write. This is called a "tripod grip" and it is very good for very fine control, but it can be painful to use for long periods of time and limits what kinds of marks you can make and the range of motion you use as you're drawing.
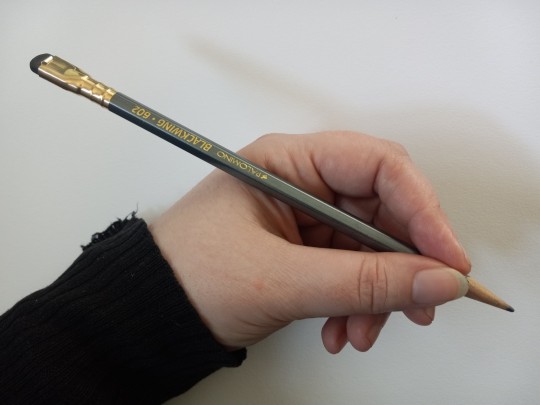
One simple way to change this up is to simply move your hand further back on the shaft of your marking tool. Think of the standard school #2 pencil and instead of holding it near the sharpened point you are holding it in the middle of the shaft or close to the eraser.
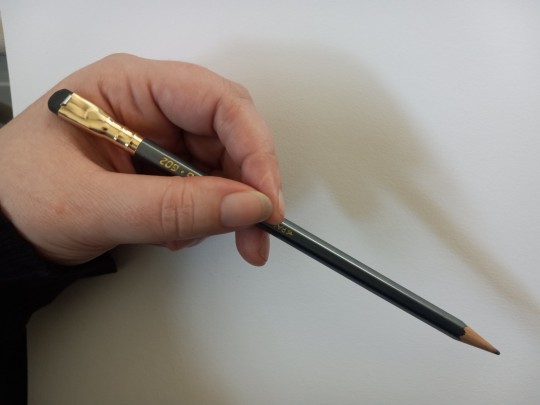
This will allow you to make much looser movements and have a much greater range of motion in your hand and arm while you draw, and it makes it easier to lift your hand away from the paper as you're making marks on the page, using only your pinky for balance instead of the whole side of your hand.
A grip that is probably much less familiar to you is the overhand grip, where the pencil is cradled against the palm with the fingers.
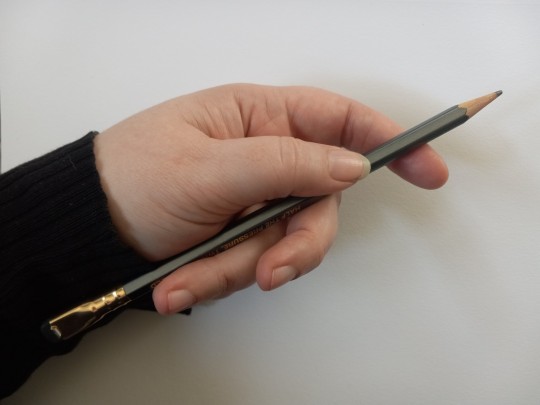
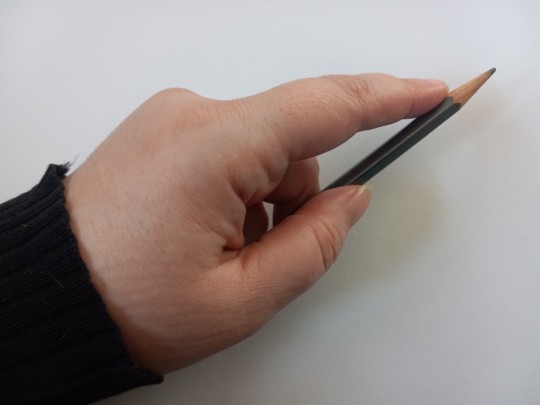
Using an overhand grip doesn't rest any part of your hand on the paper and allows you to draw with your whole arm; it's a good grip for big, loose, relaxed movements. It's sometimes called "gesture grip" because it's used when making gesture drawings so that the strokes in a gesture drawing are decisive and dynamic but less controlled than in a tripod grip.
You can adjust the amount of control you have in an overhand grip by changing the position of your fingers or by moving where the implement is in your hand. The closer your fingers are to the tip, the finer the control, the further away your fingers are from the tip, the looser the control.
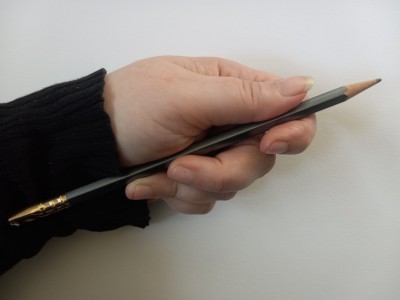
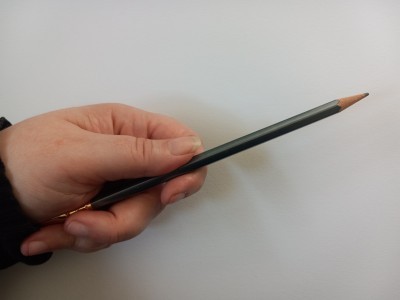
Generally speaking, you want to hold your drawing implements with as little force as you need to control the marks you're making. Hold your pens and pencils gently, and try to avoid gripping them hard in your hand or squeezing on tight because it can cause pain and damage to your hands over time, and also because it makes your drawings more stiff and rigid.
54 notes
·
View notes
Text
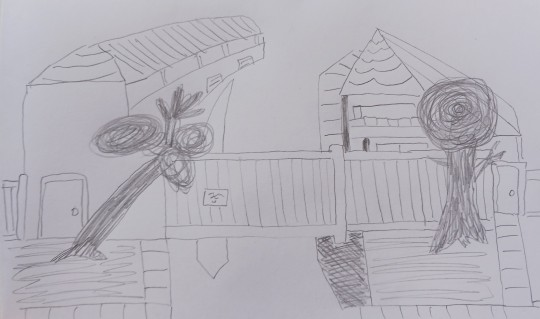
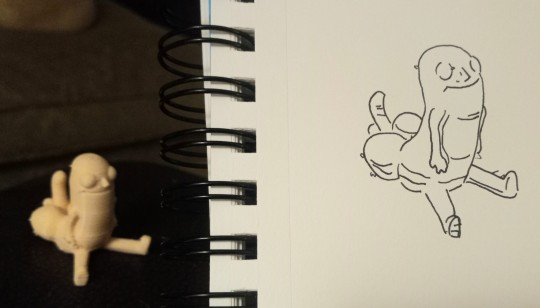
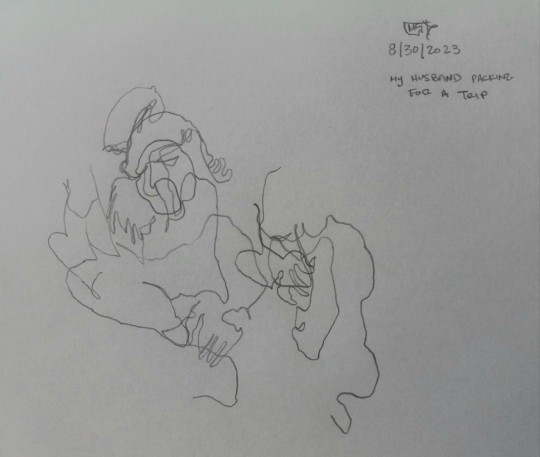
Assignment Two: Modified Contour
This assignment is very similar to assignment one, but this time you're allowed to pick up your pencil (or pen) and look at the paper about 10% of the time.
The purpose of a blind contour drawing is to train your eye to move and your hand to follow, the purpose of a modified contour drawing is to build further on those skills as well as to get you to start seeing objects in relation to one another as you pick up and move your pencil.
Instructions:
Select 3-5 detailed objects in or around your home. Good subjects for this are things like complicated furniture, grills, cars, figurines, electronics, and toys, but you can use anything that you have as long as it has a decent amount of details. You can use simpler objects too, but if you do that plan on making more drawings.
Using a fine-point drawing implement (a hard pencil is great, I prefer fine-tipped pens because it removes the temptation to erase) and any type of paper, identify one detail of the object and start to draw it.
Place your pen on the paper and your eyes on the object and begin to draw the contours of the object, glancing at your paper occasionally to check that your drawing is fairly accurate. You can look at this paper, but you should look at your subject much more, aim to look at the paper about 10% of the time and your subject 90% of the time so you can learn what your hand is doing when you aren't looking at it.
Move very slowly, taking at least half an hour to draw complex objects and ten minutes for simple ones (if you want to go for broke, draw a building and spend at least two hours on the image).
Your goal is to draw something that is reasonably accurate but not perfect. You may mess up proportions or over- or under-draw your lines, and that is fine. You are still training your hand and your eye to work together and you are still learning to look at things, so it shouldn't be perfect!
Examples:
320 notes
·
View notes
Note
Do you have any tips for how to spend 15 minutes on the blind outline exercise?
I've been trying to draw a crumpled cloth, and I feel like I have nothing to add after like 7 minutes or so.
Move your pencil more slowly! The point of the exercise isn't to finish the drawing, it's to really, really pay attention to what you're seeing and to move your pencil as you move your eye around the contours of an object. These kinds of drawings always feel really tedious to me, and I know it's frustrating to take so long on a drawing that isn't really a "drawing" but it's important visual training.
If you're still finding that there's not enough going on to justify more than 10 minutes on a subject, try using a different/more detailed subject. You can crumple the paper more or find a complex object that you want to work on instead. I made the mistake of using some headphone wires for one of my subjects and it was so boring and also just looked like a squiggle at the end; I really wish I'd drawn a pile of tangled yarn instead.
21 notes
·
View notes
Note
Is the class you are taking online or in-person? And in what ways are you modifying the assignments - is it just in material cost?
The class I'm taking is an online class. I'm modifying some of the assignments in order to make them more accessible and also in terms of materials cost (for example: if someone can't get charcoal pencils, a crayon is a reasonable replacement for gesture drawings)
For instance, in the blind contour assignment I offered more options for subjects and gave an option for how many to do; my professor required us to complete five very specific drawings and insisted that we draw from life for the drawing of the person (some people don't have people around to draw who will sit for them for half an hour!)
Our professor is very firm that we should be actually drawing things in front of us and I recognize the need for that but also my next assignment is "sit in front of a building that you like and spend three hours drawing it" - that's not something that everyone can do but it can be modified to be more approachable (draw a large, complicated object in your home; draw multiple smaller objects for shorter sessions instead of one large object in a long session, etc.)
The class I'm in also has at least one assignment that calls for at least one piece of nice watercolor paper and if you've never bought nice watercolor paper that shit is *expensive* so I'm going to see if I can modify that for multimedia paper for this course (i suspect we're doing ink washes, and I'm not certain I'll be able to modify that for a low cost version but I'm probably going to see if I can make an attempt with children's watercolors even though that won't act exactly the same).
23 notes
·
View notes
Text
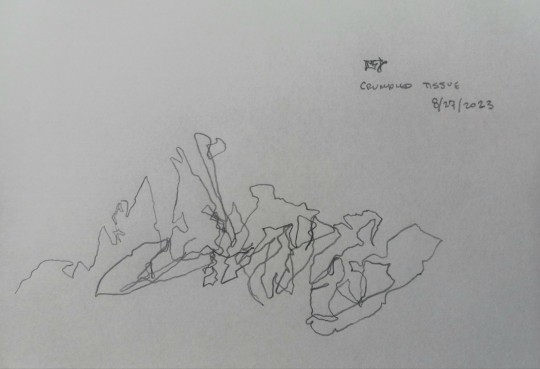
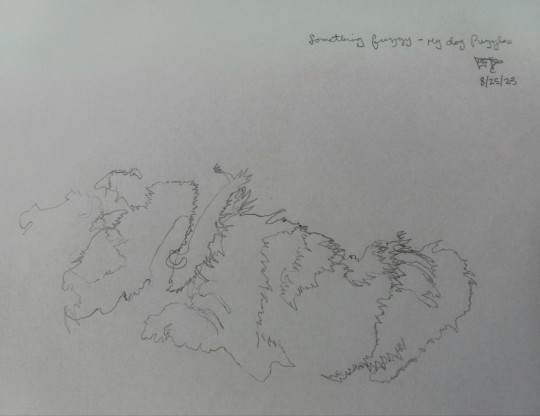
Assignment One: Blind Contour
"Contour" means "the lines on the outside of an object that define its shape." A contour drawing is a line drawing that creates the shape of an object on a page and that may or may not have lines curving around the shape to give it depth. Contour drawings may show detail, but they are not colored or shaded. You may think of contour drawings as "line drawings" or "outlines."
A Blind Contour drawing is created by making a drawing of an object on paper while you are looking at the object you're drawing, not the paper. The goal of this type of drawing is to get you to focus on what you're actually seeing, not to draw what your mind thinks you're seeing. You may actually want to try to create this drawing with your paper totally outside of your line of sight.
Instructions:
Select a subject from the list of prompts below and place it somewhere that it is easy to see. Place yourself and your paper someplace where you can comfortably observe your subject for at least 20 minutes.
Using any pencil, set your pencil on the paper and begin to trace the outline of the subject *without looking at the paper.*
Do not lift your pencil, and if you must lift your pencil to rest your hand, do not look at the paper when you put the pencil back on the paper.
Move your hand very slowly while you are tracing the outline of the object. You may double back and cross over your lines to create details on the interior of the outline, but don't shade in any dark areas, just mark the outlines of the details and the shape.
Move very, very slowly. Many art teachers recommend that you pretend your pencil is a small insect crawling on the outline of your subject. Move slowly and add as much detail as you can to the outline.
Draw for at least 15-20 minutes, and possibly longer, until you have completed the outline of your subject and have added details to the drawing.
Use separate sheets of paper, and make 2-4 blind contour drawings using different subjects.
Don't expect your drawing to look like your subject! When you are finished you will likely recognize many aspects of your drawing, but someone else most likely wouldn't be able to say what you had drawn.
Suggested subjects:
A person
A detailed part of a plant
Something crumpled (a pile of laundry, some discarded paper)
Something tangled
Something fuzzy
A vehicle
A building
An object that you enjoy and like looking at
Examples:
90 notes
·
View notes
Text
Glossary
Contour: Lines around a shape or on the surface of the shape to give it depth. (Not shading)
Terms are added as the assignments progress. If there aren't a lot of definitions here it's because we're early in the course.
10 notes
·
View notes
Text
Materials List
Art classes can be very expensive in terms of materials, so this modified tumblr course has a smaller materials list than most art classes will. If you can't afford the materials listed here, most of the projects can be modified to be completed with a simple pencil and notebook paper and an inexpensive set of crayons, and I will include instructions for the "proper" tools as well as modified instructions for less expensive tools for the assignments as needed. Links go to Dick Blick for demonstration purposes, but none of this has to be from Dick Blick or from the brands listed in the links.
Marking Tools
A set of drawing pencils in different hardnesses
Charcoal in assorted hardnesses
Waterproof ink and a brush
A Fine tip pen
Sketching pastels (optional; you can replace these with a set of crayola crayons for this drawing course)
Paper
A hardcover sketchbook
A multimedia pad (a large one is better than a small one for learning but this pad doesn't have to be huge, you can get a small multimedia pad)
A newsprint pad (this one should be the largest one you can get)
Toned paper (brown or gray paper, you can get individual sheets or a sketchbook, or you can just use construction paper if you want to)
Erasers
A kneaded eraser
A plastic eraser (any brand is fine i'm just linking tombow specifically because i love them and you can get tombow mono erasers in three packs at daiso if there's a daiso near you)
Modified Tools (Because sometimes people want to learn to draw and don't want to drop a hundred bucks on tools)
Required:
Pencil - a number two pencil is fine
Paper - printer paper is fine, though if it's thicker that's good
Optional:
Multimedia drawing pad
Construction paper
Eraser (kneaded is ideal, but any will work)
Set of 16 Crayons (crayola or other brand; you mainly want this for white, black, and brown crayons and to use other colors in place of soft charcoal for some projects)
22 notes
·
View notes
Text
Welcome to Beginning Drawing
I'm in an introductory art class and will be posting instructions and assignments based on this class to tumblr so that you can follow along in this entry-level online art class.
I will post my assignments as I complete them so that I have visual examples of techniques available without copying material from my professor, and I will be modifying the assignments and exercises based on the several art fundamentals classes I've taken over the years.
Materials list and assignments are available under the readmore.
Thanks for playing along!
Materials List
Glossary
Assignments:
Assignment One: Blind Contour
Assignment Two: Modified Contour
Assignment Three: Gesture
Assignment Four: Sighting
Assignment Five: Value Cubes
Art Tips
Tip One: Tool Grip
Tip Two: Drawing what you see
Tip Three: Basics of Composition
Tip Four: Positive and Negative Space
Tip Five: Why Warm-Up
Warm-Ups
247 notes
·
View notes