
Last Seen Blogs

edgemab
Leather Muscle

florejardins
Por onde flor, floresça.

rabexxpaulson
Mari

johnmouths-blog
Houseboat in Alleppey

kamran1numb
Untitled
Text
5 Ingredient Summer Pesto Pasta (AKA Costco Pasta)
The perfect picnic pasta! This 5 Ingredient Summer Pesto Pasta is packed with chicken, cucumbers, tomatoes and covered in tasty pesto sauce.
5 Ingredient Summer Pesto Pasta
I grew up on this pesto pasta and my Mama’s Enchiladas. These recipes were my mother’s go-to recipes and I still make them all the time for my husband. I used to bring this 5 Ingredient Summer Pesto Pasta as my lunch in grade school and the cool girls would beg me to give them bites! That’s right, this pasta is so delicious it got the cool kids to talk to me. That’s a miracle pasta right there. And to make it even better, it’s only takes 5 ingredients and about 10 minutes to whip up!
Easiest Pesto Pasta Ever.
My mother was/is the queen of simple and delicious meals that are easy on the wallet. I have nicknamed this pasta my Costco Pasta because I pick up 3 of the 5 ingredients at Costco. I grab a rotisserie chicken, a container of cherry tomatoes and a jar of pesto when I’m there! If you haven’t tried the pesto from Costco you are missing out! It’s a big bottle for the price you’ll pay for a tiny one at the grocery store and it’s really good! I’ll have a little left over after I make this 5 Ingredient Summer Pesto Pasta but I’ll use it on a panini to make my grilled cheese suuuuper fancy. Or I’ll use it when I roast veggies later in the week. Either way, Costco comes to the rescue with this easy dinner recipe!
I call this a summer pasta, but I make it all year round. So don’t shy away from making this in the winter months! It’s too easy and tasty to only eat during the summer months!
Summer Pesto Pasta Recipe
I mention in the recipe that we usually eat this pasta cold. Yes, sometimes as a kid we would eat it right after my mother would make it but more often she made it in the middle of the day when she had time or even the day before. It’s such a great cold pasta and it makes a perfect Summer Pasta recipe! It’s mayo-free so it won’t spoil in the sun and if you bring it chilled, it helps to keep your guests cool on these hot days.
Enjoy my Mom’s 5 Ingredient Summer Pesto Pasta!
5 Ingredient Summer Pesto Pasta
Ingredients
1 Box of Farfalla Pasta (Bowties)
2 C. Pesto Sauce (I buy mine at Costco)
2 Chicken Breasts, Cooked and Cut in 1/2 Inch Cubes (I use Costco Rotisserie Chicken)
1 1/2 - 2 C Halved Cherry Tomatoes
1 Cucumber, Sliced
Directions
1) Cook the pasta according to the directions on the box. Drain water, add pesto sauce, stir to combine.
2) Add chicken, tomatoes and cucumber and stir well. Serve and enjoy!
NOTE: We usually eat this salad cooled or chilled because my Mom would make it the night before or the morning of. But it does taste great served warm as well!
3.1
Copyright © YourCupofCake
Other Recipes You'll Love!
Source: http://www.yourcupofcake.com/2018/06/5-ingredient-summer-pesto-pasta-aka-costco-pasta.html
0 notes
Text
101 best restaurants in America
What makes a good restaurant a “best”? Food that’s better than just good, of course. A dining room and a level of service that suit the quality of what’s on the plate. A good wine list (which doesn't always mean an encyclopedic one) and good beers and/or cocktails where appropriate. And then the less easily quantifiable stuff: personality, imagination (or intelligent commitment to a lack of same) and consistency. We’re proud to present our ninth annual ranking of the 101 Best Restaurants in America.
101 Best Restaurants in America 2019 Gallery
When we were a young website, way back in 2011, we drew up our first ranking ourselves, making a list of the places where we, The Daily Meal’s editors, liked to eat. Taking into consideration our mood, our budget, and where we happened to be when we got hungry, we considered various criteria: Would we vote with only our critical faculties, or with our mouths and our wallets as well? Where would we send friends? Where would we want to dine if we had one night in this city or that?
By this method, we ended up with a shortlist of 150 places. Then we argued, advocated, and cajoled each other on behalf of restaurants ranging from old-fashioned to avant-garde, ultra-casual to super-fancy. Finally, we invited an illustrious panel of judges (restaurant critics, food and lifestyle writers, and bloggers) from across America to help order restaurants via an anonymous survey, and we tallied the results to assemble a ranked list.
The following year, we refined the process and made it less about our own preferences and more about those of the growing number of writers and other food-conscious folk who were contributing to the site or commenting on what other people contributed. Since 2012, then, our 101 best have been chosen by a voting pool that includes our special contributors, members of The Daily Meal Council (excluding chefs and restaurateurs), and a growing list of other panelists who have agreed to participate in the ever-increasing number of “Best” surveys we conduct.
For this year’s 101, we reached out to hundreds of restaurant experts of various stripes around the country, asking them to vote on an admittedly rather long “shortlist” of more than 700 establishments. Here are the results.
The task of choosing our nation’s best restaurants — as our panelists would surely tell you — becomes more difficult every year, because the number of excellent places to eat continues to grow. As our interest in, and appreciation of, good food continues to increase — and as more great chefs train more younger good ones — fantastic food continues to spread across America. Exceptional culinary landscapes in big cities get better, while new and different dining scenes in every corner of the country are born, in turn attracting and inspiring more talented cooks. All this makes trying to rank the country’s best restaurants more and more challenging, but also more and more worthwhile and intriguing.
You’ll find many of the expected names on this list — restaurants run by Daniel Boulud, Wolfgang Puck, José Andrés, Thomas Keller, Danny Meyer, and other luminaries of today's American restaurant scene. You’ll find Italian places both unorthodox (Animal) and extravagant (Per Se). Some of the nation’s most celebrated and refined Japanese restaurants are included (Masa and O Ya, among others). Carnivores will delight at finding places like Peter Luger and Roast, while those more piscatorially inclined will savor Pêche. Our No. 1 choice won't surprise anybody who follows fine cooking in America.
As we do every year, we expect to hear complaints about this ranking, not just because any list of this kind is subjective to a degree, no matter how many experts weigh in, but also because we haven't included any of the doubtless excellent restaurants in, say, Providence, Charlotte, the Twin Cities — or any of the hundreds of smaller towns across the U.S. where good cooking is practiced and skillfully run dining rooms are pleasing devoted clienteles.
But here's the thing: There are more than 600,000 restaurants in America, counting fast-food outlets, fast-casual chains, small places where the food might be fine but the amenities are slim, and places with no particular pretensions to quality at all. Bracket all these out and we’ve still got — what? — maybe four or five thousand places that are striving to be “best restaurants” and possibly think they already are.
Our list has room for only a tiny fraction of these, and when we reach out to our panel of some of the top restaurant critics and critical diners in America, the places they voted for — perhaps not surprisingly — tend to be concentrated in those cities that are (for reasons that are probably cultural as well as economic) renowned as “food towns.” Chief among these are Las Vegas (four restaurants), New Orleans (five restaurants), Los Angeles (eight restaurants), Chicago (12 restaurants), San Francisco (13 restaurants), and New York City (16 restaurants). Those are the places where our panelists have found the most top restaurants, because those are the places that the most talented chefs and restaurateurs from other regions gravitate to, and the places with large crowds of enthusiastic (and often well-heeled) customers to encourage them and make them profitable. We realize that there are more than 70 urban areas in the United States with populations of 500,000 and above, all of them chock-full of restaurants — but does every one of them have even a place or two that can really be compared with America’s best? Even now, probably not — though we did find top restaurants in such places as Oxford, Mississippi; Chapel Hill, North Carolina; and Los Gatos, California (among other less expected destinations). And next year, who knows?
We also recognize that many of these restaurants are out of most people’s price range, which is why we also publish a ranking of America's 101 Best Casual Restaurants, accommodating the pizzerias and taquerías and burger joints and fried chicken shacks and such that aren’t included here, but that we all love (and sometimes, frankly, prefer to the more serious places ranked here).
The sheer quality and diversity demonstrate that we live in a truly exciting time for food in the United States. We’re pleased to unveil our 2019 list of America’s best restaurants.
Source: https://www.thedailymeal.com/101-best-restaurants-america
0 notes
Text
The Route to Mama Mulan, Chatswood
It has been a while since I last visited Chatswood. It's the lure of noodles that puts Mama Mulan on my radar (Mr NQN is team dumplings, I'm team noodles). But the way to Mama Mulan is not immediately obvious. I find myself pressing the car park elevator button trying to get up to level 1. Then a text arrives with instructions to head towards Willoughby library and use their elevators to find my way there.
Located a level above the library, the restaurant sits all on its lonesome at the base of a block of apartments. It's surprisingly busy without any foot traffic passing.
I am seated in the light soaked "outdoor" section (not outdoor but they keep referring to it as that) and wait for Mr NQN, Louise and Viggo to arrive. Service is sweet and helpful but later, when the restaurant is heaving, there aren't quite enough floor staff so tables are half cleared and the bill requires a couple of prompts.
So the noodles...well the bad news is that they're only available at lunchtime because they are hand pulled noodles. The good news is you can order vermicelli noodles with your live tank seafood if you wish but they're not the same as the lunchtime noodles.
We order a couple of cocktails: a Mama Mulan for Mr NQN (Paraiso lychee liquor, Vodka O, martini bianco, lychee & lemon juice) which is sweet with floral lychee and a Mulan Rouge for Louise with Pama, Grey Goose vodka, vanilla and citrus (she asks for no egg white). Viggo has a beer and I stick with sparkling water because I've had a few days of drinking already. The chef here is Marble Ng formerly at Lotus and you can definitely see similarities here.
Ice plant salad with seared scallops $19.50
The food comes out surprisingly quickly and the first dish to arrive is the ice plant salad with crisp, slightly salty ice plant with a sweet dressing on it and two seared scallops. The ice plant is refreshing and good and it almost doesn't really need the scallops (which at two seems a little tight).
Sweet & sour fried eggplant $23
When we ordered this dish our waitress suggested that we change this for a healthier vegetable dish but said "Do you want delicious or healthy?" and we all answered with a resounding "delicious!" and so it was this eggplant dish over wok fried greens. It's battered eggplant batons with a sweet and sour sauce. The eggplant is piping hot and melts in the mouth inside the crunchy batter. Everyone loves this dish.
Mama Mulan fried rice (GF) $22
There are two types of fried rice and we went with this one as it has wagyu and XO sauce along with asparagus, baby corn, snow peas, coriander, spring onion and egg. It's a very good fried rice, a little on the oily side and the wagyu is good in it although there isn't much XO sauce flavour in it at all.
Braised pork belly with cinnamon, star anise, chilli & bamboo shoots $28
Viggo is a pork fan so we always make sure to order pork whenever we eat out with him. The braised pork belly comes as a bowl of thickish pork belly slices with cinnamon, star anise, Brussels sprouts and bamboo shoots. It has the flavour of char siu but with a sauce with it too. The bamboo shoots are nice although the Brussels sprouts don't go so well with it. Mr NQN remarks, "Do you think they accidentally put them in?".
Roast Mongolian style lamb ribs with cumin $45
A surprising favourite are the Mongolian style lamb ribs covered in toasted cumin seeds with a chilli sauce on the side and a somewhat incongruous red cabbage salad. The lamb is served on the long bone and the meat is wonderfully soft and melting. The chilli sauce provides a nice spicy counterpoint to the fatty meat. We all found that the creamy dressed salad didn't really suit it as something acidic or pickle-y would have been better.
Pippies $32.50 for 500g with noodles $20 and black pepper sauce
We also ordered a bowl of pippies in black pepper sauce because we thought we were getting our fix for the XO sauce with the fried rice. We also ordered some crispy fried vermicelli noodles as I was still craving noodles. The pippies are excellent-fat and meaty while the sauce is very bold and spicy, perhaps a little too strong for us. I do like the spicy tingle though and even with the three of us eating (Viggo abstained as he is allergic to shellfish) we can barely get through half of this dish.
Duo Duo - salted caramel deep-fried ice cream $14.50
We have just enough room to share one dessert and the one that appealed to us the most is the deep fried ice cream and is a collaboration between the restaurant and the Duo Duo fried ice cream food truck. It's a creamy vanilla bean ice cream in a layer of panko crumbs. On top is a tasty sea salt caramel sauce topped with crunchy caramel butterscotch popcorn. It's definitely a step above the usual fried ice cream and we all really enjoy this leaving no trace behind.
So tell me Dear Reader, are you team dumpling or team noodles? And would you go for delicious or healthy if you had to choose one?
This meal was independently paid for.
The Concourse, Level 1 above Willoughby City Library, Chatswood NSW 2067
Monday to Saturday 11:30am–3pm, 5:30–10pm
Sunday 11:30am–3pm, 5:30–9pm
Phone: (02) 9157 1488

Source: https://www.notquitenigella.com/2019/06/16/mama-mulan-chatswood/
0 notes
Text
Jalapeno Popper Pigs in a Blanket
Jalapeno Popper Pigs in a Blanket are a spicy, cheesy appetizer that will get gobbled up at parties and on game day. This recipe turns a childhood favorite into an adult party food.
A cocktail wiener, cream cheese, bacon crumbles, and jalapeno get wrapped up in puff pastry and baked until golden brown.
I love Jalapeno Popper Pigs in a Blanket as is, but they would also taste good dipped in some Ranch dressing.
You can use fresh jalapenos, pickled jalapenos, or canned jalapenos. Your choice.
Typically crescent roll dough is used for Pigs in a Blanket, but I love the extra cripsness and butteriness puff pastry provides. No puff pastry? Go ahead and use crescent roll dough.
This tasty appetizer can be assembled ahead of time. just be sure to wrap them well in plastic so that the puff pastry does not dry out. Keep them in the refrigerator until ready to bake.
You’ll need 1 sheet of frozen puff pastry to make 18 pigs in a blanket. You can easily double the recipe to get 36.
I love Jalapeno Popper everything! Try these other Jalapeno Popper recipes.
Jalapeno Popper Pigs in a Blanket
Jalapeno Popper Pigs in a Blanket are a spicy, cheesy appetizer that will get gobbled up at parties and on game day. This recipe turns a childhood favorite into an adult party food.
2/3 cup whipped cream cheese
4 slices bacon, cooked and crumbled
2 jalapeno peppers, seeded and finely diced
1 sheet puff pastry, thawed
18 cocktail wieners or lil smokies
1 egg beaten together with a little water.
1 jalapeno, thinly sliced
Preheat oven to 400 degrees and line a baking sheet with parchment paper.
In a small bowl, mix whipped cream cheese, bacon, and jalapenos together.
Cut puff pastry into 6 equal strips (about 1-inch in width) and then cut each strip into 3 pieces for a total of 18.
Spread a spoonful of cream cheese mixture on each piece of puff pastry. Place a cocktail wiener on each piece and roll the puff pastry around it. Brush edges with egg wash and seal well. Place seam side down on parchment paper-lined baking sheet.
Brush tops of puff pastry with egg wash and place a jalapeno slice on each one.
Jalapeno Popper Pigs in a Blanket
* Percent Daily Values are based on a 2000 calorie diet.
Disclosure: This post contains affiliate links.
Source: https://spicysouthernkitchen.com/jalapeno-popper-pigs-in-a-blanket/
0 notes
Text
Gluten-Free Chocolate Black Sesame Cake with Matcha Mascarpone
This deep dark gluten-free chocolate black sesame cake is so moist that it’s almost gooey in texture – just on the very edge of lava cake – while still cake-like and tender. Nutty whipped matcha mascarpone cuts the inky black richness of the cake while pairing with the smoky notes of the ground black sesame seeds. A chocolate cake made for grown-ups adapted from A Common Table: 80 Recipes & Stories from My Shared Cultures.
Since she started helping me in the kitchen more regularly, I’ve been joking that the first time Zoella bakes at a friend’s house, she’s going to wonder why they only measure one flour. Baking with at least three different gluten-free flours is the norm for her, though I’m not sure she knows why yet. She does, however, know that I can’t eat gluten, whatever that means to her.
In the car yesterday, Zoella (3) said completely out of the blue, “you need to try gluten-free, mama.” She repeated slowly, “glue-TEN free.”
Impressed by her vocabulary and that she remembered that fact, I agreed, “Yes, you’re right. I can’t eat gluten.”
“NO, Mama, you have to try gluten-free before you say you don’t like it.” Ha! Look at her throwing my philosophy on new foods (ahem vegetables) back in my face.
I have tried it. For years, and for years I had chronic migraines. So, I can’t eat it. Like it? Sure, it’s delicious! Like, you’ve eaten cake before, right? I’ve never met a cake didn’t like (except for that one time my mom put shredded sweetened coconut “grass” all over my 5th birthday cake – I’m not going to let her forget).
When I saw this chocolate black sesame loaf cake in my friend Cynthia’s new book, I needed a slice. And I immediately got to work making a gluten-free version so I wouldn’t miss out.
A Common Table Cookbook
I’ve been a long fan of Cynthia’s work through her blog Two Red Bowls. The way she cooks, and weaves her stories and beautiful photographs through her cooking, moves me to want to make every single recipe she produces. Somehow, in my eyes, she does it all – a grown up lawyer, mother of two kids under 3(!!), award-winning food blogger, and now cookbook author. Goals.
When her cookbook A Common Table arrived on my doorstep, I leafed through it at least a dozen times, bookmarking all the recipes I couldn’t wait to try. In her debut cookbook, Cynthia chronicles the varied cultures that have influenced her family – her, Chinese girl from South Carolina, and her husband, a Korean Irish boy who grew up in Hawaii. All of that family history tied together with the foods from places they’ve lived and traveled in getting to where they are now. The result is a collection of recipes that bridge these cultural distances in a mash-up of American and Asian flavors.
A few recipe that I’ve got my eye on next:
Black Sesame-Stuffed French Toast
Buttermilk Mochi Pancakes
Sesame-Miso Potato Salad
Sweet Sesame Skillet Cornbread
Asian Pear & Jasmine Crumble
Honeydew Bubble Tea
While the book has many naturally gluten-free friendly recipes (like a peanut butter mochi cake!!), I couldn’t stop thinking about this black sesame chocolate loaf cake. I’ve taken her recipe and adapted it with gluten-free flours, a bit of salt to draw out the flavors of the gluten-free flours, and a matcha whipped mascarpone on top. This is my new favorite grown up chocolate cake.
How to make black sesame powder
This black sesame cake uses ground up toasted black sesame powder to infuse the chocolate notes with smoky nutty black sesame flavor. To make black sesame powder, you first need toasted black sesame seeds. Either buy them pre-toasted like me, or toast them yourself on the stove top. Then grind the toasted black sesame seeds in a food processor until it becomes a fine powder. If you don’t have a food processor, a coffee grinder will work too!
Black Sesame Chocolate Loaf Cake
Combining black sesame powder with melted bittersweet chocolate and molasses-laden brown sugar makes a cake that’s all at once rich in deep chocolate notes with an underlying nutty smokiness that makes you wonder what it is. Black sesame and dark chocolate both offer a pleasant bitterness that make them a surprisingly natural duo. In the version made with 1/2 cup of black sesame seeds, the cake it undeniably rich in chocolate flavor with a hint of black sesame’s savory super-nuttiness.
When you pour this cake batter into the pan, it’s liquid and runny. Almost like coffee. You’ll think you’ve done something wrong and wonder how it can possibly bake into a cake. Almost like magic, it does.
This chocolate black sesame cake is ultra-moist and, as Cynthia calls it, “squidgy” – on the verge gooey – with a dense jet black center. Yet still, it has cake-like structure and tender crumb. Almost like a brownie and a cake mash-up. Pillows of soft matcha whipped mascarpone offer a soft contrast to the chewy cake.
Gluten-Free Chocolate Cake Recipe
I have a classic chocolate cake recipe here on my blog – posted both as a layer cake and as cupcakes. It’s my go-to back pocket recipe that I make again and again and again.
This black sesame infused gluten-free chocolate loaf cake recipe offers something very different. Something luscious. Both in texture and flavor, this isn’t your like a birthday party chocolate sheet cake or a standard chocolate loaf. This is a grown up chocolate loaf cake with deep smoky chocolate flavor.
What if you don’t love black sesame dessert?
Rest assured, with 4 ounces of melted bittersweet chocolate folded into the batter, at its core with just 1/2 cup black sesame seeds, this is a chocolate-forward cake with black sesame in the offering subtle flavor notes. My husband, who is not a fan of black sesame dessert, actually loves this rendition of the cake.
For those who love black sesame desserts (me), increasing the black sesame seeds to 3/4 cup at Cynthia’s recommendation, will bring the black sesame notes forward. This is how *I* prefer the cake.
Charge ahead with your preference in mind!
Matcha March: Matcha Whipped Mascarpone
Because it’s still Matcha March, I’ve added matcha to the whipped mascarpone. Matcha’s sweet nuttiness is a natural partner for both black sesame and chocolate. As a trio, their flavors are harmonious together.
Here are a few of my favorite matcha black sesame combos:

Prep Time: 15 minutes
Cook Time: 1 hour
Total Time: 1 hour 15 minutes
This deep dark gluten-free chocolate black sesame cake is so moist that it's almost gooey in texture - just on the very edge of lava cake - while still cake-like and tender. Nutty whipped matcha mascarpone cuts the inky black richness of the cake while pairing with the smoky notes of the ground black sesame seeds. A chocolate cake made for grown-ups.
Ingredients
Matcha Whipped Mascarpone
Instructions
Gluten-Free Chocolate Black Sesame Loaf Cake
Preheat the oven to 375°F. Grease and line a tall, 9 × 5-inch Pullman-style loaf pan with parchment paper. A regular height loaf pan may overflow—if this is all you have, take care to fill the pan less than 1 inch from the rim, and save the excess for muffins or mini cakes. Note: I used a regular 9x5 loaf pan here and was able to still use all the batter)
If using untoasted black sesame seeds, toast the black sesame seeds over medium heat in a small dry skillet until a few seeds jump in the pan and they start to smell toasty (but not burnt!), 2 to 3 minutes. Place the toasted black sesame seeds in a food processor and blend until a finely ground powder forms, 1 to 2 minutes. Set aside.
In a medium bowl, whisk together, the sweet rice flour, oat flour, millet flour, salt, and baking soda. Set aside.
Melt the chocolate, either in the microwave in 15 to 30 second increments, stirring between each interval, until fully melted and smooth, or over a double broiler for about 5 minutes, stirring frequently. Once the chocolate is melted, set aside and let cool slightly.
In a large bowl, cream together the sugar, butter, and black sesame seed powder until fluffy, 2 to 3 minutes with an electric mixer on medium speed or 3 to 4 minutes by hand. Add the eggs and vanilla, beating well. Fold in the melted chocolate until just incorporated.
Alternate folding in the flour mixture and the hot water (or coffee), 1/4 of the flour/water at a time, until the batter becomes smooth and liquid.
Pour the batter into the lined loaf pan, taking care not to fill the pan higher than 1 inch from the rim.
Bake for 30 minutes, then reduce the heat to 325°F and continue to bake for about 30-40 minutes more minutes until it springs back when touched (Note: Cynthia's non gluten-free version bakes up in about 15-20 minutes less time on the second bake). The cake should still be relatively moist in the center, and a skewer or cake tester should not come out completely clean.
Remove from the oven and let cool completely before turning the cake out onto a plate. The cake may fall; this is normal, as it is so moist. Enjoy topped with matcha whipped mascarpone (below), whipped cream, or ice cream, if desired. The cake tastes even better on the second day.
Matcha Whipped Mascarpone
In the bowl of a stand mixer fitted with the paddle attachment or a medium mixing bowl with an electric mixer, combine the cream, mascarpone, salt. Whip on medium-high until the mixture begins to thicken.
Add the sifted sugar and matcha powder and continue whipping until soft thick peaks form.
Notes
*I used toasted black sesame seeds to skip the step of pan toasting them. For a stronger black sesame flavor, use ¾ cup black sesame seeds. I've made it both ways and love it equally as much. the 1/2 cup is great for a chocolate-forward cake with a hint of black sesame and perfect for folks who may not be big black sesame lovers. The 3/4 cup version has a stronger black sesame forward flavor that's great if you're a black sesame lover like me!
Adapted, with permission, from A Common Table: 80 Recipes & Stories from My Shared Cultures.
Source: https://www.snixykitchen.com/gluten-free-chocolate-black-sesame-cake/
0 notes
Text
Grilled Corn and Zucchini Salad
This summery salad is made with grilled corn and zucchini tossed with creamy feta and fresh basil. The ideal side dish for backyard cookouts and barbecues!
We love summer entertaining, so much so that we just built a brand new deck to accommodate more space for our friends and family!
While there are so many wonderful aspects of grilling season, perhaps what I love most is how easy and effortless grilling makes it to add flavor to just about anything. Case in point: I recently created a grilled corn and zucchini salad that took just about 12 total minutes to create.
As the zucchini and corn grill the natural sugars begin to caramelize creating a sweet and smoky flavor profile that turns a traditionally bland ingredient (sorry zucchini!) into something magical and delicious.
To bring it all together, I toss the grilled corn and zucchini with lemon juice, olive oil, creamy feta, scallions and fresh basil. Bright, summery and full of fresh flavors, you really can’t go wrong with this simple summer side dish recipe.
Depending on what’s in season where you live, feel free to mix and match the ingredients in this grilled summer salad recipe. Asparagus, eggplant, peppers or onions would all be fantastic grilled then tossed with feta and basil.
The options are limitless. Your fork is waiting.
<![CDATA[.wprm-recipe-rating .wprm-rating-star.wprm-rating-star-full svg * fill: #343434; ]]>
Course: Salad, Side, Side Dish
Cuisine: American
Keyword: corn salad, zucchini salad
Prep Time: 10 minutes
Cook Time: 10 minutes
Total Time: 20 minutes
Servings: 4
Calories: 209kcal
This summery salad is made with grilled corn and zucchini tossed with creamy feta and fresh basil. The ideal side dish for backyard cookouts and barbecues!
Questions / Comments? Print Recipe
Ingredients
2 ears corn shucked
1 medium zucchini cut in long strips
1/4 cup olive oil divided
salt and pepper to taste
4 ounces feta cheese
1/4 cup fresh basil thinly sliced
1/2 cup scallions chopped
2 tablespoons lemon juice
Instructions
Pre-heat grill over high heat. Brush both sides of the zucchini slices with half of half of the olive oil (2 tablespoons) and sprinle with salt and pepper. Place seasoned zucchini slices along with the corn on the cob on the grill. Grill zucchini until tender, about 4-7 minutes, turning once halfway through. Rotate corn every 2 minutes until all sides are slightly charred.
Remove the veggies from the grill. Uesing a sharp knife, slice the corn into a large bowl. Next, slice the zucchini into bite-sized pieces and add to the bowl. Add all remaining ingredients to the bowl including feta, basil, scallions, lemon juice and remaining 2 tablespoons olive oil. Toss well and season with salt and pepper to taste before serving.
Notes
Can be served warm, room temperature or chilled.
Nutrition Information:
Calories: 209kcal | Carbohydrates: 4g | Protein: 5g | Fat: 20g | Saturated Fat: 6g | Cholesterol: 25mg | Sodium: 323mg | Potassium: 180mg | Fiber: 1g | Sugar: 3g | Vitamin A: 8.4% | Vitamin C: 17.3% | Calcium: 15.9% | Iron: 3.7%
DID YOU MAKE THIS RECIPE?If you tried this recipe I would love to to see it and have you share! Tag me @thelemonbowl using the hashtag #thelemonbowl!
Questions or Comments?Click Here to send me a note or rate the recipe!
Recipe by The Lemon Bowl // Photography by Alejandro Photography
Want more delicious salad recipes? Check out my Pinterest board!
Source: https://thelemonbowl.com/grilled-corn-and-zucchini-salad/
0 notes
Text
Classic Egg Salad Recipe
This classic egg salad recipe can be enjoyed for breakfast, lunch, or dinner. I love it on an open faced sandwich, wrapped in a lettuce cup or scooped onto a big fat salad.
Egg salad is a recipe that I like to make all year round, but I especially in the spring time when I have Easter on the brain.
This classic egg salad recipe uses just a handful of ingredients; hardboiled eggs, mayonnaise, finely diced veggies, fresh dill and some salt and pepper to taste. I like to use both hardboiled eggs and egg whites to add a little extra protein to the dish.
Start by chopping four hard boiled eggs and four hardboiled egg whites into bite sized pieces. If you prefer to use all eggs and no whites, sub in two eggs for the four whites (you will have 6 eggs in total).
Place eggs in to a big bowl and add in diced vegetables, mayonnaise, fresh dill, salt and pepper. If you want to lighten the dish up a bit, you can sub half to all of the mayonnaise for greek yogurt. This will reduce the fat and increase the protein as well.
Serve in a lettuce cup, on your favorite bread or on top of a big fat salad.
Place eggs in the bottom of a stainless steel pot, add enough water to come one inch above the eggs.
Bring eggs to a boil, shut off the heat, pop on the lid and set your timer for 10 minutes*.
In the mean while, set up an ice bath by filling a large bowl with ice cubes and cold water.
After the timer goes off, use a slotted spoon to remove the eggs from the pot and place into the ice bath.
Once the eggs are cool enough to handle, peel off the shells.
*Note: if you prefer a creamier yolk, set your timer for 8 minutes instead of 10.
Egg salad is a healthy, delicious meal to add to your weekend meal prep and will happily last for 3 to 5 days in your refrigerator.
Once you are finished preparing your egg salad, transfer it into an airtight container and store it in your fridge.
If you pack your egg salad for lunch, be sure to include an ice pack. Egg salad is safe to eat for up to two hours at room temperature, but any time after that, is not recommended.
Egg salad is naturally a very healthy, nutritious meal but for those of you with specific dietary needs, here are some easy tweaks.
Keto egg salad, skip the egg whites and use all whole eggs
Paleo egg salad, don’t change a thing
Vegan egg salad, try this recipe
Whole 30 egg salad, be sure to use avocado based mayo
Fitness friendly egg salad, add extra egg whites and sub greek yogurt for mayo
Classic Egg Salad Recipe
Yield: 2 servings
Prep Time:20 minutes
Cook Time:10 minutes
Total Time:30 minutes
This classic egg salad is delicious on top of a salad, serve in a lettuce cup or eaten right out of the bowl.
Ingredients:
8 eggs
2 tablespoons finely diced red onion
2 tablespoons finely diced celery
2 tablespoons finely diced radish
3 tablespoons mayonnaise*
1 tablespoon fresh chopped dill
salt and pepper to taste
Directions:
Place eggs in the bottom of a stainless steel pot, add enough water to come one inch above the eggs.
Bring to a boil, shut off the heat, pop on the lid and set your timer for 10 minutes.
In the mean while, set up an ice bath by filling a large bowl with ice cubes and cold water.
Once the timer goes off, use a slotted spoon to remove the eggs from the pot and place into the bath. Once the eggs are cool enough to handle, peel off the shells.
Slice four of the eggs in half, pop out the yolks (you can save them for another time) then chop.
Slice the remaining eggs in half, and chop up with the yolks.
Place the chopped eggs and egg whites into a large bowl, and add in onions, celery, radish, mayo, dill, salt and pepper. Gently stir everything together.
Transfer to an air tight container or enjoy on top of your favorite sandwich bread, lettuce wrap to green salad.
*If you want to lighten up this recipe, use plain greek yogurt in place of the mayo.
NUTRIENTS PER SERVING: Calories 310 | Total Fat 26g | Saturated Fat 5.3g | Cholesterol 210mg | Sodium: 419mg | Carbohydrate 32g | Dietary Fiber 0.4g | Sugars 0.9g | Protein 19.2g
Source: https://cleananddelicious.com/clean-eating-egg-salad/

0 notes
Text
MUDDLED CHERRY MAI TAIS
I went through an intense cocktail phase in my early 20’s. Speakeasies were de rigeuer then, and no bar cart was complete without obscure, single purpose liqueurs and a supply of egg whites at the ready. But I never made it far enough through my catalog of vintage recipes to reach the Tiki explosion – when GIs returning from the Pacific came home with a lust for sweet rum and a taste of the tropics. Trader Vic’s and cocktails like the Zombie soon populated every mid-century housewife’s repertoire. Seriously, every cookbook I have from the 50’s is punctuated by Americanized luau recipes – maraschino cherry studded pineapple slices decorating hams, spare ribs marinated in sweet teriyaki sauces, fluffy coconut desserts.
But recently, I’ve become sort of obsessed by 1950s kitsch. Yes, some of the food is a slow motion car crash, but some of the recipes are festive, fun, and silly in the best way. So for this mai tai, I borrowed the period’s love of pineapple and cherries, but with a much fresher spin. Fresh cherries soaked in syrup and muddled with pineapple and lime juice add brightness and punch to this tiki classic. Cheers!
INGREDIENTS
[Note] For 1 cocktail
2 ounces aged rum
1 ounce lime juice
1/2 ounce orange curacao
1/4 ounce orgeat
2 ounces pineapple juice
1/2 ounce cherry syrup (plus cherries)
Mint sprig, for garnish
DIRECTIONS
Combine all ingredients except the mint sprig in a cocktail shaker, shake vigorously, and pour the entire contents into a double Old Fashioned glass.
INGREDIENTS (CHERRY SYRUP)
1/2 cup cherries, pitted
1/2 cup sugar
1/4 cup water
DIRECTIONS
Combine everything in a small pot over medium heat, cooking until sugar is melted. Set aside to cool fully.
Source: https://www.thekitchykitchen.com/?recipes=/muddled-cherry-mai-tais/
0 notes
Text
Summer Squash and Basil Pasta
This week is such a blessing – cool evenings that make for perfect sleeping weather and perfectly sunny and warm daytime temperatures that make being at work soooo incredibly difficult. Us Midwesterners…we appreciate the little things, let me tell you.
I was heading home from a late meeting at the hospital and texted the nanny asking if she could give the girls a bath while I made dinner. Mark had a work dinner tonight and tomorrow’s picture day at school. She said they were just leaving the beach playground and would be home soon. Two very enjoyable minutes later, I got so jealous of the people eating out on a restaurant patio with lake views that I called Jess and asked if we could detour for dinner and so we pressed pause on baths to have dinner.
Us girls had a perfect late summer meal out on the patio – wine and all! It was perfection. I didn’t have to be inside making dinner and without dishes, there was plenty of time for me to do bath time…and a bit of a movie with snuggles in mom and dad’s bed before bed. 🙂
Sometimes, you just must take advantage of summer and all of its gifts…like the basil I used for this recipe.
Our garden has been MASS producing basil which only makes me sad because I’ll be paying big bucks for the fresh stuff in a few months, but for now…JACKPOT. Between picked fruit that we’ve frozen for the winter months and pesto, my freezers (all 3 of them!) are FULL.
I had to make something with basil and even better that it used up a ton of the zucchinis and yellow squashes my CSA has been delivering. The recipe looked fantastic, sounded super easy, and resulted in a meal loved by all. My girls nearly inhaled every last bite on their plates and I was texting my pasta, basil, cheese, and lemon-loving bestie the recipe before we’d even finished up!
Summer Squash and Basil Pasta
Author: Nicole Morrissey
Prep time: 10 mins
Cook time: 20 mins
Total time: 30 mins
Serves: 7 servings (about 1¾ cups each)
Ingredients
¼ cup olive oil
8 garlic cloves, thinly sliced
2½ lbs zucchini and yellow squash (about 5 medium), quartered lengthwise, sliced
1 tsp kosher salt
1 tsp Ancho chili powder
1 lb large tube pasta
4 oz Parmesan, grated (about 1 cup)
1 Tbsp fresh lemon juice
½ cup torn basil leaves, divided
Instructions
Heat oil in a large, deep skillet over medium. Once hot, add garlic, stirring occasionally, until lightly browned around the edges, about 4 minutes. Add zucchini and squash; increase heat to medium-high; season with the salt. Cook for 12-15 minutes, stirring occasionally, until the squash is jammy and soft. Sprinkle with chili powder and mix.
Meanwhile, cook pasta in a large pot of boiling water, stirring occasionally, until very al dente.
Transfer pasta to skillet with squash using a slotted spoon and add ½ cup pasta cooking liquid. Cook pasta, add Parmesan and more pasta cooking liquid as needed, until sauce coats pasta and pasta is al dente. Toss in lemon juice and most of the basil.
Serve hot and topped with remaining basil.
Nutrition Information
Serving size: 1¾ cups Calories: 390 Fat: 13.9 Carbohydrates: 54.4 Sugar: 5.0 Sodium: 445 Fiber: 4.2 Protein: 15.3 Cholesterol: 14
3.5.3251
Be well,
Source: https://preventionrd.com/2018/09/summer-squash-and-basil-pasta/
0 notes
Text
Moroccan Carrot Soup with Cinnamon Hazelnuts
Creamy Moroccan carrot soup with white beans is seasoned with za’atar and topped with cinnamon hazelnuts and a lemon yogurt swirl. This bright comforting soup is filling and flavorful.
One morning before school, I warned Zoella we’d be having carrot soup for dinner. When Zo was first starting to eat as a baby, my friend Emily gave me the suggestion that I prepare her throughout the day for what we’d be eating for dinner. This way she wouldn’t be caught by surprise and perhaps she’d be more willing to try new foods. I also always make sure there’s at least one thing on the table she recognizes and loves, giving her way into any meal. Then I spend all day preparing her for whatever else we’re serving.
Some days my efforts are met with a hangry whiny, “But I don’t like XYZ!!” Even if XYZ is her favorite spaghetti. When I told her we were having carrot soup with za’atar and cinnamon hazelnuts for dinner, that’s precisely what I expected.
Instead, she got visibly excited, “Yay!! That’s my favorite soup in the whole world, Mama!!” I reveled in the compliment even though I knew it was 100% a lie. I knew this because the first time I served it, she only choked down one bite before declaring soup was SOOO GRRR-OSS. To be fair, she hates almost anything puréed and smooth (especially mashed potatoes and fresh ricotta). Also, have you ever seen a toddler eat soup? Their lack of purée-on-spoon dexterity will make you extremely sympathetic to their hatred of soup. Eating soup while nursing a baby is a similar struggle.
The second time around, I served this Moroccan carrot soup over a scoop of short grain brown rice – the one familiar thing on the table that night, with hers on the side. Shockingly, Zoella didn’t just eat brown rice for dinner. She’s a woman of her word. This was her favorite soup in the whole world now…even if she insisted that I feed it to her.
Creamy Carrot Soup Recipe
I’ll be the first to admit that I’m not typically big on soups. I often find them one note and tire of eating a whole bowl just a few bites in. This soup is a different story though. Rather than the ginger profile typical to carrot soup recipes, I seasoned this Moroccan carrot soup with za’atar. Then served it up with a swirl of tart lemon yogurt and warm cinnamon toasted hazelnuts.
Cannellini beans give the soup its thick creamy texture while also making it hearty and filling enough as a main course. Fresh lemon juice adds acidity and brightness and a spoonful of ghee give it a richness that layers the soup in flavor. This Moroccan carrot soup is simultaneously warm, comforting, and complex, while also bright and refreshing.
What is Za’atar?
This Moroccan carrot purée soup gets its seasoning from a homemade za’atar spice blend, which is a Middle Eastern spice mixture. The ingredients vary across Middle Eastern countries, but typically za’atar includes sesame seeds, sumac, and dried thyme.
This earthy and herby aromatic spice blend can be served on anything from roasted veggies, to a bowl of hummus, or even mixed with harissa. Za’atar is one of my favorite versatile spice blends.
What is Sumac Spice?
If you’re still wondering – what is sumac? – you’re not alone. I texted two of my neighbors to see if they had a teaspoon of sumac I could borrow halfway into making this soup. One neighbor replied, “what is that?” and the other said she’d never used it before. That’s when I realized it’s not as common a household spice in the US . But it should be!
Sumac is a popular Middle Eastern spice made by grinding the dried fruit berries of the sumac bush. It’s a dark red powder that is tart, bright, and citrusy, adding a pop of flavor to your dishes. Sumac is also rich in antioxidants, more than any other spice. If you have trouble finding it at your grocery store, you can find it at Whole Foods or other natural or specialty markets or on Amazon.
Sumac is one of the top 5 most used spices in my kitchen for everyday cooking – as a rub for chicken skin, a spice for sautéeing veggies, or a sprinkling for roasted cauliflower. I also love pairing it with smoked paprika for a tart smokiness that’s super flavorful.
Gluten-Free Carrot Recipes
If you’re looking for a new way to use up a forgotten bundle of carrots in the back of your crisper, this soup is a keeper. Here are five other recipes to use up those carrots!

Yield: 4 servings
Prep Time: 10 minutes
Cook Time: 40 minutes
Additional Time: 5 minutes
Total Time: 55 minutes
Creamy Moroccan carrot soup seasoned with za'atar and topped with cinnamon hazelnuts and a lemon yogurt swirl. With white beans blended in, this bright comforting soup is filling and flavorful.
Ingredients
Moroccan Carrot Soup
2½ teaspoons ground sumac
2½ teaspoons sesame seeds
2½ teaspoon dried thyme
½ teaspoon kosher salt
3 tablespoons extra virgin olive oil, divided
½ medium yellow onion, chopped
1 large garlic clove, minced
2lbs carrots, sliced into 1/4-inch thick rounds
2 tablespoons maple syrup
4 cup vegetable broth (I use veggie bouillon)
2 cups water
1 15.5-ounce can cannellini beans, drained and rinsed
½ teaspoon kosher salt
2 tablespoons fresh lemon juice
1 tablespoon ghee
Fresh thyme, for garnish (optional)
Lemon Yogurt
½ cup Greek or Icelandic yogurt (or vegan yogurt of choice)
1½ tablespoons fresh lemon juice
Pinch kosher salt
Cinnamon Toasted Hazelnuts
1/4 cup chopped toasted hazelnuts
1 teaspoon melted ghee
Pinch ground cinnamon
Instructions
In a small bowl, mix together the sumac, sesame seeds, thyme, and salt. You'll use 1½ tablespoons of this za'atar in the soup and reserve the rest for garnish. Set aside.
In a large sauce pan, heat 1 tablespoon olive oil over medium heat until it begins to shimmer. Add the onion and garlic and cook, stirring until it begins to soften, but does not yet brown, about 5 minutes.
Add the remaining 2 tablespoons olive oil, carrots, and 1½ tablespoon of the mixed za'atar seasoning. Cook, stirring, for 6-8 minutes, until the carrots begin to soften.
Stir in the maple syrup then add the broth, water, cannellini beans, and salt. Bring to a boil over medium-high heat then reduce heat until the soup simmers. Simmer until the carrots tender when pierced with a fork, 25-30 minutes.
Puree the soup until completely smooth either with an immersion blender or working in batches with a blender or food processor. Return the soup to the pot and stir in the lemon juice and ghee. Taste and adjust seasoning to your liking.
Serve warm topped a swirl of lemon yogurt, cinnamon toasted hazelnuts, a sprinkling of the remaining za'atar, and fresh thyme.
Source: https://www.snixykitchen.com/moroccan-carrot-soup/
0 notes
Text
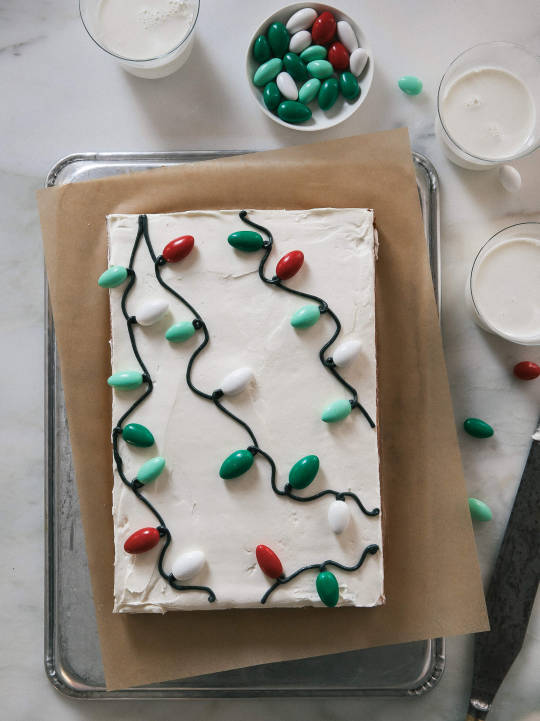
Coquito Cake
Coquito Cake
Cakes, Desserts, The Holidays
Let’s start with the basics: What is coquito?
Coquito is often described as a Puerto Rican eggnog but I’ve always felt like that comparison kinda doesn’t do it justice. First of all, it’s MUCH better than eggnog. And secondly, it usually doesn’t have egg in it (some families’ recipes do have egg in it but most don’t).
Coquito is a coconut-based drink that usually has sweetened condensed milk, regular milk, lots of rum and a hint of spices like cinnamon and cloves.
My fam is not Puerto Rican so I actually didn’t have it until I was a teenager, living in South Florida. I remember someone handing it to me at a party and I was like DANG WHAT IS THIS?!?!
It’s way better than eggnog in my opinion. The texture is way lighter than eggnog (my usual issue with drinking it).
I took those flavors and implemented them into this cake! I thought of doing a tres leches but I’ve made a lot of tres leches cakes in the past so I was looking to do something a lil’ different.
This cake is kind of like a soaking cake though, because I made a rum syrup and brushed it on top. It adds such a nice hint of rum to the cake and the coconut flavor comes through like whoa!
The cake is a nice fluffy coconut cake that uses coconut cream (a must in coquito). I used the brand Coco Lopez but you can use a can from Goya, too. I also utilized coconut extract because it really packs that coconut flavor punch that we love so much.
When the cake comes out of the oven, the entire cake gets brushed with this delicious rum syrup.
And then I added a nice fluffy coconut frosting.
You can make the topping in whatever style you like, but I went with a “string of lights” made from buttercream and large Jordan chocolate-covered almonds as the “lights.” FUN, NO?
If you’re like nahhh…I would suggest adding some toasted coconut flakes or regular coconut flakes. Or maybe some gingerbread cookies as decoration. MAKE IT FUN!
This time of year is about fun!

Coquito Cake
Prep Time: 15 minutes
Cook Time: 25 minutes
Total Time: 1 hour, 20 minutes
Ingredients
Rum Syrup:
1/2 cup sugar
1/4 cup water
1/2 cup white rum or dark rum (I used white rum but if dark is all you have, use it!)
1 cinnamon stick
Coconut Sheet Cake:
2 3/4 cups all-purpose flour
2 1/2 teaspoons baking powder
1/2 teaspoon salt
1 cups unsalted butter, at room temperature
1 1/4 cups white granulated sugar
3/4 cup milk
6 large egg whites
1/2 cup cream of coconut (from brands like Coco Lopez or Goya)
1/2 teaspoon coconut extract
1 tablespoon heavy cream
Coconut Buttercream:
1 cup unsalted butter, at room temperature
3 cups powdered sugar, sifted
Pinch of salt
3 tablespoons cream of coconut (we’re using it in the cake and buttercream)
1 tablespoons heavy cream
For Decorating:
Green and black food coloring gel (we’re going for dark green)
Jordan Chocolate-Covered Almonds (you could also use chocolate covered sunflower seeds that are in various colors)
Directions
To Make the Rum Syrup:
To a saucepan, set over medium heat, combine the sugar, water, rum and cinnamon stick. Bring the mixture to a simmer and then immediately turn to low heat. Cook for about 5 minutes. Remove from the heat and allow to steep while you make the cake.
Coconut Sheet Cake:
Preheat oven to 350 degrees F. Spray a 9x13-inch baking pan with cooking spray (or rub with butter) and line with a sheet of parchment. Set aside.
In a medium bowl, add the all-purpose flour, baking powder and salt. Whisk until combined.
To the bowl of a stand-up mixer with the paddle attachment (or you can use a large bowl with an electric mixer), add the butter and sugar. Beat until light and fluffy, about 2 to 3 minutes. In a measuring cup, pour in the milk, egg whites, cream of coconut and coconut extract; whisk until combined.
Turn the mixer to low speed and, alternating between the dry ingredients and the liquid ingredients (the egg white mixture), add to the butter/sugar mixture until the batter is relatively smooth.
Pour the batter into the prepared baking pan and transfer to the oven to bake for 22 to 25 minutes, until a skewer inserted into the center comes out clean.
Allow the cake to cool in the pan for about 5 minutes and then invert onto a cooling rack and cool to room temperature. It’ll probably take a good hour.
To Make the Frosting:
To the bowl of a stand-up mixer with the paddle attachment (or in a medium bowl with an electric hand-mixer), add the butter and sifted powdered sugar. Beat on low, until smooth, about 1 minute. Next, add the cream of coconut, coconut extract and heavy cream. Beat on medium speed for a full 2 minutes; this will result in super fluffy frosting.
To Decorate the Cake:
Set aside about 1/4 cup of buttercream and place it in a bowl. Using black and green food coloring gel, add food gel until it turns a dark green color (we’re going for the color of Christmas tree lights—we’re artists!).
Add the buttercream to a piping bag fitted with a #5 round tip. And add swirls in different directions, mimicking the cord of the lights. Arrange the almonds on the “cord” to replicate as “lights.” Slice and serve.
3.1
https://www.acozykitchen.com/coquito-cake/
coquitoeggnogpuerto rican eggnogRum
December 20, 2018 by Adrianna Adarme
Adrianna Adarme
A Cozy Kitchen is a blog written by Adrianna Adarme. Adrianna likes corgis, pancakes and cute things.
Previous Post
You Might Also Like
Thai Tea Coconut Popsicles
June 29, 2017
Spiced Babka with Rhubarb Glaze
May 23, 2017
Triple Layer Chocolate Matcha Cake
February 23, 2015

Hi! This is my lil’ corner on da internets called A Cozy Kitchen. I live in Los Angeles, California with my husband Joshua and my corgi Amelia.
Read More
Cozy Cooking Playlist!
Cookbook!

Stay Up To Date
SUBSCRIBE
Fall Foods!


Fun Brand Partnerships


Source: https://www.acozykitchen.com/coquito-cake/
0 notes
Text
Homemade Twix Bars (Grain-Free, Sugar-Free, Egg-Free, Corn-Free, Soy-Free, Dairy-Free & optionally Nut-Free)
As a kid growing up in a home where all desserts were from-scratch, I was more or less obsessed with candy bars.
I couldn’t wait to become an adult already, so I could buy as many candy bars (called “chocolate bars” where I grew up) as I wanted.
As soon as I was old enough and could afford it, I began to work my way through every candy bar I could find. In Canada, that meant a lot of Caramilks (heavenly); Cherry Blossoms (more like an egg than a bar), Coffee Crisp (chocolate + crunch + mocha–what could be better?) and Wunderbar (a feast for the senses since 1976).
I also envied my American cousins, since they had access to gems like Mounds, 100 Grand Bars, Baby Ruth and Almond Joys.
And then, there was Twix.
Apparently, Twix was the first candy bar ever to combine caramel, cookies, and chocolate. Was it a cookie? Was it a chocolate bar? Was it a snack, or was it a dessert?
I didn’t care. A buttery cookie base topped with caramel, all enrobed in chocolate: total, unparalleled, over-the-top deliciousness.
In 2009, candida came into my life.
No more cookies. No more caramel. No more milk chocolate. No more sugar, flour, gluten, eggs, dairy, citrus fruits, condiments, alcohol, caffeine–plus a whole lot of other stuff (you can read more about the diet here).
Of course, I had to re-create Twix in a form I could eat. In developing this recipe, I went through about 20 iterations before I got it perfect.
Some of my clients asked me to create a version with no grains. Done.
How about using only candida-diet friendly sweeteners? Of course.
And no dairy, eggs, yeast, soy or corn? Easy peasy.
Finally, can we have them without nuts? That’s your choice.
These bars offer up a rich, buttery, melt-in-your-mouth shortbread base, topped with an ooey-gooey caramel that does not use dates (which would be neither candida-diet nor keto-diet friendly). All coated in sugar-free, dairy-free chocolate.
Go ahead, make some Homemade Twix.
Time to enjoy being an adult again.
Homemade Grain-Free Twix Bars are also:
Sugar-free (only low glycemic sweeteners)
Date-free
Grain-free
Gluten-free
Egg-free
Dairy-free
Soy-free
Corn-free
Yeast-free
Candida diet-friendly (stage 3+)
Paleo diet-friendly
Irresistible!
These bars renewed my love of Twix–heck, my love of *all* candy bars. Now, I just need to get working on the candida diet versions of Wunderbar, Coffee Crisp, 100 Grand and Almond Joy (oh, wait–I’ve already done one of those!).
Grain-free, Sugar-free Homemade Twix Bars are a premium recipe available only to members of The Sweet Life Club. To learn more about all the benefits of the club or to join, click here.
Source: https://www.rickiheller.com/2019/03/homemade-twix-bars-grain-free-sugar-free-egg-free-corn-free-soy-free-dairy-free-optionally-nut-free/
0 notes
Text
Tuna Poke Bowls with Coconut Rice
August 16, 2018 by Jennifer Pallian
Poke bowls are a fresh, summery meal that’s both filling and healthy. They’re having a moment right now, with poke restaurants popping up on every corner, but they’re genuinely a cinch to whip up in your own kitchen.
We’ve been spoiled rotten with visiting Hawaii many times in recent years. Direct flights are frequently available round trip from Vancouver for $300 and, come on, it would be unreasonable to turn that down.
I love Hawaiian “mixed plate” meals, which consist of sticky rice, macaroni salad, and grilled fish or meats. For many trips, it’s what I always ordered when we went out for lunch.
Until last time, when I got a poke bowl: sticky white rice topped with fresh, raw fish, the sweetest local pineapple, fresh cucumber, some crunchy puffed rice, and a sesame dressing. It was so light and delicious and full of textures and flavours that I became obsessed.
I’ve started ordering them in Vancouver and then moved on to making them at home. I start mine with a base of coconut rice, then I sear a tuna steak (it’s usually served raw, but I don’t tend to make raw fish dishes at home) and toss on whatever fresh fruits and veggies I have in the fridge.
You can serve the coconut rice warm or room temperature, and the tuna can be hot, cold or room temperature according to your preference. I won’t judge you if you decide to go with canned tuna – that makes a super-easy weekday lunch.
Go crazy with the toppings. Ideally, you want to have a mix of sweet (like mango, peach, or pineapple), crunchy (like radish, corn or cucumber), spicy (fresh chiles), savoury (minced red onion or sliced green onion) and nutty (peanuts, toasted coconut, sesame seeds, etc.). As long as you have two or three of those pillars, your poke bowl will be delicious.
The kids gobble them up, too. They love all the individual components, and it’s fun for them to build their own.
A delicious Tuna Poke Bowl with Coconut Rice and lots of veggies. It's filled with colour and texture and is completely irresistible.
For Coconut Sticky Rice
1 1/2 cups white rice
1 tsp coarse salt
3 cups coconut milk
2 1/2 cups water
For Dressing
1/4 cup canola oil
1 tbsp sesame oil
1 tbsp soy sauce
1 tbsp rice vinegar
1 tsp granulated sugar
Toppings
1 tbsp canola oil
1 fresh tuna steak
salt
chopped avocado, thawed frozen corn, sliced radishes, sliced green onion, cucumber, chopped ripe peach or mango, chopped peanuts as desired
For Coconut Rice
Combine all ingredients in a saucepan over medium-high heat. Bring to a boil, then reduce heat and cover. Cook for 20-25 minutes, occasionally stirring to avoid sticking, until rice is creamy and tender. If the liquid evaporates before the rice has softened, stir in 1/2 cup of water and cook until absorbed.
For Dressing
Whisk together all ingredients in a bowl or measuring cup.
For Tuna and Toppings
Heat oil in a large, heavy skillet or grill pan over high heat. Season tuna with salt on both sides then add to pan. Cook, flipping to sear all sides. Transfer to a cutting board, rest 5 minutes, then use a sharp knife to cut it in small pieces.
Top rice with seared tuna, desired toppings, and a big spoonful of dressing.
Source: https://foodess.com/tuna-poke-bowls-with-coconut-rice/
0 notes
Text
Fairlife Milk Horror
Fairlife milk has become a horror story for the dairy industry. I have been critical for a while and now it is being pulled off the shelves in the Midwest.
Fairlife is distributed by Coca-Cola and is ultra-filtered to have less lactose and more protein. You used to be able to find it in stores around the nation.
In my 2015 post - Fairlife Milk Is So Deceitful That I Can’t Stand It - I brought up what I believed to be a misleading marketing campaign.
My initial problem was “Grass to Glass” as I knew that one of their farms (Fair Oaks Farm) with 30,000 cows was not pasturing their animals. I have been on dairy farms with 2,000 animals and they can’t efficiently pasture them and milk them three times per day.
Look at the logo on the front of the packaging! None of those cows are reaching down like that.
Photos on the Fairlife website included beautiful grassy fields (before the scandal).
The image in a consumer’s mind of a cow eating grass is below.
This beautiful dairy cow is near my house. You can see the family farmhouse behind her. She is chewing on grass. Fairlife cows did eat alfalfa - a kind of grass - but not on a pasture. I did not think that (unless you knew a lot about the dairy industry) consumers would understand that the cows were not happily chewing and traipsing about a field like the cow above.
But, that point about “grass to glass” turns out to be minor in comparison to the blatant falsehood of the first claim on the container - “Extraordinary care for our cows.”
This is what extraordinary care looks like. Look closely at this photo.
Her name is Giselle. Anyone want to try to name 30,000 cows?
Given the scale of the operation, extraordinary care would have been incredible. But, not only was the care NOT extraordinary but the cows were mistreated - from the Today Show article - Fairlife Animal Cruelty Controversy:
Employees were observed slapping, kicking, punching, pushing, throwing and slamming calves. Calves were stabbed and beaten with steel rebars, hit in the mouth and face with hard plastic milking bottles, kneed in the spine, burned in the face with hot branding irons, subjected to extreme temperatures, provided with improper nutrition, and denied medical attention,” ARM (Animal Recovery Mission) said in a statement accompanying the video that was posted on Facebook and Vimeo.
I’m not going to link to the video because it is truly awful. You can find it easily if you want to watch it.
Fairlife milk is now facing two federal lawsuits for (wait for it) FRAUD.
It took a group of activists that worked on Fair Oaks farm and documented abuses for Fairlife to face the music.
I know it isn’t possible for everyone to visit the farm that they buy milk from BUT don’t believe the hype of a company like Coca Cola when it comes to something as important as animal care.
I try to buy my milk from local family farms because I can visit and see happy cows like Giselle. Isn't she adorable?
Have you heard about the Fairlife milk scandal? What do you think?
Other posts you might like:
Source: https://snack-girl.com/snack/fairlife-milk-horror/
0 notes
Text
a true tale
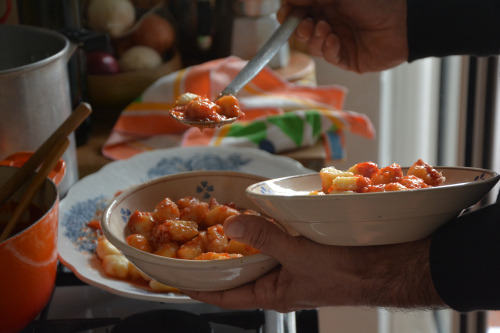
I’d intended to post this week’s Kitchen Sink Tales yesterday, meaning Thursday, the day gnocchi is traditionally eaten in Rome. Of course you can eat them whenever the heck, or day you want. Having been the woman Artusi writes about – the one who puts her spoon in the boiling gnocchi pan to stir, only to watch them disintegrate like a soluble aspirin in a glass of water – but now having got the knack, I hope I share that. I would love to know your stories, both good and bad, also the types of potato that work best for you, wherever you are, the egg or no egg.
I cannot sigh off without a deep, loving nod to Alan Rickman. Most actors (or in my case ex actor) have a tale set during their drama school years, when they queued for returns then sat thorough the same production half a dozen times, each performance more spine tingling than the previous. For me, it was Alan Rickman’s Anthony to Helen Mirren’s Cleopatra at the National Theatre in the late 90’s. I was hypnotized by his long, expressive face and body; both with a laid back seductiveness, and rich, resonant voice, somewhere between a purr, a snarl and a song, which came from almost disconcertingly closed lips. I can hear his voice now. Again in A Winter Guest at the Almeida, then films Truly Madly Deeply and Close My Eyes, he knocked me sideways. He was an actor who made me want to be an actor. Reading the tributes that are flooding in from those who knew him, all of which confirm his hypnotic brilliance, we learn too of his extraordinary loyalty, generosity, kindness, political integrity and boundless creativity. The world is a sadder place without him. It is going to sound naff maybe, but reading them, and thinking of AR has left me wanting to be kinder, more generous, more loyal and as creative as I can be.
Back soon with a recipe.
R
Source: https://racheleats.wordpress.com/2016/01/15/a-true-tale/
0 notes
Text
Winter Fennel, Sage & Kale Pasta
This Winter Fennel, Sage & Kale Pasta makes a delicious, healthy vegetarian weeknight dinner. Hearty, comforting, and easy, too!
Happy December!
I have a confession to make. I’m really terrible at decorating for the holidays. Some years it happens, others it doesn’t… and then some years we end up with a Valentine’s Day tree because we lose track of time and the work of taking down decorations is far less fun than putting them up.
So here’s my version of holiday greenery for you – it comes in the form of a kale pasta! It’s, of course, edible, and the clean up is minimal. 🙂
This kale pasta is full of all kinds of warming wintery goodness including a base of sautéed shallots, fennel, and savory, aromatic sage. There’s a bit of briny sun dried tomato for pop and (of course) some lemon juice to add a bit of bright cheer.
I used a fancy pasta shape called toscani – I just love the way the kale wraps around the short curly noodles. If you can’t find it, you can use any short cut pasta that you like.
Aside from boiling the pasta, this recipe comes together in one large skillet (or pictured, this pretty braiser), so it’s a great one to have in your back pocket when you need to get a hearty, healthy dinner on the table this winter.
Serve with olive oil for drizzling and (not pictured, but highly recommended) freshly grated pecorino cheese!
For more healthy pasta recipes, browse the pasta section of our recipe index!
Fennel, Sage, and Kale Pasta
This one-pot Fennel, Sage, and Kale Pasta Recipe with sun dried tomatoes and walnuts is an easy, healthy, delicious vegetarian dinner.
2 tablespoons extra-virgin olive oil, more for drizzling
3 shallots, thinly sliced
1 large fennel bulb, thinly sliced
3 garlic cloves, sliced
¼ teaspoon red pepper flakes
¼ cup chopped sage
12-ounces toscani pasta (or any short pasta)
¼ cup dry white wine
8 cups torn kale leaves
8 oil-packed sun-dried tomatoes, chopped
¼ cup chopped walnuts, toasted
2 tablespoons fresh lemon juice
Sea salt and freshly ground black pepper
Freshly grated pecorino cheese, for serving
Heat the oil in a large skillet over medium heat. Add the shallots, fennel, garlic, red pepper flakes, sage, ½ teaspoon salt, and freshly ground black pepper and cook until the fennel is tender, about 8 minutes.
Meanwhile, bring a large pot of salted water to a boil and cook the pasta until al dente.
To the skillet, add the white wine and let it reduce for 30 seconds. Reduce the heat to low, add the kale and toss until just wilted. Use a slotted spoon to scoop the cooked pasta into the skillet. Add the sun-dried tomatoes, walnuts, lemon juice and toss.
Season to taste and serve with generous drizzles of olive oil and freshly grated pecorino cheese.
Make this gluten free by using gluten free pasta.
Source: https://www.loveandlemons.com/fennel-sage-kale-pasta-recipe/
0 notes
Text
How to Save The Chutney
Chutney are a big part of the condiments that I serve and I always like to keep them handy since they have long shelf life. These chutneys are used as an extra source of flavor with many appetizers, snacks, and chaat (whether it be sweet, sour,spicy, etc.). They are great to have readily available, because it makes life so easy when preparing a large menu, especially when you are in mood to have something spicy or when you make a sudden plan to entertain family or friend for afternoon tea. You can easily take any kind of dry snacks that you have on hand, even boiled potatoes, chickpeas, or crackers and turn them into a mouth-watering treat.
These two chutneys, in my opinion, are a staple to every household preparing Indian food. I have their recipes on my website.
Tamarind Chutney
This chutney can be refrigerated for months. I like to make it thick in texture so that I can adjust the thickness of the chutney depending on what I am using it for. This exotic, sweet and sour chutney and can be called the ketchup of the east! This is delicious as a dipping sauce for French fries, as a spread over crackers, or even as a zesty addition to a rice dish. You really can never go wrong with it.
Cilantro Chutney
I prefer to prepare this in a large quantity in advance and freeze it in ice cube trays. You can store the frozen cubes in a zip-lock plastic bag. When you ready to serve, defrost as many cubes of chutney as needed. And after so many years, I have finally learned how to keep the vibrant green color of chutney. When blending the chutney, use crushed ice to blend instead of room temperature water; I was amazed by the difference it makes.
Keep looking out for my blogs because I will continue sharing the tips I have learned over the years. It might just solve the one problem you could not figure out.
Please Subscribe to my YouTube channel
Source: http://www.manjulaskitchen.com/how-to-save-the-chutney/
0 notes