artlessonplans-blog
Art Lessons
We write lessons round the clock like it's our job..and hopefully soon it will be.
6 posts
Don't wanna be here? Send us removal request.
Last Seen Blogs
ratoneroconversa
Ratonero Conversa 🐭

arodishere
Mitten Smitten
sing-a-songofsix-pence
oh god, words???

cl4ever
CHILE FOREVER

Text
Cities of the Future
-Carrie Shiffrin

Intended Audience: 12 graders
New York State Learning Standards:
Standard #1: Creating, Performing, and Participating in the Arts
-Indicator A: Experiment and create artworks, in a variety of mediums, based on a range of individual and collective experiences.
-Indicator B: Know and use a variety of sources for developing and conveying ideas, images, themes, symbols, and events in creating original art.
-Indicator C: Create artwork, using the elements and principles of art, to communicate specific meanings to others.
-Indicator D: During the creative process, reflect on the effectiveness of mediums or techniques that have been selected to convey intended meanings.
Standard #3: Responding to and Analyzing Works of Art
-Indicator B: Identify, analyze, and interpret visual and other sensory characteristics discovered in natural and human-made forms.
-Indicator C: Compare the ways ideas and concepts are communicated through the visual arts, with ways they are manifested in other art forms.
-Indicator D: Compare the ways ideas, themes, and concepts are communicated through the visual arts, with the various ways they are manifested in other disciplines.
Prerequisite Knowledge:
Students have read Invisible Cities by Italo Calvino, and have brought in a sketch of their favorite city. Project takes place toward the end of the year, so students have experience using most of the materials found in the studio, including x-acto knives and clay.
Goal: To create a sculptural illustration of a city from the future.
Objectives:
-Students will complete a creative writing piece to use as the basis of their artwork.
-Students will gain experience using non-traditional materials.
-Students will use logical reasoning to justify their predictions for the future.
-Students will work independently, and use each other as resources for problem-solving.
Duration: 55 minute class periods
Day 1: Critique of Invisible Cities sketches and intro to project
Day 2: Share city descriptions, materials intro and brainstorming
Day 3: City construction
Day 4: Construction continued
Day 5: Critique
Materials/Equipment:
-cardboard
-x-acto blades
-scissors
-hot glue
-hot glue guns
-masking tape
-assorted scrap paper, fabric, buttons, beads etc.
-aluminum foil
-pencils
-oil-based clay
-acrylic paint
-brushes
-water
-any other natural or recycled materials students choose
Vocabulary: non-traditional materials
Art Historical References:

Rat Evolution by Alexis Rockman
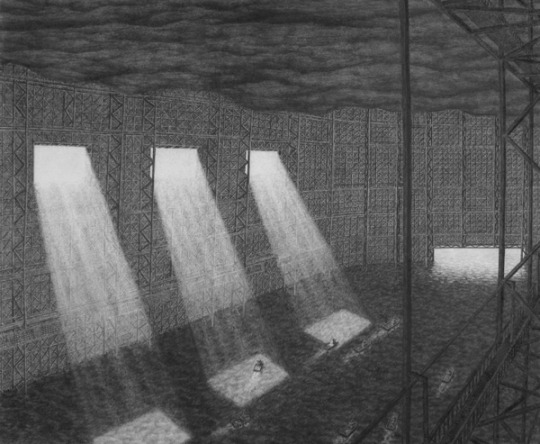
Drawings by Michael Schall:
Remaking the Night Sky, graphite on paper,41.25" x 59.75", 2008.

Black Rock Forest Preserve, graphite on paper, 40" x 60", 2008.

Rebuilding the Quarries, graphite on paper, 40" x 60", 2008.
Volkeshalle, graphite on paper, 22" x 30", 2009.
Teaching Procedures/Task Analysis:
Day 1: Critique of Invisible Cities sketches and Intro to Project
A. Introduction, Review and Key Questions: 5 minutes
Have students put their work up on the board. Explain that today students will get to see their classmates interpretations of various cities from Invisible Cities.
B. Presentation: 25 minutes
Hold an informal critique of the work for about 25 minutes. Explain that students should consider the following questions: What kind of city do you see? Is it from the past, present, or future? What do you see that makes you say that? Who lives here? Is it a place you would want to live? Why or why not? How did the artist illustrate these qualities?
C. Modeling/Demonstration: 10 minutes
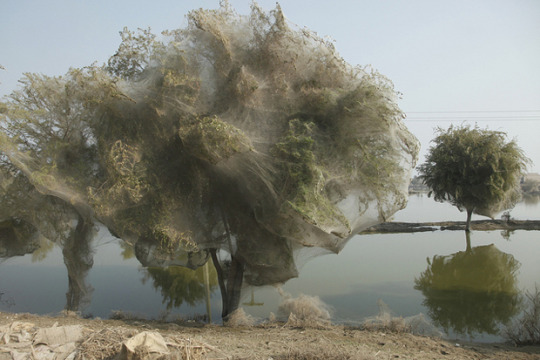
Explain that over the next couple of class periods students will again be illustrating a city, but this time it will be a city of their own creation and the illustration will be sculptural. Explain that for homework, they are to bring in a written description, in the style of Invisible Cities, that represents a city in the future. Explain that they can go as far into the future as they want but they must have a logical explanation for their predictions. Show Rat Evolution by Alexis Rockman as an example. Discuss how Rockman’s prediction for what rats will be like in the future is an extrapolation based on current patterns of environmental change. Explain that the logic used to make the prediction does not have to be a scientifically tested hypothesis, but there must be some kind of basis for the changes they choose to illustrate. Show picture of spider webs in trees following the flooding in Pakistan last March. Explain that because the flood waters took so long to recede, the spiders had to seek shelter up in the trees, spinning huge webs that covered the trees. Explain that one could use this reasoning to predict that in the future, cities will be build on tall posts above the ground because water levels will be so much higher.
D. Work Period: 10 minutes
Allow students to brainstorm ideas in their sketchbooks for the next ten minutes of class.
E. Summary: 5 minutes
Clean up and reiterate their homework: Come in with a typed description of a city in the future, using the writing style of Invisible Cities as inspiration. Emphasize that how far into the future they go is entirely up to them. It could be 5 years, 100 years, 1,000 years or beyond but remind them to be prepared to justify the predictions they are making.
____________________________________________________________________________
Day 2: Share city descriptions, materials intro and brainstorming
A. Introduction, Review and Key Questions: 5 minutes
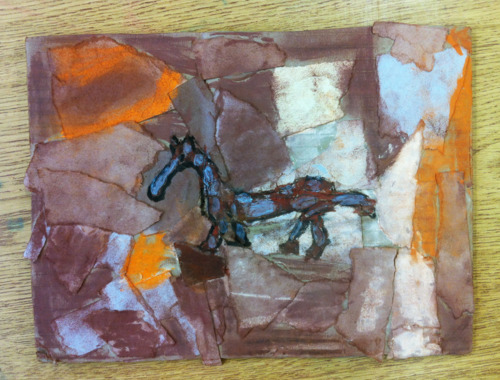
Begin class by showing drawings by Michael Schall. Pose the same questions asked during the critique from last class. Discuss how the landscapes Michael Schall creates seem entirely fantastical despite the fact that they are made up of existing human structures and materials. Discuss creating a sense of internal logic within your city.
B. Presentation: 20 minutes
Have students partner up and read their stories for 10 minutes. Have each partner give feedback on what kinds of images came to mind when hearing the description of the city. Refocus the group and discuss non-traditional materials. What do you think non-traditional materials means? What kinds of materials would be considered traditional? Non-traditional? Have the materials listed above out on a table. Walk students through the traditional and non-traditional materials given. Review the three constraints of the project:
1) The city must have a cardboard base that is no larger than 1.5’x1.5’ but may be as tall as they want.
2) At least one component of the sculpture must be made using a non-traditional material.
3) Any additional materials used must be free (i.e. only natural or recycled materials)
C. Modeling/Demonstration: 5 minutes
Explain that the sense of scale depicted in their sculpture is entirely up to them. Show NYC Scale example:

D. Work Period: 22 minutes
Have students begin by sketching out plans for their sculpture. Emphasize having at least three sketches of the project before they begin sculpting it.
E. Summary: 3 minutes
Clean up and mention that before the next class, they should have at least three sketches of their project. Explain that the sketches do not need to be perfected drawings, but clear enough to give an idea of how the sculpture will be made. Explain that they should be prepared to get to work right away in the next class, so if they want to use any additional materials, they should bring them in.
_____________________________________________________________________________
Day 3: City Construction
A. Introduction, Review and Key Questions: 10 minutes
Have students partner up with a different person than they did in the last class. Have them share their sketches for their city, explaining the logic behind their predictions for the future. For 10 minutes have them discuss their plans, choice of materials, and any suggestions the other person might have.
B. Presentation: 5 minutes
Explain that this will be a very independent project, since everyone will be using different materials. Emphasize using their fellow classmates as a resource if they have questions or would like feedback. Mention that you will also, of course, be available to answer questions and give feedback but that they should make use of the expertise of their friends.
C. Work Period: 35 minutes
E. Summary: 5 minutes
Have students clean up and regather. Ask students to share any difficulties they encountered and ways they overcame them. Give students an opportunity to ask questions of the group. Explain that they will have one more class period to work on the project, followed by a critique, so they may need to work on it during free periods, lunch or at home.
_________________________________________________________________________
Day 4: Construction Continued
A. Introduction, Review and Key Questions: 7 minutes
Have students bring out their projects. Do a gallery walk around the classroom so that everyone can see everyone’s progress. What are some non-traditional materials you are seeing your classmates use? How are they changing the purpose of these materials by putting them in an art piece? What techniques are you noticing? Does anyone have any questions they would like to ask the group? Discuss the work for about five minutes.
B. Presentation: 3 minutes
C. Work Period: 40 minutes
Students work independently. About halfway through the work period, refocus the group, have them pair up with a different partner and discuss the progress, offering feedback and any suggestions for future moves.
D. Summary: 5 minutes
______________________________________________________________________________
Day 5: Critique
A. Introduction, Review and Key Questions: 2 minutes
Have everyone display their work out on the tables with their writing piece next to it.
B. Presentation: 3 minutes
Explain that they will begin with one student choosing a piece to discuss. Explain that they should address the same questions they’ve been considering since reading Invisible Cities:
1) What kind of city do you see?
2) Is it from the past, present, or future? What do you see that makes you say that?
3) Who lives here? How can you tell?
4) Is it a place you would want to live? Why or why not?
5) How did the artist illustrate these qualities?
6) How did the artist incorporate non-traditional materials into the piece?
Hold a group discussion of each piece, allowing the people who partnered with the artist provide insight into the city description that the person wrote. Have the artist speak last.
C. Work Period: 45 minutes
E. Summary: 3 minutes
Ask students to write a one paragraph reflection piece addressing what they liked and disliked about the project and what they learned through working with non-traditional materials.
15 notes
·
View notes
Text
Aboriginal design: Animal prints
--Valentina Lopez--
Intended Audience: 3rd grade
New York State Learning Standards:
Standard 1- Creating, Performing, and Participating in the Arts.
Performance Indicator A: Experiment and create art works, in a variety of mediums (drawing, painting, sculpture, ceramic, printmaking, video and computer graphics), based on a range of individual and collective experiences.
Performance Indicator B: Develop original ideas and images through the exploration and creation of art works based in themes, symbols, and events.
Performance Indicator C : understand and use the elements and principals of art ( line, color, texture, shape) in order to communicate ideas.
Standard 3- Responding to and Analyzing Works of Art
Performance Indicator B: Describe visual and other sensory qualities found in a wide variety of art works ( color, texture, shape, size, volume)
Standard 4- Understanding the Cultural Dimensions and Contributions of the Arts
Performance Indicator C: Students create art works that show the influence of a particular culture
Prerequisite Knowledge:
Students have experience with printmaking
Goal: Students will explore and understand aboriginal design by Styrofoam printing
Objectives:
1. Students will learn about aboriginal design by using earth tone colors
2. Students will learn about aboriginal design by adding patterns and shapes inspired by aboriginal works of art to their own work
3. Students will create a Styrofoam plate using the basis of their drawing
4. Students will be able to make multiple prints using two different colors. The students will learn to print two separate plates.
Duration: 2 class of 1 hour
Materials/ Equipment: drawing white paper, construction paper, earth tone color pencils, Styrofoam, pencils, printing ink, brayers, tray
Vocabulary: Aboriginal design, earth tone colors, brayer, patterns
Art Historical Reference: Australian Aboriginal design
Teaching Procedures/ Task analysis:
Day 1
A. Introduction:
Time: 5 min
Introduce the lesson: I want you all to take a look at these two pieces. Can anyone tell me where he or she think these pieces were made? What are the colors that you see that are been used in both examples? Does anyone know what these colors are called? Why do you think they are called earth tone colors? What types of shapes can you see in the design?
B. Presentation/ Modeling/ Demonstration
Time: 10min
Introduce the activity: Using the colors and the patters that you got to observe in the aboriginal design, I want you all to start by creating a drawing of an animal of your choice. We are going to start by making a border. On the outside of the border, I want you to create a pattern that goes around the whole border. On the inside, I want you to draw your animal. Draw the animal as big as you can so it touches the edges of the margin. After you draw the outline of your animal, I want you to add patterns on the inside and outside of the animal using the earth tone colors.
C. Work Period:
Time:40
Students are going to be working on their animal aboriginal design drawings
D. Summary:
Time: 5 min
Students will be told when its time to clean up. If they are not done, they can finish the piece next class

Day 2
A . Introduction:
Time: 5 min
Introduce the second part of the lesson: the students that are done can start the second part, which is to create a Styrofoam plate using the aboriginal inspired drawing of an animal.
B. Presentation/ Modeling/ Demonstration
Time: 10 minutes
Demonstrate how to copy the drawing to the Styrofoam plate: I want you all to use a pencil to copy your drawing to the Styrofoam plate. After you have copy all the detail, go over with pencil the outline of your animal about three times. I want you all to do this so your animal separates from the background patterns. This way you are able to print the animal and the background two different colors. Raise your hand when you are ready to print since only two people are going to be allow to print at a time. Before you start printing, choose the color of construction paper you would like to use. After you have your paper, go to the printing station. Using the brayer you can roll ink to one of your two plates. We are only going to use black and white ink. It is best if you add ink to the background first and place it were you want in the paper. After that, it is easier to place the animal. It’s like a puzzle. After you place both plates in the paper, turn it around and rub it. You can do this for about 15 seconds. After that, turn it around and separate the plates from the paper. You have a wonderful print. When you are done printing, go to the sink and watch your plates since everyone is going to print another edition using the opposite colors for the background and the animal.
C. Work Period
Time: 40 minutes
Students are going to copy their drawing into the Styrofoam plate. After they are done with their plate, students are going to print their plate in color construction paper using black and white.
D. Summary:
Time: 5 min
Students will be told when its time to clean up. Students who finish early are encouraged to make more prints or do free drawing
Assessment: Students ability to follow directions.
Enrichment/ Reinforcement: Students who finishes early are encouraged to do more editions.

5 notes
·
View notes
Text
Surrealist Eye Drawings
-Carrie Shiffrin
Title of Lesson: Surrealist Eye Drawings
Intended Audience: 5th graders
New York State Learning Standards:
Standard #1: Creating, Performing and Participating in the Arts
-Indicator A: Experiment and create art works, in a variety of mediums (drawing, painting, sculpture, ceramics, printmaking, video and computer graphics), based on a range of individual and collective experiences.
-Indicator B: Develop original ideas and images through the exploration and creation of art works based on themes, symbols and events
-Indicator C: Understand and use the elements and principles of art (line, color, texture, shape) in order to communicate ideas
Standard #3: Responding to & Analyzing Works of Art:
-Indicator A: Reflect on the sources, meanings, and purposes of different art works. Describe personal responses to various works, with reasons that support these views.
Prerequisite Knowledge: Some experience drawing with pencil and oil pastel
Goal: To learn about surrealism and practice drawing from observation.
Objectives:
-Students will be able to identify examples of surrealism, as seen by the artist René Magritte.
-Students will practice observational drawing of one of their eyes.
Duration: Two 50 minute class periods
Materials/Equipment:
-One 9”x12” piece of paper for each student
-Pencils
-Oil pastels
-Magazines
-Mirrors
Vocabulary: Surrealism, uncanny, iris, source images
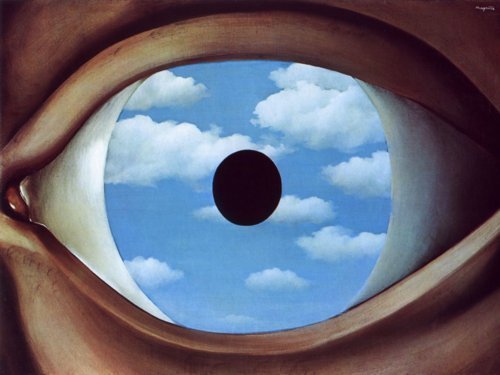
Art Historical References: The False Mirror (1928) and La Reproduction Interdite by René Magritte
Teaching Procedures/Task Analysis:
Day 1: Introduction to surrealism and observational drawings of eyes
Day 2: Draw the iris, finish up and share!
________________________________________________________________________________
Day 1: Introduction to surrealism and observational drawings of eyes
A. Introduction, Review and Key Questions: 8 minutes
On a projector, pull up The False Mirror by René Magritte. What’s going on in this painting? Is this painting realistic? Why or why not? Discuss the fact that the eye does reflect what the viewer is looking at, but that the sky reflected in this eyeball is flat and does not look like a reflection. This is an example of surrealism. Based on this picture does anybody have a guess about what surrealism might mean? Explain that surrealism is a style of artwork, writing, and film that deals with ideas from the unconscious. Explain that surrealist paintings are often uncanny, meaning that they are both familiar and foreign at the same time. Discuss how surrealist artworks tend to be realistic in style but unrealistic in subject matter. Give a couple of examples of this.
B. Presentation: 2 minutes
Explain to students that they will be creating their own versions of False Mirror by drawing their eyes reflecting something that they’re looking at.
C. Modeling/Demonstration: 5 minutes
Bring out a 9”x12” piece of paper to work on as an example. Demonstrating drawing your eye in pencil while looking in the mirror. Explain that the eye should take up most of the paper. Model lightly sketching the eye, its lid, the lashes, and the pupil. Explain that the colored part of the eye is called the iris and that for now they should leave it blank. Point out that there should be no shading with the pencil because the next step will be to draw the skin around the eye with oil pastel. Allow students to choose an unrealistic skin tone if they would like. Demonstrate creating a little bit of shading in the whites of the eye but emphasize that the iris should remain completely white.
D. Work Period: 30 minutes
Pass out papers, pencils and mirrors. Allow students to work on drawing their eyes. Once their eye has been sketched in pencil, taking up most of the paper, have them to move on to the oil pastel step.
E. Summary: 5 minutes
Clean up. Have students write their name and class on the back of their papers and turn them in. Tell them that next time they will be working on the iris.
_______________________________________________________________________________
Day 2: Draw the iris, finish up and share!
A. Introduction, Review and Key Questions: 5 minutes
Pull up La Reproduction Interdite by René Magritte on the projector. Would you call this a surrealist painting? Why or why not? What doe uncanny mean? Pull up False Mirror. Based on this picture, what do you think this person is looking at? What position would they have to be in to be reflecting the sky?
B. Presentation: 2 minutes
Explain that today students will be drawing the iris of their eyes based on something they are looking at.
C. Modeling/Demonstration: 3 minutes
Point out a stack of magazines you have. Explain to students that they are welcome to browse through the source images s to get ideas for what to draw in the iris. Explain that artists often draw from observation while looking at source images. The pictures become an element of their drawing but not a copy. Demonstrate drawing something from a source image in pencil. Explain that after it is sketched, they may add color to it in either oil pastel.
D. Work Period: 30 minutes
Allow students to browse through the source images and sketch something inside of the iris. When they’re finished, have them put their work up on the board with a magnet.
E. Summary: 5 minutes
Clean up the oil pastels and pencils. Explain that even if students aren’t finished, they should put their work up to discuss.
Enrichment/Reinforcement: 10 minutes
Have students take turns choosing a piece and discussing what’s going on. Give the artist of each piece a chance to agree or disagree with some one’s interpretation. Explain that comments should be neutral and that with surrealist work, there can be many interpretations. Clap for the group when they’re finished.
7 notes
·
View notes
Text
Abstract Rhythm Drawings
-Carrie Shiffrin
Student Examples:

Title of Lesson: Abstract Rhythm Drawings
Intended Audience: 3rd graders
New York State Learning Standards:
-Standard #1: Creating, Performing and Participating in the Arts
-Indicator A: Experiment and create art works, in a variety of mediums (drawing, painting, sculpture, ceramics, printmaking, video and computer graphics), based on a range of individual and collective experiences.
-Indicator B: Develop original ideas and images through the exploration and creation of art works based on themes, symbols and events
-Indicator C: Understand and use the elements and principles of art (line, color, texture, shape) in order to communicate ideas
Prerequisite Knowledge: Able to hold a pencil. Familiar with what the primary colors are and that they are mixed to get secondary colors.
Goal: To learn about rhythm in a composition through the use of shapes and color.
Objectives:
-Students will design and execute a rhythmic composition.
-Students will be able to identify warm colors and cool colors on the color wheel.
Duration: Three 50 minute class periods
Day 1: Introduction to shapes and rhythm
Day 2: Introduction to warm and cool colors
Day 3: Finish up and share
Materials/Equipment:
Drawing paper, card stock paper, scissors, pencils and oil pastels
Vocabulary:
-organic shapes v. geometric shapes
-rhythm
-warm v. cool colors
-analogous colors
Teaching Procedures/Task Analysis:
Day 1: Introduction to shapes and rhythm
A. Introduction, Review, Motivation, and Key Questions: 10 minutes
Who can give me an example of a shape? Call on several students and draw the shapes they name on the board. Draw a non-geometric shape on the board. Is this a shape? Explain that shapes with rules are called ‘geometric shapes’ and shapes without rules are called ‘organic shapes’ but both are shapes. Draw a curvy line on the board. Is this a shape? Explain that to be a shape a line must be closed. Show them the book It Looked like Spilt Milk by Charles G. Shaw to illustrate all kinds of closed shapes. Explain that the shapes in the books are called ‘silhouettes’ and that they have no inside lines.
B. Presentation: 2 minutes
Explain to students that they will be making abstract color drawings using one repeated shape. Explain that repetition in art is called rhythm. Just like there is rhythm in music, there can be rhythm in visual artwork.
C. Modeling/Demonstration: 20 minutes
Pass out 5”x5” squares of card stock to each student. Explain that they will draw a shape, as big as they can fit on their card, and then cut it out. Allow about 10 minute for them to draw and cut out their shapes and then refocus their attention to the front. Tell them that if they’re not finished that they should take a pause for a moment.
Explain that the next step is to trace their shape several times on their page. On the board demonstrate various ways of arranging their shapes. Show them how to trace their shape so that it’s only partially on the paper and how to overlap shapes without creating interior lines so that it looks like one shape is on top of the other. Point out that larger shapes might emerge through the arrangement of the shapes. Point out that movement can be suggested by tracing a shape and then rotating it across the page. Encourage them to explore all of the different orientations, directions, and patterns they can create with their one shape. Tell them that they should cover about half of their paper with their shapes, leaving the insides of each shape blank.
D. Work Period: 15 minutes
Students who are finished cutting out their shapes will begin tracing their shapes many times on their paper. They will turn their drawing upside down and sideways until they find the orientation they like best, and then they will write their name on the back so that they can tell which way is right side up.
E. Summary: 3
Three minutes before the end of class, students will be asked to stop where they are, leave their papers at their places, and walk the room to see everyone’s artwork. Then they will put them away for the next class.
______________________________________________________________________________
Day 2: Introduction to warm and cool colors
A. Introduction, Review, Motivation, and Key Questions: 8 minutes
What makes something a a shape? What does it mean to have a rhythm in an art piece? Remind students that last time they worked on creating rhythm with repeated shapes. How else could someone create rhythm in their art piece? Introduce color to the project by pulling out a color wheel. Who can tell me what the primary colors are? What happens when you mix yellow and blue? Blue and red? Red and orange? What happens when you mix red and orange? Explain that there are two halves of the color wheel, warm colors and cool colors. What colors do you think are warm? Why? What colors do you think are cool? Why? Explain that colors that are next to each other on the color wheel are called analogous colors and that warm colors are analogous and cool colors are analogous.
B. Presentation: 1 minute
Explain to students that they will be coloring in their shapes with the oil pastels that are sitting on the table, using either a mixture of cool colors or warm colors, leaving the background white.
C. Modeling/Demonstration: 10 minutes
Demonstrate on the board. Ask a student to choose warm or cool. Ask another student to choose one of the shapes in the example. Ask another student to choose a pattern or coloring technique. Demonstrate coloring in the shape with a combination of either warm colors or cool colors. Tell them that they should be coloring hard enough that no white of the paper shows through. Have three other students choose a shape, warm or cool and a pattern or coloring technique and fill in the next shape.
D. Work Period: 30 minutes
Students who haven’t finished tracing their shapes will finish that step. Students who have all of their shapes traced will move onto coloring their drawings
E. Summary: 5 minutes
Ask students to walk around the room again and look at everyone’s artwork. What colors look like they’re closer to you? What colors look like they’re farther away? Do any of the drawings look like they have movement in them and if so what makes them look this way? Then have students put their drawings away for the next class.
______________________________________________________________________________
Day 3: Finish up and share
A. Introduction, Review, Motivation, and Key Questions: 1 minute
Who can tell me what it means to have rhythm in art? Who can give me an example of a warm color? Cool color? What are analogous colors?
B. Presentation: 1 minute
Tell students that they will be finishing up their drawings today and choosing a color for the background that creates contrast. Explain that 15 minutes before the end of class, they will reconvene to share their drawings with each other.
C. Modeling/Demonstration: 10 minutes
Tell students that once all of their shapes are colored in, the last step is to decide about the background. Explain to students that they will look at their drawing from far away by sticking it to the board with a magnet and standing at least 4 feet back from it. Demonstrate this with an example piece. What seems more powerful in this piece the warm colors or the cool colors? Explain that students will choose one color for the background that is from the color family that is less dominant in their shapes. Explain that this is creating contrast and that contrast is what makes things look different from each other. Put two pieces of orange paper on the board, one with a red dot drawn on it, and one with a blue dot drawn on it. Which dot stands out more? That is because there is more contrast between orange and blue than there is between orange and red. Orange and red are analogous and analogous colors have less contrast.
D. Work Period: 28 minutes
Students will finish up their drawings. Tell students that if they finish early that they can free draw using scrap paper and oil pastels or pencil. Three minutes before the end of the work period, have students clean up and put away the oil pastels and pencils, leaving just their paper on the table.
E. Summary and Assessment: 15 minutes
Have students put their drawings up on the board. Give each student an opportunity to share one thing they found challenging about the project, something they liked about the project and a title for their piece if there is one. Clap for each student once they are done sharing.
11 notes
·
View notes
Text
Collage and Draw Cave Creatures!
-Carrie Shiffrin
Student Examples:


Title of Lesson: Collage and Draw Cave Creatures!
Intended Audience: 3rd graders
New York State Learning Standards:
Standard #1: Creating, Performing and Participating in the Arts
-Indicator A: Experiment and create art works, in a variety of mediums (drawing, painting, sculpture, ceramics, printmaking, video and computer graphics), based on a range of individual and collective experiences.
-Indicator C: Understand and use the elements and principles of art (line, color, texture, shape) in order to communicate ideas
Indicator E: Identify and use, in individual and group experiences, some of the roles and means for designing, producing, and exhibiting art works.
Standard #4: Understanding the Cultural Dimensions and Contributions of the Arts
-Indicator A: Analyze a variety of art works and artifacts from world cultures to discover some important ideas, issues, and events of those cultures.
-Indicator C: Create artworks that show the influence of a particular culture.
Prerequisite Knowledge: Some drawing experience
Goal: To learn about earth tones and composition in ancient cave paintings through the use of collage.
Objectives:
-Students will create collages using the colors found in cave walls
-Students will explore mixing media by drawing animals on top of their cave walls.
-Students will learn about composition by collaborating to create a large cave wall painting.
Duration: Three 50 minute class periods
Day 1: Introduction to cave paintings and collage
Day 2: Draw cave animals
Day 3: Finish up and Share
Materials/Equipment:
-brown cardboard for each student (9”x12”)
-Assortment of scrap paper in browns and yellows
-Elmer’s glue
-plastic trays for paint
-old brushes for glue
-Oil pastels
-masking tape
Vocabulary: collage, cave painting
Art Historical References: The cave paintings of Lascaux and Chauvet

Teaching Procedures/Task Analysis:
Day 1: Introduction to cave paintings and collage:
A. Introduction, Review and Key Questions: 8 minutes
Does anybody have a guess about how old the oldest painting in the world is? Where was it painted? How did the artist paint it? Show them the cave paintings from Chauvet. Let them know that these paintings are 32,000 years old. Why do you think they lasted so long without getting destroyed? Mention that many ancient artists painted inside of caves and that they were protected from the outside air. What do you notice about these paintings? What’s in the pictures? Why do you think the artists chose to paint these things? What colors did they use? What color is the cave?
B. Presentation: 2 minutes
Explain that today they will create a cave wall made by combining the colors they just mentioned, brown, tan and yellow. Explain that these colors are called earth tones.
C. Modeling/Demonstration: 5 minutes
Bring out a 9”x12” piece of brown cardboard, brown, tan and yellow paper, and a glue stick. Model writing your name and class on the back of your cardboard before you start. Explain that today we will be using collage to combine paper using glue. Demonstrate tearing the paper up into pieces about the size of a quarter, applying glue to the cardboard where you want to put the piece. Point out how much glue is necessary to stick down the paper. Point out how the scraps of paper overlap and have them fill up as much of the cardboard as they can. Explain that the paper scraps can hang off the edge of the cardboard and don’t need to line up neatly since cave artists never had a neat canvas to work on.
D. Work Period: 30 minutes
Remind them to write their name and class on the back of their cardboard. Dole out a small stacks of earth tone paper to each table. Let them know that they’ll need to share the paper. Let them paste away. If they finish early allow them to free draw once they’ve cleaned up their area.
E. Summary: 2 minutes
Clean up. Collect any remaining paper scraps, and glue. Have students put their work on the drying rack.
Enrichment/Reinforcement: 3 minutes
Read aloud The Cave Painter of Lascaux (A Journey Through Time) by Roberta Angeletti
______________________________________________________________________________
Day 2: Draw animals
A. Introduction, Review and Key Questions: 5 minutes
Does anybody remember how old the oldest painting in the world is? Remind them that it’s 32,000 years old. Where is it? Remind them of cave paintings and bring up pictures from Lascaux and Chauvet. What did these cave painters paint? Point out that they are mostly animals with a few figures. What’s going on in these pictures? What do you see that makes you say that? Discuss how cave artists could suggest a story through the composition of animals and figures. Discuss creating movement and action in a drawing.
B. Presentation: 2 minutes
Explain that today they will create their own cave painting inspired by the cave drawings of Lascaux and Chauvet. Explain that the image should be fairly simple, with no more than three animals but depict some kind of movement or action. Explain that they will be using black and white oil pastel, on top of the collage cave walls that they made last time.
C. Modeling/Demonstration: 5 minutes
Call on somebody to choose an animal that they see from the cave paintings on the board. Call on someone else to give an action suggestion. Demonstrate drawing the animal in pencil on a sample cave collage. Then, demonstrate going over the pencil outlines with black oil pastel. Mention that they can color in the animal in white or black. Explain that they shouldn’t worry about mess ups because they can always add more collage scraps if they need to start fresh.
D.Work Period: 30 minutes
Pass out pencils and oil pastels for students to sketch their animals. Point out that the animal doesn’t have to look perfect and that the drawings by the ancient cave artists weren’t perfect.
E. Summary: 3 minutes
Clean up. Have students put away pencils and oil pastels and bring their drawings up front.
Enrichment/Reinforcement: 5 minutes
Gather students together. What did you learn about cave art today? What was it like drawing on top of a collage? Do you have any tips or suggestions for your classmates who are still finishing?
__________________________________________________________________________
Day 3: Finish up, Collaborate and Share!
A. Introduction, Review and Key Questions: 3 minutes
Have sheets of brown butcher paper covering each table. Who can tell me where the oldest paintings are found? How old are they? Where are they? What kinds of colors did ancient artists use in their cave paintings? What kinds of things did they paint? Bring up images from Lascaux and Chauvet.
B. Presentation: 2 minutes
Explain that today they will collaborating on a large cave wall with their small table.
C. Modeling/Demonstration 8 minutes
Explain that the first thing students will do will be to create a composition of each persons individual cave wall on the large piece of butcher paper. Discuss how composition can suggest a story and tell students to consider where they put each piece and what kind of story that could suggest. Next, demonstrate attaching each piece of cardboard with at least 4 masking tape rolls. Next, demonstrate adding scrap earth tone paper and earth tone oil pastels to the paper in between the cardboard to create the cave wall. Suggest crumpling the paper to give it texture. Mention that the only rule is that you may not draw on anybody else’s artwork. The entire cave wall is a collaboration but at the end, each student’s work should remain their own.
C. Work Period: 25 minutes
Allow students to collaborate to create their large cave walls. When they are finished have them leave them in place.
D. Summary: 2 minutes
Clean up oil pastels and gather up any remaining scraps of paper.
Enrichment/Reinforcement: 10 minutes
Have students stand up and then orchestrate a tour around the classroom to look at all of the cave walls. Then have them sit back down. What did you guys notice about these cave paintings? What do you they tell us about the artists who made them? Who can create a story out of one of the cave walls you saw? Call on a few students to share story interpretations. Clap for the group when they’re finished discussing.
10 notes
·
View notes
Text
Give Advice to Yourself in the Past
-Carrie Shiffrin
Student Examples:


Title of Lesson: Give Advice to Yourself in the Past
Intended Audience: 5th graders
New York State Learning Standards:
-Standard #1: Creating, Performing and Participating in the Arts
-Indicator A: Experiment and create art works, in a variety of mediums (drawing, painting, sculpture, ceramics, printmaking, video and computer graphics), based on a range of individual and collective experiences.
-Indicator B: Develop original ideas and images through the exploration and creation of art works based on themes, symbols and events
-Indicator C: Understand and use the elements and principles of art (line, color, texture, shape) in order to communicate ideas
-Indicator D: Reveal through self-expression an understanding of how art mediums and techniques influence creative decisions.
Indicator E: Identify and use, in individual and group experiences, some of the roles and means for designing, producing, and exhibiting art works.
-Standard #3: Responding to & Analyzing Works of Art:
-Indicator A: Reflect on the sources, meanings, and purposes of different art works. Describe personal responses to various works, with reasons that support these views.
-Indicator B: Describe visual and other sensory qualities found in a wide variety of art works (color, texture, shape, size volume).
-Indicator C: Explain themes found in works of visual art and how the art works relate to other art forms (dance, music, theatre, etc.).
-Indicator D: Explain how ideas, themes and concepts in the visual arts are expressed in other disciplines (social studies, mathematics, science, literature, etc.).
Prerequisite Knowledge: Some drawing experience.
Goal: To learn that art is driven by ideas and not just aesthetics.
Objectives:
-Students will practice linking their ideas to their drawing skills.
-Students will consider the viewers experience with an artwork.
Duration: one 50 minutes class period
Materials/Equipment:
-9”x12” paper for each student
-Pencils
-erasers
-colored pencils
Art Historical References:
- www.learningtoloveyoumore.com created by Harrell Fletcher and Miranda July
- Rivane Neuenschwander (2003) I Wish Your Wish

Teaching Procedures/Task Analysis:
A. Introduction, Review and Key Questions: 17 minutes
What is art? Call on a couple of students to answer the question. Ask further questions based on responses. What qualities does something have to have for it to be art? Explain that you’re going to show a quick video that describes an art piece by a Brazilian artist named Rivane Neuenschwander. Show the video of I Wish Your Wish (2003)
http://www.youtube.com/watch?v=UG5aN8C4vq0
Is this art? Discuss why or why not. Why do people make art? Call on more students to answer. Discuss how art reveals things about the artist and the people viewing it.
B. Presentation: 5 minutes
Today we are going to do a project from a website called Learning to Love you More. The website was made by two artists, Miranda July and Harrell Fletcher, who created a whole list of assignments that they asked participants to do. Participants would complete the assignments and then send in pictures or videos which would be posted online and sometimes displayed in galleries.
Today we are going to do assignment #53 which is “Give Advice to Yourself in the Past”. Explain that students will think back on a particular year in their life and give a specific piece of advice to themselves at that age. Show a couple of examples (see Student Examples above).
C. Modeling/Demonstration: 3 minutes
Demonstrate choosing a piece of advice like “Take Spanish in Kindergarten, not French”. Point out that it should be something you know now but didn’t know then. Model writing the advice across the top of the paper first. Then demonstrate making an illustration of the advice underneath.
D. Work Period: 15 minutes
Pass out papers, pencils and colored pencils. Remind students to write their name and class on the back of their artwork, but not the front. That way, if they choose they can remain anonymous. Emphasize that the advice should be specific but the illustration do not need to be incredibly detailed. If students finish early, allow them to begin installing their work on the board.
E. Summary: 10 minutes
Collect all papers, pencils and colored pencils. As a group install the work on the board or somewhere else in the classroom. Read aloud each piece of advice. Give students an opportunity to share any reactions or positive comments about the work. Did anyone relate to another artists piece of advice? Why do you think we did this project today? What does it tell our viewers about us as artists? Discuss the possibility of displaying the work on a bulletin board in the school. Clap for the group at the end.
2 notes
·
View notes