
Last Seen Blogs

0v3rgl0w
0v3rgl0w

rykf6
Maktub

bigbuttsthickhipsnthighs
Nothing but Bad Bitches

babajadas
shir

numberoneasmogirlfriend
Per aspera ad astra
Text
UPnP Settings for TP-Link Archer C55 AC1200 Router
TP-Link Archer C55 AC1200 router device is a dual-band Gigabit router tp-link access point Setup your tplink Modem Router work as 3G4G router
. This supports 802.11 a/b/c/n/ac standards. This device provides dual-band supports that refine your networking needs and provides you with optimum networking speeds to fulfil your various needs and requirements.
It has the following features which are mentioned here below.
1. This device supports 802.11/a/b/c/n/ac standard tp-link access point.
2. It supports PPPoE, Dynamic IP, Static IP, PPTP, L2TP, cable internet access.
3. It supports UPnP, Dynamic DNS, Static Routing, Flow statics, VPN Pass-through.
4. Supports virtual server and special application and DMZ host.
5. Access point mode connects wifi devices to any wired network.
6. Its built-in firewall protection supports IP address filtering.
7. It has a built-in DHCP server that supports automatic dynamic IP address distributions.
The UPnP is the short name of Universal Plug and Play protocol that allows the application or host devices to automatically find the front-end NAT device and end request to it to open the corresponding ports. With UPnP enabled, the applications or host devices on the local network and the internet can freely communicate with each other realizing the seamless connection to the network.
You will have to enable the UPnP to use application for multiplayer gaming, peer to peer, connections, real-time communication or remote access etc.
To change the settings you can follow these steps mentioned as
1. Visit http/tplinkwifi.net and login with username and password you set for the router.
2. Go to forwarding >UPnP.
3. Click Disables or Enable according to your needs.
4. Save the settings.
0 notes
Text
Change my AOL account to a free plan
You will no need to worry when you can access your AOL mail on your mobile phone. You can use AOL mail account across most mobile devices through AOL app through www AOL mail com my mail, the mobile browser on your mobile. To do so you will need to so some settings which are as followed. How to Block Unwanted Emails Issues for AOL Emails

1. Use AOL mail in an app with two-step verifications: - Enabling two-step verifications gives your account extra security. You will need to generate an app password to access your account through the third party application.
2. Use AOL Mail in the AOL app:- The AOL app will give you access to all best of AOL which includes the innovative features and settings. You will be able to add accounts, send mail, organize mailbox, on the operating devices such as android or iOS with the help of app version.
3. Use AOL mail on an iOS device:- If you want to use the email app that comes with your iOS then through the device settings just add your AOL mail account. The account will be added automatically or you can set up the account manually with the POP or IMAP settings as well.
4. Use AOL app for android device:- You will have to add your AOL mail account with the phone settings on your Android device. You should be able to set up an account automatically or you can add this manually with the POP or IMAP settings.
To change AOL account to a free plan you can follow the steps as mentioned here below.
1. Click on “My Services | Subscription to access your account information.
2. Click “Manage” next to your subscription.
3. Click change plan.
4. Review the confirmation page. It will offer you the option of changing to a lower priced plan rather than cancelling your account.
5. Select a reason for cancelling from the drop-down menu and then click Cancel my billing.
0 notes
Text
Why security cameras are an invasion of privacy
Importance of security cameras: - Due to an increase in the crimes day by day it becomes to keep watch on every area where you are leaving or where you are working through Smartcam login. A single person can't keep watch on the areas by a single person. To resolve this issue security cameras are the best solutions to keeping the watch on the areas. Playback and Event Alarm Settings
Samsung SmartCam Device

Security cameras have the advantages that these can be installed easily wherever you need to keep the watch on the locations. With the revolution of technology and reach of technology becomes easy impacting the cost of the security cameras.
Purchase and installation of security cameras now become easier and easily approachable. Hence this is important to have the security camera at the various locations of the residence and office areas.
Various types of security cameras are available nowadays to keep watch on various tasks. Cameras are working on the bases of installation and the bases of their alert system and recording systems. Security cameras give the advantage to keep the records of the footages which are recorded by them and you can watch those footages later on.
Such camera is working with the wired system and some are working on wireless systems you can select according to your requirements and need according to the locations where you want to keep under your watch through Smartcam login. Some cameras have the features of the sensing the motions and when they detect and motion or event they send the alerts through the SMS or with some alarm systems.
Cameras are very helpful to keep the watch on every moment which is happening in the residential area or in the offices to keep them safe from the crimes and other events which are harmful to you.
0 notes
Text
Tips to Choose Security Camera Devices for Home
Security cameras are the essential parts of your security system. While choosing the camera of tp-link cloud register for your security system care should be taken here with consideration mind various objectives which relates to the security of the relatives and families. Here are some common tips to get the best security camera devices for the security system.TP-Link NC220 DayNight Cloud Camera 300Mbps Wi-Fi | Setup and configurations

1. Location of the cameras: - Installing location matters for the cameras. Keep in mind when you going to purchase the camera that the location of installation. Whether the camera to install indoor location or at an outdoor location. Cameras are designed according to the environment in which they will need to install so consider the locations in mind while going to purchase the cameras.
2. Area of coverage: - Second common point which should be considered in mind is the area coverage. The area that you want to cover with the cameras will determine the best camera devices according to the requirement of area wise. All the installation system depends on that area of coverage which you want to cover through the system. Hence before going to purchase make a blueprint about the area where you have to install the camera and cover the area.
3. Image quality which you required: - In the security system clarity of the images is matters. That means the quality of the images relates to its visibility through the tp link cloud register. Your area size which you want to monitor with the camera will determine the resolutions of the camera which you need. The wider area needs a high resolution to record the best quality pictures where the as small area will need less resolution of cameras.
4. Lightening conditions of the area: - Lightening conditions of the area is matter while selecting the camera device. It will select the camera lens and according to lens camera will be selected. Hence keep in mind always about the lightening conditions while going to purchase the camera.
0 notes
Text
DIS 200G 12S Industrial Gigabit Smart Wizard
DIS-200G industrial Gigabit smart wizard switch device which is equipped with 10*10/100/1000 base –Port 2*SFP Ports. Device is easy to control management interface and securities. This device is can be servive with extreme temperature conditions as well. Device is built with design so that it can compliant with vibrations, shock and free fall tastings on http:dlinkap.local. How can I back up my D-Link DAP -1520 Wi-Fi Extender?

Device is supplied with officially certified testing certificates on vibrations, shock, free fall, electromagnetic, and high capacity 6kv surge protection on all copper ports to maximize network uptime in harsh deployment environments.
This device is designed to support instant installation with its snap to DIN rail and also supports wall mountings. Easy to fitment anywhere with small and compact size.
Features of DIS-200G-12S Industrial Gigabit smart-wizard switch with http/dlinkap.local.
1. Smart management: - Featuring management interface including an industry-standard CLI and web-based UI, the DIS 200G series is easy to manage and provides the controls to help protect and shape the network.
2. Withstand with extreme temperatures: - Device operates effortlessly is a range of industrial and harsh environment in temperature from -40 deg to +65 deg.
3. Gigabit connectivity with SFP ports: - Designed with 10/100/1000 base T ports to suit a range of devices and network layout.
4. High reliability: - ERPS quick failover recovery for ring topologies that ensure minimal downtime and avoids any loss of data in mission-critical deployment settings.
5. Fanless design: - This device does not have any moving part inside it which reduces the downtime and maintenance time.
6. Fast installation: - Device is designed to keep in mind installation hence its equipment required less installing time.
7. Build quality: - Its tough housing has been created to keep your network protected and reliably rugged. That’s why every DIS switch comes with 5-year D-Link warranty.
0 notes
Text
Sync a Satellite for Netgear Orbi RBK52W WiFi System
Netgear Orbi RBK52W device designed and built to rule out the networking coverage issue from the area where you have an issue of network coverage within your home or office where you feels that the network of wifi is dragging and disturbing you on routerlogin.net. Manual configurations for ADSL Settings netgear DSL Device

Here are the features of the device that makes this device different from others.
1. Whole-home wifi system: - Improve your wifi using Orbi whole home wifi system. Best coverage network.
2. 5500 Square Feet of Coverage: - It boosts your wifi distance from the basement to be the back yard. Or can extend the range of strong connection with a single network to cover every inch of your home.
Sync a satellite for Netgear Orbi RBK52W wifi system follows the steps mentioned here below.
1. Place your satellite.
2. Connect the satellite to a power source.
3. If the power LED on the back of the satellite does not lightly press the power on/off.
· The satellite LED pulses in white. The satellite automatically finds the Orbi router’s wifi signal and attempts to synch to the Orbi router.
· The satellite LED ring lights one of the following colours for about three minutes.
- Blue: The Orbi router and satellite successfully synchronized and the connection between satellite and router is good.
- Amber: The Orbi router and satellite successfully synch and the connection between router and satellite is fair. Consider moving the Orbi satellite closer to the Orbi router.
- Magenta: The Orbi router and satellite failed to synch.
4. If the satellite ring LED in magenta move the satellite closer to the router and then synch the satellite to the router
· Press the sync button on the back of the router.
· Within two minutes press the Synch button on the back of satellite.
5. Repeat the step 1-4 if your Orbi wifi system came with second satellite with routerlogin.net.
0 notes
Text
Set WiFi using Dual-Band Wireless-N600 Range Extender
Asus N600 is a dual-band wifi router which offers advanced speed and range of network Asus repeater mode. This router is well known for its technology and user interface.Configuring SSID or Network Name for Asus wifi Router and Extender
This device is so as simple to use that anyone can do its settings easily on the network on which they want to use it. It connects with the Asus smart management tool app and you can monitor and control the router with the app easily. Features of the E2500 N600 wifi router are described here as.
1. Speed of Network:- Its dual-band technology brings the speed and reliability to your network connection.
2. Dual-Band of 2.4 and 5 GHz:- It works on dual-band technology which provides you with a strong connection on a wide range than a single band technology.
3. Traffic Management: - Its traffic management system reduces the buffering time by setting the bandwidth activities which are on high priority.
4. Parental Control: - It offers parental control feature as well which help you to control and manage the online activities for your kids.
5. Easy to setup: - Its technology offers you the easy setup process.
6. Guest Network:-You can create here a guest network secured with a unique password for secure guest access.
To set up wifi using dual-band wireless N-600 Range extender follow the procedure mentioned here below as.
The wifi setup for the device does not require any CD or even it does not require a mouse or any keyboard to complete the setup.You need to just press the WPS button available on the device to setup. Optimized performance is assured which provides a seamless internet experience.
You can simply connect the RP-N53 to PC via an Ethernet cable and go to the configuration page directly. Or you can quickly set it up from tablet or smartphone wirelessly with no disc needed and app needed.
0 notes
Text
User Name and Password Setup for Nighthawk X4S AC2200 Tri-Band WiFi Mesh Extender
Nighthawk X4S AC2200 is a tri-band wifi mesh extender that boosts the range and speed of your existing network www.mywifiext.net setup. This device improves the networking performance of your extender which further boosts the networking range to improve the performance of the network. How to configure Netgear wifi Extender without setup CD

Extender boosts the network coverage and boosts your performance by reducing the dead zone within the network area. This device works as a bridge between the router and the other networking device which is not within the range of the router.
It is always recommended that you connect through the extender network only when the wifi device is in a dead zone. The connection from the existing network is poor or nonexistent. To get the better network experience from the device you need to follow its system requirements which are mentioned here below.
· 2.4 GHz and 5 GHz 802.11 a/b/g/n/ac wireless router or gateway.
· Bowser should be compatible from the list mentioned here below
a. Microsoft Internet Explorer 8.0 or higher from that
b. Firefox 2.0 or higher
c. Safari 5.1 or higher
d. Google Chrome 25.0 or higher.
Change username and password
1. Launch the web browser from the mobile or computer device that is connected with the extender network.
2. Log in to your extender.
3. Enter your admin username and password and click on login button.
4. If the browser displays the Menu icon click on it.
5. Select setting>password.
6. To change the admin username you need to enter new email address in the New User Name field.
7. To change admin password enter a new password in the New Password field name and verify the field.
8. Select the given questions and enter the answers.
9. Click on save to save the settings here on www.mywifiext.net setup.
0 notes
Text
Password Recovery for Netgear Orbi RBK852 WiFi 6 System AX6036
Orbi RBK852 wifi devices are designed and built to handle the internet requirements within the large homes up to 5000 sq feet with fast wifi system which includes a wifi router and one satellite. How to setup for satellite connections for Netgear wifi router device?

Here are the features of the devices which make this device different from others with www routerlogin net Netgear.
1. Faster Wifi: - This device is designed to deliver higher performance over the network.
2. More coverage and capacity:- Provide coverage up to the long area to make networking easy.
3. Same connection within all homes:- It provides the same connection name within your house so you need to switch over to another network while roaming in the home.
4. Control with Orbi application:- Easy to control device with Orbi application from your mobile.
5. From a computer or mobile device which is connected with Orbi router launch a web browser.
6. Enter address as orbilogin.com. You get a login window on the screen.
7. Enter here user admin and password in defined space. Here username is admin and the password is the one that you have specified the first time that you logged in. Both username and password are case sensitive. After that, you will get the basic home page on display. Select option as Advanced>Advanced>IPv6 www routerlogin net Netgear
8. From the internet connection type, menu selects the IPv6 connection type from options available.
To recover the password you can follow these steps mentioned here below.
1. Launch a web browser from a computer or mobile device that is connected with your Orbi Network.
2. Enter Orbilogin.com.
3. Enter the admin username and password.
4. Select Advanced>Administration>Set password.
5. Type the old password here and type the new password twice.
6. To be able to reset the password select the “Enable Password Reset” check box.
7. Click on the apply button to save the changes you have made.
8. Your settings are saved now.
0 notes
Text
What is NETGEAR 10-Port Gigabit Ethernet Switch?
Netgear 10 Port Gigabit Ethernet port switch will provide powerful PoE ++ with PoE budgets up to 480W, a compact size, uninterrupted PoE, and reliable performance. Changing the Name for Netgear Nighthawk Routers

This switch can deliver up to 60 W of per port allowing the connections of higher power required devices. Additionally with the Netgear insight Remote/Cloud management option, managing all the powerful devices from anywhere is just one click away.
Here are the features of the device detailed here below
1. It provides you 10 Gigabit Ethernet ports configuration with 192.168 router login net setup.
2. It provides flexibility from Uplinks ports with 1g copper port and 1* 1G SFP port.
3. Advanced configuration and control provide management software with easy to use interface, secure setup access, remote insight management system.
4. It comes with flexibility for mounting and provides you wall mount, ceiling mount, rack mount, and includes all the necessary accessories required for mounting.
5. Its unique design makes it a silent device. It will not disturb you within your home or office with its noise.
6. Designed to optimized power usages. Lowering the consumption of power lowering the running cost of the device.
7. Built with strong material to stand within different conditions and tested for reliability, quality and performance.
8. Its insight cloud management system lets you control the device from a remote area.
9. Provides remote monitoring and management with performance dashboards and trouble shooing features.
10. You will get instant alerts on its app in your device whenever any email or message is received in the device.
11. Advanced quality services with L2/L3/L4 awareness and 8 priority queues.
12. Auto joins and configures for additional insights managed devices added to the network.
13. Its advanced features such as Protocol-based VLAN, MAC Bases VLAN, and 802.1X Guest Van.
0 notes
Text
Back and Restore new Linksys EA6900 Router
As many valuable settings and data are stored with the router to ensure to save these settings you should have a backup for these settings and configurations on my router.local 192.168.1.1. Linksys application for resetting your Linksys smart routers

While you reset your router to its factory resetting then you may lose these important settings. If you once loss these settings after reset then you will need to enter the settings manually but if you have a backup for your router settings and configurations then restoring of these settings will be easy.
To backup, your router configurations follow the steps as mentioned here below.
1. First, log in to your Linksys smart wifi account.
2. Click on troubleshooting under Router settings.
3. Click on the diagnostic tab here.
4. Click on back up which will found under router configurations. You will prompt to save the file option here.
5. First, specify the location to the backup file. Then click on the option "save" to save the backup files here.
6. Here takes care that if you going to take a backup of many files then give these files a specific name to found easily later.
After completing the back up when you complete the reset process then you need to restore these files on the router. To restore the files follow the steps as mentioned here below.
1. First of all login to your Linksys smart wifi account.
2. Click on the troubleshooting option under the router settings.
3. Click on the diagnostic tab.
4. Click on the Restore option under router configurations. Here the restore router configuration dialogue box opens on the screen.
5. Click on choose file to navigate to the location of the configuration file. Then select the file and click on open.
6. Click on start to restore the configurations at my router.local 192.168.1.1
0 notes
Text
LED Turn Off and Turn ON for Nighthawk X4S AC2200 Tri-Band WiFi Mesh Extender
Nighthawk X4S AC2200 is a tri-band wifi mesh extender that boosts the range and speed of your existing network mywifiext net setup wizard. This device improves the networking performance of your extender which further boosts the networking range to improve the performance of the network. Enable NAT for EX6100 device

It is always recommended that you connect through the extender network only when the wifi device is in a dead zone. The connection from the existing network is poor or nonexistent. To get the better network experience from the device you need to follow its system requirements which are mentioned here below.
· 2.4 GHz and 5 GHz 802.11 a/b/g/n/ac wireless router or gateway.
· Bowser should be compatible from the list mentioned here below
a. Microsoft Internet Explorer 8.0 or higher from that
b. Firefox 2.0 or higher
c. Safari 5.1 or higher
d. Google Chrome 25.0 or higher.
LED Turn on and Turn off for the Nighthawk X4S
1. Launch the web browser from a computer or mobile device that is connected with your extender network.
2. Log in to your extender.
- If you did not enable the one wifi name feature to enter wwwmywifiext.net in the address field of the browser.
- If you enabled the one wifi name feature then enter one of the following URLs.
· For windows based computers http/mywifiiext.
· Mac computers and iOS devices http:mywifiext.net
A login page will display here.
3. Enter your admin username and password and click login button. The status page displays here.
4. If the browser displays the Menu icon click on it.
5. Select the option Do More>LED On/Off.
6. To turn the LED on select the “ON” radio button.
7. To turn the LED off select the “OFF” radio button.
8. Click on save to save the settings with mywifiext net setup wizard.
0 notes
Text
Linksys E1200 WiFi Router Device Upnp Settings
The Linksys E1200 wifi router Device is built with the leading technology which creates the powerful home network wirelessly through Linksys range extender login. It helps to connect the devices such as computers, internet-ready TV, gaming consoles, smartphone and the other devices which are wifi enables. Not getting access for Linksys RE6500 AC1200 Dual-Band Wireless Range Extender? try these steps

It has advanced technology-based antennas which help to deliver the high speed even on the long distances as well. It has many features which make this product usable main features which it has areas undermentioned.
1. Advanced technology security keeps your network safe from threats.
2. It has four Ethernet ports for quick file sharing.
3. It makes your home network ready by connecting the devices such as computers and printers by connecting with the network.
4. You can create separate guest networks.
5. Its connect software helps to manage and set up easily and quickly in just simple steps.
6. It gives you access to parental control.
7. It has power indicators which let you stay steadily while power is connected by keeping watch on power through the indicators.
It requires UPNP settings to perform well. To do the UPNP settings you have to follow the steps as mentioned here below.
1. First of all login to user-based utility here from Linksys range extender login
2. Click on the tab shown as Administration then click on the page of Management.
3. Now select enabled UPnP if you want to use UPnP. Otherwise, select Disables.
4. Here you have to select the Disables which is next to Allow users to disable access to prevent the local network users from disabling your internet connection through the UPnP. Otherwise, you have to select Enabled.
This is the process of the UPnP settings which lets you do the settings in various modes to make the network safe from the users.
0 notes
Text
Configure Wireless Network for TP-Link RE200 AC750 Wi-Fi Range Extender
For the people who are living in a big house or managing a large office, there are high chances that they are facing connectivity issues in some sections of their home or space. The only solution that will be helpful is to either invest in a mesh system or get an extender. How to configure TP-Link WiFi extender using http //tplinkrepeater.net login window
The extender will receive the signal from the host router and will then transmit it to its full range. When you will first plug the extender, and then connect your device to its SSID, it will automatically redirect you to the extender’s dashboard page where the very first thing it will ask you to do is create a log in password and after hitting Next, you will be greeted by a Quick Setup menu that will guide you through the tplinkrepeater portal.
If you are wondering whether the portal interface is simple or complex, we are here to help you with everything.
How to configure the wireless network?
Though you will get to do it quite simply through the Quick Setup portal in case you missed it while the first setup, we are here to guide you with all the steps that you will need to follow.
1. Find the Settings tab and then, scroll down to the Wireless section.
2. Here, you will find an option saying Connect to a network. Click on the checkbox where you wish to enable the signal extender, it can be either 2.4GHz or 5GHz.
3. Click on the Wireless Scanner tab and it will show you all the available networks for that band.
4. Select the network you want to extend and enter the password of that SSID.
5. The tplinkrepeater will ask you to enable the wireless network. Click on the checkbox and hit Save.
0 notes
Text
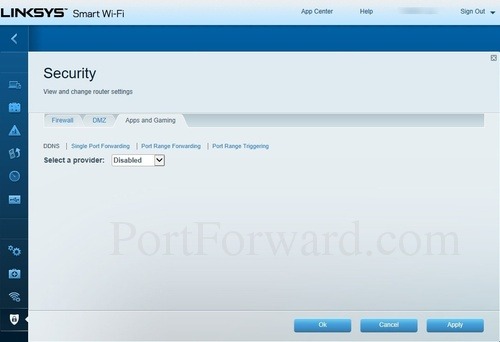
UPnP Setup for Linksys EA6900 Router MAC
As we are moving towards wireless connectivity, there are quite a few things that need to be addressed right now. Linksys is known for the quality that it has to offer and you will not feel any kind of regret investing in a premium device from the brand. Linksys smart wifi account for MAC filtrations
We are using quite a few devices that are wired and to get the best out of them, modern routers offer you the UPnP mode that will allow you to use the devices wirelessly. The Cisco Linksys router login portal is the one that you will need to go to in order to configure any type of settings.
The router will offer you the MAC filtering settings that are significantly helpful to keep the unwanted access away. You will also get to set up the QoS allocation where you will be able to fix maximum bandwidth on the devices that will not consume high data use. What it will do is that it will provide you enough bandwidth for more important tasks.
How to set up UPnP?
The devices or applications that you will be able to connect through UPnP will vary from security cameras to gaming devices. Let’s dive into the steps you will need to follow to set it up successfully.
1. Once the device is booted, you will need to launch a browser and enter the IP address to log in. The portal will prompt you to enter the login credentials.
2. From the Router Settings tab, you will need to tap on the Connectivity tab. Here, you will get a horizontal menu list.
3. Click on the Administration tab on the top-right.
4. Click on the checkbox that says Enabled for UPnP.
5. The Cisco Linksys router login will offer you to set up further settings where you will get to allow or block the internet access.
6. Hit Ok to save the configuration.
0 notes
Text
I Can't log in to My Linksys EA6350 AC1200 WiFi Router
All the routers that are coming these days are loaded with features and you will need to find the one that perfectly fits your requirements. These routers come with a default set of configuration that you will need to tweak accordingly. How to remove bad gateway error for Linksys cloud account access?

If the router that you are using is the one that was provided complimentarily by the ISP, you will need to upgrade it as soon as possible. Modern routers come with some advanced features such as MAC filtering, QoS allocation, live traffic monitoring, etc.
There will also be a guest network option that you can enable to provide your main network an extra layer of security. All these features can be easily accessed via myrouter.local 192.168.1.1 and you will need to set login credentials to be able to log in. the interface that you will get here is quite intuitive and you will not seek any sort of professional help.
How to troubleshoot if I’m unable to log in?
To all the wireless users, there will be certain issues that will keep appearing up related to login and configuring the router settings. Let’s go through a few steps that you will find helpful in solving these temporary connectivity issues.
1. Make sure that the device you are on is connected to the router to which you are trying to sign in.
2. The router should be connected with all the cables properly and make sure that the modem is turned on as well.
3. If the device that you are using isn’t showing any SSID available, there are high chances that the drivers aren’t properly installed or the radio chip of your laptop has stopped working.
4. If any of these methods aren’t working to access the myrouter.local 192.168.1.1, you can also try rebooting the router.
0 notes
Text
D-Link DSH-C310 Omna 180 Cam full HD camera device
For all the new parents out there, it’s quite important to keep an eye on their kids when they are out on their job. The best tool that you will get to install is a security camera so that you can keep an eye on your kid along with the babysitter.Netgear EX2700 WiFi extender setup

If you are wondering about the installation process, there is nothing to worry about. It is quite simple and more of a self-explanatory kind. All you need to do is set up all the cables and follow the online instructions that you will get after entering the IP address in your browser.
The login 192.168.1.1 dlink camera portal will provide you with a live feed and you will be able to access it from anywhere around the world. The camera of which we are going to discuss the details here comes in a cylindrical design and the camera offers up to 1080p.
Features of DSC-C310 Omna camera
In this section, it’s time to go through the features that are present on the camera. It’s quite necessary for you to go through these features as it will be significantly helpful in reaching a decision.
1. The FOV offered by the drone is pretty wide with 180-degrees and it will eliminate the need for installing multiple camera units.
2. It will also send you instant motion alerts in case you have configured it. Motion alerts will be quite helpful in monitoring your house.
3. The dual-audio feature will also be very helpful in understanding what’s going on the other side. You can also easily talk to the person on the other side.
4. The night vision that you will get to see on login 192.168.1.1 dlink camera is quite clear and you will be able to have clear sight up to 5 meters.
0 notes