aithsims4ccfinder
aithsims4 cc-finder
CC -reblog/link-
thank you to all creators
464 posts
Don't wanna be here? Send us removal request.
Last Seen Blogs

sopwithwhump
Sopwith Flight Medic

grimsonchin
GrimArtist

galaxina-the-pyro
AwesomeBSquared

tomcruisingthroughlife
Violet
highestg
GIANT ME DOWN
Text
Did you know you can make sims look in a specific direction whilst they're posed?
Hit shift+tab to enter first person mode
Aim the camera where you want your sim to look (make sure your game isn't paused otherwise the sim won't move - you can press 1 in first person mode to set time running)
Hit pause (by pressing P)
Hit shift+tab again to exit first person mode
Voila! Your sim is now looking in the direction you pointed 'em!

A neat little cheat to get multiple uses from the same pose! 🤸♀️
5K notes
·
View notes
Text
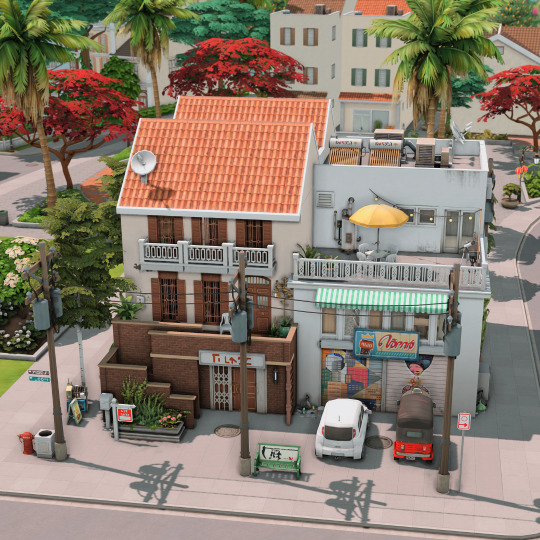


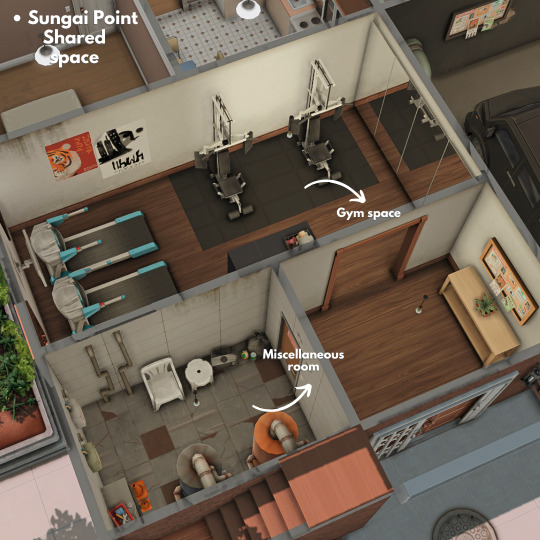
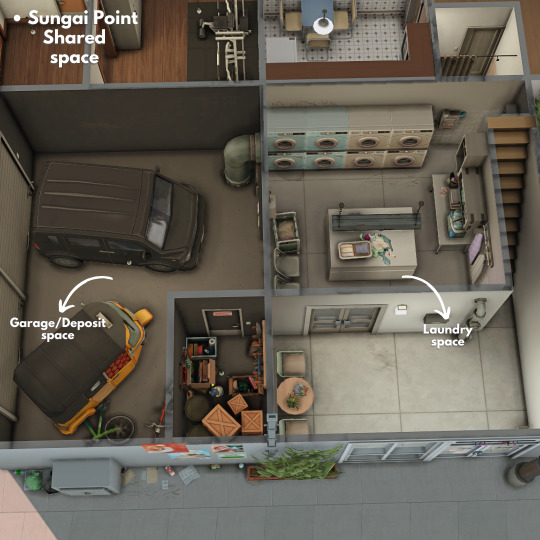
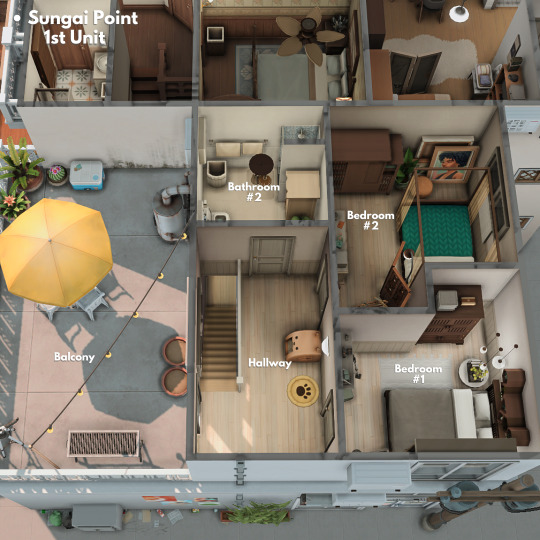
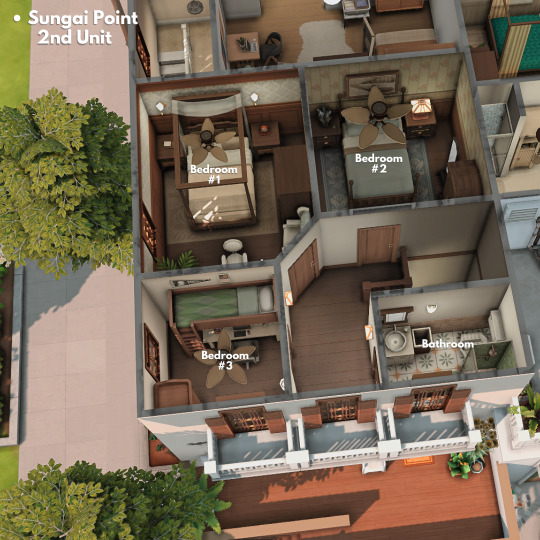
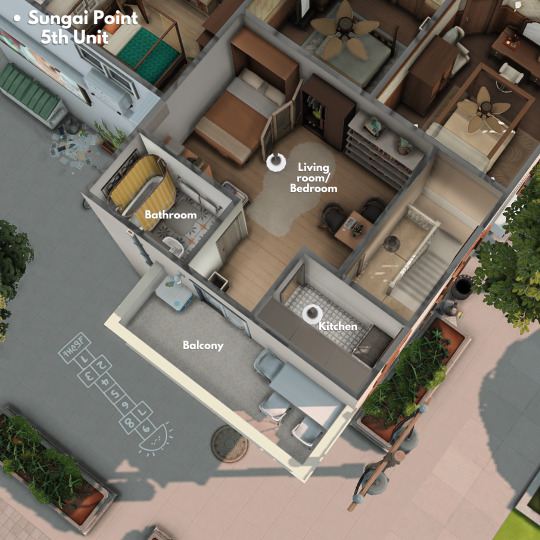
Sungai Point
• Price: § 207.376
• Units: 5
• Lot size: 30x20
• Gallery ID: Gloomydahlia
• CC FREE


Socials
• Instagram
• Twittter
•Youtube
938 notes
·
View notes
Text
youtube
Instant LODs Script Tutorial!
Hi guys!! I know I'm a little MIA right now so I'm very sorry if you've messaged me and haven't gotten a response yet, I've got a bit of a big project going on right now which I'll be able to announce soon, and then I want to overhaul my downloads page (I haven't been able to edit it for a while because of Tumblr's javascript thing so I have to remake it 🫠) and organize commission requests better.
For now though I finally made the video tutorial for the Instant LODs script that I promised a while ago! You can download the script here, let me know if you have any questions/problems!
139 notes
·
View notes
Text
1 note
·
View note
Text
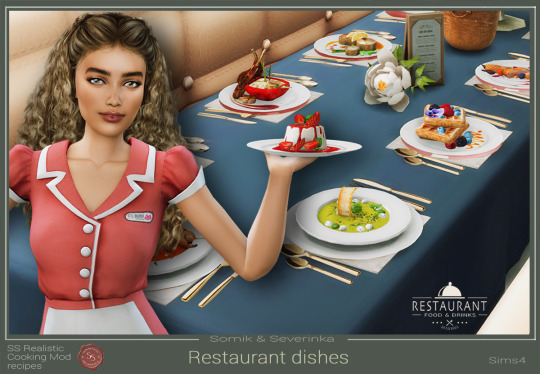
Gourmet dishes for the restaurant


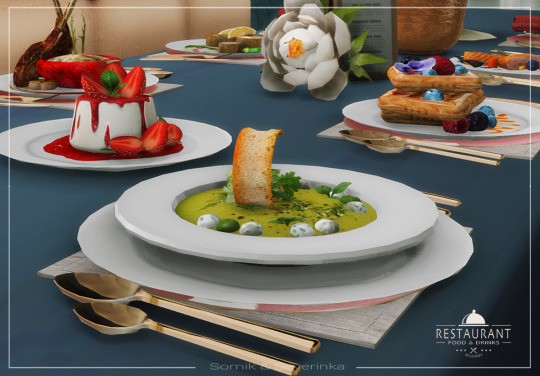

DOWNLOAD ON PATREON
or CURSEFORGE
🕓🔻
Early Access "Gourmet" and "Restaurateur" August 24
Early Access "Taster" on August 31
🔓Public release on September 14
2K notes
·
View notes
Text
Assigning Sims 4 NPC Jobs
Credits to [this post] for the cheat code and [this page] for a list of NPC jobs.
You cannot make a Sim your active household if you want them to keep their NPC career or NPC trait. You must place them in the world without playing them or give them the career and/or trait and then evict them and don’t play them again. My personal favorite method is using MC Command Center to copy/paste the looks and personality of a Sim onto a randomly generated NPC.
sims.get_sim_id_by_name [simfirstname] [simlastname]
careers.add_career [NPC career] [SimID] : Assign a career to the NPC
For example : careers.add_career CareerName 329330112625249404
I use [Sim Info Mod] to see NPC jobs and hidden traits in order to try and get these cheats.
さらに読む
850 notes
·
View notes
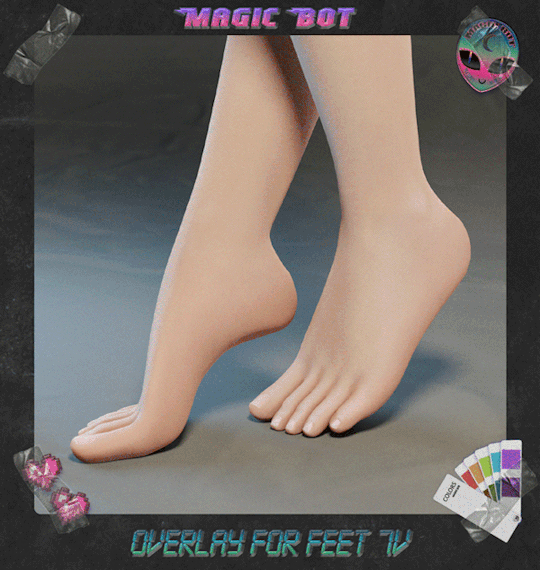
Photo
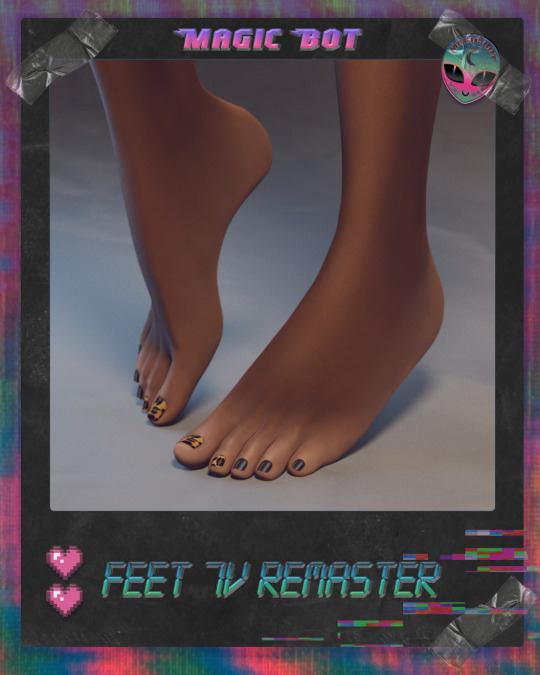
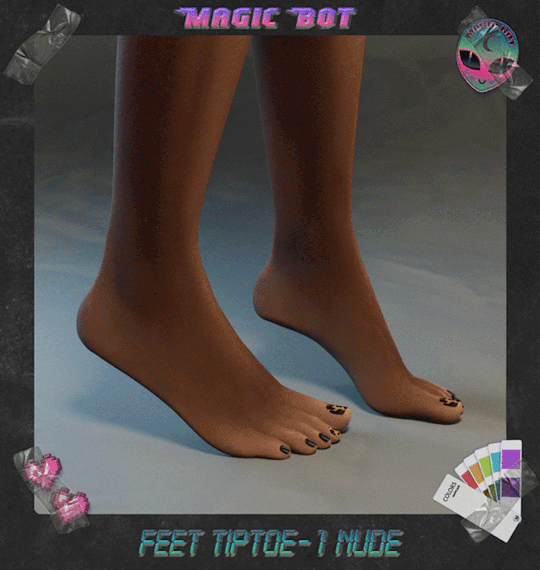


👽 FEET 7V REMASTER

Default feet
⤷ bgc
⤷ lowpoly (4918 polygons)
⤷ all ages, genders, races
⤷ compatible with hq
⤷ recommend use default slider
⤷ find: remove shoes
Non-default feet \ tiptoe-1 \ tiptoe-2 \ socks
⤷ bgc
⤷ lowpoly (4918 polygons)
⤷ all ages, genders, races
⤷ custom icons
⤷ work with body selector ww (requires mod)
⤷ compatible with hq
⤷ recommend use default slider
⤷ find: slippers
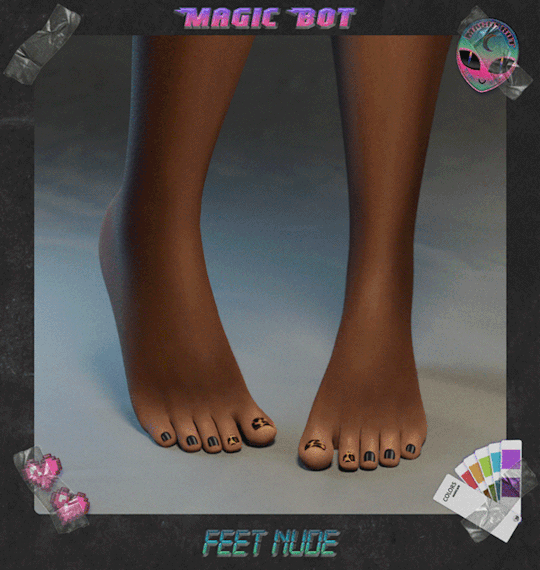
Overlay color for feet
⤷ bgc
⤷ all ages, genders, races
⤷ custom icons
⤷ compatible with hq and color slider
⤷ find: tattoo, scars, skin details
Feet nails polish base #1, french #1, design #1, design #4
⤷ bgc
⤷ elderly \ child, all genders, races
⤷ custom icons
⤷ compatible with hq and color slider
⤷ find: toenail
Blender files (for creators)
⤷ triangulation
⤷ removed double vertices
⤷ separated nails from feet
Using my cc you agree with tou

⤷ BOOSTY
985 notes
·
View notes
Text

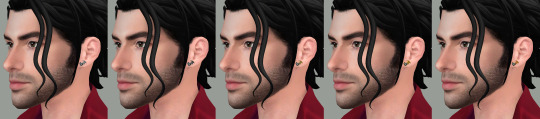
This is my February 14 Gift for you, kittens and puppies! Small gothic unisex earrings for your simmies. Once again want to thank you all for your support and believe in me!^^ Soon it would be 2 years of war in my country. It was... quite stressful 2 years, you can believe me! But I always returned to my Sims 4 art and it helped me to overcome major part of the stress. In a way... it's an escape from the reality. But in another way - it's a passion that keeps me going. And of course you were always there to keep this passion going. This February 14 I want to dedicate to you, my kittens and puppies, to my mutuals, to everyone who follows me and to the sims community.
With love,
Eugene
+ Unisex
+ Teen-Elder
+ 5 swatches
DOWNLOAD (Patreon / Free)
If you like my work, please, consider buying me a pie^^ Thank you for supporting me!
-—————————————-
>>More Wistful Stuff
374 notes
·
View notes
Photo
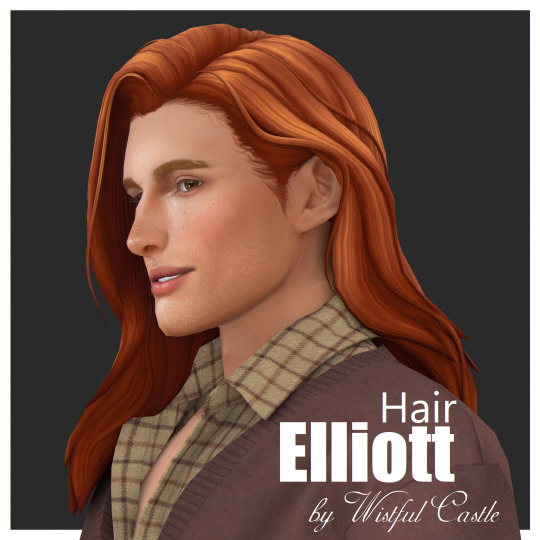
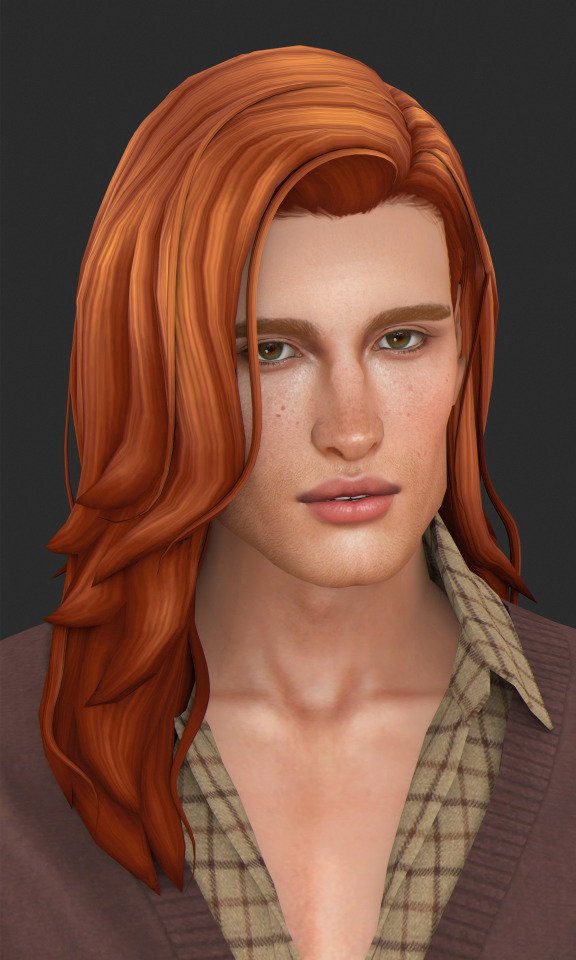

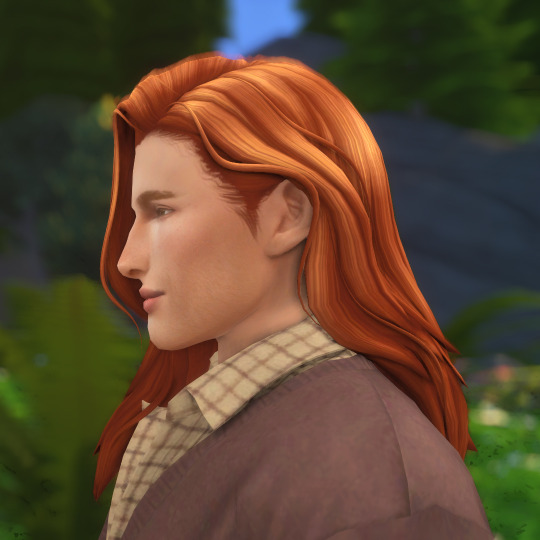

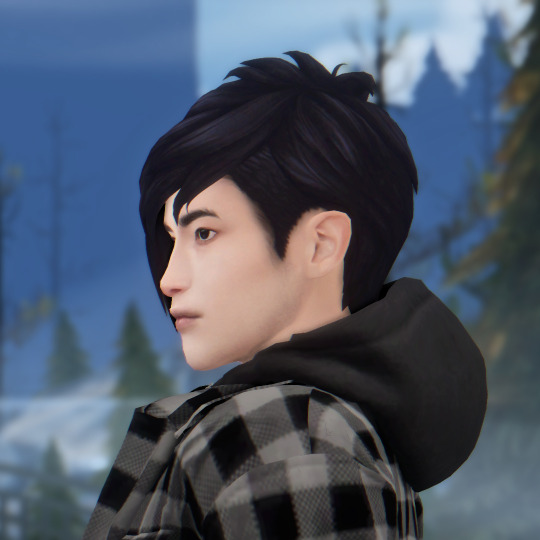
I simply had to create more LORE hair for Elliott :D
* Elliott - base game compatible hairstyle for male sims, all LOD’s, all maps, 32 EA swatches+extras, from teen to elder + Cas thumbnail
DOWNLOAD (No Ads)
Thank you for supporting me!
-—————————————-
>>More Wistful Stuff
5K notes
·
View notes
Photo


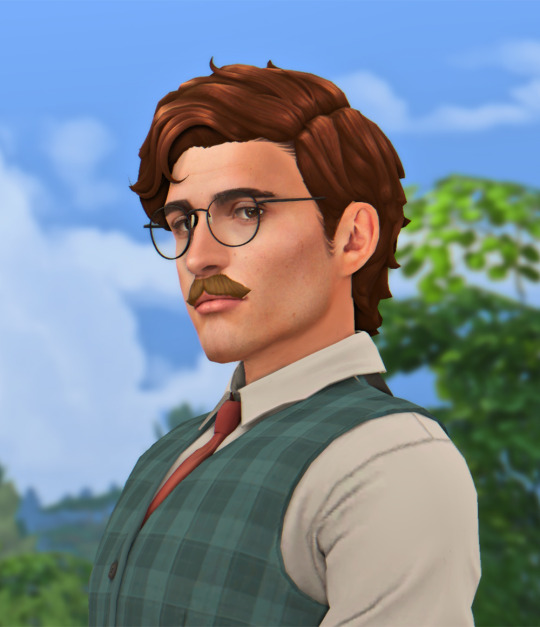
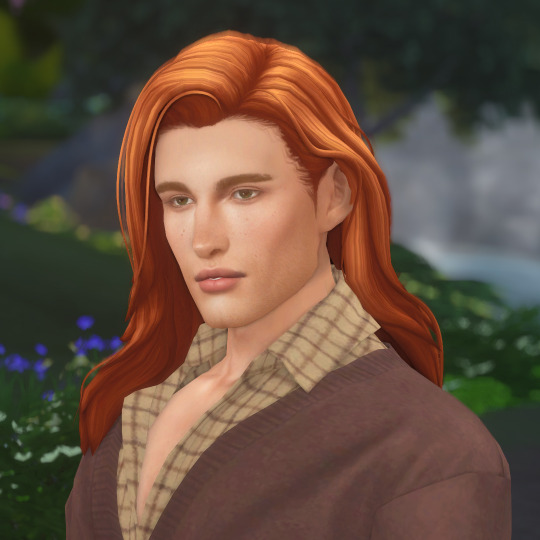
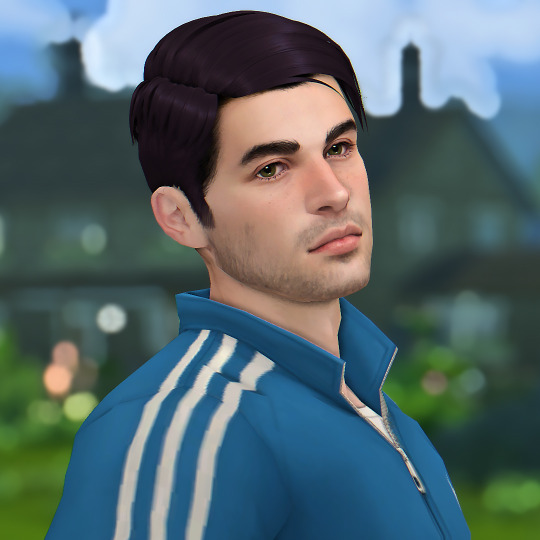
Since I wasn’t happy with my first version of Harvey I decided to redo him completely! Also made his hairstyle and mustaches for more authentic appearance^^
* Harvey Hair - base game compatible unisex hairstyle, all LOD’s, all maps, 30 EA swatches+extras, from teen to elder + Cas thumbnail
* Harvey Mustaches - base game compatible mustaches, all LOD’s, all maps, 25 EA swatches+extras, from teen to elder + Cas thumbnail
DOWNLOAD (No Ads)
Thank you for supporting me!
-—————————————-
>>More Wistful Stuff
898 notes
·
View notes
Photo
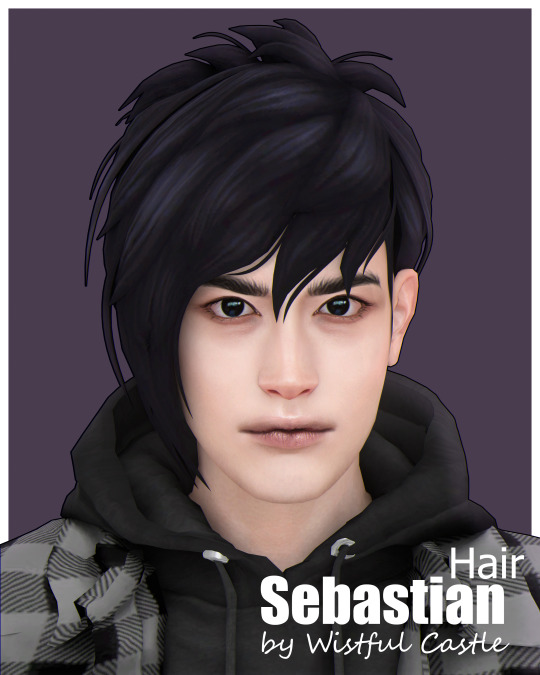


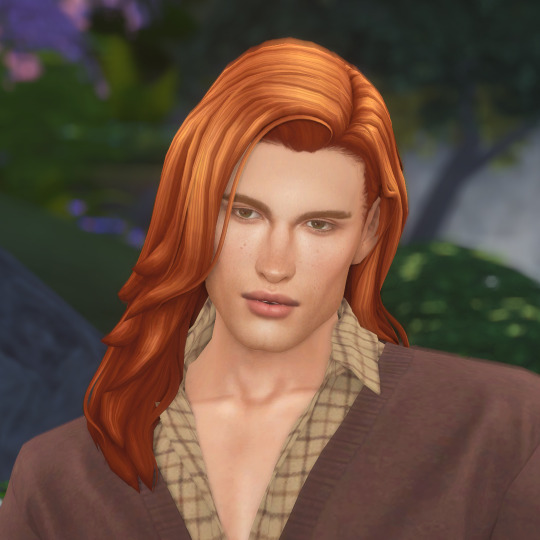
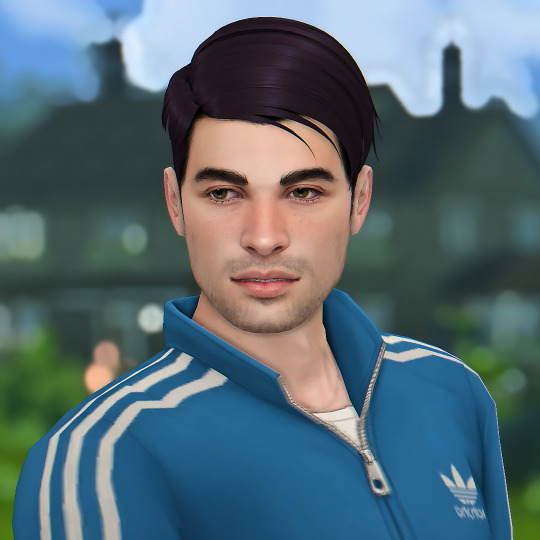
* Sebastian Hair - base game compatible unisex hairstyle, all LOD’s, all maps, 32 EA swatches+extras, from teen to elder + Cas thumbnail
DOWNLOAD (No Ads)
Thank you for supporting me!
-—————————————-
>>More Wistful Stuff
2K notes
·
View notes
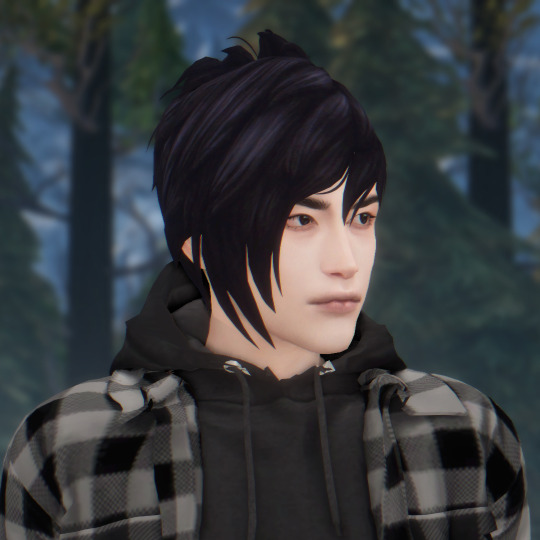
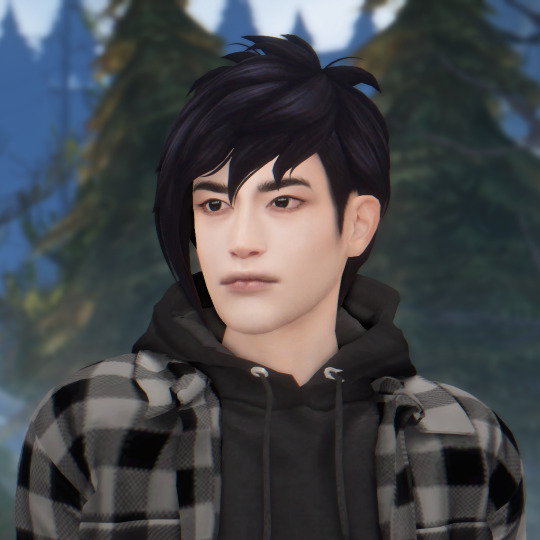
Photo


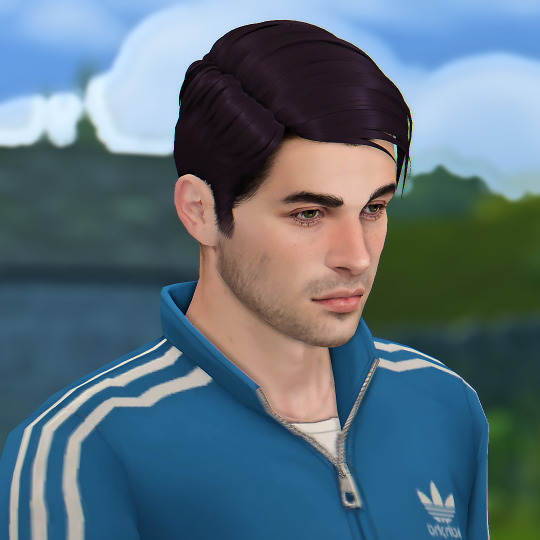
* Shane Hair - base game compatible male hairstyle, all LOD’s, all maps, 32 EA swatches+extras, from teen to elder + Cas thumbnail
DOWNLOAD (No Ads)
Thank you for supporting me!
-—————————————-
>>More Wistful Stuff
679 notes
·
View notes
Text
TS4 SimRipper, now at S4S
Andrew has updated (the late) CmarNYC's SimRipper for The Sims 4 game patch 1.105, and it has a new home: https://sims4studio.com/thread/34354/ts4-sim-ripper.
377 notes
·
View notes
Text


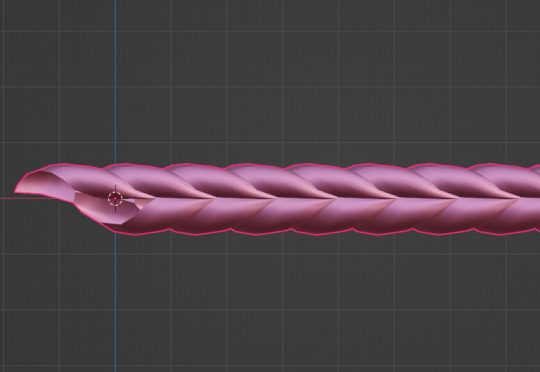
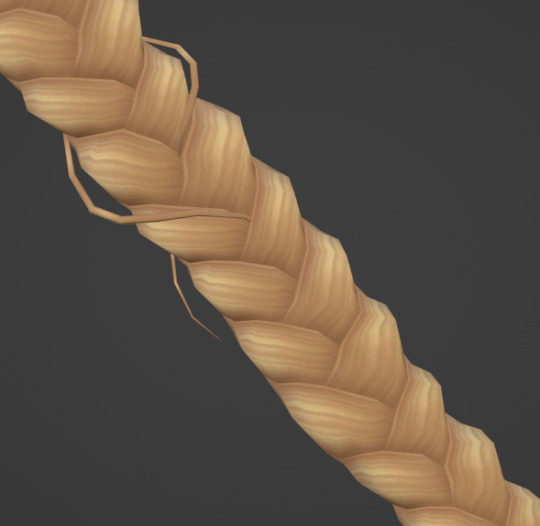
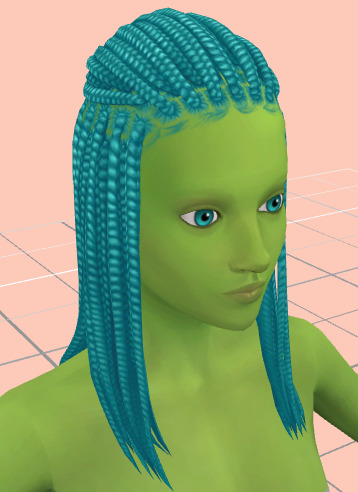
DL (mediafire)
Today I bring you not cc, but a small collection of .blend files for making cc a little easier. If you've ever wanted to quickly put a braid into a custom hair without completely obliterating your poly count*, then these might be able to help.
*braids will still add a LOT of polygons to your hair, but since every single polygon is visible** on these tiling braids, at least you know they're all being put to use, whereas if you were to physically braid 3 strands of geometry, lots of those polygons would wind up inside the braid, just adding to your count without contributing anything to the look
**if some polygons end up inside of other meshes, you may want to delete them to reduce the poly count further. The boolean modifier may be able to help you, but I haven't tried
These are completely hollow, tiling braid "facades". They just look like a braid, without being anything more than a stylized tube. Available in 9 shapes (which are all pretty similar, more or less, but have different 'vibes', and one of them technically doesn't resemble a braid, but if you squint it looks close enough) and 3 polygon counts to hopefully fit in with your project.

TOU: Same as my cc. Read it here. I obviously don't own this concept, so feel free to reverse engineer, make your own braid tiles, etc. Just don't use mine for anything commercial (using them in commissions is fine, just not paywalled final products!)
You will need to be using one of the newer versions of blender, I believe 2.8 and up. These were made in blender 3.6, so the files will not be compatible with old versions like 2.7x.
Quick start guide:
Open your hair wip's .blend
In object mode, 'Append' the 'BraidTile' object of your choice
Select 'BraidPath' and, in Edit mode, position it however you like
Additional info under the cut, because I tend to ramble, and these require a little bit of a primer before use, probably. Unless you for sure know what you're doing, in which case, feel free to just take these and run with them.
THIS IS NOT A TUTORIAL ON MAKING HAIR, OR HOW TO USE BLENDER. Seek that information elsewhere.
Before importing braids, you may want to open up the blender file and look at all the shapes, to decide which one you want to use.
When you first append your braid, or open the blend files, you may notice it does not look like the preview images above, and instead looks like a shiny pink slug. This is intentional! For previews and development work, I use @/simandy's base textures, but your hair will probably be using a different texture, so I have not included a texture at all.
Simply switch the material of the 'BraidTile' to the same material your hair is using, and adjust the uv map accordingly. I'm going to assume if you are making hairs that you know how to do that, so it will not be explained here.
Once you have your braid imported, and have edited the UV Map of the 'BraidTile' piece to your liking, you can also try scaling the tile in the X, Y, and Z axes to change up the look a little. Make sure you select all of the vertices before scaling, to make sure it still tiles. This should be safe to do, and not mess up the tiling at all, but make sure you do it in Edit mode, not Object mode. (If you mistakenly do it in Object mode, you just have to press ctrl+A and select 'scale', and that should fix it)
When you have your braid adjusted, switch over to the 'BraidPath' object, and use edit mode to move the points around however you want. This is just like any other hair strand, if you're used to making hairs with paths and curves then this should already be familiar to you. All the same controls should work.
And, if you already have a curve in your hair that you'd like the braid to snap to instead, you can select the 'BraidTile' object, locate the curve modifier, and switch the curve object to any other curve in your .blend. You'll want to change the curve in the array modifier to the same one, most likely.
If you haven't used curves to make a hair before, here's a couple quick controls you might like to know:
ctrl+T will let you Twist the object around the selected point(s)
alt+S will let you Scale the object around the selected point(s)
selecting the first or last point of the 'BraidPath' and pressing E will Extrude a new point, making your braid longer
Remember to do all of your positioning on the 'BraidPath' object! You do not need to edit the 'BraidTile' at all once you've set up the UV map and adjusted the scale!
It should tile, twist, etc. with little issue, and should get longer or shorter according to the length of your curve with no issue. If it doesn't, make sure both the array and curve modifiers of your 'BraidTile' object are using the same curve. They should be using the 'BraidPath' object by default, but if you changed this manually, ensure that both modifiers match for best results.
Unless you know what you are doing, I do not recommend messing with any other settings in the modifiers, or adjusting the 'BraidTile' mesh in any way besides scaling the entire object at once. Otherwise you could end up with gaps and holes in your braid.
When you are done posing your braid, you can apply the modifiers to turn the whole thing into a regular mesh. I like to make a copy of my 'BraidTile' and 'BraidPath' first, just in case I want to go back and change the shape later. After converting it to a regular mesh, I'd recommend going in with proportional editing turned on and randomly scale and move a few of the pleats just a little, to make the braid look a little more organic. You can even add a couple strands to make it look messier, if you dont mind adding to your poly count even more. But this comes down to your preference and style. The braid below has had some half-assed editing done to demonstrate the concept.
Ultimately, it is up to you to decide how you want to blend the braid in with the rest of your hairstyle. I can't tell you how to do that, as it is ultimately going to come down to your own personal preference, workflow, and the hairstyle you are making.
How do I know if I should use Hi, Mid, or Lo poly?
This is largely due to personal preference, and how you're using the braids in your project. I have included the three different poly versions to try and be mindful of the overall poly count of your poor poor meshes, but even a lo-poly braid is going to add an easy couple thousand polygons to your project. Keep that in mind! If you plan on having a LOT of braids, something like this EA hairstyle, for example:
You will probably want to follow their example and use a very simple mesh and just apply a braid texture instead of using these. EA's braids here appear to be a simple box shape painted to look like braids.
If you only plan on having one, maybe two braids in your entire project, especially if they are very large braids, then you might want to go with the hi-poly option. They're the smoothest, roundest choice.
If your braid has a very small diameter, you can probably get away with just using the lo-poly option, and save some polygons you won't need anyway.
The mid-poly version exists as a sort of happy medium. They aren't quite as pointy as some of the lo-poly shapes, and they won't inflate your poly count as much as the hi-poly models, so you may find you prefer them for your applications.
It's all very subjective.
I think that's pretty much everything I wanted to say. If you have specific questions, my inbox is open.
Keep in mind I am not very skilled in blender! There's probably some optimization that can be done if you know what you're doing, and I welcome you to tweak these meshes to your heart's content, if that's you! I made these for me, but I figure they could make someone else's life a little easier too, so here you go.
If you make anything using them you are welcome to tag me! If you don't end up making anything with these then I hope you at least have some fun playing with them!
204 notes
·
View notes
Text


Commissioned by @tellmeasimsstory !!
Hello!!!! LONG HAIR FOR MEN NOW. please and thank you :^)
BGC
All Lods
Hat Chops
24 EA Colors
40 Puppy Crow Colors (You will need the mesh with the EA colors)
TOU
🔥 • DOWNLOAD • ⛓️
PLEASE CONSIDER DONATING ON KO-FI OR BECOMING A PATRON. I’m trying to pay for my new ADHD meds, antidepressants and therapy, also college. Please, consider sharing too, if you can’t pay. Thank you for the support :)
COMMISSION ME! >>
3K notes
·
View notes
Text

☘️📜 Ornate Medieval Saddle Pad ☘️📜
❕ UPD (Feb 14, 2024): a bunch of improvements - made it higher quality, added a few swatches, a new thumbnail and finally fixed the shadow so now it works normally. pls redownload ✨
a little medieval style saddle pad! not flawless but i really tried xd
feel free to use and recolor it (don't forget to tag me though) <3
16 swatches
custom thumbnail
hand-painted
🌺 Download ~ SFS | Patreon {free} 🌺
🔍 @sssvitlanz @ts4medieval @ribbonsmedieval @simshistoricalfinds @sims4historicalccfinds
749 notes
·
View notes
Text

☘️⚔️ KNIGHT SET RECOLORS ⚔️☘️
recolor of an amazing medieval horse set created by @objuct!
nothing too complicated, just added a bunch of new color options 🤍
• 14 cloth swatches (kinda desaturated colors)
• 4 metal & 4 leather swatches
• custom thumbnails
• color tagged
❕ you need to get the MESH ❕
🌼 DOWNLOAD {SFS} 🌼
🐴
🔍 @sssvitlanz @ts4medieval @ribbonsmedieval @simshistoricalfinds @sims4historicalccfinds
311 notes
·
View notes