
airkewld
Custom Volkswagen Talk from the PRO's at Airkewld
If you're into Volkswagen's, you got to love the Custom VW scene right now. Airkewld is raising the bar with products, expertise and tech to make your VW stand out!
1185 posts
Don't wanna be here? Send us removal request.
Last Seen Blogs

dailytidelands
dailytidelands


the-turbatron
Everything changed when the fire nation attacked

chidoroki
solitude is poison

lordartsy
Just call me Artsy
Text

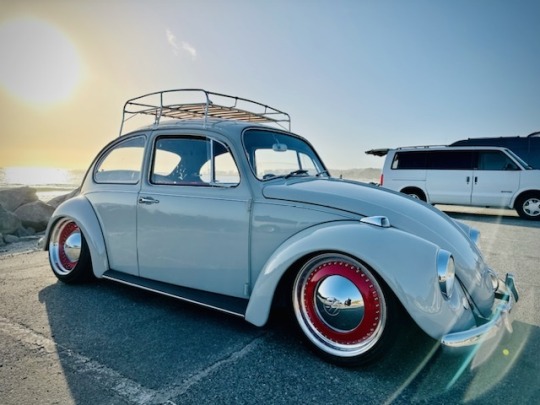
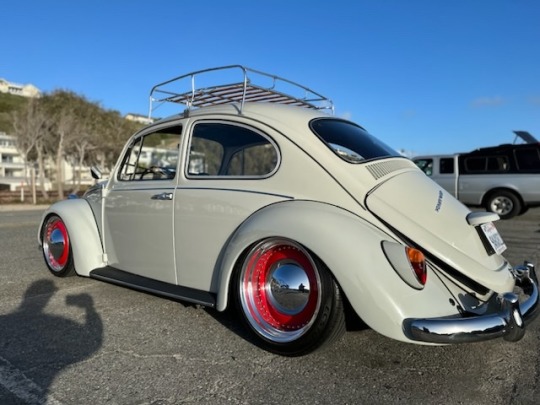
My Ultimate Plan | Airkewld | 1957 Beetle on a 1971 Chassis | Patrick
Client's Vision - 57 Beetle on a 71 IRS PAN
What kind of wheels do you want to run?:15”
Suspension Choice:Static - Set it and forget it
Stopping Power: Disc Brakes - Self Adjusting
Driving Style:Performance - More controlled, better handling, let's burn some rubber
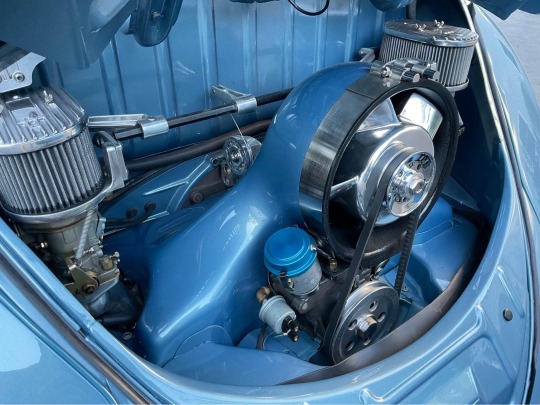
Ideal Engine: Performance - More Power, more torque, I want to have the ability to get out of my own way.
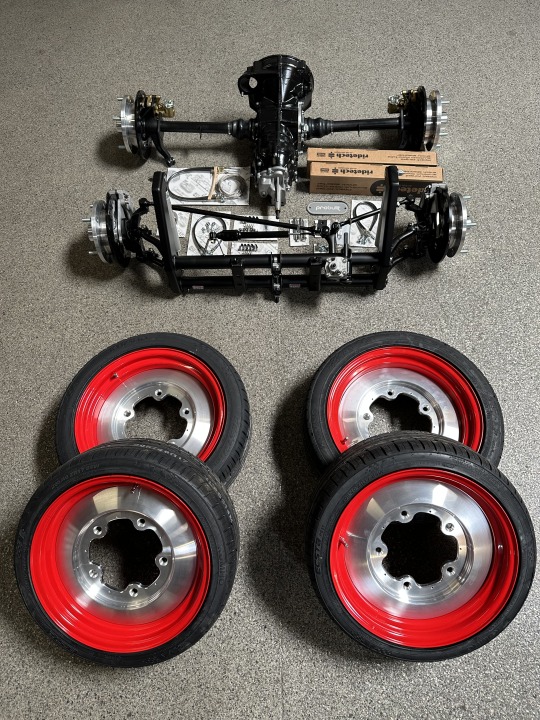
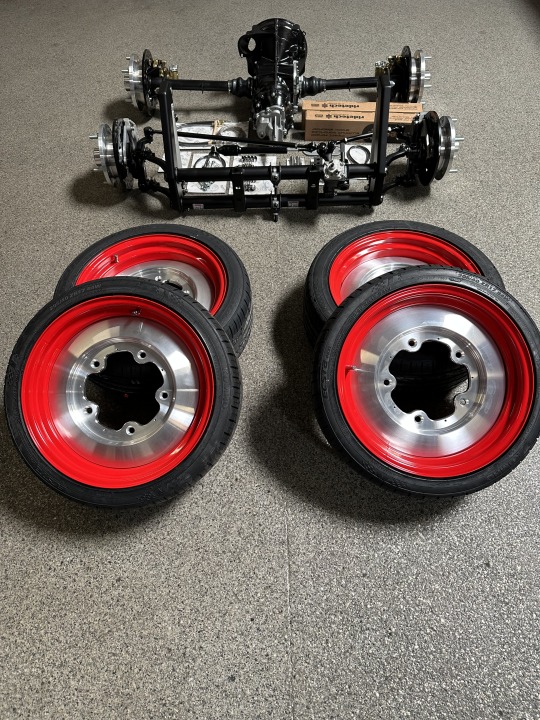
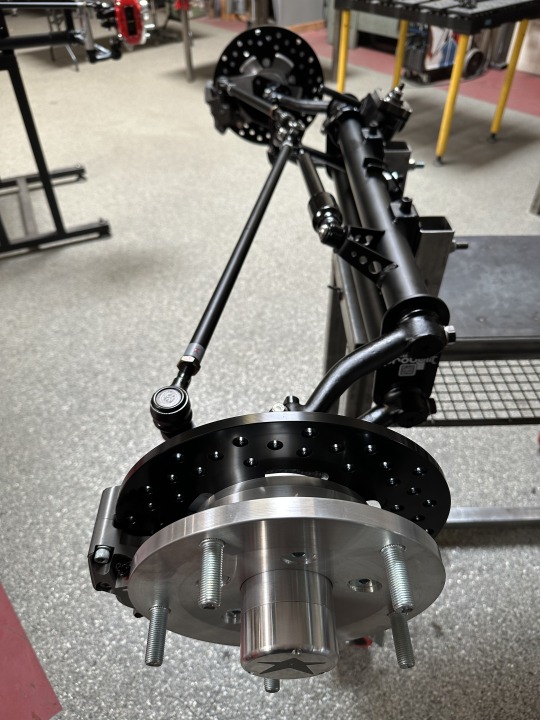
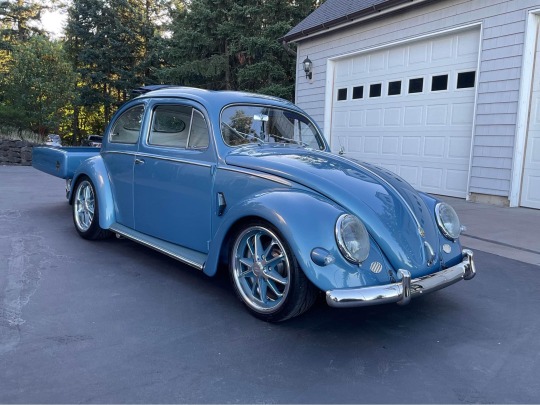
Stance: classic rake lower in the front, almost stock height in rear, wide tires front and back on titanio Venus wheels, discs on all 4 corners, daily driver mostly, ideal engine is fuel injection, 1776-2017cc, freeway flyer transmission
Wheel Link - https://vwispwest.com/titanio-venus-15-x-5-5-wheel-r1128/
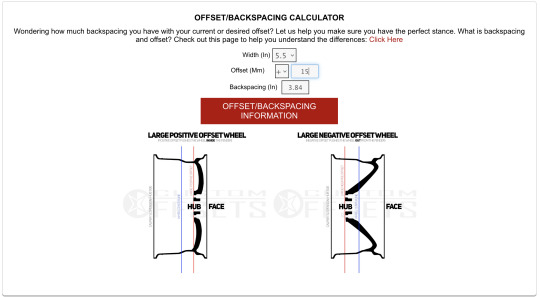
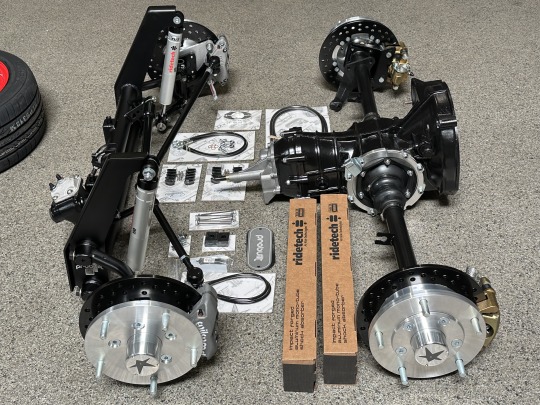
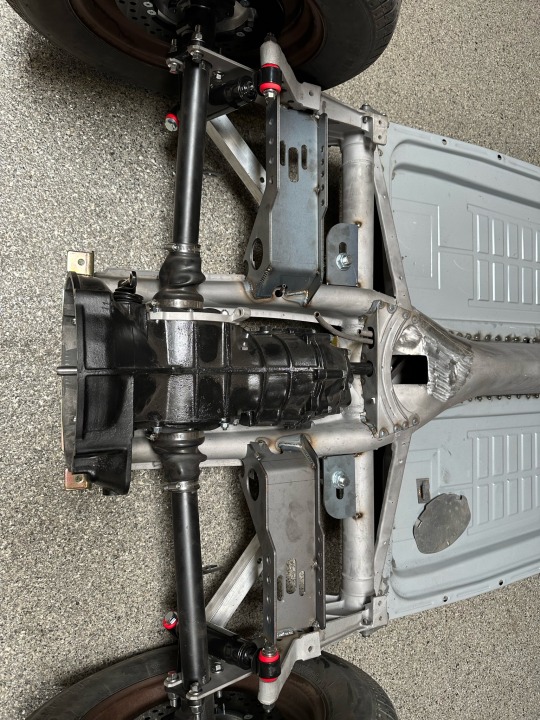
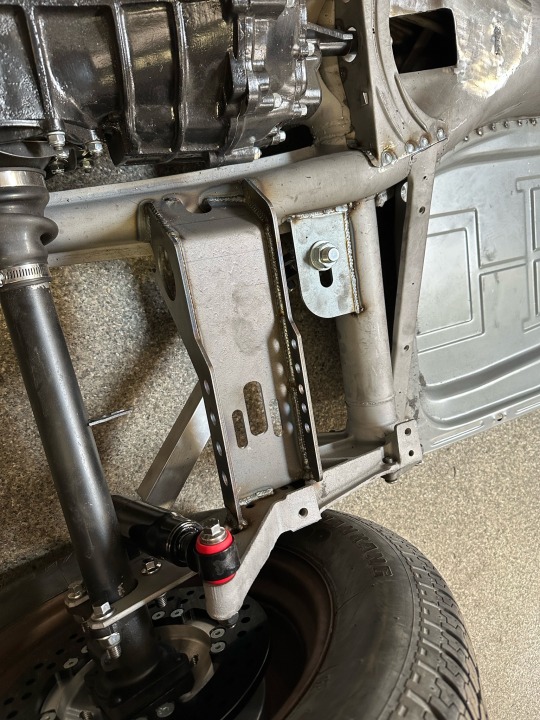
PRO's Plan for Patrick - If you go with he 15x5.5 wheel options they will come with a +15 or 3.84" backspacing up front, you would need a 5" Ultimate or PRObuilt Beam with shock towers for a performance build or a 6" shockless for a cruiser build. 165-60-15 tires up front. This is due to the Chassis swap you have and that makes the suspension platform 2" wider than your original 57 was. I think you would need to go with the same wheels in the rear but with an obviously taller wider tire. 205-65-15 tires in the rear.
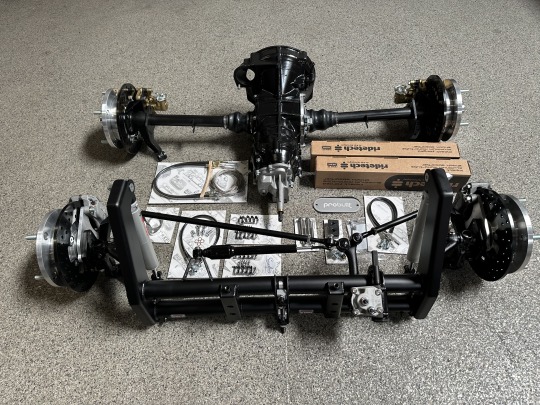
As it would ship to the client for FREE in the lower 48 states, it would come with the following:
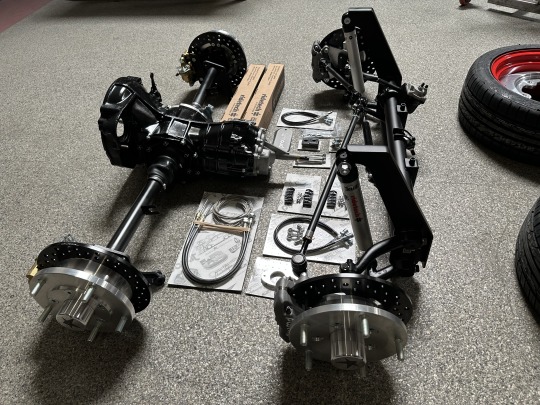
Stage 1 PRObuilt Beam complete assembled with sport shocks, drop spindles that is narrowed to spec to fit the wheels and the stance the client is looking for and GEN 2 BAD Series Brakes are installed in a Wide 5x205mm bolt pattern and outfitted with 4 piston grey Wilwood calipers. This will give him the stopping power he wants, the stance he is after and ability to give him the best user experience possible. In the rear, we went with an eBrake style NON Wilwood caliper and the Wide 5 GEN 2 IRS BAD Series Brakes couple with adjusting the torsion's to fine tune his ride height and installing a set of rear shocks and Stainless Steel hardware.


$6500 Delivered to an R&L Terminal closest to our client. All forms of payment are available and it can even be financed during checkout.
If you want to add all of these items to a cart and check them out yourself, you can here - https://airkewld.co/57-71UltimatePlan
Classic Volkswagen Drive-Train built by PRO’s that care about quality, fit-n-finish, for the Best Clients in the World 🌎
✉️ [email protected]
📞 or 💬 1-623-518-3537
🗣️ DM for more ☝️ on ☝️
25 notes
·
View notes
Text
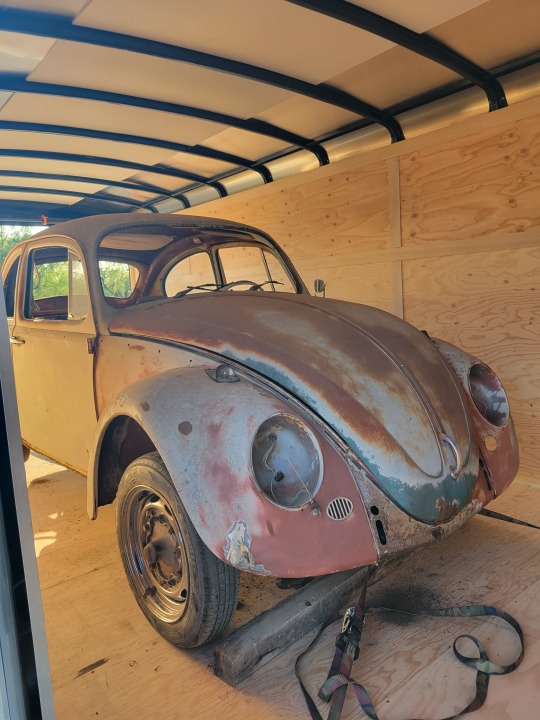


September 7th 2023 | Cores for Heroes Submission | M. Ford | 1963 Beetle
I served in the USMC from 05-09. I went through boot camp at MCRD San Diego and School of Infantry at Camp Pendleton CA. I was sent to 7th Marines in 29 palms the end of January and February 14th we left for Iraq. I had to learn everything on the go, baptism by fire. My 1st tour was in a town called Husaybah Iraq, on the boarder of Syria, and the Euphrates river. Was a wild west kind of town. My 2nd tour was in a small town called Kubaysah, just outside of Hit Iraq. My journey took me to Baghdad to testify against two bad guys we caught throwing grenades at our patrols. The best part of that trip was swimming in Sadam Hussain's pool, and i have the picture to prove it! My 3rd and last tour was in Karma and NE Fallujah, sadly having to leave my post early I was sent home due to my Dad's untimely passing. Upon arrival back in the States I also lost my great grandmother within two days of being home, grateful I was able to tell her goodbye, wish I could have had that closure with my Dad. My Dad and Uncle Dave brought me up with a love of cars and Racing. My first car was a 69 bug that I drove while in HS and sold it before I joined the USMC. I regret selling it to this day and no pictures remain of it. My favorite past-time was cruising in my 69 bug all over the Columbia River Gorge corridor and county back roads. After moving from Oregon to Texas I decided it was time to build something. So I found a 1963 that I am currently restoring from the ground up. The theme for this bug will be USMC, going to call it the "Teuful Hunden" bug or as most people know it "Devil Dog". It will be painted red, with gold doors and rims, the Marine Corps colors. This build is really helping me find parts of me I left over seas. It's going to be a long build being a disabled veteran and on a budget. I have been ordering all the new body panels first. Was going to order a pro beam with disk brakes and a Freeway flyer with disk brakes from Air kewld but having a chance to win them is really awesome of you guys. Thanks for the opportunity and your time. M. Ford USMC
M. Ford is entered into our Cores for Heroes Program here - https://www.airkewld.com/Cores-for-Heroes-Program-s/2532.htm
To date, we have 12 submissions to win and we have raised $445 dollars of our $10,000 goal.
In our honest opinion, the US Armed Force members, are so under-appreciated. The PRO's are finally in a place to put a plan together that helps everyone that participates, but more importantly, those who served or serving.
Details will slightly change as we get more context, but here's the idea.
I want to give back to those who have fought for our freedoms, regardless of our political beliefs. I didn't fight for my country but my father did and he is fighting PTSD, mental disorders, agent orange, etc., etc. I get to build products for the greatest clients in the world because of it. So, how do I make something happen?
The PRO's need cores. The AirkewldArmy has cores. Within the AirkewldArmy community, reside members of the US Armed Forces that want/need/could use a boost in their life, whether it is financially or upgrades to their favorite VW.
To give some context on our Core Program, the PRO's need certain parts to make our PRObuilt Line of Classic Volkswagen Drive-Train Components. In the past, the PRO's would print out a prepaid shipping label and rebate an order if our client/s sent that core in and it checked out. Payment would be reimbursed to the client, store credit or trade for something else, would take place. With a unique but small twist, a BIG change can make a humongous difference.
If our current or past clients, the AirkewldArmy, sent their cores in, based on a value proposition, the PRO's would give them the opportunity to win two ways. The first, for every $10 in core value, would be one entry on a quarterly drawing to win Airkewld Swag, like work shirts, tee's, hats, stickers and air fresheners, $100 gift cards to Airkewld.com or even a $500 Visa/Airkewld gift card. The second, for every $10 in core value, once the PRO's accrue $10,000 in cores, the PRO's select a Hero, to receive a Complete Airkewld Drive-Train Package or $10,000.00 (Our CEO would fly to them and personally hand them the check), delivered to their door, FREE of charge. Heroes would enter by telling their story, both about their military experience and passion for their Classic Volkswagen.
Airkewld receives usable cores. The AirkewldArmy wins FREE Stuff. Together, the PRO's and the AirkewldArmy show appreciation to someone who deserves better, our Military Heroes.
Who's ready to make a difference today?
8 notes
·
View notes
Text
July 28th | Virtual Space | Turbo VW Ringtone Development
Created my first ringtone for the iPhone, check it out here - https://airkewld.co/RingtoneTurbo
https://airkewld.co/RingtoneTurbo
10 notes
·
View notes
Text
July 27th | Ontario California | @CecchiniTrucking on IG
What and incredible ride! This early Beetle sporting Airkewld Suspension, Brakes and Smoothies, can it get any cooler? I think not, but I am biased.
Stage 1 PRObuilt Beam - 4" Narrowed - https://www.airkewld.com/Stage-1-PRObuilt-Adjustable-Beam-Complete-2201-p/2201.htm
BAD Series Brakes up front - https://www.airkewld.com/Classic-VW-Front-Disc-Brake-Kit-4150G2-p/4150g2.htm
BAD Series Brakes in the rear - https://www.airkewld.com/Classic-VW-Rear-Disc-Brake-Kit-4700G2-p/4700g2.htm
Smoothies - https://www.airkewld.com/5-Lug-Smoothie-17-Inch-Wheel-9001-p/9001.htm
7 notes
·
View notes
Text
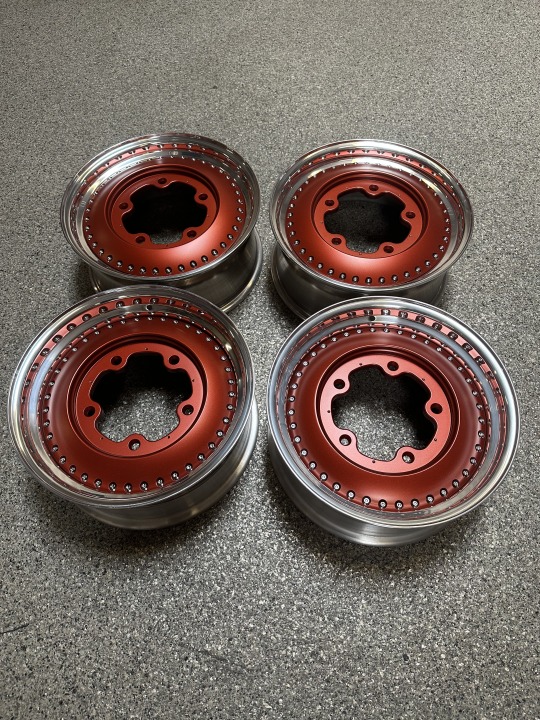
July 27th | Airkewld HQ | 17 Inch Billet Wheels for a Late Model Beetle
Are these HOTT or what? 17x7 SLG60's wrapped in Kumho Tires, 205-40's up front and 215-45's in the rear. Perfect for the late model Beetle.
Built in all small 5 lug configurations, isn't it time to upgrade the Beetle and put some new shoes on it?
6 notes
·
View notes
Text
July 26th | Airkewld HQ | Rate My Work
The PRO's are always trying to get better and this time we created a video on judging our latest assembled beam, the Stage 1 PRObuilt Beam. You can find details on that here - https://www.airkewld.com/PRObuilt-Beams-s/2486.htm
What do you think? What can we improve on? Sound off please1
16 notes
·
View notes
Text


July 17th | Rockford, Illinois | 2204 Stage 1 RAISED PRObuilt Beam on a 1969 Baja
Got a call from Mr. Grimm who wanted to lift his 1969 Baja up front and noticed that we had a RAISED PRObuilt Beam available for his model. He was still running the factory 4x130mm bolt pattern on some custom wheels and he already had a bolt on disc brake kit for it.
The PRO's suggested a part number 2204 Stage 1 RAISED PRObuilt Beam with adjustable shocks and OEM PRObuilt Steering Box System. It was built in stock width and actually raises the vehicle 3.5" or 89mm and every PRObuilt Beam has adjusters in it to get the vehicle to the ride height that he envisioned.
One thing to remember with Ball Joint VW's, the ball joints only have so much articulation in the joints. All the way up, they are locked out. All the way down, they are locked out. Giving some room to allow the suspension to adjust to the road is recommended.
Also, the adjustable shocks allow for the driver to tune in the ride quality of the vehicle, something that was never an option before.
"I’ve been driving the car lately and everything’s smooth as silk!" - Mr Grimm stated in an email.
The PRO's only have one goal in our quest to rid the industry of subpar products. WoW our clients with our education, quality of product and quality of ride. Mr. Grimm, welcome to the #AirkewldArmy.
2204 Stage 1 RAISED PRObuilt Beam - https://www.airkewld.com/Stage-1-PRObuilt-Raised-PRObuilt-Beam-p/2204.htm
8 notes
·
View notes
Text


July 14th | Montreal Quebec Canada | 3 Piece PRObuilt Smoothies are headed to the French Quarter
Having an 8 year relationship with a company gives you a bit of confidence knowing that you are doing something right. That is what Airkewld has with Jaysen over at CAR Leasing in Montreal.
Currently, Jaysen and his team are working on a 1963 Double cab Type 2 that they just got done doing air ride on and now, they needed the Ultimate Wheel package for it but he had a unique request.
White metallic powder on the centers and boy was that the right choice! These wheels are bad a$$!
The PRO's went with a 17x6.5" up front with a 1.5" lip and a 17x7 with a 2.5" lip in the rear. To get something similar, you are looking at $3800 for the exact set up, powder coating and polishing included with free shipping in the lower 48 states and competitive shipping rates worldwide. Who's ready to get a set going for their Classic Volkswagen?
Build your set here - https://www.airkewld.com/3-Piece-PRObuilt-Smoothie-17-Inch-Wheel-9010-p/9010.htm
13 notes
·
View notes
Text
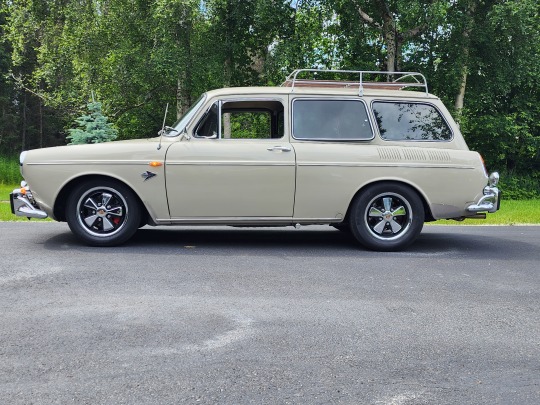
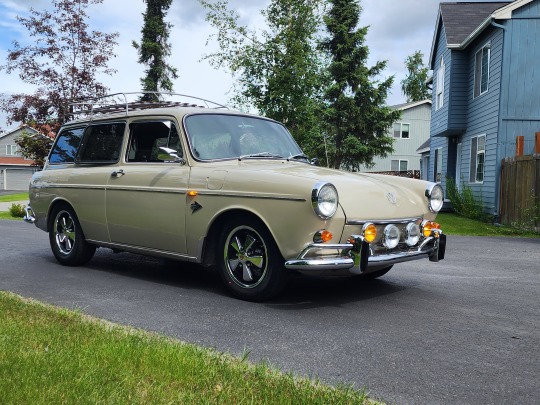


July 13th | Alaska | Yes, the #AirkewldArmy is even in Alaska!
In a matter of weeks, the PRO's received orders from the Hansmeyer brothers, both in Alaska, which is not a common thing, but doing business in AK has happened in the last 21 years.
J has a 1962 Beetle on which we did a Stage 1 PRObuilt Beam and GEN 1 BAD Series Brakes.
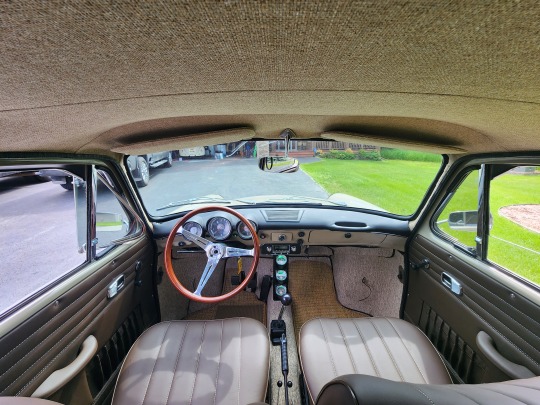
P has a 1968 Squareback, the vehicle we are featuring here today; we did a Stage 1 PRObuilt Beam along with GEN 2 BAD Series Brakes front and rear.
P has a 1967 Beetle. We did a Stage 1 PRObuilt Beam, PRObuilt Freeway Flyer Transaxle, and GEN 2 BAD Series Brakes, front and rear on.
The loyalty that this family has for the PRO's is unrivaled. Soon, I will make it to Alaska to break bread and drink some whiskey with my friends, the #AirkewldArmy.
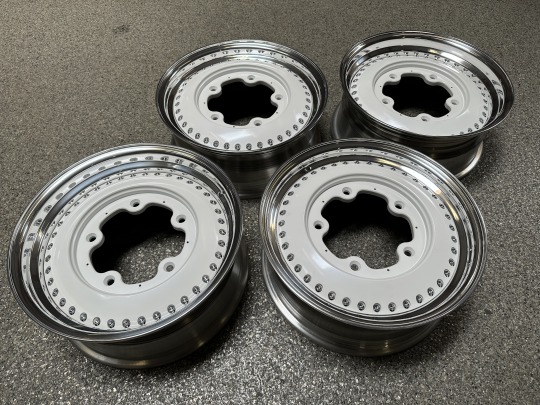
P's 1968 Squareback is super clean. So clean that we are featuring it on our blog. P is running Fuchs, front, and rear that come in different offsets, so the fit was critical with this one. 15x4.5's upfront and 15x6s in the rear. The Stage 1 PRObuilt Beam was equipped with Sport Shocks and dropped spindles along with GEN 2 BAD Series Brakes in Porsche pattern, Wilwood 2 piston Red calipers up front, and the Rear Disc Brake Kit featured match painted brake calipers for the best functionality.
Stage 1 PRObuilt Beam - https://www.airkewld.com/Stage-1-PRObuilt-Adjustable-Beam-Complete-2206-p/2206.htm $2880
GEN 2 BAD Series Front Brakes - https://www.airkewld.com/Classic-VW-Front-Disc-Brake-Kit-4153G2-p/4153g2.htm $1457.90
GEN 2 BAD Series Rear Brakes - https://www.airkewld.com/Gen-1-Classic-VW-Type-3-Rear-Disc-Conversion-p/4750.htm $1673.92
Shipping was even FREE to Alaska to an R&L Terminal out there. So my fellow Alaskan #AirkewldArmy, we got you!
49 notes
·
View notes
Text


July 12th | Airkewld HQ | The Kindigit Design's Performance Package
The PRO's got a call from Dan in Utah who had just got done watching an episode of Bitchin' Rides featuring the little sister, built by Dave King and his team at Kindigit Design.
He wanted to emulate it the overall stance on his 1956 Beetle with some slight changes, which everyone over at the HQ loves! Dan is going to install a 190hp engine in it so the PRO's needed to thing PERFORMANCE with this one.
Up front, the PRO's went with a Stage 1 PRObuilt Beam that has been narrowed 4 inches and also has drop spindles. We went with adjustable shocks front and rear and an OEM PRObuilt Steering System that will last for years!
GEN 2 BAD Series Brakes were installed on the beam in a Wide 5 pattern along with 4 piston Wilwood calipers in grey. This thing will handle, stop and can be tuned to his liking. I love it.
We opted for the PRObuilt Performance Transaxles with short axle to give the VW a deeper dish in the rear on his 17" Two-Piece Smoothies. More on those later. We went with a 4.11 ring and pinion and the overdrive 4th out of a super beetle to keep his monster motor from over revving at high speeds.
Mated to the trans, we installed a GEN 2 BAD Series Disc Brakes in the rear with an ebrake caliper, we opted for no color due to not being able to see them through the wheels. But should he decide to not install the caps, them GEN 2 matching center caps are going to look epic!
Back to the 2 Piece Smoothies, we went with RAL3020 (red) on the hoops and went with the machined center....drool. The PRO's wrapped them in Kumho's, 205-40's up front and 215-45's in the rear.
Everything Dan needed to do this install was purchased to allow him to have an adult Lego set from the PRO's at Airkewld. If you want to do something similar to your 1949-1965 Beetle, here are some links and costs.
17" Smoothies - https://www.airkewld.com/5-Lug-Smoothie-17-Inch-Wheel-9001-p/9001.htm - $3953.72 as pictured
Stage 1 PRObuilt Beam with Adjustable shocks and install kit - $3454.35 as pictured
GEN 2 BAD Series Front Disc Brake Kit - $1699 as pictured
Installing Brakes onto the PRObuilt Beam - $75.00
GEN 2 BAD Series Rear Disc Brake Kit - $1640.42
PRObuilt Performance Transaxle - Short Axle - $2863.33
Installing Brakes on the transaxle - $185.00
Matching rear Adjustable Shocks - $558.90
$14,000 shipped in the lower 48 states if it is picked up from a local R&L Terminal near you or $14,500 to your residence in the lower 48 states. We have great rates worldwide as well.
12 notes
·
View notes
Text

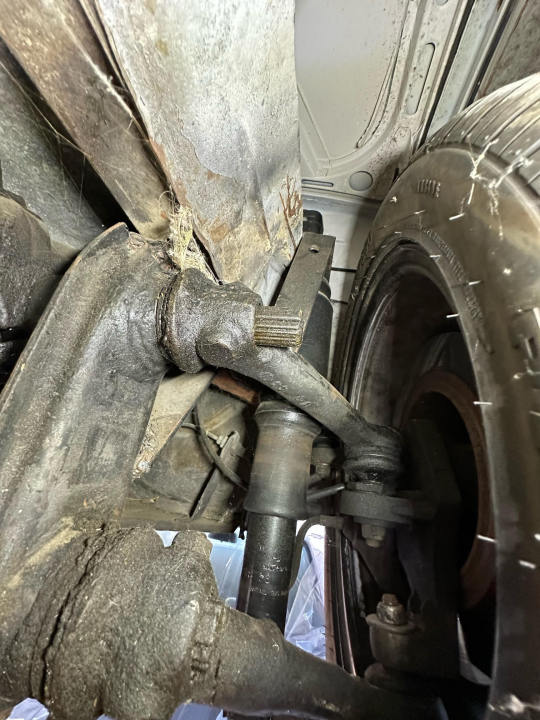
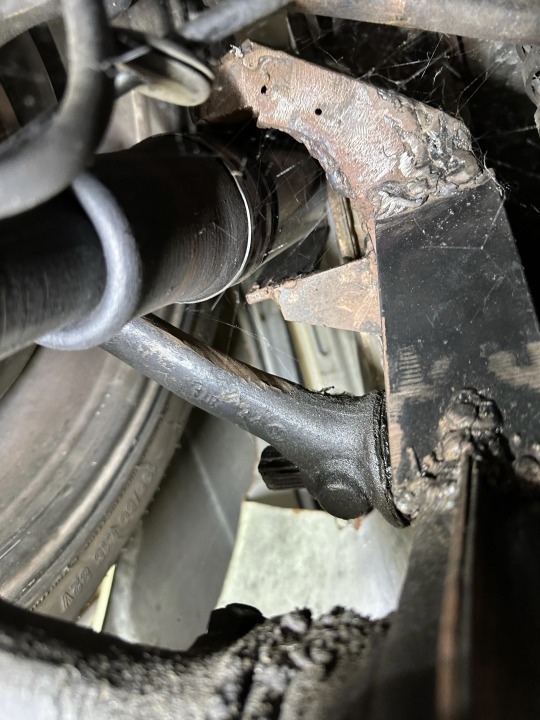
July 9th | Illinois | Excessive Play in PRObuilt Steering Box
The subject has come up when you become a leader in the steering box space, how can a professionally built steering box have play in it? The answer, it has to have it in certain places.
We created a YouTube video on this recently as we were brainstorming the possibilities of our clients and how to recreate the problem. You can find that video here.
What we found is that clients were installing the steering box in all different configurations but most of the time, not in line or in center position where it needs to be. As seen in the picture above, it was angled to the left (right in the picture). The worm gear is like an hour glass shape. As the it rotates and move the pitman arm left to right and right to left, there becomes areas where slop have to happen by original design. Those areas can not have slop removed. It's impossible. But if you bring the box back into center, readjust the steering wheel to be centered in that position, readjust your tie rods and align the vehicle, there will be no slop or play in the wheel.
Here is the conversation.
AirkewldArmy - "I finally finished my Red 1966 VW Bug. Almost everything is brand new. On my test drive I noticed my steering wheel had excessive play, so I adjusted my Pro-Built Gearbox each quarter turn, I turned the steering wheel full turns back and forth; it got better and better; but I still had some excessive play (driveable). Today, I jacked my Bug back up and went through each component one by one checking all my installs. It revealed the steering box itself has excessive play."
PRO - "It’s supposed to have play in that position. Straight back it doesn’t. https://youtu.be/Fzwf1S_oGCA "
AirkewldArmy - "Ahhhhhhhh. That was it. Thank you."
The OEM PRObuilt Steering Box - https://www.airkewld.com/Steering-Box-Components-s/2519.htm
3 notes
·
View notes
Text


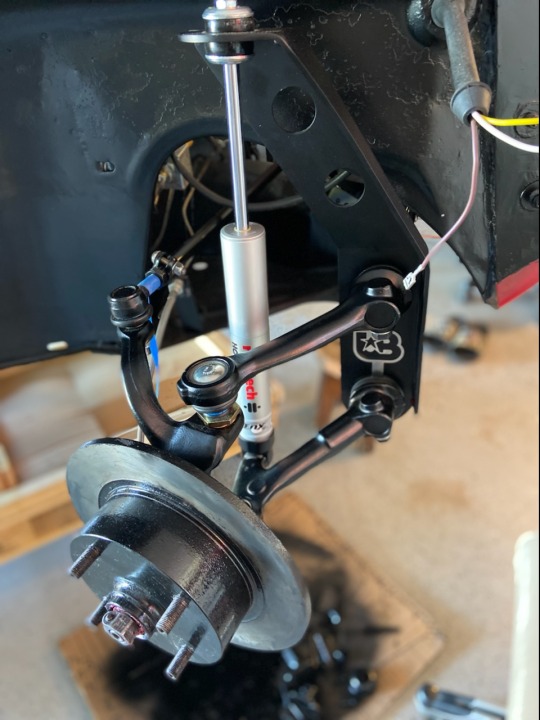
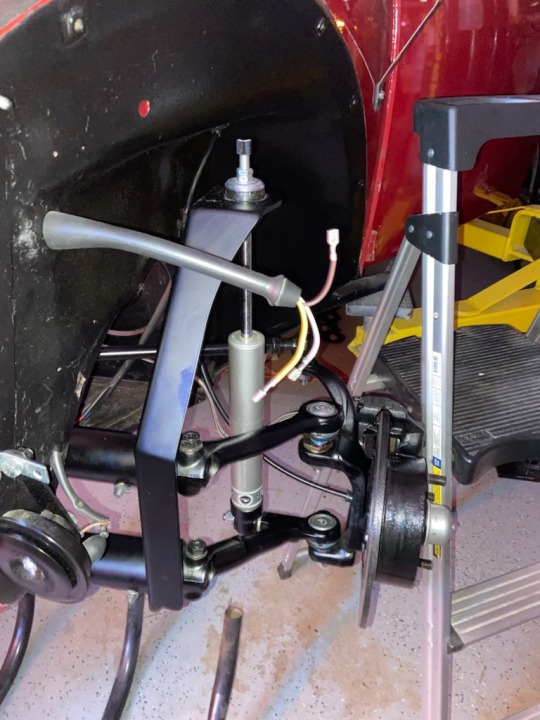
July 8th | Mexico | You actually handed money over for this job...
Daniel from IAS Labs dropped me an email about updating his 1975 Brasilia and its front suspension. He used the word "hacked" in his initial email. I wasn't ready for the pictures that came back.
If ANY experience, for reference, I have 21+ years, resonates with you, head this warning. If you hire someone and you don't vet their work, you could actually hand money over for this kind of work. Please, don't risk your life or the lives around you even thinking of driving around the streets with so many issues. Please.
With that said, Daniel asked for the PRO's expertise on what it would update this Brasilia and bring safety, enjoyment, and quality of ride, back to the forefront of this Classic VW. The Answer. The Stage 2 PRObuilt Beam.
With the vehicle having cosmic wheels and the current 5" narrowed beam, Daniel was having rubbing problem on the inner fenderwells and he also did not like how much it tucked inside the fenders. We opted to do the 2" narrowed version to check as many boxes as possible. Here are the specs on the beam;
Stage 2 PRObuilt Air Ride Ball Joint Beam Complete - 2203
The BEST way to add Air Ride to a Classic Volkswagen Type 1 with ball joint front suspension (1966 through 1977), is by installing a Stage 2 PRObuilt Beam. When the PRO's say complete, they mean complete. You will not need anything in addition to this assembly.
The Stage 2 PRObuilt Beam is built on the Ultimate Beam platform. It's made in stock width and up to four inches narrower than OEM to allow for wider wheels, drop spindles, and disc brakes, that add track width.
The complete beam comes as you see it, spindle to spindle, with an entire PRObuilt steering system installed and ready to bolt in and go.
What's included? This Stage 2 PRObuilt Beam is spindle to spindle, built in any configuration, from stock to four inch narrowed. It comes powder-coated, satin black, ready to install. The front end comes complete with the following;
New Ultimate Adjustable Beam
Through Rods
New Tie rods
New Air Ride Shocks
New Drum Drop Spindles (CB Performance/EMPI) or OEM Spindles
New Steering Dampener
New Hardware
New Grease Zerks
Premium Tie rod Ends
Premium Ball Joints
PRObuilt Steering Box filled with Corn Head Grease
Reconditioned pitman/drop arm/clamp
PRObuilt Control Arms
New eccentrics
What's recommended?
When it comes to how narrow you need, check out this article here. The PRO's recommend a FOUR Inch narrowed for most applications as it allows for just about any wheel to fit and tuck under the fenders.
If you are going for the dropped look and want to run either Airkewld's GEN 2 Disc Brake kit or your factory drums opt for the DRUM Drop Spindles. If you keep your Factory Disc Brakes (4 lug), opt for the DISC Drop Spindles. If you are keeping the drop moderate, a stock height spindle for the drum or factory disc is available. If you want to run the disc brakes you already have, click here.
Install kit (saves time, ensuring you have everything needed to do the job right) New beam bolts, upper and lower body pads, and inspection plate) .
If you want to make this beam install even more complete, maybe installing a GEN 2 Disc Brake kit might make sense. To have the PRO's install them, you will need to add the labor to do that here, then choose your disc brake kit here.
You will need an Air Management Kit (AMK) to lift and lower the vehicle on demand. If you are only doing front air ride, you can use a 2 valve AMK and use one valve per corner. This will eliminate sway left to right when turning. Trust me. If you are going to do full air ride, then the 4 valve AMK is what you need. (If you decide to use a different manufacture for air management, the PRO's will be UNABLE to tech support any issues you have as we will be unable to replicate the issue in house).
If your steering coupler from your column to your steering box has seen better days, the PRO's suggest the OEM PRObuilt Steering Box Coupler found here.
Kewl Features
American made
7.5 inches of up-and-down movement
Taller shock towers allow for the use of shocks that will work with any ride height adjustment
Industries finest packaging to ensure it will arrive to you unscathed
FAQ
Do I need to do body mods to install this beam? No. The inside dimension is 29 13/16". That gives a clearance of 1/16" on each side.
How do you narrow the beam 4" when I only have 1/2 inch on each side of my stock beam? We utilize the outer ends of the tubes and gusset outwards to give us the needed space. Here is a video that explains it.
Do I need to send in a core? No. The PRO's have a few options for your cores. Check them out here.
Will I need anything in addition to this assembly? No. It's as complete as it comes from the factory.
The front end will be coated apart and assembled to keep the clean look with new hardware. It's set to the medium height setting so that you can adjust it to your liking. It's pre-greased, and alignment will set in a rough application for shipping.
Financing is available during checkout.
What do you think of the old beam build and what do you think of the new beam build?
4 notes
·
View notes
Text


July 7th | Airkewld HQ | The GAS Monkey Garage Package ELEVATED
The PRO's got contacted by Performance Auto Color in Fenton, Missouri to outfit his 1960 Beetle with the PRObuilt goods.
We started with the same package of products that come in the Gas Monkey Garage package found here - https://www.airkewld.com/Gas-Monkey-Garage-Beetle-Package-p/2185.htm but we elevated it with Larry doing an amazing job of painting the centers a satin cinnamon color, which in my opinion, looks crazy good!
6" Shockless PRObuilt Beam to get the wheels tucking in nicely. GEN 2 BAD Series Brakes front and rear, along with a set of PRObuilt 17" 3 Piece Smoothies. We opted for the 17x6.5's up front and 17x7.5's in the rear due to an IRS swapped rear end.
The PRO's can build the same package for your Classic Volkswagen as well. Give us a call 1-623-518-3537 or drop us an email at [email protected] and we will provide you a quote today!
We now have financing so you get the dream drive train for your favorite Volkswagen today! Details within the checkout process.
7 notes
·
View notes
Text
July 6th | Debate | Do the products you use affect the value of your classic VW?
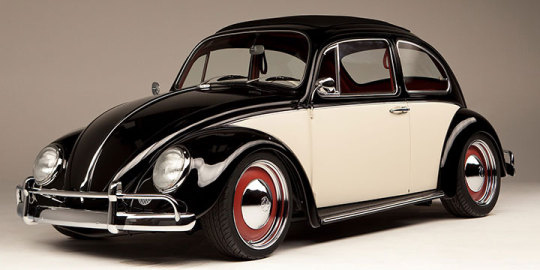
Meet Mr. Fields, the owner of this amazing 1955 Ragtop Volkswagen Beetle. https://airkewld.co/MrFields
I ran across this post of his incredible ride for sale and thought, at the price he is asking, the car is an epic deal. He’s asking $65k.
To reproduce this exact car today, it’s six figures at a minimum. Can this car be built for less? Of course. Can the amount of feet you step away from the car change the overall appreciated value? Yep, in the wrong way.
What do you think? Does the quality of parts you use affect the appreciated value of the Classic VW?

13 notes
·
View notes
Text


Tuesday July 4th | 🗺️ Huntington Beach, California 📍| Mr. William’s Sexy Sexty-Seven
Got a call from a company in HB that had Tyler’s 67 in hand and wanted a set of #PRObuilt Three Piece Smoothies. He already had a Porsche pattern disc brakes and a short axle transaxle installed.
We came up with a plan to install both a 4” Ultimate Beam and both front and rear air ride kits at the same time of the wheels. They decided to use their own air management. (Not recommended)
Up front, we went with a 17x6.5 wheel with a 205/40-17 tire and the rear we went with 17x8.5 with a 215/45-17 tire. 1.5” lip up front and 4” in the rear. Centers were coated in RAL3001.
4” Ultimate Beam - $815
Ball Joint Front Air Ride Kit - $488
Swing Axle Air Ride Kit - $930
17” PRObuilt Three Piece Smoothies - $875+ each
In my opinion, it’s perfect. What do you think?
28 notes
·
View notes
Text

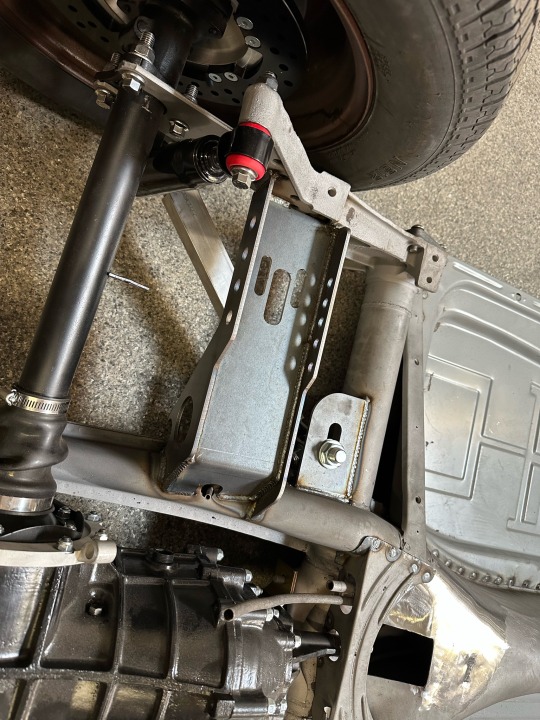


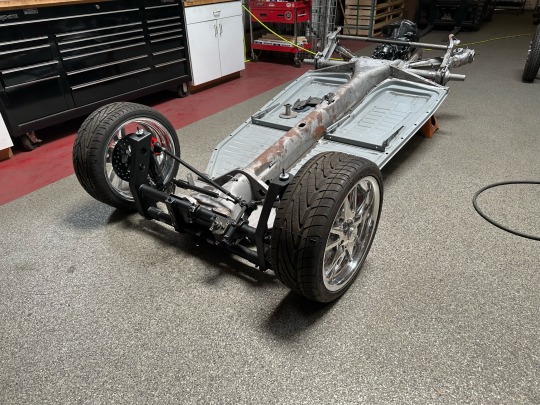
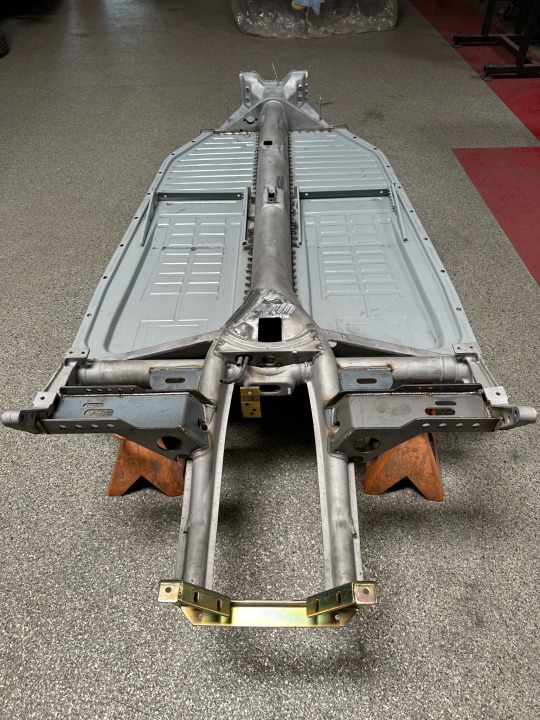
Monday July 3rd | Airkewld HQ | Swing Axle Air Ride Installation on a 1958 Ragtop Beetle
Continuing on our progress from yesterday, the PRO’s got to mocking up the rear brackets, fitting them to the chassis for the ideal fitment and matching it from side to side.
A Miller-matic 185 was used to get the job done, we have used this specific welder since 1997-8, an absolute beast. On a wire speed of 30, gas at 29 and heat on a number 3, I got to tacking everything in place, then fully welding it out ready for clean up.
Joey will take over the clean up
Swing axle air ride kit - https://www.airkewld.com/Classic-VW-Rear-Air-Ride-Kit-1200-p/1200.htm $930
Miller Welder - https://amzn.to/3NXdsEa
16 notes
·
View notes