
abhilash5
Abhilash Katta - MA blog
Documentation of the work I've produced/producing during my MA in Games Art and Design.
9 posts
Don't wanna be here? Send us removal request.
Last Seen Blogs

anyabenton
Anya Benton

raddocwrites
Untitled
fakemonalisa28-art
Lipstick On The Corner

moho-moho
moho
catnibeutism
Escape
Text
Reflective Post: Red vs Blue
We were given the brief of Red vs Blue (Red chases blue) for the initial two weeks of the Practice 1 module. On hearing the concept, I knew that I wanted to work within the realm of Pokemon and initially thought of working on a Pokedex. I ended up expanding on my idea and decided to reimagine an interior environment from the game. This was because I had been looking forward to learning and pushing myself to work with Unreal engine and decided to give it a shot with this project.
Through the process of working on the project and reflecting on it and after completing it I realised that I took on a huge amount of work to complete, relative to the amount of time that I had. This caused me to pull several all nighters and push myself, probably harder than I should have, to complete the project, to an extent that I was happy with the artefact at the least. In hindsight, I should’ve given myself fewer challenges and focused on specific portions that I wanted to learn.
For example, in this instance, I gave myself the challenge of:
Creating the entire environment and texturing it. (Over 20 individual assets modelled, UV mapped and textured)
Learning the basics of Unreal Engine.
Bringing everything over into Unreal Engine and doing all the lighting and rendering within it.
Deciding to learn the Sequencer Tool and basic animation within UE4 on the final night.
In hindsight, I shouldn’t have taken on the last challenge, but being set on learning UE4 and wanting to showcase the project better, I pushed myself to the brink on the final 4 days. Having to accomplish all of this in under 2 weeks, including the ideation caused me to need a whole day of rest and relaxation on completing this project.
Going forward planning more manageable projects that fit the time frame would be wiser, in my opinion, and focusing on learning things would help me refine the knowledge that I develop within the time. On the positive side though I reminded myself that I do work well under pressure and can work with crunch time when it does come down to it.
Working on my time management and planning skills, while keeping a balance of achievable, yet challenging, goals that do still push me to get better are my main takeaways from working on this project. Finding a balance in pushing myself while still keeping achievable goals is particularly important, as the kind of timetable and schedule I worked with on this project would not sustainable and in due time would definitely result in burnout and possible adverse health effects.
In conclusion, looking back on the project, I did end up learning a lot within Unreal Engine and achieved most of the learning goals I had set up for myself with the project. Learning the basics of lighting in Unreal engine, in particular, was high up on my goals and I was relatively pleased with the progress that I had made on that front and the results I achieved.

vimeo
0 notes
Text
Red vs Blue #8
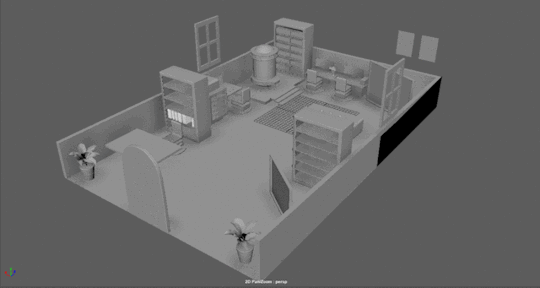
I started working on applying the principles that I had learnt from the documentation and the referenced videos in UE4. I decided to work using Raytracing and Global illumination as I liked the look it produced within UE4 and I wasn’t too concerned with optimisation at this point. Although I have been working on a machine with a laptop version of the RTX 2060, I was able to get very pleasant looking results within Unreal Engine. I worked with cooler tones and blues as I felt they suited the scene and look that I was going for. I changed the sky outside to be night as well.

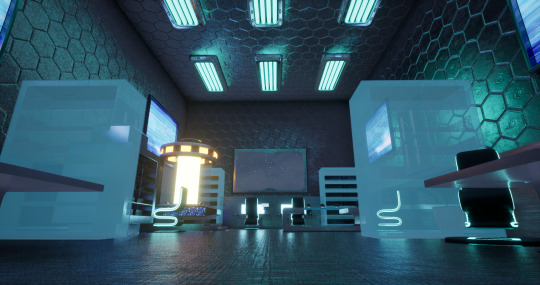
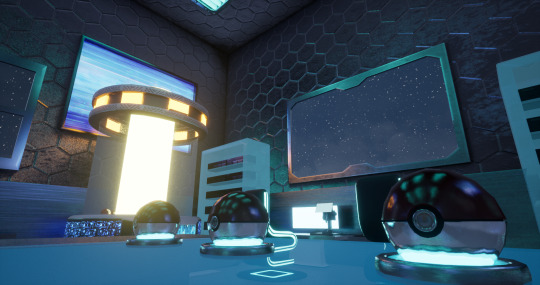
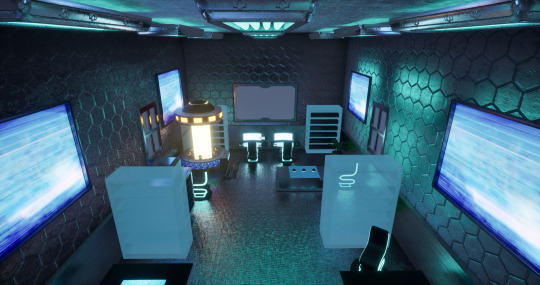
Screenshots from UE4 viewport.
I was happy with the look and feel at this stage and then went on to render a short camera animation within UE4 to better show off the interior. I learnt the basics of Sequencer using the documentation on the official website.
vimeo
Rendered video using Sequencer.
References
Sequencer Overview (no date). Available at: https://docs.unrealengine.com/4.26/en-US/AnimatingObjects/Sequencer/Overview/ (Accessed: 13 October 2021).
0 notes
Text
Red vs Blue #7
I continued texturing assets within Substance Painter and started on the chairs, tables, pokedex and the remaining assets. Most of the tools I used were the same but for a couple of assets I used the project tool to create some interesting visuals with textures and alphas.
I added detail to several of the smaller assets using the normal mapping tools within painter as I had kept their base mesh very simple in order to add detail at this stage.
For the walls of the room I decided to use a base material I found on Substance share by Ozan Önen as the base. I then mixed it with a few other materials and generators within painter to come up with the final material for the walls.

After texturing all the assets in Painter I imported them into UE4 and setup the materials within it. As some objects just have opacity for a part of the mesh, getting UE4 to understand that was a problem I ran into. I ended up separating the assets that had opacity parts and the parts with no opacity to create two materials for them to get them to work within Painter.
At this stage I just placed several lights randomly within UE4 to help me look at the materials make sure they were all working as intended and to help me assemble the scene.

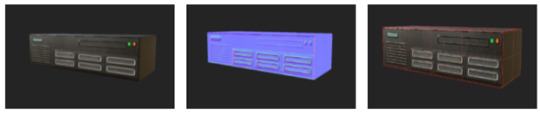
I had an issue with the materials in which the roughness and metallic component wasn’t working as I intended and the materials looked vastly different from the Painter viewport. After doing a lot of troubleshooting and I realised that UE4 had brought in the packed texture for Ambient Occlusion, Roughness and Metallic as an sRGB texture. I then manually went into the material nodes and individually changed each of the packed AO, roughness and metallic to sRGB and converted their colour space to linear to get the correct material result.


Values that had to be changed within UE4 to get the materials to display properly.
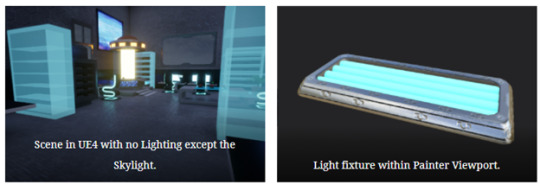
After this I worked on tweaking the scene by removing a couple of the assets that I felt didn’t work cohesively with the look and feel I was going for and by playing around with the placement of some of the assets. I then deleted all the lights within the scene with the exception of the Sky Light and started to work on the lighting. I also quickly modeled a light fixture and textured it, to help create a motivated reason for the artificial interior lighting and to make the scene feel more fleshed out.
At this point I am still new to Lighting in UE4 and so I went through the official documentation on the UE4 website. I also watched a video by Ryan Manning on the topic of interior lighting. This helped me better understand the way lights work within UE4 and the constraints of Real-time lights. I also watched a video by William Faulkner to understand the workings of the Skylight and to get a sense of how raytracing worked in UE4.
youtube
youtube
References:
Ozan, Ö. (2021) Hexagon Tiles. Available at: https://substance3d.adobe.com/community-assets (Accessed: 13 October 2021).
Ryan Manning (2019) Unreal Engine 4 – Interior Lighting (Basics). Available at: https://www.youtube.com/watch?v=xUEEIOyyKVo (Accessed: 13 October 2021).
William Faucher (2021) Demystifying the Skylight [Unreal Engine 4 & 5]. Available at: https://www.youtube.com/watch?v=BGoaPyfZlYg(Accessed: 16 October 2021).
0 notes
Text
Red vs Blue #6
After spending most of the previous day and a half UV mapping over 95% of the individual assets that would require custom materials and textures, I moved into Substance Painter. I was jumping back into Painter after a couple of months of not touching it and had to reacquaint myself with the software and the main tools I would use.
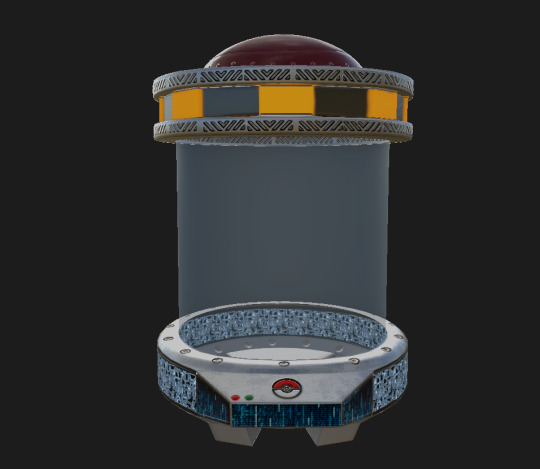
I started with the Pokémon healer device within substance as I felt it was a relatively complicated asset, in comparison with the others and would require me to use a variety of tools within Painter. The asset required me to use alphas, generators and several other tools which I had forgotten how to access and needed to brush up on my knowledge of Painter.

Healing device in Substance Painter viewport.
I ended up referencing a great introductory video done by FlippedNormals on their YouTube channel which helped me refresh myself with the usage of generators, masks, alphas and maintaining a procedural workflow. This tutorial was my go to troubleshooter whenever I hit a wall with Painter.
youtube
Another useful repository that I referenced occasional was the official documentation on Substance Painter. To reacquaint myself with the hotkeys and shortcuts within Painter this was invaluable as Allegorithmic(now acquired by Adobe) has done great job of documenting it’s software. I used Substance Painter to bake all the maps for my assets as well, as I was comfortable with the process and workflow and I personally like the results I get within it.

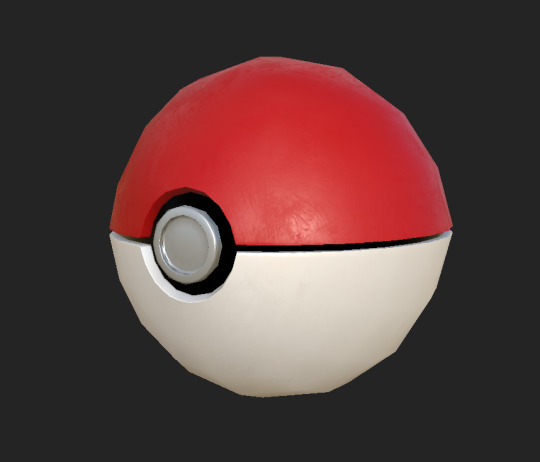
Pokeball in Painter Viewport.

Table in Painter Viewport.
References:
FlippedNormals (2019) Introduction to Substance Painter – Ultimate Beginners Guide. Available at: https://www.youtube.com/watch?v=RQ-hRk0WHJ8 (Accessed: 12 October 2021).
Substance 3D Painter | Substance 3D Painter (no date). Available at: https://substance3d.adobe.com/documentation/spdoc/substance-3d-painter-20316164.html (Accessed: 12 October 2021).
0 notes
Text
Red vs Blue #5
I started UV unwrapping the models within Maya today to get a start on texturing and baking within substance painter. I personally really like the tools within Maya to unwrap meshes.
I project the faces based on the direction they’re facing using planar project and when required used the spherical and cylindrical project. Here the tools I ended up using the cloud most were the cut, unfold, flip and layout. I tried to give the faces that had the largest area on the model a larger texel space to reduce pixelation of the textures during the painting phase that I had to work on following this.
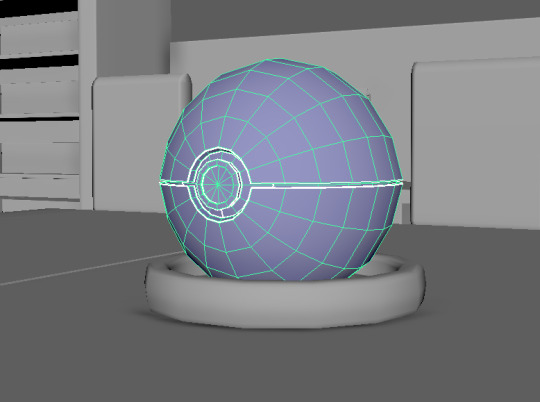
Seams of the UV map on the Pokeball.
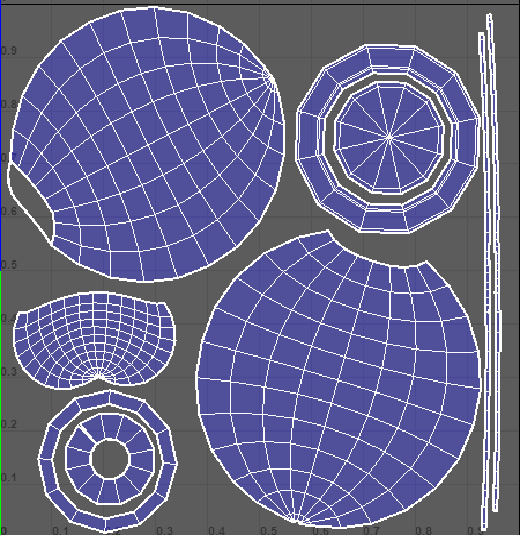
UV map of the pokeball.

Table UV seams.

UV map of the table.
While UV unwrapping I made sure there were no overlapping UVs or reversed UVs that could cause me problems down the road while texturing and rendering.
0 notes
Text
Red vs Blue #4
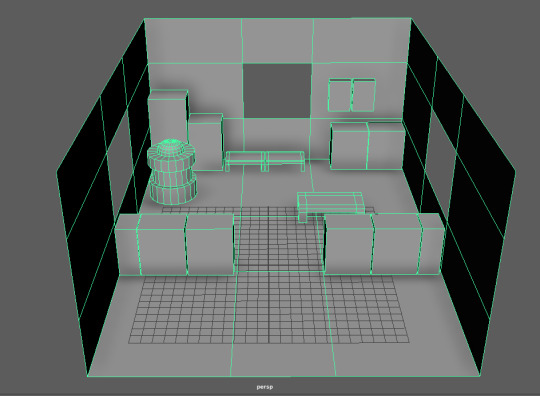
I worked on adding in more assets and reworked the dimensions of the room once more to make it feel more fleshed out. I modelled in a main table and placed the Pokeball assets on them to match the original. I also modelled a chair with a base, giant televisions, windows and some plants.
The main tools I used to create the models were – the insert edge loop tool, extrude, connect component along with the move, scale and rotate functions. When I required I used other tools within Maya such a chamfer faces, bevel, duplicate face, extract faces.
I also read an insightful article on Pluralsight on the differences in modelling for games versus modelling for films as most of my experience in modelling and rendering, apart from a few instances where I’ve dabbled with VR, have been for non-realtime engines. Though the article was a few years old and was published just around the release of the PS4, the principles within it were still sound.
Trying to keep the polycount low and optimised without leaning too heavily on the smooth modifier was a challenge that I wanted to tackle at the beginning of this course and it was a rewarding, while at times frustrating, process to model objects in the scene with a lower polycount.
After reaching this stage of the scene I was happy with the base structure of the scene and decided to stop adding assets for the time being to attempt to finish a rendered scene in Unreal engine within the stipulated time frame.

Room from the top.
Room from the side.

References
What’s the Difference? A Comparison of Modeling for Games and Modeling for Movies (2014) Pluralsight. Available at: https://www.pluralsight.com/blog/film-games/whats-the-difference-a-comparison-of-modeling-for-games-and-modeling-for-movies (Accessed: 10 October 2021).
0 notes
Text
Red vs Blue #3
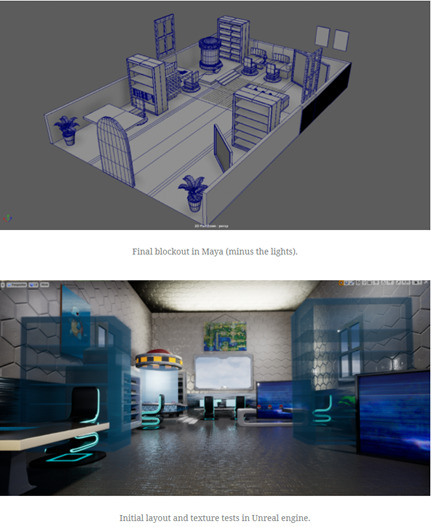
I decided to rework the blockout and create some of the assets required to populate the scene. I worked on some of the tables, monitors, a microscope, a pokeball healing device and the pokeball itself. I also worked on some wires and redid the layout to make the space feel more like an inhabitable 3D space.


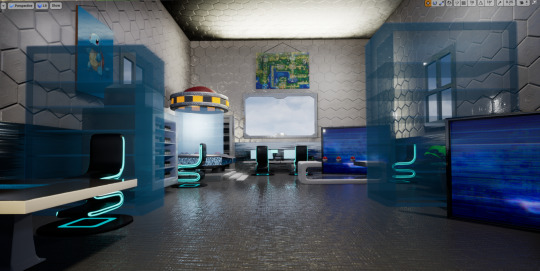
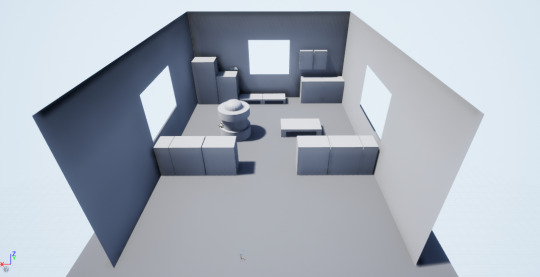
I decided to bring the WIP blockout into UE4 to get a sense for the way the assets would look in the engine.

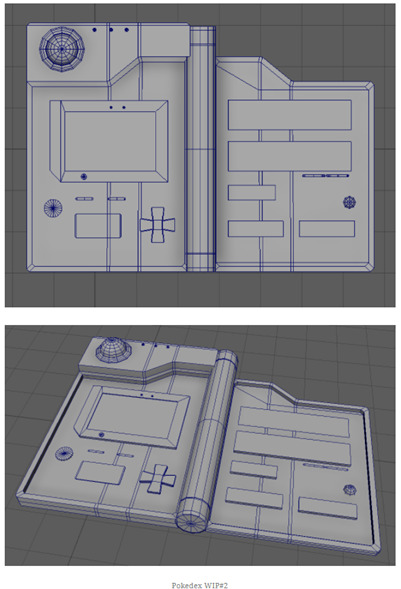
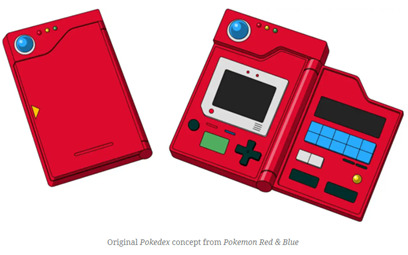
I also decided to model the original Pokedex from the Red and blue games/the original anime. I did the modelling with Maya.
0 notes
Text
Red vs Blue #2
References I gathered several references within Pinterest and created a reference board to help define the visual look that I aimed to achieve. Rather than having one specific reference, I was trying to create a visual reference library to refer to and to help achieve the stylistic look that I am going for. Most of the concepts were a lot more detailed than that what I want to achieve but served as a good starting point with the elements that stood out to me.

I wanted to look into “Overwatch” for reference as well as their style personally appeals to me greatly and wanted to be able to channel some of their iconic stylistic visual look into the project. I ended up referencing the map “Busan” within the game as it has sci-fi aesthetic that seemed to be the closest match to the modern Oak’s lab that I am looking for. I browsed on artstation and came across some environment screenshots done by the artist Simon Fuchs(2018) which were very impressive. Elements such as using sharp angles to cut through the forms and break the “block” type forms. The look they’ve achieved keeps the futuristic look without leaning on a post-apocalyptic look which I came across on several other references.

I decided to keep some of the elements from the original the same such as the Pokedex and the Pokeball as I did want to retain some of the original look and feel of Pokemon Red/Blue(Fire Red/ Leaf Green).
I decided to create another reference board using PureRef to assemble the ideas that stood out to me for specific assets such as the computers, chairs, tables and bookshelves so that I could pick and choose elements that would work within the style that I wanted to achieve.

Along the scale of cartoon to realism with stylized in between I wanted to work in a visual style between the let’s go and over watch aesthetic. Pushing the detail from let’s go but not going as far as the Overwatch look.
References
Overwatch – Busan – MechBase, Simon Fuchs (2018) ArtStation. Available at: https://www.artstation.com/artwork/QOqXE (Accessed: 5 October 2021).
LuisM Art (2017) ‘#ConceptArt #Concept #Art #Scifi #computer #console #props #building #Warzone #Structure #Scout #Base #AntiAircraft https://instagram.com/p/BY5oplBDHNC https://t.co/RC46fGptsl’, @LuisM_Art, 11 September. Available at: https://twitter.com/LuisM_Art/status/907217804855836677 (Accessed: 12 October 2021).
3D Printable Futuristic Mag-Lev Chair by Chris Huang (no date). Available at: https://www.myminifactory.com/object/3d-print-futuristic-mag-lev-chair-96142 (Accessed: 12 October 2021).
‘Designs That Make Glass Bookcases Fashionable Again’ (2010) Home Decorating Trends – Homedit, 16 May. Available at: https://www.homedit.com/modern-and-stylish-glass-bookcase/ (Accessed: 12 October 2021).
Futuristic Chair (no date) My Restaurant Wiki. Available at: https://my-restaurant.fandom.com/wiki/Futuristic_Chair (Accessed: 12 October 2021).
Futuristic table 3D – TurboSquid 1382624 (no date). Available at: https://www.turbosquid.com/3d-models/futuristic-table-3d-1382624 (Accessed: 12 October 2021).
Matrix Dining Table White | LPD Furniture (no date). Available at: https://www.lpdfurniture.co.uk/matrix-dining-table-white/?options=cart/ (Accessed: 12 October 2021).
Sci-fi computer terminal, Vlad Gumerov (no date) ArtStation. Available at: https://www.artstation.com/artwork/zdAr2 (Accessed: 12 October 2021).
Sci-Fi table , KnownSnowman98 (no date) ArtStation. Available at: https://www.artstation.com/artwork/nY9QGo (Accessed: 12 October 2021).
Zanotta – Evolution Armchair – Panik Design (no date). Available at: https://panik-design.com/product/zanotta-evolution-armchair/ (Accessed: 12 October 2021).
…El Proyecto Semihumano… – Rezlector – Wattpad (no date). Available at: https://www.wattpad.com/story/220938775-el-proyecto-semihumano (Accessed: 12 October 2021).
G-fifty (2007) ‘Garnet Syberg-Olsen: Portfolio Stuff: Atomic Betty stuff’, Garnet Syberg-Olsen, 19 November. Available at: http://garnets-o.blogspot.com/2007/11/stuff.html (Accessed: 12 October 2021).
Generator room, Andrey Serov (no date) ArtStation. Available at: https://www.artstation.com/artwork/xLyer (Accessed: 12 October 2021).
Hallway In Spaceship With Porthole And Camera . Futuristic Interior Room With Door For Games And Applications (no date) Freepik. Available at: https://www.freepik.com/premium-vector/hallway-spaceship-with-porthole-camera-futuristic-interior-room-with-door-games-applications_5028630.htm (Accessed: 12 October 2021).
Laboratory. Concept art., Sergey Zabelin (no date) ArtStation. Available at: https://www.artstation.com/artwork/mqqArZ (Accessed: 12 October 2021).
Library by Cementiet on DeviantArt (no date). Available at: https://www.deviantart.com/cementiet/art/Library-393148920 (Accessed: 12 October 2021).
POLYGON – Sci-Fi Space Pack (no date) Synty Store. Available at: https://syntystore.com/products/polygon-sci-fi-space-pack (Accessed: 12 October 2021).
[UE4] Clean Power Reactor — polycount (no date). Available at: https://polycount.com/discussion/147571/ue4-clean-power-reactor/p1 (Accessed: 12 October 2021).
Visual Novel Background -MEDICAL BAY by kjkjmulo on DeviantArt (no date). Available at: https://www.deviantart.com/kjkjmulo/art/Visual-Novel-Background-MEDICAL-BAY-773635747 (Accessed: 12 October 2021).
0 notes
Text
Red vs Blue #1
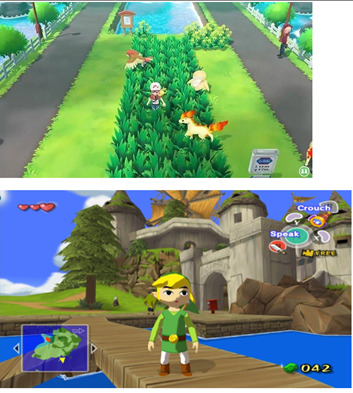
As part of our first practical project for my MA in games Art and awe were tasked with creating a still image using a real-time engine that fits the brief of Red vs Blue/Red chases Blue. I sat down and started brainstorming and the idea of working within the realm of Pokemon appealed to me. Initially, I had wanted to contrast Pokedex against a Digivice but decided it was too simple a project and limited me to creating two static assets/props. Within this MA I want to push my environment art skills and hence decided on doing a reimagination of Professor Oak's lab from Pokemon Red/Blue. The Lab is the site of Red and Blue's first-ever battle convinced me to go for it.
I started out by doing a very rough blockout of the lab in Maya.

The original design from Oak's Lab.
Rough initial blockout maintaining the original style.
UE4 - Test #1
I dropped the blockout into UE4 to get a sense of the scale and a feel for the room with a character in it and wasn't pleased with the layout or size of the room. The room felt too cramped and didn't translate into a modern interpretation of Oak's Lab and didn't suit the 3D space. This led me to rework the blockout and create a new reimagined version of the Lab using references from the Pokemon Fire Red and Let's go Games.
First blockout in UE4.
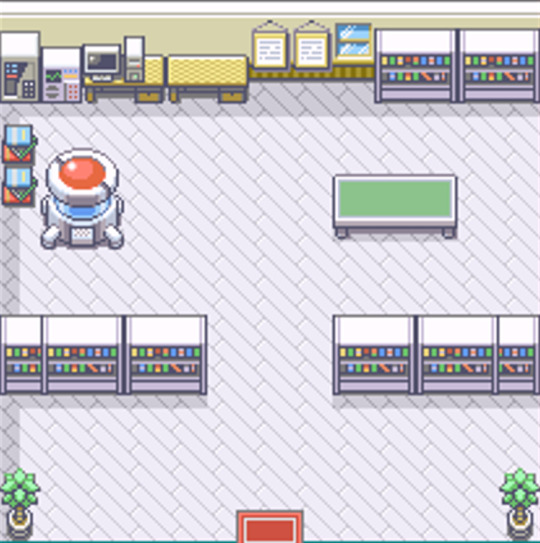
Oak's lab in Fire Red.
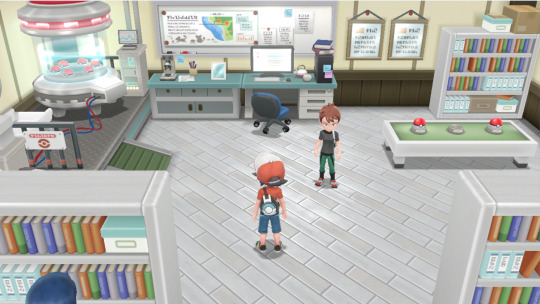

Oak's lab in "Pokemon Let's Go!". Using the lab from "Let's Go as the basis for the layout seemed like a smarter decision as there was a lot more room for adding in the newer elements. It was a good foundation while allowing me to push the visual look beyond the simple visual style and look of "Let's go!"
I set about creating a list of the assets I would need to populate the environment to help organize the progress and to create goals and timelines to complete the project within the stipulated time.

1 note
·
View note