#zoom podcast audio quality
Text
Many people ask which setup should they use for podcasting. You don’t need to invest in pricey equipment to achieve high-quality audio. Many successful podcasts use a simple setup.
Let’s explore key factors when choosing a podcast, followed by our top equipment recommendations.
Develop a podcast concept. Define your goals. Pick a podcast theme or topic. It’s important to know your why, even if it’s to have fun with friends.
Ask yourself what gives you energy. Do you love connecting with podcast guests, or do you feel your best going solo? Because that would indicate which setup you should have for the podcast.
If you choose to have cohosts, try to keep your group small. Podcasting with more than two or three people makes scheduling a challenge.
Keep in mind that some shows require more production than others. For instance, fiction podcasts usually require more editing than interview podcasts.
ONE-PERSON SETUP
Samson Q2U | $70
Pop Filter | $6-30
Any headphones you already have
PODCAST SETUP FOR TWO
Samson Q2U | $70 (x2)
Audio Technica M20x | $50 (x2)
Focusrite Scarlett 2i2 | $160
Pop Filter | $6-30
PODCAST SETUP FOR THREE
Samson Q2U | $70 (x3 or 4)
Audio Technica M20x | $50 (x3 or 4)
RODECaster Pro | $600
Pop Filter | $6-30
The Zoom P4, priced at $200, serves as a budget-friendly alternative to the RODECaster Pro.
Read the full blog: https://www.soundorp.com/beginner-podcast-setup/
2 notes
·
View notes
Text
I don't care how artist owned Maximum Fun is now, someone at that spot should enforce some audio quality standards cos even in their ads there are people with extremely long running podcasts who have sub Zoom audio quality.
3 notes
·
View notes
Text
How I record and edit podcasts in 2022
Many moons ago, I wrote a post about how I record and edit podcasts on a weekly basis. Over time I've evolved that process, learned about shiny new tools, spent a bit of money on new hardware and software, and also started brand new shows. It feels about the right time to update folks on what I do these days but also talk about how I would podcast today as a brand new podcaster starting out 2022.
But first, who the heck am I and why should you care? I started podcasting in 2007. (that's 15 years ago, wtf!) I've produced shows about comic books, fatherhood, movies, folk's favorite things, tech gadgets, and I still occasionally podcast about Tom Cruise movies. These days, I spend my time on two shows in particular. 70mm is a podcast focused on movies with a different theme every month. Danny co-hosts and produces a beautiful piece of artwork to accompany each episode. The Letterboxd Show features conversations with Letterboxd members, filmmakers, critics, actors, and movie lovers about their four favorite films. We also has a secondary show called Weekend Watchlist focused on new movies dropped that week to help you figure out what to watch. I oversee the recording and editing of both shows, as well as steer direction for both to varying degrees.
Recording and editing your first podcast in 2022
OK, with that stuff out of the way...how would I suggest producing your own podcast in late 2022 and beyond? I'm not saying this is the only way to start a pod, this is just the way I'd suggest doing so. Let's break things down below into a TL;DR and then take each section as its own topic:
Buy this USB Mic and tell your friends to buy it, too.
Chat (and record) with your friends on Zoom while also recording your own local audio on your computer, too.
Clean up the local audio if needed using free services like Audacity (optional).
Edit that audio together in a free app like GarageBand on Mac.
Upload your episode to a free hosting service like Anchor.
Buy this USB Mic and tell your friends to buy it, too.
If you're just getting into this whole podcasting thing and don't have a mic, you are going to have to spend some moolah. Don't get cheap with the mic.. please god in heaven. Maybe you have some rando mic laying around or Apple earbuds around or ..gasp.. a Yeti, but please just think about this. Do you want to podcast? Do you want it to sound decent? If you don't want it to sound decent then I suggest you not start a podcast. Like, what are we doing? You listen to podcasts every day and you get excited and you want to start one. I get that! It's the whole reason I started podcasting in the first place; I thought I could do it better than the shows I was listening to. If you don't think you can do it better than what is out there...why bother? At the very least you should want to sound as good as most podcasts out there that you like. You should have a baseline of quality for yourself because guess what, your friends and family aren't going to tell you that your podcast sounds like crap on a stick. They'll share some tweets at launch but man they will go silent and months later ask if you are still doing that podcasting thing. "You still doing that podcast thing about that whatever? Hey that's great." If you don't think you can sound as good or better than other pods, don't bother. That's my whole vibe for podcasting. Take it or leave it, bud.
You'll want to spend a few bucks on a dynamic microphone. Yeti mics are condenser mics and they pick up all sorts of background audio and mouth noises and it's just not pleasant, imo. If you get your room situation sorted and have perfect mic positional technique, you can get good audio out of a Yeti, but more often than not they just don't sound great to me. So help me god if you think it's good enough to be a podcaster and use Apple Earbuds I will slap you. I recommend using this USB-C microphone. It's $79. Both Danny and Proto use an older model of this mic and they sound great. They also use a mic arm and keep it about 3-6 inches from their mouth and don't record in a giant room. This will become a theme in this walk-through, and I get that you're excited and you want to get things off the ground, but it's relatively simple to make a podcast sound great. It's up to you to put in the work so people will want to listen...and keep listening. I've said it before and I'll say it again...your friends will not tell you they don't like your podcast. People that listen to your podcast will not tell you that your mic sucks. That's just the way it goes..let me be that person. Let me be Batman running off into the night at the end of the Dark Knight. Goofy metaphor but whatever.
I prefer to use a Shure BETA 58A dynamic microphone. I've tested a bunch of mics and I prefer how my voice sounds with this particular one. It costs ~$200. That XLR mic cable goes into a Cloudlifter C-1 ($179) to boost the gain which is plugged into a Tascam USB audio interface ($249), which is plugged into my Mac.
Chat (and record) with your friends on Zoom while also recording your own local audio on your computer, too.
There are multiple ways for you to video chat with your co-hosts and some of which offer free recording right in the browser. However, Zoom is pretty ubiquitous in this day and age and more importantly free/cheap. I'd suggest paying the $10/mo for Zoom Pro so you can have longer conversations and also record the audio of everyone in the call. There is a setting inside of Zoom where you can separate everyone's audio so you can download each person's audio as its own file. Before we get ahead any further, I would not use this audio as the files you'd edit for the show. This Zoom audio should be your backup audio. It will always sound of a lesser quality than your locally recorded audio. In case of some kind of disaster when recording locally, you'll always have your Zoom audio to fall back on. And boy howdy, you will encounter disaster. Might as well just get that in your head now and prep for the worst. "Oh shit I recorded my laptop mic instead of my USB mic!" You will do that one day. You think it won't happen, but it will.
In terms of recording your own audio locally, QuickTime lets you record audio right in the app. Open the app and go File > New Audio Recording, choose your Mic and hit record. You can also use a free app like Audacity, but you will need to double and triple check you are setting the app to record your USB microphone.
If your podcast is your Zoom call audio stitched together I'd love for you to ask yourself why. Is it because it's easier? Faster? Maybe it's faster...but is it better? I would say 100% no. If the show is you and one or two friends, just go the extra mile to have them record their audio locally. You are putting yourself out there and people are going to listen to you for the very first time and get one giant impression of your show. If you don't care about giving the highest quality audio when possible...why should they care?
Clean up the local audio if needed using free services like Audacity (optional).
In a perfect world, the audio you and your friends record locally will sound great! Or at least, "good." In some cases, maybe things don't sound great, or there is some background noise, or someone's nose is whistling and maybe you want to clean it up a bit. What I wrote in 2020 still stands in terms of using a free app for cleanup, so I'm going to paste it here again:
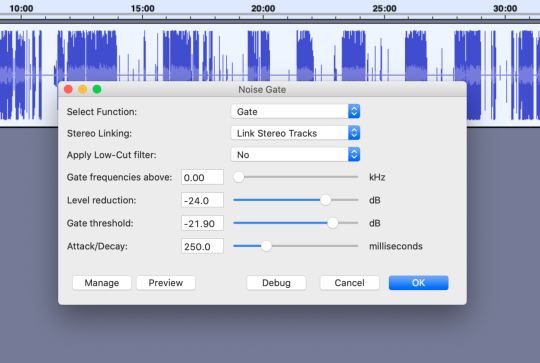
Since none of my hosts/guests have audio studios, there is inevitably going to be some random background noise happening in the audio files they send you. That could be nose whistling, your own audio coming through someone else’s headphones by accident, and maybe even a fan in the corner of their room that you asked to have them turn off but they still wont listen to you.
Knowing this, I add the audio file into Audacity and run a Plug-in on the entire thing called Noise Gate. This essentially lets me tell Audacity, “hey man remove any audio in this file that isn’t the person talking or laughing.” It’s incredibly helpful! More technically said, it can lower any audio beneath a decibel level that you set. I run that Plug-in on the file, and export that file as an .mp3. I do the same thing for the other host’s files as well. Here are what my settings look like for Noise Gate plug-in below:
Again, you might never need to do this, but worthwhile knowing these tools are available to you. If you need to raise the levels of you or your friends audio so they sound the same and don't want to use Audacity, this site offers that for a small fee.
Edit that audio together in a free app like GarageBand on Mac.
I've used GarageBand for years and years to edit my podcasts. It's free and super easy to use. Some of my friends are on PC and they use Audacity, but tbh I don't really have any experience editing there. Below is what an older project looked like in GarageBand. (Evergreen comment, but YouTube is a godsend for anything podcast related. You can legit teach yourself everything with some good tutorials.)
Upload your episode to a free hosting service like Anchor.
If you're just starting out, you're probably already annoyed that I recommended a $80 microphone but calm down, ok? Anchor is free and since Spotify owns them, it's super easy to get your show onto Spotify, too. You'll need to submit your show to Apple as well so follow this guide to submit your RSS feed that Anchor will provide to you. If you're cool with spending some cash monthly, I love Simplecast, too.
Once you have your show edited, exported, and uploaded into Anchor, publish! Tell your friends! Have fun! That's the main thing after all, ya know? Most podcasts don't produce more than 7 episodes and kinda stall out for whatever reason and the top 50% of podcasts in the US average 120 downloads after 30 days, give or take. Maybe one day I can get into the nitty gritty of pulling together an entire plan to launch a podcast and why you'd want to start a podcast, and how to keep a podcast growing but for now let's stick to the production side.
Recording and editing my podcasts in 2022
Now that I've laid out how I would start a pod in the year of our lord 2022, let's chat about how I produce and edit 70mm and The Letterboxd Show every week.
Video chat and record using Riverside.fm
Clean up local audio in Izotope RX 9
Edit and export episode using Logic Pro
Upload episode to Anchor, etc
Video chat and record using Riverside.fm
Riverside is a website that lets you video chat and record your own local audio right in Chrome. It's also $29/mo sooooo just saying. But it's so good that I don't even asks my co-hosts to record their audio locally anymore. Riverside takes care of everything right in the browser. I click record, and your guests audio starts being recorded and uploaded into the cloud right then and during the entire recording. Once I hit stop, it finishes uploading the last 1% of the audio and from there I can download it to my computer and get ready for editing. In rare cases, something went wrong with the file, where I've heard some kinda funky background audio, or my audio coming from their headphones that were turned up too loud that I didn't catch while chatting, etc etc. The nice thing is that even if their local recording is kinda crap for whatever reason, you can still download the lower quality "call audio" that you heard while chatting. There are a few other similar web apps like Riverside but I don't have experience with them.
Clean up local audio in Izotope RX 9
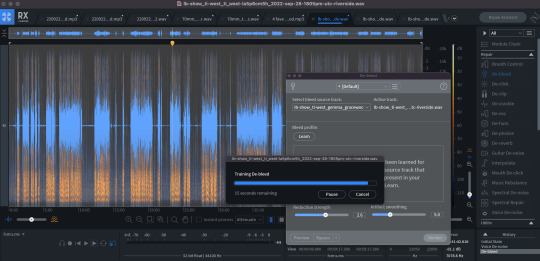
This past year or so I finally jumped in head first and spent some real money on audio cleanup software. When I started working for Letterboxd and chatting with guests without a good mic, you'll sometimes just get what you get in terms of audio. Maybe they are using ear buds, maybe they are using their laptop mic, and maybe they are using the biggest room in their entire house. After that call, I need to do what I can to clean up that audio as best I can to make sure that people have an OK time listening to that episode. RX Elements is $99 and comes with tools like de-hum, de-click, voice de-noise, de-reverb, and de-clip. It's a legit magic tool that has been an absolute lifesaver sometimes. I use voice-de-noise a lot. Sometimes you're editing and you hear a click and you have no idea wtf it is, RX can help you remove that noise. There is even a setting in RX Standard called "de-bleed", where if someone's headphones were too loud and another person's audio was bleeding into their mic, you could have the app learn those tracks and do its best to remove the bleed. RX Standard has that larger suite of tools and costs $299. Yes, I bought it, and yes I would do it again.
This section I wrote about Auphonic years ago still stands as well. It's possible that my guests audio levels are kinda funky so after recording I put their audio through Auphonic ($89) to level their audio to around the same levels before I edit to save time. It's possible I could do this step using RX 9 but I haven't really investigated. Here is what I wrote years ago:
Background on Auphonic: A few years ago I finally sprung for Auphonic Leveler for Mac ($89). When you’re recording a podcast with others, or even on a H1N Zoom recording device with more than 1 mic, it can be difficult to make sure everyone’s voice sounds the same and comes across at the same audio level. You could even get an audio file from a host/guest and their audio could be super duper quiet. Throw the audio files into this app, adjust the settings to what you want, and it exports new audio files where each one is set to the same level. Even if you weren’t recording in the same room, this helps create that atmosphere.
I’ve recorded a podcast using a Zoom using 2 XLR mics plugged in where there are 2 guests, one speaking quiet and one speaking loudly on the same audio file. Auphonic saved my bacon big-time and brought us both to the same audio levels.
Once I have the audio files from my guests, I throw them into Auphonic with these settings screenshotted below. That brings everyone to an even playing field in terms of audio levels.


Edit and export episode using Logic Pro
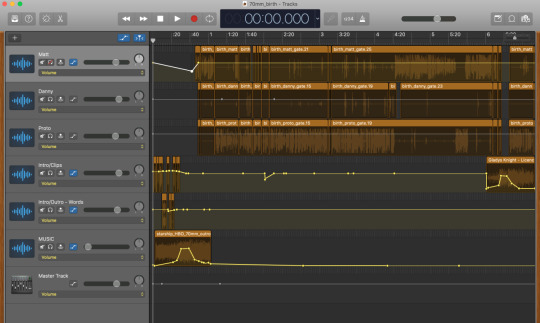
I've used GarageBand for 99% of my editing career and it's great! Many "legit" podcasters still use it. Whatever floats your boat, ya know? During the pandemic I wanted to up my game a bit. I wanted to improve the overall sound of 70mm, add some equalizers, add some filters, remove echo, adjust compression, and pretty much just make us sound legit. Like, I know we sounded good before, but I wanted to go higher. Logic Pro X from Apple is pretty much GarageBand Pro and costs $199. It let's me do some fancy keystrokes to save time moving clips around, remove dead-air sections. Below is a recent episode of 70mm and you'll notice lots of blank space where that host is not speaking. I can remove all that dead air or anything under a certain Db level and that makes it super easy to move stuff around if needed. I also use a few different plug-ins to reduce echo on someone's audio track. If you're ever curious about deeper details about how I edit, feel free to reach out with questions. I'm always happy to help!

Here is a screenshot of me adjusting the EchoRemover too.

Upload episode to Anchor, etc
Listen you've seen how much I've spent on software so far, let me live a little and pay $0 for Anchor, OK?
With 70mm, there are several other check-boxes I need to complete depending on what episode we are about to release. We have Patreon, Apple Subscription episodes, and also Paid Episodes on Spotify. Anchor lets me take care of those paid episodes on Spotify right in the dashboard but everything else requires its own upload. When we do a supporter-only episode, that means I have to upload it to Patreon, Anchor, and Apple. When we do a regular episode, I have to upload it to Patreon so our supporters listen to it first and then Anchor.
One of the perks to our 70mm Patreon is access to our VHS Village Discord. Every Thursday, we stream our recording directly into Discord so folks can listen along together. Patrons also get access to that uncut recording right after we get done. That gets uploaded to Patreon only. Initially, I was super hesitant to have a loosey goosey unedited episode floating about but tbh folks love it the three of us have hit a nice groove in our convos and there is not much overlap while talking if any.
As I mentioned earlier, too, Danny creates a beautiful piece of artwork for each episode and there is an important step I need to do to ensure it shows up in Apple Podcasts, Overcast, Pocket Cast, etc. Here is what I wrote years ago:
Forecast is free and very easy to use for Chapters. It does other things like encode your show into an MP3, but I don’t really use that. Below is a screenshot, but I right-click on my audio file and Open With Forecast. I type in all the info and then add in my Chapters for the show and drop the podcast image on each one. Apps like Logic Pro and Audition allow you to add markers as you edit, but for now I’m still using GarageBand, and it’s not that big of a pain to just add the few segments 70mm does have. If you have custom artwork for each episode, this ensures podcasts apps will show it as they listen, but it also will let your listeners easily find specific segments. If you do convert to MP3 using Forecast, it may default to exporting at 64kbps, so be sure to change that setting for a higher level of audio quality.

Not too bad, right? jk jk Podcasting can be a lot of work but more importantly, if you put the time in, it can be extremely rewarding. I think I covered just about everything and I'll go back and made additions as I find things that I left out. If you have any questions feel free to DM me on Twitter.
9 notes
·
View notes
Text
Ok.
Looks like I'm in big trouble.
Being out of work for Covid hit me harder than I'd thought.
Work only paid me for the five days I was out to isolate. Not the extra 5 days I had to stay out due to still testing positive for the antigen test. I had to be out for a total of 14 days before I tested negative. Work wouldn't let me back until they got that negative test.
Considering I'm a server in a small hole-in-the-wall restaurant and I'm nose to nose with people, that's the requirement.
I've been very careful working in a restaurant to keep myself, my coworkers, and my customers safe. It took until June 14th for me to test positive for Covid for the first time.
Every single day since this began has been a major stress game of Russian Roulette with every person what walked through that door.
And then they scheduled me for only 3 days.
They only scheduled me for two days this upcoming week.
I've already begged them to give me more time. My manager said, "I'll try" which we all know means "Likely not" in restaurant business lingo.
My rent is due on the 15th in 3 days. I rent a room out of someone's apartment, and my rent is $1200/mo.
The person I rent from is out of touch with the world, and will likely try to evict me.
I have $388 in my bank account as of this moment in time.
There is no way in hell I can make $900 to cover rent, and give myself enough to put gas in the car and buy food until my next paycheck.
I'm also on Indeed and Glassdoor searching for a new or second job, because what they're doing to me is just stupid.
I was on the edge, but supporting myself just fine before I got Covid. :(
And my birthday is next Sunday.
SO.......
I'm pimping out my voice.
If you have a short story you would like to have narrated, an article, a kids book, a romance story, a short fan fiction, - whatever it is (just not porn) - let me know.
I have a professional setup at home, since I narrate audiobooks for Audible. The approval standards for ACX are high, so you can be guaranteed quality sound.
I have formal voice training in both singing and voice acting with industry renowned coaches like Julie Klewer, and Tony Oliver (Bang! Zoom! Ent. post production. usually deals with anime, but also other things.) I've done walla work for them before.
I have an acting background. I'm a trained actor and improvisational artist, and have been told I have a nice voice.
I will narrate your short story or poem or fan fiction, ect, engineer it, and deliver it in a WAV format or an MP3 format through Dropbox for large files.
I can add some music (I pay for an Epidemic Sound subscription to use their music on YT, but if you want to post that music on your channel, you'd need to get one.). But for your own use, go nuts. :)
My ACX profile has me at $100 - $200 per hour of finished audio (what you would hear in an audiobook.) So far I've only had royalty share gigs.
So, here's what I'm thinking - because narrating and engineering the audio takes time....
Poems: $15/each
Short stories up to 1000 words: $25
Short stories up to 5000 words: $50.
Added background music: $5 extra per track.
Here's a sample of what I sound like for the last audiobook I narrated and engineered:
And this is from a Star Wars Podcast I did where I am both the translator droid T4-ZO, and the background singer at Jabba's Palace. They gave me a Huttese dictionary and a backing track and told me to go nuts. The lyrics actually mean something. They translate to an actual song with verses and a chorus. I literally riffed the melody off the top of my head for a good 5 minutes. They used what they liked.
If you can help, please, please send me an ask. Anons work, too.
If you can't, don't worry. It's ok. :) You can share this.
Thank you, guys.
You know I never ask for this. I can usually take care of myself. This is just a really, really, dire situation. :(
If you'd like, here's my paypal.
Thank you so much. ❤🧡💛💚💙💜🤎🖤🤍
#writing#writeblr#doing something I hate to do and yet here I am#I have skills to trade.#I need some help#audiobook narrator#Will read your poem or short story#I have experience in narration and audio engineering.#I'm in need of help BUT I want to give you my skill and training and time and talent in return.#voice acting#star wars#historical fiction#I've improved since these recordings.
4 notes
·
View notes
Text
The Ultimate Guide to Cleaning Your AirPods Pro: Tips, Tricks, and Best Practices
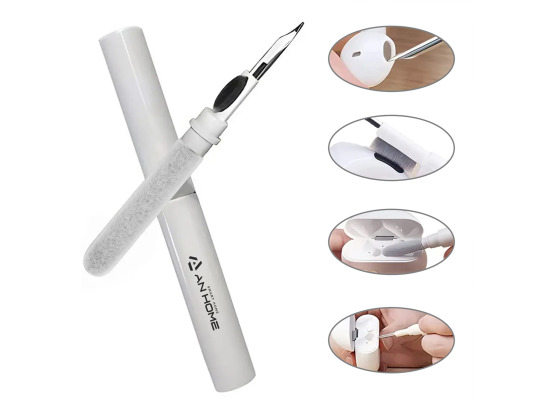
AirPods Pro are a marvel of audio technology, but they’re also magnets for dirt, earwax, and grime. Fear not! In this comprehensive guide, we’ll walk you through the best ways to keep your AirPods Pro pristine and gunk-free. Whether you’re a music enthusiast, podcast lover, or frequent Zoom call participant, these cleaning tips will ensure your AirPods Pro stay in top shape.
Why Clean Your AirPods Pro?
Before we dive into the nitty-gritty of cleaning, let’s understand why it matters. Clean AirPods Pro offer several benefits:
Sound Quality: Dirty ear tips can affect sound quality. Keep them clean for optimal audio performance.
Hygiene: Regular cleaning prevents the buildup of bacteria and germs.
Longevity: Proper maintenance extends the lifespan of your AirPods Pro.
What You Need for Cleaning
To clean your AirPods Pro effectively, gather the following supplies:
Cotton swabs
Dry lint-free cloth
Soft toothbrush
Isopropyl alcohol (preferably 70%)
Warm water (for the ear tips)
Cleaning the Ear Tips
Remove the Ear Tips:
Hold the base of each ear tip and gently pull until it separates from the AirPods Pro.
Use a dampened cotton swab with alcohol to remove stubborn dirt.
Soak the ear tips in warm water for at least 1 minute.
Wipe them dry with a clean, lint-free cloth.
Allow the ear tips to fully dry before reattaching them.
Reattach the Ear Tips:
Align the ear tip with the oval-shaped connectors on your AirPods Pro.
Push until you hear a satisfying click.
Cleaning the Earbuds and Mesh
Wipe Down the AirPods Pro:
Use a clean, lint-free cloth lightly dampened with isopropyl alcohol.
Pay attention to the earbuds and mesh areas.
Remove any visible gunk.
Precision Cleaning:
Wet a cotton swab with isopropyl alcohol.
Gently clean the earbuds and mesh.
Avoid poking through the grilles or damaging components.
Bonus Tip: Blue Tack:
Blue Tack (the reusable adhesive) is excellent for removing dirt from the black speaker grilles.
Press it gently onto the grilles to lift away debris.
Cleaning the Charging Case
Wipe the Case Exterior:
Use a dry, clean cloth to wipe down the charging case.
If needed, slightly dampen the cloth with isopropyl alcohol or use a Clorox wipe.
Keep liquid away from the charging port and contacts.
Inside the Case:
Use Blue Tack to remove dirt and gunk from both the outside and inside of the charging case.
Be gentle and avoid damaging the contacts.
Debris in Charging Contacts:
If debris accumulates near the charging contacts, try a manual air blower or canned air.
Avoid sticking anything directly toward the contacts to prevent damage.
Remember, clean AirPods Pro enhance your listening experience and maintain their value. Happy cleaning! 🎧✨
0 notes
Text

Top Five Microphone for Online Teaching
The need for high-quality microphones for online instruction has increased with the global epidemic and the following move to online learning. The use of virtual learning tools such as Zoom and Google Meet by educators and students has made clear and crisp audio essential. We've put together a list of top five microphones for Online teaching to meet this need; each one has special characteristics designed to improve the online learning environment.
Blue Yeti USB Mic: The Blue Yeti USB Mic is a highly recommended option because to its sophisticated technology and versatility. It guarantees clear audio for broadcasting, recording, and teaching by combining three capsules and offering three distinct pattern settings: cardioid, bidirectional, and omnidirectional.
FIFINE Studio Condenser USB Microphone:Skype calls, podcasts, and online classes are all made possible by the FIFINE Studio Condenser USB Microphone, which produces high-quality sound without requiring extra drivers. A robust pop filter and shock mount are among the accessories that improve user experience, and its cardioid condenser capsule and wide frequency response guarantee clear audio output.
ZaxSound Professional Cardioid Condenser Microphone : This microphone produces great sound quality and noise cancellation, even if it is reasonably priced. It's ideal for live streaming, webcasting, and YouTube recording and works with a variety of devices, including DSLR cameras and cellphones.
JOUNIVO USB Recording Microphone: Best suited for online instruction and speech recordings, this microphone boasts an innovative noise-canceling mechanism and a 360-degree rotatable design. Even so, it might have problems with noisy.
The Shure MV5 Digital Condenser Microphone provides fast setup and exceptional sound quality with its custom-tuned superior audio and onboard DSP preset modes. Its diversity of device compatibility and Apple MFi certification make it a good choice for online instruction, even though its sound and tone matching may be a little shallow.
To sum up, all of the microphones in this list have advantages and disadvantages, but they all help to enhance the online learning environment. There is a microphone to meet the needs of any educator in the virtual classroom, regardless of whether you value adaptability, price, or sound quality.
0 notes
Text
Sound Lecture!
This past Thursday we had Bryan Baker, Director of Technology, Operations, and Multimedia Projects come speak to us about sound. To start off, we learned more about equipment. When using a camera you can opt for either a single or double system. A single system captures both audio and video in one device, while a double system means using separate equipment to capture the audio-- which can be more reliable; and through the gear room we have access to several sound recorders that can do this! Sound recorders such as the Zoom H4/H5 and MixPre Recorder are available. There are also microphones such as handheld microphones, lavaliers, and shotgun microphones.
I was especially interested to learn about using Adobe Podcasts from Professor Baker. Adobe Podcasts is a simple way to improve audio quality, and we get access as Elon students!
0 notes
Text
Video Equipment and Resources Review - Speaker Bryan Baker, Reflection
I want to thank the Director of Technology, Operations, and Multimedia Projects at Elon University for visiting our classroom today. He did an excellent job connecting students with resources on campus for their multimedia projects. This was a big help to me as I plan to transition from Print to Broadcast Journalism. As I acquire more skills throughout my time at Elon I appreciate the guidance to mold me into a great journalist.
I learned about the equipment offered to students in the Gear Room such as sound recorders and microphones that work best for your project. He described a variety of recorders that included Zoom H4, H5 audio recorders, Sound Devices, and MixPre Recorder. These were mostly new devices for me since I am not the best tech-savvy person when it comes to video equipment. I didn't realize that an Azden Field mixer contains multiple microphones which I found quite interesting. Then he explained the types of microphones such as Handheld, lavalier (wired and wireless), and shotgun mic.
Baker presented us with a tutorial for Universal Music Production which allows students collect music for their production. He also introduced the Pro Sounds Effects Library that is accessible to Elon students. When he gave us an overview on how to capture the best sound with gear room equipment I found it quite helpful. He told us about single and double system which was a new concept to me. The double system helps enhance the audio, backup if one fails, and helps organize audio. This format is flexible, reliable, and resourceful. The aspect I found most relatable to me was the DSLR Recording which requires a double system to produce quality work.
He taught the class about common terms we would encounter within a journalistic field. These terms included Dynamic (durable) need close contact, Condenser (batteries), Condenser (+48v), Cardioid, Omni Directional, and Supercardiod/Lobar. I have never heard of these characteristics within my time at Elon so it was great to learn about these new concepts.
The most valuable information I received was about the new Adobe Podcast program on Adobe Creative Cloud. This is a new feature that helps improve video and audio quality for Multimedia projects. Baker gave us a tutorial on how this program works and what we can do to enhance our own personal stories. The program includes features of enhanced speech, mic check, and studio. Enhance Speech “Remove noise and echo from voice recordings.” Mic Check “Fix microphone issues before recording.” Studio “Record, edit, and enhance in your browser.” These features use algorithms (AI) to help improve work ethic and decrease tools. I believe this was the best advice that would help me on my personal project. He also offered us templates and examples from our School of Communication which will benefit me in the future.
0 notes
Text
AI Agents audio translation pro
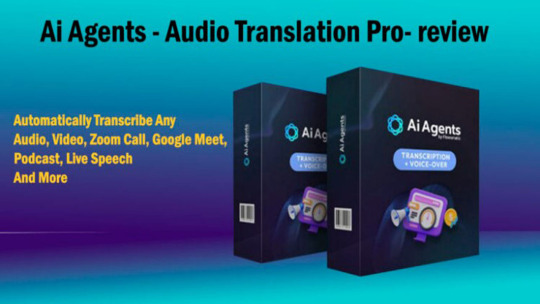
Welcome, In this age of global business and connectivity, the need for effective communication across language barriers has never been more urgent. Artificial intelligence was developed specifically for translation as a solution to the language sharing problem. Audio –Translation Pro is at the forefront of this transformative technology, leveraging advanced artificial intelligence to deliver seamless, quality translation services. Get Access....
Website: www.sk-review.com
Product link: click here
Ai Agents-Audio Translation Pro Review– Overview
Product: Ai Agents-Audio Translation Pro
Creator: Firas Alameh
Product: Click here
Price: Only $67.00
Recommendation: Highly Recommend!
Niche: Software
Refund: 30days Money-Back Guarantee
Ai Agents-Audio Translation Pro– Review
Ai Agents-Audio Translation Pro Review – Feature
What is AI Agents - Audio Translator Pro?
AI Agents Audio Translation Pro is not just a translator, but also a translator for audio, video, Zoom calls, Google Meet, podcasts, live lectures and more. I would also like to point out that you can save money.
AI Agents ATP is an intelligent translator. Audio, video, Zoom calls, Google Meet, podcasts, live chat and more. It is a tool or platform that uses artificial intelligence to perform searches. AI-powered speech translation tools often use speech recognition and grammar to convert spoken words into written text and then translate that text into different languages.
#transcribeaudiototext#transcribevideototext#videoaudiototextconverter#audiototextconverter#zoomvideoconferencing#howtousezoomvideoconferencing#youtubevideototext#speechanalysis#audiototext#videototextconverter
0 notes
Text
https://www.youtube.com/watch?v=gaBG4v...
https://kettnercreative.com/microphone/zoom-zdm-1-vs-rode-podmic/
#bestmicrophone #livestreaming #microphonecomparison #podcasting #rodepodmic #zoomzdm1
#DynamicMicrophone#Microphone#bestmicrophone#livestreaming#microphonecomparison#podcasting#rodepodmic#zoomzdm1
0 notes
Text
Revolutionize Your Screen Recording Experience with ScreenApp
In today's fast-paced digital world, effective communication and collaboration are more crucial than ever. Whether you're a student, professional, or business owner, the ability to capture and share information seamlessly is a game-changer. That's where ScreenApp comes into play—a cutting-edge, free online screen recorder with webcam functionality that requires no installation. In this article, we'll explore how ScreenApp can elevate your screen recording experience, making it easier than ever to communicate, collaborate, and share valuable insights.
The Power of ScreenApp
Effortless Screen Recording
Screen App offers a user-friendly experience with a simple three-step process:
Hit the 'Start' button.
Select your desired video and audio options.
Choose whether to record your entire screen, application window, browser tab, or webcam, with or without audio.
With just a few clicks, you can start recording your screen, making it ideal for meetings, webinars, presentations, virtual training sessions, and more. Plus, you have the flexibility to download recordings to your PC in MP4 format or save them securely in the cloud, ensuring easy access whenever you need them.
AI Transcription and Summarization
What sets Screen App apart is its powerful AI functionality. After recording, ScreenApp's AI technology transcribes your videos in seconds, converting spoken content into written text. This feature unlocks a wide range of possibilities, from crafting precise closed captions to analyzing customer feedback and extracting market research insights.
Moreover, ScreenApp's AI-driven video summarizer is a game-changer for busy professionals. It efficiently transforms lengthy webinars, podcasts, and Zoom recordings into concise summary videos, emphasizing key points and enhancing viewer engagement. Whether you're repurposing content or reaching silent audiences with auto captions, ScreenApp's AI-driven tools have you covered.
Personalize Your Content
Adding a personal touch to your recordings is essential, especially when connecting with your audience. Screen App allows you to turn on your webcam, enabling you to personify screen recordings. Whether you're delivering a presentation, hosting a webinar, or conducting a virtual training session, the combination of screen recording and webcam functionality adds a human element to your content, making it more relatable and engaging.
Unlocking Wisdom from Transcribed Video
Educational Enhancement
For educational institutions like schools and universities, Screen App has become a valuable tool for enhancing the teaching experience. Its ability to record high-quality videos directly from your computer screen has revolutionized the way lessons are delivered. Students can easily download or stream these videos online, ensuring access to educational content anytime, anywhere.
Streamlined Collaboration
Efficient communication is at the heart of successful collaboration. ScreenApp's seamless screen recording and transcription service bridge language barriers and streamline knowledge creation processes. By transcribing your meetings, Screen App enhances the clarity and speed of communication, ensuring that vital information is easily accessible to all team members.
Secure Storage and Sharing
Cloud-Based Solution
Worried about storage? Screen App offers a cloud-based solution for recording and storing videos securely. You can upload and transcribe your videos to the cloud, making it easy to share them via links or summarize them for future reference. This cloud-based approach ensures that your videos are safe and accessible from any device, fostering collaboration and knowledge sharing among your team.
Frequently Asked Questions
Here are some common questions about ScreenApp:
Is ScreenApp Free? Yes! ScreenApp's screen and webcam recorder is free for all users. You can start recording instantly without any cost.
Can I Download My Videos? Absolutely!
You can download your videos in MP4 or MKV format, making them compatible with various video editors.
Can I Transcribe My Videos? Yes, as soon as you record your screen, ScreenApp's AI technology automatically transcribes your video, saving you time and effort.
How Do I Record My Screen and Webcam? Recording with ScreenApp is straightforward. Navigate to our Screen Recorder, select your video and audio options, hit the "start recording" button, choose what to share, and click "Share." It's as easy as 1, 2, 3!
Where Can I Find My Videos After Recording? All your recorded videos are conveniently stored in your Video Library. They are transcribed and searchable for easy access.
Can I Integrate Screen Recording into My Website or Application? Absolutely! Developers can integrate the ScreenApp Recording Plugin using just a few lines of code, making it a versatile addition to your website or application.
How Can I Get Support if I Encounter Problems While Recording? If you encounter any issues, our support team is here to help. You can reach out to us via live chat or by emailing [email protected], and we'll assist you promptly.
Do I Need to Install Anything to Use ScreenApp? No installation is required to use ScreenApp. You can start recording your screen and webcam instantly without downloading or installing any software or browser extensions.
0 notes
Text
Avantree Aria Me Bluetooth Headphones Review
The Avantree Aria Me are a pair of over-ear Bluetooth headphones with a unique feature – tunable audio that allows you to separately adjust the left and right ear sound. I tested out these headphones to see how well the tunable audio works.

Key Features
[Optimize the Audio] Create your personalized audio profile and calibrate your Aria Me headphones through the Avantree Audio app. Once the profile is activated, All bluetooth audio received will be adjusted to fit your profile no matter what devices you connect.
[High-Definition Sound] Use the Aria Me with an aptX-HD certified Bluetooth device and experience HD studio level audio at 24-bits, you can pick up on every details and nuances in your favorite soundtracks.
[Active Noise Cancellation] This advanced built-in Active Noise Cancellation technology filters out low frequency ambient noises from outside and make sure they are not there to disturbe you to enjoy your immersive personally tuned audio.
[Low Latency] Aria Me’s Qualcomm chipset enables the ultra low latency. When you pair your Aria Me with other aptX-Low Latency products you will experience perfect audio-visual synchronization zero lip-sync delay.
[Converse with Clarity] Level up your call quality with the detachable mic. Strategically designed to be close to your mouth and catch your voice crystal clear. It also features the instant mute switch and allows you to mute yourself secretly in your zoom meetings.
Design and Comfort
The Aria Me have an over-ear closed back design with plush leatherette ear pads and headband that provide a comfortable fit. The folding hinges allow the headphones to fold up for travel. On-ear controls give convenient access to volume, tracks, and calls.
At just 8.8 oz, the headphones feel lightweight enough for prolonged wear. Noise isolation from the closed-back design helps block ambient noise even without ANC turned on.
Sound Quality and ANC
Sound quality from the 40mm drivers is very good with punchy bass, clear mids and smooth treble. Activating ANC helps further immerse you in your music by reducing ambient noise.
The standout is the tunable audio feature in the mobile app. You can separately control the left and right EQ to adjust the sound profile based on your hearing needs.
Tunable Audio App
Connecting to the Avantree app unlocks full controls for the tunable audio feature. Inside the app you can:
Activate an audio test to determine your hearing profile.
Select preset left/right EQ settings like Classical or Podcast.
Manually adjust the separate left/right EQ bands.
Having independent EQ control over each ear allows you to tailor the sound perfectly based on your hearing needs or preferences.
Customer review
So, let me start with the fact that our family has now bought 4 Avantree Aria headsets. (2 Aria Me and 2 Aria Podio) The products work great for my teenage son with his computer and my elderly mother-in-law when she is up late watching TV/movies. However, since 2021, we have had to buy replacement headsets for each of our initial purchases (hence the four units bought). My son’s (Aria Podio) lasted one year before breaking, my mother-in-law’s (Aria Me) lasted 2 years.
In both circumstances the headset broke (unrepairable) at the swivel joint of one ear.
I wish Avantree would make a “non-collapsible” version of these headsets, since that collapsible (travel friendly) point is the literally the “weak link” in the deisgn.
Since the device is charged via the hanging tree, we do not need the headphones to collapse, and we do not travel with them.
Avantree should consider a stronger structured version for people that use the product daily and perhaps offer a “travel collapsible version” for users that need that feature.
I likely will look for a different solution in the future if these break again within a year or two. Paying a premium for bluetooth headphones should last longer than 1-2 years in my opinion.
Customer questions & answers
Q: can avantree aria work with kindle fire and or alexa.
A: Yes, our Aria Me can work with kindle fire or alexa.
Q: Does this work with Amazon Alexa?
A: I HAVE NO IDEA, I HAVE GOOGLE AND YES IT DOES WORK WITH MY GOOGLE
Q: What is the California proposition 65 warning for?
A: This warning on the packing box is required by customs for exporting product which contains PVC. PVC is used in a variety of applications in the building and construction, health care, electronics, automobile and other sectors, in products ranging from piping and siding, blood bags and tubing, to wire and cable insulation, windshield system components and more.
Q: does the microphone work in wired mode?
A: No, it works under Bluetooth mode only. If you need to have a bluetooth device supporting microphone on the wired headphone, you can choose Avantree AS70.
Q: Does personalized hearing profile work when used in wired listening mode?
A: Hi Noah, the personalized hearing profile will not work when used in wired listening mode.
Thank you.
Factor in the quality ANC and sound, good comfort and solid connectivity, and the Aria Me are compelling wireless headphones with unique tuning capability.
0 notes
Text
The Best Budget-Friendly Equipment for Your Podcasting Shows
While investing in high-end equipment is tempting, budget constraints needn't compromise sound quality. The Zorbiant – Podcast Promotion Agency experts will advise you to opt for a USB condenser microphone like the Aokeo AK-60, which delivers crisp audio without breaking the bank. Its built-in pop filter reduces plosives, ensuring professional-grade sound.
Noise-Free Zones with Budget-Friendly Headphones
Immerse yourself in a world of sound with headphones that won't break your budget. The OneOdio Pro-10 offers excellent isolation, accurate sound reproduction, and comfortable wear for those long recording sessions.
Studio Vibes with Budget-Friendly Acoustic Treatment
Creating a recording environment that minimizes unwanted echoes and background noise is essential. Affordable foam panels, like those from Foamily, can be strategically placed to enhance your audio quality without emptying your wallet.
Mixing and Mastering on a Budget
When it comes to editing, Audacity is a cost-effective champion. This free, open-source software offers a wide range of audio editing tools, making it perfect for beginners and those watching their expenses.
Portable Popularity with Budget-Friendly Portable Recorders
For on-the-go podcasting, the Zoom H1n Handy Recorder is an excellent choice. Its budget-friendly price doesn't compromise on recording quality, and its compact design ensures easy portability.
Arm Yourself with Budget-Friendly Microphone Stands
Keep your microphone steady and at the perfect angle with an adjustable boom arm stand like the Heil Sound PL-2T. This cost-effective solution ensures consistent sound quality while allowing you to maintain a comfortable posture during recording.
Dynamic Duos with Budget-Friendly Microphone Sets
If you're running a podcast with co-hosts or multiple participants, consider a budget-friendly microphone set like the Fifine K669B. Its USB connectivity, clear audio reproduction, and affordability make it an excellent choice for team-based podcasting.
Crispness on a Budget with Audio Interfaces
Enhance your audio quality with a budget-friendly audio interface like the Behringer UMC22. This compact device ensures clear audio signal processing and offers essential inputs for microphones and instruments.
Capture Attention with Budget-Friendly Cameras
If you're venturing into video podcasting, the Logitech C920 HD Pro Webcam provides high-definition video quality at a reasonable price, ensuring your visuals are as engaging as your audio.
Quality podcasting doesn't have to drain your bank account. By strategically choosing budget-friendly equipment, you can produce professional-grade content without sacrificing your financial comfort. Remember, it's not about the price tag but the creativity and passion you infuse into your podcast that truly captivates your audience.
1 note
·
View note
Text
YouTube Vanced APK Download Latest version For Free
Introduction
YouTube Vanced APK is an enhanced version of the popular video-sharing platform’s official application. It is a modified version that provides users with a wide range of additional features and customization options, making it a preferred choice for many YouTube enthusiasts. With its extensive functionality and user-friendly interface, YouTube Vanced APK offers a superior viewing experience.
One of the key features of YouTube Vanced APK is the ability to play videos in the background. This means that users can listen to audio from YouTube videos even when the application is minimized or the device’s screen is turned off. This feature is particularly useful for music lovers and those who enjoy listening to podcasts or educational content while multitasking.
Another notable feature is the ad-blocking capability. YouTube Vanced APK blocks intrusive ads, including video ads, banners, and pop-ups, which can be disruptive and interrupt the viewing experience. This ensures a smoother and uninterrupted playback, allowing users to enjoy their favorite videos without any unwanted interruptions.
YouTube Vanced APK also offers the option to override the default video resolution and enable features such as pinch-to-zoom and toggling video speed. This level of control gives users the flexibility to personalize their viewing experience according to their preferences and device capabilities.
Additionally, YouTube Vanced supports various themes, allowing users to choose from a wide range of color schemes and visual styles to customize the app’s appearance. It also includes an advanced swipe control feature, which makes navigating through videos and playlists more intuitive and efficient.
In summary, YouTube Vanced APK is a modified version of the official YouTube app that offers an enhanced viewing experience. With its background playback, ad-blocking, customization options, and intuitive controls, it has gained popularity among users who seek additional features and greater control over their YouTube experience.
Features
YouTube Vanced APK offers a range of excellent features that enhance the user experience. Here are some of its notable features:
Background Playback: YouTube Vanced APK allows users to play videos in the background, even when the app is minimized or the device’s screen is turned off. This feature is particularly useful for listening to music, podcasts, or other audio content while multitasking.
Ad Blocking: One of the most appreciated features of YouTube Vanced APK is its ability to block ads. It removes various types of ads, including video ads, banners, and pop-ups, providing a seamless and uninterrupted viewing experience.
Override Video Resolution: With YouTube Vanced APK, users can override the default video resolution and set it to their preferred quality. This feature is handy for conserving data while watching videos or ensuring the best playback quality on devices with different screen resolutions.
Pinch-to-Zoom and Video Scaling: YouTube Vanced APK allows users to zoom in or out of videos using pinch-to-zoom gestures. It also offers video scaling options to fit the video to the screen or display it in its original aspect ratio, providing a more immersive viewing experience.
Video Speed Control: Users can adjust the playback speed of videos in YouTube Vanced APK. This feature is beneficial for those who want to watch videos at a faster pace to save time or slow down the playback for better comprehension.
Customization Options: YouTube Vanced Download offers various customization options to personalize the app’s appearance. Users can choose from different themes, including dark mode, and customize the app’s layout, colors, and other visual elements.
Gesture Controls: The app provides advanced swipe controls for navigating through videos and playlists. Users can swipe vertically to adjust brightness and volume, and horizontally to seek or skip through videos effortlessly.
These features make YouTube Vanced APK a popular choice for users who want to enjoy an enhanced YouTube experience with ad-free viewing, background playback, and greater control over video settings and customization options.
How To Download YouTube Vanced APK
Download the YouTube Vanced APK file from a trusted source.
Enable installation from unknown sources in your device settings.
Locate the downloaded APK file on your device.
Tap on the APK file to initiate the installation process.
Follow the on-screen prompts to complete the installation.
Once installed, open the YouTube Vanced app and enjoy its enhanced features.
YouTube Vanced requirements
An Android device running Android 4.4 or higher.
Sufficient storage space on your device to download and install the APK file.
Enabled “Unknown sources” option in your device settings to allow installation from third-party sources.
Stable internet connection to download the YouTube Vanced APK file.
Basic device requirements such as RAM, processor, and display capabilities that meet the minimum specifications for running Android applications.
Conclusion
In conclusion, YouTube Vanced APK Download offers a range of desirable features and customization options that enhance the YouTube viewing experience. With background playback, ad-blocking, video resolution control, pinch-to-zoom, and other features, users can enjoy uninterrupted, personalized, and immersive content consumption. It has become a popular choice for Android users seeking additional functionality beyond the official YouTube app. However, it’s important to ensure that you download the APK file from a trusted source and comply with the terms of service to ensure a safe and legal experience.
FAQs
Q: What is YouTube Vanced?
A: YouTube Vanced is a modified version of the official YouTube app that offers additional features such as ad-blocking, background playback, and customization options.
Q: Is YouTube Vanced safe to use?
A: YouTube Vanced itself is generally considered safe, but it’s essential to download it from trusted sources to avoid potential security risks or malware. Exercise caution and only download from reputable websites.
Q: Can I use YouTube Vanced on iOS or other platforms?
A: YouTube Vanced is primarily developed for Android devices. As of now, there is no official version available for iOS or other platforms.
Q: Do I need to root my Android device to use YouTube Vanced?
A: No, rooting your Android device is not necessary to use YouTube Vanced. You can install and use it on both rooted and non-rooted devices.
Q: Can I sign in to my YouTube account in YouTube Vanced?
A: Yes, you can sign in to your YouTube account within YouTube Vanced to access your subscriptions, playlists, and personalized content.
Q: Will I still receive YouTube updates if I use YouTube Vanced?
A: No, YouTube Vanced is a separate app, and you will need to manually update it when new versions are released. It won’t receive updates from the official YouTube app.
Q: Is using YouTube Vanced against YouTube’s terms of service?
A: Yes, using YouTube Vanced goes against YouTube’s terms of service as it modifies the official app. However, the usage of YouTube Vanced is widespread, and consequences for using it are rare.
1 note
·
View note
Text
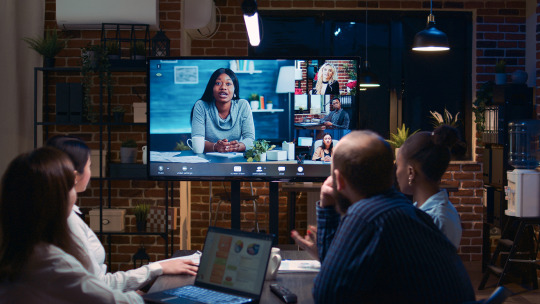
Take Zoom Meetings like a professional streamer

Unless you are a media personality or avid streamer then odds are your video presence sucks. In today's digital age, video calls have become an integral part of professional communication. Whether you're meeting with clients or colleagues, it's essential to present yourself in a way that conveys competence and confidence. Since the social lockdown of COVID-19, it has become commonplace to take meetings on platforms like Zoom, Google Hangouts, and Skype. For most, this sudden shift to telepresence required them to scramble to get the proper tools to work over video. Entire online companies reformed to help many businesses combat this visual shift.
However, even now, many professionals haven't taken the proper time to evaluate what they look like on video during these meetings, often leaving a very unprofessional but understandable image to those they take meetings with. Many professionals don't think of how they're presented on these video calls, even though they take time to put on a nice suit, prepare presentations, and be punctual to set a good impression.
There are several common mistakes that professionals make when setting up their video meetings, such as failing to consider the background behind them, leading to distracting or unprofessional settings. To ensure that you present yourself in the best possible light during video calls, it's important to invest in a quality camera and microphone to ensure that your video and audio quality is clear. Taking a few moments before your call to adjust your camera angle and lighting can also make a big difference in how you appear on camera.
Camera Placement…
If you read this article and only have one takeaway, I recommend putting your camera above your line of sight. I cannot tell you how many meetings I’ve taken where someone has a low-quality laptop camera placed below their jawline, making it appear as though they have an unintended double chin. This can be off-putting and doesn’t present a good look for the person you’re speaking with. Be sure to also make sure that your face is in the center of the camera. Remember, you’re taking a professional one-on-one meeting or a meeting with a group, not making an effort for a cinematic shot.
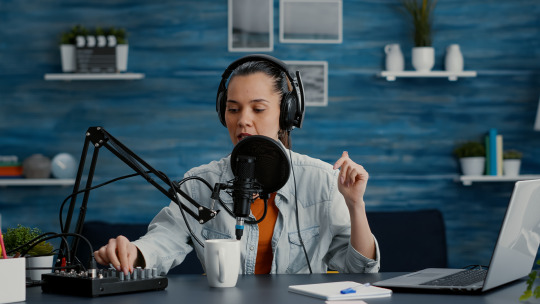
We can’t hear you.
Usually one of the first pieces of advice that content creators receive is that it’s better to have bad video than audio. People can tolerate bad video content, but if the audio is bad, it will ruin the experience entirely. Therefore, it’s essential to take time to record yourself using a screen recorder or use OBS and listen to what you sound like during a video call.
If you sound decent, then it’s up to you to judge whether or not to invest in a proper microphone for your setup. If your audio is less than stellar, I recommend buying a simple $50 to $100 USB microphone. Many people choose the Blue Yeti for their setup, but I personally use a Rode Podcast Mic, which is a bit more expensive.
After establishing that you have a proper audio input device, spend time to ensure that the quality and settings are proper. Nobody wants to listen to somebody speak loudly into a microphone only to have them peeking the whole time. By taking the time to invest in a proper microphone and ensuring that your audio quality is up to par, you’ll be able to make a positive impression during your video calls.
Whats your camera quality?
When it comes to camera quality, it really depends on your situation. If you’re often traveling, having a complete secondary camera outside of a laptop might be a hard thing to have on you at all times. However, if you have a dedicated setup in your office, then investing in a better camera might be something you should look into. You can get a decent 1080p web camera for about $50. If you take a lot of online video meetings, and it’s essential to your job, then I would invest in something a little bit more robust.
Many professionals use their iPhone as a webcam since it shoots 4K camera resolution. Personally, I use a Canon EOS M50 that I picked up used for $400. This makes my video quality on par with million-dollar streaming channels. However, it’s important to note that cameras come in a range of different quality and sizes. Most webcams are presented as straight-out-of-the-box solutions, which often means that they don’t look as great compared to professional DSLR cameras used as webcams.
By investing in a better camera, you can significantly improve the quality of your video calls, making it easier to present yourself professionally during meetings. Of course, it’s essential to consider your specific situation and needs before deciding whether or not to invest in a better camera. Ultimately, by taking the time to ensure that your video setup is up to par, you’ll be able to make a positive impression during your video calls and improve your overall professional image.
Some things to consider.
Is it a 1080P or 4k resolution camera? (Higher the better)
Is your video 3:4 or 16:9 format? (16:9 is more professional)
Do you have autofocus on your camera? (Manual is better)
Can you adjust the brightness and depth of field? (Play around til it looks good)
Are you able to adjust the color settings for the space you are in? (Adjust the gamma!)

Let there be light
How you position the lighting in your room can dramatically impact how others perceive you during video calls. For instance, if you have too much light coming from one direction, it can make you appear blown out. On the other hand, if you don’t have enough light in the room, then it can make you look like you’re sitting in the dark. Therefore, it’s essential to use a three-point lighting system to achieve even lighting and a professional appearance.
To achieve a three-point lighting system, you’ll need to consider where your outside light sources are, the positions of your inside light sources, and secondary lights positioned to highlight the area behind you. By positioning your lights correctly, you can achieve an even sense of lighting that will help you look your best during video calls.
Investing in proper lighting is just as important as investing in a quality camera and microphone. By taking the time to set up your lighting correctly, you can create a professional and polished appearance during your video calls, projecting competence, confidence, and professionalism.
Behind every great face on camera is a well-designed set
The background that sits behind you during video calls is an important aspect of your overall appearance. Whenever I move offices, I take the time to design a background that represents me while also conveying professionalism and a bit of fun. For some people, this might mean putting up posters of famous movies or creating a bookshelf full of reading materials and knick-knacks. It’s also a great opportunity to play around with creative lighting, such as highlighting different pieces that sit behind you or using colorful lighting that comes in from different directions.
Creating a good background for your video is not difficult, as long as you don’t have any construction behind you or large windows that may turn you into a silhouette. If you’re designing a background for your office video for the first time, I recommend going on YouTube and looking at different professional streamers to see what they’re doing. This can provide inspiration and help you find a background that you’d like to easily emulate.
By taking the time to design a background that represents you and conveys professionalism, you can create a positive impression during your video calls and improve your overall professional image. Remember, your background is an important aspect of your overall appearance, so it’s worth investing the time and effort to get it right.
In today’s digital age, video calls have become an integral part of professional communication. It’s essential to present yourself in a way that conveys competence, confidence, and professionalism during these calls. However, many professionals fail to consider the impact of their video setup on how they’re perceived during these meetings.
Luckily, improving your video setup doesn’t have to be expensive. You can start with low-budget upgrades such as a decent webcam, microphone, and lighting. As you become more comfortable with your setup, you can steadily increase your budget to invest in higher-quality equipment.
Remember to evaluate your camera quality, audio quality, lighting, and background to ensure that you’re presenting yourself in the best possible light. By taking the time to invest in quality equipment and creating a professional background, you can make a positive impression during your video calls and improve your overall professional image.
So, start with low-budget upgrades and gradually increase your investment over time. By doing so, you’ll be able to project competence, confidence, and professionalism during your video calls and improve your overall professional image.
If you find this newsletter useful, share or tag a friend.
Got questions? You can DM me directly on Twitter
0 notes
Text
Mixing and mastering are already embedded in the process by a professional Sound Engineer. Some mixing will be done on the fly while You are recording a Podcast. That will guarantee an industry standard sound quality.
Our Engineer can also add any audio/visual effects right during Your recording. Our unique technology allows us to give You a ready to go Episode right at the end of Your session. However any post editing is not provided.
https://bit.ly/3jP1XQD
#recording studios in hollywood#music studio for rent los angeles#recording studios hollywood ca#recording studio for rent los angeles#affordable recording studio in Los Angeles#famous recording studios in los angeles#best pod cast studio los angeles#podcast studio for rent los angeles#professional podcast studio#best podcast studio setup#podcast recording studio near me
0 notes
Last Seen Blogs

aanamar72
Aana Mar

am-k-shastri-posts-blog
Astrologer aman +91-9878279789

parabataisarah
go beyond the barrier

changes-will-come
Find Hope Here

lifeofasami
我是佐藤麻美