#tightwadery
Text
This sounds like BS or at the very least the placebo effect, but it was very much a cool thing that happened.
My wife has COVID and with it shortness of breath. We didn't have any albuterol, but we did have another idea!
Knowing that theobromine had been studied as a bronchodilator and found as effective as theophylline, and knowing that cocoa has a lot of theobromine in it, I set out to make a mean cup of bronchodilating hot chocolate.
So the effective dose of theobromine is 10mg/kg, which for my wife is about 900mg. Since cocoa has about 20mg/g of theobromine, about 45g (about 1/2 cup) would do it. We used about 1/3 cup and it... worked amazingly well.
Like so well my wife said it was the best she had ever felt lung-wise. Like, we're thinking she might have asthma because her shortness of breath is better right now with COVID + Chocolate than it is on a totally normal day without COVID.
Definitely talk to your doctor if you're having shortness of breath and don't know why, but if you just wanna make a mean cup of bronchodilating hot chocolate for kicks, the recipe is below:
1 cup water
1/3 cup cocoa powder (or if you want to get really precise, the number of Kg of body weight divided by 2 equals the number of grams of cocoa)
1-2 tablespoon sugar (to taste)
Put the cocoa and sugar in a mug and add about a quarter cup of the water to it and stir into a paste. Add the rest of the water and stir until liquid. Heat in a microwave or on the stove to desired temperature.
Enjoy!
Its not, like, the tastiest hot chocolate ever, but it's not horrible.
205 notes
·
View notes
Text
How to Cook Cheap Staples:
I recently learned that in the USA, on average, each person eats about 1,670 calories per day of just 4 foods: wheat, corn, rice and soy.
Wheat, corn, rice and soy also happen to be some of the cheapest foods available in US grocery stores. If you buy them as wheat flour, corn meal, rice, and soybean oil. If you buy them as bread, soda, rice cakes, and fried foods, they can also be some of the most expensive.
Based on the least expensive versions of these staple crops available on Amazon (because I didn't want to get off the couch to go to the store for you all), you can get 23,380 calories (the average 1,670 calories per day for 2 weeks) in 5lb of brown rice ($6.20), 5lb of wheat flour ($2.49), 2lb corn meal ($2.98), and 32oz of soybean oil ($6.48).
This means if you make all your own staple foods, 3/4 of your calories could be taken care of for about $9/week. You could even go cheaper than this if you buy white rice. I just threw the brown stuff in there for flair and fiber.
Here's how to cook your staples:
Yeast Bread Loaf
Quick Bread Loaf
Tortillas
Pancakes
Fresh Pasta
Hand Pie/Pierogi/Dumpling Dough
Polenta (don't need the cheese or butter)
Cornbread (can replace butter with oil and buttermilk with milk or water)
Corn Cakes
Tortillas (masa- this is different than cornmeal)
Tamale dough (masa)
Steamed Rice
Congee
Rice Pudding
Rice Cake
If you're trying to save money, shoot for a meal plan that basically includes your staples as the primary food, and adorn with your protein and vegetables. That means, say, a bowl of polenta with tomato-beef sauce. Or rice with black beans, onions, peppers, and spices. Keep in mind that since your staples have been taken care of, you just need about 400 calories in legumes, meat, fruit, and vegetables per day to meet a 2,000-calorie target. That's pretty much an apple and peanut butter for breakfast, a little tomato-beef sauce at lunch, and a handful of beans flavored with onions, bacon, and peppers at dinner.
If that sounds like you're eating mostly starch and fat, you're right, but technically if you're the average American you're already doing that. This is just doing it cheaper.
76 notes
·
View notes
Text
What To Do... Hygiene Edition
If you don't have a toothbrush-
The goal of brushing teeth is to prevent tooth decay. Prevent tooth decay by preventing bacteria buildup on teeth. Plaque (the slimy film that appears on teeth after a day or two) is a buildup of bacteria, saliva, and tiny food particles. If you can remove this once or twice a day, before it becomes hard (tartar) you are much less likely to have cavities and gum disease.
You can do this without a toothbrush by taking a small piece of rough cloth (like the corner of a washcloth or towel) and rubbing it all over your teeth twice per day. Rinse it well afterwards and let it dry completely (preferably in the sun) between uses.
If you don't have toothpaste-
Toothpaste is a paste containing rough particles, flavorings, and other chemicals that remove and may help prevent plaque and tarter from forming.
If you're doing a good job brushing your teeth to disrupt that plaque formation, you technically don't need toothpaste. However, if you would like a little bit of freshness or feel like you need more than just a brush or cloth, you can take a pinch of baking soda and (optional) add a drop or two of flavored extract (like vanilla or peppermint- DO NOT USE ESSENTIAL OILS FOR THIS). Put this on your toothbrush or cloth and brush as normal.
If you don't have deodorant-
Deodorant is not absolutely necessary for health, but if you work somewhere that has a "hygiene code" or some BS you probably need to smell like something other than a human.
The recipe is the same as toothpaste above. A pinch of baking soda and (optional) a drop of extract like vanilla or peppermint. Rub under each armpit.
If you don't have lip balm-
Lip balm is often necessary in colder or dryer climates to prevent cracking and infection. Any fat can be used as lip balm, for example, petroleum jelly (Vaseline), lard, butter, vegetable oils, your own face grease, etc... Just put a drop on a finger and rub on your lips until it rubs in.
If you don't have toilet paper-
You will need a plastic cup and a wash cloth. Use the plastic cup to pour water over the soiled area. If it's poop you'll need to use your hand to make sure everything washes off. Once clean, use the wash cloth to dab up any remaining water. Wash your hands well afterward.
This might sound horrible if you're used to toilet paper, but it is used all over the world and leaves you a lot cleaner than TP does.
If you don't have soap-
For handwashing- use water to wash anything visible off the hands, then follow with hand sanitizer or a few drops of rubbing alcohol to sanitize.
For body washing- You don't actually want soap for most of your body, including your privates. Wash with water only. For hair (since it tends to look greasy if unwashed), use a few teaspoons of baking soda or tablespoons of lemon juice and rub it in. This will help get rid of dirt and grease when soap or shampoo is not available.
If you don't have nail clippers-
Use sharp scissors. While these might be more challenging the first time and you'll need to be careful, you can absolutely use scissors for nail clippers, it's what everyone did before the invention and popularization of nail clippers.
111 notes
·
View notes
Text
Dumpster Diving and Salvage Shopping
If you asked me what my role in the ecosystem is, I'd say I'm a scavenger. I hate confrontation and I hate spending money when there are other options. I will gladly just take whatever you don't want in order to avoid such unsavory obligations.
So dumpster diving, salvage stores, and incidental meat registries and I get along pretty well save for the anxiety. This post, hopefully, takes some of that away for my fellow scavengers who would love to dumpster dive but just don't know how yet, or are afraid of getting in trouble.
Dumpster Diving:
First of all, dumpster diving is legal in all 50 states of the US, but check local ordinances because rich people get fussy about people digging through trash to the point of some cities condemning the practice. It's on a bunch of other posts but it's worth saying.
Cops, of course, will lie or imply otherwise on this. A good way around that is to look like someone who is "not breaking the law". AKA: look like a suburbanite: Wear some khakis and a polo shirt, carry a Starbucks cup, and act as white as you can possibly get away with. If approached, smile, call the cop "officer" or some such referential title, and explain that you thought it was legal. Not that you know it's legal- that you thought it was legal. If they tell you to scram, do so. No argument with law enforcement is worth what is in that dumpster.
Note that it is illegal in many places to put stuff into dumpsters that aren't yours, though, so if the cops are having a slow night, be careful about them asking you to put stuff back.
You also don't want to be the reason dumpster diving gets banned in your community. Do this primarily by never getting into a dumpster. I know the container of perfect strawberries is just out of reach, but if you fall or are unable to get out you are not only up a creek yourself but potentially causing an anti-dumpster-diving frenzy that your town's grocery stores will never recover from. Also, people have legitimately died from getting into a trash compactor.
Now, "legal" does not mean "pro-store-policy". One of the main reasons for this is that is dumpster diving can be somewhat dangerous and no store wants to be the store that's known for letting people break legs on their slippery dumpster juice or what have you.
Avoid too many store policy issues by waiting until the store closes, doing a pass-by to ensure no one is waiting to see if anyone is picking out of their dumpsters, and (again) looking like someone who wouldn't be diving in dumpsters.
Store management tends to worry that they will be sued for letting you eat expired or unsafe food. If you do get approached by a manager who isn't excited to see someone picking over their dumpster selections, it is a good idea to impress upon them how very many dumpsters you pick from and how you wouldn't possibly be able to prove it was their dumpster that gave you food poisoning. Also, if you're feeling particularly bold, let them know that you are saving their store money by decreasing the weight of their waste. Probably not by a lot, but hey, you're on their side here. If told to scram, once again, do so with haste.
On that note, there are safe and unsafe foods to pick:
Generally Safe:
Packaged shelf-stable foods even with damaged outer packaging
Milk if still cold
Cheese
Eggs
Bread (including frozen bread if still cold)
Whole Veggies and Fruits, even with bad spots
Fermented anything
Non-Food Items like dry pet food, hand sanitizer, soap, cleaning products (except bleach), etc...
Generally NOT Safe:
Sliced lunch meats
Cheese touching meat
Cut salads or veggie trays
Prepared hot foods (even if still hot)
Pre-cooked refrigerated meals
Frozen veggies (unless still mostly frozen)
You want to make sure you have some time the next day to process your haul. Everything needs to be carefully sorted, cleaned, peeled, and in the case of perishable food like eggs and veggies, cooked prior to eating.
One final thing:
Be considerate. Leave everything how you found it and make sure you're not making more work for employees. Also, if you know others in your area dive, leave some stuff there for the next person.
Salvage Shopping:
Perhaps you aren't completely up for dumpster diving but still like living your lil raccoon life? Thats fine!
Salvage groceries are a great option. Essentially, instead of throwing food away that they can't sell to traditional consumers, grocery stores sell near-dated or damaged products to salvage grocery stores for pennies on the dollar, and that savings is passed along to the consumer.
Most salvage stores are smaller than traditional grocery stores, and some are cash-only. Some have fresh or frozen sections, but the smaller ones are pretty much all packaged goods. If you are living exclusively on salvage stores, you may want to supplement with some dumpster diving, foraging, or gardening (or even maybe going to a grocery store, but that's hella expensive).
Salvage groceries are not necessarily going to be perfectly food safe. There will be expired goods (doesn't mean bad). That just means you will have to do some due diligence. For example:
Make sure that an item you want to purchase is still in a sealed container
If there are more than one of an item, make sure they are the same color
Prioritize un-dented cans
If you must buy a dented can, make sure the dent isn't on an edge or seam
Don't buy expired canned tomato products
If you open a food and it smells bad, looks like it thawed and re-froze, hisses or bubbles- THROW IT AWAY
Generally be more cautious than you would normally be at a grocery store.
In my area these are pretty much always run by the Amish and Mennonite communities, but check around in your area. They are becoming more and more common outside these communities.
Not all of them will be listed on google maps. Look for a shop called "Bend and Dent" or "Salvage Groceries" or a small store advertising "Discount Groceries". Once you find one, it's easy to find others by asking at the checkout, since they tend to cluster together.
A drawback is that, because they do tend to cluster, they may be farther away than other grocery options. If you are far away, I highly recommend getting a few friends together and making a day of it. I can't say this about most things, but the extra cost in gas is well worth the savings, even if you are driving over an hour.
98 notes
·
View notes
Text
The Salvage Economy in Your Local Area (And Why You Should Use It)
A salvage economy is an economic system that incentivizes the use of existing ("used") materials over the use of virgin ("new") materials to create products and generate income. They are more circular economies, where profits are more equitably shared, waste is reduced, and items have continuing value beyond a single consumer.
Let’s give the example of a piece of clothing. In a mainstream economy, raw materials would be grown (in the case of cotton/linin) or mined (in the case of something like polyester). They would then be manufactured (a water- and energy-intensive process), shipped to a store (another energy-intensive process) and sold for a profit. Once the end consumer was finished with the item, they would throw it away, losing their investment entirely, as well as losing the material and energy investment in the production of the product. Depending on the disposal method, the item would either go to a landfill (which has a limited amount of space) or burned (which releases the remains into the atmosphere where it can be a danger to human health and the natural environment- even with the most stringent of filters/re-burners).
In a salvage economy, however, the piece of clothing is diverted at the point of the first consumer no longer wanting it. It may be donated or sold to a thrift/consignment shop (where the person may get a small return on their initial investment). It could then be re-purchased by someone else repeatedly until it was no longer in a decent enough shape to be re-sold, then it would be sold to a re-processing facility, where the material itself could be deconstructed, re-woven, and returned back into that cycle (energy intensive as well, but less so than creating a garment from new materials). Everyone gets a small cut of the money involved in the item.
If the material was too damaged to continue in this cycle in a meaningful/economical way, and it needed to be disposed of, it could be added to building materials like concrete (ideal for things like polyester, for which other disposal methods would be environmentally damaging), composted (cotton/linin) to create biogas (heat/energy/cooking fuel), or burned for heat/energy (same problems as burning just to get rid of it, but at least you get energy from it, and you’re displacing some of the fossil fuels that would otherwise have to be mined just to burn for energy)*.
Salvage economies exist in parallel with more mainstream economies throughout the world, with varying levels of accessibility and cultural acceptance based on a person’s location, generation, and background. You’ve probably shopped at a “thrift” or consignment store or bought something on Craigslist or Facebook/Amazon Marketplace- this is participating in a salvage economy. But it goes deeper than that.
Culturally in the US, salvage has traditionally been seen as a cheaper second-best option if you can’t afford something new. However, in younger generations and as new items become harder to find and of lower quality, older items are becoming more desirable, and purchasing pressure is shifting, if only a little bit. While I am no economist (my highest degree is in environmental health science) I also think that as the scales start to tip to raw materials becoming less viable economically, companies will look at alternatives, and those alternatives will be existing materials.
I’m not here positing that we should abandon mainstream economies entirely. People will always want new things and be willing to pay for them. But we have a problem of too much trash and too few (and too expensive) raw materials, which create both pollution and shortages** (a problem that has been increasingly in the spotlight in recent years). And I believe that over the next few decades, the pressure (both from market demand and difficulty/expense creating/mining raw materials) will begin to shift, and with it, if you believe traditional economic theory, so too will companies looking to maintain profits. CEO’s gotta eat, (and purchase his 14th yacht), you know.
But I am here saying that you can start putting this pressure on corporations early. Avoid the rush, as they say- before shortages mean everyone turns to the salvage economy all at once with not enough infrastructure to support them. Here are some ways you can participate and build up that infrastructure:
Borrow or rent things you don’t use regularly
Hardware stores rent tools/machines
Look into tool exchanges in your area
Libraries for books (eLibraries like Libby are great if you can’t go to an in-person one, especially if you like audiobooks)
Libraries for toys/games/kits/electronics
Industrial kitchen rentals if you preserve or sell food in moderate quantities
Buy as much as you can used:
Need clothing and home-goods? Thrift stores like goodwill and consignment shops are great at this.
Some thrift shops have a fabric or yarn section if you have/want the skills to knit/sew your own clothing. I’ve gotten some excellent quality wools from Goodwill for super cheap.
Need building materials or furniture? Salvage yards run by demolition companies and charities like Habitat for Humanity ReStore have your back.
Pull-A-Part for car/engine parts
Need books, textbooks, physical media, really specific tools/items, etc? Facebook/Amazon Marketplace, Craigslist, eBay, Thrift Books, etc…
If you can’t get it used, at least save it from a landfill:
Shop for clothing/ home goods/furniture/food at overstock and “damaged goods” stores like Marshalls, Ollie’s, Gabe’s, Rose’s, local wholesale stores and the like.
Look into salvage grocery stores. Some are run by charities and specifically serve low-income clientele, but many are open to the public (especially in areas with high Amish populations). These stores buy overstock, expired (doesn’t mean bad), and food with damaged packaging in bulk and sell it for an extreme discount (like 90% off). Some even have frozen, refrigerated, and fresh sections.
Craigslist sometimes have people advertising fruit trees in their yards that are a nuisance to them d/t falling fruit, and want someone to come collect it
If you already have something, but it broke, try to get it fixed instead of replacing it. Look into:
Appliance repair places are still a thing
Electronics repair and referb places
Repair cafes (events where people with repair skills, people with tools, and people with things that need to be repaired can meet)
Mending circles and learning to mend and alter clothing yourself
Tailor/clothing repair shops
Watch/jewelry repair shops
Shoe repair shops
Car repair places (it’s like I’ve always said- the best car for the environment is the one you’re currently driving, especially if you keep getting it maintained and fixed appropriately as needed, but even if you don’t, it’s better than creating demand for something new)
Gardening! (look at it as making something you have or have access to (land/a yard) into something you need (food))
Most of these are cheaper options, some of them aren’t, but it’s great to create a list of resources in your local area as you find them- that way you’ll be less tempted to go straight to Target for a new item.
Additionally, with the exceptions of a few chains and online resources, many of the “salvage” stores are small, local businesses. And you want these to thrive, both to stick it to Amazon and Wal Mart, and because they keep skills and resources circulating in your local community. Yay!
*You’ll notice I didn’t say the word “recycling” anywhere in there. While traditional recycling works for some materials, it is expensive and the infrastructure just isn’t there currently to handle the demand, largely because as it stands there wouldn’t be a lot of return on that investment. To the point where most recycling is either sent to US-based landfills or sent abroad (where we’re not really sure what happens to it- some of it is sold back to US corporations as post-consumer materials (primarily for “greenwashing” efforts, but that’s a whole other thing), but we think the majority of it just ends up in foreign landfills or above-ground dumps). While recycling definitely has a place in salvage economies, as we do it today it is divorced from the end consumer/waste generator and has little purpose or accountability beyond making people feel like they’re not just throwing stuff away.
**You wanna know how that happened? We abandoned buy-it-for-life models popular before WWII and adopted obsolescence models that provided extreme short-term profits for corporations at the near-immediate expense of human health and the planet.
We also developed the absolute scourge that is disposable packaging. Think about how much of your trash is just packaging from things you bought. Did you know before WWII you purchased most of your goods by purchasing your first metal can or glass bottle of consumables with a deposit, then came back and got the same can/bottle refilled a bunch of times? And if you no longer wanted it, you returned the container to get your deposit back? It’s true. Some companies (liquid manufacturers, like soda/milk, up until the 1970s) had a system where you returned your empties for a return deposit each time, and they’d wash and refill them, and sell you full bottles + deposit for the next go-round? Imagine how much less trash we’d have today if we still worked on that model. We literally had to teach people to throw things away with advertising (see below). But I digress…
#the salvage economy#salvage#food#clothing#gardening#tightwadery#economics#ideology#DIY#homesteading#low effort homesteading
2K notes
·
View notes
Text
Punk Gardening!
It’s that time of year again where you are all out there planting gardens and being anxious about how none of your seeds have come up, or they’re “leggy” or there’s too many weeds or you didn’t water them enough.
And I’m here to say screw all that. You’ve been sold what a “garden should look like” by pesticide and herbicide companies. To be perfectly honest you’ve been sold that about your lawn too, but that’s for another post. It's time to take back gardening and grow some delicious, nutritious food!
So let’s talk about some things that can make you grow a happy, healthy, gnarly-butt garden that���s gonna grow a lot of food and take very little actual effort.
First: Weeds
There’s no such thing. Weeds are a myth. There are plants in your garden that weren’t the ones you planted? Great. Plants like to grow in your dirt. That should make you happy. It means the ones you want to grow will probably also like your dirt and want to grow their fruit/bodies there.
You’ve probably been told non-planted plants take nutrients from the plants you want there. They don’t. Seriously. For one thing, plants need different things, and clover isn’t going to want the same nutrients as your tomatoes, and it’s also probably not going to out-compete your tomatoes for sun. In fact, “weeds” also contribute good things and generally work together with your other plants.
Good plants to see growing in your garden:
Clover: A nitrogen fixer, meaning it will help your garden self-fertilize year to year. You want as much of this as possible in your lawn, too. It’s killed by a lot of major herbicides though, so to justify it’s use, you’ve probably gotten told you want a monoculture of bladelike leaves for the “perfect lawn”. A perfect lawn like that is both really hard to keep alive if not the exact correct type for your yard, and also generally needs added nitrogen fertilizer… because you removed the clover with your herbicide… sigh.
Dandelions: These are great because they have a really deep taproot that breaks up ground and brings water and nutrients to the surface for your other plants to enjoy. This means less watering, less fertilizing, and less need to till the soil before planting! Plus, young dandelion greens, while bitter, make a great topping for a salty sandwich or pasta dish. Their early-season buds can be pickled for capers, and if you’re vegan, cheap, or just want some variety, you can make dandelion “honey” by using dandelion flowers to flavor a sugar syrup.
Henbit: not going to hurt anything, gives good root mats that can help keep water in the soil around your plants, and is also edible, if bitter.
Grass: Similar to henbit, it creates a root mat that aerates soil, keeps in moisture, and prevents erosion.
Plantain: There’s not as much I can say about this one, but it’s not going to hurt anything. And you can make tea out of it if you like.
The only plants I would really take out are the spiky ones (that might make it hard for you to access your food come time for harvest, and are easier to remove when small) and really tall ones with large leaves, which genuinely may shade out smaller plants, especially at the beginning of growing season. If you have a bed near a tree that produces a lot of seedlings, you may also want to be selective about which ones you keep, if any.
Second: Choosing Seeds
You can go the cheap/free way (link), and make yourself a nice dumpster garden out of discarded food scraps. If you’re particularly daring or broke I recommend going to an actual dumpster, since a lot of the discarded produce will be overripe and most plant-able. If you’re gonna invest in seeds, though- make them ones that are native to your area. As my dad found out after several failed years of 2-fruit harvests- growing lemons in Ohio is expensive and futile. Something like sweet potatoes or squash though will be a much better use of your energy.
You can easily recoup your investment in good seeds if you get heirloom and save the seeds for next year, limiting the number of times you’ll have to buy them in a lifetime. A lot of time it’s as easy as letting a few plants/fruits “go to seed” or overripen, then remove and dry the seeds. This is especially easy for brassicas, lettuces, and greens, but can also be done for tomatoes, cucumbers, squashes, and others with a little research and strategic planting to ensure minimal inopportune cross pollination.
Third: Planting and Care of Your Plants
Historically, nature has been pretty dang successful in growing things. Even things humans have decided we like to eat. The biggest thing you can do for yourself here is think “what would nature do?”.
Nature doesn’t till. Generally you can help root veg (carrots, beets, potatoes, etc…) get a little bigger/more uniform by roughing up the soil, but you don’t have to do it for anything else. Not tilling actually helps plants grow longer and more complex root systems, which decreases the need for watering and fertilizing, and they’re more likely to survive high winds.
Nature doesn’t plant things in rows ¼ inch deep. She dumps a ton of seeds in one area, half of them get eaten by birds, the other half sprout and beat each other up trying to get sunlight. A few nice, hardy, delicious plants remain. You can take some advice from this, but also help nature in this regard. I recommend dumping a ton of seeds in a section, then scrabbling your hand through them and the dirt over the area you’d like them to grow. There. Planted. Some will grow too close to each other and may stunt each other’s growth. You can thin to an appropriate distance, and generally eat the sprouts whole in a salad. You’re just gonna have to assume that some of the seeds will be eaten by birds/squirrels and be okay with that. Seeds are cheap and a renewable resource- especially if you got them from a dumpster.
Nature doesn’t start seeds indoors. Just plant when it says on the packet outside.
Nature doesn’t water things regularly. If the soil is super dry when you plant, you may want to dampen it with some tap water. Other than that, water only when it’s been dry for a week or so, or the ground is exceptionally dry despite your clover and grass cover.
Nature doesn’t use petroleum-based fertilizers. She uses composted organic material (vegetable food scraps, yard waste if you’re on a 1-year compost cycle, plus pet waste, meat and dairy scraps if you’re on a 3-5 year cycle), and urine. Yes your urine. It’s great. High in nitrogen. Very free. Add it to your compost or use it directly by mixing it with about 3 parts water. You can either apply it in the rain or just try not to get too much of it on the leaves- pee plus sun will burn leaves.
Finally, nature doesn’t neatly harvest on a particular schedule. Leave a tomato plant out and watch a deer go to town on it. We actually had all of our tomato plants last year eaten down to nubs early in the season, and they came back and gave us one of the best harvests ever! I don’t recommend this as a strategy, per se, but if you’re picking something like greens or basil, harvest by just grabbing handfuls and ripping it off the plant. Our basil and other greens LOVE this and grow massively when we do this.
Fourth: Miscellaneous Tips
Move your plants around year to year. Crop rotation isn’t just a big farm thing. Tomatoes are going to take what they need from the soil but leave the rest and add something back with their own decomposition, which might be something your squash wants next year, etc.. You don’t have to be perfect about it, just try to put things in different places from the year before.
Speaking of which, once you’ve gotten what you can out of them, just chop the plants up and cover them with a little topsoil or mulch at the end of the season. Saves you time and returns everything you can back to the soil. You may get volunteers next season, but really the more the merrier!
Also- some plants you can eat a lot more of than others. For example, the only thing edible on a tomato plant is the tomatoes. But radishes? You can eat the root, the greens, the flowers, and the seed pods, and they are all great! Look into other things you have growing and you might end up with more food than you thought!
Your plants will look weird. That’s okay. Some of the leaves may rot or fall off. The tubers will be weird shapes because they grew next to a rock. Some of them will get eaten or break and be a little behind because they had to grow back. Your tomatoes may have a crack or two in them. Just eat those first. Produce isn’t supposed to be as perfect as it is at the store, and it’s not a problem that it loses a few leaves or is “leggy” at first or other things people worry about. Plants grow, sometimes weirdly. That’s really, genuinely, okay. It very likely won’t harm the end product at all.
2K notes
·
View notes
Text
Hi everyone!
Do you or someone you know use tube feed? Having an issue with current shortages or just need something less expensive?
The following formula can be used temporarily or permanently (if using permanently add a daily multivitamin).
For one serving:
1/2 cup overcooked peas
1/2 cup overcooked rice
3 tablespoons peanut butter
Flavorings as desired (cocoa, cinnamon, vanilla, banana, etc…)
Cook peas and rice with about 1.5 as much water as called for in the preparation and cook long enough for things to get really mushy. Place all ingredients in a blender and blend. If you’re using a cheap blender you may want to microwave the peanut butter first so it’s more liquid. If this comes out too thick, add some water to thin it out.
If you are putting this down a corpak you’ll need a more expensive blender (like a ninja, nutribullet, or vitamix) or you’ll need to strain it through a sieve in case there are chunks.
One serving contains about 500 calories, 22g protein, 50g carbs, and 24g fat in about 300mL of formula (about 1.6cal/mL). Assuming 4 servings a day, you can get the ingredients for about $10/3days.
68 notes
·
View notes
Text


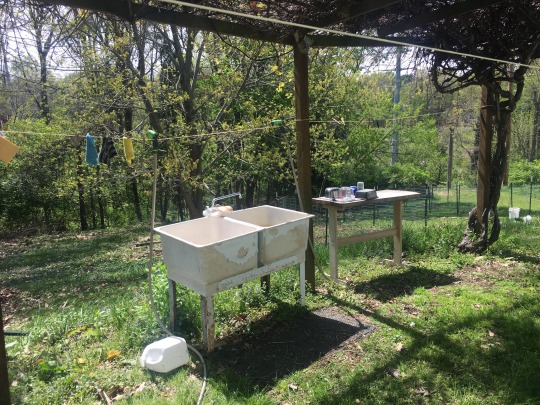
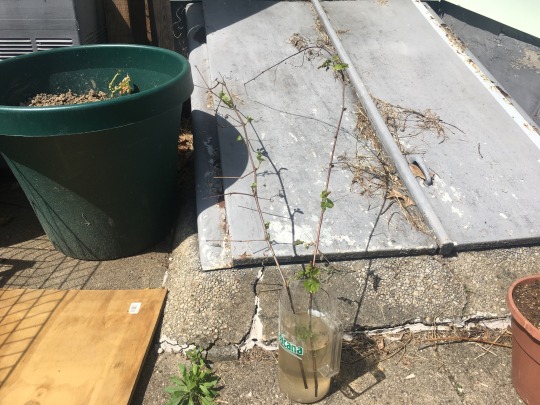
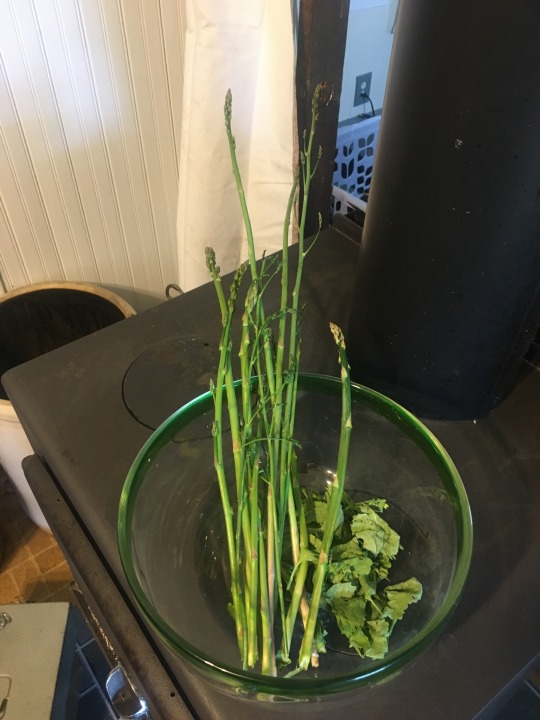
A taste of spring! Our peas are sprouting, the grapes are leafing, the orchard is coming back to life, we’re cultivating unused spaces to encourage wild food like raspberries and grapes and garlic, setting up our summer kitchen, finding cool plants in unused spaces to take and grow cuttings elsewhere, and our first crop of asparagus season!
28 notes
·
View notes
Text
The best part of 2022 is watching 12-year-old shows like doomsday preppers and extreme cheapskates and being less “lol people are crazy” and more “damn I wish I had a tilapia powered greenhouse...”
67 notes
·
View notes
Text

Crabapples!
Pulled over on the way to my parents today to harvest some crab apples from trees we’ve been eyeing for the last few months (on public land).
Crab apple trees are technically any tree that produces apples less than 2 in across. While often overlooked as a food source due to the more intense, wild, or tart flavor (or even actively disliked due to “mess” or “ugliness” in yards), their apples can be sauced, baked, fried, pie’d, made into apple scrap vinegar for canning or cleaning, or turned into apple butter. I personally also really like them raw!
Not to mention they’re totally free (save for the harvesting/collecting)!
83 notes
·
View notes
Text
Grocery Store Gardens
Did you know that if you buy just about any fresh veg from a grocery store, you can grow more of it on your own?
It’s true!
While some of these methods might not net you tons of produce, they’re a fun project and can at least save you a little in produce expenditures (and decrease waste!) if you were originally planning on throwing the seeds/butts/eyes of your fresh veggies away, here’s a chance to give them new life!
From Seed:
Trying to harvest and grow fruit and veg from seed is often the least reliable way to grow veg from supermarket produce (due to hybrids and interbreeding, which means you’re never really sure what you’re going to get-if anything- with grocery harvested seeds), but since seeds are familiar, it’s definitely worth mentioning! Seeds that are most likely to grow are those that have not been irradiated (which stops the seeds from being able to grow), and those that are fully mature (for example, colorful peppers instead of green peppers, which are not ripe enough to produce viable seeds). It is advisable to wait until the fruit/veg is very ripe or overripe before harvesting your seeds.
Tomatoes: Slice ripe tomatoes into slices, and place 4 of the slices in a gallon container of potting soil. Cover with a half inch or so more potting soil, place in a warm, sunny place, and keep moist. Seedlings should start sprouting in 7-14 days, at which time you should pull the strongest ones and re-plant them in their own pots. Once there is no longer a danger of frost, you can plant these in the ground outside or move their pots outside on a patio.
Peppers: Remove seeds from ripe (orange, yellow, or red peppers are most likely to be ripe) peppers, dry them for a few days. Once dry, test your seeds by placing them in a clear zip bag with a damp paper towel in it, and taping this to a window. The ones that sprout (time to sprouting can vary) can be moved to starting trays or their own pots. Once there is no longer a danger of frost, you can plant these in the ground outside or move the pots outside on a patio.
Winter Squash: Wait until the squash is as ripe as possible without rotting (slightly rotten is fine if you weren’t planning to eat it, or didn’t get the chance to), then remove the seeds and let dry for several days. Do as you would for peppers. Keep in mind that the squash that grow from grocery store squash seeds may be very different than the squash they came from.
Citrus fruits: Remove whole seeds from the citrus fruit of your choice, and place in a bowl of water. The ones that sink are the most developed and have the best chance of growing. Wrap in a damp paper towel and place in a clear zip bag but leave the bag slightly open. Place in a dark place (like a drawer or in your closet) for 2-6 weeks, until 2 small leaves are clearly visible. Carefully plant this tiny plant in a container of soil. Keep the soil moist. If kept well, this will form a tree that will bear fruit in 3-6 years. In a warm climate the pot can be moved outside, while in a cooler one you may want to keep your tree inside in the winter.
Avocado/Mango: Do as you would for citrus fruits, but instead of waiting for leaves, just wait until the root is about 3in long before taking it out and planting it in a pot (you will have to scrub the mango pit clean, let it dry a few days, and remove the outer part of the pit to get to the large bean-like thing in the middle, you do not have to do this for the avocado). Note that it will take about 8 years to start producing fruit, and when/if it does, it may not produce the kind of fruit you were expecting. But they do make a nice houseplant!
Stone fruits (peaches, apricots, plums, etc...): Place the pits in a small jar of dirt in your fridge for 3-4 months, until they start sprouting roots. When they begin to root, take them out of the fridge and plant them in pots. These are another 3-6 year investment, but of all the store-bought-pit-trees, these are probably going to produce fruit that is most similar to the original fruit.
From an existing base or part of the fruit/root:
Growing things from existing parts of plants will yield you a lot more consistent results and is often a lot easier than growing from seed, but it is a little more of a unique challenge!
Onion/Green onion/Celery: Cut the base off the onion or celery bunch about an inch from the roots. Set in a small, shallow container about half-full of water, coming up only a quarter to a half inch up on the base. In a few days, you’ll see shoots come up and roots start to form. Change water every day or so until there are plentiful roots, and then transplant to a container filled with potting soil, where they will continue to grow.
Turnips/Beets: Cut the root off about 2 inches below the top. Eat the root and plant the top in some potting soil so the very top is just sticking out of the soil. It will grow greens, which you can harvest and eat raw or sauté, and over time the rood will re-grow.
Potatoes/Sweet Potatoes: Wait until eyes start to form on your old potatoes. Cut them up, making sure that at least one sprouting eye is on each piece. Get a deep container like a trash can and fill the bottom 6in with gravel or rocks. Fill the container with potting soil/dirt and bury your potato pieces about an inch deep. They will shoot up leaves and stems within about a week (you can eat sweet potato leaves, but NOT white potato leaves). Place outside if it’s after the last freeze where you live or keep inside by a window. Wait about 4-5 months or until the above ground plants die, then dump out the container and find all your new potatoes! Its like a scavenger hunt!
Garlic:
Outdoor: Stick a single clove of garlic 2 inches deep in the dirt in the fall a few weeks to a month before the ground freezes. The bigger the clove, the bigger your bulb will be when you harvest. Cover with mulch or straw or cardboard or whatever you have if you live in an area with cold winters. Harvest in July/August the next year.
Indoor, for garlic greens: Plant 3-4 cloves in a pot by a sunny window. The cloves will shoot up greens within about 2 weeks, which you can cut and use like garlic.
Ginger: Essentially, take a piece of ginger with some eyes on it (more likely if it is older (but not shriveled) or organic, as conventional ginger is often treated with growth retardants which make it take a lot longer to grow) and do as suggested for avocado/mango, as above. You can harvest the above-ground shoots and it will grow more ginger below ground over time!
203 notes
·
View notes
Text
The Thrill of a $5 Rotisserie Chicken
Few things allow you to feel the potential like a $5-7 pre-rotisserie’d chicken from a fancy, otherwise expensive grocery store like Costco or Meijer or Walmart or Giant Eagle.
First, you didn’t have to cook it yourself (and, generally, for some reason it’s significantly cheaper to buy your bird pre-rotisserie’d than buying the raw bird and cooking it), and second, well, it’s like 4 entire pounds of the expensive ingredient in basically any recipe- and you didn’t even have to run the risk of accidentally messing it up with the wrong seasoning or by forgetting it was in the oven.
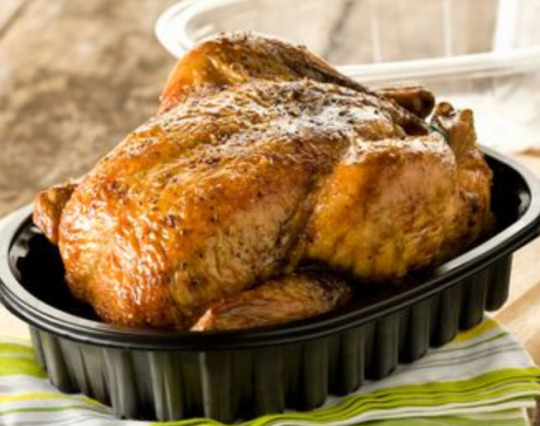
But if you’re like me, $5 is the absolute max you would ever think of spending on any single grocery item (plus, if you think about it, that’s an entire animal’s entire life in that chicken carrier)- so how to justify it?
By getting absolutely every possible single scrap of nutrient and calorie from this former wad of feathers. That’s how.
Today I’ll take you through the process of getting your (7-9) meals’ worth out of that $5 bird in 4 easy steps:
Step 1: Acquire the Bird
Figure out which stores in your area offer the least expensive rotisserie chickens. In many places this will be somewhere between $5-7. It’s worth seeing if they’re even less expensive when purchased day-old from the deli cooler instead of on the warmer, though this is rarer than you’d think. It might be worth it to you to get a biweekly/monthly chicken at a place you don’t normally shop if you, like me, usually shop at grocery stores without such a fine prepared food section.
Step 2: Divide and Conquer
Resist the urge to eat as-is. You’re on a mission here.
While the chicken is still warm, pick all the meat from the bones. Picking meat from a warm chicken will make the meat come off the bones more easily and net you more meat for less work.
Place the carcass (as well as skin, tendons, drippings, and anything that isn’t meat) in a plastic bag or large container and put it in your freezer for later.
Shred the picked meat and divide into about 6 servings. It may not look like a lot of meat per serving, but many recipes don’t need a lot of meat to make them tasty.
Freeze these in separate containers (baggies are fine, or plastic/glass containers) so you’ll have a convenient, pre-cooked, pre-portioned source of meat for recipes.
Step 3: So You’ve Got Some Conveniently Portioned Chicken...
Find some cool recipes that use chicken. They don’t have to be difficult or time-intensive- find ones that use (or can be amended to use) about 1/6th of a rotisserie chicken. Keep in mind that many recipes are not specific to a particular type of meat/protein, and pre-cooked chicken works for a lot of them.
For example:
Warm shredded chicken on salad greens
Chicken salad (chop carrots, onions, and celery, toss with thawed chicken and dressing, serve on toast)
Chicken enchiladas
Chicken and bean tacos
Chicken bacon ranch casserole
Chicken pasta salad
BBQ chicken pizza
Chicken noodle soup, stew, or white chicken chili
Chicken stir-fry
Chicken Sloppy Joes (chop chicken small and pad out with veggies like finely diced or shredded carrots, potato, sweet potato, onions, green pepper, cauliflower, etc...)
Step 4: So You’ve Got a Chicken Carcass in Your Freezer...
Remember that large container or storage bag with the chicken bones, etc... in it? Well, you know how every time you cut up an onion or carrot, or celery, or other veg there’s bits you don’t eat (onion skin and ends, carrot tops and greens, celery butts, radish greens, etc...*)? Throw those into that bag/container as you go.
Once the container/bag is full of chicken and vegetable scraps, you’re ready to make some broth/stock. Broth and stock helps you get everything else out of the food parts you’d normally throw away.
Put all the scraps from your bag/container into a large pot and fill with water. Add some herbs/spices of your choice (recommend rosemary, bay leaf, basil, parsley, pepper, salt or bouillon if you would like, and garlic (fresh or granulated)) and a few tablespoons of vinegar (any kind you have is fine- it’s just to put a little acid in there to get some extra minerals out of the bones).
Turn on the stove until just boiling and simmer for several hours. Alternatively, you can put this in an electric pressure cooker (like an instapot) for 1-2 hours or a slow-cooker for 4-8 hours.
Once everything has boiled long enough that the tendons are clear and gooey (or when you’re starting to get anxious about the gas/electric bill), pour everything through a strainer set over a large bowl.
What comes out the other side is your stock. Pour into containers and freeze for later. This can be used for a nice soup base, instead of water when making rice or pasta, or you can drink a mug of it plain. It’s particularly great for getting calories, salt, vitamins and minerals in when sick- you can hide a surprising amount of butter, lard, coconut oil, or other fat in a mug of broth!
*I recommend not using bits from cruciferous veg like broccoli, cauliflower, brussels sprouts, etc... It will be overpowering flavor-wise and not in a good way.
170 notes
·
View notes
Text
The Joy of Raising (and eating) Your Very Own Yeast Child(ren)
I know I am, statistically, late to this bandwagon.
Once a mysterious realm that only seasoned bakers would dare enter, the world of baking with a home yeast starter has become much less foreign to the scores of reluctant public health enthusiasts trying to find a way to use their sudden increase in free time.
It’s also because yeast is both reasonably expensive (like $5 for a jar that lasts a while, granted, but if you make all of your own bread, it quickly becomes the expensive ingredient) and frankly when everyone is making yeasty baked goods and supply chains are disrupted due to a pesky global pandemic, you want to have a backup. Discard also makes the food you eat just a little better for you (see below), and if you’re relying on more starchy things like flour in your diet for budget reasons, why not get everything you can out of all the other ingredients?
I, like everyone else, made like three sourdough starters in the last 12 months. I then let them die because holy crap those things 1, ate way more than I expected them to, and 2, I kept ending up with this stinktastic, slowly-fermenting glob of goo (the discard) in a takeout container on my porch because otherwise my entire apartment would have smelled like it.
I know I’m not doing a great job of selling it, but I wanted to make a post that showed it really was possible to not only sustainably and economically grow and maintain your own edible bacteria-and-yeast colony in an old jam jar, but really make it a part of your family.
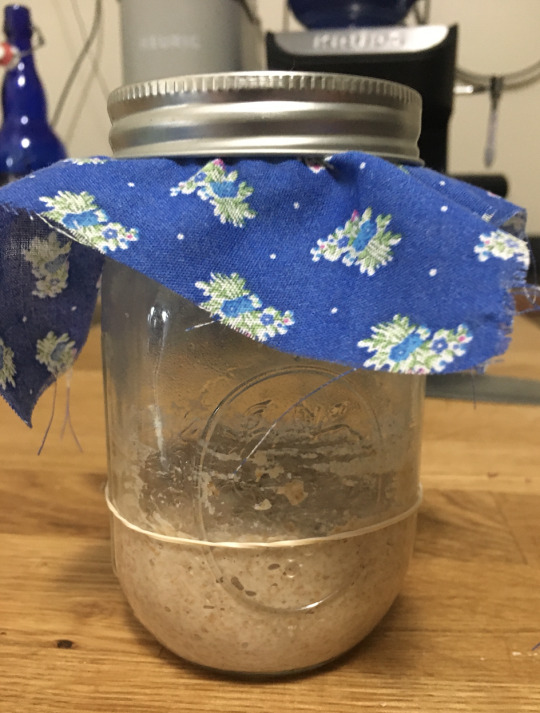
1- How to Make a Starter:
Before we can really get into the joys of raising a pet sourdough starter, you have to actually get your hands on one. It’s actually way, way easier than I thought:
First, you get the following:
A jar with a lid (preferably glass- my first one was a pasta sauce jar from Aldi, but anything that’s clear-ish and around a pint/500ish ml will work great)
A half cup or so of whole wheat flour (if you don’t use whole wheat flour often, it will only be a few cents if you buy it in the bulk section)
6-7 tablespoons of tap water
A clean spoon
A rubber band or dry erase marker (optional but recommended)
All-purpose white flour to feed
Second, you put the flour and water in the jar and mix until it forms a thin, sticky paste
Third, cover loosely with the lid, and mark the level of water-flour paste either by putting the rubber band around the jar or marking it with a dry-erase marker.
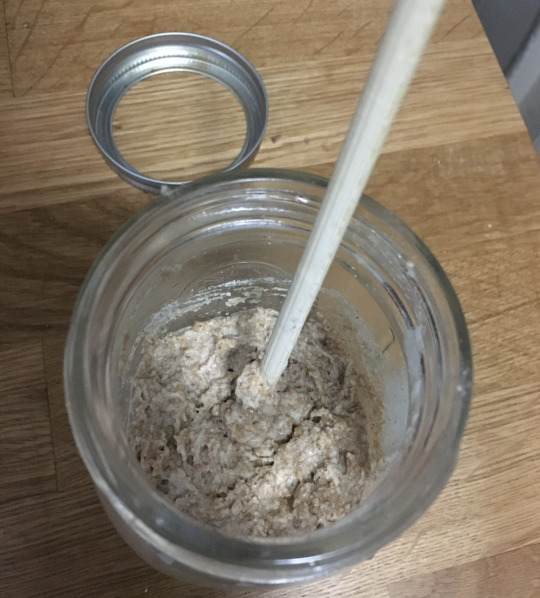
Fourth, wait like 24 hours for bubbles to appear. These are CO2 bubbles released as the wild yeast and bacteria that is naturally present in whole wheat flour eats the wheat starch.
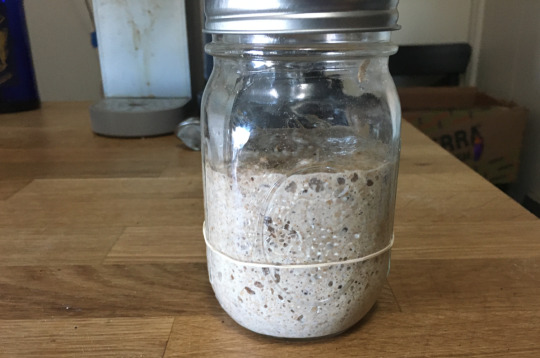
Fifth, once your flour-water-yeast goo doubles in size, scoop out half of it and discard (it should be stretchy, sticky, and bubbly in texture and smell pleasantly yeasty and ferment-y), place a quarter cup of all-purpose flour and 3 tbsp of water in the jar and mix with the remaining starter. Repeat every time the mixture doubles in size.
Note: if you go too long without feeding your yeast baby, it will form a watery layer and start to stink. All you have to do to save it is get as much of the watery stuff out as possible, discard half, and feed it until the smell and texture return to normal.
Once you start having to do this multiple times per day, congrats! You have a live and active sourdough starter!
2- What to Do With All That Goo (or ”discard”):
So basically now you have a boring, hungry toddler that really likes flour and outputs a lot of gooey discard.
First, don’t think of discard as a waste! You should think of your starter as a yeast farm and the throw-away portion (the “discard”) as the product.
Using discard in recipes not only lends a deeper flavor and chewier texture to baked goods, but helps partially digest the wheat starches (making discard slightly lower in quick carbohydrates than traditional flour), acts as a prebiotic (the fiber in discard-laden baked goods is better for feeding your gut bacteria, which helps you digest things more thoroughly), decreases the amount of gluten, and the lactic acid bacteria in discard increases the amount of nutrients like folate, potassium, and magnesium that the body can absorb during digestion. Basically, it lets you get more out of the food you eat and makes baked goods (slightly) better for you!
Here’s how you can use it (remember that measurements shown below are “stirred down” discard, meaning you have to stir the bubbles out of your discard before measuring):
Bread/bagels/english muffins- replace the active dry yeast portion of the recipe with a quarter cup of discard, and let the dough rise 12 or more hours after kneading. This longer rise time is required because the wild yeasts are not quite as active (or voracious) as their cultivated cousins, and you want time for the whole thing to get nice and sour from the lactic acid bacteria.
Crackers/thin-crust pizza dough- replace half the flour in a cracker/pizza dough recipe with discard and omit yeast.
Crepes/pancakes/waffles- replace up to 3/4 of the flour in a crepe, waffle or pancake recipe with discard, and omit yeast.
Quickbreads- replace up to 3/4 of the flour in a quickbread (pumpkin, apple, zucchini, banana bread, etc...) with discard and adjust liquid to desired consistency.
Brownies- replace as much as all of the flour in your brownie recipe with discard and adjust the liquid to the desired consistency.
Granola- replace the binder (usually honey or sugar) in granola and granola bar recipes with discard, and sweeten to taste.
Pie crust- replace half the flour in your pie crust with discard, add the discard when you would normally add the water, and omit the water.
Batter for fried fish/chicken/potato wedges/veg, etc...- water down the discard with some beer or water, dip your fried things, and fry.
3- Preserving Your Starter Colony When You Have More Bread and Crackers Than You Can Comfortably Eat:
As much as you’d like to think you’ll use discard for every recipe, you might find that your creativity (or just your tolerance for discard-flavored things) gets stretched a little thin over time.
That’s okay!
Here are a few great ways to save your starter without needing to feed it every 12 hours:
Fridge it- If you just want less discard, put your whole starter colony in your fridge- the cold slows down the yeast’s digestion so you only have to feed it once per week.
Freeze it- if you have a few days that you don’t have anything to do with your discard or want to save up for a bigger recipe, portion it into greased ice cube trays, freeze it, and then pop the discard chunks out and store in a ziploc or jar. Thaw it to use in larger recipes down the line.
Dry it- spread your discard on parchment paper-lined baking trays and let it air out at room temperature for a few days, then chop it up and store in an airtight container (with some burnt flour in a little cloth envelop if you live in a humid climate).
Gift it/sell it: You’d be surprised at how many people feel the need to buy an existing starter. Feed your starter and then portion it into small jars (baby food, etc... with labels removed), then freeze the jars. Gift or sell these frozen portions by tying a little ribbon around them (feel free to name them and write the parent starter’s date of birth on the ribbon) and sending them off with a little printout of how to care for them.
90 notes
·
View notes
Text
Baking Good Bread
Yes, I know you can get a loaf of sandwich bread for like 89c at Aldi or Walmart. And if that’s what you have access to, please, please do. Absolutely no judgement coming from me for inexpensive, convenient, filling food that works for your lifestyle.

But if you’re in the life situation to do it, for the same price (or less) and a little work (and waiting), you can get a loaf of whole wheat, artisanal bread that is seasoned exactly how you like it and goes exceptionally well with a nice soup or pasta dish, a quality grilled cheese, or even just with butter or yogurt for breakfast. The kind of loaf that retails for $6. Get good enough at making it, and it will even take care at least some of your gifting needs (my parents pretty much always accept a loaf of a nice herb bread when a gift is warranted or in exchange for using their laundry machine).
To make some nice bread, you’ll need, at minimum:
1lb (3.5c) Flour- I use whole wheat bread flour. You can buy this in bulk some places if you want exactly this much, but most of the time if you go to a regular grocery store you can find a generic 5lb bag for less than $3. It’s a little more expensive than white all purpose flour, but IMO it’s worth it for the nutritional value. And you can make about 5 loaves from that much flour.
1 + 1/8c warm water (a little less if you plan to put oil or raisin paste in your finished product, or if you live in a humid climate
2tsp (or 1 packet) Yeast- I use active dry yeast, which is ~79c for 3 packets at Aldi, or about $4 for a jar that will last you 3 months if you bake bread every week, but you can use whatever yeast you can access. Homemade yeast also works if you have it and a little more time to wait for rising.
1tsp Salt- I use koshering salt, but you can use whatever is currently in your salt shaker without an issue.
2tbsp Sugar- this is for the yeast to eat, but it also imparts some flavor. You can use white sugar, brown sugar, maple syrup, honey, molasses, or whatever else you have lying around.
A measuring cup, a medium-large bowl, measuring spoons, a baking sheet or loaf pan, clingwrap or a damp towel, a spoon, a serrated knife, and an oven or large toaster oven.
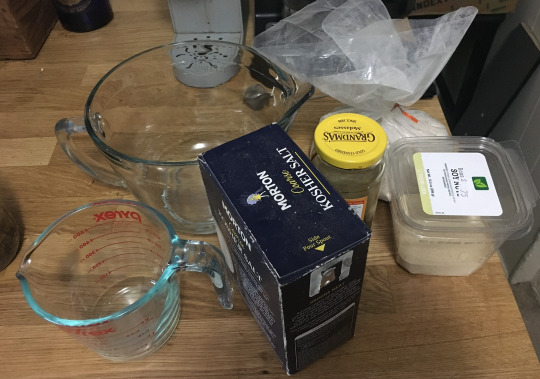
Optional:
Oil- can add some flavor if you use olive oil or other flavored oil. It also makes the bread a little easier to knead and a little softer, and if you spread it on top during the second rise, you won’t need to cover it. Use about a quarter cup.
Raisin “Paste”- It’s basically raisins you’ve let sit in hot water for an hour and smushed up with a fork, then strained some of the water out of. This prevents your bread from molding if you plan to store it at room temperature. Surprisingly, it does not change the flavor all that much, and can still be used for savory breads. Use about a quarter to half cup.
Herbs- For flavor, particularly nice if you’re making your bread for a gift. I like rosemary and garlic particularly, but feel free to experiment.
How to put it together:
Mix the flour and salt together in the bowl.
Mix the sugar, water and yeast together in another, smaller bowl or in your measuring cup.
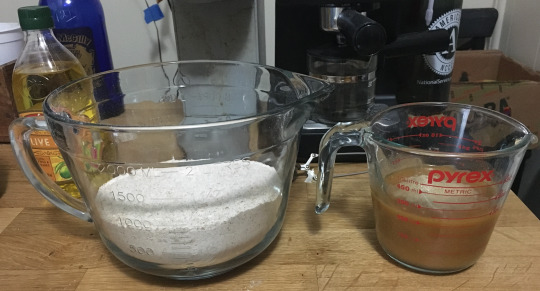
Let the yeast sit for 5ish minutes until a layer of foam sits on top.
Pour the yeast water into the flour mixture. Add oil, herbs, and raisin paste if you want to here. Stir until it becomes a grainy dough.
Let sit for about 20 minutes until the flour soaks up the liquid and gets softer.
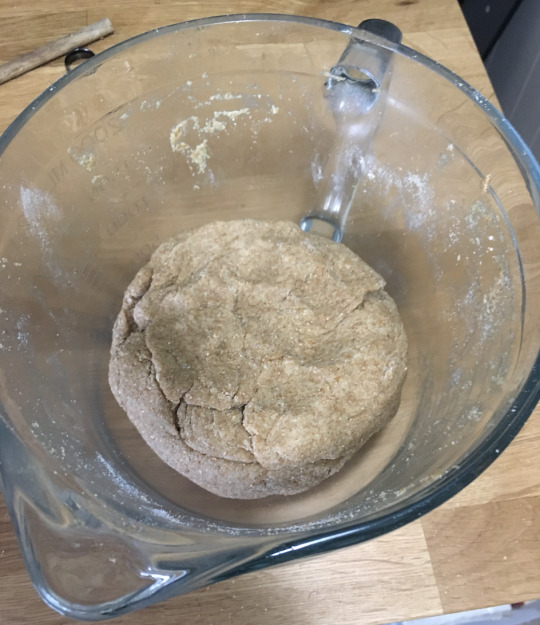
Knead for 8-16 minutes by laying out on a smooth surface, pressing the dough forward, folding, and pressing forward again. The dough will become smoother as you continue to knead.

Mold into a ball and set in your bowl. Cover with either clingwrap or a damp towel, which will let the dough rise without drying out. Wait about an hour. NOTE: if you don’t have that kind of time, pre-heat your oven to the lowest setting (mine is 170F), then turn off, and put the bowl with the dough in the cooling oven, which should shorten your rising time to about 20mins.
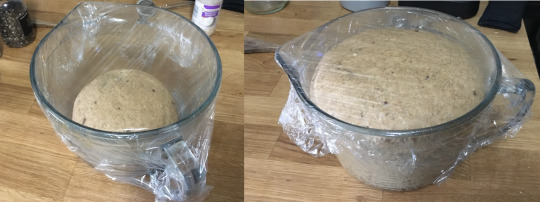
Now, go ahead and take that risen dough out of the container (it will deflate when you pull it out, this is fine). Shape it into a loaf, oil the outside if you want to, place it on a baking sheet, and cut shallow diagonal lines in the top of the loaf with a serrated knife (move the knife very quickly over the surface of the dough).

Wait another 30mins (or place back in the cooling oven for 10-15 mins) until the loaf is as large as you would like your final loaf to be.
Take the loaf out of the oven if you had it in there to rise and pre-heat to 350F.
Once pre-heated, bake for about 30-35 mins. If you have a meat thermometer you can stick it in the bread to check the temp. It should be 190F.
Let cool completely on a wire cooling rack or some paper towels (to let the bottom of the loaf off-gas some steam, otherwise it will get soggy). Slice into slices or chunks if you’re feeling particularly medieval and eat.
Keep in an airtight container or freeze for later (if you slice it before freezing it, you can take out the slices individually and toast them without needing to thaw).
Enjoy!
60 notes
·
View notes
Text
We just got back from an awesome canning jar haul. An older couple who are good family friends of some of our family friends is moving out. Avid canners/gardeners their entire lives, they were getting rid of their jars to decrease space. We went and got as many as we could load into my civic’s back seat and trunk. I don’t know how many yet, but we might be set for life!
Way better than 50c jars at Habitat or $1 jars at Goodwill!

There was at least one that was over 150 years old, which is def too thin to can in by today’s standards, but which we will absolutely keep as decoration!
11 notes
·
View notes
Text
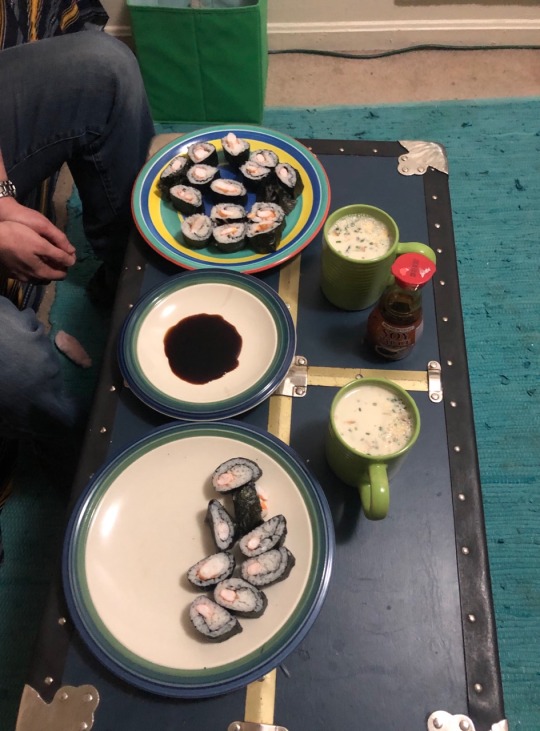
A two-course homemade sushi dinner for 2. The shrimp, nori, soy sauce, and miso soup mix were from salvage stores, and just the rice and seasoned rice vinegar were purchased at a grocery store. Total (conservatively) came out to just under $2.25.
5 notes
·
View notes
Last Seen Blogs

iceimportsct
Ice Imports

laxmy-mia
Laxmy Mia Miller

chronoceros
chronoceros

one88us
ONE88

simplesongstress
♡Beatnik☆