#this was anatomy practice so everything is a bit wonky
Note
Hiiii
First of all I want to say that I love your art and I really admire it. It has kind of make me want to go back to drawing again. I used to draw a lot a few years ago but I stopped because I became unhappy with my progress. Now I want to go back to making art but I'm insecure about it because I'm worried I'm too old to start again (I'm 19) and whether I'm capable of relearning it properly. Do you have any tips about where to begin to learn art basics (specifically anatomy)? I would appreciate any advice.
Hello!!! Firstly thank you so much for the compliments, it really does mean so much <333
I'm nineteen, too! Of course you can start art again. I've taken a lot of breaks in between my own art, too, and it's only very recently that I started enjoying making art again (after .... like.... a year or two. lord) so I really do understand how you feel. But we're nineteen years young, and have so much time ahead of us to get back on our feet.
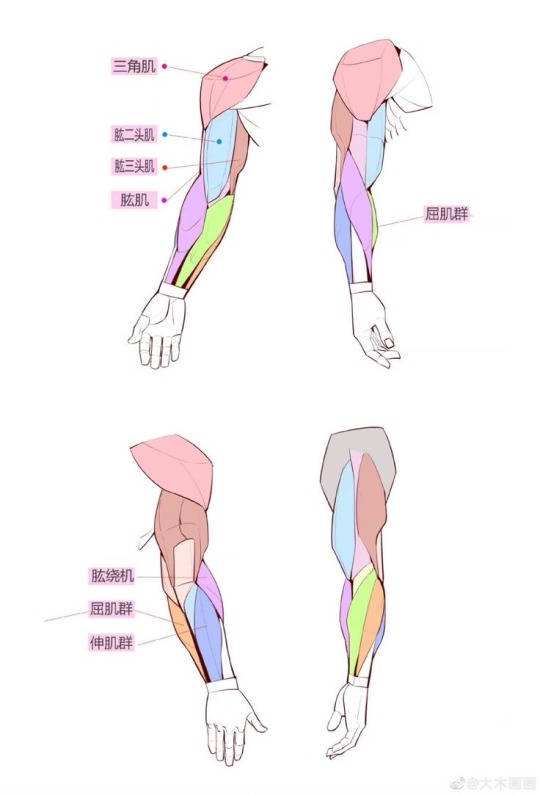
In my experience, improving comes quickest when you focus on one very specific skill at a time—and I mean SPECIFIC. Practicing gestures with torsos only, the muscles of the upper arm, skeleton heads in different angles. I've been studying arm anatomy (and only arm anatomy) recently, and I'm already miles ahead of how I used to draw arms in the past.
If you want a specific step by step on how I personally draw anatomy, I don't mind sharing a quick tutorial! But for general advice—form follows gesture, and gesture follows movement. The biggest mistake someone can make while drawing a body is focusing on the accuracy of the muscles/bones before getting the flow of the gesture down.
Even if the anatomy looks a bit wonky with the gesture, it's important that you capture the movement of the pose first, and then build muscle on top of that. Proko on Youtube has a very good quick drawing series on this, and explains it way better than I do, but that's the gist of it.
Also, PLEASE always use references! I know that hearing that gets old, but it's really important. If you'd like, I can make a quick tutorial on how to use references properly, too. Reference everything—pose, lighting, even art style if you're looking to switch things up (i have about 10 different tabs open on my computer with different artists I admire so I can reference their art religiously).
Speaking of referencing art styles, it's important to gather a bunch of artists you like in terms of style, and not just one. The trick is to separate them by skill—"this artist is for lining refs", "this artist is for anatomy refs", "this artist is for face refs", etc, etc.
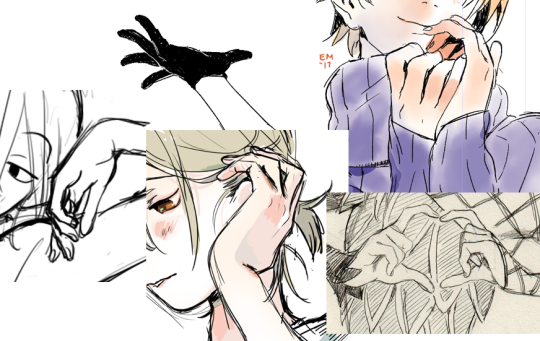
And to jump off of That: I find that with anatomy, looking at other peoples' anatomy studies on pinterest is also very helpful. Obviously you should be referencing from real life too, but with art, it can be difficult to pin down what to put on the page and what to leave to the imagination. You wouldn't want to actually draw every single muscle in the arm individually, right? So I go and look at other artists' anatomy studies to see what they keep and what they don't keep.
(usually i find them on pinterest, and they look smth like this. the color coded ones especially help me.)
I'd recommend learning gesture and anatomy first, then building off of that to learn how to draw faces, then lining/coloring, just so that you have a solid base to work off on when it is finally time to color. (also because coloring/lighting requires a fair bit of how body anatomy works as well!!)
But yes, that's all the advice I can give from laying in my bed. I hope it helped somewhat, and if you'd like tips on how to do something more specific, I'm always willing to draw it out or go more in depth ^^ Best of luck on your art journey!
99 notes
·
View notes
Note
How. Do you paint. Please. I have tried. I have cried. Tell me ur secrets 😭
i see you, bestie, we’ve all been there.
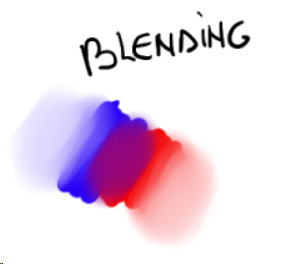
the technique i use is a common one for painting - make a mess, work on top of it. you can see it for yourself here:


(btw, i’m entirely self-taught and still have a lot to learn, so my use of this technique is probably wildly unorthodox. but it works for me and may or may not work for you.)
so the process basically goes like:
1. get yourself a messy ass sketch, don’t even worry about details, nor anatomy really. you can fix everything as you go.
2. FIGURE OUT YOUR BACKGROUND COLOR. it’s important!!! all your colors are gonna depend on it. (but again, don’t worry too much since anything is salvageable through our lord and savior gradient maps.)
3. slap some base colors on. paint some basic shadows and lighting as well. BUT! BE MESSY ABOUT IT. NO DETAILS, NO DEFINITION.
4. play around with your colors a bit. color correction? gradient maps? overlay? yes.
5. got your colors down? alright, you can add SOME definition. just fix wonky shapes, nothing too fancy.
6. NOW we’re talking about details. fix the shadows, add some highlights. get the edges nice and crisp, or cute and smooth. go all out.
7.MORE COLOR CORRECTION! fix the little places that bother you.
and that’s all, basically. Make a mess, make mistakes, fix them, have fun!
Don’t like how your artwork turned out? it’s okay, try again! art is all about practice and making mistakes, it’s not that serious to cry over it.
if y’all are interested i can post some of my older, cringier paintings (from 2014 till now) to make y’all feel better about your own journey :)
39 notes
·
View notes
Note
for the artist asks thing, 4 + 5 :)
YESSS THANK YOU FOR THE ASK :3
4. Favourite things to draw?
umm rn if we’re talking about fandoms i Cannot stop drawing victor frankenstein on everything (also jekyll & hyde but i don’t quite have designs for them yet so those are more experimental)
in general,, i actually love drawing hands, they’re fun to practice and obv easy to find refs for
i also like drawing eyes, side profiles, basically just the human body in general lol (my anatomy is still a bit wonky but it helps to practice so often)
and my favorite medium is prob either acrylic or just pencil sketching, i do love traditional art and i wish i could do it more but digital is more convenient and it’s easier to start a digital project ykwim?
5. Anything you haven’t drawn yet but want to?
YOU DONTUNDERSTAND I HAVE SO MANY IDEAS IN MY BRAIN THAT NEVER MAKE IT OUT
one of my bucket list things to draw is an actual finished animatic, like they’re so much work but i have SO many ideas and i think i could do some cool stuff if i actually commit to doing it
at the moment i have a lot of animatic ideas for the frankenstein musical soundtrack specifically. can you tell i like frankenstein
alsoo i really wanna paint something Big, i have this huge canvas lying around and i had an idea for it but i kinda forgot about it sooo we’ll see what i think of and hopefully i’ll have time to do something with it eventually
#i feel like i could think of so many answers for these but this is already super long#artist ask game#ask game#brain thoughts#artists on tumblr#art
2 notes
·
View notes
Note
How about 2, 3, and 20?
What's your favorite thing about your style
The expressions! How the characters express as a whole and how I manage to get the feelings to show right
Also lining is a pain, but man I love how the characters look by the end, the bold-ish lines give it such a nice look! I'm always debating on whether to find a way to avoid lines or going with them anyway, because every time I look back at fully lined pieces it just feels right (but also the pain... the horror... i just wanna color m a n)
What's your least favorite thing about your style
I'm happy to say in general there isn't a particular thing I dislike? But anatomy in general is what usually gets me, specially when I haven't practiced in a while (so if u look at the last humans I've posted, they do look kinda wonky. it's been a bit). But hey, that's stuff you get with more practice I guess!
OH, something i hate is perspective, but that's also on me for not studying it right. I'll get to it eventually dskjf
A piece from this year that you're really proud of
This piece! I wanted to practice line weight here, but ended up just plain out playing with the lines... and honestly, I really really liked the result! It was a LOT of work but man. everything turned out so nicely here I like it 💛

#also if u wanna check out the link to the original piece instead of just the image here that'd be extremely cool ty#happy with the attention it received but yknow. reposting it feels odd please check the original if u hadn't seen it before!!!#and DS -grabs u- ty for sending another ask you're the best#notart
8 notes
·
View notes
Note
Do you have any advice for understanding hands better? I’ve been practicing them for years but feel like compared to other aspects of anatomy it’s the one thing I haven’t seen much improvement in. I draw both from life and images and draw nearly everyday but nothing I’m doing seems to help
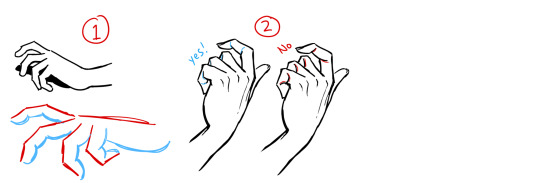
I personally get by mostly from remembering poses that I’ve already practiced a ton, like I figure out how to draw it once and am able to file that away in my brain and use it again later, and tweak bits of the pose or the level of simplification to suit what I’m drawing.
I’ve paid special attention to drawing hands for like.... most of my life so I have a LOT of poses I’m easy comfy with now, but when I need to figure out something complicated or new, I can usually work it out by breaking a hand down into shapes, remembering a few key points/”rules” from what I’ve learned about hands in order to help me break it down in a way that makes sense. And if that’s not enough either, then I take photo refs.
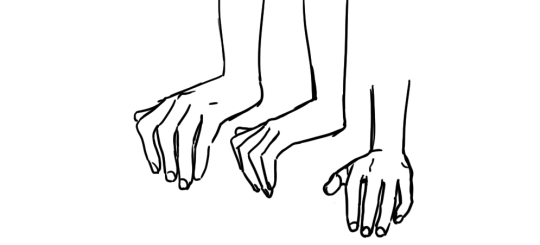
^^^ here is a pose I use a ton. I have a quick way of drawing it from various angles. the first time I had to draw a pose like this, I had to think and figure it out, but in drawing it a bunch of times and having to use various angles like this, I’ve eventually come up with a quick, reliable way to draw it from a few of the most common angles that fits the style I like to draw in. I’m blessed with a good memory for observations, so when I see a beautifully posed hand, I can usually really quickly analyze what I like about that pose and why, and that helps me absorb it so I can recreate my saved impression later. But I know not everyone thinks the same way. it might benefit you to quickly scribble down a study in a sketchbook when you see a pose you find beautiful and want to learn from for later.
^^^ here are some poses I had to stop and spend time figuring out, calling up the “rules” for how hands are built to kind of logic-out how they should look from angles I’m less familiar with. results can be mixed, but... if I end up with something expressive that fits the style of the rest of the drawing, I’m usually really forgiving of fudged anatomy or slightly wonky proportions. as long as the thumb is on the right side and there aren’t too many fingers, that’s a great start lol.
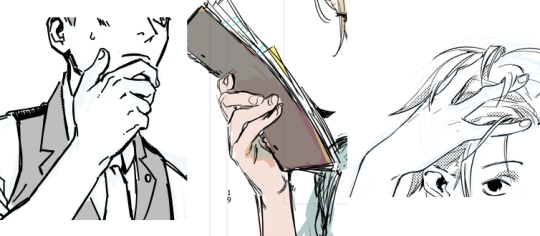
^^^ and here are ones I had to take reference-selfies for. I try to use this as a last resort because 1) it’s a lot of trouble 2) interrupts my drawing and 3) if I’m not careful I stick too close to the reference, and the drawing ends up with the hand looking referenced and the rest of the pose not, which is jarring to me. not to mention I have tiny manlet wrists that without fail, look horrific and emaciated in photos, and the lens distortion makes my fingers look scary too... ugh, photo reference has definite flaws. I actually don’t like the look of drawings for which I can Really Tell the artist drew from photo reference, because most often that means they’re taking the ref too much at face value and incorporating ugly lens distortions into their drawing. so I have to think extra hard not only about interpreting the ref, but also might have to make multiple passes just to get the hand to look normal, AND match the style of the rest of the drawing.
Anyway, here are some of the ““rules””” I mentioned earlier that I fall back on to help me figure out more complicated poses:
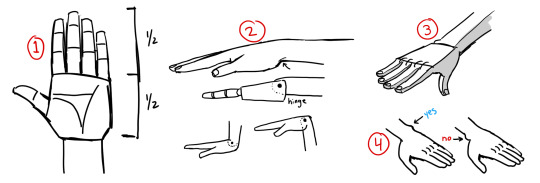
1. probably seen this before, but basic proportions. the palm is usually half the total height of the hand. obviously you can mess with this purposefully.
2. I think of joints as like, ball joints or hinges. I find that easier than trying to remember bones & muscles. here’s a drawing of the wrist as a hinge. note that when you’re thinking of it this way, it’s a shortcut, but a shortcut is only good if you use it with precision. notice the pin for the wrist hinge is not just halfway, it’s closer to the top of the hand. being precise about that is what allows this shortcut to work. the heel of the palm juts out, while the top of the hand transitions into the wrist quite smoothly.
3. simplified planes. planes are important yo. in super simple terms: top is flat, bottom is round. this works on the fingers too, actually. the tops are bony and tendony, and the bottom is where the fat is, so it’s rounder and soft
thinking of the hand as abstract shapes REALLY helps simplify the task of drawing hands, and is just as helpful even if you are drawing from reference. I can say “the palm is a box” and obviously the palm is not really as simple as a box, but if I think of the palm, wrist, and each finger joint as various shapes of box, then all of a sudden, psychologically, my task is SO much easier. I’m not drawing a Hand, which is hard, I’m drawing boxes, which is easy.
4. that prominent knob some people have on their wrist? that’s on the pinky side.
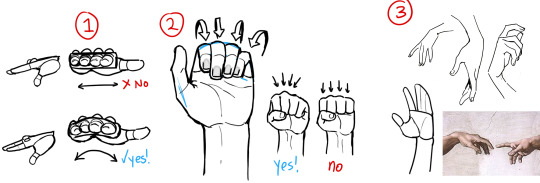
1. the knuckles aren’t really a flat row on top. the hand is like a cup right, so your palm can hold water and things. so we can think of the hand as a box to make figuring out the pose easier, but when it comes down to it, you’ll want to make it more of a curve. this curve is why you can see multiple fingers in a side view
2. when curled up, the fingers nestle together. the fingernails also turn slightly toward the center. even if I’m simplifying the hands significantly, I usually still draw the fingernails because they are SO useful for communicating the pose of the hand effectively.
3. lots of people suggest to think of the hand as a mitten, grouping the pinky/ring/middle fingers and singling out the index finger. this works great, the index finger is more independent from the other three. on the flip side, those three are really stuck together; if you’re drawing the pinky curled up all the way, then you better not draw the ring finger sticking straight up, cause that would HURT. anyway, singling out the index finger leads to more interesting poses in my experience.
1. this is another illustration of top = flat and bottom = curved. this is a really easy way to organize your line quality. straight lines and sharper angles where there is bone, and soft gentle lines where there is muscle and fat. your drawing as a whole will read very clearly if you find some guidelines like that to stick to, as it means all your lines are intentional and thoughtful.
2. this one’s about overlaps. when forms overlap, it makes a crease, and when you draw that crease you’re communicating which form is in front of the other. in the second drawing I reversed all the creases, and it looks.... messed up. think about how pieces connect.
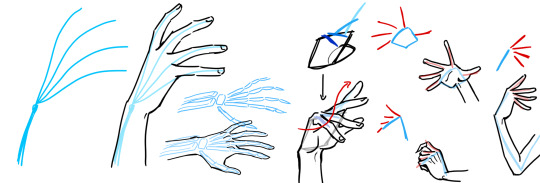
so when you’re trying to make up a pose without using specific reference, I think it’s good to think about the.... flow of energy through the pose. honestly, I know it’s really abstract, but if I have an ability to make interesting poses that communicate weight and movement, the things that make people say your character feels ALIVE, like they really EXIST in a space... it’s because I started to think of poses this way. imagining streams of energy bouncing through the body, flowing down the limbs and out through the fingers. this is why hands are so important to me, cause they’re where the kinetic energy of the pose ultimately ends up. I talk about it when drawing the torso and arms and legs, but an interesting drawing has a bounce back and forth between opposites: for every curve, an opposing straight line, alternating back and forth down the entire body. if you’re sensitive to the energy of the pose, then even very simple poses will be interesting to look at.
anyway, with regards to hands, I imagine the energy getting sort of cinched in as it passes through the wrist, and then emanating out through the fingertips. I hope my drawing at least SORT of communicates this imagery. it makes sense because that’s BASically how the bones in the hand are anyway. and then the right side of the image above is just demonstrating some highly simplified gestures. see how the fingers fan out and curl in, rarely parallel to eachother. when you’re figuring out the pose, using a line to stand in for the row of knuckles is super valuable.
aaand finally, here’s two hands where I intentionally neglected correct anatomy and proportion because I felt it worked better for the style of the whole drawing. Left side: since this is a really simple and cartoonish style, I was thinking back to kids’ and shoujo manga I have read where the style was very solid and distinctive, but definitely NOT overly concerned with correct anatomy, or even really drawing hands, uh, “well” at all. to me, that sort of approach has a Look that I like to invoke sometimes, since for years I felt like I learned a bunch of anatomy and proportion and drawing from life actually in detriment to the liveliness and appealness of my drawings. this hand is mushy and makes very little sense, but it turned out as intended. Right side: sometimes I like to pretend fingers only have 2 bones in them, cause i am a Queen and i do what i want
and there you go. I hope that helped, like, at all? Look at real hands and photos of hands and hands in motion, but also look at drawn hands as well. find what you like, and work towards expressing that yourself. and remember the hand is part of the whole drawing. not only in the art style like I’d been talking about, but because the angle and placement of the hand is reflected in the angles of the arm, which in turn reflects on the angles of the shoulder, which affects the whole torso, etc etc etc. and the techniques you can use to understand and draw the rest of the body, works on hands too. as you improve everything else, your hands will improve as well.
DISCLAIMER: I whipped up these diagrams quickly, they’re not meant to be good drawings or accurate refs, just diagrams to illustrate my thought process lol
3K notes
·
View notes
Note
hi your art is so freaking cool oh my goodness, the fact that you are using my color palettes makes me very happy!!!! do you have any advice for making cool compositions? i feel like i want to practice that more
oh my GOD hi there!!!!!! wowow i was not expecting this. and here i was almost worried i was clogging your tag?
gosh okay i hardly consider myself the expert on composition. i am still pushing myself to get better at it. but uhHHH let me list a couple tricks ive picked up on!
1. i like to look at my artwork from far away sometimes, especially when im at the stage where im blocking out color, or when ive stared at something for so long its kinda turned to mush in my eyes. detailwork is good! but i find i get a better sense of how the piece as a whole is balanced if i stand back a bit or zoom out.
2.it helps to check how it looks in black and white sometimes? the key with compositions is always contrast, you’re looking for ways to make your subject stand out against the background. sometimes thats making them really bright against a dark background! or even having a highly B&W character against a contrast-less, grey background.
4. alternatively, ive noticed a trend in the eyestrain brigade in picking two highly contrasting colors without changing the values- for example, drawing a blue subject against a red background? this is a cool example of “cheating” while still utilizing contrast! its all about figuring out how to make things pop against eachother.
5. the second piece of advice i have is to go more on.... feeling instead of logic? a strong sense of anatomy is good, and should not be overlooked! but sometimes i find it helpful to, jsjusute, go loose and boneless, and instead of being like "realistically, this is where an arm goes," think more in the realm of "a dark/light shape needs to go here". and i then try and conspire with the elements that are already on the page to see if i can make that work.
6. push your poses! tilt em! go full wonky with it! play! with! motion! some people approach composition as an extension of motion. take your motion lines, and have them dictate where you put everything. a character crashing into the wall? make everything smooth until the hit, and then have as many random bits to help accentuate the impact as possible. let the motion shape the environment
7. finally it is criminally easy to put down a border. if youre more used to drawing characters and dont know where to start on backgrounds or compositions, just try putting down colored borders or adding one (1) shape in the back somewhere. its a good way to get started in thinking with composition! branch out one step at a time, y’all!
#sorry i didnt add any pictures to illustrate my points better#if enough people are interested i might go back and do that??#not sure if anything i said got lost in translation yknow :P#[bugg chitters]#chicken-mc-nuggets
20 notes
·
View notes
Photo
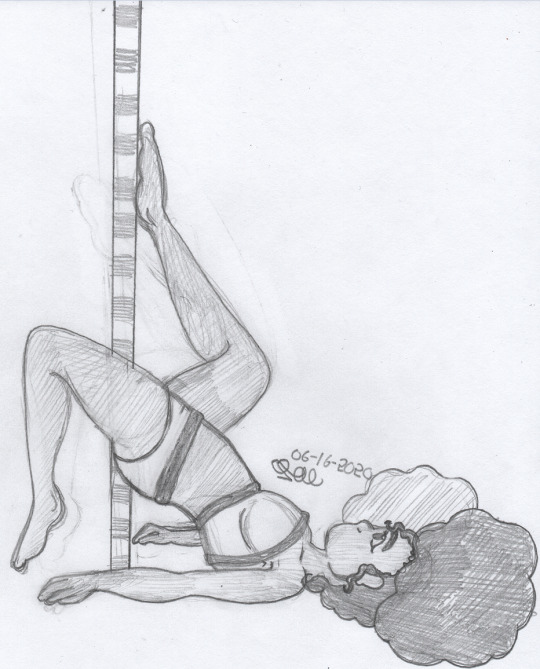
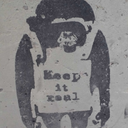
“Back up on my bullshit”
I did this based on the song by:Jhene aiko - B.S. ft. H.E.R
This is my newest Oc, her name’s Bonnie but she prefers Bon bon, her stage name is: “Cotton kandie”
I mainly did this to practice anatomy, and I think it came out fairly well. I ended up using a reference image and mine is a bit wonky but I’m happy with it overall.
I’ve also had this Oc in the back of my mind for awhile, I really like her, she’s cute.
I love being able to pull off more detailed and complex pieces like this..
I want to take a moment to say, from this post to all the posts before it, and all the posts that’ll come after. Thank you all so much for every like, favorite, heart, watch, comment, share, llama, retweet, everything you could do to show your like and appreciation! For this and any other post it means the world to me, so from the bottom of my heart. Thank you! <3
#Oc#Original#Original art#Pose art#Pose#Pose practice#Anatomy#Anatomy practice#traditional art#Traditional#Traditional drawing#Sketch#Doodle#Pencil#Pencil art#Pencil drawing#Music#Music art#Reference#Reference drawing#Rtonsart
5 notes
·
View notes
Note
If you don't mid me asking, How do you stay motivated to draw? I really want to get good at drawing so I can draw my OCs and make fan art, and I KNOW that I have to practice to get good, but i'm always so unmotivated. When I try to draw I become very discouraged by my own inability. And half the time I can't even work up the motivation to start drawing in the first place. How do you do it?
The biggest tip I have is to keep it FUN!!
The amount of times I’ve seen other artists go “well I’m really not feeling it today but I haven’t drawn in a bit so I gotta power though” is honestly worrying. If you’re not drawing for fun but out of obligation, you’ll eventually stop wanting to draw all together.
With the comic there’s of course times where I don’t feel like drawing but I power through it because there I have a deadline I want to hit. But other than that if I’m noticing I’m not having fun or it’s not working out I just put down the pencil. I draw for fun!! Not to make it my job or become famous or any of that nonsense I just draw because I want images I imagine to exist! That’s it babey!
And I get the skill thing too, I suffer from a horrible need for my stuff to be up to a certain (unrealistic) standard and to please whatever audience I’ve begun to imagine who want more content but man!! As hard as it is u gotta tell that voice to SHUT UP! Draw whenever u feel like it even if it’s just once a month, make shitty fanart, have wonky anatomy who gives a singular fuck man it’s not like anyone is telling u to draw the next Mona Lisa
If you have fun making art, then you’ll be motivated to make more. Everything else will follow
7 notes
·
View notes
Link
Title: In the Wake of the Verdant Wind
Fandom: Fire Emblem: Three Houses
Pairing: Raphael/Ignatz
Word Count: 1836
Warnings: None
Summary: Years after the war, Ignatz was as busy as ever, with a seemingly endless list of art commissions on top of helping his husband Raphael run the inn. Even so, they always did manage to set aside some time to just enjoy each other’s company, and reflect on just how wonderful their lives had turned out.
Written for @ferarepair-week 2019 Day 7, Prompt: Verdant
“You think the inn will be okay with us gone?”
“Ah, c’mon Ig! You gotta relax! Maya will take care of things for us. Besides, we’ll only be gone for, like, a week or two at most.”
Ignatz turned to look up at Raphael’s smiling face, golden eyes shining with an overwhelming fondness. They had been married three years to the day, and still the sight never failed to make his heart race. They were off on a trip to visit Ignatz’s family that doubled as a mini vacation to celebrate their anniversary as well.
“Man, am I hungry! Can we stop and eat now?” Raphael asked, laughing as his stomach growled loudly when he slapped a hand to it.
“You’re always hungry, dear. But, I could use a break.” Ignatz said, giggling as Raphael let out an excited whoop, grabbed Ignatz’s hand, and entwined their fingers together.
“Yes! This is why I love you, Ignatz!” Raphael gushed, and Ignatz felt his face heat up as they turned away from the road and climbed up a small hill, with a large tree on the peak that would be a perfect place for a picnic.
“I hope that’s not the only reason you love me.” Ignatz teased, and the absolutely distressed look that crossed Raphael’s face made Ignatz snort with amusement.
“No way!” Raphael said, dropping the pack that he carried so that he could wrap his arms around Ignatz and pull him into a bear hug. “I love everything about you! Your passion for art! Your pretty eyes, and really nice hair. I love your cute glasses and your smarts and your hugs and your-”
“Okay, okay! I get it!” Ignatz said, his voice muffled due to his face currently being squashed against his husband’s broad chest. “I was just joking, Raph.”
“Oh, uh, right.” Raphael said, a light blush appearing on his face as he released his hold on Ignatz and rubbed the back of his neck sheepishly. “I knew that.”
Ignatz laughed as he and Raphael busied themselves with setting up a fire and cooking their simple meal of pheasant meat and eggs, and Raphael showered Ignatz with compliments on his improving hunting skills as they ate.
“You’ve really gotten better with a bow lately, Ignatz! I’m glad, ‘cause it means that I still get to eat fresh meat even when we’re on the road!” Raphael said as he happily shoved more food into his mouth. Ignatz sighed and rolled his eyes as bits of meat got caught in Raphael’s beard. Some things would never change, it seemed.
“Raph, dear, you’re getting food all over your face.” Ignatz said, chuckling as he leaned over to wipe Raphael’s beard clean. The larger man blushed as his smaller husband doted on him, and when Ignatz was done and tried to pull away, Raphael instead pulled him onto his lap.
“Thanks, Ig.” Raphael said, his honey colored eyes locking onto Ignatz’s emerald green ones as his arms wrapped fully around the love of his life, and he gently caressed Ignatz’s cheek with the back of his hand.
“Ah, y-your welcome.” Ignatz barely managed to squeak out in his flustered state. He recovered quickly though, and he was amazed that Raphael could still turn him into a stuttering mess after all this time. Ignatz giggled and reached up to cup Raphael’s face, his fingers setting in the soft hair of his beard. The content sigh that passed between Raphael’s lips was cut short when Ignatz kissed him, his hands moving to the wild hair at the back of Raphael’s neck as he deepened the kiss.
The feeling of Raphael smiling against his lips made Ignatz’s heart swell with delight. He never dreamed that he could be this happy, living the life that he always wanted. He was making a living doing a job that he loved, living in a modest yet comfortable environment, and every morning he woke up in the arms of the man that he loved the most. Something was definitely going right with his life when his reality was so, so much better than his dreams.
Ignatz tilted his head, his nose brushing against Raphael’s beard. He giggled as the hairs tickled him, and Raphael pulled away, eyebrows knitted with confusion. Ignatz laughed at how silly he looked, and he cupped Raphael’s face and ran his thumbs over his cheeks.
“Sorry, Raph. Your beard was tickling me. Again.” Ignatz said. Raphael smiled as he rest his forehead against Ignatz’s and let his hands slip around his waist.
“Oops! I guess that means that it’s overdue for some trimming.” Raphael said, a toothy grin crossing his face as he placed a light kiss on Ignatz’s nose.
“Hah, probably. You look even more like a sheep now that you’re beard is fully grown out.”
“You think so?”
“Indeed.” Ignatz nodded, and he pulled away as he ran a hand through Raphael’s hair. “I remember when I first likened you to a sheep. You didn’t really like it.”
“Yeah, I know.” Raphael said, reaching up to cup Ignatz’s cheek, and the movement knocked Ignatz’s glasses slightly askew. “I really like it now, ‘cause your eyes always light up when you say it, and the biggest smile always crosses your face.”
“O-Oh…” Ignatz said, averting his gaze bashfully as his face flushed a bright red.
“You know, I really lucked out, Ignatz.” Raphael said, his voice only a bit louder than a whisper and a tender look in his eyes, “Three years ago I married the cutest, most amazing man that I’d ever met, and we still have a whole lifetime ahead of us! I’m so happy, I think my heart might just burst from my chest or something!” Ignatz was stunned into silence by the sincere words, but he recovered quickly. A bright smile crossed his face as Ignatz wrapped his arms around his husband, his head resting on Raphael’s broad chest.
“I feel the same, Raph. I love you.”
“I love you too, Ig!” Raphael eagerly hugged Ignatz back, but then he suddenly gasped and pulled away, “Oh yeah! I almost forgot!” He turned to rummaged in his travel pack, while Ignatz watched with a curious eyebrow raised.
“Ah, here we go!” Raphael said as he pulled out a small box that was wrapped haphazardly in paper. “Happy Anniversary! I was too excited to wait until we got back home to give you your present, so I brought it with me!”
“You didn’t need to get me anything.” Ignatz said as he smiled and took the box. He chuckled at the giddy look on Raphael’s face as he watched Ignatz tear the paper away with wide eyes, and Ignatz could practically feel him shaking with excitement.
“Well, do you like it?” Raphael asked, waiting with baited breath as Ignatz examined the gift. It was a small carving made out of wood, roughly the size of his hand. It was him and Raphael, holding hands and looking into each others eyes. The carving was a bit rough around the edges and the anatomy was a little wonky, but Ignatz hardly cared as his eyes welled up with tears.
“Oh Raphael, I love it.” Ignatz said, removing his glasses so that he could wipe away his tears of joy.
“Oh, really? Alright!” Raphael said, letting out a triumphant whoop that made Ignatz burst out laughing, “I was really having trouble figuring out what to get you, but Maya thought that I could be good at wood carving, so I thought I’d try it out.”
“It really is an amazing first try. I’m impressed.” Ignatz said as he put his glasses back on.
“Er, well,” Raphael said, averting his gaze as a dusting of pink appeared on his cheeks, “This one is actually the...seventh try. I kept on breaking the wood in half so I had to keep starting over.” Ignatz laughed and shook his head.
“Is that so? Well, I’m honored that you would put so much work into a gift for me. I’ll treasure it, love.” Ignatz said. He then reached over to his own pack and pulled out a neatly wrapped package. “I got you something too.”
“Really?!?” Raphael exclaimed, his booming voice causing Ignatz to wince slightly. Raphael took the gift and ripped open the wrapping paper, and his face scrunched up in confusion as he held up a book.
“Hmm, a book?” Raphael said, tilting his head curiously as he scanned the cover. Ignatz smiled, and couldn’t help but think that his husband looked adorable.
“Yeah, it’s a cookbook.” Ignatz said, “I know you’ve been working hard to run the inn, so hard that you’ve been trying to learn how to cook. I thought this would be a good book to help you get a good start. Plus, this one focuses mostly on meat dishes.” Raphael was silent for a moment, and Ignatz was startled when his husband suddenly started sobbing uncontrollably. He pulled Ignatz into a bear hug, arms locking around the smaller man in a tight embrace.
“Ig! I love it!” Raphael said between his blubbering, and Ignatz struggled to wriggle free from the death grip he was in as he struggled to breath.
“Raph...can’t...breath…” Ignatz managed to choke out, and Raphael quickly let go of him, allowing Ignatz to cough and take a few deep breaths.
“Ah, sorry…” Raphael said, sniffing as he rubbed his face and composed himself. “I’m just...so happy, Ignatz. You really are the best husband ever!”
“I don’t know, I think you’ve already claimed that title.” Ignatz teased, and Raphael’s chest rumbled as a hearty chuckle escaped him.
“Aw, Ig. You’re too cute sometimes, you know? Actually, forget that! You’re too cute all the time!”
“That’s so cheesy…”
Laughter filled the air as the loving pair cleaned up their lunch and packed away their gifts. Ignatz frowned, not really wanting this perfect day to end with them back on the road quite yet. When Raphael moved to sling his pack over his shoulder, Ignatz placed a hand on his arm, stopping him.
“Hey, Raph?” Ignatz said, and Raphael gave him a quizzical look. “Would you mind it if we just stayed here for the day and moved on in the morning? I’m...not quite ready to leave this relaxing place.”
“Oh yeah! I’m totally okay with that!” Raphael said, nodding enthusiastically as he took Ignatz’s hands, fingers gently brushing over the wedding ring on his left hand. “If I had any say in it, I’d spend all of my time just relaxing with you in my arms!”
“I’d definitely do the same.” Ignatz said, smiling as he looked up into Raphael’s eyes. With that decided, Raphael pulled Ignatz into an intimate embrace as their lips met in a tender kiss. The light wind that blew across the verdant meadow around them cooled their flames of passion, but could never blow strong enough to extinguish the unwavering, unconditional love that they held for each other.
#ferarepairweek#fire emblem three houses#raphael kirsten#ignatz victor#igraph#raphael/ignatz#fanfiction#jade writes fanfiction
10 notes
·
View notes
Note
hello! i was wondering what program&brush settings you use for your artwork? im new to digital art and i really like the way you colour! Especially those light effects they're so extra cool!
omg Anony you’re such a wonderful being, thank you for liking my art enough to ask me that!
now watch me failing trying to explain things to you lmao. I’m self taught and I’m in no way the best at this, so what I’m going to tell you might still be flawed but this is how I do things o/
hmm it’s gonna be long so I’ll put it under a cut!
1) I’m using Paint Tool Sai for everything in my art but if I still feel the need to, I’ll use Photoshop to correct colors and lighting. for example in this progress gif:

you can see where I decided “no, I don’t like this cold blue feeling” so I went to Photoshop (because it allows changes much easier than Sai when it comes to colors) and I changed it to a warmer purple! you can always play in Photoshop and try to see different versions of your art, different colors will give off different feelings
most of my artworks don’t look the way they do at the end because while drawing I tend to be focused on other things (line, where to place shades, lighting, etc) while when the picture is done I can focus on the feeling I initially wanted it to have!
2) My usual brushes are really basic. also ignore my ugly writing.
Sketch: I use this to sketch because it has a nice and easy flow, I can get messy lines that look good (the latest Brahms Heelshire drawing I did is entirely drawn with this one!)

you can always switch between your brushes depending on what feeling you want your art to have
Lineart: this one has nice, smooth and bold lines. I like to play around with it’s size. I believe it’s the basic one Sai has
little advice: if you’re not happy with your lineart try to alternate heavy lines with tiny ones. for example:
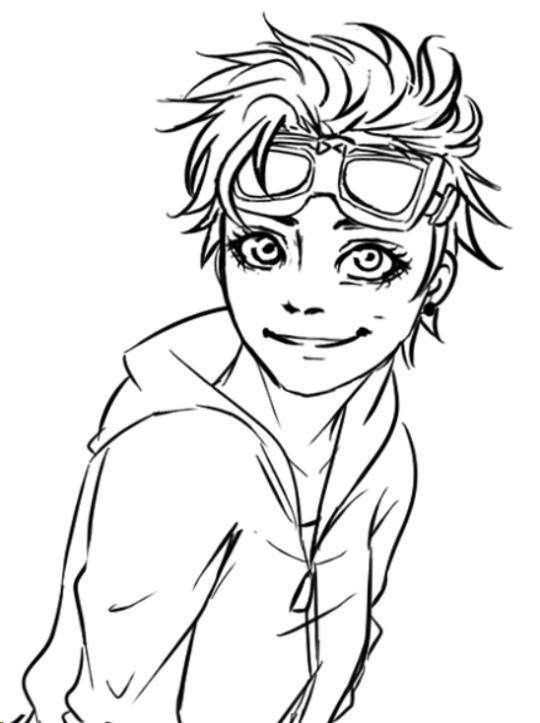
you can see how bold her hair is, but adding thinner lines to the glasses, the folds of her clothes, hair etc. it will create a better dynamic of your picture and will leave the eye of the viewer to run around it! I’m honestly awful at explaining stuff fdkjsnjkfds ofc this is a personal preference but my linework improved since I started to think like this
Base color: this is the color tool sai gives you, I changed my names so I can’t remember its default name. I like it to be bold because when I was little I used to color entire coloring books, so even now digitally I like to color every bit like I’m using crayons haha. time consuming and useless but shhh. basically I put down every base color with this one

Acrylic: now this one is tricky, when I got it the first time I wanted to use it to shade, but using it I discovered it’s much better for blending. after I put down the main colors and shades I just use this one to blend them together and I sometimes paint with it too

Blending: it’s literally the blur brush Sai provides you xDD
now keep in mind that using its settings (the things near the “Normal” option!) you can get different types of blur! always play around to see what looks good in your art. also remember that not every shadow has to be blurred or blended out, there are many ways shadows can look, using both blurred and heavy (cast) shadows in your art will definitely improve it. using real life references might help
Airbrush: the very brush Sai gives you. I’m using this one mainly for lighting. what I do is basically put down a hard light, like literally take a light color and place it where I see fit on the character, then I give it a bit of glow with the airbrush. one thing I noticed is that depending on the surface, the glow will change!

in this one you can clearly see the light on his cheekbone, but then there is a much weaker light on his face, that’s made with the airbrush and then blended into the structure of the face.the glow on the cheekbone and the ear is made with airbrush, using orange and playing around with the layer modes (overlay and luminosity, these are your best friends when it comes to lighting!)
lastly I want to present another best friend for us artists, the eraser

you can make highlights with the eraser too! you can cut the light in different shapes to give different feels and many other things, the eraser is definitely your best friend and not only in erasing mistakes. try to play around with it sometimes
Other things I learned:
try to use a different color for shading, using the exact color but darker will only make your art look dull, lifeless. the same goes for lighting! there are lots of tutorials on color theories and practices out there to help you with it
don’t be afraid to get wild, use oranges, reds, blues, purples in your skin and play around with the layer modes, you’ll see how much more alive it will feel. also don’t be afraid to try different styles, constancy is not the friend of a creative mind. experiment, try things, go out of your comfort zone. make it fun, make it personal. if you like drawing dogs then keep drawing dogs and enjoy it! don’t let labels and others to influence you and your spirit
ik this is obvious but never compare yourself with others. your journey is yours, you have a different hand, a different brain and a different being. this also goes to drawing things others did already! who cares there’s 0284e4895 other pictures with Kitbull already? draw yours, it will be unique and special because it has something from YOU in it, and no one can replicate that not even with tracing
watch people online! of course when you sit down to draw it will be completely different, but involuntarily you’ll learn and exercising you’ll find your own way of doing things. there might be much better ways for drawing lighting than I do, but this is how I feel good and I like to do it!
I know you hear this everywhere but really, practice, daily if you can! in October 2017 I tried to to the inktober challenge for the first time, I haven’t finished it and I was late anyway but I can tell you that trying to draw daily definitely improved my art. now I’m able to draw a picture per day with not much effort (yesterday I was able to draw three pictures with pretty good quality! o/ always start small and be proud of every step!!)
lastly, don’t be hard on yourself. every picture is a lesson, doesn’t matter how it came out. maybe the anatomy is wonky af, but you learned and your brain will remember what not to do next time. try and try and try and never say “my art sucks”, say “this pic doesn’t look how I wanted, but I still like it. I’ll do better next time!”. the moment you start to like your art you’ll see how much it will start to shine hehe
I might come out with more stuff but this is already really really long xD just be yourself, love your art and enjoy it!! lots of luck for you Anony, I hope I didn’t bore you and this will be helpful for you and others! :D
#ira geneve#art advice#tutorial#sai brushes#art tips#anon ask#ira rambles#wah this was long sorry#but it warms my heart to know some people look up to me for things#and I'll do all I can to help anyone
66 notes
·
View notes
Text
I’ll Try Anything Once: Chapter 2
Written By: ss, Sol
Edited By: Sol, Allegra
Alex strode down the hallway, glancing at the room numbers posted above each door, stopping suddenly when he found the one printed on his schedule. It was his first-ever class at art school - Principles of Drawing. He walked in and looked around, not recognizing anyone. All of the two-person tables were already half-filled. Alex sighed and grimaced slightly, annoyed that he would have to sit next to someone else. His eyes darted around the room again, and he settled on a seat next to a boy who looked shy, but excited to be there nonetheless.
“Hey,” Alex muttered, glancing the blonde up and down. The boy nodded back, a slight flush coloring his cheeks. He didn’t say anything.
“I’m Alex. And you are…?”
“Bob,” the blonde murmured. He fiddled with the hem of his shirt.
Alex smirked. “You alright?”
Bob nodded, quickly flicking his eyes up to meet Alex’s. “Yeah...I...uh...good. Everything’s good,” he stammered out.
Alex wrinkled his nose and forced himself not to roll his eyes. “Nice to meet you.”
Professor Smith dashed in at that moment, a large tote bag in one hand and a giant mug of coffee in the other.
“Is this guy any good?” Alex asked quietly, pulling out his sketchbook.
“It’s my first day.” Bob tried not to look at Alex, a bit wary of his charm and confidence.
“Oh, me too. A bit colder here than I expected.”
“You’re from…?”
“Athens.”
“Greece?”
“That’s the one.”
“I wouldn’t have guessed.” Bob was curious about Alex’s accent.
“Dad’s a diplomat. I learned English in primary school from a translator he got from the UN.”
“Impressive,” Bob said quietly, trying not to engage in any more conversation.
Luckily for Bob, before the conversation could progress any further, Professor Smith introduced himself, and the class started. Since it was the first day of class, they weren’t required to do anything educational yet, and the bored professor seemed to want to end the session early. After discussing the syllabus, he dismissed the students. Alex was a bit bummed that he didn’t get to practice art immediately. He noticed that he wasn’t the only one feeling that way, as he saw Bob flipping through his own sketchbook that he took out sometime during Professor Smith’s introductions.
“You draw too?” Alex asked Bob, trying to initiate conversation again.
“Yeah,” Bob answered shortly. He was always shy about his drawings and seeing Alex eyeing his sketchbook, quickly closed it.
Alex saw that Bob was about to put away his sketchbook. Curious about what the shy blonde liked to draw, he quickly stopped Bob by grabbing his wrists.
“Can I see your drawings?” Alex asked with a curious twinkle in his eyes.
Bob struggled to find a proper response. He tried to avoid looking into Alex’s sparkling blue eyes, nervous that Alex would reject or ridicule him. Before he could answer, the sketchbook he tried so hard to keep to himself slipped from his grasp.
Alex flipped open the worn cover of the moleskine sketch pad, his eyes darting from one page to another. As much as Bob wanted to hide his drawings from the world, he figured showing them to a stranger would be the first step for him to finally be able to open up about his artworks to the public eye.
And then he heard a scoff. Alex pointed to one of Bob’s figure drawings. “What happened here? The anatomy is all wonky; this guy looks like a horse.”
Bob’s heart dropped. He quickly grabbed his sketchbook from Alex’s hands. So much for showing his artwork to the world, he thought. Embarrassed and upset, he shot Alex a dirty look before storming out of the classroom. Alex shrugged and got up from his seat, heading to his next class for the day.
14 notes
·
View notes
Note
Any tips for drawing?
I mean, you’re gonna need to be more specific - I can’t impart years worth of skill and memorisation to you in a few tips. I can do my best, though, so here we go:
1: Use references, but don’t stress yourself out trying to get your picture’s proportions and details exactly like the reference image. You’ll waste a lot of time doing that, and all you need from the reference is the general idea of what the anatomy and gesture of the pose is. It’s better to get more drawings done that don’t look exactly like the reference image than to spend all your time on copying every detail of one image - with the first, you get more practise with more poses so you can become familiar with anatomy in general, but with the second you’ll just become really familiar with that one pose and you’ll probably burn yourself out and end up not drawing again for a while.
As a rule for this blog, if it takes me more than 24 hours to draw, it stops becoming a doodle and becomes a drawing, so I never spend more than 24 hours on something. This way, like with the reference images, I can get more practice doing a variety of things, instead of spending days slaving away over one image. I would recommend starting a blog like this if you’re looking to improve your art skills, actually! Just try to remember that it’s a DOODLE per day. Don’t throw yourself into it trying to release masterpieces every day, or your art motivation will die very quickly, and the point is to just get a little bit of low-stress practice in every day, so you improve just a little bit every day. Wow, I just said the word ‘day’ a lot of times.
2: Try to break away from your style every so often as an experiment (draw faces less pointy, thinner lines, shade in greyscale before colouring, draw the hands), but know that you don’t have to make these changes forever. For me, I stopped drawing pointy anime faces so I actually had to know about the anatomy of the bottom of the face, and now my knowledge of faces in general is very improved, and if I get the urge to draw a pointy anime face it’s now a much better pointy face than the ones I did when I was using pointy chins as a crutch to avoid different face shapes. Same with drawing really thin lines for a while - I realised how much I was covering up with thicker lines, and now even though I don’t draw with really thin lines any more, my thicker lines look much better.
3: If you want an expression to be more intense, make the facial features more asymmetrical. In fact, don’t be afraid of asymmetric features in general. I know the totally symmetrical face is considered to be more handsome by science or whatever, but it’s also much less expressive. Generally, the way you should go about it is… If you want to make one eyebrow lower than the other, make the eye below the eyebrow slightly squintier and move the other eyebrow up higher and make the other eye a bit wider. That way, one side of the face is squashed and the other is stretched, so it looks like an intentional decision rather than you not being able to draw the other eye the same way.
That said, getting the other eye correct is much less of a big deal than it’s made out to be - so long as they look generally the same, most people won’t notice. I’ve seen a few other people’s drawings where I’ve only noticed that one of the eyes is uneven after staring at the picture for a while, and my reaction is almost always 'oh, still a good drawing though/doesn’t really take away from the rest of the drawing’, rather than 'oh no, the other eye is wonky and now that I’ve seen this the whole thing is ruined’.
4: Learn colour theory. Learn about composition and negative space and gesture. Learn learn learn. People always make the mistake of assuming artists are naturally talented, or that creativity just magically produces good art. Wrong! Art is a discipline, a craft, and you need to know things about it to be able to do it. If you don’t know how to do fractions, then you won’t be able to do fractions; if you don’t know how to draw a leg, then you won’t be able to draw a leg. This sounds daunting, but what this means is that you have to look up pictures of loads of legs and study leg anatomy and practice loads until you will be able to draw a leg, just like practising a load of sums.
Being an artist is essentially being someone who knows what everything you see in the world is made of and how it works so you can take this knowledge and put it on paper. You need to learn about the texture of skin and hair and what it’s made of before you can render full HD portraits of people with detailed skin and hair.
Roman is actually probably smarter than he seems, because you need a lot of knowledge to create things (and conversely, Logan is probably much better at creative things than he lets on because he has the knowledge to do it – for example, his rap verse was super creative and well done. He just doesn’t utilise his knowledge as much).
Essentially, ignore everyone who tells you art skill is some magical talent that only a few people are blessed with - sure, some people are more naturally inclined to it, but it’s something you have to learn about and practice like maths, writing, music, etc. A person with no natural talent who spends their years practising and learning about the world and what it’s made of and how to draw it is ONE HUNDRED PERCENT OF THE TIME going to be better than someone with natural talent who relies entirely on this innate talent their whole life and never learns and improves. Maybe when they’re a kid they’ll be the best artist in their class, but by the time they’re older, if they haven’t practiced, they’ll be infants compared to people who actually know their stuff.
5: You know that style you use when you’re just casually drawing instead of trying to get your anatomy correct? Like, maybe you draw the face shapes one way when you’re doodling and when you’re working on a big piece you try to draw them a different way that maybe feels less natural? Yeah, that style? Just start using it for your fancier art. You’ll get way more done and improve more because you’re getting more done. This is essentially the same tip as my first one, but I still think it’s really important.
It’s like the Pot Theory that I saw going around once: there was a class divided into two. One half had to make one pot, and it had to be the best pot. They had hours to look up knowledge of how to make pots, so they could make their pot the best pot it could be.
Now, the other half was assigned to make as many pots as possible, regardless of quality. They had much more fun experimenting, finding out what works and what doesn’t, and they practised a lot more than the other class even though their first few attempts were terrible. In the end, the first half’s pot was… Okay, but the half that had produced loads of pots had pots that looked much better because they’d practised loads and allowed themselves to fail and then learn from it. Funnily enough, in art, quantity is better than quality.
(Essentially, by producing one Logan doodle per day, I’m doing the same thing as the students who just made lots of pots, regardless of quality. That’s why I’d recommend starting a blog like this if you want to improve.)
31 notes
·
View notes
Note
Do you have any advice for those who want to learn how to do digital art but are starting from scratch?
Well, I think the first thing you should do is remember to allow yourself time to get used to a new medium. A lot of people get started with digital and expect instant results or little trouble moving forward. The trouble is, it can be very different from traditional media, especially depending on the tools you use. [For example: using an Intuos tablet is harder to adjust to after working with pen/pencil on paper vs. a Cintiq tablet.] Even if you don’t have experience with traditional art before starting with digital, a lot of the steps will be the same. The only difference is that you’re going to be applying a lot of the same things you would apply to traditional artwork straight to the digital world. [Things like: Studying anatomy, colors theory, shading techniques, etc.]
So my first piece of advice is:
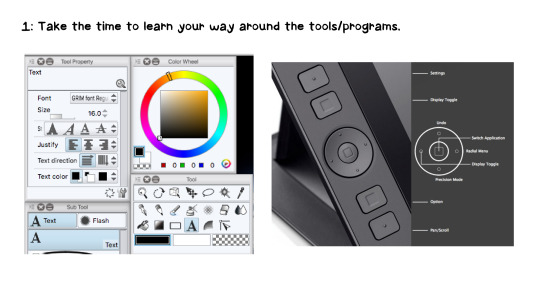
This means exploring programs that you have/the trial versions, testing out settings/shortcuts for the buttons and keys, and even taking a look at some tutorials around the internet. Find out what things work best for you and your style, make sure your work space is comfortable and things like your keyboard is accessible while you work. You’ll find there’s a lot to discover about the programs and tools, and yourself. You don’t even need to draw right away, just play with brushes and tools, see what catches your eye and what doesn’t. As you move along and begin drawing, you’ll start to figure out what short cuts and buttons you will be using the most and what’s the best way to apply them. [Example: I have Control Z as a button on my tablet. Along with Copy/paste and other tools I use a lot. On my keyboard, I have a lot of different shortcuts I’ve created the suit my specific needs as an artist.]

A lot of working with digital is actually just remembering simple things like when to use your control z and when to erase, how and when to color your lines, how to layer your colors/shade layers, to put colors in your shadows, etc etc. All of these things can be very different than working with more traditional mediums. [Example: Working with watercolors and line work can be a very different process with your pencil lines, adding the color over them, then going over your lines with ink--compared to creating your sketch layer, draw over it with a complete line work layer, then creating a color layer under it, and removing your sketch layer.] You’re going to find things like ‘clip masks’/clip layers for shading or coloring lines, all your layer modes for lighting effects, and brushes. So many brushes. If you’re just starting out directly with digital, it’s a similar path of discovery. You’re going to find that some techniques are easier for you than others, and some might actually bog down your process than streamline it. [Things like: Different shading techniques, styles of rendering, lighting effects, etc.]
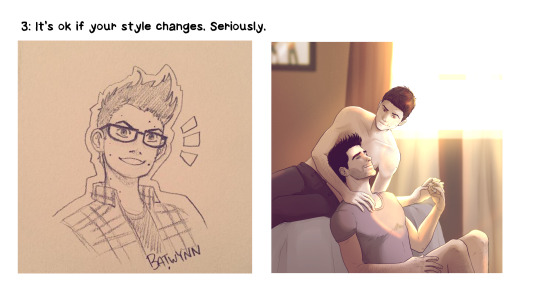
If you’ve drawn with other mediums before, you might see changes in your technique and style that you may not like or understand. You might even consider yourself ‘slipping back’ or ‘regressing’ in regards to technique/style. You may go more simple, or more complex with details. Some of it can be a product of the medium, some can be due to the ability to branch out with different effects and colors, and some can just be your style doing its thing. This is okay! Allow yourself some room to explore and get a feel for the medium. Things are going to feel and look a little wonky at first as you get used to it. If you’re pumping out full bodied professional work on your first try... well, I mean... kudos to you. You’re a genius who wears many hats. But this is not typical of people just starting out with anything. You’re going to stumble a bit. It is okay. If you’re starting out new, you might be nervous about how your style looks and how it develops. I think it’s something a lot of newcomers focus a little too much on, and I’d like to say that style is really not something you need to focus on in the beginning. I mean, to be quite honest, I never actually thought very hard about my style once in my entire lifetime. It just... did its own thing and went its own way, and I followed along. It changes with your moods, it changes with your mediums, with the weather, with the political environment. You’re going to have Bad Art Days that feel like you’ve slipped back into the dark ages. You’re going to have Good Art Days where everything looks so much better how did I even manage that and now I can’t do it again oh my god what was I doing right?! Don’t stress style. Seriously.
Other than that, I have one more thing to say. It’s what everyone says, and I know people are sick of seeing it as advice but there’s a reason for it.
Practice.
Trust me, it does help. It does move you forward. It may feel like a snail’s pace sometimes, but practice means effort means time spent means things learned means progress. Progress is always good. And while you’re practicing, please don’t forget to enjoy creating art. Having fun, even if the end product isn’t perfect or an absolute stunner, is a huge part of practice and being an artist in general. [Trust me, i’ve created some truly ugly things in my time, and I’ve learned from them and had a good laugh.]
So, go forth and create. Learn. Practice. Fail. Succeed. Enjoy.
137 notes
·
View notes
Text
ANATOMICAL VULNERABILITY #4 : IYESHA WALKER
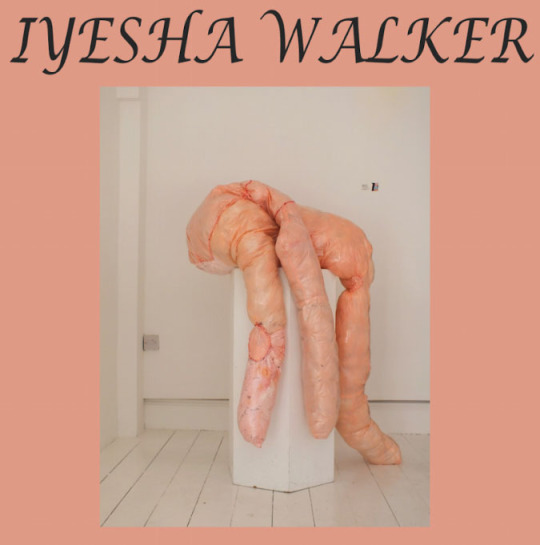
IYESHA WALKER IS A FINE ART STUDENT AT NUA. SHE IS A MIXED MEDIA ARTIST WHOSE PRACTICE EXPLORES COLLAGE, DRAWING AND SIFT SCULPTURE, DELVING THROUGH A WIDE RANGE OF MATERIALS. EXPLORING THE LIMITS OF THE BODY AS WELL AS THE UNSEEN WITHIN HER ARTWORK WITH AN UNCANNY APPEARANCE THAT PLAYS WITH THE MIND.
WHERE DID YOUR INTEREST IN SCULPTURE AND TEXTILES BEGIN? WHAT DO YOU LOVE ABOUT IT?
My interest in sculpture began whilst I was doing a foundation course the year before moving to uni. It was when I realised how far you can take sculpture without having to stick to traditional methods of making. Throughout my GCSE’s and A-levels, fine art was always kept within classical realism, still life painting, etc, and if I got the idea that if I was to do anything else it would be considered ‘wrong’. And this never interested me as much as textile art began to interest me as I did more research. But I never knew how to apply this love without having to study textiles or fashion, until the tutors on my foundation course explained the broadness of fine art, how there is no right and wrong way to make art, which finally gave me the confidence to make literally whatever I felt like making!
So I combined my love for clothes making, sewing and fabrics with my love for the shapes that are often overlooked whether they be within the body or nature or shadows or bags of trash, and the desire to make them three dimensional in my own way. I love the flexibility of textiles, the lack of restrictions with the movement of fabric that allow me to form smooth curves and softness!
TELL US ABOUT YOUR WORKS : ‘AROUSE’.
I made a series of three drawings and three small soft sculptures for a collaborative exhibition between NUA and the Fairhurst Gallery in Norwich. This exhibition was named ‘AROUSE’, which set out to arouse the senses through art in different ways. It was curated by one of my fellow students and I got asked by the curator to make works similar to drawings I had previously posted on my blog, which was exciting because it was a little project I had wanted to do something with for a while but didn’t know what to really apply it to. I always begin with drawing before making sculpture, and always forget they can be works in their own right too in or out of a sketchbook, and it was nice to exhibit them as I never usually do.
WHAT WERE YOUR INSPIRATIONS BEHIND THIS PROJECT?
Over the summer before my second year, I got hooked on the visuals of really incredibly bad 80’s body horror movies. I just got insanely inspired by the gross manipulation of the body within these films that happened along side the weird, sometimes silly story lines. I looked into the works of David Cronenberg and his ideas on horror and body manipulation and deterioration. I saw these fleshy messes as a further way of abstracting the body and decided to translate the inspiration through soft watercolour drawings and small pastel pink sculptures. There was something about having these odd looking shapes that were all soft and stitched into, not harmful at all, that had stemmed from severed limbs and blood and imaginary humanoid things set out to shock, found in these B movies.
HOW MUCH OF A RELATIONSHIP DO YOU THINK THERE IS BETWEEN VULNERABILITY AND THE FEMALE BODY?
I think there definitely is a relationship between vulnerability and the female body. It can be a vulnerable feeling to express ourselves, whether this be through emotion, conversation, what we wear, the makeup we chose to put on or not, how we cry, how we laugh, how we share and through our bodies. Vulnerability is often considered a weakness when it should not be at all. It is the expression of emotions, sometimes deeply, which although can be scary, proves a lot about how we care.
DISCUSS THE PHRASE: ‘ANATOMICAL VULNERABILITY’ – WHAT ARE ITS CONNOTATIONS FOR YOU?
To me ‘anatomical vulnerability’ relates a lot to the process of becoming comfortable with your own body. Becoming comfortable with it yourself and feeling vulnerable in front of only yourself can also be a strange process. I still don’t feel used to myself on some days and other days I can feel completely different! You live with your own body for all of your years and there’s always gonna be things you love about it and things you hate about it, but it takes a different amount of time for everyone and can be easy or difficult, and that’s okay no matter how long it takes.
WHO ARE YOUR BIGGEST INFLUENCES TO YOUR WORK- ARTISTS AND OTHERWISE?
There are so many artists out there that use their materials in such a beautiful way. Alina Szapocznikow’s work has always mesmerised me – she works with the body, showing it in ways which you’ve never seen before, making it awkward, wonky, unbalanced, dainty and clunky at the same time, and glowing whilst confronting some scary autobiographical parts of her life, controlling the fears of illness and death. Athena Papadopoulos is another wonderful artist focusing on unwelcomed subjects and transforming them into these amazing soft arrangements of bright pink limbs. She totally transforms the idea of sculpture and use of materials and using pink in an amazingly raw way. There’s lovely little bits of humour in both of these artist’s works too, and something so powerful about the photographs you can find of them within their creations!
I am massively inspired by the reimagined world of surrealist photographers also; Andre Kertesz, Bianca Sforni, Karl Blossfeldt. These photographs keep me reminded of everything there is to discover within almost anything, a zoom or a crop reveals a whole new image and shape and thought about a subject which is always exciting to discover.
WHAT TRIGGERS YOUR CREATIVE PROCESS?
Almost anything! I’m constantly finding new inspiration that could be from the tiniest thing, but the more I draw it out in my sketchbook and flip it and crop it and abstract it, the bigger it grows into something new, and then it eventually may become a sculpture. Plants have a good way of doing that, my houseplants are constantly growing and changing with a new leaf or root or flower and seeing this process and capturing it with a camera provides a great little collection of inspiration.
WHAT ARE YOU WORKING ON AT THE MOMENT?
At the moment I’m working towards my degree show piece, a sculptural idea that I feel I can never explain fully without hand gestures! Being in my final year of uni and looking back at how my practice has developed, I’m aiming to combine everything I’ve taught myself, using the fabrics that have always been faithful to me. It is going to be a process of metamorphosis, the sculpture forever changing as I’m making with the aimed outcome to be a strange fleshy organic cocoon type entity suspended from the ceiling. I’m combining a ton of different inspirations together from the body, limbs, organs to beetle pupa, orange peel, sea horses, slugs, foam, and strange washed up sea objects. I want to create the odd feeling of not knowing if this thing is alive or dead, the strange in between like the beauty of a flower which is curling up and dying.
SEE MORE OF IYESHA WALKER
Instagram: @ahseyi
Website: www.ahseyi.co.uk/
‘ANATOMICAL VULNERABILITY’ IS A SERIES OF INTERVIEWS HIGHLIGHTING THE BEAUTY OF THE FEMALE ANATOMY AND INVESTIGATING HOW THE ROLE OF A FEMALE AND/OR THE EXPERIENCE OF TRAUMA CAN AFFECT THE BODY PHYSICALLY AND MENTALLY TO CREATE DAMAGE OR DISTORTION.
0 notes
Note
I really love your art! Do you by any chance have any tips for someone who is just starting to try their hand at drawing? Either digitally or traditionally?
Thanks! Glad you like it!Now, tips… tips tips… I’ll answer you as a reminder to myself too? Because there is a looot of stuff I know I should do more often in order to improve but because reasons, I always end up not following my own advice. Sooo here we go:1) Talent is just the 10%: You can have a natural ability, thats totally true. Some people are “naturally better” than others in all fields, and art is not an exception. But what matters here is your attitude. You can be incredibly “talented” but if you don’t practice and work and you just put all your confidence in your natural ability, you’re not going to get anywhere. What matters in the end is how much effort you put in improving.Also, as I said before, attitude is the real deal here. Don’t compare yourself to other artists unless it’s to study how they work and what you can apply to your own style. Don’t fall for the “ah, whatsherface is way better than me why bother drawing anything?”. If you have to compare your work with someone, compare it with yourself. Your previous works, what improved, what needs more work on. The best way to move forward is just compare your own work over time. Don’t get discouraged with what other artists can do, you don’t really know the ammount of time and effort each piece costs anyone else but yourself. Plus how many years of practice and study there are behind every incredible piece someone else uploads.This is a really hard point to get across and is an incredibly hard thing to avoid. I do know its hard for me, but I also know is the key to improve and not suffer.2) “It’s all in the wrist” : In order to get your lines more fluid and less shaky and stuff, you need to not worry about your pulse. Try to make loose movements constantly and draw lines fast. This can only improve by practice, over and over, but the results are always better than when you’re so focused on doing the perfect line that you end up with your arm locked like its made of stone. Nope. - How do you improve this? Doodle. Doodle all you can anywhere you can. And warm up. I used to draw loose circles and spheres for like 5 minutes before start drawing. That will make you feel more comfortable about your posture and lines.And when you actually start drawing, take into consideration that everything in the world can be simplified into basic shapes. Try to pick out the basic shapes that make up the over all shape. Usually these shapes are pretty easy to draw. Draw the shapes then draw the outlines until you get the result you want. As much as this can be applied to literally everything you wanna draw, is specially important to do this if you’re drawing people or “organic” characters. Anatomy can be a bitch, so if you get this previous step right, adding all the rest is going to be easier. 3) Look for information: Internet is an amazing place to learn. Watch tutorials, read books, follow other artists advice, ask people about their work and how they do what they do. Learn the basics then up, don’t try to draw superheroes with all the muscles and dynamic postures in one setting. Read a bit about anatomy, perspective and info in general that will help you understand how to work better and more accurate. No one was born with the ability to draw, we all learned from somewhere. And internet is an inexhaustible source of information. Use it to your advantage. It also depends in what you’re interested. I do try to draw as close as reality/source/classic as possible (i’m a canon bitch and i’m not sorry). What might help if what you wanna draw is relatively realistic, is take a look at Andrew Loomis’ books. It never fails.4) Don’t be ashamed of using references: Whoever says that artists that use references are not artists is absolutly wrong. Even the most famous painters used references. They are called references for a reason and now a days, is easy as fuck to just go to google, look for what you need and use it. Even use 3D programs to put the bases of what you’re going to paint. Look up for info in the industry of illustration or concept art, you will realize the ammount of “cheats” that are used is insane, but what matters is always speed and the visual result being what you want. Do not mistake “use reference” with “copy the same crap others did before me”. No go.5) Share your work: This is a good way of always getting feedback. If you’re not comfortable uploading it to the net (we all know there is always an asshole that will troll you, sadly is unavoidable) show it to a friend or family, ask them for opinions and what they like and dislike about your work, of course in terms of technique. But, always have faith in your style. There will be people that will not like the style in which you draw but it’s yours. Don’t let people change what you like to do.6) Know your tools: Its good to know the limitations of the software/tools you’re using, either digital or traditional have their own limitations. Which pencils are the best for sketching or for shading, if you’re going to use ink, make sure to find the propper pen for it, one that makes the lines as you want them to be and practice different thickness and weights in lines depending of the tool. I mean i could go on and on about this particular point. Speaking of digital (Since I’ve been working digitally for almost 3 years now so I feel more confident with it) a lot of people use one software for lines and other for color and render. It of course depends on how comfortable you are. For example, Photoshop doesn’t have a line stabilizer, so some lines can be a bit wonky. Paint tool SAI has this stabilizer so the lines look more steady and professional. But, if you are familiar with one software, knowing the other too can be a lot of time invested and its possible you don’t have the luxury of dedicating weeks to learn both softwares even if its a little portion of it. In my case, I use Photoshop and Lazy Nezumi Pro, that is actually a plug in that works as an stabilizer for the lines. Is a matter of trying several softwares and then decide which one makes you feel comfortable. Also, if you work with a tablet, it doesn’t really matter which one. Of course the more professional ones have a wider range of possibilities, but if you know how to work your way through them, it really doesn’t matter at least at first. Don’t go running and waste a bunch of money on a Cintiq 24′’, when you can easily achieve the same results with a Wacom Intuos Pro. What i’d suggest to take into consideration is the size of the tablet and the screen you’re using. The closer the size of the tablet is to the screen, the better, but its just cos perception of space since most tablets doesn’t have a screen on their own, like the Cintiq does. Its just a reccomendation, but is not necesarely something that could make things more complicated. I’ve drawn for months with a Bamboo medium size with good results. I just noticed when i changed my tablet for a bigger one that I felt way more comfy drawing on a bigger work area.7) Practice. Practice. Practice: The more you draw, the better you will be. Buy a sketch book and draw anytime, anywhere. You have ten minutes to spare? Doodle something. You don’t know what to draw? get prompts and get at it. Draw, draw, draw. Digitally, traditionally, using the PC, using the phone, pen, marker, ink, pencils. Just draw at least a bit every single day. Art is not talent, art is a Skill and as any skill you get better at it by repetition. Well, I hope this wall of text helps you a lil’ bit! Good luck with your art and always keep drawing!
12 notes
·
View notes
Last Seen Blogs

shutupandfixit
Untitled
himbonamjoonstan
nah namjoon can get it

bakabakaurusei
ewii's home ♡

caos-utopico
kat
mapplepoutine
Dreams Asylum