#technically this is from september i just went through my sketchbook trying to find something that'd be easy to finish
Text
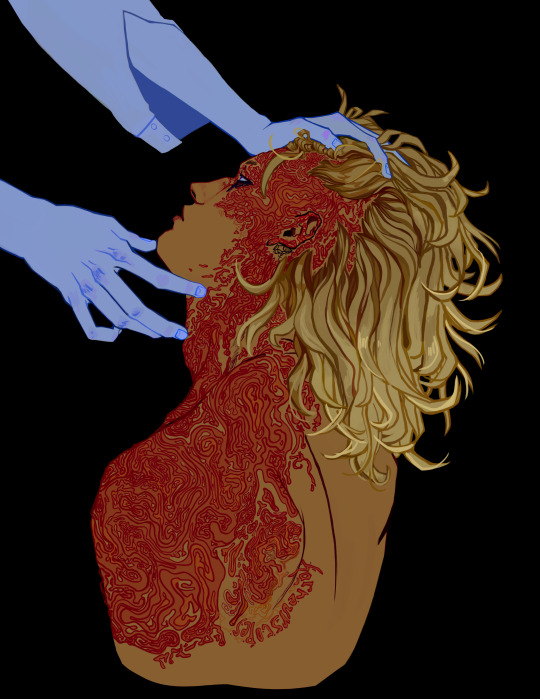
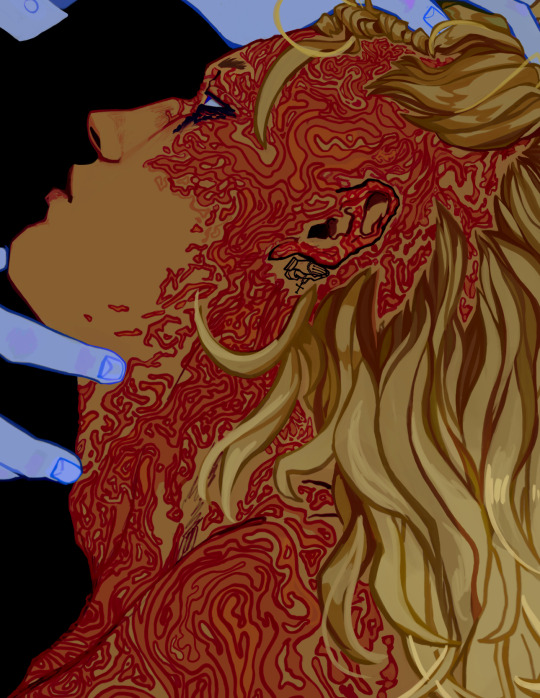
transfiguration's gonna come for me at last, and i will burn brighter than the sun
#posting a little mello deathnote 5 mins before the end of his birthday. as a treat#its been a couple rough months catching up with the commission queue so#technically this is from september i just went through my sketchbook trying to find something that'd be easy to finish#him....... alex are you still hyperfixated on-- yes. yes i am. death note blorbos save me. death note blorbos please#death note#mihael keehl#mello#mello death note#mello dn#meronia#horreurart
962 notes
·
View notes
Text
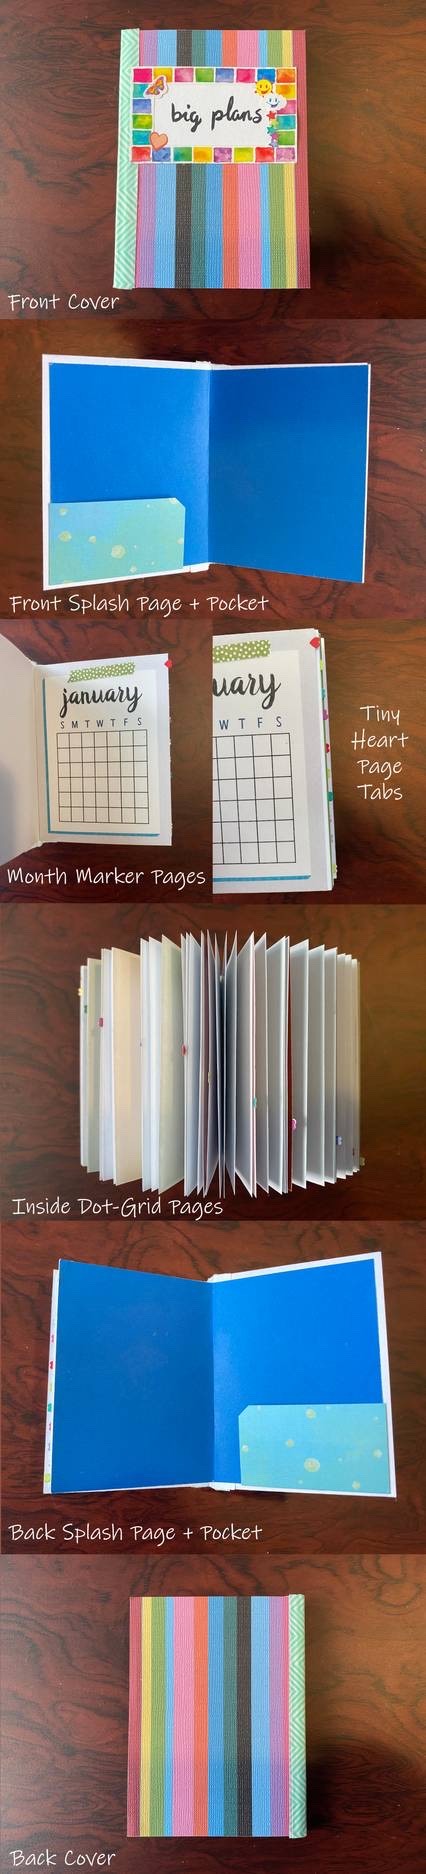
Big Plans Tiny Planner
Ta-da!! :D
It took forever, but I think this is quite possibly my favorite book-making project I've done to date!
A while back while JoAnn's was having a sale on decorative paper (I think it was 10 sheet for $2 or something like that?) and I stocked up on a few combinations I thought would work well for future book projects, and among my choices, I had picked out a page that consisted of tiny calendar pages for a full year and a piece of heavy-duty paper that I thought worked well with the various colors on that page (not all the calendar pages were as drab as the January page here, I just didn't have the patience to try and photograph all twelve of them for this ).
However, it wasn't until I saw this video by SeaLemon, my go-to person for DIY book things, that I knew how to get pages that work well for a tiny planner.
I had originally gotten some small lined memo pads from the dollar store, hoping to use a couple of them for pages in this theoretical mini-planner...only to find out that nope! Those pages are just a little bit too big. Trying to get them and the calendar pages lined up to glue the spine would be infuriatingly difficult. Naturally, this left me semi-up-creek without a paddle.
But then I saw the aforementioned video and learned something that had never occurred to me: You can make dot-grid paper...by printing a dot grid onto regular paper!!
It seems so obvious and so simple now, but it had honestly never even crossed my mind. I guess because I have actually tried using regular grid paper for a book before and it didn't go as smoothly as I had hoped, in addition to me knowing that making your own lined paper in a similar fashion would be much more tedious task. Lining up lines when you're not a machine capable of cutting pages with laser-precision is both time-consuming and next to impossible to get perfectly aligned pages from.
The dot-grid, on the other hand, provides guidelines to use for writing and drawing (the biggest disadvantage to unlined paper), and a guide for cutting, but the dots are spaced in such a way that the cut has to be pretty egregiously bad for it to be immediately noticeable if they aren't quite lined up correctly. Additionally, in this case, specifically, the dots are so faint that 1. it makes any misalignment even harder to notice, and 2. they will not show up on camera for anything, and so I didn't bother trying to include a photo to show said dot-grid.
That said, I just printed off the dot grid SeaLemon made and shared in the video description onto normal printer paper. Twelve pages; printed the grid onto the front side of each, then flipped them over and printed it onto the backsides. That way I had double-sided pages and I could cut multiple small pages--four 3" x 4" pages per piece of paper--without worrying about if anything was going in the wrong or right direction.
Once the grid was printed, I then used a paper cutter to first slice all twelve pages to be the same size, cutting off the excess where the dot grid didn't print because of printer margins. Then I went back through and cut them down to be the size I needed. After which I counted out four pages for each calendar page, and having learned my lesson about end pages (the pages that connect the text block to the splash pages) from the SweetTarts book I made, I cut two more pages out of cardstock to put on the front/top and back/bottom of the stack.
And then I carefully lined up one side of the page stack, clasped it in place with a binder clip, and got gluing.
While I waited for the coats of glue on the spine to dry, I started on the covers and splash pages.
The splash pages I cut and dealt with without much fuss. The covers, on the other hand...
Originally, I meant to cut the covers large enough that I could have a little overhang on the edges to make the book a bit nicer. However, I mismeasured/calculated and didn't realize it until I'd already cut the covers in one direction. It wasn't too late to adjust for the height, but it was too late to adjust for the width. However, that wasn't too terrible, as I figured I could just move the covers over slightly and covered the missing area with the tape over the spine.
That did complicate things slightly in that, later on, I had to cut and add strips of paper to the spine area to cover the under of the tape to keep the adhesive from folding and/or sticking to everything.
But before the anti-sticky-spine steps happened, I was playing with placement for the cover. Earlier in the process, I had recouped the frame sticker on the front cover from my sticker collection to use in conjunction with the "big plans" placard I wanted to make in a similar fashion to how the names of the months are printed on the calendar pages. While I was fiddling with how it was going to look with the covers, I also started thinking about my choices for the tape on the spine.
I ended up thinking that I liked the color of the lines on one of the covers better than the other, based on the frame and the tape options I had, combined with the color of the splash pages that were already attached to the text block by that point.
I tried not to. I really did. But I couldn't help myself; I cut out another cover identical to the one of the two that I liked better. To be fair, I'm glad I did because it makes my brain feel better knowing they match nicely, but part of me can't help but wonder if it really would've mattered, provided I had put the other cover on the back.
So with that "problem" solved, I could then move on to attaching the covers and placing the tape. And I did.
And I am still not very good at getting the spine tape straight on the first try. This was a problem this time, not because this tape was any less forgiving than the other options I've used in the past, but rather because of the thinner paper I'd put in place to cover the adhesive. It did not
want to let go of the tape once they were stuck together.
As a result, instead of repositioning or even removing the tape, I instead placed another piece on top to fix the unstraight edges. That piece I could reposition, and it's a good thing because it still took me a few tries to get it exactly where it needed to be.
I almost thought I was done once that was taken care of and the frame and placard were attached to the front cover. Then I realized this is a tiny planner (of sorts) and a planner could really benefit from book pockets...Which I believe I had originally planned on adding to the book, but it had somehow slipped my mind among everything else.
So after I spent way too long deciding on what paper to use for the pockets (and ultimately decided to use some that was leftover from when I made splash pages on the Duck Tape mini sketchbook) and to simply clip the corners instead of using my paper punch to round them because it's started not doing its job very well as of late, I applied the pockets by carefully prying the covers away from the splash pages on the appropriate corners, wedging the pockets in, and then squeezing in a bit of tape and glue to the best of my ability to reinforce them. (Normally reinforcement wouldn't've been an issue because I would've securely taped them to the back of the splash pages before trying to attach the covers.)
This time I really did think I was done. And, technically, I was. I was quite proud of my little baby planner, too.
The next day I videoed a little flip through of the book to show it to a couple of friends because I figured that would be faster than taking my staging photos like I normally do. In that process, I discovered that it was fairly tricky to flip through the pages and find each calendar page quickly, and also the September page decided to pop out. Apparently it wasn't quite far over enough or didn't get quite enough glue or something. Also, I was a little bothered that one edge of the sticker frame on the front didn't want to stay flat down but also didn't pop up far enough to be able to get more glue under it without making a mess.
I've never attempted to reinstate a page that fell out of one of these books before, despite having at least two fall out of one of the first ones I ever made. Fortunately, it went more smoothly than I expected. A little very carefully placed tacky glue and few minutes' patience to hold it still, then some time to dry long-term with extra paper on both sides to absorb any extra glue, it appears fairly stable now.
The page-turning took a little more thought, but I settled on using these teeny-tiny heart stickers (one on each side to, again, keep the adhesive from sticking to things it shouldn't) as tiny little page tabs. And when I say teeny-tiny, I'm not kidding. I have fairly small, nimble fingers, and I still found it easier to manipulate the stickers with the help of a pair of tweezers. But they are just big enough to work in this form. The only problem is that they don't stick out uniformly solely because the pages themselves don't, and they have to be stuck on about halfway down the sticker so that they stick to the page securely but still stick out enough to be useful at all once the pages start fanning open.
While I had the sticker sheets out to get the hearts off, I peaked at the other options and settled on a few to stick to the frame on the front to fix that other problem about one side not sticking down to my liking. Then I added a couple more on the other side just to balance things out. It's a bit much, but it still feels better than leaving the frame to just stick up like it was.
After all of that though, now it's finished. And I'm still very happy, if not even more so, with how it turned out. It was a piece of work, but it looks so nice and it's functional, too!
I'm not even sure I'll use it--I haven't decided yet since it is so nice, I'm thinking I might want to keep it as an unmarred example for future projects like it--but I just enjoy knowing it exists and how good the end product looks that it was worth it to me anyway.
This was also a bit of an extra learning experience to 1. Plan these book projects out a little more thoroughly in advance, and 2. Pay closer attention before and during the process of cutting anything. Which, I mean, I already try to do those things, but evidently not quite enough, lest I wouldn't have some of the problems I do that often crop up in my making process.
I'm not quite sure what the next book project will be, but I do have a few more pieces of that paper that I picked out for some, so we'll see what happens next time I sit down and make some.
____
Artwork © me, MysticSparkleWings
____
Where to find me & my artwork:
My Website | Commission Info + Prices | Ko-Fi | dA Print Shop | RedBubble | Twitter | Tumblr | Instagram
1 note
·
View note
Last Seen Blogs