#puffier sphere
Text
Part 2/? of Mugi and other dolls!
More process pictures! Mugi is my perfect excuse to buy cute dresses 🥰


The original idea was to make the torso split into 3 parts, with a ball in the middle just because I liked the aesthetics of the ball, but it did not improve the posability (unless I changed the overall shape of the body, but I didn't want to), so at the end I decided to make it into 2 pieces, so it matches the other bodies!

Also redid some joints digitally, so they look way more neat. Making joints and pieces that are more technical is always harder to do by hand, like neat edges and perfect spheres. So being able to make them digitally is a time saver. Just so you can make an idea, it took me several days to make the piece on the left and the surface is still not smooth. For the piece on the right, it took me 30 minutes to sculpt it digitally, and 1 hour to get it printed. It's just too fast and easy 🥹

Mugi current status is practically finished! But before sending her to the casting factory, I want to digitalize her. First of all, because I want to make a human version of her head, with no horns. But also because the casting factory waiting times have gone up like crazy, and I don't want to wait for +5 months to play with Mugi, so I will print a copy to play in the meantime 🥲

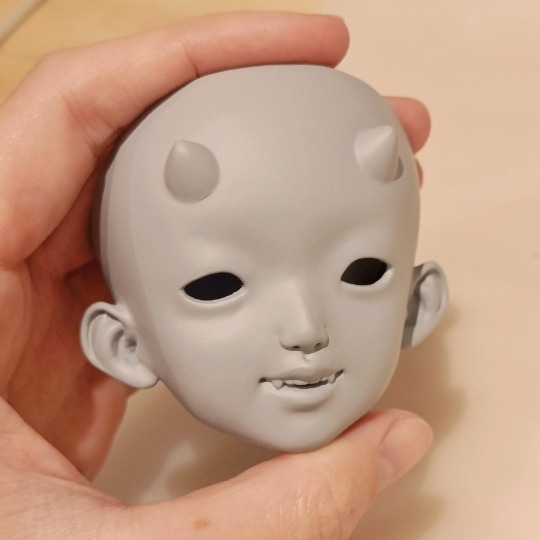
Head is all smooth and soft 🥰
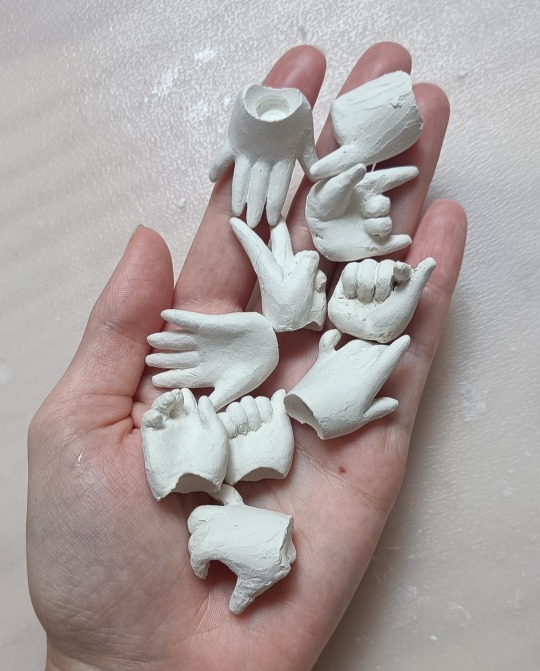
I sculpted a lot of hands in cute poses and I want them to be easily interchangeable with magnets, but making hands is super tedious 🥲 Sanding between the fingers, make sure all nails have the same overall shape in all hands...It's the only part that I still have to finish 💔
Last but not least! Please let me introduce you to MeiFang or MeiMei!


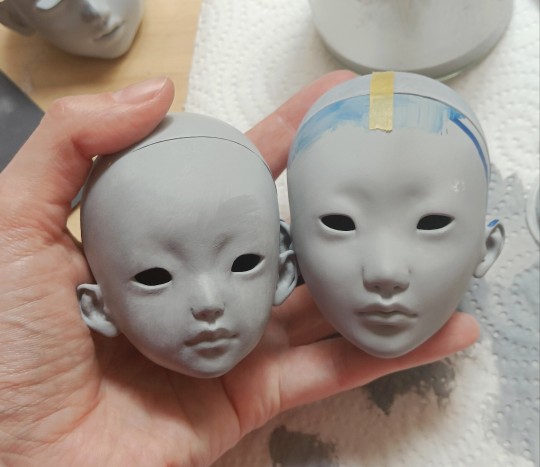
My most requested doll has always been an MSD Fang. I KNOW. I am fully aware that this is NOT what people have been asking me to do 😅 But since I don't think I will make a MSD mature Fang (let's say, a shrunk version of the current one) I decided to make a child version of her! I adjusted the features accordingly to the age change, so the eyes are larger and rounder, the nose and mouth are smaller, and her cheeks are puffier. Really hope people still appreciates her 🫶
I am sending you a virtual snack If you read until this! 😆
Thank you so much,
Nuria
137 notes
·
View notes
Text
https://instagr.am/reel/Cs7lBj2grjz/
This project began as thoughts about current events, other than shootings. It began with bans on Drag shows, differences & similarities, but it’s still morphing, & a little confusing maybe with next steps… it’s just turned into more of an engineering project than I’d anticipated. I’m ready to get to the fun part … fuzzy spheres. 8000 fuzzy spheres.
-
So these are progress photos to date.
-
#gro
#galleryrouteone
#galleryrouteoneboxshow
#theboxshow
#theboxshowgalleryrouteone
#forever
#baddecisions
#humanrights
#constitutionalrights
#someoftheabove
#alloftheabove
#somethingelse
#istilldontknowwhy
#becauseicaniguess
#madeinchina
#wrappinginnovato
#thelistisincomplete
#madeinchina
-
We wanted this one to be warm and fuzzy (pun intended), inviting and joyful, even if it deals with sensitive and very serious topics.
-
I also tried to stick to materials that are intended for ages 4 and up.
-
I don’t think I’ve ever wrapped a 10 sided box with fragile concave face before and I thought cotton batting would be easy. Its not. It’s fuzzy. Fuzzy is awkward, but it needed to be “more puffier” and more “swollen” if that’s the right word. This one is not trashy or apocalyptic, it’ll be bright and colorful. 8000 rainbow Pom-Poms colorful.
-
It was not a scientific approach. It was not a mathematical or a geometric approach. -
-
Actually, I tried to do it mathematically and realized that perfect is overrated. It was pretty much cut here, a little there, push this, pull that, squeeze this, and there were a couple of areas where I stapled it like sutures to hold it together, but it worked.
-
We have about 8000 rainbow colored fuzzy pom-poms in assorted sizes from one quarter inch up to 2 inches so the outside will definitely be rainbow colors.
-
I’m happy with our “simulated dna strands” or double helix or whatever it is and I found what appear to be the perfect tiny butterflies (I have no idea why except they provide “hope”)
-
For The Box Show @galleryrouteone
May 31, 2023 at 07:36PM
via Instagram https://instagr.am/reel/Cs7lBj2grjz/
0 notes
Text
ANNOUNCEMENT:
@all my followers
I am switching accounts to a new one
Some of my older followers will remember when I went from PUFF-SPHERE to the current PUFFIER-SPHERE
Well it's the same now
The reasons for this switch will not be discussed
So please allow me to introduce you to my new blog
🤡PUFF THE CLOWN🤡
32 notes
·
View notes
Note
Not a recommendation but a warning
If anyone has ever told you to play persona 5 or any atlas game well... DONT atlas is transphobic look up Catherine a game they made, in it there is a trans girl who's always joked on for being trans. There's also a point where she's giving advice to the main character and he says "only if you were a real girl" passively
Just letting you know have a wonderful day
I wasn’t already going to play Persona 5 because the Persona games are a pile of absolute fucking garbage that I can’t imagine anyone but the most lonely weeb wanting to play.
But thanks for the heads up I guess.
13 notes
·
View notes
Text
Yo check out PUFFIER-SPHERE
MY SPHERES ARE 20% PUFFIER, FIRMER, SOFTER
EVERYTHING A MAN LOVES
5 notes
·
View notes
Text
Galaxies grow bigger and puffier as they age
Sydney, Australia (SPX) Apr 24, 2018
A new international study involving The Australian National University (ANU) and The University of Sydney has found that galaxies grow bigger and puffier as they age. Co-researcher Professor Matthew Colless from ANU said that stars in a young galaxy moved in an orderly way around the galaxy's disk, much like cars around a racetrack. "All galaxies look like squashed spheres, but as th
Full article
32 notes
·
View notes
Text
Vicar Character Modelling Process
Maya T-Pose design for Modelling
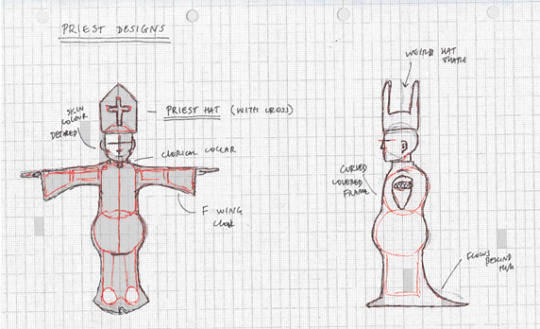
I created my Priest character by using a cube polygon, and increasing the sub divisions. I decided to learn from my last character model and only create half of the mesh on the Z-axis so it would be better to mirror when I would eventually get to this point in the process. After I created my half cube polygon I began extruding the faces into a basic skull shape, constantly referring to the smoothed version as I progressed through making the head shape.
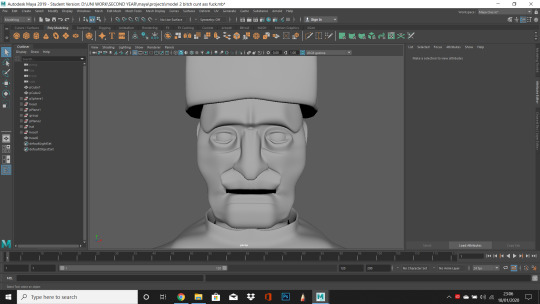
After creating the basic head shape, I added some facial features such as a nose, a protruding forehead, indentations for eyes and a nose.
Eyes
To create the eyes, I made incisions in the centre of the head with the multi-cut tool and created multiple edges. After I had created these cuts, I deleted the interior faces, making a hole in the head mesh. This was the basis for the eye socket. I then added a sphere polygon behind the empty head mesh, I then moulded the eyelid around the eyeball sphere. As I wanted there to be multiple wrinkles around the eyes to express the Priests age and show detail, I decided to follow the same process of creating my creatures rib-cage. I selected the edge tool and moved the edges into positions where the mesh would look folded, as if there were bag under their eyes. I extruded the faces on the wrinkles and moved them outwards to define them and differentiate between the sizes.
Wrinkles and Facial Details
I added several folds and wrinkles to the character, as I wanted him to look old and weathered like my concept art. I incorporated the protruding forehead by using multiple edges made by the the edge loop tool to create a thick forehead and eyebrow line. I also developed the bone structure of the face by selecting the faces and edge’s by manipulating them into positions where I felt certain indentations, such as the temple and raised, puffier skin, such as his jowls and cheekbones.

Ears
I created the ears by creating a basic ear shape on the side of the head using the multi-cut tool and extruding the shape outwards, I then added additional edges on the interior of the ear, again using the multi-cut tool to create a basic shape of the ear anatomy and using the face tool to push certain elements of the ears outwards or inverting the interior, lower parts of the ear deeper into the geometry. After I had created the basic shape of the ear, I observed how it looked in the smoothed view and defined extra elements such as the earlobe by selecting the mesh face and deforming it so it looked drooping. After doing this I realised that the ears looked too high up the face and weren’t defined enough to be seen on the front Z axis view of the character, to resolve this I selected the entire mesh faces of the ear and lowered it down the face, I then used the rotate tool to define them enough to look like they were sticking out his head, rather than pressed against his skull.
Nose, Lips and Mouth
Using a similar process for the ears, I extruded the faces I had created by cutting edges into the mesh by using the multi-cut tool. I then rotated them to make a more nose like-structure. I then move the vertices to make a more consistent shape, whilst doing this I added more edge loops around the head in order to create a deeper and accordant nose topology. I decided to make the nose more hooked and curved, as this was a characteristic of my designs when I was creating the concept art for my character.
When I had developed the nose, I moved onto the creation of the lips. I made the lips by adding edge loops around the lower part of the nose to the point where I thought the mouth would be. Additionally, I added some cuts using the multi-cut tool to create the basic layout of the lips and eventual mouth. I deleted the mesh face that was to be the mouth and moulded the lips around the mouth gap by manipulating the edges and curving them downwards and in towards the inside of the mouth.

Neck Problem
I had an issue with a deformation on the neck of my character during the creation of the chin and the anatomy of the lower part of the head. This may have occurred during the process of the extruding of the edges of the bottom of the head typology, as I think the issue may have been I created multiple faces and when connecting the vertexes together with the weld tool, I connected one vertex to an unintentional vertex, this created a slight raised line on the top of the mesh above the collar (Above). I resolved this by discovering the problem during looking through the wire frame view and realising there were several extra vertexes, I changed the view port to the polygon mesh and deleted the back of the head and corrected the mistake.
Creating the Body Posture
I created the body posture and costume by referring to my previous designs. I used a cube polygon and increased the amount of subdivisions in the body’s mesh. I then selected the faces on these subdivisions and created the general body shape by using the extrude tool and increased the size of the more defined body parts such as the belly and shoulders. i wanted the Priest to have a small torso and defined body, as it was the opposite body structure to my creatures.
I deleted the faces in the mesh where the collar would be connected to the neck and extruded the edge of the hole to create the collar by creating a curved geometry which curved inwards using the rotate tool. I then selected faces on the side of the Priest to create the arm. I extruded these and added multi edge loops around the arms, creating the basic arm shape by manipulating the edge loops by using the vertices to create the flowing fabric of the arm. I did this by lowering a single vertex and then the correlating vertexes above to create a sleeve. I then selected the edge of the sleeve and extruded it, pushing it into the mesh. I extruded this again, pushing the edge closer together, then extruded it out of the mesh. This was to become the basic geometry of the hand, I added edge loops to make it curved and less square.
I debated on making the legs long and thin, however, I liked the idea of a cloak, much like I had previously done in my earlier designs. I thought this would work as the Priest is very covered up and this is the binary opposite of the creature that is exposed and, essentially nude. I made the base of the cloak by extruding the base of the stomach and extruding the base of the body outwards. I added multiple edge loops and increased the amount of edges in places where there would be slight over lapping and change in direction. For the back of the cloak, I used the vertexes by manipulating them further back, deforming the mesh to make it look like it was dragging behind himself.
Four View Point of Priest
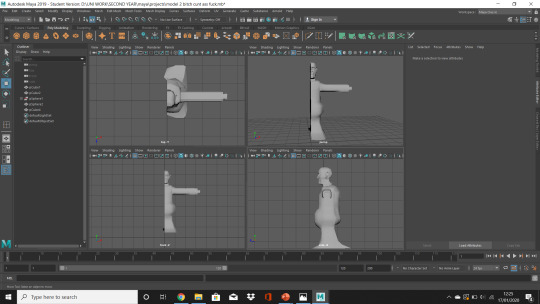
Front View of Priest

Side View of Priest

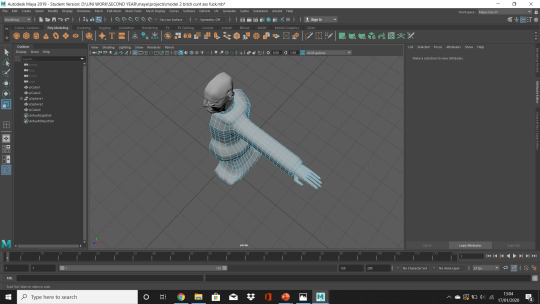
Creating Hands
To create the hands, I used the basic hand stump from the creation of my arm geometry, and added some edges using the multi-cut tool and extruded some fingers out of the mesh, I did this by making small squares and leaving a small space between the mesh that would be extruded, selecting only the mesh that would become the fingers, I added some edge loops to make the fingers curved and shrank the spaces between the vertexes on the tips of the fingers to make them pointed. I used a similar process to make the thumb on the side of the hand. I used the multi-cut tool and extruded the selected face to create the basic shape of a thumb. I then added an edge loop around the centre of the thumb, and selected the edge and rotated it, I then extruded the face on the tip of the thumb to extend it.
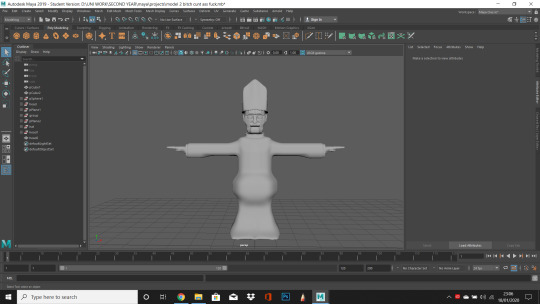
Adding the Hat to the Mesh
I decided to add the accessory of a hat to my character as I felt he needed more personality through his clothes. I created the Pope hat by using an image plane and making it into the general shape of the hat,by manipulating the vertices and deleting half of it, as it was over the Z axis, placing it above the characters head and manipulating the vertices around his head to give the impression of it fitting on his head.
I then duplicated the front of the hat by selecting the mesh by using duplicate special and flipping the dimensions of the hat, placing it on the back of his head and then manipulating the vertices around his head. I then combined both these meshes into one mesh. I selected the edged of the top of the hat and extruded them into a basic hat shape, sloping down the back of the other side. I then combined both these meshes together by using the extrude tool and connecting both elements together. Using references from Google and my designs, the curved bump in the middle was prominent. As I was using the poly view, I used the edge cut tool to add multiple edges and vertices into the centre of the head and selected the vertexes upwards to create a curved effect.
Side View of Pope Hat

Front View of Pope Hat

Side View of Pope Hat

Mirroring the Mesh
To mirror the mesh, I used the mirror tool in the mesh drop bar and duplicated the other half of my mesh on the Z-Axis to create the full bodied version of my Priest to keep the geometry consistent. The geometry automatically connected together and I thought the end product was up to scratch, as I had not designed a fully detailed human character before.
Fully Mirrored Priest
Fully Mirrored Priest Close Up
Texturing the Mesh
When it came to the process of developing my characters mesh, I decided to use the colour textures and different MAYA mesh textures to define my character. I selected the specific faces I wanted of the mesh and selected Assign New Material, for the skin, pope hat and clerical collar I used the Lambert MAYA texture, as they would be less reflective and added the correct colour using the colour picker tool, as I am colour-blind and selecting the colours off Google. For the textures that I wanted to reflect light I used Blinn, for example for the cloak, which I wanted to look like silk and the cross that I wanted to look like real viable gold.
Front View of Priest Mid Development
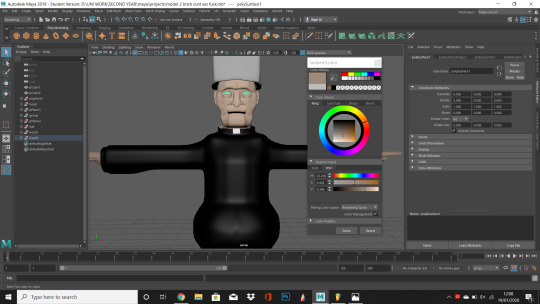
Side View of Priest Mid Development

Finalised Priest

I also added a cross as a final touch as I thought this would add to the relatively bare priest hat. I did the cross by using a cube polygon and increasing the amount of subdivisions. I then extruded the selected faces on either side and shrank it down to size to fit on the hat. I changed the texture to Blinn, to make it shine when light would hit it and chose a gold colour on the cross to show the, supposed, divinity of God. I then rotated it and combined it to the mesh.
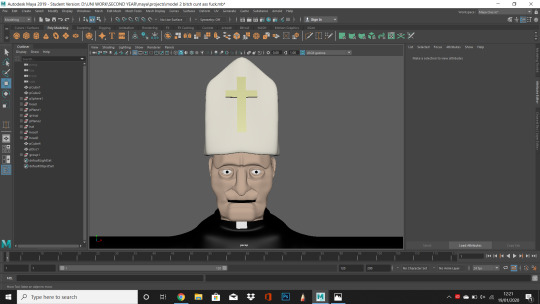
When I sent the pries into render View the texture of his cloak was incredibly shiny and did not look realistic, it looked more like a gimp suit. I resolved this by changing the cloak to an JPEG image of a black material, however it is not visible on the mesh for a reason that I couldn’t resolve due to time constraints


I decided to Render him in the T-Pose because of time restrains and i had already modelled him in this way an did not want to deform the mesh.
I then added a different colour as it didn’t match the Pope hat of my character using the colour tools.

0 notes
Text
Me then

Me now

Wild
2 notes
·
View notes
Note
Lily what's dumber you or a lily flower
Me
4 notes
·
View notes
Last Seen Blogs

mememami
Untitled

hotelurilamunte1-blog
Hoteluri La Munte
elusianknight
gay wardening

youngmusclebear
Lift. Eat. Grow. Repeat.

panfurwarellc
PanfurWare LLC Music Publishing and Placements