#permaculture garden
Text
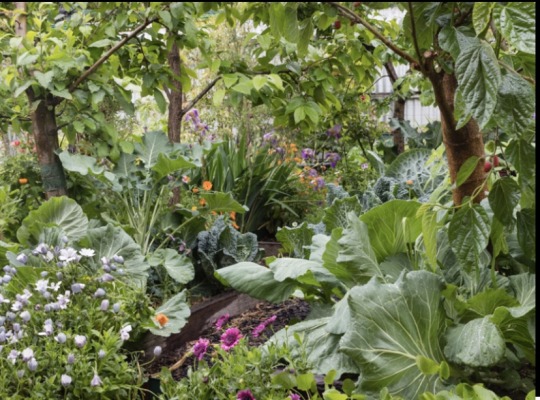
Healthy Soil, Happy Garden: The Power of Regenerative Farming
Healthy Soil, Happy Garden: The Power of Regenerative Farming. Learn how to garden with natural
Methods for regeneration #organicgarden #permaculture #soil #regenerativeagraculture
Field of sheep. Animals are a great way to add fertilizer and bring biodiversity to the garden.
Welcome to the world of gardening, where the magic of nature meets the enthusiasm of the human spirit. As a regenerative gardener , I am excited to share with you the importance of healthy soil and how you can create it in your own backyard. But first, let’s talk about what regenerative farming is all…
View On WordPress
#amending soil#composting#gardening#gardening tips#gardentips#growfoodathome#homesteading#how to build garden beds#how to garden#permaculture garden#soil building#soil Health
6 notes
·
View notes
Text
youtube
#Podcast with Billy Bond from Permaculture P.I.M.P Cast#Permaculture P.I.M.P Cast Secrets with Billy Bond#The Truth Behind Permaculture P.I.M.P Cast#Billy Bond Reveals All on Permaculture P.I.M.P Cast#Billy Bond on Permaculture P.I.M.P Cast#Permaculture P.I.M.P Cast Exposed by Billy Bond#permaculture#permaculture basic#permaculture design#introduction to permaculture#permaculture video#permaculture garden#what is permaculture#permaculture orchard#permaculture beginners#Youtube
0 notes
Text
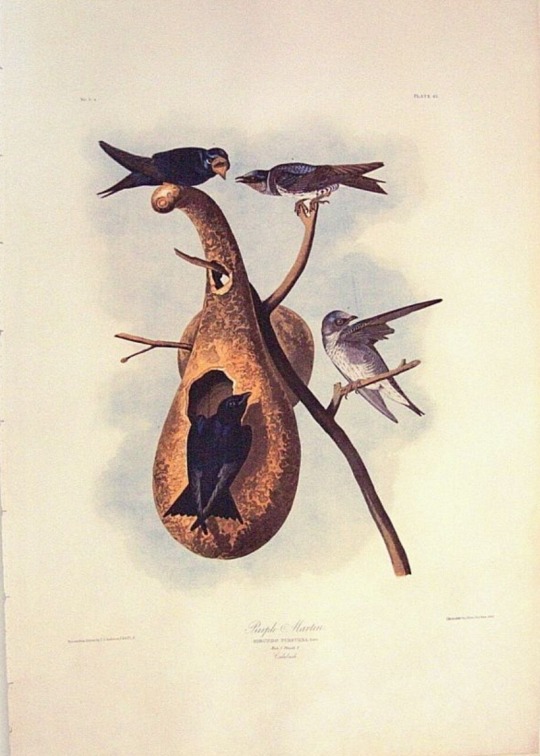
I think it's so adorable that early humans took wild gourds - a tiny fruit that hollows out as it dries, making it float - and decided to make something out of it
they thought the tiny fruit was so good that they bred it for thousands of years, making it larger to form into bowls and cups, and different shapes to become bottles and spoons

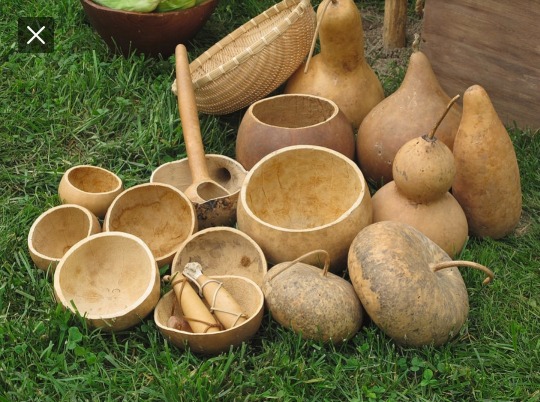
and musical instruments


And then, people took the hollow gourds they farmed, and they turned them into houses for birds. We adapted them into the perfect houses for birds, and now there are specific breeds of birdhouse gourd just for making into birdhouses
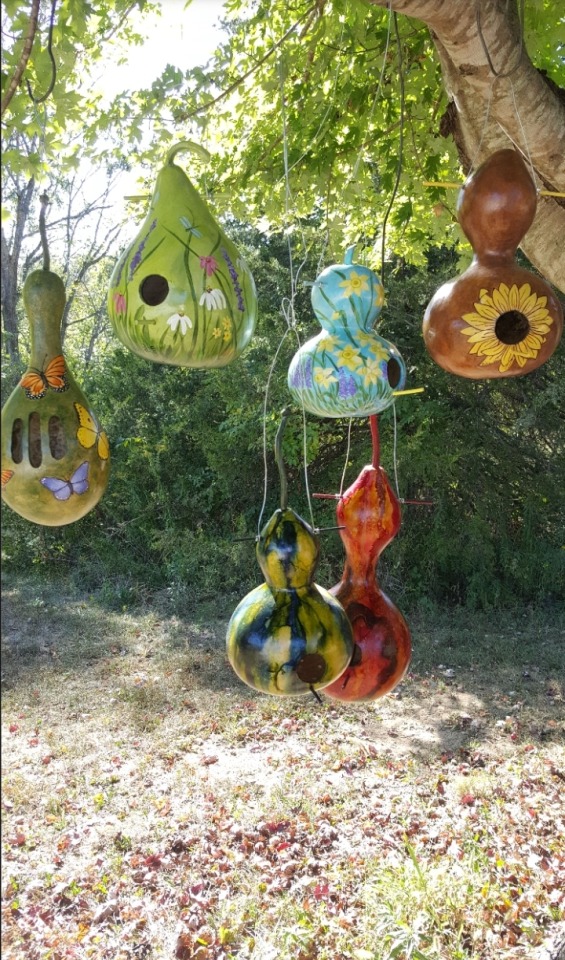
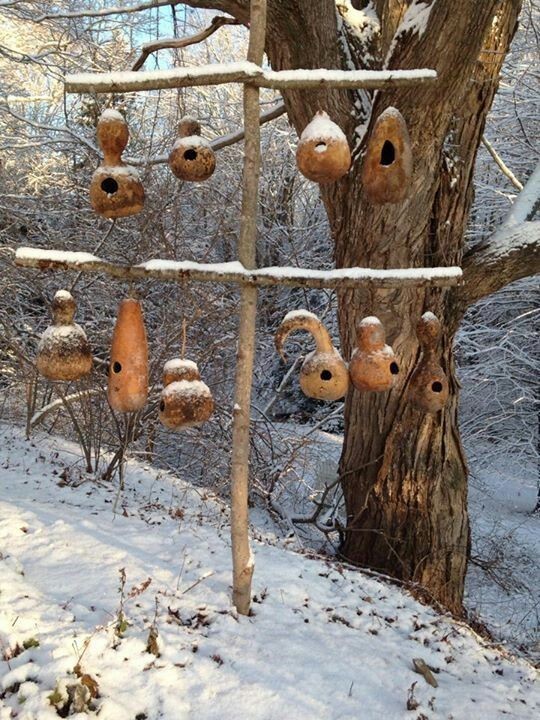
And humans dedicated gardening space and time and thousands of years of breeding to make the gourds so absolutely perfect for birds, that there is a species of bird that lives almost exclusively in them
#yes I KNOW i posted about this the other day but *crying* i just love plant domestication and the history of agriculture#and humanity's positive affect on the ecosystems we live in#mine#image IDs in alt text#hmm. I'm gonna tag this#permaculture#just to pspsps @ that community to look at how cool gourds are please everyone grow birdhouse gourds and give cavity nesters places to live#i don't think mine will become fully ripe before i get my first frost :( next year i need to start gourds indoors#i didn't want to grow them before because i didn't have much garden space but now i do and i need to grow all of them#i might be. a little obsessed with gourds. but also i saw a pair of purple martins flying by the road last year#and i had never seen one before then! and i need to see more of them#i have a few hundred barn swallows but i need more birds flying around my house. more!!#and also i have a ton of invasive cavity nesting species around here. house sparrows and starlings.#gotta make up for those things competing with native birds for nest dites#*sites#the invasive birds very often win :/#that's why they're invasive#i really do need to start trapping them....
31K notes
·
View notes
Text

LOOKlooklooklooklook LOG GARDEN BEDS!!!!
Rotting logs hold moisture like a sponge so it would keep the conditions moist for your plants, It would provide fertilizer to them and ideal conditions for symbiotic fungus, it creates the perfect habitat for useful beneficial creatures, and it could be used on an eroded area to make a barrier against erosion.
If a tree ever falls down in a storm or has to be cut down for whatever reason this is an excellent idea to consider. You could even raise the log off the ground to allow for trailing vines or place things underneath
878 notes
·
View notes
Text
Making Desert Land Fertile with Water Bunds
#permaculture#regenerative ag#regenerative agriculture#agriculture#farming#gardening#how to make soil more fertile#how to turn a desert into fertile land#soil#soil fertility#organic farming#organic gardening#water harvesting
2K notes
·
View notes
Text

Built a greenhouse out of reclaimed windows and scrap wood, took me an embaresing amount of time but it looks good now.
921 notes
·
View notes
Text
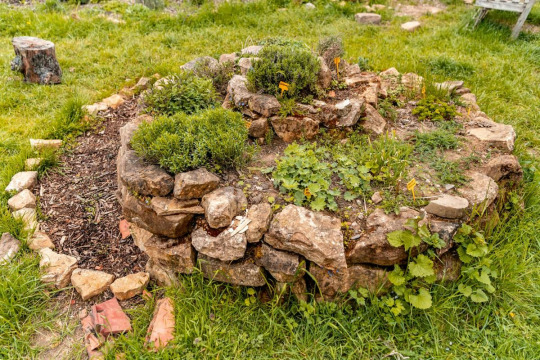
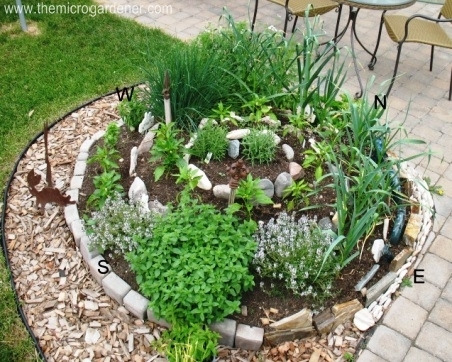
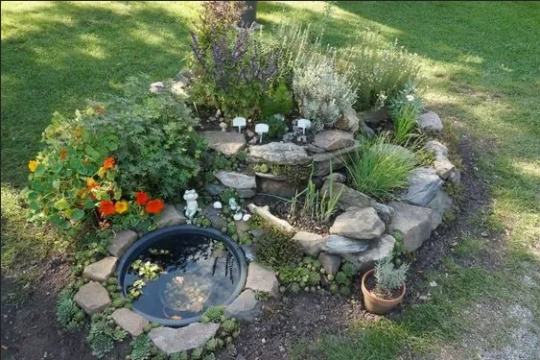
The Permaculture Spiral Garden - A Great Starting Point
There is probably no other structure as popular for illustrating Permaculture in practice as the Herb Spiral. Okay, I guess I could mention the lasagna sheetmulching method or also the cob oven that tends to be the first hands-on project at a typical Permie intro session. But when it comes to showing how landscape design, zones and sectors, stacking functions, and efficient use of space and water come together in one unique structure, the Spiral Garden is unbeatable.
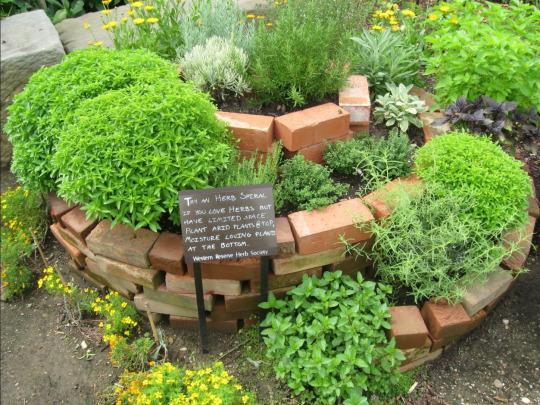
Turning Theory into Practice
In typical Permaculture Designer Certificate courses, but even in brief intro weekends to Permaculture, there tends to be a lot of theoretical discussions. Since the numerous design principles can be applied to any climatic region, from the tropical to the subarctic, and on any scale from the humongous to the tiny, the practical aspects of the ideas can easily get lost. That's where a good hands-on application comes, where the participants get to move around rocks and dirt, while realizing how much it ties in to the concepts they've just discussed. This way the apparent "main purpose" of "building something to grow all your kitchen herbs on", becomes a neat side feature.
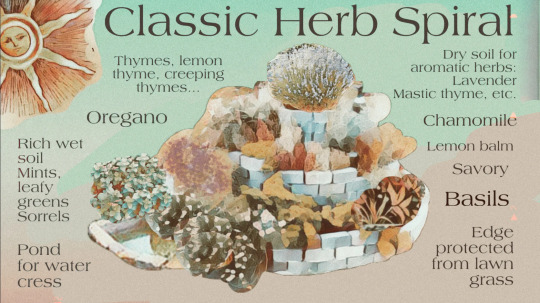
Adjust Your Landscape!
The first thing to realize that landscape is welcome to be modified and adjusted to bring out the best in it. Clearly, while it is important to work with what's there already, it doesn't hurt think about mounds and valleys. And before you bring out the excavators for your large-scale farm, it makes sense to start small… say on a circle of 2-5 meters (6-16 feet) diameter. In other words, the Spiral Garden is a hill with a spiral shaped surface, leading down to ground level, or further down into a water hole. It can be made out of rocks, bricks, concrete debris, or anything else you have lying around that can hold your soil.
Design According to Your Scale
Looking around for existing Herb Spirals it's easy to get confused. Some are so big you can actually climb on them (that is, you have to in order to reach what's growing on top). Others are so tiny that you may not even want to step on them. The question is: which size is the right one for you? Since this is something you will have to decide almost daily in Permaculture, it doesn't hurt starting out with this important question.
Organizing Your Spiral Garden
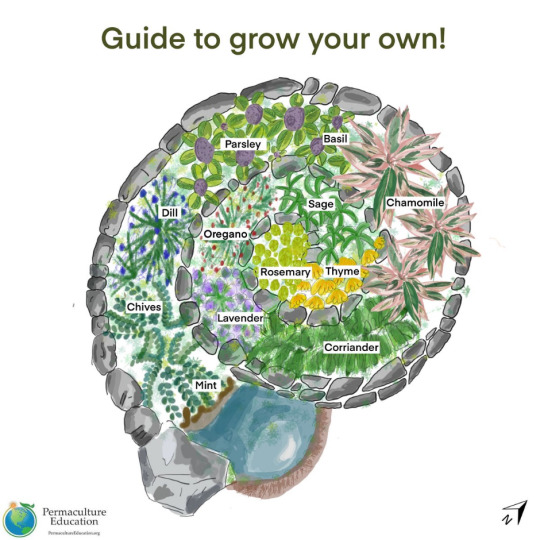
While there are seemingly endless types of Spiral Gardens, there are a few things they all have in common: They all start out with a region on the top, where water is bound to run off right away, leaving the soil relatively dry. This area is also the most exposed to the wind. Keep this in mind when choosing the plants that are going to live here. Ideally, the spiral should start sloping toward the East from here. Delicate plants that benefit greatly from the morning sun will appreciate this region. As the slope continues toward the South and West, it becomes more suitable for sun loving species. Finally, as the spiral reaches the ground level in the shady Northern part, it will be perfect for herbs that prefer less sun, more shade and more water, since the soil tends to be wetter here. (Note: This is for the Northern Hemisphere. In the Southern Hemisphere North and South are reversed.) To make full use of the runoff water, many people add a small pond at the base of the spiral, where additional aquatic plants, such as watercress, can be grown.
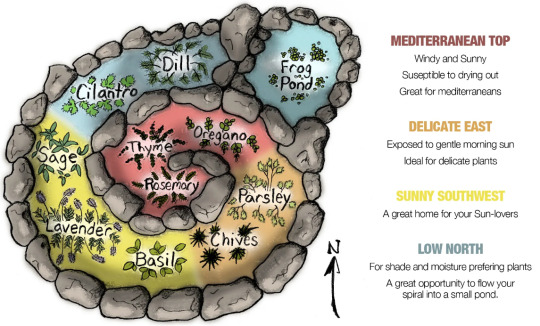
The given illustration offers a good number of herbs for a nicely diverse kitchen. Depending on what else you want in your Herb Spiral, you can add it in the most suitable region. Mint and lemon balm love the cooler, shady part with more water. Lemongrass is great in the sunny area, and tarragon and estragon prefer the dry top of the spiral. Of course, the idea is not limited to kitchen herbs. For maximalists, the same theory can work with a mountain you might want to terraform into a spiral farm. But right now I'd prefer to stay small scale.
Plenty of Benefits (That's Why It's Permaculture)
As explained above, the main purpose of the Spiral Garden is not only to increase your gardening area by making use of the vertical, but also to create diverse climatic conditions, which do make a difference on the smallest scale. But as Permaculture tends to be, there are many other benefits to it. The structure itself offers great habitat for numerous animals, such as frogs, salamanders, lizards, but also pollinating insects, and of course others that may not directly benefit us, but by feeding on others they all add to the stability of our ecosystem. The structure itself will suppress weeds and make use of material that you're not likely to use elsewhere. Finally, depending on the size and location, it will be an ideal place to grow all your kitchen herbs right where you can access them most easily.
Some Things to Keep in Mind
When building the structure, make sure it will contain the soil in a nice trough, slanting slightly inward. That way bits and pieces that fall off will roll towards the center, until contained by the main mound.
Make sure the slope is always nice and gradual, avoiding sudden drops where the water can rush down quickly, eroding the soil.
If you're going to walk on your spiral, include a separate walkway that won't compress good soil. Most importantly, it should be sturdy enough to provide stability and make access safe.
Don't forget that while the structure is important to keep the soil in place, it is the soil that you'll be growing plants in. So it should have a good depth of 20-50 cm (8-20 inches) throughout the entire spiral. This can be the trickiest part!
Apply your own observation to which plants do better in which parts of the spiral. Also, with time you will find many other plants growing in it that you didn't plant. Before removing them, consider how much they actually bother your herbs, and whether their benefits may not outweigh their drawbacks.
Go Out and Build Your Own!
I hope this brief overview got you inspired to go out and try building an Herb Spiral yourself! I would love to hear your experiences with it!
Sources: 1, 2, 3, 4
3K notes
·
View notes
Text
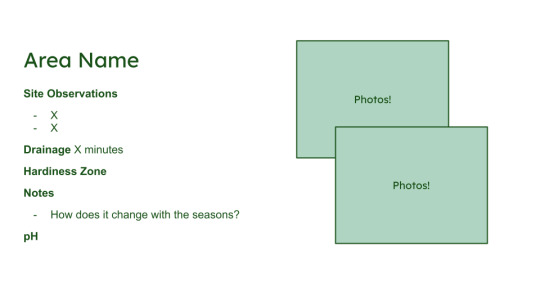
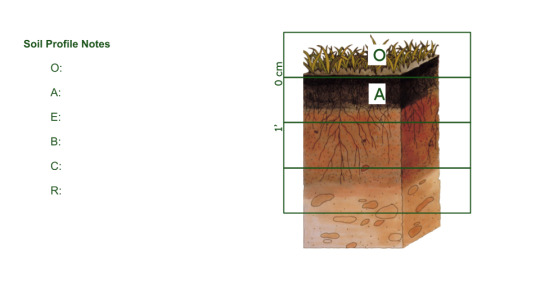
Create Your Own Soil Profile!
A garden’s soil is the base of all its growth, and knowing how to properly interact with your soil can make all the difference!
Step 1 Site Observations
Take a few photos of your site (project area)
Note down:
what vegetation is there?
is it near water?
the slope
approximate exposure to sun
Step 2 Take a soil profile
Set out a tarp or a garbage bag
Dig a hole about 3 feet deep (you may want a friend’s help!)
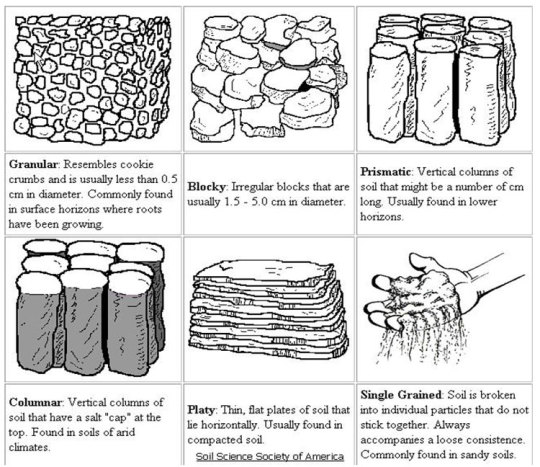
Place that soil in piles onto the tarp, sorted into different soil layers
Remember horizons! (O, A, E, B, C, R(bedrock))
Make a sketch of a soil profile, and measure the depth of each horizon
The top of the profile should start with 0 cm
Refill the hole, and try to return each type of soil in order!
Step 3 Build your profile
Describe each layer of soil, moisture/structure/color/smell
Use the “feel” method to take notes

Step 4 Drainage
Dig a hole 1 foot deep and 1 foot wide(ish)
Fill the hole with water and measure how long it takes to fully drain
An ideal time is around 10 to 30 minutes!
Note down the time
Keep in mind that even if the soil type would suit desert-like plants more, think of the weather. If it rains a good deal the drainage can matter less(or more!)
Step 5 Biological Activity
Bury a pair of cotton underwear(I know it’s silly)
Wait about 60 days
Unearth the undies, the more tattered they are the more activity there is!
Step 6 pH Testing
OSU Lab for Oregon, and many states have soil testing labs
Soil pH Meter
DIY Test
Step 7 Hardiness Zone
This just takes looking at a map!
Hardiness zones can tell you about the weather’s highs & lows in a particular area

USDA Plant Hardiness Map
And that 's it! It's a lot, and you don’t have to do everything. Each step can provide a better view of how to properly support your garden, and can be fun activities to do with friends and family!
I’ve included a template for a complete soil profile, but feel free to make them as fancy as y’all want!
Sincerely,
records of dirt
393 notes
·
View notes
Text
Hey, hey, don't cry. Plants fruiting and flowering, okay? The earth is laughing and exhaling and taking up space, right?


545 notes
·
View notes
Text
Endangered Fireflies & Conservation
Fireflies are at risk of extinction due to habitat destruction, light pollution, and pesticide use. Recovery efforts started in 2023 for the 18 endangered species in North America. Almost 1 in 3 firefly species in the US and Canada are threatened with extinction.
Scientists have yet to prove the effectiveness of these steps due to limited research on firefly populations. However, there is evidence suggesting that human activities may contribute to the decline of fireflies. So, here's what you can do:
Turn off outside lights during nighttime hours
Allow logs and leaves to naturally decompose in your yard
Incorporate areas of water into your landscaping
Refrain from using pesticides in your yard
Avoid excessive mowing of your lawn
Plant native tree species in your yard.
Please take a moment to explore resources related to firefly conservation:
Discover articles from the Xerces Society on firefly conservation: https://www.xerces.org/endangered-species/fireflies
Watch a video from the Canadian Permaculture Legacy on saving fireflies: https://www.youtube.com/watch?v=McjHyQMf5eQ
Learn more about the Firefly Conservation & Research organization: http://www.firefly.org/
Explore their articles on how you can contribute to firefly conservation: https://www.firefly.org/how-you-can-help.html
If you have spotted fireflies in your area, please report your sightings here: https://www.firefly.org/firefly-sightings.html
#fireflies#firefly#lightning bug#bugs#insects#conservation#endangered species#north america#Xerces Society#Fire fly#extinction#environment#cottagecore#gardening#permaculture#agriculture#light pollution#Canada#United States#habitat destruction#habitat loss#restoration#glow worm
161 notes
·
View notes
Text
So, this is cool:
We need to convince more municipalities to plant more trees. I would suggest looking into trees that are more heat and drought tolerant (oaks, not western red cedar, for an example) & also those that grow more quickly. Planting on the west and south (or north, if you're in the Southern hemisphere) of a building matters the most for heat reduction.
If you want to get into it, I'd suggest finding your Köppen climate classification, and then finding either native trees that can thrive in a hotter-but-otherwise-similar climate than yours, or trees from such a climate. For example, I'm in a warm-summer Mediterranean climate so I'm looking at plants from Hot-summer Mediterranean climates that are hardy enough to still survive our winters (oaks, I'm looking at oaks. Fortunately, one species extends from here to down there, so that's easy).
I wouldn't usually advocate for non-native plants, but I'm seeing the climate change quickly enough that I think maybe humans should help with the pole-wards migration of plants.
2K notes
·
View notes
Text
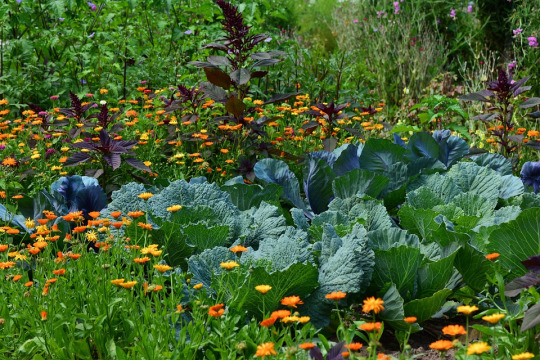
Companion planting for Beginners
Companion planting is a fascinating gardening technique that involves much more than simply putting different plants next to each other. #organicgardening #permaculture #growfood #companionplanting #gardenhacks
What is companion planting?
Companion planting is a fascinating gardening technique that involves much more than simply putting different plants next to each other. It’s a strategic and clever approach to growing crops that takes advantage of the natural relationships between plants to create a thriving and diverse ecosystem.
At its core, companion planting is about finding the right pairings…
View On WordPress
#biodyversity#companion planting#ecogardening#gardenpestcontrol#gardentips#grow vegetables#how to companion plant#natural gardening#organic garden methods#permaculture garden
0 notes
Text
Fun fact the reason garlic was believed to repeal evil spirits and vampires is because it repealdls pests including fungus, many insects, certain rodents etc because it produces fungicides, and produces lots of strong smelling sulfurous compounds hence why you can never have enough garlic in your garden especially around apple trees since apple trees are particularly vulnerable to fungi that are repelled by garlic
268 notes
·
View notes
Text
Things are starting to happen in the garden
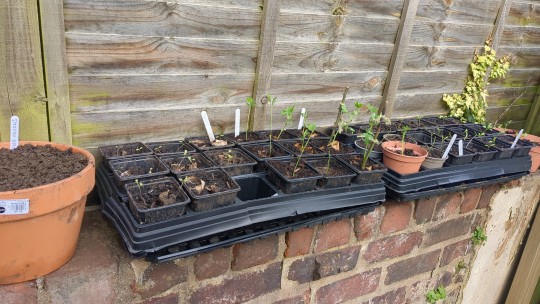
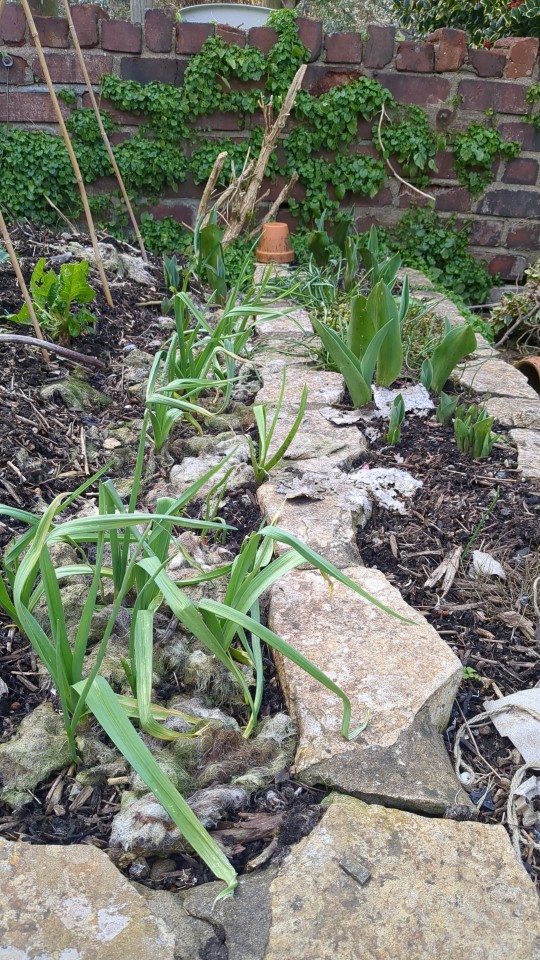
Seedlings! Tulips! Buds bursting!
The fruit bushes I planted over winter are showing signs of life!

I planted these peas outside last week. It's too early, but they were desperate to LIVE and to CLIMB. I could not give them the life they wanted indoors. It snowed pretty much immediately, and was frosty for several days. And yet, the peas remain unbothered and flourishing.
I had a 100% germination rate with these guys too. The variety is Lord Leicester if anybody is interested.
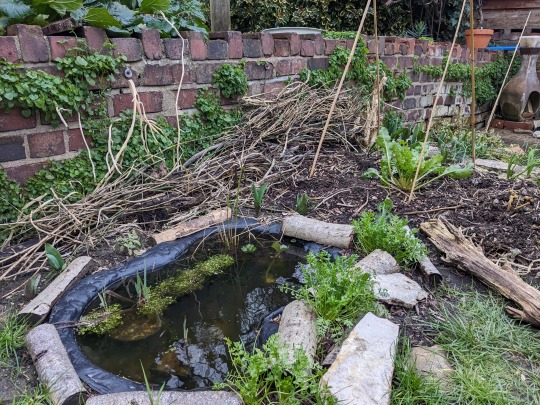
I've stacked up a load of old twigs and prunings which were lying around to make a bit of a habitat wall area. I'm hoping this will one day give frogs a safe passage to the pond. In the shorter term, I'm wondering if any climbing plants might like to use it as a support. Does anybody have experience with this?

This is the inside of the compost bin. I just like to look at it :)
#permaculture#small space garden#urban gardening#solarpunk#peas my beloved#compost#shall i compare thee to a february pea?#no thou art nowhere near as lovely
112 notes
·
View notes
Text
I see a lot of content here in the solarpunk community about the importance of re-wilding, of re-introducing biodiversity and turning our garden's into little sanctuaries, but this has always felt super inaccessible to me. I have always lived in rental properties that have little to no outdoor space, need to be regularly mowed for inspections, and where I am not allowed to make any major changes to the garden.


Recently I moved into a tiny granny flat. The yard is about a metre and a half of grass in a circle around the house, and a metre of grass either side of my concrete driveway. When I first got the inspection report for it, the real estate described the yard as "mostly weeds." This time I thought, fuck it. I only have inspections once every three months, which gives me plenty of time to let it grow without anyone noticing. Plus I had the insurance that with the lawn being "mostly weeds" the real estate wouldn't notice the difference. Let see if letting it grow actually makes a difference to the eco-system around me.


I invested in a push mower, to cut down the grass without doing much to the "weeds", and then after my first inspection I just let it grow. My hopes were not high. My space is absolutely tiny, and most of the wild flowers growing in my yard mostly invasive species for Australia. I had no idea if it would make any difference at all.
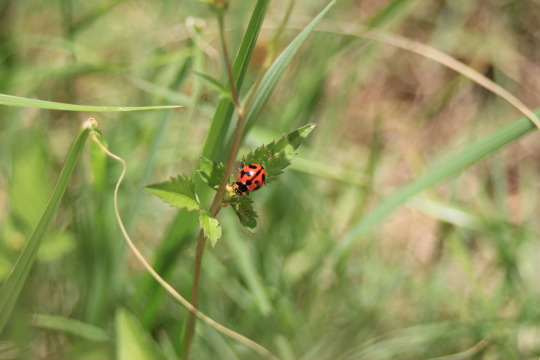

Its been an uncharacteristically rainy spring here, so the flowers all sprung up far far more quickly than I thought they would. Only two weeks after the mow there were dandelions as high as my knee. With the wildflowers came the bees, and the butterflies, and then after that came the ladybugs, the dragonflies, the lizards, spiders and birds. The photos above are only a tiny fraction of what the garden has on offer, and those are only the photos from this week.
When I first moved in, I didn't used to see anything in the well mowed lawn but ants. Its only been about a month and a half since I mowed it, but with all the rain we've had recently its sprung to life far far more quickly than I'd hoped. With such a teeny tiny lawn in the middle of the suburbs I really didn't expect to see a difference in biodiversity. How much difference can such a tiny little patch of flowers actually make? It turns out a lot.
I'll be devastated when I next have to mow it all down in another 6 weeks, but with the risk of snakes here, its probably for the best. It honestly been so lovely to walk down my driveway in the morning and be circled by all the butterflies. Its made my day every morning.
I hope I've convinced anyone else who also has a tiny space and has been considering letting it grow out to give it a go. You don't need to have a huge garden or be able to plant all native species in order to make a difference. Although these things are great, making due with what you have is the best first step.
#solarpunk#permaculture#biodiversity#gardening#rewilding#ecopunk#Also if any of you have any photos from your own garden of how your own rewilding projects are going please share with me!
337 notes
·
View notes
Text
You wouldn't download 16 basil plants

So, you know those spindly basil plants you can get in the supermarket that are all leggy and pale, and you put them on the window-ledge and pick a few leaves from them and then they die?
Here is the hack for
turning it into a healthy plant and
making an army of clones from it so that all your friends can have one too
You will need
one parent plant
scissors for cutting the stalks
enough pots for however many seedlings you want to make
compost
one or two empty bottles
Method
Have a look at your parent plant. You'll see that each bundle of leaves comes out from a knobbly bit in the stem. That knobbly bit is called a leaf node.
Gently take hold of the very top set of leaves and count the leaf nodes on that particular stalk, counting down from the top.
If there are more than three nodes, cut the stalk just below the second leaf node.
The bit that you have just cut off is called a cutting, and it will become a new plant. To do this, we have to get it to grow roots.
Take your cutting and remove all the leaves except the four at the very top.
Fill your bottle with water and insert the cutting into the top of the bottle, with the stem completely submerged in water, and the leaves outside in the air.
Now repeat until you've taken about six cuttings, or you've taken all the cuttings available. Put them all in water-filled bottles. (I use milk bottles which hold about four stems at once with enough space for their leaves to get the sunlight, but if you're using wine bottles it might be fewer.)
Put the cuttings/bottles onto a sunny window-ledge and wait. Within about a week you should see roots beginning to grow. Keep the water topped up to the top, and let the roots grow until they are two or three inches long.
When the roots are 2-3 inches long, fill your pots with compost and water them well. Shove your fingers in the wet compost to make a space for the cutting's new roots and gently insert the cutting into the hole. Put a little bit more compost on top and firm it down, move on to plant the next one.
Providing all your cuttings get over the shock of transfer (and they probably will) you will then have 8 little basil plants like the smallest ones in my picture.
Put them back on the sunny window-ledge to let them get established and begin to grow. Congrats, you now have 8 basil plants plus the parent plant.
The parent plant
When you're taking the cuttings, you must leave at least one leaf node on every stalk. The plant can't create leaves without the nodes, and if it has no leaves it's basically going to die.
You want the plant to create new leaves and thicken up. If a stalk doesn't have more than two nodes, don't make cuttings from that stalk at all. Leave that stalk to grow.
Taking your cuttings will stimulate the plant to grow, and lower nodes which may not have had leaves on them when you got the plant, will now begin to produce them. This will make the plant bushier and stronger, but it will need a bit of extra food to help it put the extra effort in. So give it a new layer of compost on the top, water it, and put it back on the sunny window-ledge as well.
First batch cuttings
Let your first generation of cuttings grow undisturbed for a few weeks. (Water only when the soil feels dry.)
When they start looking long and thin, you want to encourage them to create side-shoots and begin bushing out. You don't want a long thin plant. It will fall over in the wind.
Look at the very top of the plant where you will see two tiny baby leaves developing. If you let them develop, the plant will continue to grow long and thin, but if you take them out it will encourage the side shoots to grow. Pinch out the tiny baby leaves right at the top of the cuttings, and very soon you'll see they start to grow outwards instead of upwards.
Second batch cuttings
After a few weeks your cuttings will look like the larger plants in my picture, and your parent plant will have grown enough to have added extra nodes. Which means that you can now take another batch of cuttings and start the process all over again.
You can pretty much keep this going all summer if you want.
Give plants away, eat fresh basil all summer and fill your freezer with bags of basil leaves for the winter :) Happy cloning!
3K notes
·
View notes
Last Seen Blogs

dealfreedom29
Untitled

grosirbajuanak100-blog
Tanpa judul


iadaware-blog
Untitled

reph-but-art
『ЯΣPΉIᄃ』