#omg i just checked the colors on my phone they are so saturated
Text
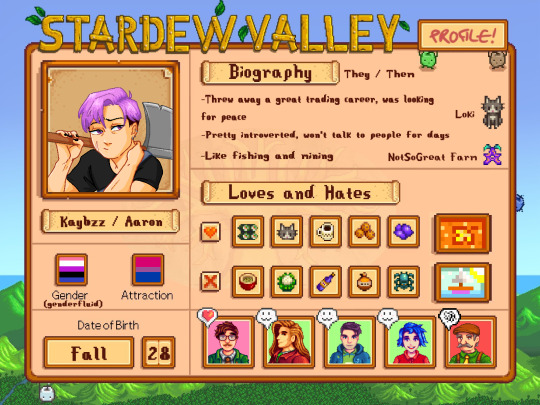

Coming at the end of my first in-game year, I wanted to do the little farmer profile thingy.
Template under (made by Mairland on reddit)
#art#my art#stardew valley#sdv#sdv farmer#sdv harvey#sdv shane#sdv elliott#sdv emily#tagging everyone cuz why not#doesn't look like pixel art from afar#i had fun ngl#sdv oc#omg i just checked the colors on my phone they are so saturated#if you can look at this on your computer you'll have the real -less disgustingly saturated- colors
596 notes
·
View notes
Text
someday i will come up with wanted connections but today is not that day

* darren barnet, cis male + he/him | you know spencer novak, right? they’re twenty-six, and they’ve lived in irving for, like, two years? well, their spotify wrapped says they listened to i got you (i feel good) by james brown like, a million times this year, which makes sense ‘cause they’ve got that whole messy piles of sheet music, button-ups with rolled up sleeves, slow motion running thing going on. i just checked and their birthday is october 8, so they’re a libra, which is unsurprising, all things considered.
basic info
full name: spencer ryan novak
birth date: october 8, 1994
pronouns: he/him
hometown: seattle, washington
sexuality: pansexual
height: 6′4″
eye color: brown
hair color: brown
build: lean
tattoos: none
piercings: none
style: used to just be graphic tees with loser sayings on it, but after being in the public eye (and now as a teacher) he was forced to up his game. now he’s got nice, tailored button-ups and jeans/slacks that show off his ass. it’s like queer eye came and fixed him
favorite color: green
favorite food: everything
zodiac: libra sun, sagittarius moon, libra rising
mbti: enfj
hogwarts house: hufflepuff
enneagram: type 2 wing 3
temperament: sanguine-phlegmatic
spencer was a very loved, very planned, very wanted baby, so as far as traditional “family drama” went, he had none. he and his younger sister have always gotten along well, his parents are still together and very much in love, and have always supported their children and their paths in life no matter what. they were an upper middle class family, with enough to have their needs met and most of their wants, but not enough to spoil themselves. it was very picturesque, and spencer didn’t realize how well adjusted he was until he got to college.
a lifelong band geek and first chair trumpet player with enough dorky charm to start a high school glee club without being creepy about it, it was no surprise that spencer decided to go to school for music education. ohio state university was far from home and not necessarily where he wanted to end up (who wants to end up in ohio for the rest of their lives, really) but they’d offered him a hefty scholarship and had one of the best marching bands around, so he couldn’t turn it down.
the hitch in the plan came in his sophomore year of high school, when america’s next top model decided to add guys to their roster. spencer knew nothing of modeling and had no desire to enter the industry, but after losing a dare to his frat brothers, he ended up submitting a casting video. he may or may not still have been tipsy while filming it, but he was pretty and tall and charming, so he somehow made it through to the filmed audition episodes. he made a distinct impression on the judges despite not having a great walk (miss jay, he found out later, was jumping at the chance to work his magic) and lo and behold, spencer made the top 14.
for the first few weeks, spencer mostly stayed in the background of episodes, watching the drama unfold. sure, a lot of it had been staged, but seeing how well his competitors could fall into place scared him a little (a picture of him clutching a pillow and staring at a catfight has since been turned into a viral meme). he expected to get eliminated early on, but found himself floating near the middle of the pack from week to week instead of at the bottom. the only time he seemed to stand out was the week of a late shoot, where he hadn’t told the crew about his diabetes and passed out on set after not eating for too long. (it’s still one of the most “omg moments” in top model history.)
and then the time for commercials came, and spencer’s star really started to shine. for all the things he wasn’t as polished on as the other contestants, nobody could compete with his natural charm. things started coming together for him after that, and he cracked the top four before getting sent home. still, he’d set into motion something he could never have accounted for, and suddenly everybody wanted a piece of spencer novak.
as soon as the season was done airing, spencer’s phone would not stop ringing. agents and managers and publicists, oh my!! a dare from his frat brothers had opened up a whole new world of possibilities for him, and suddenly he had a choice to make: would he continue with his plan of being a high school band director, or take the once in a lifetime opportunity of seeing where an acting career could take him?
the acting career went as most do for realty show stars. he had a staring role on a show that got cancelled after a season (too many teen dramas had saturated the market), and it seemed that all anybody wanted him to do was take his shirt off. sure, he’d packed on some muscle since being a lanky high school band geek, but it just wasn’t him. while filming another teen movie in irving (yes, he played a mermaid and yes, he was very excited about the part), he fell in love with the town. he’d never considered himself a beach guy before, but irving had convinced him. after filming ended, he decided to go back to the original plan, finished his degree and teaching certification in north carolina, and got a job at the local high school. his agent is still hounding about coming back, but he’s made his choice and he’s content with it. if you’re missing seeing him on film, though, you can still catch him on #hotteachertiktok.
#irvingintro#let's gooooooooooooooooooooooo#i still haven't figured out who's on discord and who's not so if we haven't plotted yet pls ??? yell at me????????????
13 notes
·
View notes
Text
EXO when they hear you sing for the first time.
*I do not own the gif’s*
Xiumin

He’d be amazed by your voice but when you notice him you would stop and blush. ‘’Jagi, you don’t have to be embarrassed. You have an amazing voice.’’ He would pull you on the couch with your legs over his lap and you will continue singing but this time you would sing ‘Colors’ for him. ‘’You’re dripping like a saturated sunrise You’re spilling like an overflowing sink.’’
omg this one is a bit cheesy lol
Luhan

When he hears you sing ‘Boombayah’ he is surprised. Because you never sing in front of him. ‘’I don’t want a boy. I need a man.’’ He would pause the music and you would look up in surprise. ‘’I may have a bit of a baby face, but I am very manly and you know that.’’ You would walk to him and put your arms around his neck. ‘’Baby, I love your face so shush and yes I know you’re manly.’’ You would peck his lips. ‘’You have an amazing voice by the way.’’ This would make you bury your face in his chest.
Kris

He hears you sing while he’s learning his lines for his new movie. He finds you in the kitchen stirring in the pan while singing ‘Not On Drugs’.’’Baby, listen please. I’m not on drugs, I’m not on drugs, I’m just in love.’’ He would wrap his arms around you from behind and would place a kiss on your neck. ‘You have an amazing voice, baby. I hope you’re going to sing more often.’’
Suho

While you’re doing chores you sing along with ‘Here’. He would be amazed by your voice. ‘’Excuse me if I seem a little unimpressed with this. An anti-social pessimist but usually I don’t mess with this.’’ You probably wouldn’t notice him until you’re done with the song. So out of nowhere, he would say ‘’Wow, jagi, you have a beautiful voice.’’ You would jump in the air. ‘’Babe, you scared me!’’ he would laugh at you and give you a kiss on your temple.
Lay

When he sees you dance to ‘National Anthem’ you already took his interest. But when you even begin to sing - ‘’Tell me I’m your National Anthem. Ooh yeah baby bow down, makin’ me so wild now.’’ - this unicorn wouldn’t even know where to start with complementing you on your skills. ‘’Omg baobei! You have an amaaaaazing voice.’’ You would blush and he would attack you with hugs.
Baekhyun

He would come into your living room when he sees you and your friend with a guitar on the couch and what surprised him was that you were singing. You didn’t notice that he came home so he would just listen to your voice. ‘’Remember those walls I built. Well, baby, they’re tumbling down.’’ Your friend, of course, noticed that he came in but she knows how shy you can be when you sang in front of other people. So you didn’t notice until you were done singing that he was standing at the door opening. ‘’Omg, Baekhyun. How long have you been standing there?’’ you said a little embarrassed. ‘’Long enough so I could hear your beautiful voice.’’ You would hide your face behind your hands so he couldn’t see your red face.
Chen

He would watch you sing ‘Fire Meet Gasoline’ with so much passion written over your face he would giggle a little. ‘’Flame you came from me. Fire meet gasoline. Fire meet gasoline. I’m burning alive.’’ Don’t get me wrong he would find your voice amazing. Now that he knows that you can sing like that, he would want to play games like ‘Who could reach the highest notes’. ‘’We should definitely check out who can sing the highest note.’’ He would say out of nowhere. You would turn around quick. ‘’How long have you been standing there?’’ ‘’Since you began to use the broom as your mic.’’ He would say smiling.
Chanyeol

You were inspired by Chanyeol’s cover of ‘All of me’ so you sat behind Chanyeol’s keyboard and searched a video of the chords of the song so you could learn them and maybe show it to Chanyeol when he comes home. You were a quick learner so you learned the chords and began to sing. Little did you know Chanyeol came home a little earlier and saw you behind his keyboard. ‘’Give me all of you. Cards on the table, we’re both showing hearts’’ ‘’Wow, I didn’t know I had such a talented girlfriend.’’ he would say and you would turn around a little shocked because you didn’t know that he had been watching ‘’Thanks, babe’’ you would say smiling. Now that he knows that you could sing, he would want to sing more with you. Maybe even record a song with you.
D.O

He would come home from practicing with EXO and he would hear some distant singing coming from the bedroom. He slowly opened the door and you were folding your clothes with 'Dear No One’ coming through your Bluetooth box. ‘’I like my space, yeah. But I’d love to have a soul mate.’’ He would film you and send it in the group chat of EXO. ‘’Look how talented my baby is 😏’’
Tao
(just imagine for this reaction that he is still in EXO *sobs in a corner*)

He would hear you sing along to ‘Monster’ and when you sing along with the part of Nicki Minaj without any mistakes he actually would find it sexy that you could rap so good. ‘’You could be the king but watch the queen conquer’’ he would film you and send it to the group chat of EXO. ‘’Look how badass my girl is ;)’’
Chanyeol: Wow, we should totally get together to rap sometimes.
Tao: Okay, sure if it’s for rapping. Don’t get crazy ideas, boi. She’s my girl.
Kai

While you were making chicken for the two of you to eat that evening you started humming. But what once was humming was now singing your lungs out. ‘’WHO RUN THE WORLD? GIRLS!’’ he would stand at the door opening smiling. He would wrap his arms around you after you put the chicken in the oven and you would turn around in his arms. ‘’Welcome home, babe’’ you would say ‘’Hi, my talented jagi.’’ he would say and give you a quick peck on your lips. ‘’Oh my god… Did you just-‘’ ‘’Yeah, I did, and you should sing more.’’
Sehun

You thought you were home alone with your friends, so you pulled your clothes like boas and big sunglasses out of the closet. You were doing karaoke with your friends. Once the melody of ’Me too’ started playing, Sehun walked in but you didn’t notice him yet. ‘’Who’s that sexy thing I see over there? That’s me, standin’ in the mirror.’’ ‘’You sure are sexy with that boa and your big sunglasses.’’ He would say while he recorded you with his phone. ‘’Sehun! Don’t you dare to send-‘’ but you already heard the sound of a message being sent. ‘’You didn’t just send that to all the members.’’ ‘’I sure did’’ he would say smirking.
#exo reactions#exo scenarios#exo imagine#exo imagines#exo x reader#xiumin x reader#luhan x reader#suho x reader#tao x reader#kai x reader#chanyeol x reader#sehun x reader#chen x reader#baekhyun x reader#lay x reader#kris x reader#d.o x reader
906 notes
·
View notes
Text
How to Edit Beautiful Instagram Photos With Lightroom Presets (Free Video)
If you’re looking to create beautiful Instagram photos, editing with Lightroom is one of the best steps you can take to improve your Instagram feed.
Whether you’re a beginner or a pro, Lightroom is a great tool to use if you want to create that flawless, cohesive Instagram aesthetic.
And thanks to trendy Lightroom presets, it’s easy to create stunning Instagram photos from your computer or your phone, and you can dramatically speed up the time it takes to edit your Instagram feed!
Plus, you can edit with the Lightroom CC mobile app for free!
Watch our step-by-step video tutorial for editing with Lightroom by Instagram influencer and content artist Maddy Corbin:
Why You Should Be Editing With Lightroom for Your Instagram Photos
There’s no denying that the quality of photography we see on Instagram today is A+.
Today we’re seeing professional and amature photographers, influencers, brands, and businesses all pitching for space in the Instagram feed.
The best way to claim your place is by having strong Instagram imagery that stands out from the crowd, and post-production editing is where the magic happens!
With Adobe Lightroom, there are countless ways to manipulate your photos, whether you’re editing from scratch or using presets on the desktop or mobile app.

Once you start editing with Lightroom, even just by using Lightroom presets (which are like “filters”), you’ll start to see your image quality drastically improve, and you’ll start to develop a style that is unique to you and your Instagram feed!
And if you’re looking to find or create a unique style, or theme for your feed, using presets that you like will really help in creating that cohesive Instagram look.
What are Adobe Lightroom Presets?
Lightroom presets are one-click photo editing tools that can dramatically speed up your workflow and give your Instagram photos a professional look.
Lightroom “presets” are like photo filters, except you have more control over them and can adjust pretty much anything in your photo, down to changing the saturation or hue of certain colors in your image.
Many Lightroom presets are offered in “packs” or collections, so you can choose from a selection of filters for each of your photos while still maintaining a cohesive look on your Instagram feed.
There are lots of Lightroom presets to choose from, and you can check out my Maddy Corbin presets for both desktop or mobile here!
Step #1: Choose RAW or JPEG for Editing with Lightroom Presets
Before you purchase Lightroom presets, you’ll need to know if you will be shooting your photos in RAW or JPEG. It’s personal preference but it will have a different effect on your photos.
If you’re shooting with a DSLR camera, you may have a preference to shoot in RAW. A RAW file preserves most of the information from your camera, such as the contrast or sharpness of an image, and doesn’t compress that information in the file.
A JPEG is what your iPhone shoots in, but some photographers prefer to shoot in JPEG on their camera as well. It’s a much smaller file and doesn’t have the same level of detail or quality as a RAW file.
View this post on Instagram
hi 🙃📷 always a fun time @ripplebnb — I was more than thankful to be a part of Deborah’s journey in curating the Ripplebnb brand (over 1.5 years ago omg!) and she has taken these amazing Airbnb spaces to a whole new level! meeting with her again next week but until then, I’ll just sit + swoon at this kitchen! ⭐️😍 pants: @anotherloveclothing #inmyal #ripplebnb
So if you’re shooting in RAW (you’ll know if your file name ends with “.CR2”) you really want to find and use presets that have been specifically created for RAW images.
Similarly, if you’re shooting on an iPhone, or prefer to take photos in JPEG format with your DSLR, you want to look for a preset that’s been created for JPEG or mobile editing.
If you’re using the wrong type of present, on the wrong type of file — like a RAW preset on a JPEG image for example — you might find that the results aren’t exactly what you want. You’re going to have to work extra hard at manipulating the colors of the photos to get it right, which is just added editing time!
But if you get it right from the start, editing with presets often just takes a couple of clicks!
Step #2: Editing with Lightroom on Desktop vs Mobile App
Next, you need to know the difference between the desktop and mobile version of Lightroom.
The desktop version of Adobe Lightroom CC is a program that can be downloaded on your computer, and you’ll need to sign up for an Adobe Creative Cloud subscription (about $10/month).
If you are editing RAW images, you will only be able to do so on the desktop version.
If you prefer the flexibility of editing on-the-go, or you don’t want to invest in a subscription yet, Lightroom CC Mobile is a free app that you can download for iOS or Android.
As you’ll learn in the video above, editing with Lightroom presets can be done on either your desktop or mobile app! Just make sure that if you’re editing on the mobile app, you purchase presets that have been made specifically for JPEG or mobile edits.
Just starting out? You can download the FREE Maddy Corbin MC02 preset for mobile or desktop to follow along with the video and this blog post!
Step #3: Editing with Lightroom Presets on Your Desktop
In this blog post (and our video), we’ll be showing you everything you need to know about editing with Lightroom, from how to import and sync your presets to how to edit photos on both the desktop and mobile app. Just interested in mobile? Scroll down!
While editing with Lightroom’s mobile app is really easy to navigate and is perfect for beginners, understanding the basics of the Lightroom desktop app will help you fine-tune your editing process and create gorgeous images for your Instagram feed.
If you don’t already have Adobe Lightroom installed on your computer, you can download it here.

How to Download and Import Lightroom Presets
Let’s start by making sure you have your preset loaded into your Lightroom program. When you purchase a Lightroom preset, you should also get instructions on how to import them to Lightroom.
Most presets are sent to you or are downloaded as zip files. Whether you are purchasing presets for mobile or desktop use, you will need to start on your desktop and download them to your computer in order to access them on your phone.
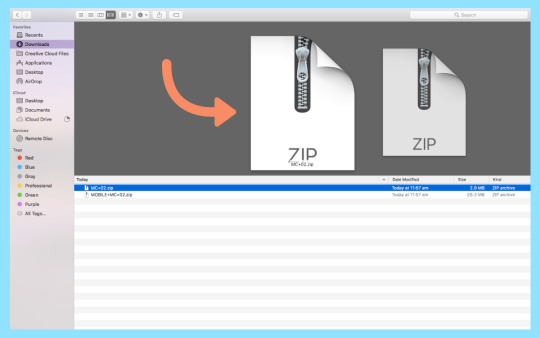
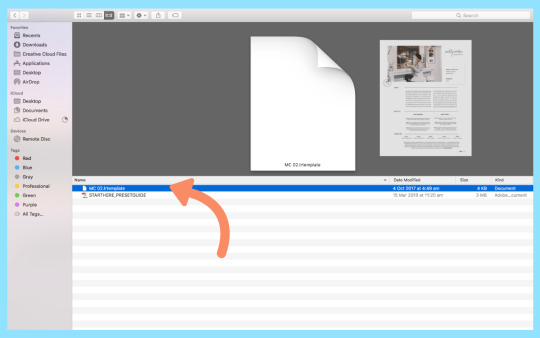
Once you’ve downloaded the file, you can unzip it and access the .lrtemplate file that comes with it. That .lrtemplate file is your preset! Either double-click and open it with Lightroom or import it to Lightroom itself.
Now that your preset is open, let’s start editing in Lightroom!
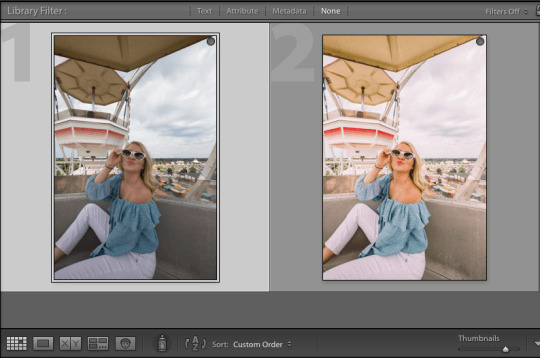
For the photos below, we’ll be using the Maddy Corbin MC06 preset, which is the preset I have used to specifically curate my Instagram @maddy.corbin and have found it is best on neutral backgrounds with fun pops of color.
Choosing Your Lightroom Preset
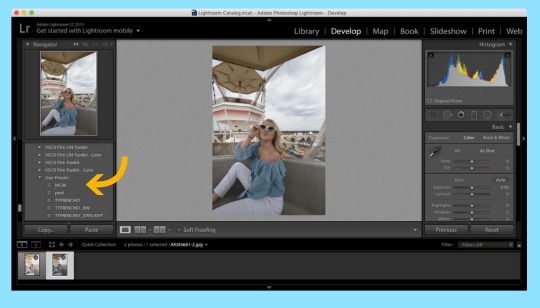
From your media library, open the image you want to edit. Make sure you’re viewing and editing your files with the Develop tab, this has all the tools, features, and editing bars you’ll need to work on your image.
Your presets can be found in the Presets toolbar on left-hand side, and all you have to do is click the preset you want to use to instantly apply the edits!
If you have more than one preset in your Lightroom program, you can hover over each preset to see a preview of what your image will look like once you apply a preset.
While editing with Lightroom presets will save you lots of time, most presets won’t be a simple “one-click and go” edits, because every photo is different.
The lighting, exposure, color of the background, or even the location of your images may be similar, when it comes to editing, they will all react differently to your preset.
Lightroom Presets work as a starting point for your editing, you’ll be able to apply similar changes to all your photos with one click, but you want to spend some time really fine-tuning and manipulating your individual images so they look the best they can be, which you can learn all about in the video above!
Editing with Lightroom
Once you have applied your Lightroom preset to your image, you can use the editing tools in the Develop to adjust all the elements in your photo.
Here are a few things you can play around with if you want to get the best results from your preset:
Under the Basic tab, you’ll find these controls:
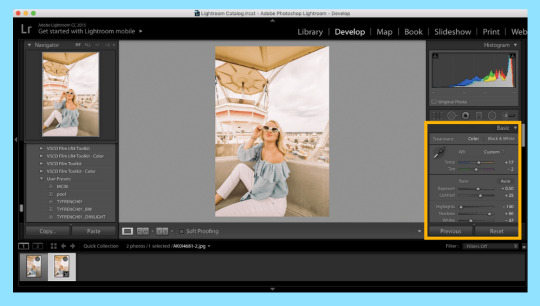
Temperature: This will change how cool or warm the colors appear in your photo. If your colors are too yellow, move the slider to the left. Or if there’s a blue hue in your photo, move the slider to the right.
Tint: This is specifically for the green or purple colors in your images. If your colors are too purple, move the slider to the left. If they’re too green, move it to the right.
Exposure: This controls the brightness of your photo. If you photo is too bright or over-exposed, move the slider to the left to make it darker. Or you can make your image brighter by sliding to the right.
Contrast: This will help you define the contrast between the light and dark colors in your image. If you want a stronger, more dramatic look to your image, move the slider right to up your contrast.
Highlights: This is used to control the light parts of your image, like a white background, or a clear sky or clouds. Slight to right to brighten or to the left to make them darker.
Shadows: Similar to Highlights, this slider controls the darker parts of your images. Slide right to make it brighter or left to darken.
Whites: This slider will set the white point of the image. If you want more colors to appear completely white, move the slider to the right.
Blacks: The complete opposite of the White toolbar, this sets the black point of the image. Move the slider to the left to make more colors appear completely black.
Vibrance: You can increase the saturation of lower-saturated (or muted colors) more than higher-saturated colors. This can help keep skin-tones looking natural and not overly processed.
Saturation: This slider will boost the saturation of all colors equally. Just move the slider to the left to de-saturate or dull the colors, or move it to the right to boost saturation and make the image really pop!
Under the HSL / Color / B&W tab, you’ll be able to adjust specific colors in your photo.

One of the best things about editing with Lightroom compared to other photo editing apps is the level of detail you can get with editing colors in a specific spectrum.
For example, in the photo above you’ll see how increasing the “blue” saturation can make the color of the shirt really pop, so if you have lots of blues in your Instagram feed you might want to do this to make the photo fit with the rest of your feed.
There’s so much you can do by editing photos in Lightroom, but those are the basics to get you started! Play around with the controls until you find a look and feel that you like and an image that you love.
Once you’re happy with your edited image, it’s time to export. Click on “File” and choose “Export,” from here you can also change the size, name, and file type that you want your photo saved as.
Step #4: Editing with Lightroom Presets on the Mobile App
If you’re taking photos on your phone or editing on the go, the Lightroom CC mobile app is a great option for you! It’s quick, easy to navigate, and completely free.
Start by downloading the Lightroom CC mobile app either from the App Store or Google Play.
Then, you’ll need to purchase a mobile Lightroom preset (or download my MC 02 mobile preset for free) and get it set up in your mobile app, which is a little bit complicated.
How to Download Lightroom Presets for Mobile
Just like desktop presets, mobile presets need to be downloaded on your desktop first! Once you’ve purchased and downloaded your mobile preset files, you’ll find a zip folder. Open this folder and you’ll find a .DNG file. This .DNG file, or image, is your mobile preset!
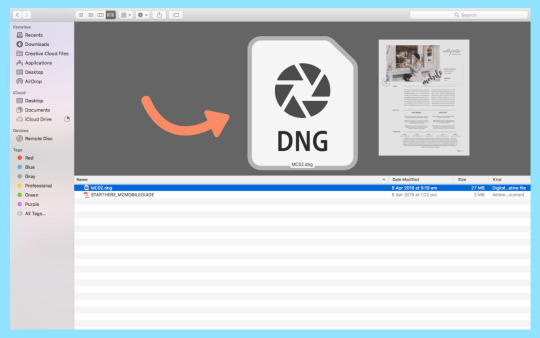
Next, you’ll need to send the .DNG file to your mobile phone using airdrop, Dropbox, Google Drive, or email.
Once the .DNG file is on your phone, it may open up as a photo in your files instead of (sometimes it doesn’t show an image at all). It might also look like a completely un-edited photo. But don’t worry, it does have edits to it and it will act as your preset once it’s installed in your Lightroom app!
Next, you’ll want to import this photo to your Lightroom CC mobile app.
Click the bottom right corner and tap the Add New Photo button to access your camera roll. Select the photo you want to edit, and then click “Add Photos.”

Don’t be worried if this image looks a little funny — it could look really dark or overexposed, or have strange looking edits. That’s totally normal!
It’s because it’s the preset by itself, and the edits applied to that image may not be what your final image will look like once you’ve added your tweaks. Remember your preset is your base template and you’ll most likely want to edit it once it’s applied.
To edit photos on the Lightroom mobile app for free, you’ll be copying the preset settings from this original photo and pasting them on to the photo that you want to edit. If you have an Adobe Lightroom subscription, you can sync the presets from your desktop version to your mobile app for one-click editing, see the steps on how to do that here.
Editing with Lightroom CC Mobile App
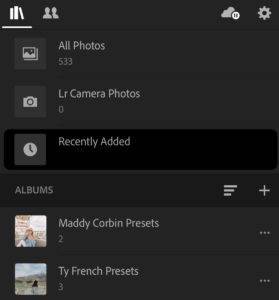
Now that you have your preset photo installed, it’s time to add the photos that you want to edit from your camera roll!
Once you have imported your photos, you’ll want to find the original preset photo, because you’re going to be copying these settings.
Editor’s tip: create a folder in your Lightroom app for each preset so you can easily find the preset photo to copy the settings!
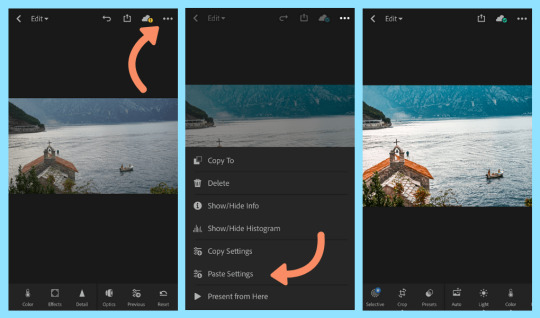
To copy the settings on your preset photo, click on the three dots in the top right-hand corner of the image and select Copy Image Settings. Make sure everything is selected in the box that opens on your screen and tap Ok.
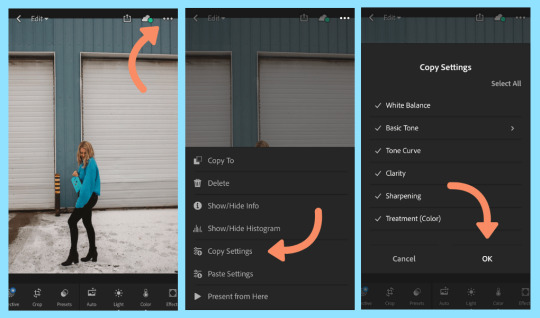
Now, you can go back to your All Photos folder and open the image you want to edit with your present. Tap on the three dots on the top right-hand corner and select Paste Image Settings. Now your preset has been applied to your image!

Like editing on your desktop, you might want to tweak some settings on your image. Use the scroll bar at the bottom of your screen to find all you editing tools like Exposure, Contrast, and Highlights.
The color button is where you can play around with the individual colors in your image, just like you did on the desktop app, but this time for free!
Just tap the Mix button and you can tap to select individual colors and change the Hue, Saturation, and Luminance of each of the colors.
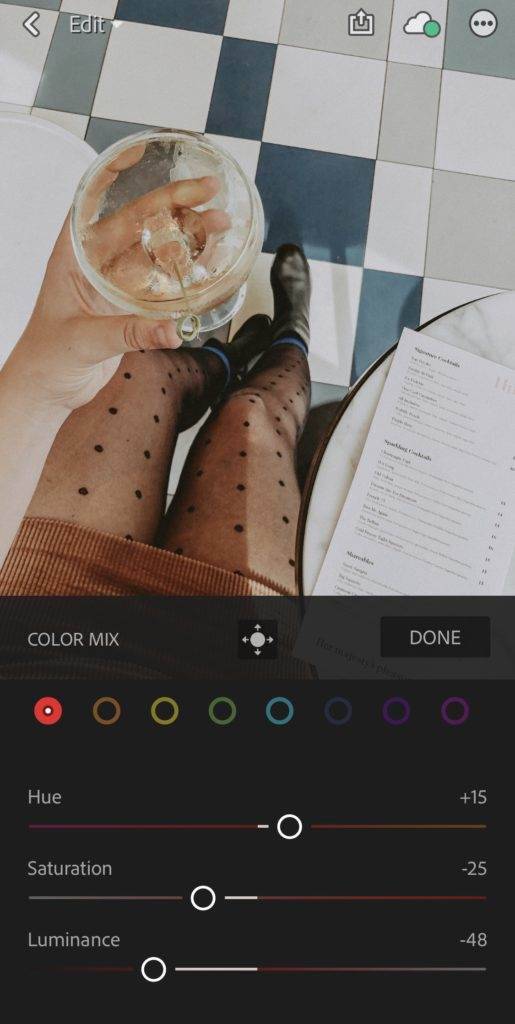
When you’re done, you can tap and hold the screen on your photo to see the before and after of your images!
Once you’ve added all your edits and you’re happy with your image, tap the Export button the top right corner of your screen and you can choose to save it to your camera roll or files.
Step #6: Planning Your Instagram Feed and Aesthetic
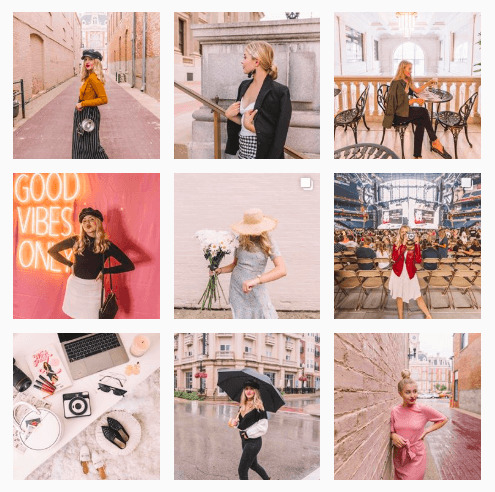
One of the biggest benefits of using Lightroom presets is that you’re able to maintain a cohesive Instagram aesthetic across all your images.
The #1 tip for a beautiful Instagram aesthetic? Use the same preset (or filter) on all of your images!
Having an Instagram feed that looks curated and edited will help you stand out from the crowd and convert your visitors to new Instagram followers.
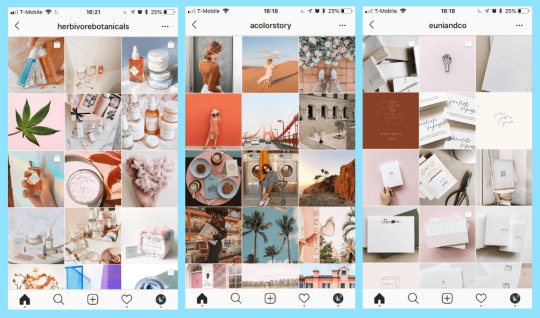
So when it comes to selecting your presets, try to be consistent with the preset you use for all your Instagram feed images. You can also find a collection from a preset creator that’s complementary to each other so that you can use different presets, but they still look great next to each other!
If you start swapping and changing presets with different tones or from different creators, you’re going to struggle to get that cohesive look.
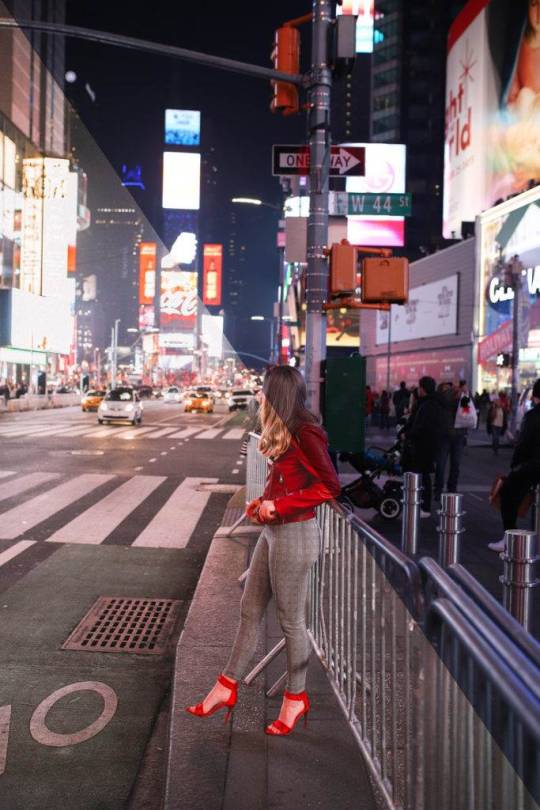
Even if you shoot in the darkest of alleys or against the brightest of white walls, if you’re using the same preset, it’s really going to help keep the underlying colors together.
One of the easiest ways to help curate your Instagram feed is by being able to preview what your images will look like side by side, and on top and below of one another. Free tools like Later’s Visual Planner are a great way to plan out your feed, and curate the layout simply by clicking and dragging your posts around to the order you like.
Plus, if you’re editing with Lightroom on your desktop, Later makes it super easy to upload and schedule Instagram posts right from your computer!
Congratulations: you have now taken photos, edited in Lightroom successfully, and scheduled your shots into a beautiful, cohesive Instagram feed. Well done!
Ready to plan and schedule a beautiful Instagram feed? Sign up for Later, the #1 Instagram marketing platform, for free!
https://growinsta.xyz/how-to-edit-beautiful-instagram-photos-with-lightroom-presets-free-video/
#free instagram followers#free followers#free instagram followers instantly#get free instagram followers#free instagram followers trial#1000 free instagram followers trial#free instagram likes trial#100 free instagram followers#famoid free likes#followers gratis#famoid free followers#instagram followers generator#100 free instagram followers trial#free ig followers#free ig likes#instagram auto liker free#20 free instagram followers trial#free instagram followers no#verification#20 free instagram likes trial#1000 free instagram likes trial#followers instagram gratis#50 free instagram followers instantly#free instagram followers app#followers generator#free instagram followers instantly trial#free instagram followers no survey#insta 4liker#free followers me#free instagram followers bot
0 notes
Text
How to Edit Beautiful Instagram Photos With Lightroom Presets (Free Video)
If you’re looking to create beautiful Instagram photos, editing with Lightroom is one of the best steps you can take to improve your Instagram feed.
Whether you’re a beginner or a pro, Lightroom is a great tool to use if you want to create that flawless, cohesive Instagram aesthetic.
And thanks to trendy Lightroom presets, it’s easy to create stunning Instagram photos from your computer or your phone, and you can dramatically speed up the time it takes to edit your Instagram feed!
Plus, you can edit with the Lightroom CC mobile app for free!
Watch our step-by-step video tutorial for editing with Lightroom by Instagram influencer and content artist Maddy Corbin:
Why You Should Be Editing With Lightroom for Your Instagram Photos
There’s no denying that the quality of photography we see on Instagram today is A+.
Today we’re seeing professional and amature photographers, influencers, brands, and businesses all pitching for space in the Instagram feed.
The best way to claim your place is by having strong Instagram imagery that stands out from the crowd, and post-production editing is where the magic happens!
With Adobe Lightroom, there are countless ways to manipulate your photos, whether you’re editing from scratch or using presets on the desktop or mobile app.

Once you start editing with Lightroom, even just by using Lightroom presets (which are like “filters”), you’ll start to see your image quality drastically improve, and you’ll start to develop a style that is unique to you and your Instagram feed!
And if you’re looking to find or create a unique style, or theme for your feed, using presets that you like will really help in creating that cohesive Instagram look.

What are Adobe Lightroom Presets?
Lightroom presets are one-click photo editing tools that can dramatically speed up your workflow and give your Instagram photos a professional look.
Lightroom “presets” are like photo filters, except you have more control over them and can adjust pretty much anything in your photo, down to changing the saturation or hue of certain colors in your image.

Many Lightroom presets are offered in “packs” or collections, so you can choose from a selection of filters for each of your photos while still maintaining a cohesive look on your Instagram feed.
There are lots of Lightroom presets to choose from, and you can check out my Maddy Corbin presets for both desktop or mobile here!
Step #1: Choose RAW or JPEG for Editing with Lightroom Presets
Before you purchase Lightroom presets, you’ll need to know if you will be shooting your photos in RAW or JPEG. It’s personal preference but it will have a different effect on your photos.
If you’re shooting with a DSLR camera, you may have a preference to shoot in RAW. A RAW file preserves most of the information from your camera, such as the contrast or sharpness of an image, and doesn’t compress that information in the file.
A JPEG is what your iPhone shoots in, but some photographers prefer to shoot in JPEG on their camera as well. It’s a much smaller file and doesn’t have the same level of detail or quality as a RAW file.
View this post on Instagram
hi 🙃📷 always a fun time @ripplebnb — I was more than thankful to be a part of Deborah’s journey in curating the Ripplebnb brand (over 1.5 years ago omg!) and she has taken these amazing Airbnb spaces to a whole new level! meeting with her again next week but until then, I’ll just sit + swoon at this kitchen! ⭐️😍 pants: @anotherloveclothing #inmyal #ripplebnb
A post shared by MADDY CORBIN (@maddy.corbin) on Sep 6, 2018 at 4:11pm PDT
So if you’re shooting in RAW (you’ll know if your file name ends with “.CR2”) you really want to find and use presets that have been specifically created for RAW images.
Similarly, if you’re shooting on an iPhone, or prefer to take photos in JPEG format with your DSLR, you want to look for a preset that’s been created for JPEG or mobile editing.
If you’re using the wrong type of present, on the wrong type of file — like a RAW preset on a JPEG image for example — you might find that the results aren’t exactly what you want. You’re going to have to work extra hard at manipulating the colors of the photos to get it right, which is just added editing time!
But if you get it right from the start, editing with presets often just takes a couple of clicks!
Step #2: Editing with Lightroom on Desktop vs Mobile App
Next, you need to know the difference between the desktop and mobile version of Lightroom.
The desktop version of Adobe Lightroom CC is a program that can be downloaded on your computer, and you’ll need to sign up for an Adobe Creative Cloud subscription (about $10/month).
If you are editing RAW images, you will only be able to do so on the desktop version.
If you prefer the flexibility of editing on-the-go, or you don’t want to invest in a subscription yet, Lightroom CC Mobile is a free app that you can download for iOS or Android.
As you’ll learn in the video above, editing with Lightroom presets can be done on either your desktop or mobile app! Just make sure that if you’re editing on the mobile app, you purchase presets that have been made specifically for JPEG or mobile edits.
Just starting out? You can download the FREE Maddy Corbin MC02 preset for mobile or desktop to follow along with the video and this blog post!
Step #3: Editing with Lightroom Presets on Your Desktop
In this blog post (and our video), we’ll be showing you everything you need to know about editing with Lightroom, from how to import and sync your presets to how to edit photos on both the desktop and mobile app. Just interested in mobile? Scroll down!
While editing with Lightroom’s mobile app is really easy to navigate and is perfect for beginners, understanding the basics of the Lightroom desktop app will help you fine-tune your editing process and create gorgeous images for your Instagram feed.
If you don’t already have Adobe Lightroom installed on your computer, you can download it here.
How to Download and Import Lightroom Presets
Let’s start by making sure you have your preset loaded into your Lightroom program. When you purchase a Lightroom preset, you should also get instructions on how to import them to Lightroom.
Most presets are sent to you or are downloaded as zip files. Whether you are purchasing presets for mobile or desktop use, you will need to start on your desktop and download them to your computer in order to access them on your phone.

Once you’ve downloaded the file, you can unzip it and access the .lrtemplate file that comes with it. That .lrtemplate file is your preset! Either double-click and open it with Lightroom or import it to Lightroom itself.

Now that your preset is open, let’s start editing in Lightroom!
For the photos below, we’ll be using the Maddy Corbin MC06 preset, which is the preset I have used to specifically curate my Instagram @maddy.corbin and have found it is best on neutral backgrounds with fun pops of color.
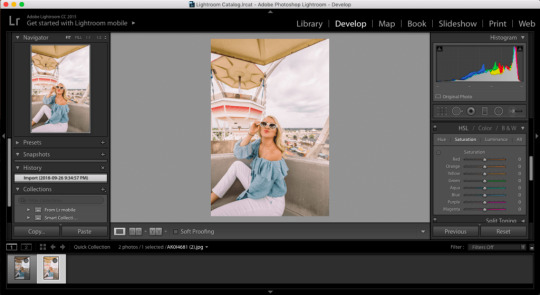
Choosing Your Lightroom Preset
From your media library, open the image you want to edit. Make sure you’re viewing and editing your files with the Develop tab, this has all the tools, features, and editing bars you’ll need to work on your image.
Your presets can be found in the Presets toolbar on left-hand side, and all you have to do is click the preset you want to use to instantly apply the edits!

If you have more than one preset in your Lightroom program, you can hover over each preset to see a preview of what your image will look like once you apply a preset.
While editing with Lightroom presets will save you lots of time, most presets won’t be a simple “one-click and go” edits, because every photo is different.
The lighting, exposure, color of the background, or even the location of your images may be similar, when it comes to editing, they will all react differently to your preset.
Lightroom Presets work as a starting point for your editing, you’ll be able to apply similar changes to all your photos with one click, but you want to spend some time really fine-tuning and manipulating your individual images so they look the best they can be, which you can learn all about in the video above!
Editing with Lightroom
Once you have applied your Lightroom preset to your image, you can use the editing tools in the Develop to adjust all the elements in your photo.
Here are a few things you can play around with if you want to get the best results from your preset:
Under the Basic tab, you’ll find these controls:

Temperature: This will change how cool or warm the colors appear in your photo. If your colors are too yellow, move the slider to the left. Or if there’s a blue hue in your photo, move the slider to the right.
Tint: This is specifically for the green or purple colors in your images. If your colors are too purple, move the slider to the left. If they’re too green, move it to the right.
Exposure: This controls the brightness of your photo. If you photo is too bright or over-exposed, move the slider to the left to make it darker. Or you can make your image brighter by sliding to the right.
Contrast: This will help you define the contrast between the light and dark colors in your image. If you want a stronger, more dramatic look to your image, move the slider right to up your contrast.
Highlights: This is used to control the light parts of your image, like a white background, or a clear sky or clouds. Slight to right to brighten or to the left to make them darker.
Shadows: Similar to Highlights, this slider controls the darker parts of your images. Slide right to make it brighter or left to darken.
Whites: This slider will set the white point of the image. If you want more colors to appear completely white, move the slider to the right.
Blacks: The complete opposite of the White toolbar, this sets the black point of the image. Move the slider to the left to make more colors appear completely black.
Vibrance: You can increase the saturation of lower-saturated (or muted colors) more than higher-saturated colors. This can help keep skin-tones looking natural and not overly processed.
Saturation: This slider will boost the saturation of all colors equally. Just move the slider to the left to de-saturate or dull the colors, or move it to the right to boost saturation and make the image really pop!
Under the HSL / Color / B&W tab, you’ll be able to adjust specific colors in your photo.
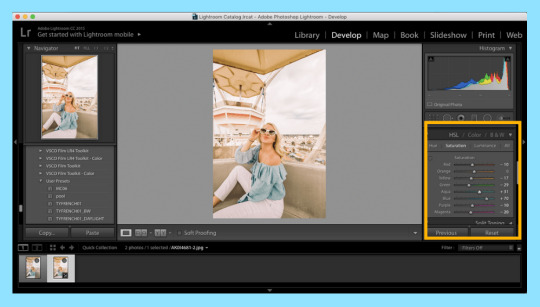
One of the best things about editing with Lightroom compared to other photo editing apps is the level of detail you can get with editing colors in a specific spectrum.
For example, in the photo above you’ll see how increasing the “blue” saturation can make the color of the shirt really pop, so if you have lots of blues in your Instagram feed you might want to do this to make the photo fit with the rest of your feed.
There’s so much you can do by editing photos in Lightroom, but those are the basics to get you started! Play around with the controls until you find a look and feel that you like and an image that you love.

Once you’re happy with your edited image, it’s time to export. Click on “File” and choose “Export,” from here you can also change the size, name, and file type that you want your photo saved as.
Step #4: Editing with Lightroom Presets on the Mobile App
If you’re taking photos on your phone or editing on the go, the Lightroom CC mobile app is a great option for you! It’s quick, easy to navigate, and completely free.
Start by downloading the Lightroom CC mobile app either from the App Store or Google Play.
Then, you’ll need to purchase a mobile Lightroom preset (or download my MC 02 mobile preset for free) and get it set up in your mobile app, which is a little bit complicated.
How to Download Lightroom Presets for Mobile
Just like desktop presets, mobile presets need to be downloaded on your desktop first! Once you’ve purchased and downloaded your mobile preset files, you’ll find a zip folder. Open this folder and you’ll find a .DNG file. This .DNG file, or image, is your mobile preset!

Next, you’ll need to send the .DNG file to your mobile phone using airdrop, Dropbox, Google Drive, or email.
Once the .DNG file is on your phone, it may open up as a photo in your files instead of (sometimes it doesn’t show an image at all). It might also look like a completely un-edited photo. But don’t worry, it does have edits to it and it will act as your preset once it’s installed in your Lightroom app!
Next, you’ll want to import this photo to your Lightroom CC mobile app.
Click the bottom right corner and tap the Add New Photo button to access your camera roll. Select the photo you want to edit, and then click “Add Photos.”
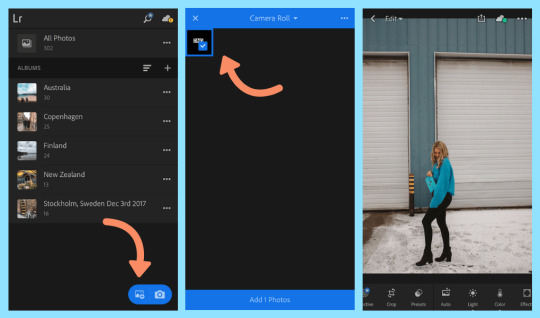
Don’t be worried if this image looks a little funny — it could look really dark or overexposed, or have strange looking edits. That’s totally normal!
It’s because it’s the preset by itself, and the edits applied to that image may not be what your final image will look like once you’ve added your tweaks. Remember your preset is your base template and you’ll most likely want to edit it once it’s applied.
To edit photos on the Lightroom mobile app for free, you’ll be copying the preset settings from this original photo and pasting them on to the photo that you want to edit. If you have an Adobe Lightroom subscription, you can sync the presets from your desktop version to your mobile app for one-click editing, see the steps on how to do that here.
Editing with Lightroom CC Mobile App
Now that you have your preset photo installed, it’s time to add the photos that you want to edit from your camera roll!
Once you have imported your photos, you’ll want to find the original preset photo, because you’re going to be copying these settings.
Editor’s tip: create a folder in your Lightroom app for each preset so you can easily find the preset photo to copy the settings!

To copy the settings on your preset photo, click on the three dots in the top right-hand corner of the image and select Copy Image Settings. Make sure everything is selected in the box that opens on your screen and tap Ok.

Now, you can go back to your All Photos folder and open the image you want to edit with your present. Tap on the three dots on the top right-hand corner and select Paste Image Settings. Now your preset has been applied to your image!
Like editing on your desktop, you might want to tweak some settings on your image. Use the scroll bar at the bottom of your screen to find all you editing tools like Exposure, Contrast, and Highlights.
The color button is where you can play around with the individual colors in your image, just like you did on the desktop app, but this time for free!
Just tap the Mix button and you can tap to select individual colors and change the Hue, Saturation, and Luminance of each of the colors.

When you’re done, you can tap and hold the screen on your photo to see the before and after of your images!
Once you’ve added all your edits and you’re happy with your image, tap the Export button the top right corner of your screen and you can choose to save it to your camera roll or files.
Step #6: Planning Your Instagram Feed and Aesthetic
One of the biggest benefits of using Lightroom presets is that you’re able to maintain a cohesive Instagram aesthetic across all your images.
The #1 tip for a beautiful Instagram aesthetic? Use the same preset (or filter) on all of your images!
Having an Instagram feed that looks curated and edited will help you stand out from the crowd and convert your visitors to new Instagram followers.

So when it comes to selecting your presets, try to be consistent with the preset you use for all your Instagram feed images. You can also find a collection from a preset creator that’s complementary to each other so that you can use different presets, but they still look great next to each other!
If you start swapping and changing presets with different tones or from different creators, you’re going to struggle to get that cohesive look.
Even if you shoot in the darkest of alleys or against the brightest of white walls, if you’re using the same preset, it’s really going to help keep the underlying colors together.
One of the easiest ways to help curate your Instagram feed is by being able to preview what your images will look like side by side, and on top and below of one another. Free tools like Later’s Visual Planner are a great way to plan out your feed, and curate the layout simply by clicking and dragging your posts around to the order you like.

Plus, if you’re editing with Lightroom on your desktop, Later makes it super easy to upload and schedule Instagram posts right from your computer!
Congratulations: you have now taken photos, edited in Lightroom successfully, and scheduled your shots into a beautiful, cohesive Instagram feed. Well done!
Ready to plan and schedule a beautiful Instagram feed? Sign up for Later, the #1 Instagram marketing platform, for free!
https://growinsta.xyz/how-to-edit-beautiful-instagram-photos-with-lightroom-presets-free-video/
#free instagram followers#free followers#free instagram followers instantly#get free instagram followers#free instagram followers trial#1000 free instagram followers trial#free instagram likes trial#100 free instagram followers#famoid free likes#followers gratis#famoid free followers#instagram followers generator#100 free instagram followers trial#free ig followers#free ig likes#instagram auto liker free#20 free instagram followers trial#free instagram followers no#verification#20 free instagram likes trial#1000 free instagram likes trial#followers instagram gratis#50 free instagram followers instantly#free instagram followers app#followers generator#free instagram followers instantly trial#free instagram followers no survey#insta 4liker#free followers me#free instagram followers bot
0 notes
Last Seen Blogs

lisaione
From the Train

ronnydandelion
Ronny Dandelion

gb49
Untitled

customketodite
🚴♂️CustomketoDiet 🥗

bapi001
Untitled