#love that I learned to recolor clothes with Canva
Note
allow me to rant about the only thing that has been in my brain for the past two months and that is doll customizing babeyyyyy
i know there’s a 90% chance that you wont give a Shit about any of this but here we go anyways
SO first you gotta choose a doll. preferably one with a high range of motion to avoid creating new joints or having annoying limitations like not having elbow joints for some fucking reason. what the fuck mattel. give monster high dolls back their ball jointed shoulders and elbow joints. smh
the most common dolls ive seen used as bases are monster high and ever after high. most customs ive seen are highly stylized so the stylized face molds work well for those types of dolls but dolls like barbies are good for when you want a more realistic face-ups.
once you’ve got your base picked out you gotta wipe that bitch’s face off with like. acetone or nail polish remover or something strong like that. you can also use acetone to shrink doll heads which is cool as hell imo. n e way once the face is wiped you gotta chop off the hair and remove the hair plugs from the inside. ive seen this done several ways but the easiest and most common way ive seen is to dunk the head into boiling water for ~30 seconds until it gets squishy and malleable. once you’ve got the head back, you can use pliers (i think tweezers would work in a pinch) to pull out the hair plugs which are kinda icky because theyre covered in glue and other gross shit. ew
now you must decapitate the doll. dunk em back in the boiling water to soften them back up then just tug the head off. the neck pegs look funky and are usually a different color than the body so thats cool ig
once the head’s off, you can start the face-up which is basically just giving the doll a new face using stuff like watercolor pencils, acrylic paint, gouache, and a whole lot of other stuff. hell ive seen people use person makeup on these dolls.
next,,,,, hair. there’s about twenty million ways to do hair from gluing yarn wefts to sewing to rerooting with purchased nylon doll hair or yarn wefts but i’m gonna talk about the most common one ive seen which is rerooting and gluing.
before you can reroot, you need doll hair. which, as i mentioned, can be bought at stores like the doll planet or made at home with yarn in literally any color. have fun with it! make rainbow hair or something idk
to make homemade wefts, you take some acrylic yarn, cut it twice as long as you want the hair to be (keep in mind you can cut and style the hair once it’s been rerooted), fold them in half, and tie it to something sturdy like a wire coat hanger for the next step.
once you’ve got your yarn tied to your hanger, use a pet brush and brush the yarn until it’s wispy and looks like hair. then take a straightening iron and iron the weft flat. then remove from the hanger and boom. hair wefts. ta-da
to reroot the wefts onto the head, use a rerooting tool (which can be as simple as a needle with the eye cut at angle) (just google it please i’m shit at descriptions)) to poke small sections of the hair into the head. you can use the pre-existing rooting holes for your own reroot as they’re usually pretty reliable. to reroot, take a small length of you doll hair (about 10-15 strands), loop it in half, and put the middle of the loop into the reroot tool. poke the end of the tool with the hair on it into the pre-existing hole and remove the tool. the hair *should* stay in and fill up that plug!! also remember to plug thickly at the hairline and part of the hair where it's most noticeable. it doesnt matter as much in the center of the head as that’s not usually visible on the doll. once you’ve rerooted, squeeze in strong glue through the neck hole and squish around the head to make sure it covers all the plugs and secures them in place. then pour hot water onto the head to make the hair lay flat for styling later.
also, you can reroot yarn directly into the head to make thicker, more textured hairstyles. and since the yarn is thicker, you dont need to glue the inside of the head for the hair to stay in place!!
if youre not doing body modifications (which are also cool as hell) then it’s time for clothes but clothes are boring and i like body mods more so i’m gonna rant about them instead
the material ive seen most doll artists use is apoxie sculpt, which is like play doh on steroids. it comes in two parts which you gotta mix together for some reason. why dont they sell it pre-mixed. what was the reason. also once it’s dry it’s super super strong and you can sand it, drill into it, paint it, and all kinds of stuff. very nice and i want some for myself.
you can use hand saws and drills and shit to whack off doll limbs to make stuff like digitigrade legs or new joints. also dont be afraid to use other mismatching doll parts when customizing like heads and bodies and forearms and hands and shit. it literally does not matter if youre gonna recolor the doll anyways so have fun with it. make frankenstein’s doll if youre feeling spicy
accessories my beloved. stuff like tiny beads and clay baubles and shit will literally transform the entire doll plus they’re adorable and multi-purpose
i suppose i must talk about clothes now. ah well. you can find great clothing patterns if youre new to customizing on other customizer’s etsy shops and probably google although those will probably be lower quality than paid pattern pieces. and keep in mind that if it exists as clothing irl, you can likely make it doll-sized. there are literally no limits to your clothing options as long as you can execute your idea.
the once all your components have been made, you can assemble the doll again!! and finally see what all the parts look like together!! very cool 10/10 stars.
ight that wraps up my doll rant. i could really go into more detail on certain parts but thats a whole other rant for a whole other day smh. sorry for fucking flooding your inbox ender ahaha……………. you asked for this
little did you know that dolls have been one of my favorite things since like ever. if i can read a 25 chapter long fanfic i can read this B)
mattel definitely fucked up by completely ruining MH doll designs and just stopping EAH, alot of their profits most likely came from people who collect and customize dolls and by changing MH doll designs/Stopping EAH dolls they 1. most likely lost a small (or big if we're not jus talking people who customize dolls) part of their profit and 2. made it harder for doll customizers to make dolls/get commissions out rather quickly because they probably have to waste more time making joints or learning how to make joints.
EAH/MH dolls (specifically MH dolls) had AMAZING MODELS because there was so much variety with height, face shapes, etc (my favorite molds had to be the short/tall dolls and the cat molds because of the tails) and doll customizers really went all out with enhancing a molds unique features. The only "downside" abt MH dolls is that they (or atleast most)(from what i remember)) had slimmer faces but wider eyes while EAH dolls have wider faces with slimmer smaller which left a canvas for the face and not the eyes (and vice versa for MH dolls)
I've never seen any videos where a barbie is customized (maybe because i absolutely despised barbies at the time) so I'll definitely have to check those out but they seem to be good for realistic makeovers. I've seen like like semi realistic makeovers for EAH/MH dolls that were pretty good too tho (pretty sure mostly EAH dolls since yk MH dolls were used for creature makeovers while most EAH dolls weren't)
yeah i was always amazed by the head shrinking with acetone. honestly i still am?? idunno i have no idea how that chemical bullshit works. Ive seen a few of uh makeovers that just pain over the face (in multiple layers ofcourse) but that's usually when they're painting the entire body a different colour (again usually when they're turning a doll into a funky little baby man). I've also seen a few that just chop the hair off and take out the hair plugs yk without uuh like softening the head or just go straight for the hair plugs after taking off the head (i used to do that it was funny to me??). i always really liked when they used watercolour pencils or just colour pencils in general to draw/sketch on the face cause like wow ur drawing on ur doll without ruining it?? kinda epic maybe even poggers and pogchamp?? oh god my brain is failing wjshsmsj.
Watching them putting the hair back on the doll was, other than the face stuff, was the BEST part for me. Favorite type of hair was iuuuuuh was either thick yarn or brushed out yarn. Literally worship the people that would reroot the hair, theyre the most patience people on this earth!! it's literally insane but i guess that's what happens when you've been doing that for years? you guess kinda get used to it. when they put glue into the head does it just become stiff?? like it's just a clump of dried glue or does it like..hollow out again??
dude you literally cannot convince me most of the supplies used for doll makeovers. APOXIE CLAY LOOKS SO FECKING GOOD. its edible and i will die on that hill. The body mods are literally so amazing!!!!! it's so impressive how theyre able to imagine certain features THEN LIKE ACTUALLY MAKE IT LOOK ACCURATE TO WHAT THEY WANTED TO LOOK LIKE AFTER LIKE ON TRY (or many yk trial and error is very necessary for..everything). Absolutely loved when doll customizers would saw off a dolls legs and use different ones or just completely get rid of the torso to use a different one. it's like uuh that one big guy that's mismatched and sewn together. very cool. The accessories are so fun!! just small little details you seen really need but can add because it's your feckin doll!! I used to be absolutely obsessed over the doll clothes i would find on etsy, so much so that i started sewing shitty shirts and dresses for my uh "customized" dolls (they were absolute HORRORS idk WHY my mom let me feck up my dolls like that).
Thank you for this!! i haven't been able to talk about any of my interests for a while and this just really made me happy!!
Question fer u my fellow MH/EAH enthusiast: what was your favorite MH/EAH movie/episode and doll series. Mine was The fusion dolls (MH obvi) and that MH movie "Haunted" cause we got to know more about Spectra :D
#YOOOO LONG POST?!#long post#:) hehehe#this was very fun to read cant wait for ur next fanfic length ask#asks :D#theoreticallyjasper
2 notes
·
View notes
Text
Coloring in grey scale
So, hey, this is somewhat of a tutorial for those curious about some of my coloring and blending. I made this especially for anyone younger than me and is exploring digital art, but this is also for others who are curious about what I do. I love reading other artist’s comments and looking at their WIPs, so why not.
Another reminder: if you’re looking for my artwork, please follow @rainbow-illness and not this blog. All of my finished stuff goes there; usually, my works in progress (WIPs) or Angry Doodle Corner go here. Sometimes I use this blog to repost my art, but that is my official art blog, no this one. Not unless you like nonsensical posting and metal, then have at it. If you have any questions, don’t be afraid to hit me up, I love talking about art.
So I can’t always sit down and talk about my processes and how I go about doing them, but I was able to sit down and take some screencaps while I was working on my iPad Pro. Using the iPad is actually my first choice to draw on because of the convenience of carrying it around like a sketchbook, whereas my laptop isn’t always easy to carry around--it’s a big laptop. While I use my iPad, I also like to go back and correct things, recolor, re-proportion, or spend more time privately working on a drawing. I have my iPad with me, all the time, so I’m out in places usually like Starbucks doing this. I also struggle with pretty bad PTSD and agoraphobia, so having my iPad out with my headphones on gives me an excuse to put my mind elsewhere to calm down. My family just usually looks at me and goes “oh, she’s working on her art again”; I did this as a kid, too, only with sketchbooks.
I do not have a Cintiq either, though I would absolutely love one. This laptop is capable of using a stylus, but I think I need a better one to do it with. All I’m using is a cheap Wacom Bamboo tablet that I’ve had for five years, that’s it. Everything I’ve done on this blog has been on a small surface. So if you’re just dabbling into art, don’t beat yourself up for having the small stuff, I’ve worked with small stuff and still do. The only thing I have that’s not small is, well, the space and processor on my laptop are much faster than any other laptop I’ve owned, bought especially for graphic design classes and my artwork.
So, that being said lemme just forewarn some of you guys. My artwork is all done in two to three layers! Yes, you read that right! Why? When I was 16, I didn’t have a Wacom tablet to mess with, so I had to use a mouse and learned from there. When I turned 18, I got my first Wacom tablet while working my first official job and the family computer didn’t have a good processor. So when I got my first official laptop, it was basic and not made to run anything beyond the web browser and such, it could barely handle Photoshop. It did, however, run Paint Tool SAI with no issue (which is why I still prefer it over anything I use), it just couldn’t handle more than five layers. After losing my drawings constantly and not being able to do anything in the prized software I’ve been eyeing since my Sophmore year of high school, I found a workaround with it.
And that’s what I’m going to write about here. With that in mind, no, you do not have to limit your layers! I’ve taken traditional art classes so my first instinct is to literally paint over my stuff like I would on a canvas. If you don’t want to do that, you don’t have to! Yes, I am nuts.
That being said, let's do this.
If you haven’t taken traditional art classes, that’s cool! I’m going to be using some art terms you haven’t heard of, but you definitely will when you take your first ever drawing class. These terms are foreground, value, negative space, contour, and weighted line (I’ve seen it called line weight too). For the more experienced art students who are likely groaning over that stupid contour practice from that book “Drawing on the Right Side of the Brain”, I’m sorry, guys. Newbies, you are going to know this.
And you are going to hate it. While I still hate it and, yeah, my eyes are rolling into my skull right now just even talking about it, there are some useful practices in here that I... actually use. Who would have thought? At least we’re not talking about still lives.
Anyway, here’s what I’M going to say that some art teachers will not tell you but I want anyone to read this to know:
- Do not obsess over your drawing to look exactly like your reference. Just don’t. Forget this completely, worry about it later or don’t even worry about it at all. This is your style, your interpretation.
- Digital art is hard. Art is hard! Practice makes perfect and you learn over time just by studying (looking at) other pieces of art. It took me like well over 10 years to find my own little niche and I’m still playing around with coloring styles. I have a lot.
- If you’re just starting to draw with a tablet of any kind, play around with it. My first official program was a cheaper version of Paint Shop Pro and when I first got it when I was 14, I sat around and experimented on layers to see what it would look like. Explore!
- When you start drawing figures or faces, try not to think of it as, well, face or a figure. Reduce it to basic shapes, like squares, triangles, and circles.
Greyscale can establish light source, value, scale, and negative space.
I don’t always use greyscale for my art, but when I do, I appreciate it because it makes my life easier. For example, Alphonse Mucha’s pieces here from his “Slav Epic”.
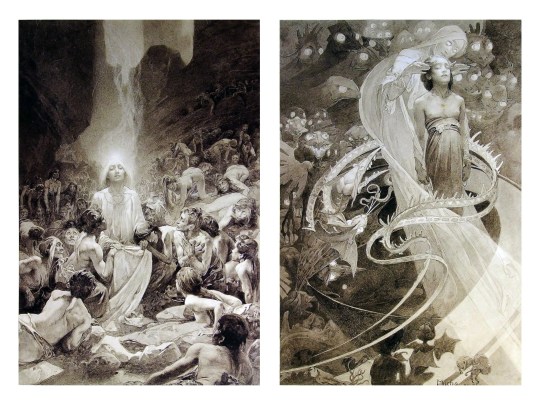
Chances are, you’ve seen Mucha’s art nouveau on prints, fanart, fabrics, and all of that. But Mucha did so much more and he is a huge influence on me for a reason. By the greyscale we see here, we can see foreground/subject with each illustration. Mucha is using value (that’s shadow) to emphasize this, in addition to negative space (background) to draw you in, just by using black and white. Notice how the other subjects don’t have such a powerful contrast and light source versus the other, especially the woman on the left. Mucha made his art pop by his understanding of contrast.
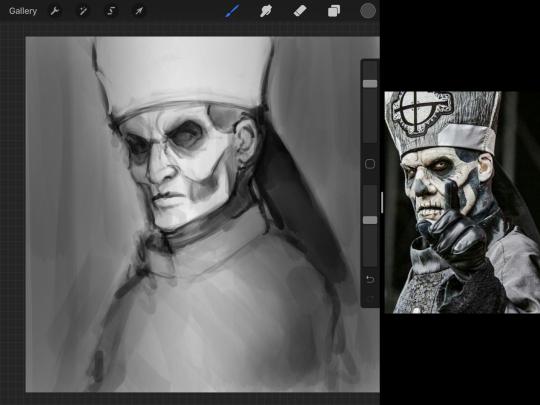
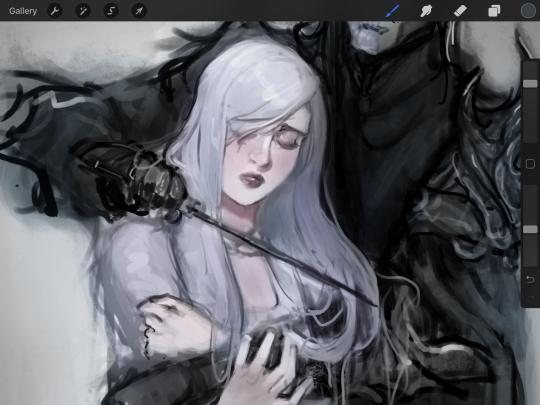
For this first part of this entry, I’m going to be using Papa Emeritus II from “Ghost”... who is a good example of how to draw faces, too. Huh. Regardless of what drawing program you’re using, keep your opacity low, at 50%.
Simplicity at its finest
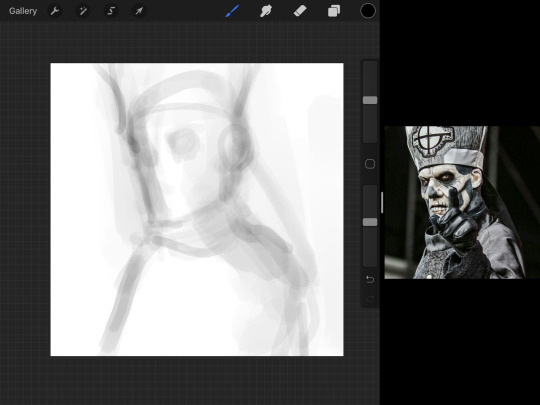
Instead of focusing a lot on Emeritus’ face, I’m going to focus on the negative space behind him. I’m using this to define his figure. This is a good picture because of the stark contrast, though, it’s a little tricky because it is really contrasted and you can’t see where the light source really is. But that is okay! I am going in and just using this negative space, the contour of his head and torso. Before I even think of a face, I want to softly go in and use black (or grey) to fill up that negative space. Keep it simple and work your way up.
After I lightly fill in the negative space around him, I can start lightly going in and establish his face by blocks of shadow. And this is why Emeritus II is such a good example for this kind of work. I don’t usually start going in and drawing eyes, I rely on the shadows of the face to see where their eyes, ears, lips, and such lie.
Here’s another example (though, it’s old):
This is in my maroon style underpaint, which is what I post most of the time. For their faces, I just used basically eye sockets to start working on their faces, like Papa Emeritus II down below. Again, this dude is a great example.
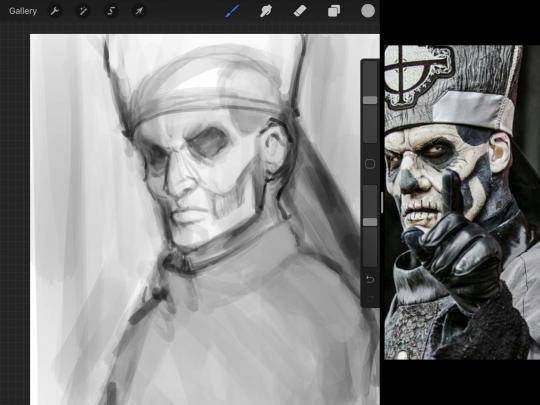
Here is where it may get a little funky. I created a new layer and set that layer to Multiply, still keeping that opacity low. Since I have no light source and I just want to create a really dramatic lighting, I made a vignette with a simple airbrush tool.
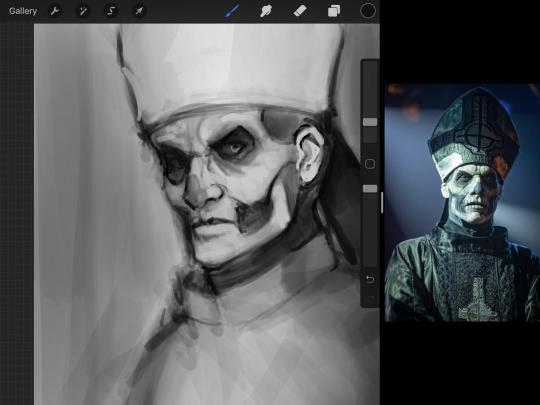
With that little vignette, you can create a new layer (unless you’re me, I just merge it down because of that constant fear of nonexistent software crashing) and I’m using the color pick tool to go back and forth to start using greys to really get into Emeritus’ face, especially his wrinkles. I’m painting over it constantly, switching back and forth between a paintbrush tool and color pick tool to blend. Again, keep your opacity low... unless you’re me and you’re feeling adventurous. You’ll also notice here that I have more than one photo reference. I use several for a lot of my art, so I encourage you to do the same. I had no idea what his jaw looked like, so I grabbed a second photo. Now that I have a better idea of where his hat ends on his forehead and how his nose looks, I start doing a weighted line.
Weighted line and Contour
Now is the dreaded talk. Of contour.

Welcome to Drawing I hell. This cursed image is from the book “How to Draw on the Right Side of the Brain” and if your teacher does not talk about this in your first drawing class, I am going to eat my hat... I have a hat lying around here somewhere. ANYWAY, the contour line exercise is basically you just using a neverending line for a drawing. I don’t know who drew this (and tbh, thanks a lot for every single boring assignment I’ve done in drawing classes), but this guy used contour lines for his drawing. I’m having war flashbacks over here, but I managed to find an art teacher’s page talking about different types of contour. My god, they are evolving.
Going back to our dear friend Papa Emeritus II, I used weighted line to start adding in little shadows to his face. Weighted line goes hand in hand with contour; it is a great technique to not only add details, but add little bits of shadows.

This is a simple example; the thicker line is adding to the shadow of the apple, giving it value!
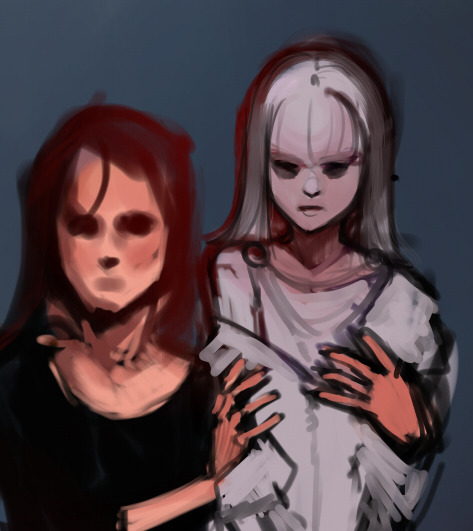
Papa Emeritus II is such a good reference... I used him as inspiration for King Melwas here.
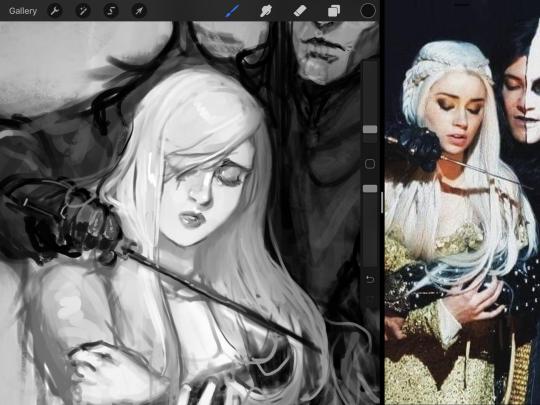
Gwenhwyfar is also a good example of weighted line. Gwen is essentially a very, very pale character. In contrast to Melwas, who is in darker clothing, Gwen is soft, she is the focal point in this drawing. For the little pieces of her hair, the corner of her lips, eyelashes, and her fingertips, I used a weighted line to establish these things, otherwise, Gwen is so pale, she’ll easily be washed out completely.

This drawing of Alice, which I’m still messing around with, is another example of how effective a weighted line can be with depth. The lines I added into her face, eyelashes, creases, hair, and fingers add those little details since everything I’ve done before like Papa Emeritus II was so soft with a low opacity on the brush settings.
Layer masks and curves
There are two ways you can color greyscale images.
You can do this by going into Layer > Adjustment Layer > Curves (this is how it looks like in Procreate).
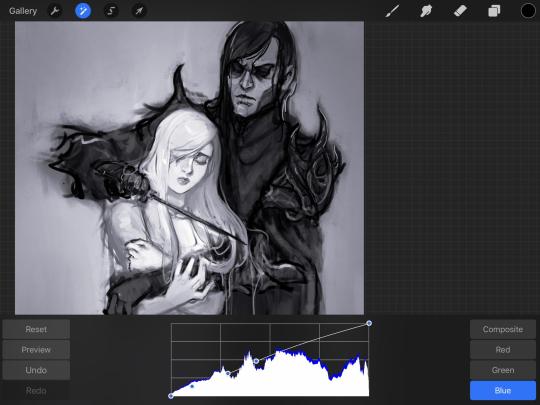
This gives you a neat ol’ base color! I am playing around in the blues, adding soft hues of blue in their figures and the white in this picture can either turn blue, cream, or even green. You don’t have to use Blue, you can use any of the other colors. For me, I’m always drawn to blues. Another cool thing to play around with is Color Balance, which is underneath the same function as Curves.
But if you don’t have any of these, you can add a new layer, and do Multiply.

The only drawback to this, of course, is how destaturated (the lack of color) it looks. And yes, that’s an issue you will have and I did run into this while doing this. How I combat this is using additional layer masks. Believe it or not, Alice here was once at a grey scale, looking even more desaturated than Gwen.
For Alice’s face, I went in and use:
- Soft Light because she needed more peach and roses in her skin. Omri’s original drawing gave her a light rose blush so I wanted to do the same.
- Overlay to mask out the black lines from the greyscale I had.
- Lighten which I used to make her lips pinker, her apron’s shadows lighter, and parts of her hair brown.
The same went for Gwen, who is, again, very pale. But while she’s supposed to be pale, I didn’t wash her out completely. To add more saturation, I used a combination of Soft Light over my Multiply layer and Overlay to start working at the highlights on her hair, nose, and shoulder.
This little walkthrough isn’t as visual as I like, but with limited software like Fire Alpaca, GIMP, or Paint Tool SAI that don’t have the abilities of Photoshop in terms of color correction and playing around with colors, I really encourage you, readers, to play around with these tools. Using the color picker back and forth, especially after using layer masks, gives you an ability to mix and blend colors. The reason why I work with greyscale or a maroon under paint is that you can create brilliant colors and make a new palette; the trick is to constantly mess around with them. I never go in and flat out color anything, with the exception of things like “angry doodle corner” which is basically what I call my lazy drawings, drawings where I’m just honestly goofing off with.
So in summation...! Or me trying to summarize this.
Experiment and explore with layer masks and adjustments. Whoever says that using these tools isn’t real art, they’re wrong. And please don’t ever be afraid of using references of any sort! Alphonse Mucha is saved ten times over on this computer.
#my art#tutorial#i think#an attempt was made#digital art#procreate#ipad drawing#ipad pro#Alice madness returns#alice liddell#american mcgee's alice#alice asylum
7 notes
·
View notes
Text
BEST 656 Print Dresses for women '' NEW ''
BEST 656 Print Dresses for women '' NEW ''
BEST 656 Print Dresses for women
Hello, before watching the Print Dresses I recommend you first watch this video
33 EASY SUMMER CLOTHES CRAFTS
youtube
To buy the Shirt Dresses click here please
33 COOL AND SIMPLE CLOTHING LIFE HACKS AND CRAFTS
youtube
What to Look Out For When You Wear Prints
Botanical prints are wherever in summer. Come Fall and Winter, creature prints become possibly the most important factor. Realistic prints are famous all year around.
How would you wear prints without looking as though you are wearing somebody's window ornaments?
In all actuality, window ornament texture may look great as playwear. In the motion picture, The Sound Of Music, Maria transformed disposed of drapes into playwear for the Von Trapp kids.
Of course, individuals will talk in the event that you are wearing somebody's draperies, or in the event that you appear as though you are wearing shades.
At that point there is the issue of a few prints being complimenting. Expansive prints and wide level stripes influence anybody to look fat. In the event that you are as of now huge, a few prints can influence you to look greater.
However prints are pragmatic. Not at all like garments in plain textures, stains don't appear as effortlessly on prints. Particularly on the off chance that you wear little prints. The horde of hues and examples in run of the mill little blossom prints shroud recolors effectively. Over that, little prints don't have the swelling impact their enormous cousins show, so greater ladies can escape with outfits that element small prints. While petite ladies may look overwhelmed by extensive prints, dainty examples look incredible on them as well. Perhaps the leggy, Amazonian composes can escape with huge flower prints. (Those ladies can wear sackcloth and look staggering in any case). Be that as it may, us common mortals should stick to littler prints on the off chance that we need to wear florals.
On the off chance that you fear appearing as though you are wearing somebody's window ornaments, go for tasteful materials that nobody would use for draperies. Wear printed silk dresses [https://ift.tt/2woAc7H] that stream over your body. Or on the other hand you should need to go for realistic prints. Shading square outfits look incredible on everybody and can be to a great degree complimenting. Some extremely tasteful dresses utilize shading boards on the sides of the dresses to make the optical deception of a slimmer figure.
In the event that you need something sexier, attempt creature prints. These are works of art and request to the essential creature impulse. Creature prints like zebra, panther, tiger or unique half and halves of fake hide that are purposely made to maintain a strategic distance from stir up with genuine hide (which rankle every living creature's common sense entitlement activists) are plain hot. Wear them in a dress a sultry look. In the event that that is excessively for you, creature print pants, top combined with something plain would give you that sultry seductress look without looking as though you made a decent attempt. In the event that you need something more unobtrusive, attempt a creature print extra like a sack or scarf.
Flower prints and creature prints are incredible for play, yet may be excessively fun loving for work. Particularly in the event that you work in a preservationist situation. All things considered, you can enjoy prints, regardless of whether you work in a bank. Attempt a stick striped shirt with your suit which looks sufficiently proficient for the meeting room.
Learn How to Make a Leopard Print Dress
Creature prints are particularly in vogue nowadays among the design cognizant ladies for their bolder look. These dresses are viewed by numerous as adaptable on the grounds that one can wear these outfits throughout the entire year. Despite the fact that a panther print dress draws the consideration of dominant part of the mold fan divas around the globe not every one of them have same affection for such clothing. The individuals who are lifelong aficionado of this strong print can simply get a total look by dressing themselves from go to toe in panther prints. Be that as it may, some of them are not all that profoundly committed towards this print and they like to contact up their look with adornments with panther prints. A stunning bit of panther printed article of clothing can suit pretty much any lady who has the certainty and state of mind to convey the dress. For the individuals who haven't yet worn any such outfit, here is a brief and basic manual for put on such attire to flawlessness.
On the off chance that you are vigilant to locate a breathtaking panther print dress to cause an immense mix in your up and coming gathering or wedding welcome the above all else thing that you have to do is to discover precisely what sort of outfits you are searching for. To accumulate some thought you can investigate the mold magazines or sit in front of the TV and get mindful of the most recent form patterns. You can likewise run over most recent trend while you meander in general society. When you decide on the sort of clothing you need to be dressed in you can arrange the example on the web. In any case, it is constantly smarter to buy the textures from a retail location so you can attempt and feel the shading and nature of the all alone. When you happen upon quality texture the following thing you ought to do is to get your hips, midriffs and chests estimated. I case you have decided for the stiffer texture, you are in an ideal situation leaving 1 inch for the crease. Presently you need to choose would you go for a smaller than expected panther print dress or you approve of typical length. On the off chance that you incline toward a small dress, custom fitted fit is the thing that you ought to decide on as it runs best with smaller than normal panther printed outfits.
On the off chance that you are acquiring the texture to influence a late spring to wear your picked texture ought to be light-weight and if this will be your winter exceptional clothing then it is smarter to purchase a texture that is relatively heavier. Since you are through with the determination of the texture and example, the time has come to remove the examples pieces and iron them to smooth out the wrinkles and wrinkles. This squeezing of the textures additionally helps preshrink cottons materials that are characteristic filaments. In the wake of pressing, the piece of the texture needs to collapsed over and you have to put twofold example pieces on the collapsed texture. From that point onward, these example pieces should be stuck to the textures and cut those pieces out. While removing the pieces you have to exceptionally careful and keep a nearby eye for the soil, scores and markings. Presently you have to stick up the texture pieces and line up the scores to guarantee that the example bits of your desired panther print dress fit together flawlessly. At last you have to sew the example as indicated by bearing. To find out that your recently influenced panther to print dress is completely fit you simply need to press the crease open.
The Print Dress Vs the White Dress
Each lady has a little accumulation of dresses in their storage room today, if not a major gathering! Regardless of what your own design style might be, there is a dress sitting tight for you inside the ladies' mold advertise today. Architects like Elan International have made mind boggling lines of easygoing dresses that enable you to look incredible and feel good in dresses. Previously, wearing a dress influenced you to look impressive no uncertainty yet you were never agreeable! The form business has changed all that today and ladies wherever cherish it! Presently the unavoidable issue this year is obviously would it be advisable for you to settle on the customary and great white dress for summer or would it be advisable for you to break out into one of the new prints? We are here to diagram the distinctions so you can settle on an educated choice.
We should begin by talking about the ever well known white dress. The white dress is very like the little dark dress, it works all season and can be worn pretty much anyplace and this is the reason such a significant number of ladies pick to run along these lines with their late spring style decisions. It is truly similar to a clear canvas. The white dress enables you to dress it up with any shading you pick as far as shoes, belts, totes and adornments so as to rapidly and essentially make another look every single time you wear it. Basically there is nothing superior to wearing a fresh white dress after a whole winter of dim and grim shading decisions. Albeit white isn't thinning like dark and it can end up messy in a rush, it is as yet one of the best dress alternatives for ladies of any age today.
Presently in examination, the print dress has done nothing not as much as surprise the design business this year. Prints of every kind imaginable have appeared to assume control over the plain and strong dresses we used to settle on in the previous years. Little florals are certainly the most sizzling example to look over today and the whole dress will be canvassed in design; this is the uniqueness of the announcement. You can discover print dresses similarly as you can white dresses in various distinctive styles including: strapless, sleeveless, maxi dresses, bridle dress, one shoulder dress and even long sleeve dresses when fall and winter start to approach.
It is very difficult to think about these two styles in view of how extraordinary they truly are. The white dress offers the most flexibility since it tends to be worn plain or it tends to be spruced up inventively with assistants to make an altogether unique look and this is the place some may state the white dress would win the challenge. In spite of the fact that print dresses are to a great degree captivating they can wind up tedious sooner or later on the grounds that there isn't much that should be possible to adjust the style. The decision is obviously at last yours yet in the event that you can bear the cost of both that is unquestionably the best approach!
10 Tips for Accessorizing Your African Print Dress
So you at long last understood that African print dress that will definitely grab the eye of the general population around you. Be that as it may, when you attempted it on, you saw that there is something lacking.
At that point you understood, you require adornments for your new dress. You ought to be watchful however. Dresses with African prints are beautiful. Be that as it may, with the wrong adornments, you can without much of a stretch demolish your look. Indeed, you can go erring on the side of caution and put as meager embellishments as would be prudent. Be that as it may, under decorating can divert your dress from fab to boring. In the event that decorating an African-enlivened dress befuddles you then the ten hints underneath will doubtlessly be of incredible help.
1. Keep away from huge burdensome pieces
African prints are striking as it seems to be. You don't need the extra consideration by wearing burdensome extras. When you are wearing dresses with strong prints, it is constantly fitting to go little and downplayed when it comes ti extras.
2. Try not to blend prints
One of the most noticeably bad things that you can do when you are wearing a dress with an African print is to have adornments with clashing prints. This implies no polka spots or stripes. Be predictable with your look and go African the distance.
3. Stay away from various hues
You ought to likewise abstain from having embellishments with excessively numerous diverse hues. You need to emerge not resemble a jokester. An astute methodology is pick one shading from the print of your dress and afterward get just frill with that shading.
4. This isn't an ideal opportunity to sparkle
This implies you ought to likewise abstain from wearing adornments that shimmers. Once more, you ought to go for the monochromatic look with regards to adornments. Think dark dots. On the off chance that you need a little shimmer, at that point decide on little pieces like stud hoops.
5. Be that as it may, somewhat gold won't hurt
On the off chance that you truly need to "help up" your look at that point run with gold gems. Be that as it may, again keep it basic. A little gold chain is ideal over huge stout pieces.
6. Say no to expansive sacks
When you are wearing an African print dress than that is the time so say farewell to expansive sacks and hi to little grips.
7. Get the correct shoes
Would it be a good idea for you to likewise wear African-enlivened shoes? Not really. A superior alternative would be shoes with nonpartisan style and shading.
8. Would it be a good idea for you to wear a cap?
Wearing a cap may likewise take you over the edge on the off chance that you are wearing an African print dress. On the off chance that you can locate a straightforward African-enlivened hood however then it could be a decent expansion to your look.
9. What about hide?
Hide is alright as long as it isn't genuine. Pitilessness does not look great regardless of what sort of print you are wearing.
10. What to do with your hair.
Since African print is related to being insane and wild then you can basically relax. Or on the other hand you can likewise tie it up with an African-motivated hair frill. Once more, you ought to abstain from anything excessively intense.
Since you know how to embellish your African print dress, you are prepared to spend a wild night around the local area.
Floral Print Dresses - A Brief Overview and Shopping Tips
Despite mold's unpredictable propensity to change in styles, it appears as though botanical print dresses never leave style, particularly in the spring season. These dresses are a most loved for ladies to wear to chapel occasions, Easter occasions, and even weddings.
Notwithstanding for easygoing days, they show up as the warm climate approaches as blustery sundresses. They are either overwhelmed by a variety of blossoms or may have one or two or three expansive flower embellishments.
They go in lengths from over the knee, ideal on the knee, directly beneath the knee, at the mid-calf, at the lower leg or floor length (lower leg and floor length dresses are less ideal to the larger part of mold disapproved of ladies).
These sorts of dresses never appear to leave style since they are refreshingly ladylike and appear to be extremely popular once the blossoms in nature spring forward. Flower print dresses can look great on anybody as long as the accompanying are remembered:
1. They look best when the botanical prints are little and sensitive in light of the fact that bigger prints have a tendency to overpower the figure and do nothing for the shape.
2. They ought to be in a shape slice to feature the lady's midsection and middle zone with the goal that the prints don't overwhelm and conceal the figure.
3. No matter what, flower dresses ought not have shoulder braces. Shoulder braces are for suits or for a 80's look. It doesn't fit the delicate look that a botanical dress loans.
4. The most complimenting sleeve lengths are sleeveless, top sleeve or 3/fourth sleeves. Sleeve lengths that hit the center of the upper arm or the wrist have a tendency to make a square shaped upper half.
5. They are most agreeable and most wearable when the length is directly beneath the knee to mid calf.
6. The texture of for this sort of dress is most getting to be the point at which it is light, breezy and wispy. This makes a flowy, exquisite look.

from HOT DRESSES https://ift.tt/2LyHQkw
via IFTTT
0 notes
Last Seen Blogs

butta-bb
Bellams

cremedensada
i guess i write stuff?

seanpultz
Sean Pultz's Tumblr
maryhale1
Mary Hale

kittytale-i-do-what-i-want
kittytale