#i wanted to add more but tumblr limited me to 10 link boxes
Text
Guides to self-managed abortion:
Resources for medication:
Abortion fund and provider resources:
#abortion resources#fuck the supreme court#i wanted to add more but tumblr limited me to 10 link boxes#the aid access website appears to be up and down right now#i bet its getting a ton of traffic right now
2K notes
·
View notes
Text

✦ Okay, I give in. Let's upload our gifs on the beta editor to prepare for a gif pack page. Resources are available at the bottom, so lets get started !!
So first things first, you can only upload 30 gifs at a time. Now for me, I will always upload as I gif, around every 20 gifs, then upload to the page (this also ensures I don't skip any or have doubles) and keep gifing. That used to mean that I don't have to wait for tumblr to load 300 gifs and die from impatience. For the rest of y'all that means you're going to have to batch upload. I know, I'm sorry.
Note: With the help of @nataliealynlind we discovered that the daily limit is 250 gifs! So if you have more than that, prepare to upload your gifs over the course of a couple days or use a second blog. (imo this is another great reason to upload as you gif! that way you don't have to get stuck at 250!)
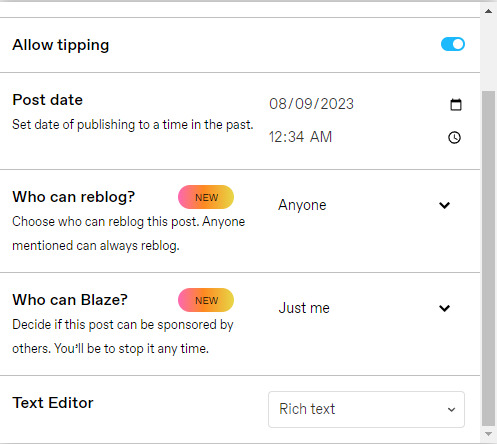
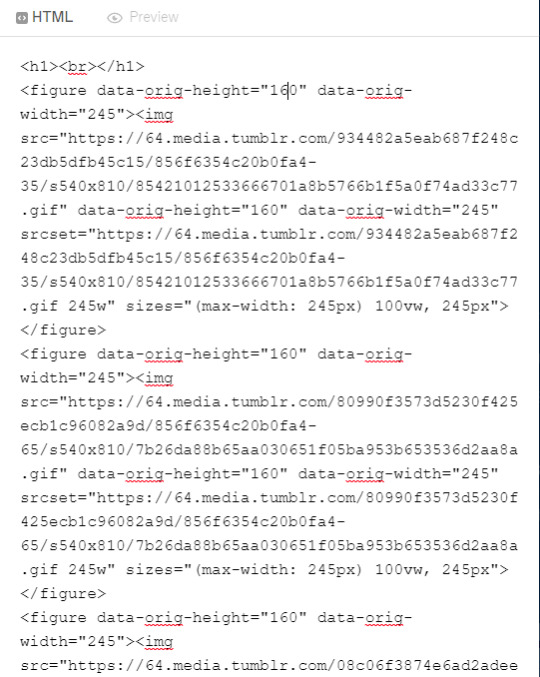
So after you upload your gifs (in this case I only did 10)*, you're going to go to the gear at the top of your post and click it. Then scroll all the way to the bottom where it says Text Editor. This looks familiar, right?

*Note: If you don't save it as a draft first, your gifs will be in .gif format, not .gifv. This means you can skip removing this tag later on, but I'm not sure if gifs that are uploaded but never saved/drafted will later disappear at some point. To be safe, I would save it as a draft. I just forgot at this part tbh
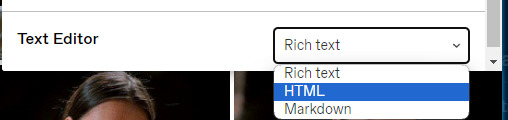
Well the good news is, you only have to change this once! The bad news is, we don't do Markdown then HTML anymore bc Markdown doesn't strip any of the code anymore 🙃 So just change it to HTML
Now it should look like this! Fun!
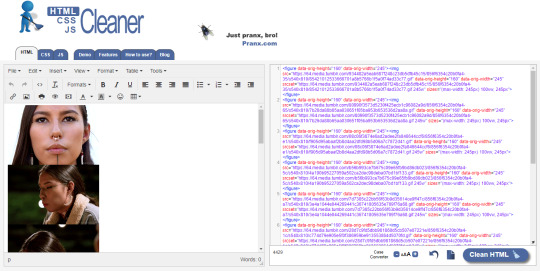
Okay, now we're going to copy that text and take it on over to our new best friend, the HTML Cleaner! So you're going to want to paste it on the right side of the screen. Your gifs should appear on the left side. If both sides have text, that's how you know you pasted it on the left.
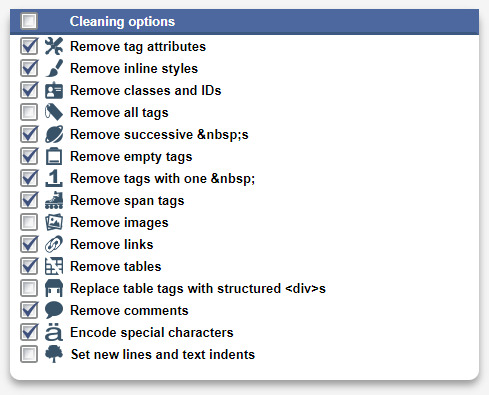
So in order to get ride of all this extra code, it's going to take a couple extra steps. First, you're going to check these boxes on the left hand side.
Now, on the right hand side, you're going to enter these under Find and Replace (copy/paste section below!!). I know you're like, uh what? Where the hell did you get those numbers? Well, I got them from our gif post code!
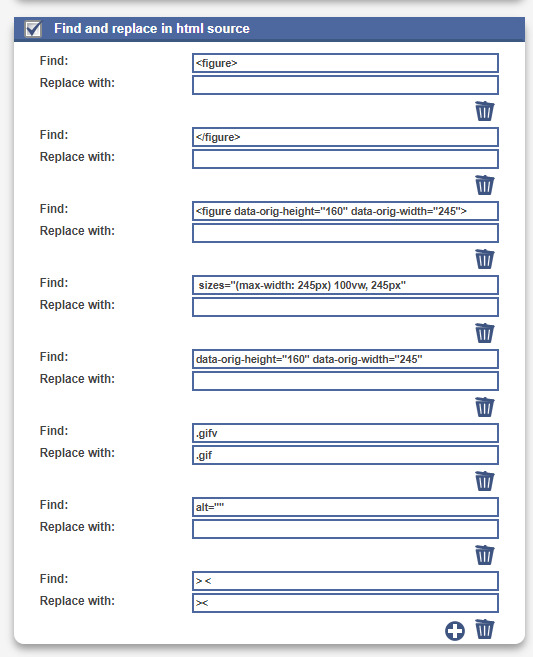


For easy copy pasting:
Find: <figure>
Replace: (leave blank)
Find: </figure>
Replace: (leave blank)
So after you add the specific widths for your gifs, you're also going to want to add the following:
Find: .gifv
Replace: .gif
Find: alt=""
Replace: (leave blank)
Find: /> <
Replace: /><
NOTE: If your gifs are usually the same size, I would recommend saving these snippits above on your computer's sticky notes or a draft to copy/paste for future uploads! While I do appreciate the viewer traffic, I'm sure coming to this tutorial every time is gonna get old real fast.
After all that, click Clean HTML

And now, your code should look like this! If there's still a space between your image links, just click Clean HTML again and it should get rid of it!

Now your code is nice and clean to put into your gif pages! Not quite sure how to do that? Read the Setting Up Your Sidepage section in this older tutorial!!
Resources
HTML Cleaner
My Gif Pack Page Codes
Recommended Gif Pack Page Codes (tag)
Previous Tutorial (How to upload to a Standard Sidepage)
Barebones Code (for previous tutorial)
#rpc#rph#gif pack tutorial#uploading gifs on beta#rp tutorial#beta editor tutorial#mytutorial#rp guide#me: i'm tired of this (remaking this tutorial every other year) grandpa#tumblr changing posts every five minutes: that's too damn bad!
159 notes
·
View notes
Photo

TUTORIAL: staying logged in on multiple tumblr accounts using Firefox container tabs
As rpers, we are constantly looking for ways to be logged into several different tumblr accounts at the same time. While methods like sessionbox and creating new Chrome profiles are popular, I wanted to share this third option that I’ve been using for some time now : Firefox + container tabs !!

The benefits of this method include being able to have multiple accounts open in a single window without re-logging back in and not needing to re-download xkit when you want to add a new muse. You can also have more than 10 stored containers and more than 5 open at the same time, all for free. I’ve also personally found this to be more reliable than sessionbox ( so far for me, this method has not broken at all and pretty much have never had to re-log back in ).
Detailed instructions below & please like/reblog if you found useful !!
written 03.20.23. ©

Note: All these instructions are as if I just opened Firefox for the first time. Please also note that if you do not already use Firefox, you will have to add the xkit rewritten extension and set those preferences but you will only have to do that once no matter how many containers ( accounts added ) you make !
First, head to the menu in the upper right > settings

Click on “themes & extensions” in the bottom left.
Search for “containers” in the find more add-ons search bar.

The desired extension should be the very first one that comes up: Firefox Multi-Account Containers. Click the extension and “add to Firefox.”


Click “Add” & then “Okay”.


The extension is now installed ! Head back to settings ( you may have to refresh or re-navigate to the page ). On the general settings page, scroll down a little to the “Tabs” section. Next to the “Enable Container Tabs” option, click settings.

You will now see the default containers ! Now you can remove/change these containers to correspond to each of your muses by using “settings” and “add new container”. You can set the container tab name, color, and symbol.
Default view:

Below is an example of what things might look like when changed to correspond to muses. You can have more containers than this, I just stopped here for this example --- there are also only 9 unique colors that help identify which container tab is open as shown further below, so logistically it can get a little more difficult to identify which tabs are open ( because they have the same color ), but technically nothing changes that is limiting.
Example view:

Once last optional step: I recommend checking the box at the bottom “Select a container for each new tab.” What this means is when you open a new tabs, you will get a dropdown asking you to select which container it should go into, as shown below.
If you do not check this, every new tab will be “containerless” or you would have to right click on the new tab button to open a new tab in a specific container. Regardless of the setting, if you ctrl + click or right click on a link directly in a container tab, that link will automatically open in the same container.

When you have multiple tabs open in different containers, you can tell the difference between different ones by the colored bar at the top as seen below. In this example, I can see the first tab ( blue = muse 1 ), second tab ( orange = muse 6 ), third tab ( purple = muse 8 ), and fourth tab ( green = muse 3 ).

You can also always see which container you’re in by looking at the end of the address bar where the container name and symbol are shown in the respective container color ( below, I am on muse 6′s container tab ):

This concludes the tutorial !! You will have to log into the respective Tumblr account in each tab initially, but after that you shouldn’t have to do log outs and relogins anymore.
If you have a lot of tumblr accounts and don’t want to constantly have them all open, I suggest checking out my tutorial here that describes how you can get tumblr notifications for multiple accounts to come into a private discord server !!
I hope you found this useful and please like/reblog if you did !!
129 notes
·
View notes
Text
Alby's Writings Discord Server
Hello again!
As I said in the previous post, I’ve made a Discord server while I’ve been slowly chipping away at Chapter 1 Part 3 😄 Once again, special thanks to my lil bro @system-operations for being my guinea pig as I worked on and tested out the server 🤭
In case you haven’t seen what I wrote in that post about the server, here’s what I said about it:
So, part of the reason why it’s been difficult for me to do stuff on Tumblr is because my access to it is rather limited now due to personal stuff; it’s nothing bad, don’t worry, and it’s not because I’ve been doing anything shady or illegal (I think it’d be the shock of the century to people who know me if they ever heard that I did something like that 😅). It’s just personal stuff 😅
I also think that part of why I’ve been overwhelmed with Tumblr stuff is because of the similar asks that start to pile up the longer that I’m unable to answer them, which is why I’ve set up some forum channels in the server where people can send questions and feedback and you guys can see what questions have been asked and which ones have been answered, especially without needing to wonder if I received your questions and answered them or not.
But the main purpose of this server is to provide a lil space where you guys can hang out and maybe interact with each other and with me :3 I’ve got a few things planned for server activities:
Game Night: We would play some of the games in Discord Activities and some other online browser games like Red Flags and Cards Against Humanity
Watch Party: We would watch some animes that are available on Youtube (such as Campfire Cooking in Another World [100/10 great anime in my opinion we stan wholesomeness in this household]) and Starkid musicals (the Hatchetfield trilogy is fire y’all), and probably some other Youtube stuff
Study With Me: Just popping into a voice channel and playing some music while I study helps me quite a lot apparently, so if that works for any of you who might join the server, it’s a-okay if you wanna join in :3
But of course, participation in these activities is very much optional! It’s okay if you’d prefer to lurk, I’m a lurker myself in most of the other servers I’ve joined 😅
However, I do want to make it very clear now that this will be an 18+ server, as it will not only be for ATE but also for the other IF projects that I have planned, some of which will contain content that is not suitable for minors. So just to be sure, I’ve decided to restrict the server to those 18 and above. Please, for any underage followers that I may have, do not lie about your age if you join because I will have to remove you from the server. You have been warned.
So now that I’ve laid out the stuff with Discord, you might be wondering what’s gonna happen with the Tumblr asks after I’ve answered the stuff in my inbox. Well, here’s what I’m planning to do:
Step 1: Compile all Tumblr asks into a Google doc
Step 2: Add any Discord asks into same Google doc
Step 3: Share the Google doc for public viewing
Step 4: Re-open Tumblr ask box
Step 5: Update the Google doc as I receive future asks from both Tumblr and Discord, even if I’m unable to answer the questions immediately
This way, everyone can see the asks, whether or not you’ve got Discord or Tumblr, and the search for the asks is gonna be a lot more efficient!
So long, Tumblr search, hellooo my old buddy ctrl/cmd+f!
TLDR: I have made a Discord server that I’ll be maintaining on a more regular basis compared to Tumblr, set up some forum channels that function similarly to Reddit where people can send feedback and questions, got some plans for server activities (participation is optional!), and restricted server access to those who are aged 18 and above.
With all of that said, here’s the link for the server:
I hope that everyone who joins will enjoy their time in the server! Thank you all and I hope you have a good day/night!
11 notes
·
View notes
Text
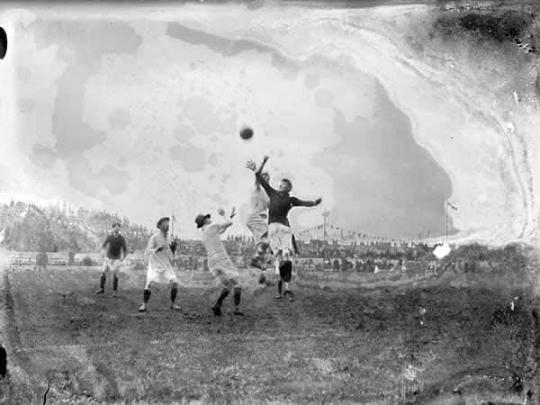
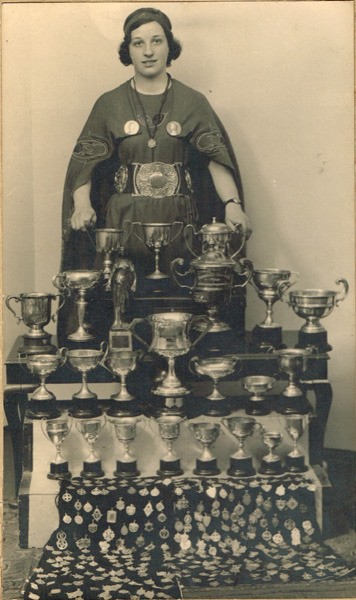

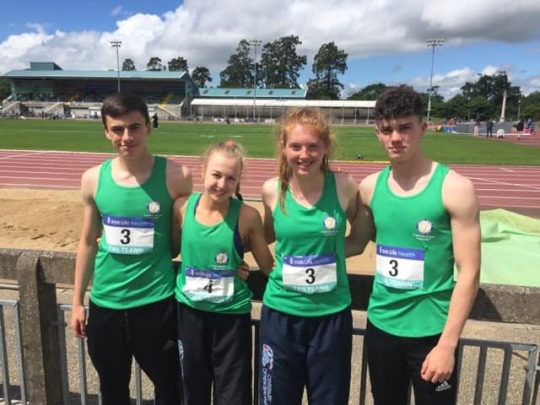

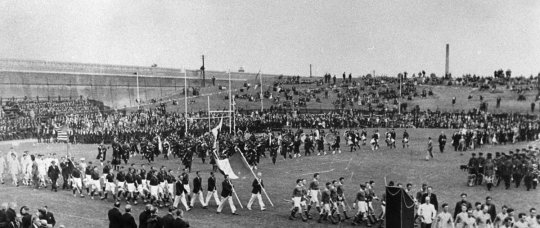


The Tailteann Games revival. Tumblr only lets me add 10 photos, but there's about 70 more I rounded up on my blog, link below. Photo credit: (Part of the Independent Newspapers Ireland/NLI collection.). (Photo by Independent News And Media/Getty Images).
"The Tailteann Games would probably have lain forgotten in the annals of history were it not for the ‘Gaelic Revival’ of the late nineteenth century. During this time, Irish nationalists dug deep into the past to remind the country of its rich history. They wanted Irish people to feel proud of their culture and language; restaging the Tailteann Games was seen as a means to that end. It may have seemed like a distant dream in the 1890s, but just one month after the British left Dublin Castle in 1922, the new Irish government decided to revive the Tailteann Games. This grand gesture would announce the birth of the Irish nation to the world and showcase the best of Irish culture and sport. The date was set for August 1922.
Minister for Posts and Telegraphs, J. J. Walsh, took the job of organising the event. Walsh, who had been jailed during the War of Independence, was instrumental to the success of Aonach Tailteann, as it was called. The new government allocated £10,000 for the games. Walsh gave this money to the G.A.A. to renovate Croke Park and in return, they made the stadium available for the duration of the games. Walsh also had big plans to involve Irish emigrants. Irish communities across the world held trials to choose contestants who would travel to the games.
Enthusiasm was high and plans were in progress when Civil War broke out. Aonach Tailteann was postponed. When the war ended a year later, the country was in ruins and some in government felt the money would be best spent elsewhere. Walsh, arguing that the games were more important than ever, got his way and the date was fixed for August 1924.
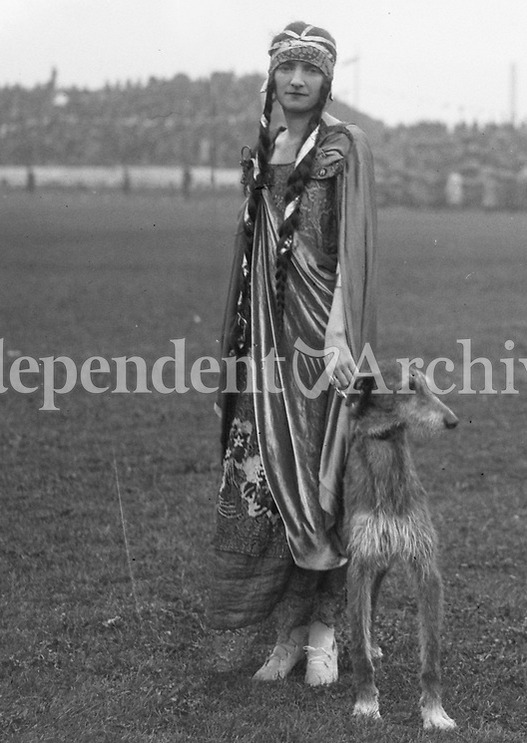
Anti-Treaty supporters, who had opposed the government during the Civil War, called for a boycott but their pleas fell on deaf ears. The event was a roaring success, larger than even the Olympics, held in Paris that same year. Thirty thousand people watched the opening ceremony at Croke Park as Irish wolfhounds and actors in Celtic dress paraded the arena. That night, a fireworks display lit up the skies over Dublin. An ambitious programme of events had been arranged, with six and a half thousand competitors and a thousand medals. Teams of athletes – who were either Irish or of Irish heritage – came from England, Scotland, Wales, New Zealand, South Africa, Argentina, Canada and America.
Events were staged all over Dublin. Gaelic games were played at Croke Park, swimming took place at the Phoenix Park, rowing at Islandbridge, boxing at Portobello, billiards at the Catholic Club on O’Connell Street, chess at Trinity College and yachting at Dun Laoghaire. In fact, the range of events was staggering, with tug of war, tennis, cycling, archery, horseracing, shooting and golf all getting their moment to shine. There was even a marathon from Navan to Croke Park. And participants weren’t limited to sporting events – contests also took place for piped bands, poetry, Irish dancing, storytelling, singing and art.
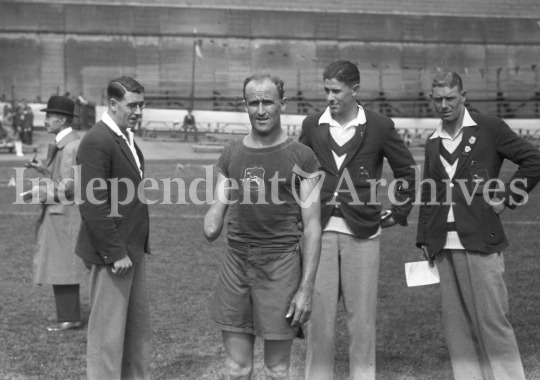
To ensure the games were well attended, Walsh had invited a host of athletes to stop off in Ireland on their way home from the Paris Olympics. The most famous of these was Harold Osborn, an American athlete who won two golds in Paris. His appearance at the Tailteann Games drew huge crowds and lots of press interest.
Motorbike racing was one of the great successes of the Games, drawing forty thousand spectators to the Phoenix Park. Many more gathered to witness a mock battle staged by the newly formed Free State Air Corps. One hundred thousand people watched as ground troops defended a wooden castle while in the air, pilots dropped fake bombs that exploded into plumes of smoke. The Irish Times described the Games as “an enormous success, full of brilliant performances which have given a tremendous impetus to Ireland and to Irish sport” and hailed J. J. Walsh as “an optimist among pessimists.”
It was expected that this would be the first of many, and that Aonach Tailteann would be held every four years. The 1928 games were similarly successful. Amsterdam hosted the 1928 Olympics so once again, athletes were invited to visit Ireland. Pat O’Callaghan, a medical student from Cork who became a national hero when he won Olympic gold for his hammer throw, was welcomed enthusiastically. To the crowd’s delight, he threw even further at the Tailteann Games than he had in Amsterdam.
The most famous visitor to the 1928 Games wasn’t a competitor, though a sportsman, nonetheless. World heavy weight boxing champion Gene Tunney, whose parents hailed from Mayo, received a great welcome when crowds turned out for his arrival at Dun Laoghaire. Tunney was only recently retired, having won his last fight just a month previously.
Waterpolo was a highlight of the 1928 Games, thanks to Ireland beating England. And once again, teams of Irish athletes came from all over the world – in fact, the number of competitors was almost as high as it had been in 1924. More female athletes took part in the Games than in the Olympics that year. All in all, the second Aonach Tailteann was a huge success.
Things had changed dramatically by the time the Games were due to be staged in 1932. Fianna Fáil won the election that year, ushering in a complete changing of the guard when they formed a new government. With memories of the Civil War still fresh, how likely was the new government to endorse an event that had been the brainchild of their political enemies?
The Games of 1932 were plagued by a series of unlucky events. Firstly, J. J. Walsh stepped down as director of the Tailteann Committee. Disillusioned with politics, Walsh had resigned from government in 1927. Now, he decided it was time to focus his efforts elsewhere. His experience was sorely missed.
The second problem was timing. The Eucharistic Congress, which took place just days before the Games kicked off, drew one million people to mass at the Phoenix Park. In contrast, the thirty thousand people who turned up to the opening of the Games seemed like a poor show. Finally, the 1932 Olympics took place in Los Angeles, depriving the Tailteann Committee of another chance to attract international stars. As a result, the 1932 Aonach Tailteann was nowhere near as successful as its predecessors. Sadly, Aonach Tailteann fizzled out after that poor performance, despite Walsh’s efforts to save it. At the time, the National Athletic and Cycling Association was involved in a bitter dispute about its representation of athletes in Northern Ireland. It refused to recognise the international body’s ruling that it had no jurisdiction there. As a result, Irish athletes were banned from competing, making the fate of the 1936 Games uncertain.
On top of that, a damaging trade war with Britain meant that government finances were in a poor state. Walsh continued to lobby for the games, however, so Taoiseach Eamon de Valera appointed a committee of civil servants to report on its feasibility.
In 1938, it recommended that the event be discontinued. The Tailteann Games came to a disappointing end, but almost a century has passed since then. Perhaps the time is right to revive this historic festival once more. When we are finally able to come together again, what could be better than an epic celebration of Irish sport and culture?"
-taken from IrishPost
#celtic#ireland#lughnasadh#irish history#sports#europe#pagan#irish#history#paganism#ancient celts#sports history#tailteann#tailtiu#black and white photography#1920s#1930s#festival
9 notes
·
View notes
Text
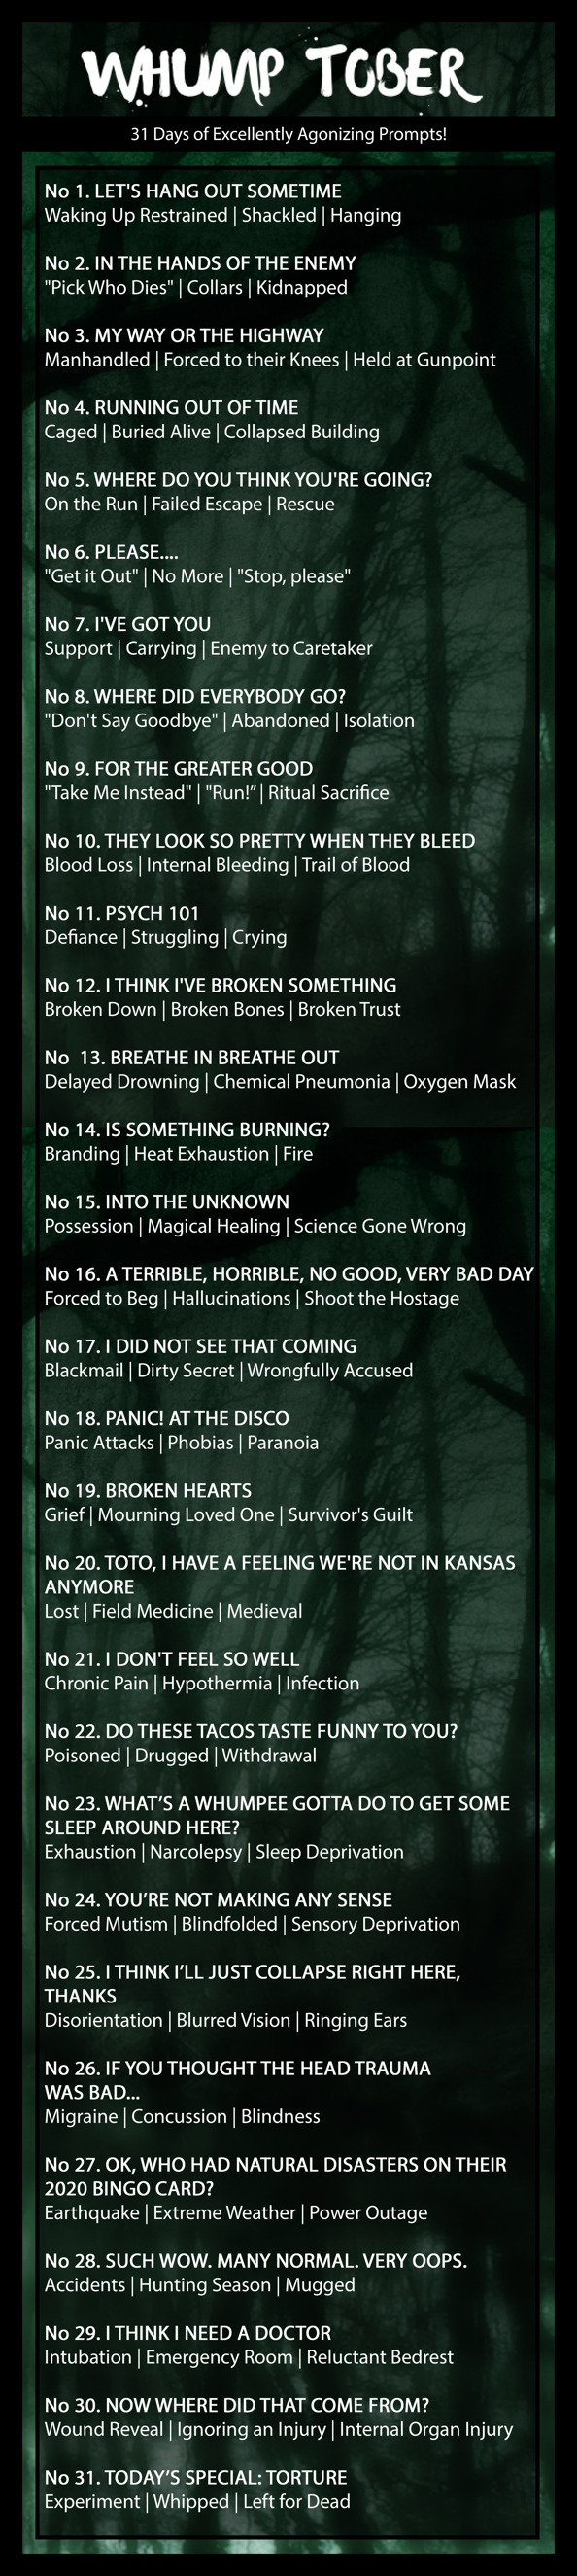
Whumptober 2020 - Updated

Welcome to Whumptober 2020! We’re doing things a little differently this year so please make sure to read the Event Info carefully. We are also excited to announce the addition of an AO3 Collection, which can be found here.
We hope you’re as excited as us to watch the Whump Community come together once again for a month of bone-crunching creativity and collaboration!
(All 31 Themes + Prompts, Event Information, and FAQs are posted below the cut!)
No 1. LET'S HANG OUT SOMETIME
Waking Up Restrained | Shackled | Hanging
No 2. IN THE HANDS OF THE ENEMY
"Pick Who Dies" | Collars | Kidnapped
No 3. MY WAY OR THE HIGHWAY
Manhandled | Forced to their Knees | Held at Gunpoint
No 4. RUNNING OUT OF TIME
Caged | Buried Alive | Collapsed Building
No 5. WHERE DO YOU THINK YOU'RE GOING?
On the Run | Failed Escape | Rescue
No 6. PLEASE....
"Get it Out" | No More | "Stop, please"
No 7. I'VE GOT YOU
Support | Carrying | Enemy to Caretaker
No 8. WHERE DID EVERYBODY GO?
"Don't Say Goodbye" | Abandoned | Isolation
No 9. FOR THE GREATER GOOD
"Take Me Instead" | "Run!” | Ritual Sacrifice
No 10. THEY LOOK SO PRETTY WHEN THEY BLEED
Blood Loss | Internal Bleeding | Trail of Blood
No 11. PSYCH 101
Defiance | Struggling | Crying
No 12. I THINK I'VE BROKEN SOMETHING
Broken Down | Broken Bones | Broken Trust
No 13. BREATHE IN BREATHE OUT
Delayed Drowning | Chemical Pneumonia | Oxygen Mask
No 14. IS SOMETHING BURNING?
Branding | Heat Exhaustion | Fire
No 15. INTO THE UNKNOWN
Possession | Magical Healing | Science Gone Wrong
No 16. A TERRIBLE, HORRIBLE, NO GOOD, VERY BAD DAY
Forced to Beg | Hallucinations | Shoot the Hostage
No 17. I DID NOT SEE THAT COMING
Blackmail | Dirty Secret | Wrongfully Accused
No 18. PANIC! AT THE DISCO
Panic Attacks | Phobias | Paranoia
No 19. BROKEN HEARTS
Grief | Mourning Loved One | Survivor's Guilt
No 20. TOTO, I HAVE A FEELING WE'RE NOT IN KANSAS ANYMORE
Lost | Field Medicine | Medieval
No 21. I DON'T FEEL SO WELL
Chronic Pain | Hypothermia | Infection
No 22. DO THESE TACOS TASTE FUNNY TO YOU?
Poisoned | Drugged | Withdrawal
No 23. WHAT’S A WHUMPEE GOTTA DO TO GET SOME SLEEP AROUND HERE?
Exhaustion | Narcolepsy | Sleep Deprivation
No 24. YOU’RE NOT MAKING ANY SENSE
Forced Mutism | Blindfolded | Sensory Deprivation
No 25. I THINK I’LL JUST COLLAPSE RIGHT HERE, THANKS
Disorientation | Blurred Vision | Ringing Ears
No 26. IF YOU THOUGHT THE HEAD TRAUMA WAS BAD...
Migraine | Concussion | Blindness
No 27. OK, WHO HAD NATURAL DISASTERS ON THEIR 2020 BINGO CARD? Earthquake | Extreme Weather | Power Outage
No 28. SUCH WOW. MANY NORMAL. VERY OOPS.
Accidents | Hunting Season | Mugged
No 29. I THINK I NEED A DOCTOR
Intubation | Emergency Room | Reluctant Bedrest
No 30. NOW WHERE DID THAT COME FROM?
Wound Reveal | Ignoring an Injury | Internal Organ Injury
No 31. TODAY’S SPECIAL: TORTURE
Experiment | Whipped | Left for Dead
Alternate Prompt List
Alt 1. Punctured
Alt 2. Falling
Alt 3. Comfort
Alt 4. Stitches
Alt 5. Stoic Whumpees
Alt 6. Altered States
Alt 7. Found Family
Alt 8. Adverse Reactions
Alt 9. Memory Loss
Alt 10. Nightmares
Alt 11. Presumed Dead
Alt. 12. Water
Alt. 13 Accidents
Alt. 14 Shot
Alt. 15 Carry/Support
Event Info
WHUMPTOBER is a month-long, prompt-based creation challenge (think: Inktober, but whumpier). There are 31 Official themes this year - one for each day of the month - which can be used, skipped, or combined in any way you’d like. They are meant to serve as inspiration without being taken literally (e.g. you don't have to include the exact wording into your work). Additionally, there are 3 prompts for each theme. These are optional suggestions and can be used in conjunction with the theme, or as options/alternatives. We want to give everyone as much creative freedom as possible, as well as increase event accessibility for folks with triggers and squicks.
Creators can PRODUCE work in any media they choose, including but not limited to: writing, visual artwork, and photo/video/audio edits. Creators can PARTICIPATE as much or as little as they want (i.e. you don’t have to do ALL the prompts if you don’t want to) and prompts can be used in any order. They are also free to use even after the event ends.
When uploading Whumptober content to your blog, be sure to tag the with:
#whumptober2020 …..(the event tag)
#no.1, #no.2, #no.3, …..(theme number)
#bruised, #stabbed, …..(the theme or specific prompt you chose)
#fandom or #OC
#medium …..(gifs, fic, podcast, art, etc.)
#teeth, #etc …..(trigger warnings & any additional tags. Keep in mind not to add “tw” in front but only use the word/trigger itself, because tumblr sucks)
#nsfw, #nsfwhump …..(only for nsfw content)
PLEASE BE DILIGENT WITH YOUR TAGGING. Only properly tagged posts are considered for archiving on the official @whumptober2020 blog. They must be tagged in the order above.
Unfortunately, due to the sheer number of participants in recent years, we cannot guarantee your work will be archived. A random selection of properly tagged posts from all genres will be reblogged each day.
Whumpers who produce content for 31 total theme days are considered event completionists and will be tagged in a masterpost at the end of the month.
Questions not addressed below can be directed to this blog as well.
Thanks for reading, and happy whumping!
Frequently Asked Questions
Q. What kind of content can I make? Can it be NSFW?
This is a MIXED MEDIA event! You can write fic, post meta, doodle or paint, create a gif set or photo edit, link a song, or get crafty with video - anything goes. As for NSFW, make what you like, we just hope that you’ll tag your work accordingly so that others participating in the event can stay safe :)
Q. Do I have to do all 31 Days? Can I post early/late?
Participate as much or little as you like, and post whenever! Just be sure to tag your posts properly (ex. #no.11, #psych101). Combining prompts into one piece of work is okay, and posting late is as well so as long as it’s in October.
Q. What if I don’t understand a theme?
Send us an ask! We’re happy to help clarify. That said, the themes are entirely up for interpretation :)
Q. Can I combine Whumptober with other creation challenges?
Absolutely! That’s like shooting two whumpees with one bullet :)
Q. Can I upload/repost my whumptober content to other social media platforms?
Of course! We’ve created an AO3 Collection to archive any fics posted there. The archive can be accessed here. The blog is the official archive, so please respect the boundaries of any closeted whumpers in your social circle :)
Q. Can I use prompts to write a new chapter for an existing fic?
Yes
Q. An existing fic I am currently writing contains many of the Whumptober prompts, can I use it?
If you are actively writing this fic at the moment with the whumptober prompts in mind, yes. If it just conveniently checks the boxes, then please don’t. You can, however, add new chapters answering one or more of the prompts.
Q. What kind of characters can I write for?
Fandom characters, OC characters, human, furry, alien, cyborg, whoever you like.
Q. Can I use a prompt multiple times?
Yes, but it only counts once
Q. If I’m not comfortable with one day's prompts can I use a prompt of a different day as a substitute and still be a completionist?
Yes, but please do not use a specific prompt twice. We have also created an alternate prompts list that you can draw from [here].
Q. Where can I post my work?
Post where and how you want. You don’t even have to (cross)post it to Tumblr. Just keep in mind if it’s not on Tumblr we will not be able to add it to the blog archive.
Q. Can I start posting early?
You can, but this is an October event and wouldn’t it be more fun with everyone doing it at the same time? That being said, you can post early, but we won’t be reblogging any work predating October 1st.
Q. Do I have to finish a fic I started/can I post WIP’s.?
Yes you can post WIPs. And you’re not obligated to finish it in October for it to count towards being a completionist.
Q. Is co-writing allowed?
Yes, absolutely, and it would count towards being a completionist for both/all of you :)
Q. Do I have to create 31 standalone pieces to be considered a completionist or can I write one continuous story?
One continuous story is fine. The challenge is to write something for 31 prompts. If that’s spread over 31 fics or just one, you are still considered a completionist. (The same goes for every other media you choose.)
Q. Is there a min/max limit on word count?
There is no limit
Q. Can I combine prompts? Is there a limit on how many?
No limit and combine as many as you’d like.
Q. Is a hc/angst focus ok?
Of course!
Q. What’s considered nsfw?
See this post
Q. What's whump?
See this post
Q. My interpretation of the prompt isn't whumpy at all, does that count?
No, sorry, but keep in mind that whump [see definition] is something very nuanced and different for everyone and emotional whump/angst is just as much part of it, as is physical whump and torture. So before you dismiss your idea, think about this.
Q. Can I start working on the prompts before October?
Absolutely! That’s why we posted the prompts a month in advance. We recognise how difficult it can be creating for 31 days in “real time”.
Q. How do I tag triggers?
tw at the end of the word, ex. emeto tw
Q. Do I have to use your tags?
Yes, if you want your work archived on the blog. If not, feel free to use whatever tags you want.
Q. Does combining prompts count towards completion?
Yes
Q. Can we @ you?
Yes but we mostly rely on the whumptober2020 tag
Q. Is there anything we are absolutely not allowed to write?
There are no rules, just be sure to properly tag your trigger warnings. And keep in mind Tumblr’s policies if you are posting it here (or the policies of whatever site you use).
Q. Where can I go for brainstorming help?
Here on Discord
Q. My characters are minors, is that ok?
Yes, but as with everything else, tags are your best friend.
Q. Can I cross post on other blogs?
Yes, multiple platforms and blogs are perfectly acceptable. You can also post different works to different accounts under different names, without posting them everywhere at once.
Note: This is a creation challenge, please don’t repost your old work under our tags (unless it’s been changed or edited for the event).
10K notes
·
View notes
Text
$5 tumblr theme/html commissions

Hiii tumblr users ~ <3 and other people maybe <3 The above are some of my most popular themes; Fruityswirl Surprise, MySpaceTV, Happy98, Noelle, and I Love My Gf! I'm Emoticon, but you may also know me as technokittenadventure ! I'm an amateur self taught coder and I'm taking commissions that start at $5 for personalized Tumblr themes... I also can make a Neocities page if you want instead ! The details for how I will be taking this money is at the bottom of the post ^.^ please reblog if you don't mind doing so ... i appreciate it <3
$5 = basic theme, like 3rd and 4th image
(Happy98, Noelle)
Basic customization options (colors, sidebar image,
custom links, border styles and sizes, text sizes)
Basic layout (I can do header and sidebar themes)
I can add a few extra optional features; such as glowing links, mouse effects, custom cursor and scrollbar,
text selection colors, etc etc etc. Limited to 10 at a time...
$10 = complex theme, like 1st, 2nd, and 5th
(Fruityswirl, Myspace, I Love My Gf)
More complex layout, like a container theme, or
with tons of extra boxes for extra things
Basic customization options like previously mentioned, but
with much more. I can make the theme lots more customizable with a lot more opportunities for personalization ! (extra colors, tons of images, footer changes, font options, etc)
Same fancy features as mentioned before, but you can ask for
as many as you'd like (as many as I can add, really)
just ask honestly
I don't desperately need this money, this is for my personal wants. Payment is in the form of Roblox digital gift cards, which you don't need an account on the website to buy for me. You'll just need to send the purchase to my email. If you need help with that part, I will gladly assist (ꈍᴗꈍ)
Thank you if you read this far ! ~
Contact me through DMS for questions, comments, concerns.
(EDIT: the carrd for the terms and notes for commissioning me)
#long#sorry for incoming tag spam... *sad face*#roblox#commissions#commission#my themes#blog theme#theme#tumblr themes#tumblr theme#layout#edit: changed my super old carrd for terms etc. I didn't wanna lose the url but it was just sitting there so
397 notes
·
View notes
Photo
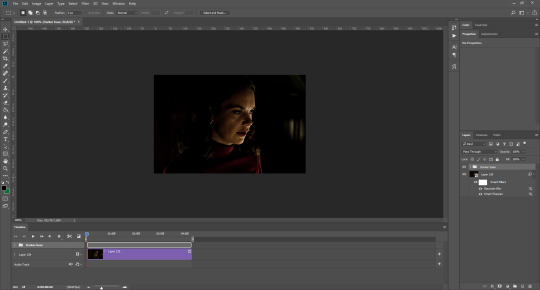
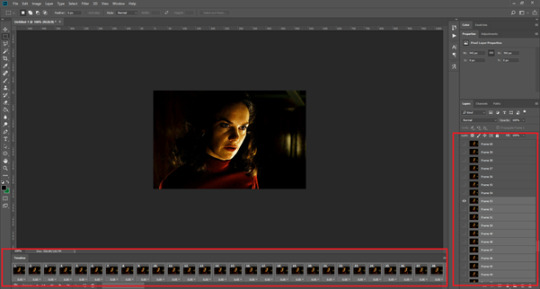
Hello! As requested, here is a tutorial on how I make my gifs. I would like to preface this by saying there are many ways to make gifs, and there’s no right or wrong answer imo. This is just how I personally go about doing so!
I will be using PS CC 2017, but as long as you have the video timeline option, it shouldn’t matter too much; on any version of PS, you should be able to adapt anything I mention here! You will also need some kind of screen recording software. I’ll talk a little more about that under the cut.
To start, you need the source material you will be making the gifs from! I get mine from snahp(.)it (avoiding links so tumblr hopefully doesn’t banish this from the tags lmao) and I always opt for either 1080p or 2160p. Not all laptops will support 2160p as it’s 4K, but either works great! You just want your gifs to be the best quality possible.
Next is where the screen recording comes in. I don’t use the screencapping method to make my gifs (where you use a program to cap a clip and then load those caps into a stack in PS). This isn’t for any particular reason… it’s just how my friends, (who very kindly taught me to gif), had always done it, so it’s now how I do it too. Personally, I find the quality to be just as good as the screencapping method, and have never noticed a difference between the two.
As I have a PC, I use the software built into it for screen-recording. If you go here: theverge(.)com/2020/4/21/21222533/record-screen-pc-windows-laptop-xbox-game-bar-how-to – you can see how to use the XBOX screenrecorder to record from files you have d*wnloaded. This also works on some streaming sites, but I think it depends on what browser you use. Personally, I recommend Firefox, as that seems to bypass a lot of the blocking and ads that occur when trying to do this sort of thing.
For MAC users, I have been told handbrake works well, as it converts MKV files to MP4, which can then be used to make gifs. You only need to convert part of the file to MP4 depending on how much you want to gif, and this also bypasses the screenrecording stage, as you can edit MP4 clips on Quicktime. I am told you can split them into smaller clips by going to edit > trim and it saves the new clip!
I have also used anyvideoconverter for small clips, but I can’t say what it does to the quality of your video, or how big of a file it lets you put in! With the XBOX screenrecorder, it doesn’t matter what type of video files you get, as the recording will save to MP4 anyway.
LOADING YOUR FRAMES
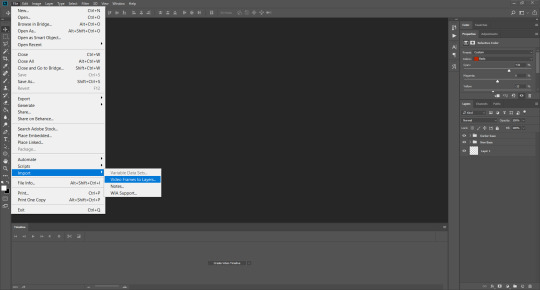
Now, go ahead and record whatever clips you want to gif. Make sure you have the video timeline open, by going to window > timeline. Then, go to file > import > video frames to layers.
Next, select and open your clip from where it has saved (with the XBOX recorder, it saves in video > captures). You should see a little window pop up, where you can move the sliders back and forth to clip your recording to whichever part(s) you specifically want to gif. I recommend trying not to load a lot of frames into photoshop at once, but I would be a hypocrite to say that, since I do it a lot lmao. Just be patient if you do!
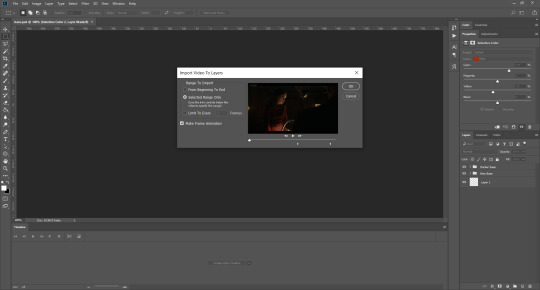
Once you have chosen the length, click okay. Never, EVER, I repeat NEVER click the button that says “limit to every __ frames”. This really ruins the flow and quality of your gif—it’s better to have shorter, but smoother gifs, I promise. And with tumblr’s new 10 MB limit, it shouldn’t be a problem anyway!
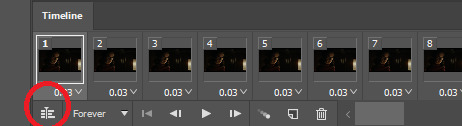
Then, your frames should open up. What we want to do is make them into a smart object, so we can edit all the layers at the same time. To do this, click the small button in the left-hand corner. ALWAYS click this first. If you don’t, it will only convert the first frame to a smart object and the gif won’t work.
Give it a second to sort itself out, then, on the right-hand side, select all your frames at once using the shift key.
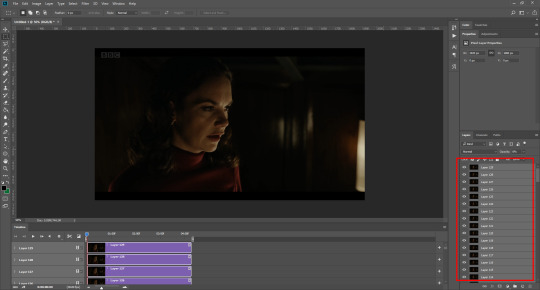
Then, go to filter > convert for smart filters. This might take a minute. Don’t click anything else in case PS gets angry lmao, just leave it for a second and it’ll do its thing. The more frames you have, the longer it takes! Now we have our gif, but it needs to be cropped, sharpened and coloured!
CROPPING
You want to start by selecting the rectangular marquee tool on the left-hand side, then drag it across by clicking and highlighting the area you would like to crop your gif to, like so:
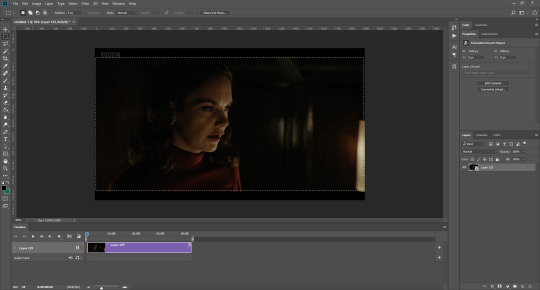
What I tend to do is select everything inside the black lines you sometimes get around your gif (this depends on what file you d*wnload), and also the tiniest bit inside the sides. This is because I’ve found if you crop it right up to the edge, you get a tiny bit of transparency on the sides of your gifs, which I’d rather avoid.
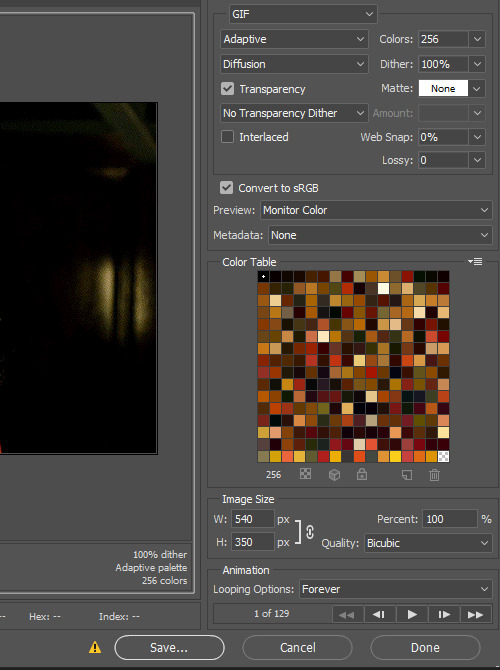
Once you have your desired selection, go to image > crop. Now, the dimensions for tumblr are 540px width, so all your gifs have to be that width. However, the length is up to you. I really like big gifs, so sometimes I even make a full square, or even longer. It’s entirely up to you, and what kind of set you want to make.
For the purposes of this gif, I will stick to what I usually go for, 540px by 350 px. This will mean you’ll have to crop some width off, but that’s okay, since Marisa isn’t central anyway. The cropping is always trial and error for me, as sometimes people move out of the frame within in the gif. The best thing to do is just try it, and then move the slider in the timeline window at the bottom to see if the person stays inside the gif, and if not, adjust accordingly.
Next, go to image > image size:
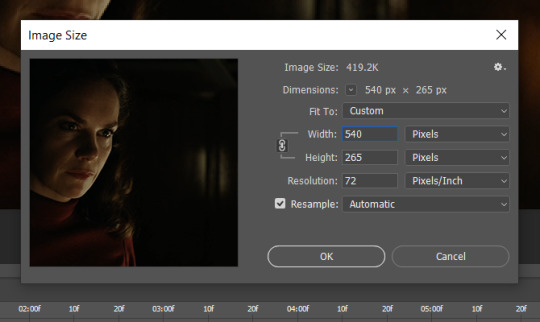
In this box, if I put the width as 540, the gif is a smaller height than I want, as it keeps to the dimensions of the gif when you load it into PS. That’s okay, just put the height you want instead, and we’ll crop off the excess.
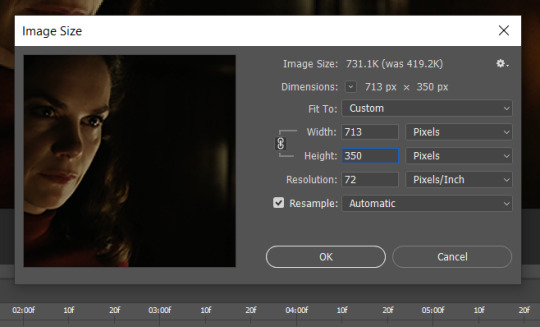
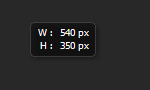
Then click OK. Using the rectangular marquee tool again, we need to remove the excess width. Part of the reason I like this version of PS is that it tells you the width of your selection as you do it, but you can always use the ruler as a guide, and check the size of your image by going to image > image size again.
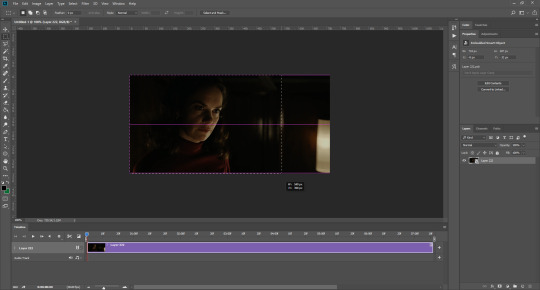
Again, use image > crop, and your gif should now be the correct size!
You can also use the crop tool in the timeline window to crop the length of your gif:
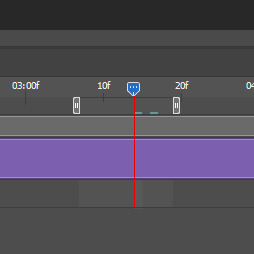
However, I tend to wait until later on to do this (which will be explained further down!)
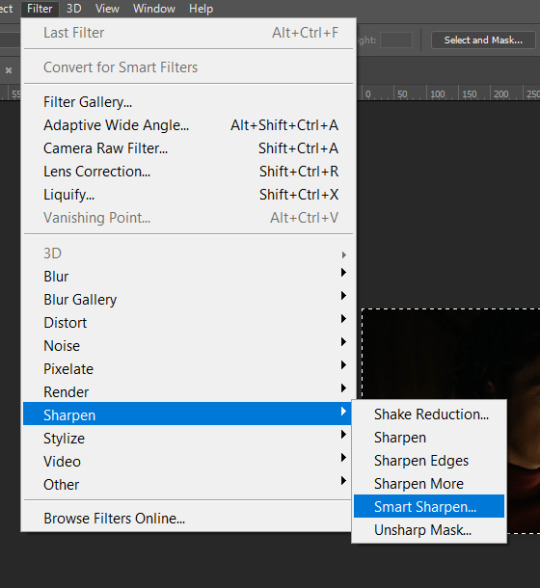
SHARPENING
Next you want to go to filter > sharpen > smart sharpen.
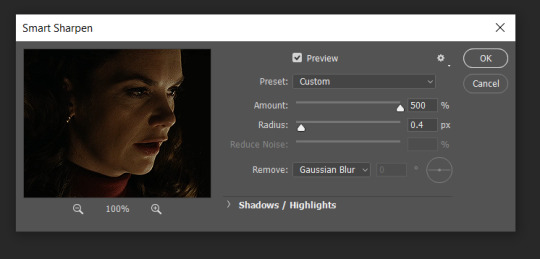
These are my settings. However, 0.4px is very sharp, too much so, but that’s easily fixed.
Go to filter > blur > Gaussian blur and then set it to 1.0.
Now on the right-hand side, we need to reduce the blur, so double click the little adjustment button, and change the opacity of the blur. I usually go for 20-30%!
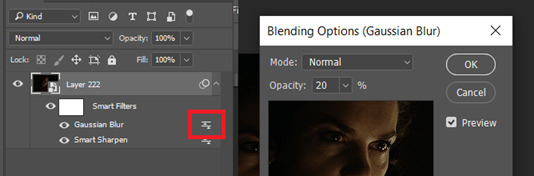
Then click OK, and that’s your sharpening done!
COLOURING
I picked this scene on purpose as it’s dark, so good for showing how to colour a gif. I have a base psd which consists of some very basic adjustments, but it mostly exists so I don’t forget what adjustment layers I like to use. I adjust them every time I make a gif, essentially colouring each gif from scratch.
In this case, the psd actually makes it darker. So, what I will do is turn each layer off, and adjust as I go. A lot of people say using lots of adjustment layers ruins the quality of your gif… I have never found this to be true, as long as you are gentle with them. If you whack the brightness right up to the top, it’s going to ruin your gif no matter if you use 1 adjustment layer or 100. I would just say use your common sense, and adjust a little at a time!
I start with a simple black to white gradient map set to soft light, because I think it helps you see depth once you add some brightness to it. I usually do this on about 10%, or more if needed. It’s probably unnecessary, I just like how it looks!

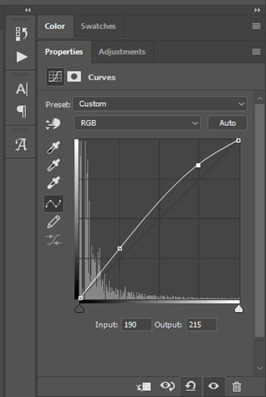
Then, I move onto using curves and levels. This is where things can diverge depending on who you’re colouring. If this person is white, it doesn’t matter too much. If they’re not white, you don’t want to white wash them. My best advice is to play around with it. By adding vibrance and other (usually the red) selective colour settings later, you can ensure you don’t change the person’s skin tone from what it originally was. You can also use layer masks at varying opacities (various shades of grey), on your curves and levels, to remove some brightening so that you’re not changing anyone’s skin colour. Just brighten slowly and check in with yourself honestly about how your gif looks.
Some people don’t like using levels, or curves. It’s completely up to you. I tend to use both because levels are good for bringing depth, even if not brightening (though I like to use them for that as well).
One thing you can do is use the white point of the gif to make PS adjust the curves itself, however I like to drag the sliders myself and see what it looks like. Just make sure it’s not too bright, as we will be using further layers to brighten more, after.

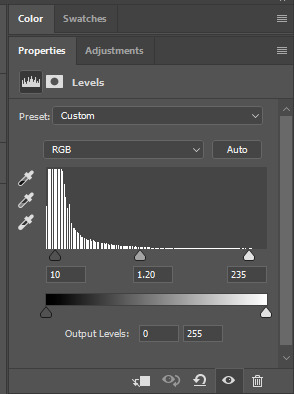
Next is levels. The slider on the left controls the black point, the one in the middle controls the midtones, and the one on the right controls the white points. The black brings depth, the midtones adjust the overall brightness, and the white points produce stronger highlights. Again, you’ll get a feel for how this works as you practice. Just don’t use the white point excessively, especially if your characters are not white.
Then I add vibrance (+20!), because we’ve removed a lot of it when lightening the gif. Next is exposure, which I find brings out the highlight and shadow areas more effectively:

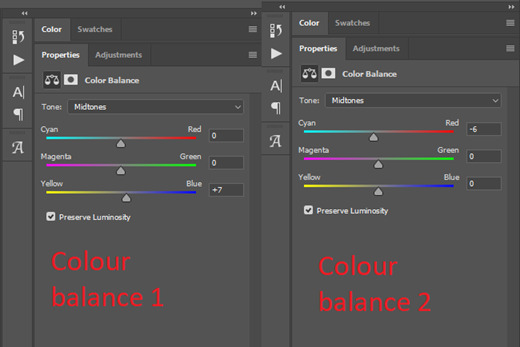
Then colour balance! This helps with scenes that might be a certain colour, i.e. too blue, too green, too red, etc. Moving the sliders in the opposite direction of the colour your gif is will counteract it. The best thing to do when accounting for different colours, is to make a new layer every time you change colour, so that you don’t get confused. I always add a new layer for colour balance and selective colour if I want to change more than one thing. So one for red, one for yellow, one for pink, etc.
A layer of brightness just to make the gif pop, and because the scene is extra dark, I added a very gentle extra curves layer:
SAVING YOUR GIF
Time to save the gif. You can go ahead and file > export > save for web (legacy) now, but then you’ll have to reopen the gif to reset the frame rate from 0.07, to 0.05. Instead of doing that, I use a modified action. The original was made by the very talented @elenafisher! So I do not take credit for that at all. You can find the original here: elenafisher(.)tumblr(.)com/post/190817437374/gif-sharpening-action-2-preview-download and in my resources tag. Please reblog it if you’re going to use this!
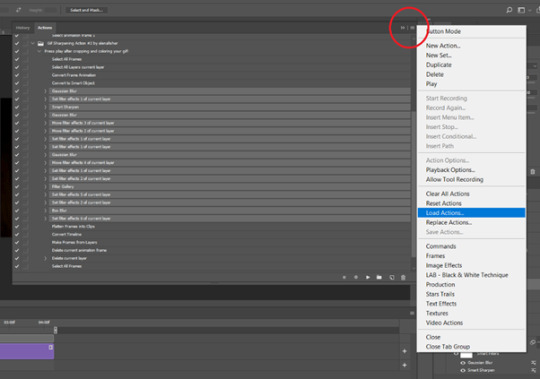
To use an action, first make sure you have actions turned on in window > actions. To load in your action, go to the little lines circled, and then load the action from your downloads:
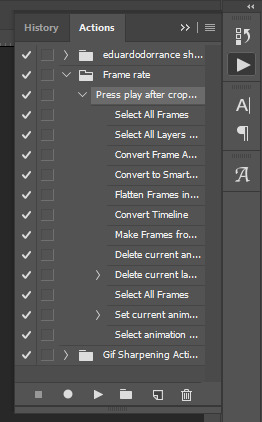
Obviously if you don’t want to sharpen your gifs yourself, you can use the action as it is, and it will give you a beautiful glowing effect. If you’d just like to use it to flatten your gif into frames like I do, make sure to take out all the items I have highlighted:
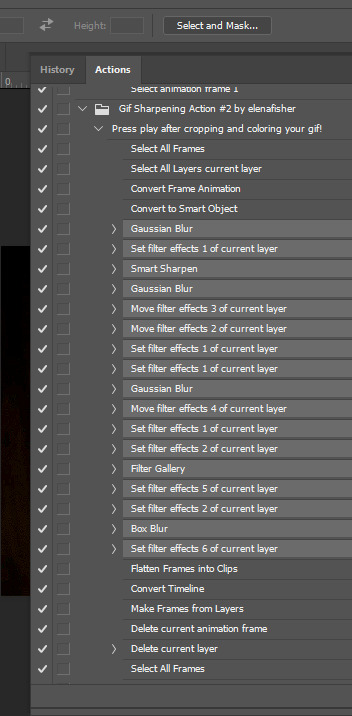
Until it looks like this!
Make sure you have the layer under the file name highlighted, and then click the play button at the bottom! (If you get a screen saying select all frames cannot be found, don’t worry, just click continue!) You can delete the layer that does that if you want, I just keep it in case I realise I’ve forgotten to do something, because you can click cancel and edit your gif before you flatten it. Of course you can undo the steps to get back to the smart object version of your gif, it just takes longer!
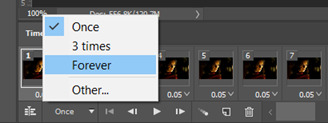
And now your gif is in frames and set to 0.05 already, so you don’t have to change the speed! All you need to do now before saving is change the gif cycle to “forever” in the bottom left-hand corner:
Then to save the gif go to file > export > save for web (legacy). Sometimes, the gif is bigger than the tumblr 10MB limit. You’ll be able to see this in the bottom left-hand corner of the gif save settings. If this is the case, I like to preview the gif, to see whether it would be best to cut frames off of the beginning or the end, or both. When you’ve decided, you can select the frames at the bottom, and in the right-hand side panel, and delete them both using the little bins/trash icons.
I keep checking and deleting frames until I get the gif under 10 MB! Just don’t delete frames from the middle, as then you’ll have the same issue as if you selected “every other frame” when making the gif: it won’t flow!
Lastly, these are my save settings:
So that’s it! That’s how I make all my gifs. Blending I do when the gifs are in the grouped, smart filter stage, whereas text I add on during the framing section above! Really hope this is helpful, please feel free to ask any questions you may have! 💖
#gif tutorial#tutorial*#completeresources#yeahps#chaoticresources#allresources#mikesmom#usergeo#userava#usertix#usersmile#usertom#if you'd like me to cover anything more advanced just shout#i wanted to show how i add text too but tumblr wouldn't let me add any more pics#but people can let me know if that's something you'd want!
504 notes
·
View notes
Text
Changes Writing Challenge
I love this little nook of Tumblr so much, and I love the people in it who have become my friends. No judgement, the least amount of drama I’ve seen in a while, and just so much encouragement! Huge thanks to each and every one of you for making me feel like I’ve accomplished something whenever I post a fic or series!
To celebrate hitting 500 followers, I decided to do a little writing challenge. If you saw this post then you know I’ve been making some changes as I have gone through the last year of rediscovering myself. In light of that, all of the twenty prompts below are quotes/from quotes which I have hoarded during this time to keep my spirits up and remind me I’m not alone. First, the boring-but-important stuff. Please read all of the information carefully!
Rules, Guidelines, Important Dates:
1. Sign-Ups start when this post is live and will go through to June 28, 2021.
2. I will accept one writer for each prompt. If I have to add prompts, I will.
3. Please send your sign-ups to my ask box so they’re easier to keep track of.
4. In your ask, please include your preferred prompt and a backup option. Since I’m only taking one writer per prompt, I’m not worried about your pairing this time around. Also, please let me know if you’ll be posting from a URL other than one you’re asking from. To be included in the challenge masterlist, please post your fic (or the first part, if it’s a series) by June 30, 2021.
5. Please include an author’s note tagging me and mentioning the challenge in your fic post; include #ChangesWC in the first five tags. If the tag doesn’t work, you may DM the link to me, also. If you decide to write a series, please create a masterlist and only tag me in the masterlist.
6. Please give me up to 48 hours to read your fic before checking if I have seen it. If I have not liked it after 48 hours, please DO check. (You know, since we’re all aware of how unreliable tumblr is. And how I can space out at times.)
7.The challenge masterlist will be posted between July 1 and July 4, 2021.
8. There are no word count limits, but please use the Keep Reading feature if your story goes beyond 500 words. Additionally, if your fic goes beyond 5000 words, please consider splitting it into multiple parts. This is not a requirement, only something to think about.
9. You can use your prompt as dialogue, as an inspiration for a scenario, any way you want. If you use it as dialogue or somewhere else within the fic, please make sure it’s in bold text.
10. Because this challenge was inspired by rising up and not letting life get the better of me, I will accept most genres as long as your story has a hopeful ending.
11. For personal reasons, I do not read and will not accept into the challenge stories that include: non-con/dub-con, underage sex, adult-child romantic/sexual relationships, spouse-bashing, child abuse – I could go on, but I think you get the idea. If you’re not sure about something, I’m always happy to answer questions. Whatever you include, please be sure to warn accordingly.
12. Characters and RPFs are welcome.
13. Bring on the ships, OFC’s, reader pairings, put yourself in the story. Whatever you’d like.
14. I can’t promise that I will read everything. Again, for personal reasons.
15. This challenge is about writing what makes you happy. I have to set some boundaries for (yep, you guessed it) personal reasons, but otherwise, please feel free to go wild with expressing yourself. If you have any questions, feel free to shoot me an ask or a message!
Prompts are below the cut, you know where to send your sign up! Happy Writing!
1. Change is hard at first, messy in the middle, and gorgeous at the end.
2. We cannot become what we want by remaining what we are.
3. If you’ve been brutally broken but still have the courage to be gentle to other living beings, then you’re a badass with a heart of an angel.
4. If you have an idea you generally think is great, don’t let someone talk you out of it.
5. How amazing it is to find someone who wants to hear about all the tings that go on in your head.
6. It’s a strange thing to nourish the thing that could kill you, in the hopes it does not kill you.
7. I don’t really have a plan. I rely solely on caffeine and weirdness to get me through the day.
8. You can’t fuck up anything that is meant for you.
9. You scare people because you are whole all by yourself.
10. You don’t know how strong you are until years later, you look back and see an incomprehensible survival.
11. You either say how you feel and fuck it up or say nothing and let it fuck you up instead.
12. It’s funny, you know? How some people won’t listen until you have nothing left to say.
13. Sometimes feeling right, after feeling wrong for so long, is the hardest thing to get used to.
14. You had to be that person to become this one.
15. Whatever you do, never run back to what broke you.
16. You don’t know pain until you’re staring yourself in the mirror with tears in your eyes, begging yourself to just hold on and be strong.
17. Forgive yourself for the survival patterns and trends you picked up while enduring a trauma.
18. I’m still learning how to go back and reread my own chapters without feeling like I want to set all of my pages on fire.
19. Healing comes in waves; maybe today the wave hits the rock. You are still healing.
20. It could take you years to actually face what has happened. And numerous more to overcome it.
Tags because why not: @captain-s-rogers @letsgetfuckingsuperwholocked @hurricanerin @im-not-an-armrest-im-short @shynara51 @sea040561 @pinknerdpanda @xtina2191 @beakami @heartsaved @blackwidowismyhomegirl @averyrogers83 @jennmurawski13 @connie326 @whitewolfvibraniumdreams
#changes wc#changes writing challenge#500 follower milestone#change is okay i guess#a queue of armor around the world
21 notes
·
View notes
Text
How to sign up for Black Emporium!
Yes sweet nuglets, it's that time of year again: Time to sign up for Black Emporium!
CLICK HERE TO SIGN-UP!
Helpful Links:
How to Guide || Requests on Ao3 || Tagset || Nominations Spreadsheet
Signups end: July 18, 2020 @ 8:00PM EDT || Countdown
CHANGES THIS YEAR
-Maximum number of offers and requests increased to 30 through the Ao3 signup, plus 10 "bucket" offers/requests in optional details (40 total)
-If you decide to offer "any", you may offer "any nonbinary" as well as the other relationship categories (F/F, F/M, M/M, Multi)
-Sign up summary will now show requests/offers on a per-pairing basis - once a pairing is requested, it will be added to the sign-up summary the next time it updates (on an hourly basis)
A STEP-BY-STEP GUIDE TO SIGN-UPS
1. Sign in to Ao3
If you don’t have an Ao3 account, contact the mods for help!
2. Go to the Black Emporium signup field (link)
3. Scroll to the “Requests” field
There are several different components of this field:
Relationship:
Enter one, two, or three approved relationships that you would like to see in a fanwork created for you. This field will autosuggest approved pairings. If your pairing does not show up, it may be that you have fallen victim to a known bug of Ao3's that we cannot fix, wherein pairings in a tagset do not autofill. If this happens, simply type it in as it appears in the tagset.
Additional Tags: You can request fanfic, fanart, or both. Selecting "any" is treated the same as selecting both.
Letter: If you have written a letter on an external website (such as Tumblr/Wordpress/Dreamwidth/Google Docs), you may link it here.
Description: Here is where you can provide additional detail about what you would like to see in a fanwork, both in general and for specific pairings. Good things to include (in this box, a letter, or both) are general likes and dislikes, preferred content rating, and Do Not Wants. Please remember to put your DNW's (do not wants) in the Ao3 sign up form - we can only take action if you put your DNW in your Ao3 sign-up form because it is the only thing we can absolutely guarantee that your creator will be able to access.
Remember that anyone who creates fanwork for you must respect your Do Not Wants. If you do not enter anything into this box, and you do not have a link to a letter, we will assume that means you are okay with anything for the specified pairing(s). If you have any preferences or things you do not want, we would encourage you to add them. It makes the process smoother for all involved.
Here are some things commonly put in the description box:
Likes/Wants:
- Frequently it can be considered helpful to your author or artist if they have some idea of what you like to see, and what you don't. For example:
I love F!Adaar/Sera because I think the idea of them merrily pranking they way around Skyhold is so much fun. Please don't write me something sad about them.
Do Not Wants:
- stuff that makes you uncomfortable, or just plain stuff that is Not Your Thing. While the Black Emporium does not believe in kink shaming or otherwise insulting people for their own personal taste, we do want people to let their artists or authors know what their limits are. You don't have to give any reasons for this;"no x/y/z" gives your creator plenty of info to discern where your limits are.
We can only take action if someone writes you something against your DNWs if it is in your sign-up.
Prompts -
Prompts can be just about anything, but they're meant to be ideas that you'd like to see that can help give your artist or author something to work off of. Sometimes this can be a prompt or a question you'd like explored (for example: What if Solas found himself falling for M! Trevelyan? How would he feel about potentially falling for a human?) or an idea you'd love to see (Josie and M!Cadash snuggled up in front of a fire, please!) or just a few words of inspiration (Leliana/Josephine - secrets, lies, ravens).
Details about your character(s):
It is fairly common for people to give basic descriptions of their characters if it is a character where their appearance or personality may vary (ex: Wardens/Hawkes/Inquisitors), particularly if fanart is requested. These descriptions can be very basic indeed (ex: purple hawke), or extremely detailed (ex: This is Celeste Trevelyan, she loves her squad more than life itself, pink hair, dusky-rose skin, built like she could bench press you six ways from sunday).
Bucket Requests:
You may also use the description field to note additional pairings that you would be willing to receive. You may find this option helpful if you are willing to consider different Warden or Inquisitor backgrounds for your specified pairing that have been nominated. You are limited to an additional ten pairings specified in this manner. Please fill out the form entirely before resulting as filling in pairings manually in the description; those that you fill in in the relationship field (the first 30) will take priority.
Things you should not put in the description field:
“I would like anything but nasty [kink]. I think people write that are gross and nasty.”
Please do not insult people who like something you dislike. It’s Not For You, and That’s Okay. “No [kink]” expresses this much better than a long explanation of why you don’t like [kink].
“I’m only choosing this to get to three nominations. Please don’t write it.”
While we know someone who signs up for a,b and z may want a and/or b more than z, but please don’t scream to your author or artist that what you may well match on is something you don’t want as much as other pairings. Writing something like this also reduces your chance at treats as well.
“Even though I said I wanted M!Solavellan, I’m fine with F!Solavellan too if you like that better.”
Please don’t tell people that you’d be alright with non-nominated pairings, as fics with only non-nominated pairings cannot be added to the collection.
Minimums and Maximums in Requests:
You are required to fill out a minimum of three request fields (Required: Relationship, Additional Tags; Optional: Letter, Description). Remember that you may put in one OR two relationships per request field, so the maximum number of pairings that you can list in this manner is thirty. Remember also that you must fill out at least 3 request fields, so if you fill 2 out with 3 requests in each "request box", Ao3 will still want you to add one more -- it's a good rule of thumb to fill at least three out with one request, then double up as you wish.
4. Continue to the “Offers” field
There are several different components of this field:
Relationship:
Enter one, two, or three approved relationships that you would like to see in a fanwork created for you. This field will autosuggest approved pairings. If your pairing does not show up, it may be that you have fallen victim to a known bug of Ao3's that we cannot fix, wherein pairings in a tagset do not autofill. If this happens, simply type it in as it appears in the tagset. If it continues to give an error, please drop us a comment with the pairing so we can figure out what's going on. You also have the option to select any relationship.
This means that you are willing to write or draw fanwork for, literally, any of the approved pairings.
The only limitation we will accept will be be a limitation of what sort of relationship you want to create for: eg, any f/f, any m/m, any f/m, any multi, or any nonbinary. Anything else WILL BE REJECTED. You may NOT use this option to say, for example, “Any Cullen pairing”. This option is for any and all of the approved pairings. Do not use this option unless you are sure that any is what you want.
Additional Tags:
You can offer to create fanfic, fanart, or both. Selecting "any" is treated the same as selecting both.
Comments for mods:
Here is where you can provide additional detail about what you will and won’t create. As with your requests, you can provide general likes and dislikes as well as things that you absolutely will not do. If there is someone signed up you absolutely cannot stand, please write "don't match me to x" here; we won't ask details, we just won't match and this will be a fully confidential field. If you hate nugs, put it here, and we'll make sure you get at least one nug-free prompt and, ideally, a nug-free sign-up. We want you to have an assignment you'll be happy about, so if you've got something that would be triggering for you to create for, let us know. We can only take action based on our own knowledge, so the more information we have the better we can try to match you with what you really want. If you do not enter anything into this box, we will assume that means you are okay with anything for the specified pairing(s) selected. If you have any preferences or do not wants, we would encourage you to add them. It makes the process smoother for all involved. None of the mods will blab over whatever you write; we just want you to have the best time possible with your assignment.
Minimums and Maximums in Offers:
You are required to fill out a minimum of three offer fields (Required: Fandom, Relationship, Additional Tags; Optional: Comments to mods). Remember that you may put in one or two relationships per request field, so the maximum number of pairings that you can list in this manner is twenty. Remember also that you must fill out at least 3 offer fields, so if you fill 2 offer fields out with 2 offers in each "box", Ao3 will still want you to add one more offer field even though you have one over the minimum required amount of offers -- it's a good rule of thumb to fill at least three offer fields, each with one offer, then go back and double up or not, as you wish.
Bucket Offers:
You may also use the comments to mod field to note additional pairings that you would be willing to write if you have already filled thirty slots. You may find this option helpful if you are willing to consider different Warden or Inquisitor backgrounds for your specified pairing. You are limited to an additional ten pairings specified in this manner. Once again, those filled in the actual relationship: tags will take priority over those written in, so choose which pairing goes where carefully!
A Note on Matching
Black Emporium runs on OR matching, which means that you will match on one relationship out of the ones that you offer and request. You are guaranteed to match on ONE relationship; you may match on more, you may not. For your assignment, you can write what you matched on OR you can write any other couple on their sign-up form. You will only have to write or draw for ONE request, not all of them. The minimums will be one piece of artwork or one 1,000 word fic.
62 notes
·
View notes
Text
How to gif without photoshop (second method)
Hello! A couple months ago I made a tutorial on how to gif without photoshop using the website ezgif. I got a really great response for it and received some requests for the other giffing program I use when I don’t have access to photoshop. The program is called instagiffer; this is a software so it needs to be downloaded but I have never had any trouble with my version.
Warning that this is VERY text and image heavy because I know how frustrating it can be when a tutorial feels like it’s skipping steps and I want this to be as clear as possible. Also please read this on desktop, tumblr mobile kills the quality of gifs inside text posts.
Please reblog if you found this helpful!
This is the video I will be giffing and here is the gif I will be making!

What you need:
Instagiffer
This program has been around since 2013 and I have used it since 2016. Unfortunately, it hasn’t been updated since 2016 and the download link on the official website is broken. That being said, there are a few other websites that still have a working download, which is what I linked to above.
ezgif
Although we aren’t going to use this website to make the gif, we are going to use it to add more color and brightness to the gif.
A video downloader
This is the video downloader I use but basically any youtube/video download website works. There are two ways to gif on instagiffer; using a video and using the built in screen recorder. I will show you how to use both.
A video to gif
This program is a lot more forgiving about video quality than ezgif is, but for best results 720p or 1080p is still the standard. Scenes with good lighting and bright colors turn out the best, but you can still make good looking gifs from darker or unsaturated scenes if you know what you’re doing.
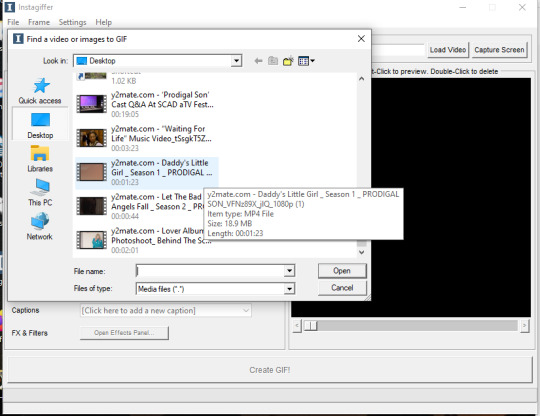
1. Making a gif with a downloaded video
Step One: Getting the frames
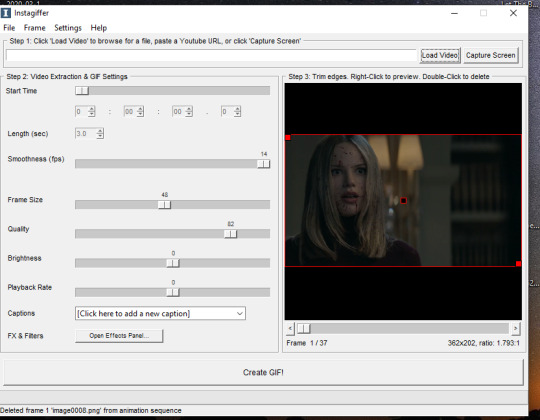
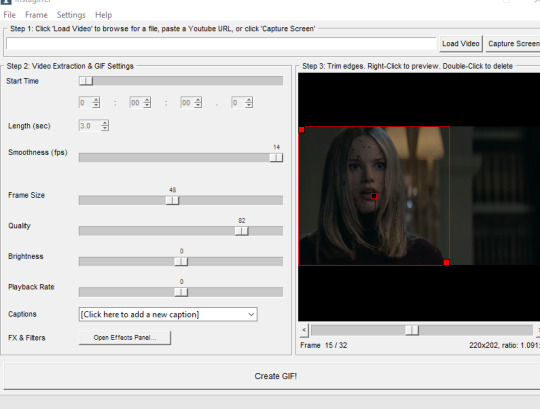
First, you download the video you want to gif. Then you open up instagiffer and click on “load video.” Scroll down until you find the video you want to gif and click on it.
The video will appear on the screen in the right hand side. Go ahead and put “smoothness” up as high as it can go. This increases the frames per second and makes the gif look smoother. It also makes the gif longer, so you may have to bring it down later so it doesn’t go over tumblr’s size limit, but I always start as high as possible then work down.
Next, find the moment in the video you want to gif. You can either use the sliding bar or just type in the start time (you can use hours, minutes, seconds, and millisecond). You also want to put how long the clip you want to gif is. 3 seconds is the default but I usually bump it up to at least 4 (unless I know it’s a really short clip) just because it’s a lot easier to delete frames than add them.
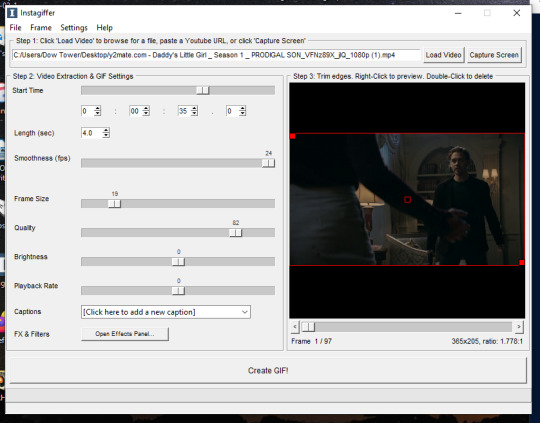
If you do this, you’ll quickly realize your gif has extra frames that appear slightly before and slightly after the moment you want to gif. It’s really easy to get rid of those frames; just click on them until you only see the frames you want in the gif. Use the scroll bar at the bottom of the gif to move around the frames, and use it to make sure the only thing on screen is the clip you want included in the gif.
Step Two: Resize the gif, brighten the gif, change the speed and add captions
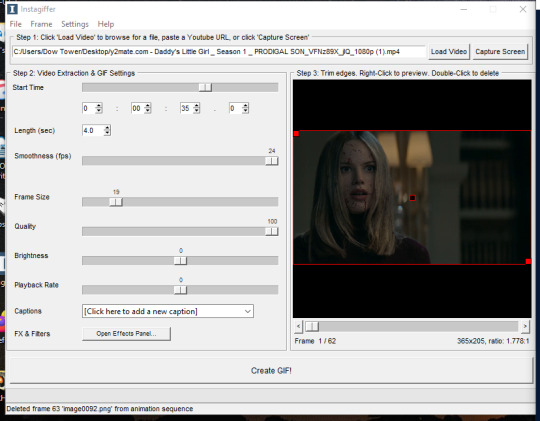
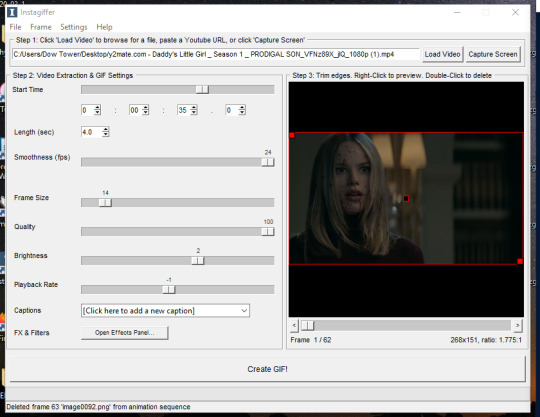
Now, it’s time to size, brighten, and color your gif! First look at the “frame size” option. Using the correct gif size for tumblr is one of the easiest ways to make sure the gif looks good. For gifs that take up a whole row, the size should be 540p wide. For two gifs in one row, the size is 268p each. For three gifs in one row, the sizes are 177p, 178p, and 177p in that order. Here is a visual of it. You can see what the width/height of the gif is in the bottom right hand corner of the gif screen. I am making this gif 268p. Get the frame size as close to the width you want as possible; right now, it is 269x151. To get it down to 268 exactly, go up to the top of the program, click on “frame” > “manual crop”. This little box will pop up. Just set the width to 268 and make sure the size is listed as 268 under the gif as well. The height can stay the same.

Keep quality up to 100 obviously. I almost always brighten by 2. Unless you’re giffing something with a huge spot of light, 2 is basically standard. Going up any higher usually makes the gif just look grainy, but if the scene is REALLY badly lit, you can go up to 3. Playback rate is usually -1, just to make the gif look smoother. Unless it’s a super long gif or a super short gif, I don’t mess with it further.
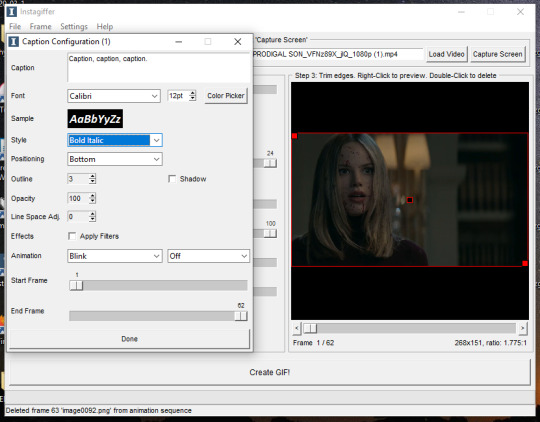
Captions are obviously optional but if you want to add one, click on “click here to add a new caption.” A box will pop up with options of how you want the text to look. I only use this to “caption” gifs (aka add dialogue). The settings I use are 12pt font, calibri, white, bold italic, bottom of gif, outline up to 3. You can also chose what frame you want the caption to start/end on if you want. Since this gif doesn’t have talking, I’m not going to include the caption in the final gif, but I wanted to show how to use this function.
Step Three: Color the gif
There are two parts to this. The first place I color the gif is on instagiffer, and then I use ezgif to add more effects. The second part is totally optional but they have more choices for coloring there.
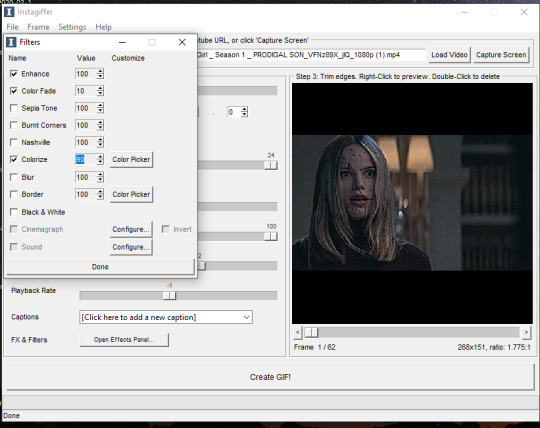
Click on the “open effects panel”. A window will open showing what the gif currently looks like, along with a variety of filters you can use. Ignore how grainy it looks, it won’t look that way when it’s finished.

First thing is keep “enhance” up to 100. This is basically a sharpening function and without it the gif will get super blurry. There are a ton of filters you can play around with, but the only two I focus on usually are “color fade” and “colorize.” For color fade, I click it on and set it at 10. Obviously, if you’re trying to make a desaturated gifset, you can raise it up for a faded color effect, but I use it more for color balance than desaturation. Next click on colorize, and then color picker.
I almost always pick a light shade of blue, purple or pink; it brings out the color in the gif and tends to keep skin tones from being washed out. This is usually my default:
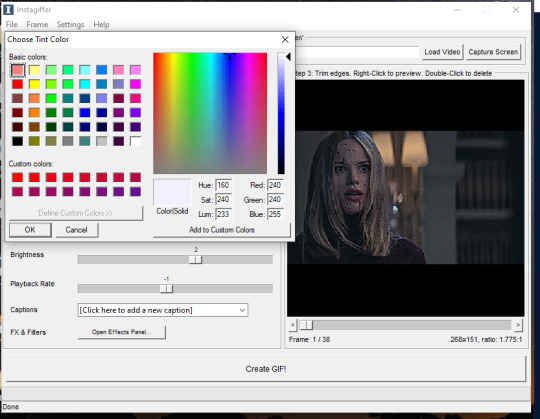
Then, I bring the “colorize” option down to 90 to increase the effects of shadows.
Last thing to do is click create gif! It’ll take a few seconds, especially for longer gifs, so be patient. ALSO there is a good chance you’re going to get a message saying something to the effect of “this gif is too big for tumblr’s photo limit.” Feel free to ignore that; the software being old means it still has the photo limit as 2gb when now it is 5-6gb so almost any gif you make will be considered “too big.”
Your gif now shows up in a preview tab! It should also show up as a file labeled “insta” on your desktop.
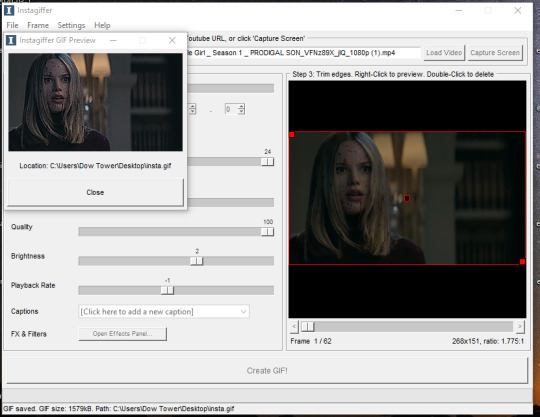
Here is the gif so far.

You can end here if you want. But when using instagiffer, I always go to ezgif to brighten up the colors further.
This part is basically the same as how you would color a gif you made in ezgif (see this tutorial) but I’ll quickly walk through what I do.
Go to ezgif.com/effects. Click chose file and upload your gif. First, you’re going to want to up the saturation, brightness, and contrast. You have to play around with these functions a lot because every scene is different, but in general, I have my saturation up pretty high and my brightness and contrast at at least 8. For a scene as dark and desaturated as this, I put saturation at 200, brightness at 12, and contrast at 16.
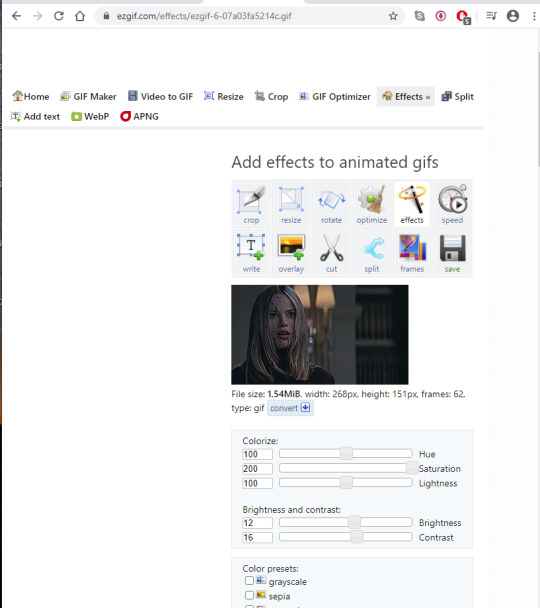
Afterwards, you want to go down to “color presets” and select “tint.” In my other tutorial, I recommended tinting with a light red or light blue, but for gifs made on instagiffer, I tend to use a light yellow/gold. I already tinted the gif purple in instagiffer so adding yellow in ezgif tends to balance it out. The shade I used for this gif is #fffcf0.
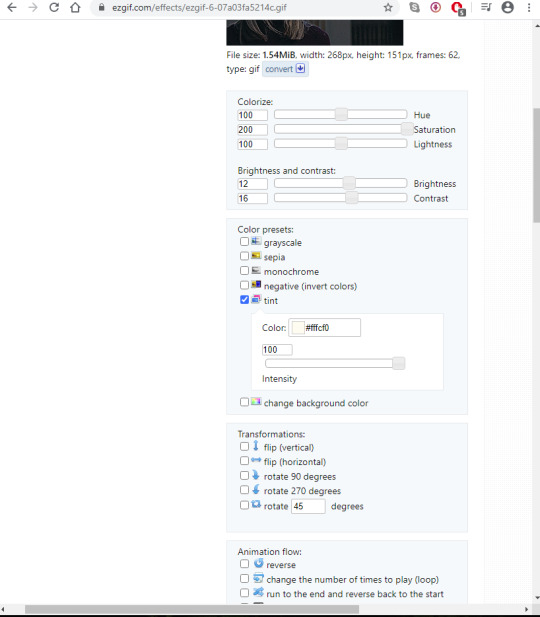
If the gif ends up looking too yellow, either decrease saturation, or click the “effects” button under the gif and add a layer of light purple to balance the colors more.
Your final gif should look like this.
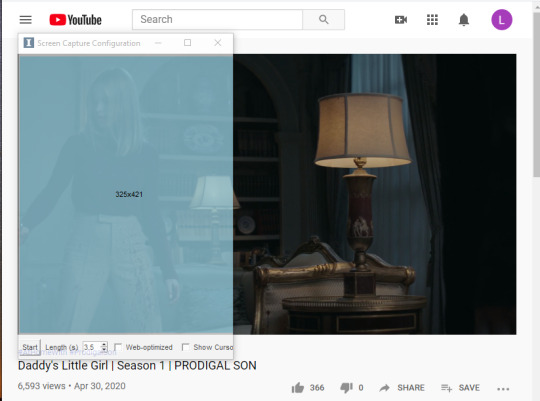
2. Making a gif with the “capture screen” feature
This only changes the method of how you get gif frames. Everything related to resizing, coloring/effects, and adding captions is the same as above.
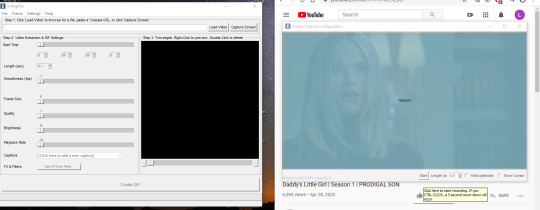
What if you don’t have a download of the thing you want to gif? The great thing about instagiffer is it has a built in screen recorder so you can gif any video you want, even if you can’t download it (or if you’re like me and don’t want to deal with downloading a 45 minute episode of something just to gif one scene).
To use this tool, click on the “capture screen” button on the top right corner next to “load video.” Then this screen will pop up.
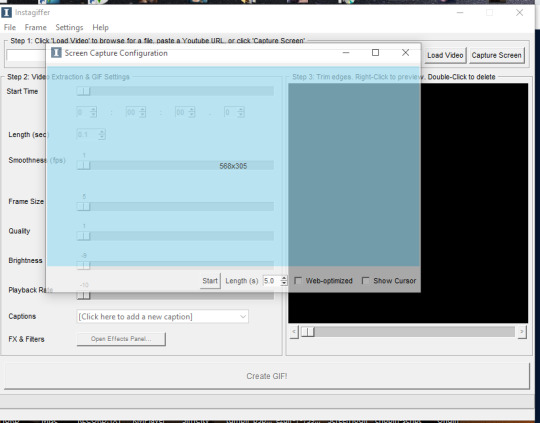
You’re going to want to take this blue screen over to the screen you want to capture. I’m going to put it over the youtube video I am giffing. Adjust it so the only thing it’s focused on is the video and set the length in seconds. I usually set it for longer than the clip is just because it’s easier to remove extra frames than rerecord a scene. There is also sometimes a lag so starting it right before the scene you want to gif helps with that. For example, if the clip I’m giffing is 3 seconds long, I set it to 3.5. Then start running the video and click “start” on the screen!
Your frames will now show up on instagiffer. Everything is the same, except you can’t change the frame rate or timing. Go ahead and delete frames that you don’t need by clicking on them. After that, just use the same resizing, and coloring method I outlined above.
Some notes:
When using the video download option, the effects you use will save, as will the size of the gif. So if you gif one part of a video, then move the time stamp to another part, it will stay in whatever size you put the gif as. However, when using screen capture, you have to resize the gif and go to the effects menu each time because they reset after each use of the screen recorder.
You can also just paste a youtube link into the white bar at the top of instagiffer to gif it, but I’ve found that the quality is much better if you download or use the capture screen.
To crop a gif, move the red box around (just make sure it stays the right width size!)
If you are using the screen recorder and only want to record part of the video (like just a characters outfit) size the gif recorder so it’s just surrounding the part of the video you want to see.
I hope this made sense lol, it took me a few days to write it all so please let me know if you have questions or need anything clarified! Support me on Ko-Fi if you’d like and are able 💕💕💕
#gif tutorial#giffing tutorial#giffing#gifmaking#mine#my gifs#blood //#long post#@ anon hope this helps!
76 notes
·
View notes
Note
Hi there! I absolutely loooove the destiel fic collection and think that it's a genius way to expose fans to fics that might not always get as much attention on fic recs and when searching on ao3. I was thinking of trying to create a similar collection for another fandom and was wondering if you have any tips? Or if there's anything that you wish you knew when you started it? Thank you!
Hi!! Just for openers, sorry I didn’t reply to this yesterday, my mom’s basement flooded and took with it all my writing time, sigh. ANYWAY. On to the topic at hand. How to make a “faves survey” for another fandom, and have it resemble what I’ve made for Destiel? Well, here’s what I’ve done, hopefully some of it will be applicable to you...
1. This is the most important part: Do NOT let it become or be perceived as a popularity contest. Never release the raw stats (except perhaps to a small number of people who you trust to help you). Never announce a “winner.” Never share a ranked list. Never act as if more votes equals better. Never ever suggest in anyway that your purpose to find “the best.” Treat people and fics who get one vote with just as much fanfare as people and fics who get 50 votes. I do release a “top 20″ list just because so many people asked, but even then, it’s in alphabetical order, and meant more as a snapshot. Encourage people to vote for their favorites that aren’t already in whatever collection you end up making, and encourage people to vote for things they don’t usually see on rec lists. Aim for an expansive range of types of fics being voted for, and make it clear - no ship shaming (or secondary ship shaming, if yours is ship-based like mine, rather than being general to a given fandom) or kink shaming.
2. Keep the survey super simple. People don’t read complex instructions, and they’re not going to want to rank lists or anything like that. You can see the one I use here. Feel free to emulate it, copy it, modify it for your own purposes. I used to just do boxes but people would routinely put in way more than 5/10, and while I didn’t really mind the extras, it greatly increased the amount of work I had to do, and since the survey routinely gets a couple hundred replies that I go through, I decided to make it a little harder for people to go over the limits. Don’t bother asking for people’s names or trying to validate the results. I’ve tried. People don’t want to put their names, and validation encourages people not to submit...AND doesn’t prevent cheating...so is really pointless. Just keep it anonymous, after four rounds I can say...that works best.
3. And, speaking of people going over the limits, and cheating...people will cheat. No matter how clear you are that number of votes don’t matter, no matter how much you insist that whatever data you’re collecting will only be used in so-and-so a way...you will spot people “cheating,” for various definitions of the word cheating. People who vote for their own works. People will submit multiple surveys. People will “ballot box stuff” for their favorite(s). People will list more than the maximums you’ve asked them to. People will submit works from other ships, and - though it’s never happened to me - if you make it fandom-general I’ll lay heavy odds at least one dumbass will submit for some other fandom entirely. It happens in different permutations every time, some more obvious than others, but it happens. And the conclusion I reached is...so fucking what? In the end, since the idea is to highlight as many different great works as possible...screw it. Let people vote for themselves. Let people ballot box stuff. Let people submit multiple surveys, or list more than whatever maximums you’ve set. In the end, since every work is treated as equal and one vote is worth as much as a hundred...if they’re cheating to up the vote count, it’s irrelevant, and if they’re cheating to vote for more works, then yay! more works to include! and basically the only thing I’ve found that reduces cheating is to make it absolutely clear to people that I’d really rather they not but ultimately I can’t stop them, so do their thing I guess? And it does help. I got less cheating each time I do it, or at least less that I’m able to catch lol. (as a side note - the one exceptions is the “works for others ships.” Those you can see listed on the “INELIGIBLE” sheet of the spreadsheet I link below, but I don’t add them to the AO3 collection.)
4. Spreadsheets are your best friend. You’re going to want some way to organize the data you’re collecting. I’ve got a public version of the sheet I use that you can see here. It’s pretty similar to my “private” version, except the private version includes actual vote counts, separated by which time(s) I did the survey that the work in question got votes. I mostly use that data so I can do comparisons over the years (“this year X works were added to the collection that were never in it before!”) and because I like numbers. However, depending on how exactly you plan to use the data, you may not even need to tally vote counts, and you could do one that’s more similar to my public version. Also, if you make an AO3 collection, you’re going to want some way to track which works you’ve invited, which have been added, etc., cause otherwise it’s just a nightmare to keep track of. (a little more on this later).
5. Decide how and where you’re going to share your data - as an AO3 collection? As a public spreadsheet? On social media? Maybe you want to make a side Tumblr just for it? Or a Discord server? etc. etc. Like, I’ve got a pillowfort group (though I hardly use it) and a channel in a Discord server (thanks again to the PB folks for making space for me!) with the AO3 collection being the main portal. You want to make sure that it’s advertised enough that people know it exists, and also be prepared that short term you’ll hear basically no feedback on whether people use it, and even long term it’ll be once in a blue moon and suddenly eight people will be like WAIT YOU’RE THE PERSON BEHIND THAT THING I LOVE THAT THING. In that respect it can feel a little thankless but I’ve definitely found that people do use it, it’s just that there’s no real way for people to let YOU know they’re using it (and, honestly...good? This isn’t really about us, after all, it’s about all these fic writers, the goal is to bring attention to them, not ourselves, we’re just a go-between for the writers and the readers.)
6. For making an AO3 collection, you’ll have to invite every single work individually. Some people have their accounts set to auto-accept invites, but otherwise whether the work actually gets added will depend on the authors. Some people will never accept the invite. Some people won’t know how to accept the invite. Some people will accept the invite and then subsequently remove their work. Some people have left these parts completely and will never even see the invite. That’s why it’s important to track who has added and who hasn’t, and periodically double check it (I double check every six months or so). For the people who don’t accept the invites for whatever reason, you can bookmark the item to the collection. HOWEVER, if you do this with your personal account, every single one of those bookmarks will be listed under your personal AO3, which is why I ultimately made the Faves survey its own account - it’s entirely to facilitate bookmarking. You can also use the “Bookmark External Work” feature to link to works that aren’t on AO3, and to tag them to whatever extent you want to. Here’s some examples of how I chose to bookmark external works.
7. Things will inevitably get complicated. Authors will change their names. People who do the survey will use shorthand you’ve never heard of for some fic you don’t know. People will misspell things and you’ll either recognize it even with the typo...or you won’t. People will vote for things that list eight different ships and you’ll have no idea which one is endgame. People will vote for things that have been deleted, or they’ll tell you it’s definitely on AO3 when it’s not, it’s on some other platform. The list of random things I’ve had to deal with is stupidly long and I’ve probably forgotten even more. Just...roll with it. Do your best. Ask for help (“Someone nominated a fic abbreviated as ABC to the collection and didn’t give the author and I have no idea what it is, help me Tumblr!”). And in the end, if you’ve done everything you can think of and you still don’t know...let it go. It’s just not that worth worrying about. And sometimes if you step away and look again in a few days you’ll figure out another way to search and it’ll pop up. But honestly I’ve got a handful of works I still haven’t been able to track down, and that one work that someone submitted that’s only available in Finnish and is explicit and behind a log-in wall on a small independent Finnish-only fic archive...well, I spoke to the author and confirmed the work exists, but otherwise...whelp, it’s not linked, and I did my best. That’s all you can do.
8. No matter what you do, someone somewhere will probably get upset about it. The first time I did the survey, when it got the most traction, I actually got a little hate, and I got some anons who were like “oooooo did you know that ~x~ is cheating” and I had a little “HOW DARE YOU NOT PLAY FAVORITES WHAT ABOUT MY PERSONAL FAVE?” and just...decide how you’re approaching the survey, and stick to your guns, and if anyone is a douche, hit the block button. And, related...
9. Transparency is most important imo. Not transparency for vote counts obviously, but transparency for what you’re doing, and why you’re doing it, and what you hope to accomplish. Make sure your goals are clear from the start (mine weren’t that first time, hence some of the problems I encountered) - if it’s to highlight as wide a range of works as possible, say that. If it IS to pick a favorite, say that too. Just be clear, and honest, and above board, and it should work out okay.
10. Side note...one of the saddest things about all this is that if you do it over an extended period you’ll see authors deleting their works. As such, I personally chose to download every work that gets a vote, that way it’s at least preserved. I then expanded that into a much larger archive that I’m still adding to all the time, trying to save as much Destiel as possible. But then, I’m an archivist at heart, whether you want to branch out in that kind of direction is up to you.
...okay, that’s everything I can think of. Hopefully I didn’t scare you too bad. I don’t know what fandom/ship you’re looking at but for perspective...first time I did the survey I got about 400 replies, and then the next two times it got about 200, and this most recent time it got about 300. I chose to do mine annually, on the assumption that gives some time for people to come and go for fandom and a lot of new works to get created, and I deliberately timed it for about a month after the biggest fandom event (the DCBB) that generates fics, to give people time to read those fics and consider them in their voting. For me, that means I happen to run the survey starting on January 1st, and I keep it limited to 15 days, since usually it tapers off anyway. But you could try experimenting with different schedules, or leaving it open all the time, etc., it just depends how much time you want to devote to monitoring and updating it. For me, I mostly want to do a big burst of work and then not have to think about it most of the rest of the time, lol.
So...questions? comments? thoughts? wanna tell me I’m dead wrong? I’m all ears, lemme know how I can help!
#destiel favs survey#unforth replies#sorry if this is a mess I've GOT to do some writing so I don't want to take the time to edit it#treatlouwithkindness
12 notes
·
View notes
Photo
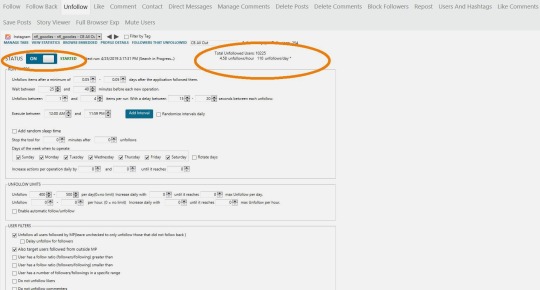
How to unfollow everyone on Instagram in 2020
How do I unfollow everyone on Instagram?
Every once in awhile we get an email from our readers asking how to unfollow everyone on Instagram. Some even want to know the best Instagram unfollow app so that they can attempt to mass unfollow everyone on Instagram in an instant. Instead of responding to the emails individually, we thought it would be more convenient if we’d create a comprehensive guide on how to unfollow everyone on Instagram. We should first look at some of the reasons you’d want to unfollow everyone on Instagram before exploring the best instagram unfollow app
Reasons for unfollowing everyone on Instagram Start a clean slate Sometimes you just really need a clean slate, you’ve followed the same people for 6 years, seen the same old content. You feel you’ve outgrown the content the people that you follow post, frankly, it gets monotonous and boring. This may be your cue to unfollow everyone on Instagram.
Clean up timeline You may not want to unfollow everyone on Instagram. But you may have users who frequently post undesirable content, unfollowing such users can help clean up your timeline.
You’ve reached your follow limit Instagram allows you to follow a maximum of 7500 users for each account. In order to be able to follow more people, you’ll need to unfollow some of the users you are following in order to make room to follow others.
You’ve changed your business model If you are running a business account and you’ve changed your business model, it would make sense to unfollow users from your previous niche, in order to make room for following new users in the new niche you’ve ventured into.
You’re unable to view posts from close friends and family When following too many users on Instagram, your feed can easily get clogged by posts from people you don’t have a close relationship with, so much so that you won’t be able to view posts from people you actually care about. In such a case the easy thing to do would be to unfollow everyone else except those you would wish to keep around.
Related: Who unfollowed me on Instagram ? A tutorial on how to find out who unfollowed you on Instagram . How to know if you need to unfollow everyone on Instagram Here’s what your follower/following ratio says about you (the number represents the ratio of your following compared to the number of followers you have – 400 is <0.5x of 1,000, 500-1,000 is 0.5-1x of 1,000, etc.):
<0.5 Spammer: You are inexperienced with Instagram automation tools and are spamming followers in hope for follows back.
0.5-1 Suspicious: You are likely to be using Instagram automation tools, but are following the wrong people or have poor quality content leading to poor follow back rates.
1-2 Normal: You have some success with Instagram automation, but need to focus on other strategies to drive more engagement.
2-10 Micro-Influencer: Users that are either master of Instagram automation or has incredible content to grow their account.
10+ Influencer: Likely to be micro-celebrities or rising stars that are popular on other social media channels.
If you’re in the <0.5 Spammer or 0.5-1 Suspicious bracket and you want to add some credibility to your channel, you need to mass unfollow on Instagram.
Who should you include when performing a mass unfollow on Instagram? Here’s a composition of followers that may necessitate you to unfollow everyone on Instagram
Inactive accounts Bot/Fake accounts Those who haven’t followed you back The conventional way of unfollowing everyone on Instagram 1. Sign in to Instagram and then press the “Profile” button. 2. Press the “following” box that displays the number of people you’re following on Instagram. 3. Press the green “Following” button next to the first person on the list to stop following that person. Make sure the button becomes a blue Follow button. 4. Repeat the previous step for up to 200 people that Instagram displays in the list. 5. Sign out of Instagram or continue to use it but don’t follow or unfollow anyone. Wait about an hour and then repeat the previous steps to unfollow another 200 people until you’ve unfollowed everyone on your list. As obviously noted the above process is tedious and frankly, nerve-wracking, don’t worry we have a simpler method Apps to unfollow everyone on Instagram There are many unfollow app in the market today that claim to have this functionality including the option to remove followers on Instagram , caution, however, should be observed, Instagram has made several upgrades that may result in a ban if you tried unfollowing everyone on Instagram. As a matter of fact, an attempt to unfollow 500 users at a go may plunge you into a blocked or banned account. There is however a Social Media Automation tool that has stood the test of time and is frankly unrivaled. JARVEE is an intelligent tool that mimics normal human behavior and runs on autopilot. This is to say that, after successfully setting up, you sit back while JARVEE does the job for you.
Go here and download a free trial of this advanced social media automation tool for free. The trial period is 5 days which is time enough to unfollow everyone on Instagram. (No credit card details required)
PS: JARVEE also supports Facebook, Google+, Twitter , Pinterest , Tumblr, LinkedIn, and Youtube platforms.
Once you’ve registered and installed the tool, use the details sent to your email to log in to the app. Here you are going to add your Instagram account (s)-depending on the downloaded package you can automate as many Instagram accounts as possible. To add your account on JARVEE , click on SOCIAL PROFILE on the left Menu bar. Now click on ADD PROFILE and select INSTAGRAM . Fill in your Instagram login details and click VERIFY. Once your account is VALIDATED , you can now click on TOOLS on the left Menu bar. Here you will see all the accounts that you have added on JARVEE. To set up auto unfollow, click on the name of the account whose users you want to unfollow. A new interface will appear with all the features available for Instagram. Since we are only interested in auto unfollowing, you’re going to click on the UNFOLLOW tab. Here you have a myriad of options to go with At this point, you need to decide whether you want to unfollow everyone or a select group of people. Manual Way to Unfollow People On Instagram
In order to unfollow everyone on Instagram manually, follow these steps:
Tap your profile icon on the Instagram application. Click on the “Following ” section and see the list of people who you follow. Whoever you want to unfollow, click on the “ Following ” section which is written next side of the name of the person. Confirm your request with Y/N questions. Unfollow everyone on Instagram Since Instagram will not allow you to mass unfollow instantly, we’re going to spread the unfollowing task over the 5 days trial period. Ideally, you’ll need to allocate the number of users you wish to unfollow proportionately to the 5 days trial period. For instance, if you need to unfollow 500 users, then you’ll have JARVEE unfollow 100 users per day.
To achieve this, copy the setting as illustrated in the image below when you’re done toggle the status button to start the unfollow operation.
Unfollow a select group of people In this section, you’re going to decide on the users you DO NOT intend to unfollow. You’re going to achieve this by placing their user names in a WHITELIST . You may also wish not to unfollow users that have interacted with your content. This will help keep your engagement going. Just make sure to check the two boxes that say ‘ do not unfollow likers ‘ and ‘ do not unfollow commenters ‘
Under USER FILTERS, there’s an option to use the WHITELIST . Make sure you have it checked and place the user names of the users you’d like to continue following. Once this is done, you can now toggle the STATUS button to start the process.
Other apps include, but are not limited to: #1. Cleaner for Instagram [Android] This is a multi-function app for Instagram. Using this app you can delete multiple photos at a time, Mass Block & Unblock, Mass Unfollow etc.
To Mass Unfollow, Follow the steps:
Step 1: First Download & Install : Cleaner for the Instagram app on your Android device.
Step 2: Launch this app and login with your Instagram account username and password.
Step 3: Tap on ‘Following’ from the bottom bar and go with the ‘Quick Select’ blue button. Here you will many options to select the ‘following’ users. Just Tap on ‘Select All’ to unfollow all at once
Step 4: Now Simply Tap on ‘Flash’ blue floating icon and Tap on the ‘Unfollow’ option, as shown in the above image.
Also Read: How To View & Download Instagram Profile Picture [Full Size]
#2. Mass Unfollow for Instagram [iOS Devices – iPhone/iPad] ‘Mass Unfollow for Instagram’ is one of the best tools for iOS Devices to clean up your Instagram account. Using this tool you do the following task:
Bulk block/unblock/unfollow users Bulk delete posts Bulk unlike posts & more… It’s very simple to use this tool. First Download & Install: Mass Unfollow for Instagram App on your iOS device (iPhone/iPad). Login in this App with your Instagram Credentials. After that simply select the users from ‘Following’ tab at the bottom bar and Unfollow all in a tap. #3. Unfollow for Instagram – Non-followers & Fans [Android] ‘Unfollow for Instagram’ is a simple Instagram Manager tool that shows you all the users who don’t follow you back and give you an option to unfollow singe or multiple users in a single tap.
To Mass Unfollow , First Download & Install: Unfollower for Instagram App on your Android device. Then Login with Instagram Username and password. It will scan your Account and tell you Followers/non-followers stats. To unfollow the users who don’t follow you back, tap on ‘Non-Followers’ Tab. Now simply tap on ‘Unfollow’ button from the bottom bar to unfollow all non-followers. Download Link: Unfollow for Instagram
#4. Cleaner for Ins [iOS Devices – iPhone & iPad] This is another best tool to clean up your Instagram account on your iOS devices. Steps are similar to the above ones. So Download this app from the below-given link and Unfollow Tons of people with a single tap.
#5. Unfollowers for Instagram – Follow Cop [Android] Follow Cop is an ultimate and elegant utility tool to manage your Instagram account. It gives you details of your Followers, Non-followers, Recent Followers etc from your account. Also, you can Mass Unfollow [upto 15 people in a click] from your Instagram Account.
Steps are similar to the above ones. Download this app from the link given below and start to Clean up your Instagram account is FREE.
That’s it.
Feel free to reach us in the comment section or on email for any assistance.
Recommended: How To Grow Your Business on Twitter in 2019 .
https://socialtipster.co/unfollow-everyone-on-instagram/?utm_source=rss&utm_medium=rss&utm_campaign=unfollow-everyone-on-instagram
#smm #socialmediamanager
1 note
·
View note
Photo

How to unfollow everyone on Instagram in 2020
How do I unfollow everyone on Instagram?
Every once in awhile we get an email from our readers asking how to unfollow everyone on Instagram. Some even want to know the best Instagram unfollow app so that they can attempt to mass unfollow everyone on Instagram in an instant. Instead of responding to the emails individually, we thought it would be more convenient if we’d create a comprehensive guide on how to unfollow everyone on Instagram. We should first look at some of the reasons you’d want to unfollow everyone on Instagram before exploring the best instagram unfollow app
Reasons for unfollowing everyone on Instagram Start a clean slate Sometimes you just really need a clean slate, you’ve followed the same people for 6 years, seen the same old content. You feel you’ve outgrown the content the people that you follow post, frankly, it gets monotonous and boring. This may be your cue to unfollow everyone on Instagram.
Clean up timeline You may not want to unfollow everyone on Instagram. But you may have users who frequently post undesirable content, unfollowing such users can help clean up your timeline.
You’ve reached your follow limit Instagram allows you to follow a maximum of 7500 users for each account. In order to be able to follow more people, you’ll need to unfollow some of the users you are following in order to make room to follow others.
You’ve changed your business model If you are running a business account and you’ve changed your business model, it would make sense to unfollow users from your previous niche, in order to make room for following new users in the new niche you’ve ventured into.
You’re unable to view posts from close friends and family When following too many users on Instagram, your feed can easily get clogged by posts from people you don’t have a close relationship with, so much so that you won’t be able to view posts from people you actually care about. In such a case the easy thing to do would be to unfollow everyone else except those you would wish to keep around.
Related: Who unfollowed me on Instagram ? A tutorial on how to find out who unfollowed you on Instagram . How to know if you need to unfollow everyone on Instagram Here’s what your follower/following ratio says about you (the number represents the ratio of your following compared to the number of followers you have – 400 is <0.5x of 1,000, 500-1,000 is 0.5-1x of 1,000, etc.):
<0.5 Spammer: You are inexperienced with Instagram automation tools and are spamming followers in hope for follows back.
0.5-1 Suspicious: You are likely to be using Instagram automation tools, but are following the wrong people or have poor quality content leading to poor follow back rates.
1-2 Normal: You have some success with Instagram automation, but need to focus on other strategies to drive more engagement.
2-10 Micro-Influencer: Users that are either master of Instagram automation or has incredible content to grow their account.
10+ Influencer: Likely to be micro-celebrities or rising stars that are popular on other social media channels.
If you’re in the <0.5 Spammer or 0.5-1 Suspicious bracket and you want to add some credibility to your channel, you need to mass unfollow on Instagram.
Who should you include when performing a mass unfollow on Instagram? Here’s a composition of followers that may necessitate you to unfollow everyone on Instagram
Inactive accounts Bot/Fake accounts Those who haven’t followed you back The conventional way of unfollowing everyone on Instagram 1. Sign in to Instagram and then press the “Profile” button. 2. Press the “following” box that displays the number of people you’re following on Instagram. 3. Press the green “Following” button next to the first person on the list to stop following that person. Make sure the button becomes a blue Follow button. 4. Repeat the previous step for up to 200 people that Instagram displays in the list. 5. Sign out of Instagram or continue to use it but don’t follow or unfollow anyone. Wait about an hour and then repeat the previous steps to unfollow another 200 people until you’ve unfollowed everyone on your list. As obviously noted the above process is tedious and frankly, nerve-wracking, don’t worry we have a simpler method Apps to unfollow everyone on Instagram There are many unfollow app in the market today that claim to have this functionality including the option to remove followers on Instagram , caution, however, should be observed, Instagram has made several upgrades that may result in a ban if you tried unfollowing everyone on Instagram. As a matter of fact, an attempt to unfollow 500 users at a go may plunge you into a blocked or banned account. There is however a Social Media Automation tool that has stood the test of time and is frankly unrivaled. JARVEE is an intelligent tool that mimics normal human behavior and runs on autopilot. This is to say that, after successfully setting up, you sit back while JARVEE does the job for you.
Go here and download a free trial of this advanced social media automation tool for free. The trial period is 5 days which is time enough to unfollow everyone on Instagram. (No credit card details required)
PS: JARVEE also supports Facebook, Google+, Twitter , Pinterest , Tumblr, LinkedIn, and Youtube platforms.
Once you’ve registered and installed the tool, use the details sent to your email to log in to the app. Here you are going to add your Instagram account (s)-depending on the downloaded package you can automate as many Instagram accounts as possible. To add your account on JARVEE , click on SOCIAL PROFILE on the left Menu bar. Now click on ADD PROFILE and select INSTAGRAM . Fill in your Instagram login details and click VERIFY. Once your account is VALIDATED , you can now click on TOOLS on the left Menu bar. Here you will see all the accounts that you have added on JARVEE. To set up auto unfollow, click on the name of the account whose users you want to unfollow. A new interface will appear with all the features available for Instagram. Since we are only interested in auto unfollowing, you’re going to click on the UNFOLLOW tab. Here you have a myriad of options to go with At this point, you need to decide whether you want to unfollow everyone or a select group of people. Manual Way to Unfollow People On Instagram
In order to unfollow everyone on Instagram manually, follow these steps:
Tap your profile icon on the Instagram application. Click on the “Following ” section and see the list of people who you follow. Whoever you want to unfollow, click on the “ Following ” section which is written next side of the name of the person. Confirm your request with Y/N questions. Unfollow everyone on Instagram Since Instagram will not allow you to mass unfollow instantly, we’re going to spread the unfollowing task over the 5 days trial period. Ideally, you’ll need to allocate the number of users you wish to unfollow proportionately to the 5 days trial period. For instance, if you need to unfollow 500 users, then you’ll have JARVEE unfollow 100 users per day.
To achieve this, copy the setting as illustrated in the image below when you’re done toggle the status button to start the unfollow operation.
Unfollow a select group of people In this section, you’re going to decide on the users you DO NOT intend to unfollow. You’re going to achieve this by placing their user names in a WHITELIST . You may also wish not to unfollow users that have interacted with your content. This will help keep your engagement going. Just make sure to check the two boxes that say ‘ do not unfollow likers ‘ and ‘ do not unfollow commenters ‘
Under USER FILTERS, there’s an option to use the WHITELIST . Make sure you have it checked and place the user names of the users you’d like to continue following. Once this is done, you can now toggle the STATUS button to start the process.
Other apps include, but are not limited to: #1. Cleaner for Instagram [Android] This is a multi-function app for Instagram. Using this app you can delete multiple photos at a time, Mass Block & Unblock, Mass Unfollow etc.
To Mass Unfollow, Follow the steps:
Step 1: First Download & Install : Cleaner for the Instagram app on your Android device.
Step 2: Launch this app and login with your Instagram account username and password.
Step 3: Tap on ‘Following’ from the bottom bar and go with the ‘Quick Select’ blue button. Here you will many options to select the ‘following’ users. Just Tap on ‘Select All’ to unfollow all at once
Step 4: Now Simply Tap on ‘Flash’ blue floating icon and Tap on the ‘Unfollow’ option, as shown in the above image.
Also Read: How To View & Download Instagram Profile Picture [Full Size]
#2. Mass Unfollow for Instagram [iOS Devices – iPhone/iPad] ‘Mass Unfollow for Instagram’ is one of the best tools for iOS Devices to clean up your Instagram account. Using this tool you do the following task:
Bulk block/unblock/unfollow users Bulk delete posts Bulk unlike posts & more… It’s very simple to use this tool. First Download & Install: Mass Unfollow for Instagram App on your iOS device (iPhone/iPad). Login in this App with your Instagram Credentials. After that simply select the users from ‘Following’ tab at the bottom bar and Unfollow all in a tap. #3. Unfollow for Instagram – Non-followers & Fans [Android] ‘Unfollow for Instagram’ is a simple Instagram Manager tool that shows you all the users who don’t follow you back and give you an option to unfollow singe or multiple users in a single tap.
To Mass Unfollow , First Download & Install: Unfollower for Instagram App on your Android device. Then Login with Instagram Username and password. It will scan your Account and tell you Followers/non-followers stats. To unfollow the users who don’t follow you back, tap on ‘Non-Followers’ Tab. Now simply tap on ‘Unfollow’ button from the bottom bar to unfollow all non-followers. Download Link: Unfollow for Instagram
#4. Cleaner for Ins [iOS Devices – iPhone & iPad] This is another best tool to clean up your Instagram account on your iOS devices. Steps are similar to the above ones. So Download this app from the below-given link and Unfollow Tons of people with a single tap.
#5. Unfollowers for Instagram – Follow Cop [Android] Follow Cop is an ultimate and elegant utility tool to manage your Instagram account. It gives you details of your Followers, Non-followers, Recent Followers etc from your account. Also, you can Mass Unfollow [upto 15 people in a click] from your Instagram Account.
Steps are similar to the above ones. Download this app from the link given below and start to Clean up your Instagram account is FREE.
That’s it.
Feel free to reach us in the comment section or on email for any assistance.
Recommended: How To Grow Your Business on Twitter in 2019 .
https://socialtipster.co/unfollow-everyone-on-instagram/?utm_source=rss&utm_medium=rss&utm_campaign=unfollow-everyone-on-instagram
#facebook
1 note
·
View note
Text
Transferring and Editing Weights in Blender 2.78. Basics
youtube
( turn on English subtitles )
Hello. In this tutorial, I will explain how to:
transfer weights in Blender 2.78 the right way;
manually weight paint and subtract the right way;
find and fix what is causing distortions;
do other useful related operations.
ENG | ВЕРСИЯ НА РУССКОМ
WRITTEN TUTORIAL:
PLEASE DO NOT REPOST
Let’s prepare our mesh by removing doubles. Even if two vertices have identical coordinates, the weights may be assigned differently to them for some reason. To be able to easily split the mesh again, go to Edit Mode ( TAB ), select everything ( A ), Select – Select Boundary Loops ( 1 ), and make them sharp ( Shading/UVs tab – Shading – Edges – Sharp ) ( 2 ). This way you will be able to split all sharp edges again by selecting one, Select – Select Similar – Sharpness ( 3 ) and splitting them ( Mesh – Edges – Edge Split ) ( 4 ) . Finally, select everything and remove doubles in Tools – Remove ( 5 ). Set Merge Distance to 0,0001 ( 6 ).


Now, let’s append the reference file. You need to find the one that is closest to your mesh by volume. Export this mesh ( 1 ) and append it ( File – Append) ( 2 ). Shift-select all parts of it ( 3 ). Shift-click on s4studio_mesh_1 twice to make it active and join it with the rest ( Tools – Edit – Join or Ctrl J ) ( 4 ) .

RMB-click on rig.001 and bone_bone_shape.001 to delete ( 1 ). Make sure Keep UV and edit mode mesh selection in sync is on ( 2 ), select ( B or Ctrl ) and remove unnecessary parts ( Delete – Faces ) ( 3 ). Adjust the length of the mesh and position of edge loops. Make sure Limit selection to visible is off ( 4 ). G to move, S to scale, G/S followed by Z is to move/scale vertically.

Shift-select the mesh you’d like to transfer the weights to. Go to Weight Paint ( Ctrl TAB ) and choose Transfer weights ( 1 ). Scroll down and choose By Name in Source Layers selection ( 2 ) and All Layers in Destination layers matching ( 3 ). Now, let me show you what makes a mesh fly in the game. In Edit Mode select any vertex. Dozens of vertex groups with 0.000 value that you see to the right ( 4 ) are the reason. To remove them, go back to Weight paint mode, choose Clean ( 5 ), scroll up, and choose All Groups in Subset ( 6 ). Always go back to Edit mode to check if they were removed ( 7 ).
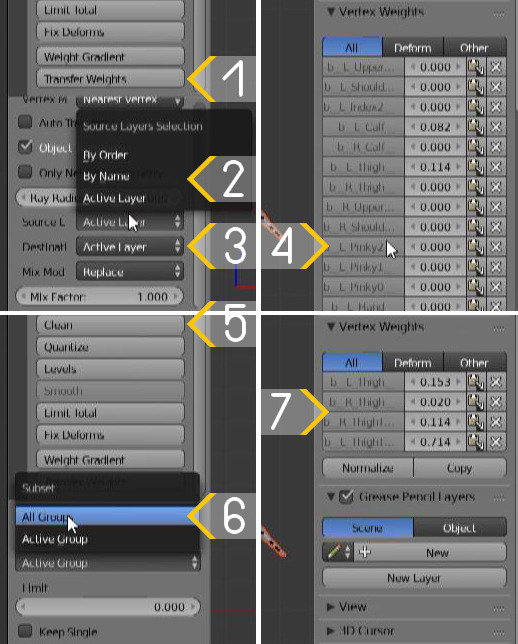
Hide the reference ( 1 ). Let’s tie the mesh to the rig. It has to be done not only to see how the mesh will deform in different poses but also to enable auto normalizing of weights for individual vertices. In Modifiers tab add Armature ( 2 ) and choose rig in Object ( 3 ). If it is hidden, make it visible and selectable ( 4 ). In Pose mode RMB-click on any bones and rotate ( R ) or move ( G ) it. You can also enter the exact values under Rotation ( 5 ). You can proceed to edit the weights and go back to the original pose later by selecting all bones ( A ) and resetting transformations ( Pose - Clear Transform – All ) ( 6 ).

There are three features you should always make sure are enabled/disabled:
Auto Normalize ( 1 ). Make sure it is turned on. This feature adjusts weights to ensure that the sum of all vertex groups of individual vertices equals 1 ( sometimes 1,001). Here is an example of how editing one group affects the others ( 2 ).
Face selection masking for painting ( 3 ). This feature lets you define which areas you can and cannot paint. You can select everything with A or individual faces with Shift-RMB. You can also select an entire UV island with Ctrl L or Select – Select linked in UV/Image Editor ( 4 ).
Limit selection to visible ( 5 ). This feature lets or prevents you from painting on both sides of the mesh.
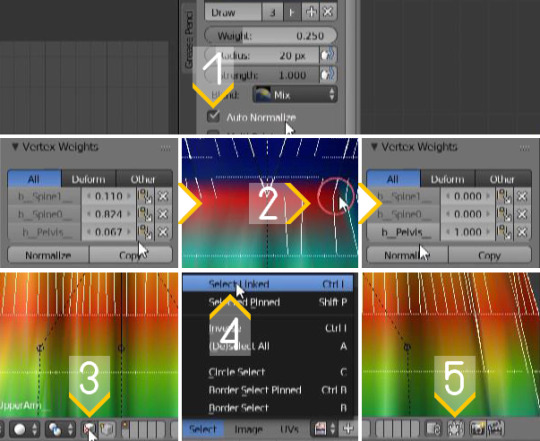
Now, let’s talk about brushes. The one I’m using right now is Draw brush. Weight value dictates how much influence a related bone will have on the painted area. Radius ( F ) dictates the size of the brush, strength ( Shift – F ) – it’s intensity. Other useful ones are Blur and Subtract. As the names suggest, the first one blurs and the second one subtracts. The last brush can nullify the value but does not remove the vertex group completely. So make sure to always use Clean tool to remove vertex groups with 0.000.
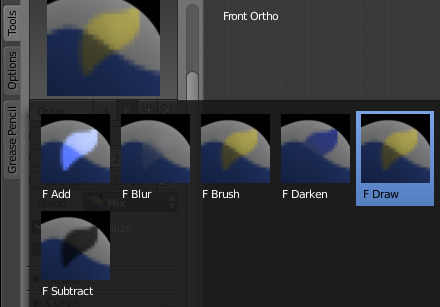
Let’s take a closer look at Weight tools ( 1 ).
Normalize, with Auto normalize disabled, adjusts the values of the active group in a way that the highest one becomes 1.
Normalize All adjusts the values of inactive groups unless locked in relation to the active one.
Gradient. You can select the area to work with either in Weight Paint mode or in Edit mode with Show Weights ( 2 ) enabled. Set weight value and drag from one side to another.
Quantize sets weight to a fixed number of steps.
Smooth. To enable it, first turn on Vertex selection masking for painting ( 3 ).
Levels. Lowers or raises all values simultaneously.
Mirror. Flips the paint to the other side. Works well only for symmetrical, as is mirrored within Blender and never edited, meshes. In other cases, you will get “bald” and “leftover” spots. A better method would be to split the mesh ( P – Selection ) ( 4 ), duplicate ( 5 ) and mirror ( 6 ) the edited side, delete the group(s) you want to overwrite ( 7 ), copy ( 8 ) and rename the opposite one, transfer the weights ( all or active ) , delete copied mesh, join everything back.
We’ve already looked at some features in Vertex groups, let’s see the rest. In Edit Mode select an area and assign ( 9 ) any group with a specified below value ( 10 ). You can use Select ( 11 ) and Remove ( 12 ) to find “stray” vertices that were painted on accident.
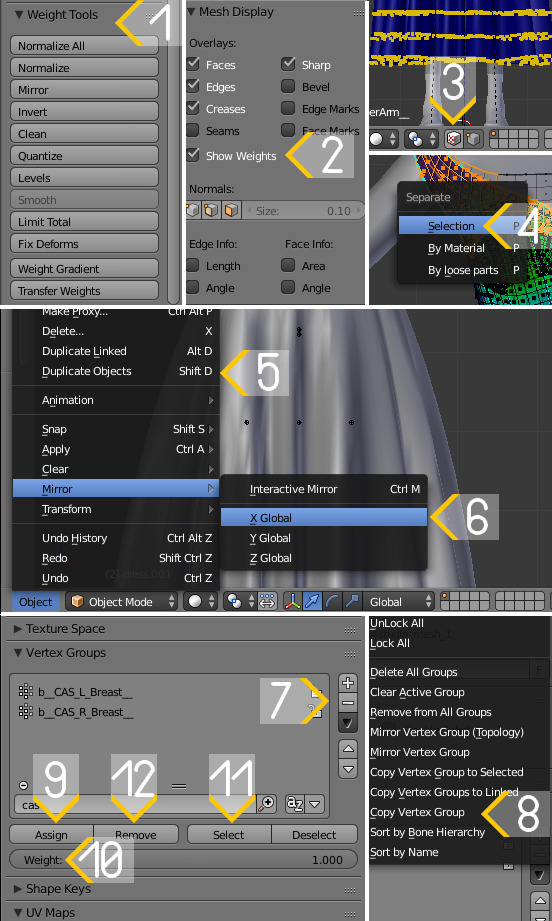
Weight values can also be manually edited in Vertex Weights. Select desired vertices, enter your new value, click copy button ( 1 ). Normalize will adjust the weights of an active vertex. One more useful feature can be found in Modifiers tab. Vertex Weight Mix ( 2 ) allows you to add, subtract and do other operations with 2 vertex groups. Choose Vertex Group A ( 3 ) and Vertex Group B ( 4 ), Add in Mix Mode ( 5 ), All in Mix Set ( 6 ), Apply. They are combined now.
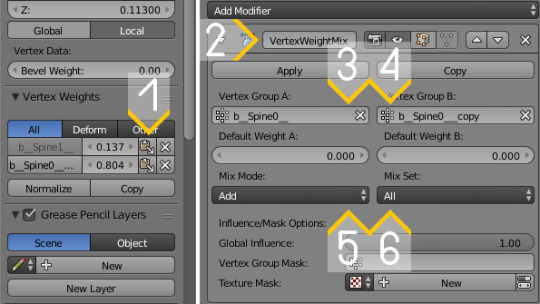
In-game distortion of mesh can be caused by incorrect uv_1 map or weight assignment. If distortions disappear or amplify in the process of morphing, it’s the former. If it happens during movement, it’s the latter. To find which vertices are causing the problem, go to UVs – Export UV Layout ( 1 ). Set Opacity to 1, Format to .png and size to 2048 x 4096 or 1024 x 2048. Add the second swatch and import the UV texture. Save. Now you can detect what vertices are causing a problem.
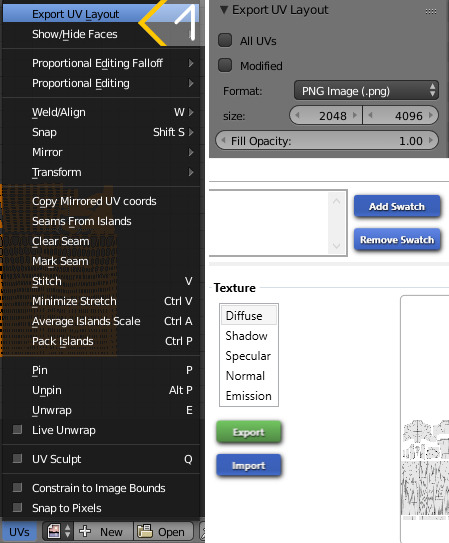
THANK YOU FOR READING.
If you have any questions or suggestions to improve this workflow, please leave them under the video / in replies to this post / in the ask box or message them privately on tumblr / via e-mail ( [email protected] ).
397 notes
·
View notes
Text
Happy 32nd Birthday Nobuhiko Okamoto!
Personal Note:
I’ve been preparing for a while because I wanted to make this with a lot more thought. Sorry for the length of this post. I spent quite a bit of time on it, but I didn’t realize it would get so long! He is one of my top favourite voice actors (both English and Japanese) ever. To me, he’s a relatable, awesome, and passionate inspiration. He puts his all into every role he does, and he never gives up no matter who tells him to.
I could probably go on about how much I like many of the roles he’s done, but that would be a whole other essay in itself. I even considered watching Corpse Party (the scaredy cat I am) because I heard he was in it. Yeah, I’m one of those people who gets drawn to anime when I figure out certain studios and voice actors are attached to it. I have watched a few episodes of some really bad anime because I heard he was in it. No regrets! Okay, maybe I have a few... I still haven’t watched them all though! I plan on watching a ton more, and that includes a few bad apples here and there.
Despite all the hurdles and adversity he faces, he overcomes it! He has had so many amazing roles, he sings, he’s good at shogi, and he’s just a good person. I respect him a lot. Honestly, I can’t word stuff too well, but I sincerely hope he continues working, maybe gets married and has kids (since he said he wanted to), and experiences all the happiness he deserves.
Table of Contents:
Top Roles (+ clips)
Trailblazer arrangement
Facts + Q&As
Music Recommendations
Additional Sources + other cool posts
Top Roles:
I watched to include even the ones that I didn’t watch entirely, so I put together a whole list. It’s generally not too strict in order, but I went from his good to his best. If I wanted to put a few words, I just included them in square brackets. In those, there will also be recommended clips if I feel the need to add any in.
* = ones that I haven’t watched completely (or up to its current point)
Rui Tatsumi* - Starmyu

Ivan Karelin* - Tiger and Bunny

Shin-ah - Akatsuki no Yona
[This character didn’t talk much, so he actually got to play a MOB character as well. I found this character kind of charming though.]
Mitsuo - Danshi Koukousei no Nichijou
[He’s the one who dropped the hot dog. Rest in Pieces. This anime made me laugh, and even though this character barely appeared, he made me laugh every time he did. Recommended clip: “Glasses”]

Gladion* - Pokemon Sun & Moon
[He’s actually the perfect choice to play this edgy boi.]

Yumeji Fujiwara* - Yumekui Merry
[RIP the can]

Makoto Kashino* - Yume-iro Pâtissière
[I just started this one]

Mizuki* - Kamisama Hajimemashite
[I watched six episodes of this one.]

Rei Ogami - Code:Breaker
[This wasn’t a very good anime, it’s a mediocre manga, but I still enjoyed it.]

Nikaidou Harunobu* - 3-Gatsu no Lion
[I watched around 6-8 episodes of this one. This character is a pure round boi, and I like the way Nobu portrayed this character. Recommended Clip.]

Io Otonashi* - Acchi Kocchi
[I watched around 5 episodes of this one. His bishounen game is very strong.]
Takeru Fujiwara* - Prince of Stride
[These anime characters run like how I run from my life responsibilities and problems. His bishounen game is also very strong. The strong and silent type is always popular. Sadly, I’m the quiet and extremely frail and weak type.]
Shouta Kisa* - Sekaiichi Hatsukoi
[According to Tumblr, he has never done an R-rated (18+) BLCD, but he has been in some shounen-ai anime.]

Issac Foster - Satsuriku no Tenshi
[My reaction to this anime. Don’t worry, I’m following this to the end.]
Ryousuke Kominato - Diamond no Ace
Ryou Kurokiba* - Shokugeki no Souma

Age - Sakasama no Patema
[Yeah, that’s his actual name. If you name your child something that stupid, I would personally like to have a word with you. This movie was really nice though.]

Accelerator* - Toaru Majutsu no Index
[I had to include his laugh to this]

Jurai Andou - Inobato (Inou-Battle wa Nichijou-kei no Naka de)
[And jail is just a building you live in! I can’t remember the context of this line.]
Kiyoharu Hyoudou - Welcome to the Ballroom
Yoichi Saotome* - Owari no Seraph
Eiji Niizuma* - Bakuman
[Recommended Clip]

Obi - Akagami no Shirayuki-hime
[When he looks into the mirror and realizes he’s missing his eyebrows.]

Takumi Usui* - Kaichou wa Maid-sama
Yuu Nishinoya* - Haikyuu
[Recommended Clip: ROLLING THUNDER!]

Rin Okumura - Ao no Exorcist
[He’s such a likeable protagonist. Recommended clip: Rin x Shiemi because they’re adorable]
Mikoto Mikoshiba - Gekkan Shoujo Nozaki-kun
[This character made me laugh so much. He and Seo are my favourites. I haven’t seen another amazing anime with both Miyuki Sawashiro and Nobu. They’re my two favourites. I hope to see them acting together eventually (even if Mikorin and Seo never really communicated). Thanks to Nobu, we have a voice to this madly embarassed bishounen. Recommended Clips: Mikorin Clips, Mixer Clip]
Katsuki “Kacchan” Bakugou - Boku no Hero Academia
[Bakugou might not always be my cup of tea as a character, but his voice made me like him somewhat anyway whether he’s an asshole or not. There are a few scenes in season three that hit me with mad feels,, but even during season one and two, Nobu aced this role. This role is what shot him up to one of my favourite voice actors. Recommended Clips: Rage moments, Kacchan vs Deku audio segment (scroll down a little for this Tumblr post), Salty Bakugou S1]

Karma Akabane - Assassination Classroom
[While Bakugou is one type of crazy, Karma is another. Honestly, he’s such a sly, cunning, and mischievous character, but that’s what we all like about him, right?]

Trailblazer Arrangement:
youtube
This is my first time transcribing a song and arranging it! I improvised and made up some stuff (mostly guitar solos that just didn’t fit as well logically on piano). I usually don’t like (actually, I kinda hate) transcribing because it’s basically like trying to copy down a book that someone reads aloud (and you can’t look at the text). But it was worth doing this! He’s definitely not my favourite singer, but I’d still listen to him.
I didn't want to go with an original score for this one because I felt like I wanted to improve a lot more as a composer and artist (as if I'm qualified enough to be called those terms). When I make one for him, I want to go all out.
Facts:
I found some other interesting facts online. There are quite a few different sources. I’ll try to list them below all the facts (but I might link them to the actual facts as well. There are a lot, so there’s that.
All [Nat Notes] will be put between square brackets “[these]”.
These are all from THIS POST:
After graduating from secondary school, he entered some voice acting training courses associated with his agency (Pro-Fit) to pursue his dream as a seiyuu.
To be able to pay for his training, he worked at a 7-Eleven and a post office.
His family is very strict and conservative.
He was into video games when he was younger, but his parents were against letting him play video games and ended up limiting him to a one-hour per day time limit [THIS POOR BOI]
[Regarding his gaming] his parents told him, “If you want to play games, you can play shogi.” This ended up being the reason he started playing shogi.
He is a practicing Catholic [ironic since one of his most iconic roles is playing the son of Satan]
He’s a 3rd dan ranked shogi player, and he once aimed to be a professional shogi player.
He has a huge love for sweets. I follow his blog, and a lot of his posts involve sweets.
“His favourite [candy bar] would be Black Thunder chocolate bars (same as Kamiya Hiroshi and Ono Daisuke), and at one point, he always ends up buying Black Thunder by the box, stocking up on it, and eating up to 10 bars in one day, that his agency decided to restrict him into eating just one bar a day.” [let the poor guy eat his chocolate]
He is easily bullied by other seiyuu [check out the original post which has gifs of his mishaps]
“[While recording] …he ran away from the mic, forgetting that he was wearing headphones connected to the mic and ended up messing up the recording room, and the staff had to rearrange everything.”
He’s a big fan of Pokemon [He now plays Gladion in Pokemon Sun & Moon]
These are from “More Nobu Facts”
“As a student, he used to fall asleep on the train and miss his destinations sometimes. He thinks that it’s really comfortable to take a nap there.” [Yeah, you say that until you somehow end up in the middle of nowhere and wonder where you are and why you even exist.]
“He suffers from hay fever in the spring. Said that the symptoms kill him.” [You and me both except mine are year-round and gradually getting worse.]
“He played with Lego bricks when he was a kid.” [If he’s the type of person who left out the bricks and made people experience pain because of it, I will personally leave Lego bricks outside his door. Those things hurt when they’re unexpected.]
“He loves the indoor life.” [don’t we all…]
“He read the Harry Potter series.” [I did too! Not that I remember any of it.]
“His cute, foreign Furby only speaks English. Noburin stated, “English is very hard.”” [HOW DO PEOPLE SLEEP KNOWING THEY OWN ONE OF THOSE? I WOULD BURN IT IF I GOT ONE.]
“In elementary school, the girl he liked gave him chocolate on Valentine’s Day. He said he felt like crying from the shock.” [I haven’t experienced that. Was he happy because it was that girl who gave him chocolate or because he got free chocolate?]
“He was hospitalized before when he was a child due to a bad cold (or maybe the flu).” [Well, that diet sure doesn’t help, and I doubt screaming all the time is good for you. Weirdly, I can’t say anything more than that because I do both too except I scream internally while he does it as his profession.]
He tends to get sick within the first two weeks of October, right before his birthday. [I wish you luck!]
He likes to watch lightning and thinks that it’s cool. [I’M SO SCARED OF THUNDER]
During the summer as a kid, he liked to catch cicadas and dragonflies, and play with water guns. [SAME DUDE]
He was in the badminton club during secondary school.
These are all from his Q&A!
[Part 1], [Part 2], [Part 3], [Part 4]:
I’m not going to include quotation marks for this one for the most part. I changed some awkward phrasing. I left out some questions from the original posts as well. Check the sources out!
Nickname: Pikorin
Favourite animal: Dog
[Same. I love my dog, Penny. She’s my little sister. I have no shame.]
What are you fond of?: Squirrels
[why?]
Description of your personality: Moody
[Same.]
Favourite Colour: Black
Health and Beauty Routine: I drink two cups of milk in the morning and do squats two times a day.
First thing you do in the morning?: Rinse your mouth
First thing you wash in the bath: Face
Amount of sleep you get: 4 hours on the weekdays, 10 hours on the weekend
[I wouldn’t live with that kind of schedule.]
Rain or sunshine: Rain!
What did you play as a child?: I slid down the slide and got many scratches.
[I ran up slides a lot in elementary school]
Something you’re proud of: “I have a shiny legendary Pokemon.”
[I ALMOST NEVER GET SHINIES. LET ALONE LEGENDARY ONES. THAT’S AN ACCOMPLISHMENT RIGHT THERE. The chances of getting one kinda vary, but it’s less than 0.1% I think.]
Favourite school subject: Math
[Can’t relate. I’m dumb.]
Least favourite school subject: Civics
Best school memory?: I won a badminton tournament.
[Can’t relate. I’m a blob.]
Previous part-time jobs: [...]post office, fast food, convenience store and then accounting, I’ve done different jobs.
If you could be reborn, would you be a man or woman? A woman!
Who was your first love?: We were in elementary school, in the same class.
[Related post]
Any gesture of women unnerving to you?: My heart skips a beat when ousted or “shooed” by hand.
[He gets shooed like a bug XD]
Where would you go for a date?: Tokyo Disney Sea.
[You know you’re at the height of luxury when you can afford to take someone there. I want someone to take me to Disneyland or Disney World, or a Disney Cruise.]
Morning person or night person?: Morning person.
[Can’t relate.]
If you could drive to any time period, what would it be?: Jurassic Period!
[If it just so happens you do, *pats* it was nice knowing you (even though he doesn’t know me). He’ll get eaten by a dinosaur.]
If you were stranded on a deserted island, what would you want there with you?: My Nintendo DS or PSP.
[Good luck without a charger or electricity. What games would he bring though?]
Favourite music genre: Anime songs
[Me too fam.]
Do you play any instruments? No, playing the F chord on the guitar is my limit.
[I like playing and creating music. I’m just not any good at it. XD
He should try learning though!]
Favourite sports: swimming and badminton
[I’m not good at swimming. I’m not good at badminton. I’m not good at sports.]
Sweets you usually eat: Macarons and chocolate-related sweets
[AYE, that’s pretty much my taste too, so we pretty much have similar taste.]
Something you’re self-conscious about: The thickness of my eyebrows.
[If his eyebrows were ugly, I would’ve commented on that already. XD (I usually say something along the lines of, “Is that a caterpillar on your face? It’s so thick and bushy! It looks like you took hair from your head and put it on your eyebrow! Maybe you can’t grow facial hair because all of it goes to those eyebrows.”)]
What will you do when and if only you became an invisible man one day?: Secretly observe Sugita Tomokazu-san.
[Well, alright then. Fangirls have some competition? More importantly, Nakamura has competition!]
What’s the scariest thing to you?: In a sense, the most intimidating people.
[All people are intimidating for me O^O’]
What is the title of the first game you’ve ever played in your life?: “Super Mario World”.
[For me, it was Pokemon Pearl]
What would you be if you went into the fantasy world?: A witch.
[Nobu, defying gender barriers. He’ll be a fabulous witch. I would similarly want to be a mage.]
What if I want to use a weapon to fight monsters?: Bow, crossbow.
[I would want to use magic or a sword!]
Favourite season?: Spring.
[I like winter because plants are dead (I have extremely bad allergies), snow, Christmas, my birthday, and New Year’s!]
At what spot do you like to linger around?: Starbucks.
[Again, the height of luxury is when you’re able to afford Starbucks regularly.]
How’s your tolerance to alcohol?: I can’t drink much.
[I don’t drink]
What good books do you usually read?: Original works that are adapted into anime.
[I don’t read a lot. I’m an illiterate fool.]
What do you buy at convenience stores?: Fresh premium caramel roll cake.
[I wish they had those in Canada…]
Favourite place in the country?: Okinawa.
[I gotta go there someday!]
What countries do you want to go abroad?: Italy.
[He recently said he wants to go to Italy for gelato and to be honest, I relate. Europe has good chocolate and cheese from what I hear.]
What are the challenges to your trip destinations like?: Pickpockets like to snatch!
[He better watch out for those vans that say “Free Candy!” They might be meant for kids, but he might just stumble in.]
Are you nervous in public?: Recently it’s been okay; still nervous during events.
[I’m always nervous in public. I would like to attend an event by the end of my life though.]
What would you tell your past-self (10 years ago)?: “Don’t give up and eat your dinner properly!”
[I tell that to myself now XD
If I were to send a message to myself, it would be something along the lines of, “What you feel, what you think, and what you believe is important. Listen to yourself. At the end of the day, you will figure out what to do. Don’t be afraid of being alone, and don’t be afraid to wander. Loosen up.”]
What would you message to your future-self (10 years from now)?: “The you in his twenties is having lots of fun. Are you having fun?”
[Message for me ten years from now: PLEASE TELL ME YOU AREN’T AS DEEP INTO VOICE ACTORS AND ANIMATION. I BEG YOU, GET A LIFE.]
If the world was going to perish in 24 hours, what would you do? Gather all my friends and family, and have a BBQ party.
[I would just write something in case it resurfaces. I would want to write my thoughts, opinions, and experiences along with the people around me.]
Where do you want to work?: A place where I could grow.
[Same!]
What are your thoughts when you look back at 2010? I issued a sex appeal to play [Usui], and worked hard to reach the targets!
[From the amount of screaming fangirls, I think you did just fine.]
What is your current aim?: To be more playful and get more out of acting.
Finally, a message to the world: I’ll work hard from now on to make a voice that everyone will not have a hard time to listen to. Thank you for your support!
[Thank you Nobu! You inspire a lot of people (including me) everyday!]
Additional Facts! [SOURCES WILL BE LISTED BELOW!]
He likes watching horror movies (especially with his friends Ryouhei Kimura, Kouki Uchiyama, and Yoshimasa Hosoya. Kouki is a scaredy-cat.)
When watching a horror movie, he experienced scary unknown noises and used salt to ward away ghosts.
His birthdate is October 24, 1986
He is 168cm tall
He is affiliated with the agency Pro-Fit
He won:
- Best New Actor Award at the Third Seiyu Awards for his roles as Shin Kanzato in Persona: Trinity Soul, Ryuji Kuhoin in Kurenai, and Accelerator in Toaru Majutsu no Index (along with Yuuki Kaji!)
- Best Supporting Actor Award at the Fifth Seiyu Awards for his roles as Takumi Usui in Kaichou wa Maid-Sama, Eiji Niizuma in Bakuman, and Accelerator in Toaru Majutsu no Index II
He loves sweets... a lot:
- He’s a qualified patisserie
- Where his love of sweets came from
[I can also say that is a good portion of his blog]
He tried to be rebellious as a kid but got “clobbered” by his mom.
He would purposefully wear long-sleeves while in the hot recording room for “My Hero Academia” so that he would be agitated enough to play Kacchan!
He adds chocolate to his curry sometimes
He gave Ayane Sakura the nickname “Ayaneru”
He often celebrates fictional characters’ birthdays on his blog for series that he’s involved with!
He was once told to give up on being a voice actor!
youtube
Thank you for not giving up Nobu!
Music:
月刊少女野崎君-俺の手でSPARKING!! 御子柴實琴(CV:岡本信彦) - Gekkan Shoujo Nozaki-kun: Mikorin Character Song
Kamisama Hajimemashita: Mizuki Character Song
Welcome to the Ballroom: Kiyoharu Hyoudou Character Song
『 サクラメント』By Okamoto Nobuhiko Ending for Vatican Miracle Examiner
Promise - Kaichou wa Maid-sama: Takumi Usui Character Song
Restoration to 0 - Code:Breaker: Rei Ogami Character Song
Tiger and Bunny: Character Song
スタミュ Starmyu S2 Shadow & Lights 「沈黙のディアローグ」Ver. Tatsumi Rui
Blue Flame - Prince of Stride: Takeru Fujiwara Character Song
99.9% Noisy - To Aru Majutsu no Index: Accelerator character song
Oikaze ni Tsugu - Diamond no Ace: Kominato Ryosuke
Trailblazer - Ao no Exorcist
Kimi wa Hitori Janai
List of Links (Sources and other cool stuff!):
Some of the links were included in the actual facts themselves! If a source and other stuff is missing, they’re included above!
Voice Compilations:
25 Anime Characters That Share The Same Voice Actor as Boku no Hero Academia's Bakugou Katsuki
Voice Compilation [ 1 ], [ 2 ]
Wikipedia:
Nobuhiko Okamoto
3rd Seiyuu Awards
5th Seiyuu Awards
Haikyuu Stuff:
Haikyuu Awards
Basically, they got the fans to nominate for awards like “Who’s the best dressed?” Then the cast got to comment (and maybe get praised by the two female cast members)
“Imagination Game” - Seiyuu Event
Long story short: to win a pair of Karasuno boxers, the voice actors must answer all the same character when asked something like, “Out of the Karasuno team, who’s the most likely to [blank]”
Cast Pictures
Drama CD: Why Noya isn’t popular with women
(This one is because I fricking relate because I’m too short for this tall world)
“Who’s Best Girl?” - Cast Comments + Nobuhiko’s comments [video with cc]
Nobuhiko Okamoto & Yuuki Kaji being bros
[ 1 ], [ 2 ], [ 3 ], [ 4 ], [That time they challenged a Guinness World record], [Nobuhiko’s message for Yuuki Kaji’s 30th birthday]
Nobuhiko’s athletic ability
Kouki Uchiyama, Daiki Yamashita, Nobuhiko Okamoto: [Comic] BNHA Cast Comments
Daiki lending Nobuhiko his jacket (this can potentially fuel Bakudeku fanfics. I can feel it.)
Nishinoya and Bakugou at Jump Festa
#Nobuhiko Okamoto#HAPPY BIRTHDAY#seiyuu#don't ask how long I spent on this#seiyuu facts#seiyuu songs#seiyuu roles#too many tags too little time
16 notes
·
View notes
Last Seen Blogs

i-sooyeon
those who wait ;

rubiegubie
rubie rubes :3

monstermince
Rarepair junkie

gem-muse
Untitled

chiefflowerpastahound
Untitled