#food shortages
Text
"If you control the food, you control the people. That's ultimately the end goal." 👀
All around the world, unelected globalist bodies like the UN and WEF are waging war against farmers, in an attempt to seize control of the global food supply, under the banner of UN Agenda 2030.
Are You Prepared? 🤔
#pay attention#educate yourselves#educate yourself#knowledge is power#reeducate yourself#reeducate yourselves#think for yourselves#think about it#think for yourself#do your homework#do some research#do your own research#ask yourself questions#question yourself#question everything#be ready#be prepared#food shortages#food supply#food supply chain
707 notes
·
View notes
Text
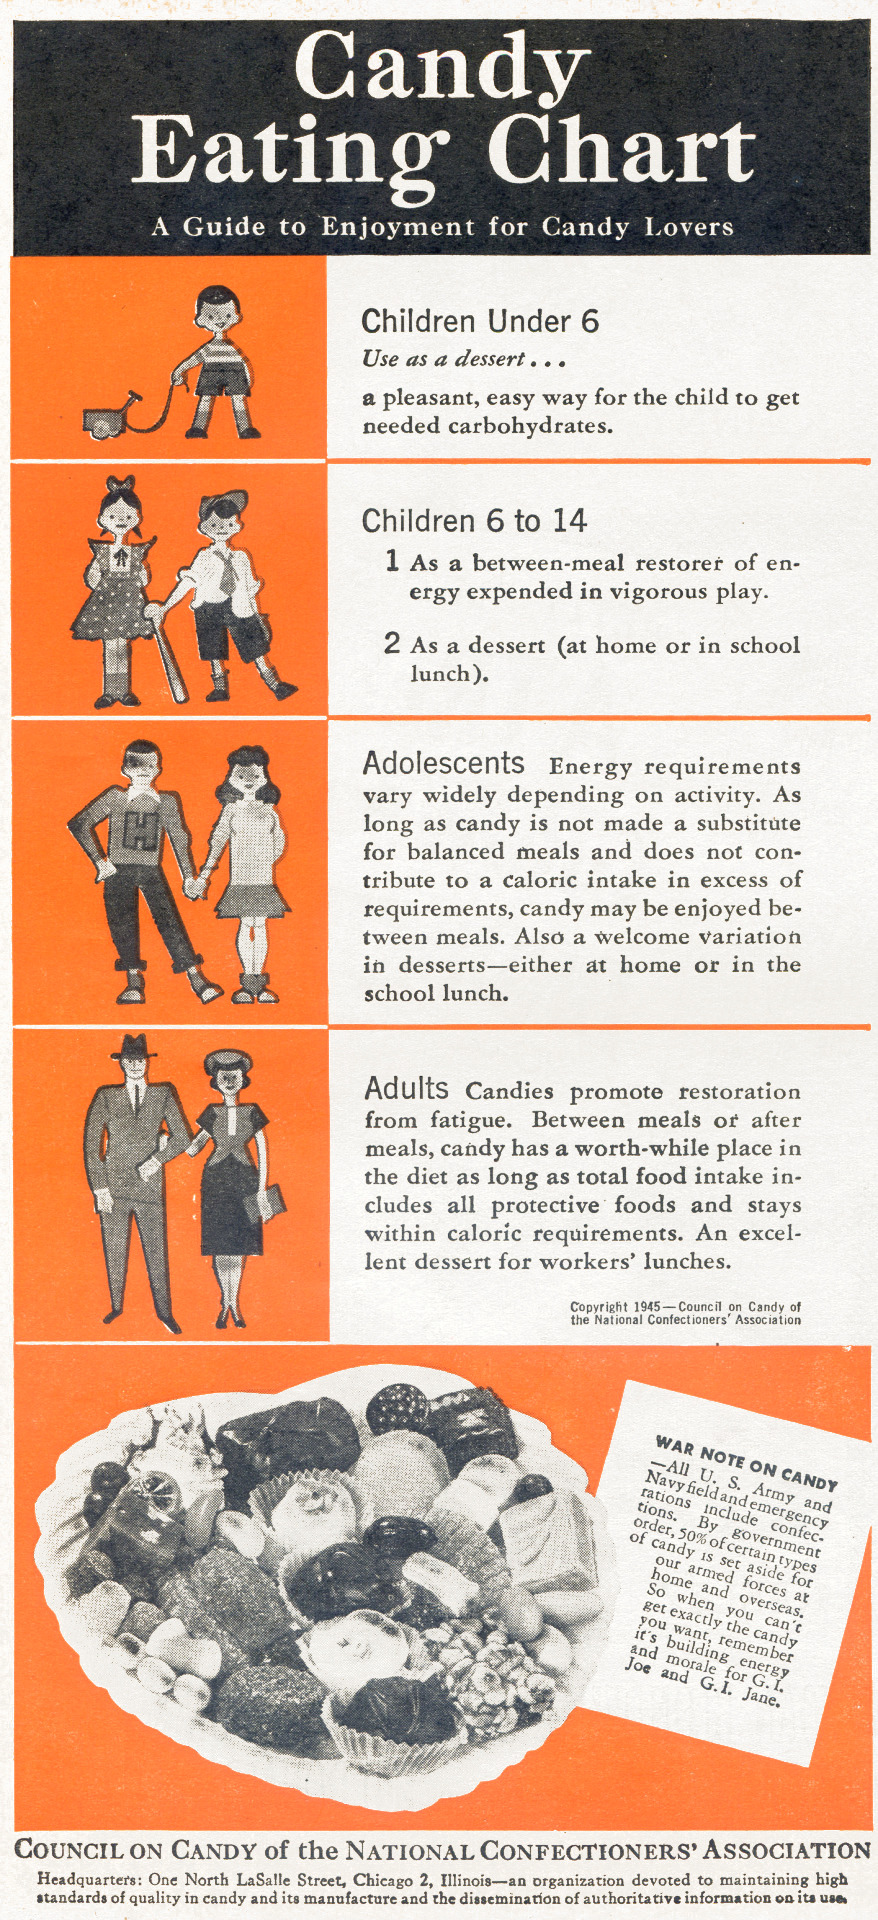
If there were a candy shortage today there’d be rioting in the street. That is if I can get out of my easy chair. Umph, maybe tomorrow.
Parents Magazine 1945
#vintage ad#advertising#advertisment#vintage ads#1945#candy#food shortages#wwii#1940s#1940s ad#1940's#1940's ad#nutrition#funny#humor#humour
118 notes
·
View notes
Text
As many of us know by now, Yemen has been the GOAT! A poor Muslim country doing everything in its power to help Gaza and because of this, the WFP (world food program) cut them off. Malnutrition rates among women and children are the highest in the world. If you are able to, please make a donation!
#Yemen#get you a friend like yemen#help yemen#food shortages#humanitarian crisis#free palestine#palestine#human rights
30 notes
·
View notes
Text
Take some time to really think about what you are going to want and need in your emergency food storage. Reevaluate it from time to time based on changing diet or preferences.
15 notes
·
View notes
Link
The strangely coincidental timing of all this certainly raises a lot of concerning questions 🤔
706 notes
·
View notes
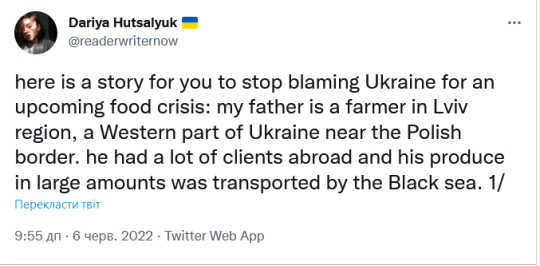
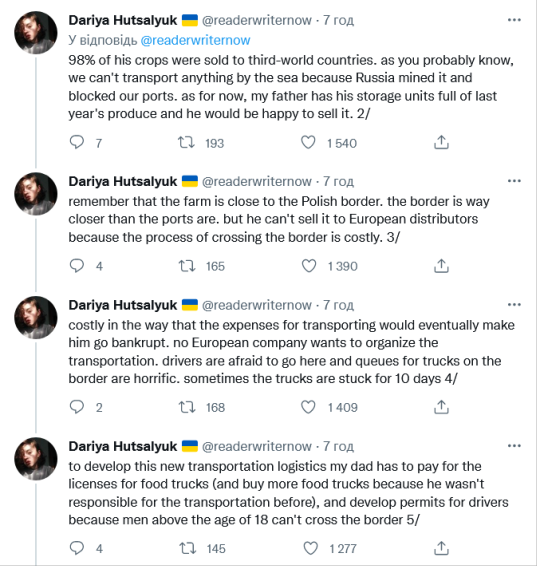
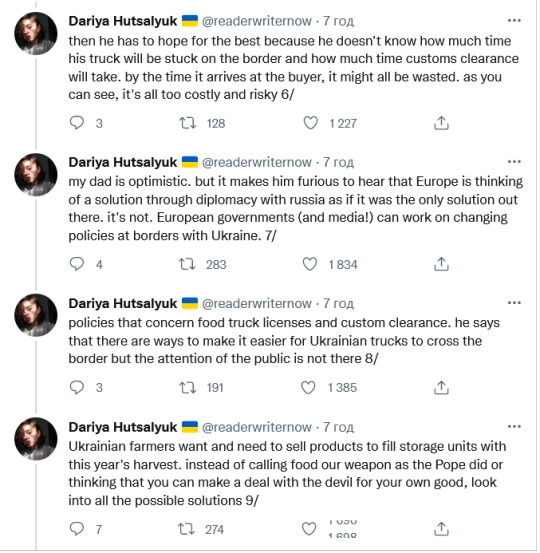
Text
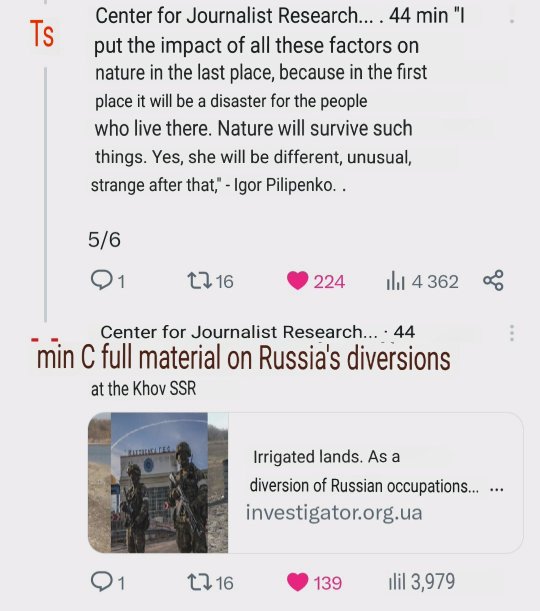
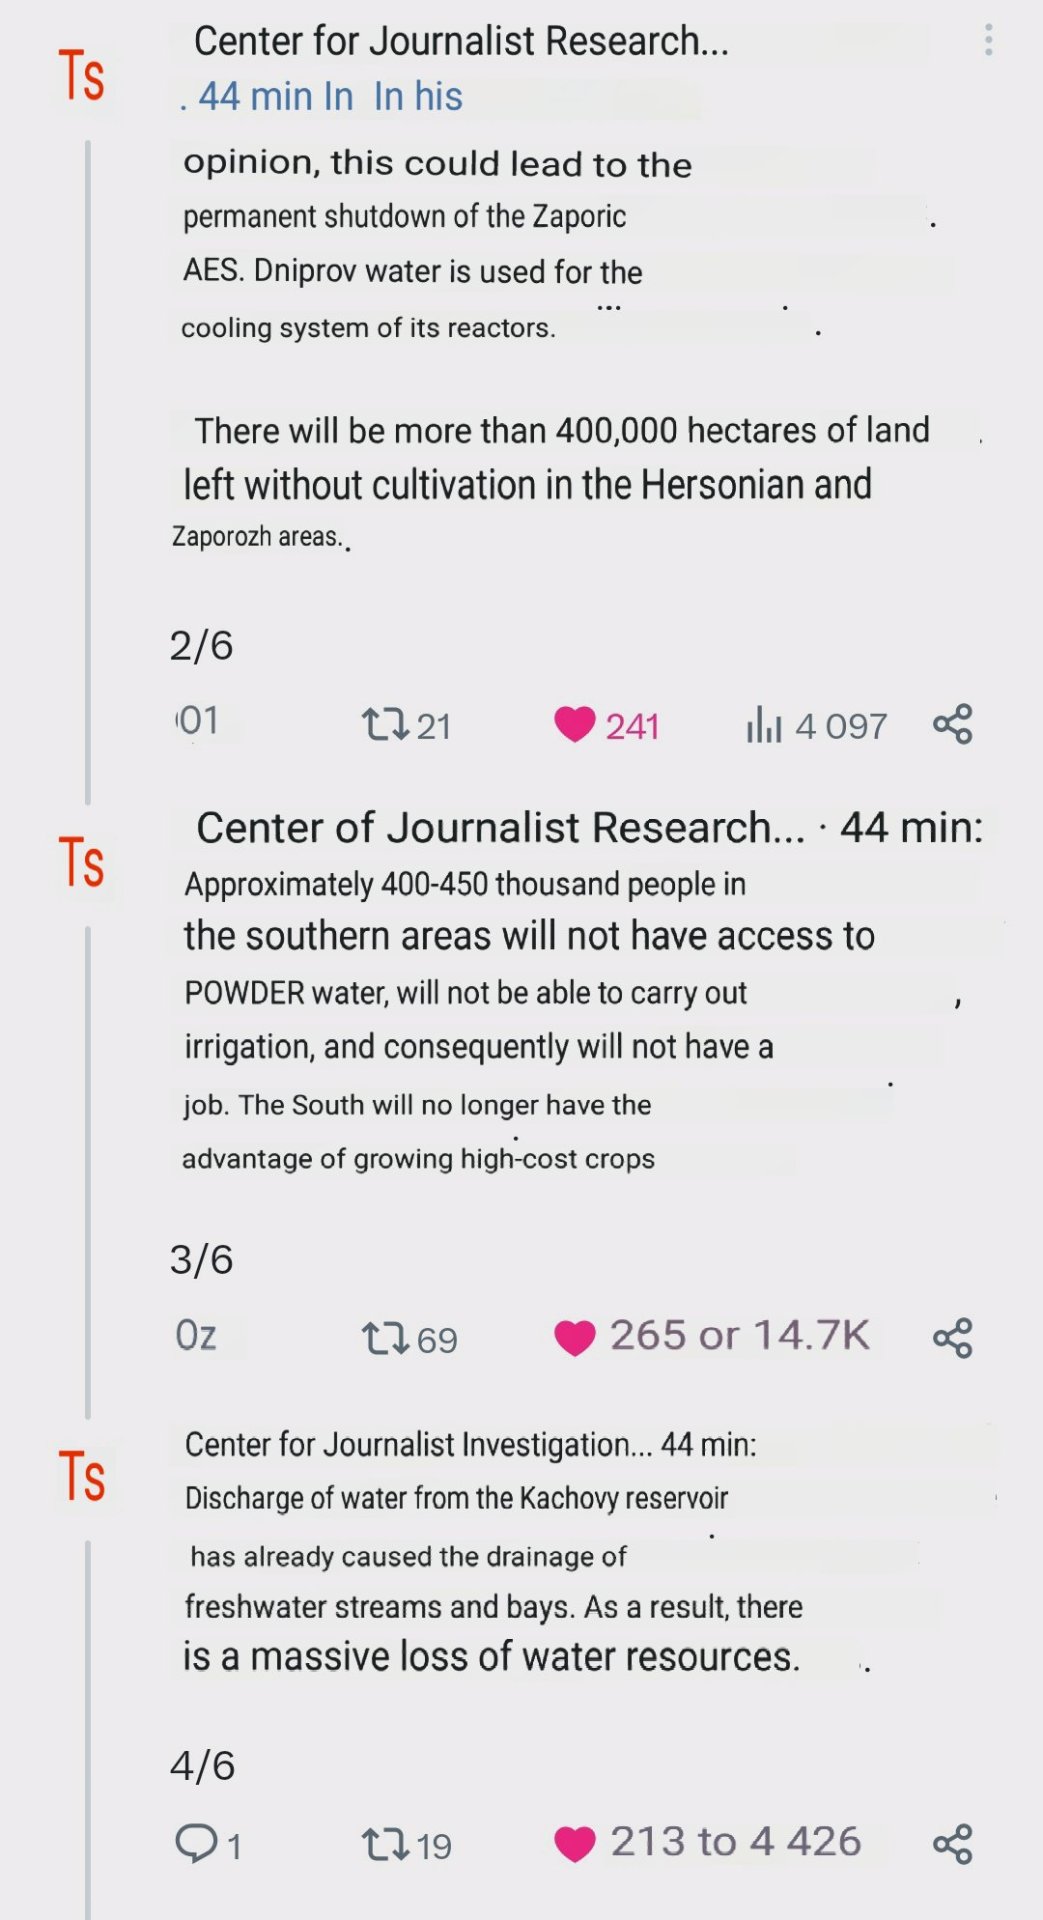
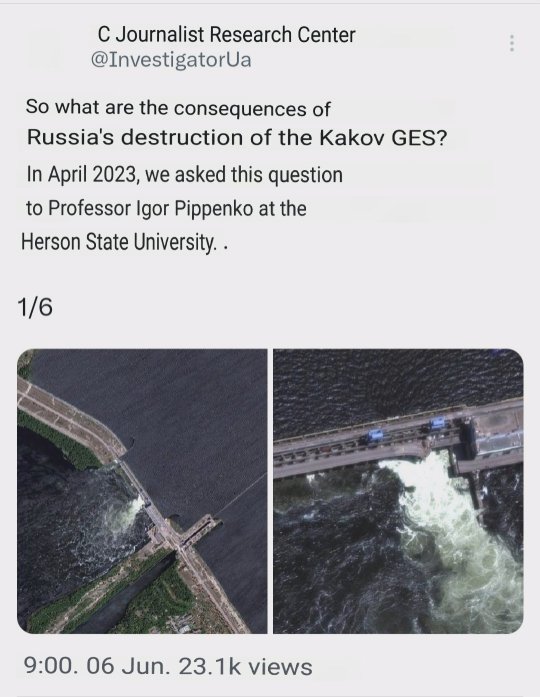
Apologies for shitty auto-translation
#ukraine#war in ukraine#russia#russian invasion of ukraine#russo ukrainian war#terrorism#russian war crimes#ecocyde#food crisis#food shortages#kakhovka dam
51 notes
·
View notes
Text
521 notes
·
View notes
Photo
77 notes
·
View notes
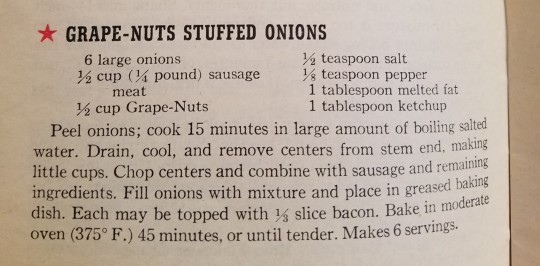
Text
War time recipe booklet from General Foods 1943

It begins with an illustration of Victorianna and a letter to Uncle Sam from his 'Niece' pledging to do her best to get dinner on the table despite food shortages.
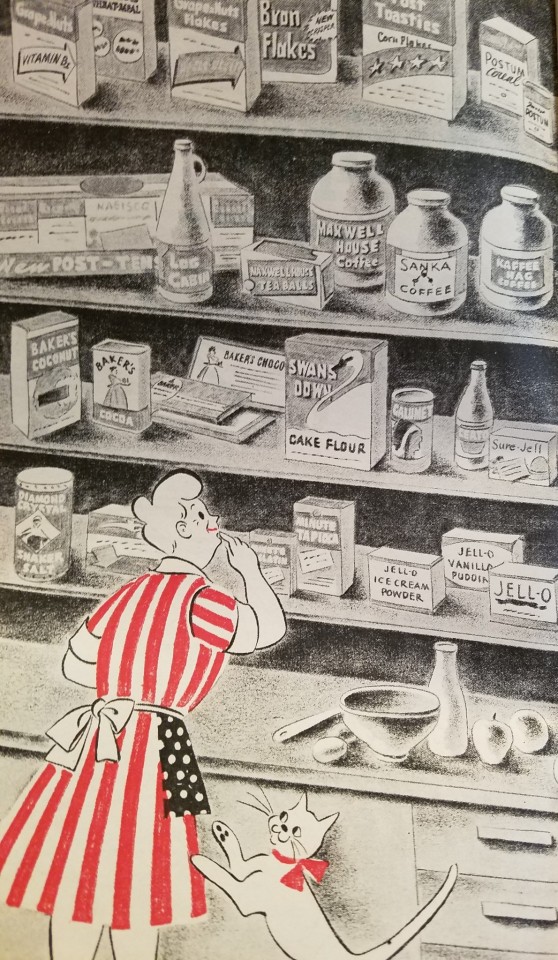
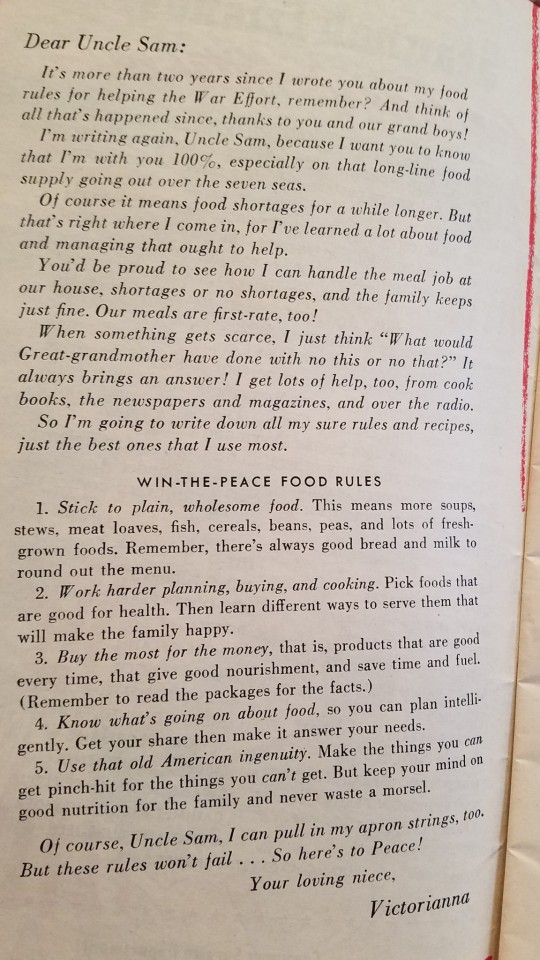
This was a fun read and included many war time tips to make meat, eggs and sugar stretch further.
It suggests adding cereals like grapenuts or bran flakes to tamales, hamburgers, meatloaf, casseroles, breads and pancakes. And, actually the pancakes would be very good with fruity or chocolate cereal.
It also features cake recipes with low or no sugar, subbing all the sugar for honey and or half for log cabin syrup.
The cakes and cookies feature one egg only and have a section on rendering your own chicken fat to sub for shortening.
The lunches and dinners encourage using less meat to really stretch those war time rations.
Another tip is mixing butter for sandwiches with gelatine to make it last longer, but concedes it is not meant to be cooked with.
Here are two featured recipes, one stretching a small amount of sausage with Grape-Nuts and the other a Jell-O dessert featuring postum.

I had not yet heard of postum and was grateful for the following passage explaining its usage. You can apparently still purchase this.

All in all a great little booklet and a fascinating glimpse into recipes and rationing during WW2.
#ww2#1940s#1943#vintage recipes#recipes#rationing#food shortages#history#postum#grape-nuts#stuffed onions#Victorianna
62 notes
·
View notes
Text
Food Storage Guidelines
Know you need to be storing extra food, but not sure where to start? Identify your level of food preparedness below and consider bumping up one level at a time.
Level 0: Weekly grocery run
At this level, you depend on your weekly (or more frequent) grocery runs to have enough food in your house. That means you’re dependent on food being on the shelves. When food shortages hit (note that I didn’t say “if”), your food will run out quickly.
Level 1: A few extra cans
This is “intro to prepping”. Each time you go to the grocery store, get one extra shelf-stable item. Canned foods, rice, beans, pasta, etc.
Store these in a back closet away from light and moisture - if you can, store them in the coolest part of your home.
Pros: Easy place to start, minimal financial investment
Cons: You will get REALLY tired of rice, beans, and canned foods. As much as possible, go for variety.
Level 2: Emergency Food
This is the next stop for most people. You can buy emergency food buckets from many different companies - do your research and consider what you and your family actually like to eat (as well as any allergies or sensitivities) before buying a bucket. Note that most food buckets don’t include meat - you’ll see “chicken flavored” and “beef flavored” meals, with no actual meat in sight. Usually you have to pay extra for real meat.
I recommend one bucket per family member to start. Depending on the company you order from and how you ration, a bucket may last 1-2 months.
Pros: More food variety, easy storage
Cons: Can get expensive, and you may end up with more oatmeal or banana chips than you actually intend to eat
Level 3: Home food preservation
Preserving your own food by canning, dehydrating, or freeze drying can move you from “I have a little extra” to “I’m prepared for the worst.”
Canning: Many foods can be canned in a large stockpot (water bath canning), but some foods require a pressure canner to reduce the risk of botulism. Canned foods take up space and are heavy, so you can’t easily transport them. They also lose some nutrition during the canning process.
Dehydrating: Pretty low startup costs, but it can take a long time to set aside a substantial amount of food. Not all foods dehydrate well, and you do lose some nutrition.
Freeze drying: Highest startup cost, but can be well worth the investment. Retains the most nutrition out of the three options, and many foods can be rehydrated to pretty near their original taste and consistency. This can allow you to build your own emergency food buckets. You can freeze dry meals and bag them, knowing what you’ve stored away is what your family likes to eat. Fats and oils don’t freeze dry well, so you will need to find a way to store those separately (making your own Ghee is a simple and cost-effective option for this).
Pros: Store the foods your family likes at a fraction of the cost of food buckets (after startup costs)
Cons: Requires potentially expensive equipment and storage space
Level 4: Homesteading
If you’re worried about a total collapse of society and a grid down scenario, you will eventually realize that homesteading is the only way to truly be prepared for anything.
For this you’ll need some land (at minimum a couple acres) and the time and energy to grow food and raise at least chickens, if not other livestock.
You’ll never be 100% self-sufficient, but you can reach a point where you are able to grow/raise most of your own food and trade with others for the things you can’t grow or make yourself.
Home Gardening Supplemental:
Of course, you can and should have a garden at any of these levels - even back at level 0, a garden can be a nice way to supplement your grocery runs with homegrown veggies. A home garden can also provide the food for preserving at level 3.
This garden can be anything from some herbs on a windowsill to containers on your porch to a full-fledged vegetable garden in the backyard or at a community garden.
As with all of these options, something is better than nothing!
136 notes
·
View notes
Text
Supermarkets are running out of food in Europe now because of the farmers blockade. "Coming To America" 🤔
#pay attention#educate yourselves#educate yourself#knowledge is power#reeducate yourself#reeducate yourselves#think about it#think for yourselves#think for yourself#do your homework#do some research#do your own research#ask yourself questions#question everything#food shortages#food supply chain#food
167 notes
·
View notes
Text

She went from Mommy Issues to Mommy Tissues.
Parents Magazine December 1944
#vintage ad#advertising#vintage ads#advertisment#1944#meat#wwii#food shortages#heath#pregnancy#1940s ad#1940s#1940's#1940's ad#funny#humor#humour
22 notes
·
View notes
Photo


Spoilers for the next season of Top Boy.
72 notes
·
View notes
Text

Displaced Palestinians in Gaza waiting to get flour from a distribution centre. Not only are they being bombarded, they're starving from the blockade.
(via. wearthepeace)
#starvation#free palestine#palestine#gaza#end israeli occupation#end israeli apartheid#end israeli siege#famine#food shortages
18 notes
·
View notes
Text
#emergency preparedness#government failure#liberty for security#women preparedness#preparedness saturday#prepping#preparedness#food storage#food shortages#shtf
19 notes
·
View notes
Last Seen Blogs

saintlouiscity
huh? what?

to-gay2-live
absolute mad lad

sparklefist
SUP FELLAS

my8thgen-blog
My8thGen.com