#both 4k i extracted frames from both videos and Down is the only one that looks like it. why does the married man get better quality
Note
do you have any tips on how to make HQ gifs? i followed a bunch of tutorial but specially on twitter is just look sorry to say this word but very sh*tty you are one of the blogs i followed so maybe i can ask you but i’m too shy to come off anon
fghjkjhgfdsdfghj alright let’s try a linked-filled tutorial
when giffing for either sns, imo it comes down to a few basics:
getting the source video in the best possible resolution
your video player (highly recommend potplayer but it’s only compatible with windows)
size limits - the thing about file size is that both sites will distort them even if you follow the keep-it-down-as-much-as-possible rule of thumb *stares at tmblr’s garbage .gifv default display* anyway, my current width settings are at 900px for twtr & 250/400/540px for tmblr
sharpening - the Difference this makes, ugh (a big fan of rubyredwisp’s glossy sharpen action over the years. you can also explore vapoursynth if you’re willing to deal with some light coding/wanna create a .gif output without going through ps... fair warning, it’s greedy on ram)
attaching a guide with screenshots but it’ll probably be long so imma keep that under the cut
(click on the in-line images to enlarge them)
first, i open the video i want. in trusty ol’ potplayer, taking screencaps is simply pressing ctrl+g (in case you prefer taking clips, it’s alt+c)
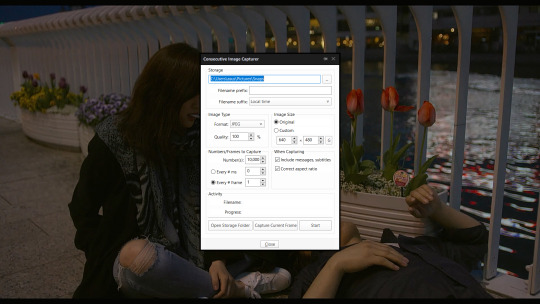
as you can see, the caps i got from that are 1080p
listen, a lot of folk would say 720p is fine but we’re not settlers in the age of 4k and up. as long as your disk space/internet can handle, use the ~best resolution available~
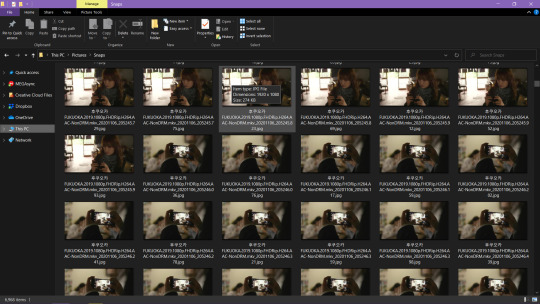
open photoshop. there are two ways (importing video frames to layers and loading files into stack) but in my experience, the latter yields preferable results so that’s the method we’ll follow here
the routine i’m used to is to load all the caps from that scene and trim from there but idk about your practice ymmv
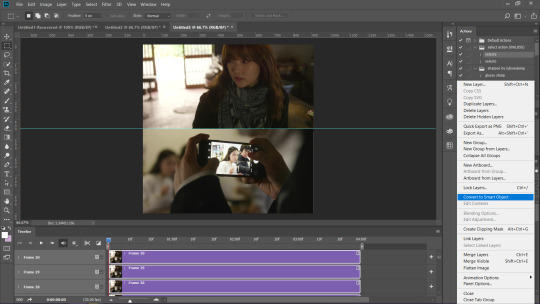
don’t forget to select all your layers* before pressing “convert video timeline.” we’ll need the frames first so click that three box/timeline button on the lower left corner, make frames and reverse frames


previous frame extraction step and cropping+resizing are interchangeable. both arrive at the same result. sometimes, i’d like to see the individual frames first before cropping but doing the reverse is often lighter on your ps
[tip: make use of crop ratio. that pair of numbers would help you maintain the shape of the gif instead of eyeballing using the move tool later on. 1:1 is a square, 2:1 is a rectangle, and so on and so forth]


set the frame timing. i like consistency so i keep my gifs running at 4s unless i can’t help it. a lil’ math is involved in order to divide frame time (0.07 for 60f/0.1 for 40f/0.13 for 30f/0.2 for 20f) though keep in mind the number of frames contribute to the gif size
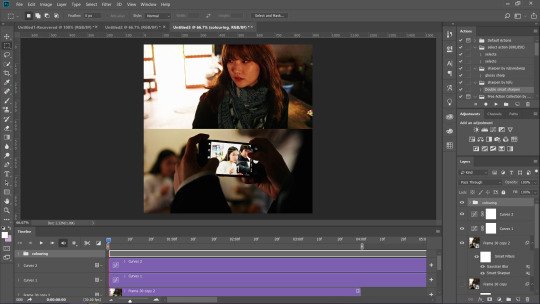
you’re probably wondering why i kept this twtr gif a few pixels above the 900px width i said earlier. after sharpening the smart object* - the reason why i had all the layers selected from the beginning - i slightly resize further using the canvas. this extra step would give you clean gif borders

once all that is finished, you’re free to do/not do colouring
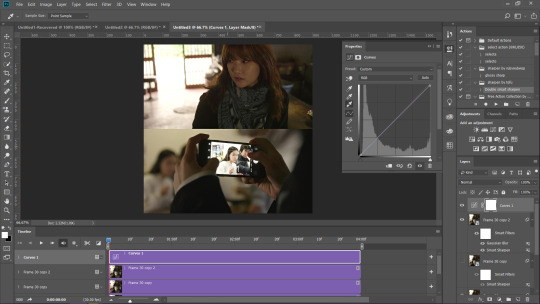
the simplest trick i learned recently from @waegashi-tofu is using curves to balance out your gif (use the white dropper for the portion that should be the brightest, the black dropper for the darkest area; you can make separate layers to easily discern the change made by the two) play around with opacity of that curve layer/s
leave it at that or if you’re overthinking all the time like me, colour further™


remember to double check the end marker of the video timeline. we’ve arrived at the last step where you’re now ready to save (alt+ctrl+shift+s)
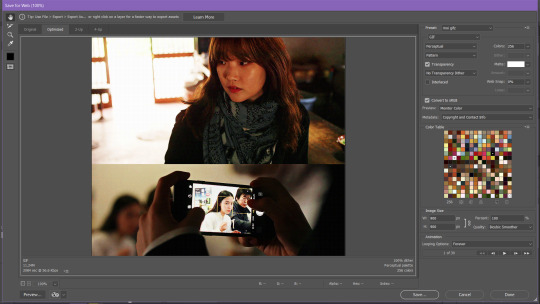
and we’re done! ᓚᘏᗢ
#heylo nonny i hope my process is concise and non-shitty lmfao#don't be shy next time and tell me if this tutorial was helpful or confusing#featuring more sodammie pining just because#miss bookshop keeper from fukuoka matches her well#tmblr has its bonkers set of rules and some gifs i thought would be fine look like hell when uploaded#twtr won't stop you unless you exceed 2000px but#k-fans are crazy for doing 1000px and up#then again they whitewash theirs so i guess taking out colours help them in that regard#anon reply#ps*
37 notes
·
View notes
Text
My Favorite Video Downloaders (ALL FREE)
Download Managers/Software
The advantage of download managers is that they let you keep all your downloads in one place, download multiple things at once, and most importantly restart, pause, or resume downloads (this is super useful if your internet goes out because the download manager will usually be able to resume the progress from where you left off, while for example if your internet goes out while downloading from your browser it can sometimes mess up the download and make you restart the entire thing from the beginning).
JDownloader 2: THE GOAT
http://jdownloader.org/jdownloader2
This is my favorite video downloader for sure! It lets you choose the quality, frame rate, and format of your video download. It can load entire channels or playlists from YouTube. It combines and extracts ts part files (.ts.001, .ts.002, etc.). Many sites are supported besides YouTube like dailymotion, vimeo, facebook, vk, twitter, ok.ru, archive.org, etc. You can also paste the m3u8 links to download videos from sites like NBC Sports (video clips and full event replays/streams), NBC Gold, NBC Olympics, Olympic Channel, 1tv, FISU, eurovisionsports, radikal.ru, rutube, vs-mobi, etc. It works for managing downloads from sites like google drive, mediafire, sendspace, mega.nz, etc. too. You can even use a proxy to download geo-blocked videos.
You can find the m3u8 links to copy and paste using any of these browser extensions:
The Stream Detector (Firefox): https://addons.mozilla.org/en-US/firefox/addon/hls-stream-detector/
This only grabs links and doesn’t download. I use this to get m3u8 links on Firefox.
HLS Downloader (Chrome/Opera): https://chrome.google.com/webstore/detail/hls-downloader/apomkbibleomoihlhhdbeghnfioffbej
HLS Downloader can also download videos as mp4s, but you have to re-encode the video using avidemux for smooth playback, uploading, importing the video for gifing in photoshop, etc. so I prefer to just use it for copying the m3u8 links into JDownloader 2, where the videos download PERFECTLY. I use this to get m3u8 links on Opera and Chrome and I prefer this to Adobe HDS/HLS Video Saver in terms of user interface. The downside to this extension is that it makes videos unplayable on dailymotion and rutube.
Adobe HDS/HLS Video Saver (Chrome/Opera): https://chrome.google.com/webstore/detail/adobe-hds-hls-video-saver/fkbfbopjoockkhmfnchmacgpmkofcfaj/
Adobe HDS/HLS Video Saver can also download videos as .ts files, but I prefer my files as mp4s so I didn’t use this to download videos, but only to get the m3u8 links to paste into JDownloader 2. I uninstalled this extension when I found HLS Downloader though because I prefer that one and don’t need two m3u8 link grabbers from Opera/Chrome. You have to clear your downloads or refresh your page a lot if you just want a link for a specific video because it captures a lot of m3u8 links and they sometimes stay in the url bar when it’s just videos from browsing and not ones you want to download.
Xtreme Download Manager
http://xdman.sourceforge.net
You use this along with downloading the XDM Browser Monitor extension for whatever browser you use to download videos. Many sites are supported (it doesn’t detect NBC Gold videos tho). The original files will usually be .ts files (and for YouTube MKV), but when downloading it lets you choose MP4 best quality to save/convert as. I use this to download videos from Disney Now and to download and convert 4K YouTube videos to MP4 (all the other downloaders only let you download 4K videos as MKV or WEBM).
You can also click on file and then “download video” and enter URLs to download and those will actually be MP4 files already and not require conversion with the built in converter that takes a lot more time/cpu power. It doesn’t find downloads or work for as many sites as the XDM Browser Monitor though.
Megabasterd
https://github.com/tonikelope/megabasterd
A MEGA downloader that has no download limit. It also lets you get streaming links for MEGA that you can view in your browser. You can also upload to MEGA, split files, or combine files.
Browser Extensions
Flash Video Downloader
NOTE: DO NOT USE THE VERSION CURRENTLY IN THE FIREFOX ADD-ON STORE (https://addons.mozilla.org/en-US/firefox/addon/flash-videodownloader/) IT IS A KNOCK OFF OF THE ORIGINAL THAT WAS TAKEN OFF THE STORE AND DOES NOT WORK WITH THE FVD DOWNLOADER MODULE
This was my favorite Firefox extension, but Firefox disabled it after the latest update. There’s still a way to get it though! This is very easy to use since it’s a browser extension and can download from nearly every site. This can download from NBC Gold and is the only add-on that can do so. Other sites it works on are NBC Sports (both videos clips and full event replays/streams), Olympic Channel, vimeo, dailymotion, archive.org, niconico, rutube, vs-mobi, youku, 1tv, ok.ru, vk, radikal.ru, etc.
Download this folder:
https://drive.google.com/file/d/1-dcatnY2BHN6Ryt4dwHOTdIMP2LXCovh/view
Download the FVD Downloader Module from here:
http://fvdmedia.com/fvd-welcome-ff/
Go to Firefox add-ons

Click install Add-on From File

Choose the file [email protected] (835 KB) from the ValidLatest-v16.2.9 folder, which will be in the google drive folder you downloaded.

You should have the extension downloaded and now just go to options and click off from automatic updates!
Stream Video Downloader
https://chrome.google.com/webstore/detail/stream-video-downloader/imkngaibigegepnlckfcbecjoilcjbhf
Basically the Chrome extension equivalent of Firefox’s Flash Video Downloader. It can’t download from YouTube though because of chrome extension store rules. But it works for nearly every other site including NBC Sports videos, Olympic Channel, vimeo, dailymotion, archive.org, niconico, rutube, vs-mobi, youku, 1tv, ok.ru, vk, radikal.ru, etc. It also sometimes works on Disney Now. Sometimes it says network error and sometimes it works. On NBC Gold it’s similar... it sometimes says network error after downloading everything, it sometimes fails in the middle and downloads a part of the stream. I feel like NBC Gold videos are too large for this extension to download well in full, so I would just stick with JDownloader 2 or Flash Video Downloader for NBC Gold.
Video DownloadHelper
https://addons.mozilla.org/en-US/firefox/addon/video-downloadhelper/
You can see a lot of the supported sites here: https://www.downloadhelper.net/asites/f/standard/1
Note: there’s also a Chrome extension, but you should use the Firefox version since the Firefox version has no restrictions, while the Chrome version you have to log into your Chrome account to have no restrictions, while if you don’t you have to wait 2 hours between each video download.
I originally didn’t include this in my list because I didn’t like how this caused dropped frame rate or big lags in downloads from NBC Sports, Olympic Channel, youku, 1tv, vk, dailymotion, etc. I’m including it now though because it works for Disney Now (correct frame rate and no lags) and was able to download 720p of one Disney Now episode that XDM kept failing to download. XDM and Video DownloadHelper are the only downloaders that can consistently download from Disney Now. Disney Now is really the only site I use this for downloads (besides all the testing I did for this post lol) since it doesn’t need to convert from .ts to mp4 like XDM and therefore takes a lot less time/CPU power, even if it’s not as high quality as XDM MP4 best quality conversion setting. It also works without video lags or dropped frame rates in rutube and radikal.ru though I would just use JDownloader 2, FVD, or Stream Video Downloader for these since I prefer those downloaders. Don’t use Video DownloadHelper for YouTube or vimeo because any 480p, 1080p, or 60fps videos will need ADP conversion which takes a long time and also leaves an ugly watermark.
Command Line
YouTube-DL
https://www.youtube.com/embed/fKe9rV-gl1c?feature=oembed&enablejsapi=1&origin=https://safe.txmblr.com&wmode=opaque
Really fast command line downloader. Guide on how to set up and use is here. Supported sites are here: https://ytdl-org.github.io/youtube-dl/supportedsites.html
This is the only downloader that works really well with bilbili (downloads entire video and in the best quality). Bilbili downloads are .flv files though, so you will have to use avidemux to convert to mp4 if that’s your preferred file format (it is mine). It’s also the best downloader for youku imo.
It can also download entire YouTube channels and playlists.
BTW for YouTube videos that are 480p or 1080p when you just enter the URL, it downloads mp4 video and webm audio and combines them into a MKV. I prefer mp4 files and to get mp4 just use this command:
-f bestvideo[ext=mp4]+bestaudio[ext=m4a]
Some more command tips:
To choose or check the video download qualities available use --list-formats
To specify where you want your video downloaded use -o and then the file path (ie. C:/Users/user/Downloads/%(title)s.%(ext)s)
Websites (no software or extensions required)
DiStillVideo
distillvideo.com
An easy to use online video downloader! Imo the best online video downloader. It requires no program installation or extension or command line use. It can download from NBC Sports site and gives direct link you can either use to view or save video as. Afaik the only other website downloader that could do that was QDownloader, but that got taken down. :( The description on supported sites says these are all supported:
Youtube, Twitter, Vimeo, Facebook, Dailymotion, SoundCloud, Instagram, Liveleak, Break, Imgur, TED, CNN, Mashable, 1TV, 9gag and 5000 more websites
9xbuddy
https://9xbuddy.com
A video downloader recommended by @decemberelegy. See supported sites here: https://9xbuddy.com/sites It supports downloads for YouTube, a lot of Russian sites, and a lot of the free TV streaming sites likes yesmovies.
ddownr
https://ddownr.com
This is a site (no software required) that actually lets you download YouTube playlists (up to 250 videos). Your videos will be put together in a .zip file that you can download and extract to your computer.
Streamable
streamable.com
This lets you paste the link of youtube videos and then it will upload and save it to it’s server! You don’t even have to download anything yourself. But you can download it easily from the site too. You can also upload and host videos from your computer too. And it lets you choose time stamps to upload or download only a clip of a video. There is a 10 minute and 1 GB max limit though per video.
ClipConverter
clipconverter.cc
This lets you download only clips (you can still download the entire video though) from YouTube, vimeo, facebook, and dailymotion. It also lets you choose video quality and format and sometimes frame rate. The downside is that it doesn’t work for YouTube videos that include copyrighted music. This is really useful for downloading only clips instead of the whole video when you want to make gifs.
Media Players
KMPlayer
http://www.kmplayer.com/home
The latest version of KMPlayer is suuuuuuuch an improvement from the older versions. It no longer has annoying ads in the box. And it can play a lot of media m3u8 links (you can get the links from the extensions I mentioned in my JDownloader 2 description earlier) and it can play sooooo many video formats and subtitle files (.sub and .idx both work on KMPlayer, but not other media players afaik). Also it has an option to download videos. You can go to file and then download URL. You can download from YouTube, Facebook, Instagram, NBC Sports, dailymotion, nicovideo, v-s mobi, etc. Usually if you paste actual URL and it finds a download, it can download it. m3u8 links usually don’t download though with download URL option even though they can be played through play url/youtube.
PotPlayer
https://potplayer.daum.net
PotPlayer is my new favorite media player. It can basically play all the files and links KMPlayer can. It has much better color quality than KMPlayer though and better default aspect ratio detection. Another cool feature it has over KMPlayer is that when you play TV episodes in the same folder it will create an ordered playlist, which makes things easy to watch. It doesn’t have a URL download option like KMPlayer, but this isn’t an issue for me because anything that can be downloaded in URL download from KMPlayer, I can download with a different downloader on this list. PotPlayer has an even more useful feature that sets it apart from everything else on this list, which is video recording that records directly from the source video (much better than screen recording). This works on things KMPlayer URL Download can’t work on like playable m3u8 links or playable live-streams. There is a guide on how to use the function here: https://www.journeybytes.com/2018/01/how-to-use-potplayer-to-record-videos-from-different-sources.html
Userscripts
Userscripts can be easily downloaded via the browser extension userscript managers Tampermonkey or ViolentMonkey
Local YouTube Downloader
https://greasyfork.org/en/scripts/369400-local-youtube-downloader
This shows you the direct audio and video links under YouTube videos. You can click on the links to simply view or click “save video as” and download. That’s all you need to do if you want 360p or 720p streams. For 480p or 1080p quality you have to download the audio and video streams separately and combine them with ffmpeg. I don’t do this since it’s easier to just have them download and combined with JDownloader 2 or YouTube-DL. I love this script mostly for having direct links I can view in new tab instead of on YouTube site or downloading geo-blocked YouTube videos with just browser (instead of computer wide) extension VPN.
VK Media Player
https://greasyfork.org/en/scripts/38614-vk-media-downloader
This puts a download button on VK videos where you can click and download to your computer or open the link in a new tab and show/view the direct video. I find this really useful since VK’s video playing layout can be annoying with the playlists and slowish loading times.
Torrents
qBittorent
https://www.qbittorrent.org
This is what I use to download torrents and the best torrent download manager imo. It’s open source and has no ads or malware. You can also use the search engine (it will download with python) and add search plugins to search from torrent sites. It’s better than uTorrent which I tried and would always open on start up even when I put not to in my options and would be stuck at 0% when trying to download magnet links.
Screen Recording
If you’re a windows user, Windows 10 has a built in screen recorder in it’s game center that is very high quality. Here is a guide to how to use it: https://www.laptopmag.com/articles/how-to-video-screen-capture-windows-10
OBS Studio
https://obsproject.com/download
OBS lets you record and/or stream your entire screen/display capture, specific windows (browser, media player, game, etc.), media files, and even has a built in browser capture you can interact with.
243 notes
·
View notes
Text
Convert MP3, WAV, WMA, AAC, AC3, OGG, DTS, FLAC And Extra!
I have to convert audio information to mp3 utilizing ffmpeg. Universal audio converter. Extract and convert audio tracks from audio and video information to MP3, AAC, AC3, WMA, OGG, FLAC, M4A, WV, AIFF, WAV and other codecs. Convert video with AC3 audio to audio format like convert MKV with AC3 to MP3 audio. After loading one or more audio recordsdata to , you simply want to choose one of the output formats from beneath. When the file is able to be downloaded, use the small download button to put it aside to your computer.
AC3 audio is a surround sound with little loss and top quality. As one of the supported audio codec of the ASTC standard, it has been generally used on DVDs and HDTV. But this audio format has less compatibility. As a result of restriction of Dolby Lab, AC3 audio can only be played on specified players or devices like a DVD player. When this happens, many are inclined to convert AC3 to MP3, another audio format which has each higher sound high quality and http://ubgjacques18540.pen.io/ better compatibility.
You may also set the MP3 to AC3 Converter to delete a supply file after conversion and protect the the original folder structure, when doing batch conversion. five hundredth Video Converter allows you to effectively perform video conversions, burn video information, extract audio tracks and more. On high of all the options listed above, there are some extra advantages that come with buying DivX Pro In DivX Converter, you possibly can unlock customized encode settings, set B-Frames, modify settings with Target Quantizer and other super nerdy choices. In DivX Participant, you'll be able to allow HEVC 10-bit playback and more.
AAC takes a modular method to encoding. Relying on the complexity of the bitstream to be encoded, the specified performance and the acceptable output, implementers may create profiles to define which of a particular set of tools they wish to use for a selected software. Also, its Windows version enables you to obtain movies directly from video sharing web site like YouTube. All you'll want to do is copy the URL within the field and the program will routinely detect the video content material.
It now appears that ANY file I use to convert to AC3 at 48khz, the outcomes are the same. Choose the files you want to convert. They may now be added to the list in the Converter" view. As an alternative, you'll be able to at all times drag and drop information to the view. Add help for AC3 audio with DivX video formats, together with HEVC video as much as 4K Ultra HD.
Just drag and drop the audio information you could be converted instantly into this system, select an output format, and then start the conversion. Conversion (mp2 to wav) of C:\TEMP\Extracted_audio_1.mpa finished. Click on the Free Obtain button below to try Change Audio File Converter Freeware without delay. Merely drag & drop audio files and even audio folders so as to add into the conversion checklist.
Ease MP3 WAV Converter includes options to convert different file formats to MP3, equivalent to AAC to MP3, or WMA to MP3. Ease Audio Ac3&mp3 converter downloader free can convert audio formats MP3, WAV, WMA, OGG, AAC ,APE,FLAC,MP2,MP4, M4A,MPC(MusePack),AC3, TTA,ofr(OptimFROG),SPX(Speex),Ra(Real audio),and WavePack from one to a different. Chance to splitting the output files primarily based on chapters stored in the supply files.
You are appropriate, DTS is supposedly better than AC3 since it has a higher bitrate than AC3 does. But many DVD gamers can not decode DTS in any respect though it perceives a better high quality. For greatest compatibility with gamers and units, you must use AC3 as it is a codec that each one DVD players offered in the world have to be capable of decoding and playing within the participant itself. You talked about the standard. I'd say DTS and AC3 are lossy both.
Scroll down the page to find the "Output Format" field. Depart "No Video Preset" selected within the first drop-down menu. Open the second drop-down menu and select the desired format for the VOB file's exported audio. You'll be able to choose from MP3, WAV or AAC. Hit the "OKAY" button. The VOB file might be uploaded to the online service and the file conversion shall be initiated. You can be redirected to a obtain page when the exported audio file has been successfully created.Often different on-line converters send your information to be downloaded to an external server the place they're transformed. We don't suggest utilizing these companies as your information can occur to be found by different folks. The principle function of our converter is that it doesn't add recordsdata to the server for processing. The process takes place on the consumer aspect, that is, in your browser. You shouldn't worry that someone gets the access to your recordsdata. All conversion of audio recordsdata takes place uniquely in your browser in online mode. The conversion process in the browser is very exhausting and time-consuming. It takes more time than in purposes and audio conversion applications.
1 note
·
View note
Text
gif tutorial !! (feat. anamo)
for everyone asking how i get my gifs so crispy
note: this tutorial is made using photoshop cs5! and while it should still work for newer versions, not everything may be the same. sorry :(
programs
photoshop cs5 (this is the only version i’ve really ever used so sorry cs6 and cc users)
topaz clean & denoise (optional)
kmplayer
media downloaders
4k video downloader
twitch leecher (for clips longer than what twitch allows)
how to download twitch clips (I use the “slow” method) twitch update made this useless ! so now i just use this site to download clips :)
1. extracting your frames when you can’t do video frames to layers
I think you need QuickTime (i don’t, which is why i can’t use this method) for this, but if your version of photoshop allows you to do File > Import > Video Frames to Layers, here’s another tutorial to help with that!
Remember that the best, clearest gifs come from the highest quality sources! However, I don’t normally recommend downloading actual 4k videos because while your gifs may be super HD, the frame rate is almost always really weird and slow.
After downloading your video/clip using one those nifty programs listed above, we need to extract your frames! Personally, I’ve only ever used KMPlayer to do this, but I’m sure that other equivalents will work pretty much the same.
Anyways, after opening your video in KMPlayer, pause right before the scene you want to gif and right click. There should be a tall menu that pops up, and from there you click Capture > Frame: Extract. This brings up yet another menu, and here are the best settings (at least I think so) for extracting your frames!
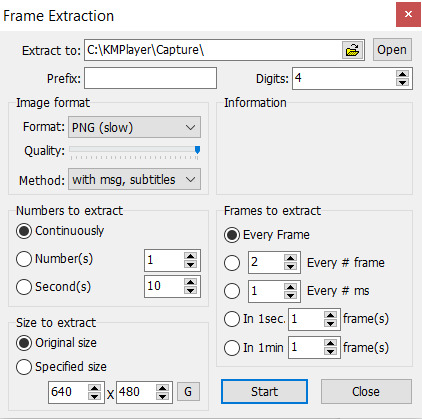
Now, you need to click start and let your video play. Once you’ve captured all the frames that you want, they should all be in your Capture folder that KMPlayer made for you (mine is located under This PC > Windows (C:) > KMPlayer > Capture). Just organize the frames as you want - I usually separate the frames for each gif into separate folders, but do whatever you want.
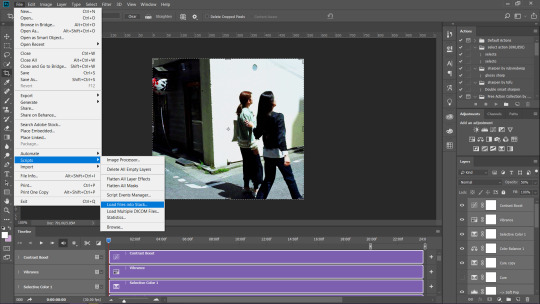
To actually get these frames into PS, start up the program and go to File > Scripts > Load Multiple DICOM Files and locate your Capture folder. Look, we have frames now. Cool.
2. actually making gifs
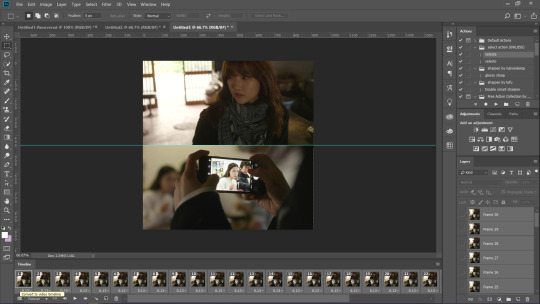
Make sure that your Animation window is open (it’s under Windows on PS if it’s not) so you can see what is likely only one frame, which is probably way less than the amount of frames that you captured (this will be different if you used Video Frames to Layers). To fix this, click on the symbol (a little upside-down triangle next to four lines) on the far right of the animation window and choose Make Frames From Layers.

Since we now have a lot more frames in our timeline, you can click the play button and watch them scroll through. Decide how you want to crop your gif and then resize the cropped frames to fit Tumblr (sizes here). Once you’ve done this, click on the upside-down triangle again and select Convert to Timeline, then select all the frames in the Layers tab that’s probably on the right of your screen and right click > Convert to Smart Filters. This will make sharpening easier because you can sharpen every layer all at once like this.
3, sharpening
At the top of your PS window, there should be a Filter tab. From there, click Sharpen > Smart Sharpen. Using my fairly limited experience with PS versions other than CS5, I do know that not every version of PS sharpens the same, so if you’re using something other than CS5, settings may vary somewhat. But anyways, here’s what my Smart Sharpen settings look like:
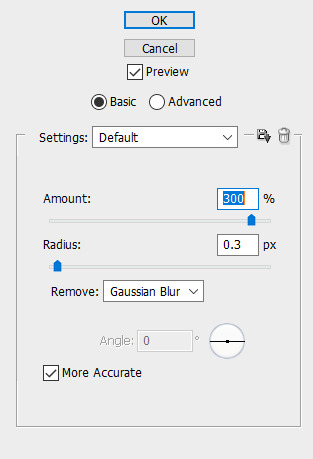
I then have my own personal sharpening action that I apply to the gif to somewhat smooth out the sharpness, but this tutorial has something towards the end that’ll give you a similar effect. And don’t forget to play your gif again to make sure that it works before you start coloring!

4. coloring
As a lot of players are POC, please be conscious of how you color the gif! Obviously, Obivously, it’s one thing to lighten up a dark scene because it’s hard to see what’s going on. However, when you purposefully and consciously make the decision to lighten (or darken) solely a player’s skin color, that’s gross! Stop!

This being said, there are 5.6 million gif coloring tutorials out there and 5.6 million ways to color a gif. Personally, I tend towards more “””natural””” and true-to-life colorings for my OWL gifs, but I’ve made vibrant and pastel and colorful gifs as well. Here’s what the base PSD for all my OWWC gifs looks like, and this is pretty representative of all my other OWL PSDs as well.
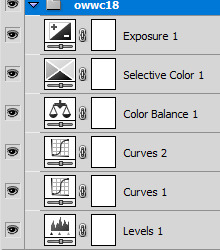
But as I said, there are so many different ways to color gifs - some of my gifs only have a total of three adjustment layers - and everyone has their own preferences for how they like their gifs to look. However, I will say that my first step in coloring is a gif is always use Levels and click the Auto option for a little color correction.
When you’re all done coloring your gif, select everything in your Layers tab (PSD + actual gif), then right click > Convert to Smart Filters again so that you only have one (1) layer in the tab.
5. using topaz to be extra (this is optional)
Is using Topaz necessary to make gifs? No, absolutely not. It also makes the giffing process take longer. It’s literally just to be extra yet I still use it on every single one of my gifs. Why? Because it makes them s m o o t h and I hate seeing pixels. Even if most OWL stages are pretty noiseless and nice overall.
To use Topaz, click on your single Smart Object gif layer and go to Filter > Topaz Labs.
While I do have both Topaz Clean and DeNoise, I typically prefer DeNoise over Clean, and that’s mostly because it’s a bit more difficult to mess it up. Topaz DeNoise does exactly what it sounds like it does - it removes noise from images. However, it also smoothes skin and hair and everything else, which is why you still need to be careful using it unless you’re going for an unrealistic, completely airbrushed look. Topaz Clean does the same, but with more emphasis on the smoothing (I guess), so it’s easier to accidentally go overboard with it.
I almost never use the two in conjunction, but a good thing about Topaz is that it also reduces your gif file size by reducing noise! Which is nice! Also here are some nice Topaz settings. I use these (for the most part)!
update as of jan. 6, 2019: I am a Big Liar and I use both Clean and Denoise together all the time now and have been doing so since pretty much immediately after writing this tutorial. Just be careful when using both otherwise your gif might start looking too smooth - as with anything else, Topaz should be used in moderation :)
6. saving your gif
This part is actually super important if you used Topaz on your gifs. After you’ve made everything into a Smart Object, click on the upside-down triangle on your Animation window and select Flatten Frames Into Layers. If you used Topaz and don’t do this before trying to save your gif for posting, you will crash PS.
This process might take a while for Topaz users, but at the end, once your Smart Object has been made into many layers, go back to the upside-down triangle, click Convert to Frame Animation, and then select Make Frames from Layers from that same menu.
Now all your frames are visible on the timeline! Delete the very first one (otherwise the same frame will be repeated twice), select all of the frames on your timeline, then click on the little “0 sec” thing beneath the frames to set the gif timing. For this, I generally recommend using 0.03 or 0.04 seconds, but this depends on personal preference as well as the frame rate of the original video.
It’s time to finally save our gif. You just go to File > Save for Web & Devices and a big window will pop up. Honestly, the only save setting that really matters is that you have your gif set to loop for forever. Some people prefer using Diffusion over Pattern when saving, but this is what mine looks like right now:
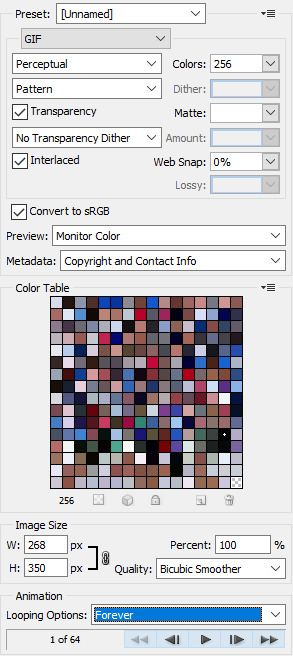
If you go to save your gif and find that it’s above Tumblr’s 3MB gif limit, you are probably just going to want to delete frames if you don’t want to lose the overall gif quality. Otherwise, you can click on that Colors: 256 box and try to cut down the number of different colors in your gif - though I will warn you that this generally makes gifs look more pixelated. And once your good and settled, click save and your gif is ready to post!
12 notes
·
View notes
Text
What No Man Has Seen Before: Remastering Deep Space Nine to Maximum Quality
I’m done.
Most stories don’t begin at the ending, but that’s the only place to start this one. I’ve been working to remaster Deep Space Nine for the past nine months, ever since AI-based video upscaling software began to hit the market. After I saw how much improvement could be wrung out of some old MKVs, I decided I’d start over, using the original, superior, Deep Space Nine DVD source. Nine months later, I’ve accomplished what I set out to do: Create a method of remastering and upscaling Deep Space Nine that didn’t rely on hand-combing episodes to fine-tune deinterlacing algorithms while compromising on image quality to the smallest extent reasonably possible. I’ll be demonstrating the results all throughout this article.
I have created a 23.976 progressive version of Deep Space Nine, codenamed Rio Grande. While I have not yet checked the method against the entire show, it worked well on test episodes from S2, S4, S5, and S6. Special thanks to Cyril Niderprim, who found the hilariously simple solution below, and a pox on the small mountain of more complicated scripts I’d written. While Rio Grande is capable of throwing errors — I have included an example of such — there’s an alternative if it tangles up an episode in a way you don’t like.
I have also achieved an identical-quality 59.94 fps conversion, codenamed Orinoco. Orinoco preserves motion correctly in all scenes and is included here as an insurance policy. While it matches Rio Grande on quality, it packs 2.5x the frames and takes 2.5x as long to process and upscale. Rio Grande should work — but if it doesn’t, Orinoco will. If either of these methods proves insufficient to deal with an episode, we’ll come up with a custom way of handling it and I’ll wind up writing something about it and/or updating this article to keep track of special cases.
I’ve done a couple renders of the credits to showcase two different AI upscaling models Topaz offers: Theia Detail (at default settings) and Gaia-CG. Gaia-CG is below:
youtube
This article is not a step-by-step tutorial on how to perform this process suitable for literally anyone to follow. That will be its own project. I will, however, provide enough information that anyone with a passing knowledge of AviSynth should be able to recreate both approaches.
Theia-Detail credits below:
youtube
There’s a missing bit of frame for several seconds when the Bajoran freighter is panning around the station. This is a unique error — I’ve never seen it anywhere else on the show — and it pops up a lot, nearly regardless of what filters you use to adjust an episode. It’s always unique to the credits; you don’t need to worry about random blocks of content missing from the sides of your video.
Maximum Warp
Rio Grande and Orinoco make as few compromises on image quality as is reasonably possible. Every aspect of this process is designed to preserve detail at the deliberate cost of hard drive space until the final encode, at which point you can be as lossy as you like.
All of the clips you’ll see below were encoded in 0.0 H.264 until losslessly upscaled frame-by-frame. I encoded these clips in H.265 at a CRF of 6, which turned out to be ludicrous overkill. Live and learn. There’s a freeze-frame, just-noticeable quality difference between CRF 14 and CRF 20, while 25 is pretty ugly.
Upscaler Models: Avoid Artemis, 200 Percent Upscales
I’ve encoded at least one example of every upscaler mode Topaz offers except for Artemis-LQ and Artemis-HQ. These algorithms are completely unsuited to Deep Space Nine, and while they no longer produce literal garbage output when run against the show, they do not react well to its content. Consider them fundamentally unsuited to the task. I don’t care for Gaia-HQ’s output against DS9 very much, though I included one example below. That leaves the two Theia models and Gaia-CG.
I’ve always preferred Gaia-CG, so that’s what the majority of the encodes are in, though I’ve also showcased the Theia algorithm family. The Theia models offer tunable parameters for noise, sharpness, and detail recovery, and these can be very useful if you’re attempting to denoise an ugly patch of wall or carpet.
The 200 percent upscale option should be avoided. It creates errors that were not originally present in the source in some cases and it offers meaningfully reduced image quality compared to the 400 percent version. Be advised that the repair process has a habit of creating a seam down the left or right side of the image frame — you can crop it out with no trouble, but it’s something to be considered.
Topaz offers the option to upscale losslessly by image or via lossy MP4. All of the upscale videos you’ll see here are lossless PNG conversions.
How Much Additional Detail Did I Recover?
The idea that sent me haring off on this mad quest was that I could extract additional visual data if I returned to the source DVD rather than relying on old backup files. Here’s an example of my best upscale in January:
That was then.
While some of these improvements come from low-level improvements to the AI upscalers themselves, the upscaler has to be able to lock on to enough information to upscale an image without making hash of it. Imagine a screenshot where everything was rendered at DVD resolution except for Odo’s hair, which was done in 4K. It would look odd, to say the least. The more detailer the upscaler can get its hands on, the better the chance it creates something gorgeous on the back end. Going back to the DVDs gave the upscaler more to work with in the final process.
This is now.
As a reminder of how far we’ve come: The following three screenshots are the Defiant as it appears on the native DVD, the best upscale result I could achieve in early February, and my current best result today:
The Defiant in all her DVD glory. At least it beats Netflix. Let’s see what we can do.
February, 2020: It’s a big improvement, but I believed better was possible.
That’s more like it. Image from Orinoco encode.
Here’s my favorite Defiant shot from the entire show. I was really proud of how this turned out in April. It’s still quite nice.
I still like the way this came out, but it’s not the best we can do.
This is one place where I’m obviously getting help from a tweaked AI upscaler model. Better processing might clean up the model a bit differently, but some of the features on the hull are slightly different shapes. This image benefits from a side-by-side comparison to the other at maximum resolution.
The gains are real. Every time I compare an upscale based on the old MKV files I’d created years ago against the benefit of going back to the DVD, the DVD wins. If you want the best version of Deep Space Nine, invest in the DVD set.
So How Good is It?
With careful processing and good upscaling, it’s possible to give Deep Space Nine a clarity that I think approaches that of what’s typically referred to as “HD” content, though it’s still limited to the NTSC color gamut as opposed to later standards like Rec. 709. At its worst — allowing for some deviations from perfection — it’ll still look like the best damn DVD you’ve ever seen. At its best — and I consider the shot of Sisko up there to be one of the best — I’d argue that he, at least, comes across in HD levels of detail.
The processing steps I’ve used repair some baked-in damage to the source, but not all of it. There’s a frame sequence in “The Way of the Warrior” that literally looks as though something was spilled on the film, and that’s not something I know how to fix. All of the encodes below are from Rio Grande.
Way of the Warrior: It’s No Illusion
“The Way of the Warrior” contains two of the best battle scenes of Season 4. In the first, Sisko takes the Defiant to rescue a Cardassian ship under heavy fire from the Klingons. You can see the VFX team experimenting with what amounts to an over-shoulder kill cam — not exactly the kind of thing Next Generation was known for. It’s obvious the VFX teams had a lot of fun with the Defiant.
youtube
The second major battle scene of the episode is below. There’s an excellent callback to an event from the show’s pilot, when Kira attempts to bluff a squadron of Cardassian warships into believing the station is far better armed than it actually is.
This time around, things go differently. Upscaled in Theia Fidelity first, at default settings, followed by Gaia-CG. Gaia-CG is what I’ve used for screenshots in the past:
youtube
I’ve included clips of normal human interaction in this article specifically to illustrate that these processing techniques don’t just work on starships and battle scenes. Deep Space Nine is about far more than just CGI combat — it just happens to have some really great examples of the latter, particularly by late-90s standards. Gaia-CG below:
youtube
Paradise Lost
The Defiant takes on the Lakota in this battle scene. Elements of Starfleet were in the process of slow-walking a coup attempt. This clip deliberately shows what happens when Rio Grande doesn’t get a scene entirely right. While this shot mostly works, it’s noticeably jerky at the end. I’ve confirmed that this only affects Rio Grande — Orinoco plays back perfectly smoothly in this situation. If the small amount of jerk doesn’t bother you, Rio Grande is your oyster. If it does, try Orinoco.
youtube
Far Beyond the Stars
One of the benefits of science fiction is that it allows creators to play fast and loose with the question of time travel. Here, Benjamin Sisko is flung back into the 1950s — at least, in his own mind — and finds himself face to face with the ugly racial politics of the era. Upscaled in Gaia-CG:
youtube
In the Pale Moonlight
The greatest episode of Deep Space Nine concludes with a chilling soliloquy. Upscaled in Gaia-CG:
youtube
The same scene, rendered in Theia Detail at 10 percent sharpening, 20 percent noise reduction, and 20 percent detail recovery.
youtube
Sacrifice of Angels
Y’all knew we’d be back to this episode, right? In First Fleet (below, rendered in Gaia-CG), the Federation closes to battle with the advance forces of the Cardassian / Dominion military. I quite like the Galaxy-class maneuvers that bookend the clip. The Galaxy-class often looked fat and ungainly from certain angles, while others showed it to great effect. It gets more of the latter and less of the former on DS9 than it did on TNG.
youtube
This initial engagement doesn’t provide the opening the Defiant needs in and of itself. Starfleet decides to try and force a breach through enemy lines, even though they’re outnumbered, 2:1. This is the scene I chose to render in a number of different ways. First, Gaia-CG:
youtube
Next, here’s Gaia-CG at CRF=20. The quality loss is modest here, but I don’t recommend going much higher. The problem with starting from DVD source is that there’s not a lot of detail to lose before quality starts suffering, and the interpolated/upscaled information is only just so good to start with. When you start pushing the quality downwards past a certain point, it drops like a rock. CRF=25 is way too high. I wouldn’t go lower than 20.
youtube
Gaia-HQ:
youtube
Theia Detail, default settings:
youtube
And finally, Theia Fidelity, at 20 percent sharpness, 30 percent detail recovery, and 20 percent noise reduction settings:
youtube
Although I’ve chosen to focus on the later seasons of the show, this encoding and upscaling method works on the early seasons, too. Just keep in mind that the actual source material for the early seasons isn’t as good as what we got in later years.
That concludes the demonstration portion of today’s program. Now, let’s talk about implementation.
How to Encode Rio Grande
To encode using Rio Grande, rip the DVD using DVD Decrypter and generate a D2V index file using DGIndex or an equivalent tool of your choice. Next, fire up whatever AviSynth front-end you use, if you use one at all. I use StaxRip, personally.
The AviSynth script is as follows:
TFM()
TDecimate()
QTGMC2 = QTGMC(Preset=”Very Slow”, SourceMatch=3, InputType=2, Lossless=2, MatchEnhance=0.75, Sharpness=0.5, MatchPreset=”Very Slow”, MatchPreset2=”Very Slow”)
QTGMC3 = QTGMC(preset=”Very Slow”, inputType=3, prevGlobals=”Reuse”)
Repair(QTGMC2, QTGMC3, 9)
That’s it. You also have the option to inject some noise back into the video in the process of running these scripts — season to taste, basically. Noise added to one of the QTGMC runs will still come through after repair. While Rio Grande isn’t 100 percent frame-perfect, it works perfectly on all but one of the 29.97 fps scenes I’ve tested against. If it proves to have more issues than anticipated, we’ll modify it — and that’s where Orinoco comes in. Technically, it’s possible to render this specific scene at 59.94 fps and then include it in the 23.976 fps version by assembling a VFR file when you compile your image sequence back into video. I might explore this in a future update.
The QTGMC runs above are required to achieve the improved visuals, and while I’m completely open to alternatives, nothing I’ve ever tried comes anywhere close to what this script can do. You can tune the above script for strength and processing time, but you’ll notice the quality hit from stepping down to “Slow” from “Very Slow” and “Medium” is unsuited to the task. If you like your content noisy and you don’t mind more combing artifacts (or have a different solution for dealing with them), “Slow” may be a better option.
The one downside to running QTGMC this way is that it can occasionally produce a small ripple in one part of a scene. I find it trivial to ignore and the only solutions I’ve found for it so far cause far more damage than the ripple itself. While I’d like to get rid of it, it’s currently a tolerated “feature.”
Defiant, rounding the station.
The “InputType=2” and “InputType=3” sequences are essential. Running a single QTGMC instance will not produce the same effect. Running two instances of “InputType=2” will not achieve the same effect. There are nine potential ways to combine input types in a repair run like this and I’ve tested every single one of them. The “2,3” combination is what works the best, from “Emissary” to “What You Leave Behind.”
Similarly, I’ve tested all 25 functional “Repair” modes AviSynth supports. You want ,9. If you don’t like that output for whatever reason, try ,1. Most of the others didn’t have much of an impact one way or the other, though a few of them broke content in interesting ways. I’ve revisited them more than once when testing new filters, just to see how final output varied by mode.
If you have suggestions on how to improve output quality further, by all means, drop me a line.
How to Encode Orinoco
Orinoco is not simple, but it works far better than I feel like I had any right to expect.
For starters, we’re creating two files, not just one. Encode your first version of your target episode using the following script:
TDeint(mode=1, type=2, tryweave=true, mtnmode=3, full=false, ap=10, aptype=2, slow=2)
This script orders TDeint to produce doubled frame output, to perform kernel interpolation, to attempt to repair a frame by weaving if the result is fewer combing artifacts than deinterlacing would create, and to only deinterlace interlaced frames. This preserves the progressive frames baked into the NTSC source. Type=5 was the only option that came close to Type=2 in overall image quality, and the bi-directional blending Type=5 introduces causes more frame blending issues at scene boundaries. Type 5 occasionally fixes a problem in Type 2, but it causes them far more often than it repairs them.
Now we set this clip aside and turn our attention to the other. Run the following script against your second clip:
QTGMC2 = QTGMC(Preset=”Very Slow”, SourceMatch=3, Lossless=2, MatchEnhance=0.75, Sharpness=0.5, MatchPreset=”Very Slow”, MatchPreset2=”Very Slow”)
QTGMC3 = QTGMC(preset=”Very Slow”, prevGlobals=”Reuse”)
Repair(QTGMC2, QTGMC3, 9)
While similar, this script is not identical to the script we used for Rio Grande. Rio Grande’s QTGMC implementation is run in progressive mode. For Orinoco, we want to double the frame rate, bringing our base 29.97fps up to 59.94fps. Now that QTGMC and TDeint are at the same frame rate, we run a repair against them, too. If you run two clips in “Repair” mode at two different frame rates, it’ll work… ish. You’ll know if you’ve done this if you’ve got a weird seam migrating across your video.
This is a bass-ackwards approach to video editing, at least as far as I’m aware, but there’s a method to my madness. The reason people don’t typically just inject a bunch of frames to bring VFR 23.976 / 29.97 content up to 59.94fps is that the process the interpolated and blended frames that boost the frame rate can also create visual errors and other problems. This creates a catch-22: Leave those frames out, and the single-rate output is choppy. Keep them in, and some of your scene boundary changes are going to look decidedly odd as a fireball mushrooms from someone’s head, or two completely different locations are blended together. It’s not a great situation.
But there’s a way to fix the problem.
clip1=FFVideoSource(“C:\DS9S6D2\Sacrifice-TDeint.mkv”)
clip2=FFVideoSource(“C:\DS9S6D2\Sacrifice-QTGMC-ToPairWithTDeint.mkv”)
Repair(clip1, clip2, 9)
The reason we create the interpolated QTGMC file is to serve as a sharp, clean source against the Sacrifice-TDeint file. The reason I used QTGMC for this is that — as I’ve said before — I’ve never found an equivalent method for creating clean footage. If you want less noise in your video, use “Very Slow” or “Slow” as an alternative. I do not recommend “Medium” for this purpose.
You can run QTGMC against this output again if you want, but the footage will start to look a bit overprocessed. The Theia models can compensate for this to some extent, thanks to a fairly effective (and tuneable) denoise algorithm. There are multiple examples of Theia models in the videos below.
Quality-wise, Orinoco and Rio Grande get you to the same place and I often cannot tell the difference between them when I compare them frame-by-frame (not counting interpolated frames, obviously). Rio Grande is to be preferred — it’s faster and simpler — but I cannot guarantee that it’ll work on all 176 episodes of the show. If you run into an episode with erratic or stuttering motion when its created via Rio Grande, try Orinoco as an alternative and let me know you’ve hit a snag.
Flaws and Shortcomings
Orinoco and Rio Grande are not perfect. I’m still hunting for a method of eliminating the ripple. Small as it is, it’s basically the one problem left (so far!) that I haven’t solved. The best method I’ve come up with so far involves using MCTemporalDenoise, and MCTD appears to be both entirely single-threaded and causes me other headaches in terms of source quality.
If you want to experiment with MCTemporalDenoise, I’d recommend using up to seven pixels but applying a relatively weak effect (strength 2-3). This will not completely eliminate it, but it helps in certain places. If you don’t like the impact this has on your visual quality, investigate the Theia upscaling models and try applying 10-20 percent noise reduction. While you don’t want to go nuts, you can lightly smooth away some defects. I don’t like using one filter just to squash problems another creates, and with any luck Orinoco won’t be needed in the first place.
While my goal has always been to create a one-size-fits-all template for this project, I’ll record any adjustments or changes that need to be made to Rio Grande or Orinoco to deal with problematic episodes, unless that episode is Move Along Home.
Next Time on… the Deep Space Nine Upscale Project
Now that I’ve finished this project, I get to actually start ripping episodes and encoding them. I’m going to write a set of tutorials that give an actual guide to how this works, build a benchmark for workstations, and solve any per-episode problems that need fixing. I’ve come up with a completely free method of upscaling that, while not as good as Topaz, presents a genuine improvement. I also want to look into PAL.
ViacomCBS doesn’t think Deep Space Nine is worth remastering. I say it’s wrong. There’s a limited amount of improvement we can squeeze from a DVD, which is why you don’t see me referring to the show as “4K” or “UHD”, even though it’s common to see those terms tossed around in projects like this. You can upscale Deep Space Nine to 4K resolution, but there’s no way (yet) to squeeze 4K quality out of a DVD source file. This is an imperfect solutions — but it’s light-years beyond any previous version of the show that’s ever existed. If it turns out that Rio Grande does throw more than very occasional 23.976 fps errors, we’ll find a solution for those episodes. There’s every indication that Nvidia’s upcoming GeForce RTX 3080 is going to make this kind of upscaling much faster, which will reduce the pain of a 59.94 conversion.
After today, no Star Trek fan has to wait for ViacomCBS to decide it makes financial sense to invest in its own back catalog. It’ll cost some money for the DVDs and the software, and a lot of compute time to get the work done (8-10 hours per episode on an RTX 2080 at 23.976, 2.5x longer at 59.94fps). Will most people do this? No. Most people will watch the show on Netflix, where the quality is much lower than what they’d get on DVD.
But as of today, nobody has to do that again. As of today, you can see the work of the VFX artists and actors who created in this show the way it was meant to be seen. Orinoco and Rio Grande aren’t perfect, but they illustrate just how much additional quality can be wrung from late-90s DVD source. GPUs are getting faster. AI upscalers are getting smarter. Even if the computer or GPU you own today isn’t capable of tackling a project like this, your next one very well might be.
May the Prophets guide you,
Hruska out.
I owe thank-yous to Stan Pennington, Gary Huff — man, Gary, I probably owe you a hearing aid — Cyril Niderprim, Robert Hallock, Andrew Swan, David Berry, Dan Greeney, Mark Renoden, the folks at Black Magic, my long-suffering fiancée who has listened to me talk about this topic for most of a year and contributed insights at numerous points, Ben Carter, Joe Robinson, multiple helpful individuals at Doom9, and a lot of other people. If I forgot names, I’m sorry. If you helped me, thank you. Most of all, thank you to the talented actors and artists who created Deep Space Nine in the first place.
Now Read:
DS9 Upscale Project Update: What I’ve Been Working On
Deep Space Nine Upscale Project Season Finale: What We’ve Brought Ahead
Deep Space Nine Upscale Project (DS9UP): Technical Goals and FAQ
from ExtremeTechExtremeTech https://www.extremetech.com/extreme/314653-remastering-deep-space-nine
from Blogger http://componentplanet.blogspot.com/2020/09/what-no-man-has-seen-before-remastering.html
0 notes
Text
How NextVR and the NBA are bringing VR from the sidelines to center court
I’m standing at the back of a cramped production trailer in the bowels of Portland’s Moda Center where the NextVR crew is busy broadcasting the Blazers/Cavs game live. The game is electric, yet everyone in the trailer seems a little down — Lebron James just threw down what some are calling the best dunk of his career, which just happened to be at the hoop where the NextVR crew was down a backboard camera for tonight’s game. They’re afraid they missed out on capturing the moment in all its glory. But I saw it. In startlingly close virtual reality, no less, captured by NextVR’s camera mounted just beneath the backboard (which was working just fine, thanks very much). And it was epic. I tell the crew as much. There are some smiles and a bit of relief, but there’s no time for reflection right now. They’ve got a live show to put on for an eager crowd of early VR adopters across the globe. And as the saying goes, the show must go on. A tech match made in VR heaven The NBA has been good to NextVR, and vice versa. The two forged a strong relationship when NextVR landed a contract with the NBA’s League Pass, which allowed the company access to capture the live action from multiple vantage points inside stadiums across the country and broadcast it all globally in virtual reality. For the 2017/2018 season, NextVR will broadcast a total of 27 live games to League Pass subscribers, replete with highlights, replays, and mondo dunks like the one Lebron just dropped on the Blazers (the Blazers still won, just sayin’) for free. “We basically had each other at ‘hello,’” said NextVR CEO David Cole in our recent interview. “We loved our early basketball VR tests and so did they.” “The NBA is a very innovative organization and they recognized very early (more than 3 years ago) that the NBA fan experience can be greatly enhanced by VR,” said Cole. “Because we’ve had such a long runway to work with the NBA, we’ve been able to innovate production technology (e.g. court-safe cameras like the behind the glass cam) that radically benefit the content.” For each broadcast, NextVR usually sets up eight different cameras throughout each stadium, including two behind each backboard, a courtside camera, overhead setups, and more. It’s not just the courtside action that NextVR streams to its online viewers, either. Two roving production crews (one for the Eastern Conference, one for the West) capture behind-the-scenes footage and locker-room interviews in lieu of commercial breaks. The crew even captures scenes around each city (for Portland that naturally included a waterfall) all to give viewers the full experience. It’s the proverbial “next best thing to being there.” And no one is doing it quite like NextVR. A quick pivot None of this would be possible if NextVR hadn’t been impressively light on its feet when faced with a change-up pitch in the ever-evolving entertainment industry, one that could have been catastrophic. Like Netflix before it (sans the Quickster debacle), the company formerly known as Next3D had to reinvent itself when the budding 3D broadcast industry collapsed in 2012. “The decision [to move to VR] was easy once we took the prototype content out to partners (mostly in the live sports broadcast space) and demonstrated VR,” said Cole. “We were immeasurably catalyzed by their response. This was a quick 90-degree start towards VR, and we swung for the fences.” “This was a quick 90-degree start towards VR, and we swung for the fences.” Part of the muscle behind that swing for said fences was its complex compression technology that was already set up to broadcast 3D streams. “When we adapted (our patented) compound entropy to VR, we realized that we could construct a mesh from the occlusion extraction process and send that mesh with the video stream,” Cole said. “This means when you are viewing NextVR content, you’re actually in a virtual environment that is a facsimile of the actual captured environment.” In other words, League Pass viewers are not actually seeing the live VR broadcast in its native form, but a bitmapped version of the broadcast — a fully, reconstructed virtual world mapped out by the information captured by NextVR’s third-generation stereoscopic cameras. While that may seem like a lot to wrap your head around, when it comes to the viewing experience, it makes all the difference. Choose your VR adventure As a tech writer, I’ve had the chance to experience multiple VR simulations, but NextVR’s broadcast is different. The wall-eye look — characterized by blurred edges and exaggerated focus at the center of the image — that’s common to many VR “experiences” simply isn’t an issue with NextVR, thanks to the company’s “facsimile” of the captured environment. It’s not just the natural scaling of NextVR’s broadcasts that make the content so accessible, either. The company has worked hard to bring the “reality” portion of VR to its League Pass content, with little touches like fades that mimic human blinking as the broadcast transitions from camera to camera as it follows the ball across the court. “Our show directors really pride themselves on moving your POV (point of view) with the action, without disrupting presence,” Cole said. “In addition to the produced show, we also offer the ability to choose your own camera position in almost all of our experiences.” All of this provides a more natural transition into the VR world, helping to break down the barriers between you and the action and allowing for the all-important suspension of disbelief. While I only watched the game for a few minutes over NextVR’s Samsung Galaxy GearVR headset, it didn’t take long before I was fully immersed in the action. What feels alien at first slowly becomes less so, until it’s just you, perched behind the backboard, watching Lebron take flight. Looking around inside the environment becomes second nature, and feels surprisingly realistic — until you run into the border of NextVR’s 180-degree broadcast, that is, and the world fades into a blue haze. But that is set to change soon as well. Six degrees of freedom Not to be confused with the Kevin Bacon game, six degrees of freedom (or 6DOF, as the company refers to it), is the next big step for NextVR, promising a fully immersive virtual environment. “6DOF is the way your head wants to work. It’s just natural,” Cole said. “If someone stands up in front of you at a game, you’d simply look around them. This will be possible when the next step in NextVR’s transmission process rolls out.” We’re told it will still be impressively clear and clean when the next generation of VR headsets begin rolling out to users. While NextVR’s 6DOF broadcast transmission is ready now, NextVR’s head of sports, Josh Earl, tells us the company is essentially waiting for the other links in the broadcast chain to catch up. That’s true when it comes to resolution, too, which accounted for our only real beef with NextVR’s streams. Currently, the resolution can’t compete with your HDTV, let alone 4K content. But that’s more of an issue with the tech surrounding NextVR, including limitations in both bandwidth and hardware. Earl says that, while streaming bandwidth offers some restrictions currently, the next generation of VR headsets will go a long way in improving NextVR’s image resolution, which is already captured in 6K by stereoscopic cameras (which NextVR is incredibly secretive about). That translates to resolution that sits just under 4K Ultra HD once split into a stereoscopic stream, but we’re told it will still be impressively clear and clean when the next generation of VR headsets begin rolling out to users. It should also be mentioned that 4K TV broadcasts are still in their early stages. Earl calls the Oculus Go a game changer for the company, not just because it will offer higher streaming resolution than current headsets in its class, but also because it’s going to be a lot more accessible to potential League Pass subscribers thanks to its low price point of just $200. The future of VR It seems like VR, on the whole, has been right on the cusp of breaking out for eons when measured in tech time. But NextVR’s fearless leader (naturally) sees a very bright future ahead for the technology, framing it as the eventual keystone of all things entertainment. “In five years realism will increase dramatically,” Cole said. “Your VR headset will become your automatic go-to device for sports and entertainment content.” “In 10 years the idea of a non-immersive playback medium will seem like black and white TV,” Cole continued. “The devices will be nearly ubiquitous … and VERY central to lifestyle-based computing. They will become the new smartphone.” For now, NextVR and the NBA are moving in tandem to write that future, one game at a time. Editors’ Recommendations https://www.digitaltrends.com/home-theater/nextvr-nba-league-pass-writing-future-of-vr/
https://blog.cyberprosocial.com/2018/03/31/how-nextvr-and-the-nba-are-bringing-vr-from-the-sidelines-to-center-court/
0 notes
Text
Panasonic Lumix GX9 offers 20MP with no low-pass filter, improved shutter mechanism
Panasonic is taking the wraps off the GX9, a 20MP Micro Four Thirds camera. Its sensor does not use a low-pass filter in an effort to maximize sharpness, and a new L/Monochrome D Photo Style is on board for fans of black-and-white film. The GX9 does not offer weather-sealing, unlike the GX8 and G9.
The GX9 offers a 2.7 million-dot (equiv.) EVF that tilts 90° upward, and a 1.2 million-dot touchscreen that tilts up 80° and down by 45° – a departure from the G9 and GX8's fully articulated screens. An electromagnetic drive claims to reduce shutter shock by 90%, an attempt to mitigate the shutter-induced softness we saw in previous GX- models.
youtube
The camera relies on contrast detect autofocus with the help of Panasonic's Depth from Defocus technology when Panasonic lenses are used. Naturally 4K/30p/24p video is present with all of the affiliated 4K Photo Modes, including two new ones: Auto Marking and Sequence Composition. Auto Marking allows the camera to identify movement in a 4K clip and set a marker to quickly jump to the action, and Sequence Composition makes it easy to create composite images of action in-camera.
In-body 5-axis stabilization combines with dual-axis optical stabilization, resulting in a claimed 4-stop reduction in shake. Wi-Fi and Bluetooth are available for quick image sharing.
The Panasonic Lumix DC-GX9 will ship in the beginning of March with a new 12-60mm F3.5-5.6 kit lens for $999. An optional wide eyecup ($19) and grip ($59) will also be available.
Press release
LUMIX GX9
The Ultimate Compact Single Lens Mirrorless Digital Camera Capture High Quality Images in Your Own Creative Way
Newark, NJ (February 13, 2018) – Panasonic is proud to introduce the LUMIX GX9, a sleek, compact new Digital Single Lens Mirrorless camera for everyone who wants to shoot vibrant, true-to-life, high quality images in their own creative way with excellent resolution, high contrast and impressive color reproduction.
The LUMIX GX9’s 20.3-megapixel Digital Live MOS Sensor without a low-pass filter and Venus Engine combine to drive maximum lens performance while rendering natural, high-precision images. The L.Monochrome D mode is newly added to Photo Style, making it easy to shoot detailed dynamic monochrome photos with emphasized highlights and shadows. Plus, Grain Effect can also be adjusted in all monochrome modes with Photo Style.
A 5-axis Dual I.S. (Image Stabilizer) in the LUMIX GX9 effectively suppresses blur. Combining an O.I.S. (Optical Image Stabilizer, 2-axis) and a B.I.S. (Body Image Stabilizer, 5-axis), the Dual I.S. compensates for a wider range of movement to enable blur-free photo/video shooting from wide to tele, even in low-light conditions.
A new wide screen LVF (Live View Finder) in the LUMIX GX9 tilts up approx. 90 degrees. With its high, approx. 2760k-dot equivalent, resolution and 100% color reproduction, this 16:9 LVF provides approx. 1.39x / 0.7x (35mm camera equivalent.) magnification and 100% field of view. Plus, the camera's large 3.0-in., approx. 1240k-dot high resolution static-type touch monitor provides nearly 100% of field of view tilts up approx. 80 degrees and down 45-degrees to enable shooting in high or low angle even easier.
The Contrast AF System in the LUMIX GX9 features DFD (Depth From Defocus) technology and excels in both speed and accuracy by exchanging digital signals between the camera and the lens at max. 240 fps*1, for ultra-fast auto focusing in approx. 0.07 sec*2. A range of extensive AF functions include Face/Eye Detection AF, Pinpoint AF, One-shot AF and advanced Low Light AF to enhance usability to comply with various shooting situations. Live View Boost makes it possible to check composition even in total darkness by boosting sensitivity just for live view.
The LUMIX GX9 records smooth, high-resolution 4K video in 3840x2160 at 30p or 24p in MP4. 4K PHOTO is easier to use in more creative ways with Auto Marking and Sequence Composition, two new additions to Post Focus, Focus Stacking, Light Composition and 4K Live Cropping.
Ultra HD 4K video and 4K PHOTO
With a high-speed sensor signal readout and engine processor, the LUMIX GX9 records smooth, high-resolution 4K videos in 3840x2160 resolution at 30p or 24p in addition to the Full-HD 1,920x1,080 60p videos with practical full-time AF. With this technology, LUMIX 4K PHOTO lets users capture perfect moments by extracting single frames from 4K burst files shot at 30 fps to save as 8-megapixel equivalent photos.
Choosing the best shots out of hundreds of 4K video frames is now easier with a newly added Auto Marking function. Auto Marking identifies the frame most different from others in the file to help minimize the time it takes to choose the best individual shot. A Sequence Composition function creates a stromotion image in-camera by synthesizing multiple images shot at fixed frame to produce a unique image of a subject’s motion without special retouching.
The LUMIX GX9 also includes Post Focus, a function selects an in-focus area even after shooting. Post Focus is helpful in situations such as macro shooting where strict focusing is required or for changing expressions by changing the focused subject. This capability combines high-speed, high-precision DFD (Depth From Defocus) auto focus technology and 4K technology. A Focus Stacking function adjusts depth of field after shooting by combining multiple images shot with Post Focus in the camera. Now users don't need to focus strictly while shooting because they can create images with the defocus level they want or pan-focus simply by selecting the focus area after shooting — beneficial when shooting macro images of insects, small accessories and so on.
LUMIX GX9 also incorporates a Light Composition function, a new 4K PHOTO option. The camera synthesizes images by choosing and saving a brighter pixel to easily produce more dramatic images of fireworks or night scenery in-camera. What's more, the LUMIX GX9 also enables 4K Live Cropping in video recording to realize stable panning or zooming. In panning shots, users just set the viewing angle to begin and end with for smooth panning imagery without using special equipment like a slider. And in zooming, users can set the after-zoomed viewing angle firs to ensure the subject is perfectly in the frame. The imagery of zooming is smooth because it does not move the zoom lens physically.
The LUMIX GX9 includes Bluetooth and Wi-Fi® connectivity for a more flexible shooting experience and instant image sharing with easy operation. Compatibility with Bluetooth 4.2 (Bluetooth Low Energy) enables consistent connection with a smartphone or tablet with minimum power consumption.
About motion picture recording / 4K Photo recording
- Use a card with SD Speed Class with "Class 4" or higher when recording motion pictures.
- Use a card with SD Speed Class with "UHS-I UHS Speed Class 3 (U3)" when recording motion pictures with [MP4] in [4K] or [4K PHOTO]. (SD speed class is the speed standard regarding continuous writing.)
- MP4 motion pictures with [MP4] in [FHD/30p] [FHD] [HD]: You can continue recording without interruption even if the file size exceeds 4 GB or 30 minutes in length, but the motion picture file will be divided and recorded/played back separately. - MP4 motion pictures with [MP4] in [4K]:
- When using an SDHC memory card: You can continue recording without interruption even if the file size exceeds 4 GB, but the motion picture file will be divided and recorded/played back separately.
- When using an SDXC memory card: You can record a motion picture in a single file. - When the ambient temperature is high or continuous recording is performed, the camera may stop the recording to protect itself. Wait until the camera cools down.
For [4K] video output, use an HDMI cable that has the HDMI logo on it, and that is described as "4K compatible."
*1 Contrast AF with DFD Technology works only with Panasonic Micro Four Thirds lenses. *2 In AFS, at wide-end with H-FS14140 (CIPA).
Panasonic Lumix DC-GX9
PriceMSRP$999 (w/12-60mm F3.5-5.6 lens)Body typeBody typeRangefinder-style mirrorlessBody materialMagnesium alloySensorMax resolution5184 x 3888Image ratio w:h1:1, 4:3, 3:2, 16:9Effective pixels20 megapixelsSensor photo detectors22 megapixelsSensor sizeFour Thirds (17.3 x 13 mm)Sensor typeCMOSProcessorVenus EngineColor spacesRGB, Adobe RGBColor filter arrayPrimary color filterImageISOAuto, 200-25600 (expands down to 100)Boosted ISO (minimum)100White balance presets5Custom white balanceYes (4 slots)Image stabilizationSensor-shiftImage stabilization notesDual IS uses sensor and lens-shift (when available)CIPA image stabilization rating4 stop(s)Uncompressed formatRAWJPEG quality levelsFine, standardFile format
JPEG (Exif v2.31)
Raw (Panasonic RW2)
Optics & FocusAutofocus
Contrast Detect (sensor)
Multi-area
Center
Selective single-point
Tracking
Single
Continuous
Touch
Face Detection
Live View
Autofocus assist lampYesDigital zoomYes (2x-4x)Manual focusYesNumber of focus points49Lens mountMicro Four ThirdsFocal length multiplier2×Screen / viewfinderArticulated LCDTiltingScreen size3″Screen dots1,240,000Touch screenYesScreen typeTFT LCDLive viewYesViewfinder typeElectronicViewfinder coverage100%Viewfinder magnification1.39× (0.7× 35mm equiv.)Viewfinder resolution2,760,000Photography featuresMinimum shutter speed60 secMaximum shutter speed1/4000 secMaximum shutter speed (electronic)1/16000 secExposure modes
Program
Shutter priority
Aperture priority
Manual
Built-in flashYesFlash range6.00 m (at ISO 200)External flashYes (via hot shoe)Flash modesAuto, auto w/redeye reduction, forced on, forced on w/redeye reduction, slow sync, slow sync w/redeye reduction, forced offFlash X sync speed1/200 secDrive modes
Single
Burst
4K Photo
Post Focus
Self-timer
Continuous drive9.0 fpsSelf-timerYes (2 or 10 secs, 3 photos over 10 secs)Metering modes
Multi
Center-weighted
Spot
Exposure compensation±5 (at 1/3 EV steps)AE Bracketing±3 (3, 5, 7 frames at 1/3 EV, 2/3 EV, 1 EV steps)WB BracketingYesVideography featuresFormatMPEG-4, AVCHD, H.264Modes
3840 x 2160 @ 30p / 100 Mbps, MOV, H.264, AAC
3840 x 2160 @ 24p / 100 Mbps, MOV, H.264, AAC
1920 x 1080 @ 60p / 28 Mbps, MOV, H.264, AAC
1920 x 1080 @ 60p / 28 Mbps, AVCHD, MTS, H.264, Dolby Digital
1920 x 1080 @ 60i / 17 Mbps, AVCHD, MTS, H.264, Dolby Digital
1920 x 1080 @ 30p / 20 Mbps, MOV, H.264, AAC
1920 x 1080 @ 30p / 24 Mbps, AVCHD, MTS, H.264, Dolby Digital
1920 x 1080 @ 24p / 24 Mbps, AVCHD, MTS, H.264, Dolby Digital
1280 x 720 @ 30p / 10 Mbps, MOV, H.264, AAC
MicrophoneStereoSpeakerMonoStorageStorage typesSD/SDHC/SDXC card (UHS-I supported)ConnectivityUSBUSB 2.0 (480 Mbit/sec)USB chargingYesHDMIYes (micro-HDMI)Microphone portNoHeadphone portNoWirelessBuilt-InWireless notes802.11b/g/n with Bluetooth 4.2 LERemote controlYes (via smartphone)PhysicalEnvironmentally sealedNoBatteryBattery PackBattery descriptionLithium-ion battery & chargerBattery Life (CIPA)260Weight (inc. batteries)407 g (0.90 lb / 14.36 oz)Dimensions124 x 72 x 47 mm (4.88 x 2.83 x 1.85″)Other featuresOrientation sensorYesTimelapse recordingYesGPSNone
[Read More ...]
Panasonic Lumix GX9 offers 20MP with no low-pass filter, improved shutter mechanism was originally posted by proton T2a
0 notes
Text
Overview of the New Canon 5D Mark IV
Canon’s 5D Mark line has embedded itself deeply in the heart of photographers. Although the price generally keeps this camera in the hands of professionals, hobbyists have equally drooled over its capabilities and power. It comes as no surprise that the newest edition to the line, the Canon 5D Mark IV, sparked a lot of excitement and interest. But does this model really live up to the expectations it has set itself?
Subject: Rusty the Golden Retriever
As a Canon camera enthusiast myself, having gone through many different cameras in my career (and currently working with four), I have been pleasantly impressed by the new model. Each camera has its high points and its low points, but the Canon 5D Mark IV lends itself to being an excellent piece of machinery with more pros than cons. In comparison to its predecessor the 5D Mark III, beloved features have been better optimized and improved while adding new capabilities that were previously missing.
Physical Specs of the Canon 5D Mark IV
In terms of the camera’s physicality, the Canon 5D Mark IV weighs at 28.2 ounces, versus its predecessor which weighed 30.4 ounces. Although this doesn’t sound like a significant difference, your arms will thank you for the lighter weight of the Mark IV after several hours of shooting. Lighter equipment weight is an aspect that many photographers consistently request from their beloved camera companies, as heavy gear often leads to various body aches.
The body feels sturdy and comfortable. The fact that Canon found a way to decrease the weight of their newest 5D camera shows that the brand was certainly listening. Alongside this, the camera’s weather sealing shows quite an improvement over the previous models. I have taken the camera out to the snow, beach, heat, and rain with no trouble.
Otherwise, The 5D Mark IV feels almost indistinguishable to the 5D Mark III. They have virtually the same ergonomics, buttons, and menu layout. The camera continues to have the dual card slots, much like the Mark III; one slot for a compact flash card and one slot for an SD card. The settings allow you to write on either both simultaneously or switch over to the secondary card once the main card is full.
New feature – touch screen
Possibly the most noticeable new feature is the inclusion of a touch screen, the first of any of the 5D models. The touchscreen has been present in several of Canon’s other models, and this was highly requested as an addition to the new 5D lineup. In Live View Mode, the touchscreen allows you to tangibly tap the screen to adjust the focus or the exposure settings. This is a significant benefit to video shooters, as tapping the screen allows you to silently make your adjustments without adding noise to your rolling video.
The touchscreen is also customizable, similar to the live view features of the 1Dx Mark II. It can be programmed so that the touch of the LCD screen actually takes the picture. The rear LCD on the 5D Mark IV is an improved 1.62 million-dot 3.2-inch screen, unlike the 5D MK III’s 1.04 million-dot LCD. Although Canon did not include a swivel LCD screen as wanted by many shooters, the touchscreen is a welcome addition.
Megapixels – big increase
Although both are full-frame cameras, the Canon 5D Mark IV sports a whopping 30.4 megapixels versus the 5D Mark III’s mere 22.3 megapixels. 30.4 MP offer a solid 17% linear resolution increase. In addition, the new camera features Canon’s DIGIC 6+ image processor. Pair the processor with the increase in megapixels, and the 5D Mark IV officially has a better dynamic range (an aspect of the Mark III that often gets criticized).
ISO range – not much change
The Canon 5D Mark IV at ISO 25,600 shutter speed 1/500th.
The Canon 5D Mark III at ISO 25,600 shutter speed 1/500th.
The ISO range for the 5D Mark IV is ISO 100 – 32,000, versus the Mark III’s 100 – 25,600. However, both models offer the same expanded ISO range of 50 to 102,400. The high ISO and low light performance continue to be quite excellent, as is to be expected from a full-frame Canon DSLR. However, there is no real significant difference in higher ISO performance from the Mark III to the Mark IV.
Canon does have significantly better low light cameras in its highest end models (such as the ID X series), but the 5D holds its own very well for the price point. A big change in the ISO aspect of the camera, however, is the move to on-sensor analog-to-digital circuitry (ADC) that results in noteworthy improvement in base ISO dynamic range. Canon DSLRs prior to the 1D X Mark II and 80D were very well known for poor shadow recovery. This is not an issue in the Mark IV.
Subject: Kiss the Border Collie
Frames per second burst rate
The Canon 5D Mark IV has a 7 FPS burst rate, about one frame per second faster than the 5D Mark III. Not a huge difference in hindsight, but where the 5D Mark IV really excels is the buffer performance. Continuous JPEG shooting is essentially unlimited; the camera will shoot until the memory card is full, whereas the 5D Mark III’s buffer filled after about 63 JPEG images. Still an impressive feat, but the unlimited is certainly better.
21 RAW frames can be captured before the buffer fills and the camera comes to a halt, which is fantastic considering that each RAW frame is from a 30.4 MP sensor. Wildlife photographers will really enjoy the 7 FPS burst rate and increased buffer performance.
Subject: Valkyrium
New Dual Pixel Raw Mode
On the topic of RAW, the Canon 5D Mark IV includes a very powerful new Dual Pixel Raw mode, which advances upon the Dual Pixel CMOS AF technology. This makes use of the split-pixel design to capture two images at once. The outcome allows you to be able to make subtle adjustments and changes to focus/sharpness, bokeh, and ghosting. The downside is that the file sizes of Dual Pixel Raw images are nearly twice as large, and the burst rate and buffer capacity are reduced while in Dual Pixel Raw mode.
Canon 5D Mark IV with Canon 70-200mm F/2.8 L IS USM II
Autofocus
The autofocus in this model is downright incredible. While the 5D Mark IV offers the same 61 AF points as in the 5D Mark III, the new model uses an upgraded AF system. Now all 61 points can focus down to f/8 and they can cover much more of the frame. The 5D Mark III only offered f/8 autofocusing at the center point. These changes are very similar to features inside the EOS-1D X Mark II, Canon’s high-end model. Photographers that use super-telephoto lenses and teleconverters are sure to appreciate this improvement.
21 of these points also remain cross type for extra sensitivity. Unfortunately, there is no way to link spot metering to a chosen AF point. One of the big changes to autofocus on the 5D Mark IV is the use of the infamous Dual Pixel CMOS AF, frequently touted by Canon. Equally, the model has inherited the AI Servo AF III with EOS iTR AF from EOS 7D Mark II and EOS-1D X Mark II. This AF feature truly shines when using the camera to photograph sports or action.
The AF system’s detection range has also been broadened, from -2 EV on the EOS 5D Mark III to -3 EV, and this drops down even further to -4 EV when using Live View. As well as this, there’s also now an AF Area Selection button on the back plate.
WiFi!!
Another brand new feature to the Canon 5D line is the presence of WiFi capabilities and NFC technology. This new aspect of the model allows the camera to be controlled remotely from a smartphone or tablet and have images transferred wirelessly to a multitude of other devices. The camera utilizes the same Canon Camera Connect app as other WiFi models, which is available for both iOS and Android platforms. This feature was also widely requested from Canon users and allows photographers to bypass the need to purchase wireless triggers for their camera.
Self-portrait photographers rejoice! GPS/Geo Tagging continues to be included in this upgrade to the Mark III.
Subject: Jessica Bari
Video features – pros and cons
Arguably the most marketed aspect of the Canon 5D Mark IV is the ability to film in 4K. This model is one of the first DSLRs to allow you to shoot in 4K and showcases Canon’s interest in shifting high-quality videography to DSLRs. The benefit to shooting footage with these smaller cameras is maneuverability, portability, and other such size benefits. The videography portion of the camera does sport very accurate autofocus, the touch screen allows you to switch focus points and exposure levels silently, and it is all-around a smooth piece of filming equipment. Due to its on-sensor
Due to its on-sensor phase-detect system, Live View AF on the Mark IV is super-quick, smooth and precise. By comparison, the 5D Mark III offered only contrast-detect AF with Live View, which was slower and had a tendency to hunt, making for distracting wobbling as focus adjusted.
Much like Canon’s other 4K models, the EOS 5D Mark IV allows you to extract JPEG frames from the 4K footage. The images have a resolution of 8.8MP, as opposed to the lower 8-8.3MP resolution of images extracted from cameras recording the slightly lower resolution UHD 4K footage.
That being said, being one of the most marketed features also opens the doorway to major scrutiny. Videographers have mentioned the 4K video being limited to Motion JPEG, the 4K/30p video requiring the use of a CF card, the 1.64x crop factor in 4K video limiting FOV, the HDMI-out limited to 1080 video, and the lack of log gamma, focus peaking, or zebras for video as all major cons to this feature.
Canon 5D Mark IV with Canon 16-35mm F/2.8L USM II
Special features
As far as built-ins go, the 5D Mark IV has a movie time-lapse mode, an intervalometer, HDR and multiple exposure capabilities, mirror vibration control, and a “Fine Detail” picture style. The camera also has an anti-flicker feature that was originally introduced in the 7D Mark II and 1D X Mark II, in which the camera can be set to adjust the moment of exposure to compensate for flickering electric lighting.
Subject: Desiree Perkins
Summary
In conclusion, the Canon 5D Mark IV keeps itself familiar and sentimental, while improving upon features that attracted photographers to the 5D line in the first place. Although not every desired feature was implemented in this model, Canon certainly showed that the company listened to its customers and took their feedback into strong consideration. The product that resulted is a well-rounded, functional, and incredible piece of equipment. On the value-for-dollar front, the 5D Mark IV is absolutely worth its price tag.
The post Overview of the New Canon 5D Mark IV by Anabel DFlux appeared first on Digital Photography School.
from DIYS http://ift.tt/2rOHRbv
0 notes
Text
Overview of the New Canon 5D Mark IV
Canon’s 5D Mark line has embedded itself deeply in the heart of photographers. Although the price generally keeps this camera in the hands of professionals, hobbyists have equally drooled over its capabilities and power. It comes as no surprise that the newest edition to the line, the Canon 5D Mark IV, sparked a lot of excitement and interest. But does this model really live up to the expectations it has set itself?
Subject: Rusty the Golden Retriever
As a Canon camera enthusiast myself, having gone through many different cameras in my career (and currently working with four), I have been pleasantly impressed by the new model. Each camera has its high points and its low points, but the Canon 5D Mark IV lends itself to being an excellent piece of machinery with more pros than cons. In comparison to its predecessor the 5D Mark III, beloved features have been better optimized and improved while adding new capabilities that were previously missing.
Physical Specs of the Canon 5D Mark IV
In terms of the camera’s physicality, the Canon 5D Mark IV weighs at 28.2 ounces, versus its predecessor which weighed 30.4 ounces. Although this doesn’t sound like a significant difference, your arms will thank you for the lighter weight of the Mark IV after several hours of shooting. Lighter equipment weight is an aspect that many photographers consistently request from their beloved camera companies, as heavy gear often leads to various body aches.
The body feels sturdy and comfortable. The fact that Canon found a way to decrease the weight of their newest 5D camera shows that the brand was certainly listening. Alongside this, the camera’s weather sealing shows quite an improvement over the previous models. I have taken the camera out to the snow, beach, heat, and rain with no trouble.
Otherwise, The 5D Mark IV feels almost indistinguishable to the 5D Mark III. They have virtually the same ergonomics, buttons, and menu layout. The camera continues to have the dual card slots, much like the Mark III; one slot for a compact flash card and one slot for an SD card. The settings allow you to write on either both simultaneously or switch over to the secondary card once the main card is full.
New feature – touch screen
Possibly the most noticeable new feature is the inclusion of a touch screen, the first of any of the 5D models. The touchscreen has been present in several of Canon’s other models, and this was highly requested as an addition to the new 5D lineup. In Live View Mode, the touchscreen allows you to tangibly tap the screen to adjust the focus or the exposure settings. This is a significant benefit to video shooters, as tapping the screen allows you to silently make your adjustments without adding noise to your rolling video.
The touchscreen is also customizable, similar to the live view features of the 1Dx Mark II. It can be programmed so that the touch of the LCD screen actually takes the picture. The rear LCD on the 5D Mark IV is an improved 1.62 million-dot 3.2-inch screen, unlike the 5D MK III’s 1.04 million-dot LCD. Although Canon did not include a swivel LCD screen as wanted by many shooters, the touchscreen is a welcome addition.
Megapixels – big increase
Although both are full-frame cameras, the Canon 5D Mark IV sports a whopping 30.4 megapixels versus the 5D Mark III’s mere 22.3 megapixels. 30.4 MP offer a solid 17% linear resolution increase. In addition, the new camera features Canon’s DIGIC 6+ image processor. Pair the processor with the increase in megapixels, and the 5D Mark IV officially has a better dynamic range (an aspect of the Mark III that often gets criticized).
ISO range – not much change
The Canon 5D Mark IV at ISO 25,600 shutter speed 1/500th.
The Canon 5D Mark III at ISO 25,600 shutter speed 1/500th.
The ISO range for the 5D Mark IV is ISO 100 ��� 32,000, versus the Mark III’s 100 – 25,600. However, both models offer the same expanded ISO range of 50 to 102,400. The high ISO and low light performance continue to be quite excellent, as is to be expected from a full-frame Canon DSLR. However, there is no real significant difference in higher ISO performance from the Mark III to the Mark IV.
Canon does have significantly better low light cameras in its highest end models (such as the ID X series), but the 5D holds its own very well for the price point. A big change in the ISO aspect of the camera, however, is the move to on-sensor analog-to-digital circuitry (ADC) that results in noteworthy improvement in base ISO dynamic range. Canon DSLRs prior to the 1D X Mark II and 80D were very well known for poor shadow recovery. This is not an issue in the Mark IV.
Subject: Kiss the Border Collie
Frames per second burst rate
The Canon 5D Mark IV has a 7 FPS burst rate, about one frame per second faster than the 5D Mark III. Not a huge difference in hindsight, but where the 5D Mark IV really excels is the buffer performance. Continuous JPEG shooting is essentially unlimited; the camera will shoot until the memory card is full, whereas the 5D Mark III’s buffer filled after about 63 JPEG images. Still an impressive feat, but the unlimited is certainly better.
21 RAW frames can be captured before the buffer fills and the camera comes to a halt, which is fantastic considering that each RAW frame is from a 30.4 MP sensor. Wildlife photographers will really enjoy the 7 FPS burst rate and increased buffer performance.
Subject: Valkyrium
New Dual Pixel Raw Mode
On the topic of RAW, the Canon 5D Mark IV includes a very powerful new Dual Pixel Raw mode, which advances upon the Dual Pixel CMOS AF technology. This makes use of the split-pixel design to capture two images at once. The outcome allows you to be able to make subtle adjustments and changes to focus/sharpness, bokeh, and ghosting. The downside is that the file sizes of Dual Pixel Raw images are nearly twice as large, and the burst rate and buffer capacity are reduced while in Dual Pixel Raw mode.
Canon 5D Mark IV with Canon 70-200mm F/2.8 L IS USM II
Autofocus
The autofocus in this model is downright incredible. While the 5D Mark IV offers the same 61 AF points as in the 5D Mark III, the new model uses an upgraded AF system. Now all 61 points can focus down to f/8 and they can cover much more of the frame. The 5D Mark III only offered f/8 autofocusing at the center point. These changes are very similar to features inside the EOS-1D X Mark II, Canon’s high-end model. Photographers that use super-telephoto lenses and teleconverters are sure to appreciate this improvement.
21 of these points also remain cross type for extra sensitivity. Unfortunately, there is no way to link spot metering to a chosen AF point. One of the big changes to autofocus on the 5D Mark IV is the use of the infamous Dual Pixel CMOS AF, frequently touted by Canon. Equally, the model has inherited the AI Servo AF III with EOS iTR AF from EOS 7D Mark II and EOS-1D X Mark II. This AF feature truly shines when using the camera to photograph sports or action.
The AF system’s detection range has also been broadened, from -2 EV on the EOS 5D Mark III to -3 EV, and this drops down even further to -4 EV when using Live View. As well as this, there’s also now an AF Area Selection button on the back plate.
WiFi!!
Another brand new feature to the Canon 5D line is the presence of WiFi capabilities and NFC technology. This new aspect of the model allows the camera to be controlled remotely from a smartphone or tablet and have images transferred wirelessly to a multitude of other devices. The camera utilizes the same Canon Camera Connect app as other WiFi models, which is available for both iOS and Android platforms. This feature was also widely requested from Canon users and allows photographers to bypass the need to purchase wireless triggers for their camera.
Self-portrait photographers rejoice! GPS/Geo Tagging continues to be included in this upgrade to the Mark III.
Subject: Jessica Bari
Video features – pros and cons
Arguably the most marketed aspect of the Canon 5D Mark IV is the ability to film in 4K. This model is one of the first DSLRs to allow you to shoot in 4K and showcases Canon’s interest in shifting high-quality videography to DSLRs. The benefit to shooting footage with these smaller cameras is maneuverability, portability, and other such size benefits. The videography portion of the camera does sport very accurate autofocus, the touch screen allows you to switch focus points and exposure levels silently, and it is all-around a smooth piece of filming equipment. Due to its on-sensor
Due to its on-sensor phase-detect system, Live View AF on the Mark IV is super-quick, smooth and precise. By comparison, the 5D Mark III offered only contrast-detect AF with Live View, which was slower and had a tendency to hunt, making for distracting wobbling as focus adjusted.
Much like Canon’s other 4K models, the EOS 5D Mark IV allows you to extract JPEG frames from the 4K footage. The images have a resolution of 8.8MP, as opposed to the lower 8-8.3MP resolution of images extracted from cameras recording the slightly lower resolution UHD 4K footage.
That being said, being one of the most marketed features also opens the doorway to major scrutiny. Videographers have mentioned the 4K video being limited to Motion JPEG, the 4K/30p video requiring the use of a CF card, the 1.64x crop factor in 4K video limiting FOV, the HDMI-out limited to 1080 video, and the lack of log gamma, focus peaking, or zebras for video as all major cons to this feature.
Canon 5D Mark IV with Canon 16-35mm F/2.8L USM II
Special features
As far as built-ins go, the 5D Mark IV has a movie time-lapse mode, an intervalometer, HDR and multiple exposure capabilities, mirror vibration control, and a “Fine Detail” picture style. The camera also has an anti-flicker feature that was originally introduced in the 7D Mark II and 1D X Mark II, in which the camera can be set to adjust the moment of exposure to compensate for flickering electric lighting.
Subject: Desiree Perkins
Summary
In conclusion, the Canon 5D Mark IV keeps itself familiar and sentimental, while improving upon features that attracted photographers to the 5D line in the first place. Although not every desired feature was implemented in this model, Canon certainly showed that the company listened to its customers and took their feedback into strong consideration. The product that resulted is a well-rounded, functional, and incredible piece of equipment. On the value-for-dollar front, the 5D Mark IV is absolutely worth its price tag.
The post Overview of the New Canon 5D Mark IV by Anabel DFlux appeared first on Digital Photography School.
from DIYS http://ift.tt/2rOHRbv
0 notes
Text
Overview of the New Canon 5D Mark IV
Canon’s 5D Mark line has embedded itself deeply in the heart of photographers. Although the price generally keeps this camera in the hands of professionals, hobbyists have equally drooled over its capabilities and power. It comes as no surprise that the newest edition to the line, the Canon 5D Mark IV, sparked a lot of excitement and interest. But does this model really live up to the expectations it has set itself?
Subject: Rusty the Golden Retriever
As a Canon camera enthusiast myself, having gone through many different cameras in my career (and currently working with four), I have been pleasantly impressed by the new model. Each camera has its high points and its low points, but the Canon 5D Mark IV lends itself to being an excellent piece of machinery with more pros than cons. In comparison to its predecessor the 5D Mark III, beloved features have been better optimized and improved while adding new capabilities that were previously missing.
Physical Specs of the Canon 5D Mark IV
In terms of the camera’s physicality, the Canon 5D Mark IV weighs at 28.2 ounces, versus its predecessor which weighed 30.4 ounces. Although this doesn’t sound like a significant difference, your arms will thank you for the lighter weight of the Mark IV after several hours of shooting. Lighter equipment weight is an aspect that many photographers consistently request from their beloved camera companies, as heavy gear often leads to various body aches.
The body feels sturdy and comfortable. The fact that Canon found a way to decrease the weight of their newest 5D camera shows that the brand was certainly listening. Alongside this, the camera’s weather sealing shows quite an improvement over the previous models. I have taken the camera out to the snow, beach, heat, and rain with no trouble.
Otherwise, The 5D Mark IV feels almost indistinguishable to the 5D Mark III. They have virtually the same ergonomics, buttons, and menu layout. The camera continues to have the dual card slots, much like the Mark III; one slot for a compact flash card and one slot for an SD card. The settings allow you to write on either both simultaneously or switch over to the secondary card once the main card is full.
New feature – touch screen
Possibly the most noticeable new feature is the inclusion of a touch screen, the first of any of the 5D models. The touchscreen has been present in several of Canon’s other models, and this was highly requested as an addition to the new 5D lineup. In Live View Mode, the touchscreen allows you to tangibly tap the screen to adjust the focus or the exposure settings. This is a significant benefit to video shooters, as tapping the screen allows you to silently make your adjustments without adding noise to your rolling video.
The touchscreen is also customizable, similar to the live view features of the 1Dx Mark II. It can be programmed so that the touch of the LCD screen actually takes the picture. The rear LCD on the 5D Mark IV is an improved 1.62 million-dot 3.2-inch screen, unlike the 5D MK III’s 1.04 million-dot LCD. Although Canon did not include a swivel LCD screen as wanted by many shooters, the touchscreen is a welcome addition.
Megapixels – big increase
Although both are full-frame cameras, the Canon 5D Mark IV sports a whopping 30.4 megapixels versus the 5D Mark III’s mere 22.3 megapixels. 30.4 MP offer a solid 17% linear resolution increase. In addition, the new camera features Canon’s DIGIC 6+ image processor. Pair the processor with the increase in megapixels, and the 5D Mark IV officially has a better dynamic range (an aspect of the Mark III that often gets criticized).
ISO range – not much change
The Canon 5D Mark IV at ISO 25,600 shutter speed 1/500th.
The Canon 5D Mark III at ISO 25,600 shutter speed 1/500th.
The ISO range for the 5D Mark IV is ISO 100 – 32,000, versus the Mark III’s 100 – 25,600. However, both models offer the same expanded ISO range of 50 to 102,400. The high ISO and low light performance continue to be quite excellent, as is to be expected from a full-frame Canon DSLR. However, there is no real significant difference in higher ISO performance from the Mark III to the Mark IV.
Canon does have significantly better low light cameras in its highest end models (such as the ID X series), but the 5D holds its own very well for the price point. A big change in the ISO aspect of the camera, however, is the move to on-sensor analog-to-digital circuitry (ADC) that results in noteworthy improvement in base ISO dynamic range. Canon DSLRs prior to the 1D X Mark II and 80D were very well known for poor shadow recovery. This is not an issue in the Mark IV.
Subject: Kiss the Border Collie
Frames per second burst rate
The Canon 5D Mark IV has a 7 FPS burst rate, about one frame per second faster than the 5D Mark III. Not a huge difference in hindsight, but where the 5D Mark IV really excels is the buffer performance. Continuous JPEG shooting is essentially unlimited; the camera will shoot until the memory card is full, whereas the 5D Mark III’s buffer filled after about 63 JPEG images. Still an impressive feat, but the unlimited is certainly better.
21 RAW frames can be captured before the buffer fills and the camera comes to a halt, which is fantastic considering that each RAW frame is from a 30.4 MP sensor. Wildlife photographers will really enjoy the 7 FPS burst rate and increased buffer performance.
Subject: Valkyrium
New Dual Pixel Raw Mode
On the topic of RAW, the Canon 5D Mark IV includes a very powerful new Dual Pixel Raw mode, which advances upon the Dual Pixel CMOS AF technology. This makes use of the split-pixel design to capture two images at once. The outcome allows you to be able to make subtle adjustments and changes to focus/sharpness, bokeh, and ghosting. The downside is that the file sizes of Dual Pixel Raw images are nearly twice as large, and the burst rate and buffer capacity are reduced while in Dual Pixel Raw mode.
Canon 5D Mark IV with Canon 70-200mm F/2.8 L IS USM II
Autofocus
The autofocus in this model is downright incredible. While the 5D Mark IV offers the same 61 AF points as in the 5D Mark III, the new model uses an upgraded AF system. Now all 61 points can focus down to f/8 and they can cover much more of the frame. The 5D Mark III only offered f/8 autofocusing at the center point. These changes are very similar to features inside the EOS-1D X Mark II, Canon’s high-end model. Photographers that use super-telephoto lenses and teleconverters are sure to appreciate this improvement.
21 of these points also remain cross type for extra sensitivity. Unfortunately, there is no way to link spot metering to a chosen AF point. One of the big changes to autofocus on the 5D Mark IV is the use of the infamous Dual Pixel CMOS AF, frequently touted by Canon. Equally, the model has inherited the AI Servo AF III with EOS iTR AF from EOS 7D Mark II and EOS-1D X Mark II. This AF feature truly shines when using the camera to photograph sports or action.
The AF system’s detection range has also been broadened, from -2 EV on the EOS 5D Mark III to -3 EV, and this drops down even further to -4 EV when using Live View. As well as this, there’s also now an AF Area Selection button on the back plate.
WiFi!!
Another brand new feature to the Canon 5D line is the presence of WiFi capabilities and NFC technology. This new aspect of the model allows the camera to be controlled remotely from a smartphone or tablet and have images transferred wirelessly to a multitude of other devices. The camera utilizes the same Canon Camera Connect app as other WiFi models, which is available for both iOS and Android platforms. This feature was also widely requested from Canon users and allows photographers to bypass the need to purchase wireless triggers for their camera.
Self-portrait photographers rejoice! GPS/Geo Tagging continues to be included in this upgrade to the Mark III.
Subject: Jessica Bari
Video features – pros and cons
Arguably the most marketed aspect of the Canon 5D Mark IV is the ability to film in 4K. This model is one of the first DSLRs to allow you to shoot in 4K and showcases Canon’s interest in shifting high-quality videography to DSLRs. The benefit to shooting footage with these smaller cameras is maneuverability, portability, and other such size benefits. The videography portion of the camera does sport very accurate autofocus, the touch screen allows you to switch focus points and exposure levels silently, and it is all-around a smooth piece of filming equipment. Due to its on-sensor
Due to its on-sensor phase-detect system, Live View AF on the Mark IV is super-quick, smooth and precise. By comparison, the 5D Mark III offered only contrast-detect AF with Live View, which was slower and had a tendency to hunt, making for distracting wobbling as focus adjusted.
Much like Canon’s other 4K models, the EOS 5D Mark IV allows you to extract JPEG frames from the 4K footage. The images have a resolution of 8.8MP, as opposed to the lower 8-8.3MP resolution of images extracted from cameras recording the slightly lower resolution UHD 4K footage.
That being said, being one of the most marketed features also opens the doorway to major scrutiny. Videographers have mentioned the 4K video being limited to Motion JPEG, the 4K/30p video requiring the use of a CF card, the 1.64x crop factor in 4K video limiting FOV, the HDMI-out limited to 1080 video, and the lack of log gamma, focus peaking, or zebras for video as all major cons to this feature.
Canon 5D Mark IV with Canon 16-35mm F/2.8L USM II
Special features
As far as built-ins go, the 5D Mark IV has a movie time-lapse mode, an intervalometer, HDR and multiple exposure capabilities, mirror vibration control, and a “Fine Detail” picture style. The camera also has an anti-flicker feature that was originally introduced in the 7D Mark II and 1D X Mark II, in which the camera can be set to adjust the moment of exposure to compensate for flickering electric lighting.
Subject: Desiree Perkins
Summary
In conclusion, the Canon 5D Mark IV keeps itself familiar and sentimental, while improving upon features that attracted photographers to the 5D line in the first place. Although not every desired feature was implemented in this model, Canon certainly showed that the company listened to its customers and took their feedback into strong consideration. The product that resulted is a well-rounded, functional, and incredible piece of equipment. On the value-for-dollar front, the 5D Mark IV is absolutely worth its price tag.
The post Overview of the New Canon 5D Mark IV by Anabel DFlux appeared first on Digital Photography School.
from DIYS http://ift.tt/2rOHRbv
0 notes
Text
Overview of the New Canon 5D Mark IV
Canon’s 5D Mark line has embedded itself deeply in the heart of photographers. Although the price generally keeps this camera in the hands of professionals, hobbyists have equally drooled over its capabilities and power. It comes as no surprise that the newest edition to the line, the Canon 5D Mark IV, sparked a lot of excitement and interest. But does this model really live up to the expectations it has set itself?
Subject: Rusty the Golden Retriever
As a Canon camera enthusiast myself, having gone through many different cameras in my career (and currently working with four), I have been pleasantly impressed by the new model. Each camera has its high points and its low points, but the Canon 5D Mark IV lends itself to being an excellent piece of machinery with more pros than cons. In comparison to its predecessor the 5D Mark III, beloved features have been better optimized and improved while adding new capabilities that were previously missing.
Physical Specs of the Canon 5D Mark IV
In terms of the camera’s physicality, the Canon 5D Mark IV weighs at 28.2 ounces, versus its predecessor which weighed 30.4 ounces. Although this doesn’t sound like a significant difference, your arms will thank you for the lighter weight of the Mark IV after several hours of shooting. Lighter equipment weight is an aspect that many photographers consistently request from their beloved camera companies, as heavy gear often leads to various body aches.
The body feels sturdy and comfortable. The fact that Canon found a way to decrease the weight of their newest 5D camera shows that the brand was certainly listening. Alongside this, the camera’s weather sealing shows quite an improvement over the previous models. I have taken the camera out to the snow, beach, heat, and rain with no trouble.
Otherwise, The 5D Mark IV feels almost indistinguishable to the 5D Mark III. They have virtually the same ergonomics, buttons, and menu layout. The camera continues to have the dual card slots, much like the Mark III; one slot for a compact flash card and one slot for an SD card. The settings allow you to write on either both simultaneously or switch over to the secondary card once the main card is full.
New feature – touch screen
Possibly the most noticeable new feature is the inclusion of a touch screen, the first of any of the 5D models. The touchscreen has been present in several of Canon’s other models, and this was highly requested as an addition to the new 5D lineup. In Live View Mode, the touchscreen allows you to tangibly tap the screen to adjust the focus or the exposure settings. This is a significant benefit to video shooters, as tapping the screen allows you to silently make your adjustments without adding noise to your rolling video.
The touchscreen is also customizable, similar to the live view features of the 1Dx Mark II. It can be programmed so that the touch of the LCD screen actually takes the picture. The rear LCD on the 5D Mark IV is an improved 1.62 million-dot 3.2-inch screen, unlike the 5D MK III’s 1.04 million-dot LCD. Although Canon did not include a swivel LCD screen as wanted by many shooters, the touchscreen is a welcome addition.
Megapixels – big increase
Although both are full-frame cameras, the Canon 5D Mark IV sports a whopping 30.4 megapixels versus the 5D Mark III’s mere 22.3 megapixels. 30.4 MP offer a solid 17% linear resolution increase. In addition, the new camera features Canon’s DIGIC 6+ image processor. Pair the processor with the increase in megapixels, and the 5D Mark IV officially has a better dynamic range (an aspect of the Mark III that often gets criticized).
ISO range – not much change
The Canon 5D Mark IV at ISO 25,600 shutter speed 1/500th.
The Canon 5D Mark III at ISO 25,600 shutter speed 1/500th.
The ISO range for the 5D Mark IV is ISO 100 – 32,000, versus the Mark III’s 100 – 25,600. However, both models offer the same expanded ISO range of 50 to 102,400. The high ISO and low light performance continue to be quite excellent, as is to be expected from a full-frame Canon DSLR. However, there is no real significant difference in higher ISO performance from the Mark III to the Mark IV.
Canon does have significantly better low light cameras in its highest end models (such as the ID X series), but the 5D holds its own very well for the price point. A big change in the ISO aspect of the camera, however, is the move to on-sensor analog-to-digital circuitry (ADC) that results in noteworthy improvement in base ISO dynamic range. Canon DSLRs prior to the 1D X Mark II and 80D were very well known for poor shadow recovery. This is not an issue in the Mark IV.
Subject: Kiss the Border Collie
Frames per second burst rate
The Canon 5D Mark IV has a 7 FPS burst rate, about one frame per second faster than the 5D Mark III. Not a huge difference in hindsight, but where the 5D Mark IV really excels is the buffer performance. Continuous JPEG shooting is essentially unlimited; the camera will shoot until the memory card is full, whereas the 5D Mark III’s buffer filled after about 63 JPEG images. Still an impressive feat, but the unlimited is certainly better.
21 RAW frames can be captured before the buffer fills and the camera comes to a halt, which is fantastic considering that each RAW frame is from a 30.4 MP sensor. Wildlife photographers will really enjoy the 7 FPS burst rate and increased buffer performance.
Subject: Valkyrium
New Dual Pixel Raw Mode
On the topic of RAW, the Canon 5D Mark IV includes a very powerful new Dual Pixel Raw mode, which advances upon the Dual Pixel CMOS AF technology. This makes use of the split-pixel design to capture two images at once. The outcome allows you to be able to make subtle adjustments and changes to focus/sharpness, bokeh, and ghosting. The downside is that the file sizes of Dual Pixel Raw images are nearly twice as large, and the burst rate and buffer capacity are reduced while in Dual Pixel Raw mode.
Canon 5D Mark IV with Canon 70-200mm F/2.8 L IS USM II
Autofocus
The autofocus in this model is downright incredible. While the 5D Mark IV offers the same 61 AF points as in the 5D Mark III, the new model uses an upgraded AF system. Now all 61 points can focus down to f/8 and they can cover much more of the frame. The 5D Mark III only offered f/8 autofocusing at the center point. These changes are very similar to features inside the EOS-1D X Mark II, Canon’s high-end model. Photographers that use super-telephoto lenses and teleconverters are sure to appreciate this improvement.
21 of these points also remain cross type for extra sensitivity. Unfortunately, there is no way to link spot metering to a chosen AF point. One of the big changes to autofocus on the 5D Mark IV is the use of the infamous Dual Pixel CMOS AF, frequently touted by Canon. Equally, the model has inherited the AI Servo AF III with EOS iTR AF from EOS 7D Mark II and EOS-1D X Mark II. This AF feature truly shines when using the camera to photograph sports or action.
The AF system’s detection range has also been broadened, from -2 EV on the EOS 5D Mark III to -3 EV, and this drops down even further to -4 EV when using Live View. As well as this, there’s also now an AF Area Selection button on the back plate.
WiFi!!
Another brand new feature to the Canon 5D line is the presence of WiFi capabilities and NFC technology. This new aspect of the model allows the camera to be controlled remotely from a smartphone or tablet and have images transferred wirelessly to a multitude of other devices. The camera utilizes the same Canon Camera Connect app as other WiFi models, which is available for both iOS and Android platforms. This feature was also widely requested from Canon users and allows photographers to bypass the need to purchase wireless triggers for their camera.
Self-portrait photographers rejoice! GPS/Geo Tagging continues to be included in this upgrade to the Mark III.
Subject: Jessica Bari
Video features – pros and cons
Arguably the most marketed aspect of the Canon 5D Mark IV is the ability to film in 4K. This model is one of the first DSLRs to allow you to shoot in 4K and showcases Canon’s interest in shifting high-quality videography to DSLRs. The benefit to shooting footage with these smaller cameras is maneuverability, portability, and other such size benefits. The videography portion of the camera does sport very accurate autofocus, the touch screen allows you to switch focus points and exposure levels silently, and it is all-around a smooth piece of filming equipment. Due to its on-sensor
Due to its on-sensor phase-detect system, Live View AF on the Mark IV is super-quick, smooth and precise. By comparison, the 5D Mark III offered only contrast-detect AF with Live View, which was slower and had a tendency to hunt, making for distracting wobbling as focus adjusted.
Much like Canon’s other 4K models, the EOS 5D Mark IV allows you to extract JPEG frames from the 4K footage. The images have a resolution of 8.8MP, as opposed to the lower 8-8.3MP resolution of images extracted from cameras recording the slightly lower resolution UHD 4K footage.
That being said, being one of the most marketed features also opens the doorway to major scrutiny. Videographers have mentioned the 4K video being limited to Motion JPEG, the 4K/30p video requiring the use of a CF card, the 1.64x crop factor in 4K video limiting FOV, the HDMI-out limited to 1080 video, and the lack of log gamma, focus peaking, or zebras for video as all major cons to this feature.
Canon 5D Mark IV with Canon 16-35mm F/2.8L USM II
Special features
As far as built-ins go, the 5D Mark IV has a movie time-lapse mode, an intervalometer, HDR and multiple exposure capabilities, mirror vibration control, and a “Fine Detail” picture style. The camera also has an anti-flicker feature that was originally introduced in the 7D Mark II and 1D X Mark II, in which the camera can be set to adjust the moment of exposure to compensate for flickering electric lighting.
Subject: Desiree Perkins
Summary
In conclusion, the Canon 5D Mark IV keeps itself familiar and sentimental, while improving upon features that attracted photographers to the 5D line in the first place. Although not every desired feature was implemented in this model, Canon certainly showed that the company listened to its customers and took their feedback into strong consideration. The product that resulted is a well-rounded, functional, and incredible piece of equipment. On the value-for-dollar front, the 5D Mark IV is absolutely worth its price tag.
The post Overview of the New Canon 5D Mark IV by Anabel DFlux appeared first on Digital Photography School.
from DIYS http://ift.tt/2rOHRbv
0 notes
Last Seen Blogs