#Woodmdad
Text
Bird House Plans | wood working as a hobby | mind relex bird sound | wood mdad
A weekend woodworking project that you may complete with young children is building a birdhouse. Watch this video and adhere to the instructions to make a simple birdhouse out of scrap wood.
A beginner can complete the enjoyable undertaking of building a bird house in a few of hours. Build your own one-board wooden bird house by following these easy steps and our free, basic bird house blueprint.
#wood#woodmdad#basicwoodworking#woodworkingidea#woodworkingprojects#woodworkingtips#typeofwood#woodhabit#kindofwood#woodworkingtool#birdhouse#diy
3 notes
·
View notes
Text
cinnamon tree
The evergreen cinnamon tree, sometimes referred to as Cinnamomum verum or Cinnamomum zeylanicum, is a member of the Lauraceae family. It is commonly planted throughout other tropical areas and is indigenous to Sri Lanka and southern India.
5 notes
·
View notes
Text
Embracing the Art of Wood Craft: From Hobby to Masterpiece
Wood mdad™
Wood craft is a timeless art form that allows individuals to unleash their creativity through the manipulation of wood into unique and stunning creations. Whether you are a seasoned woodworker or just starting your journey in this craft, there is something truly special about the process of transforming raw wood into a work of art.

Woodworking, a timeless craft that has captivated artisans and enthusiasts for generations, offers a journey rich in creativity, skill development, and the satisfaction of transforming raw materials into works of art. In this blog post, we'll explore the journey from woodworking hobbyist to master craftsman, delving into the nuances of technique, inspiration, and the joy of creation.
Woodworking, with its roots deeply embedded in human history, beckons both beginners and seasoned artisans alike to pick up tools and unleash their creativity upon raw timber. From the humble beginnings of whittling sticks to the intricate designs of fine furniture, the art of wood craft offers a canvas as vast as the imagination.

The Beauty of Working with Wood
Working with wood offers a sense of satisfaction that is unmatched by any other medium. The natural beauty of wood grain, the texture of the material, and the earthy aroma that fills the air as you work are all part of the experience. Every piece of wood tells a story, and as a wood crafter, you have the opportunity to bring that story to life through your creations.
Tools of the Trade
To fully immerse yourself in the world of wood craft, it is essential to familiarize yourself with the basic tools of the trade. From simple hand tools like chisels and mallets to more complex power tools such as saws and sanders, having the right tools at your disposal can make all the difference in the quality of your work.
Techniques and Skills
Mastering the art of wood craft requires a combination of patience, practice, and a willingness to learn new techniques. Whether you are interested in traditional woodworking methods or modern woodworking trends, there is a wide range of skills to explore, from carving and joinery to wood turning and finishing.
Learn more visit wood mdad™
https://woodmdad.blogspot.com/?m=1
Finding Inspiration in Nature
Nature is a limitless source of inspiration for wood crafters. From the intricate patterns found in tree bark to the graceful curves of a leaf, the beauty of the natural world can be translated into your wood creations. Take a walk in the woods, observe the details of the world around you, and let nature guide your creative process.
Conclusion
Wood craft is more than just a hobby; it is a journey of self-expression and creativity. Whether you are creating a simple furniture piece for your home or a complex sculpture for display, the art of wood craft allows you to unleash your imagination and create something truly unique. Embrace the beauty of working with wood, hone your skills, and let your creativity soar in this captivating craft.

The Joy of Getting Started
For many, woodworking begins as a simple curiosity or a desire to create something tangible with their hands. Armed with basic tools and a piece of wood, beginners embark on a journey of exploration, learning the fundamentals of shaping, carving, and joining. Whether it's crafting a rustic shelf or a hand-carved spoon, the initial steps into woodworking are marked by a sense of discovery and the thrill of turning an idea into reality.
Learning and Growth
As novice woodworkers hone their skills, they delve deeper into the craft, soaking up knowledge from books, online resources, and experienced mentors. From understanding wood grain and selecting the right tools to mastering joinery techniques and finishing methods, the learning curve in woodworking is both challenging and rewarding. Mistakes become valuable lessons, guiding artisans toward greater precision and craftsmanship with each project completed.
Learn more visit wood mdad™
https://woodmdad.blogspot.com/?m=1 ⬇️

Finding Inspiration
Woodworking is as much about creativity as it is about technique. From the natural beauty of the wood itself to the world around us, inspiration can be found in myriad forms. Whether it's the graceful curve of a tree branch or the geometric patterns of architecture, the discerning eye of a woodworker sees potential in every grain and knot. Drawing inspiration from traditional designs, personal experiences, or contemporary trends, artisans infuse their creations with a unique identity that reflects their passion and vision.
Mastering the Craft
As woodworkers progress along their journey, they evolve from amateurs to artisans, refining their skills and developing a signature style. Mastery in woodworking is not merely about technical proficiency but also about a deep understanding of the material and a commitment to excellence. From intricate marquetry and sculptural forms to heirloom-quality furniture and architectural marvels, master craftsmen push the boundaries of what is possible with wood, elevating the craft to an art form.
The Joy of Creation
At the heart of woodworking lies the joy of creation—the satisfaction of transforming raw materials into something beautiful and enduring. Whether it's a simple gift for a loved one or a masterpiece destined for a gallery, each project carries with it the pride of craftsmanship and the satisfaction of knowing that a piece of oneself has been imbued into the finished work. In a world of mass-produced goods, woodworking offers a refuge for those who seek authenticity, craftsmanship, and the timeless beauty of handcrafted creations.
Conclusion
In the art of wood craft, the journey from hobbyist to masterpiece is a testament to the enduring allure of creativity, skill, and craftsmanship. Whether one's passion lies in carving, turning, joinery, or marquetry, woodworking offers a path of self-discovery and expression unlike any other. So, pick up your tools, unleash your imagination, and let the beauty of wood inspire you on your journey to creating something truly extraordinary.
Learn more with wood mdad™

#woodmdad#basicwoodworking#wood#woodworkingidea#woodworkingprojects#woodworkingtips#woodhabit#kindofwood#woodworkingtool#plants
0 notes
Text
Wood working business / woodworking entrepreneurs
🌿Entrepreneurs in the woodworking industry
Frequently, a do-it-yourself woodworking project blossoms into a successful craft enterprise. Customers' interest in woodworking has grown due to the growing desire for well constructed, handcrafted goods.

There are many ways to turn a simple woodworking project into a successful business; we'll lead you through the top woodworking projects that sell. Wood crafts can be utilized for gifts and home decor.
🔴 Is It Possible to Earn Money Woodworking?
If you know the fundamentals of woodworking, you can turn your projects into a profitable endeavor. Additionally, there are more opportunities to expand your firm as you get experience and take on more challenging assignments.
🔴 How to Start a Business in Woodworking
In addition to being a fantastic pastime, woodworking can be a successful business. Here are some actions you can do if you want to launch a woodworking business:
Improve your woodworking abilities. The most crucial step is this one. To succeed, you must be able to produce woodwork of a high caliber. You can improve your carpentry abilities in a variety of methods, including by attending classes, reading books, and viewing online tutorials.
Determine your specialty. Which kind of woodworking are you interested in specializing in? Do you wish to create toys, home decor, furniture, or something else entirely? Once you've identified your niche, you can begin focusing your marketing efforts on prospective clients.
Make a plan for your business.
Learn ↘️
https://woodmdad.blogspot.com/p/book.html
🔴Deals for Small Businesses
🌿Begin modestly.
Avoid trying to take on too much at once. Concentrate on a small number of goods or services at first, then expand your company from there.
🌿Have patience.
Establishing a profitable woodworking business takes time. If you don’t notice results right away, don’t give up.
Enjoy yourselves! As enjoyable as woodworking is, be sure it's a hobby you're into. It will be hard to succeed if you're not enjoying yourself.
🌿Advantages of Starting a Woodworking Business
The woodworking industry presents a multitude of noteworthy advantages, rendering it a compelling choice for both experienced artisans and beginners. Above all, woodworking as a business offers the chance for ingenuity and originality.
A woodworker's workshop produces one-of-a-kind, handcrafted objects that appeal to a specialized clientele that values the uniqueness and craftsmanship involved in custom-made items.
Furthermore, woodworking is flexible; a wide variety of goods, from toys and culinary utensils to furniture and home décor, may be made with it. Because of the variety of goods that can be made, woodworkers are able to adjust to changing consumer wants and market trends.
With consumers ready to pay more for handcrafted wood products, this business can have a large profit margin. The main investment in woodworking is in the tools and skill set because the raw materials used, mostly wood, are reasonably priced.
A woodworker can create things that sell for a good price once they have acquired a collection of premium tools and developed their craft. Another important benefit of the business is its scalability; it may be started modestly, maybe as a side project, and expanded as demand grows.
Furthermore, having a woodworking business offers a great way to achieve job satisfaction and self-fulfillment.
More⬇️
#woodworkingidea#basicwoodworking#woodworkingprojects#wood#woodmdad#woodworkingtool#woodhabit#woodworkingtips#kindofwood
0 notes
Text
how to make easy , wood coaster
🔴 How to Make Easy, Wood Coasters
The majority of us only give coasters any thought when we are reminded how ineffective we have been with them. However, that may be the result of the dull and uninspired nature of many coasters. You can do this simple woodworking project in a few hours, and making coasters out of well-seasoned logs will almost certainly make you remember to use one the next time you place a drink down on more delicate furniture. The ability to experiment is one of the best things about making your own wood coasters. You can do almost anything with colored epoxy resins and wood-burning processes. Now let's get going.

🔴 Materials Required:
miter saw
Stiff brush
seasoned log with a diameter of about 3.5 to 4 inches
Gritted surface
Stain, shellac, varnish, or mineral oil of your choice
⬇️ Visit us…. ✍️ Wood mdad™
🔴Choose and Prepare Your Wood
dried log of a tree.
Pick well-seasoned wood; if not, it may continue to dry and break after you've constructed your coasters, which is something you don't want. Most wood takes around six months to season in a dry, well-ventilated area.
You are free to select whatever kind of wood you desire. Hardwoods such as oak, mahogany, hickory, maple, and alder will look more elegant and maybe be more durable than softwoods like fir, cedar, and pine, which frequently give a rustic appearance. A foot or more in length, 3.5 to 4" in diameter, and somewhat straight logs are what you want to find.
Using a stiff brush, clean the log.
After choosing your log, brush out any loose bark and extra dirt using a strong brush. You can use a hatchet, hand plane, or chisel to remove your bark entirely if you wish to.
🔴 cut Your Coasters
Using a power miter saw or any other preferred saw, cut a coaster.
While a handsaw can be used to create your wood coasters, a power miter saw greatly simplifies the process. To get started, trim the end off so that you have a perfectly level surface.
Size of coaster: 1/2–3/4.
Next, make your first coaster circle, about 1/2 to 3/4" thick, using your miter saw. Clamp a scrap piece of wood to the base of your saw and use it as a guide to cut consecutive coasters to ensure consistency. Cut whichever many coasters you would like. At least four coasters are included in most sets.
🔴 Use a palm sander to finish and sand the coasters.
To get the desired level of smoothness, sand your coasters by hand or using a palm sander, starting with a coarse grit (such as 120) and working your way up to finer grits.
Sand from the wooden coaster.
Sand off any excess loose bark at this time, and use it as an ideal opportunity to add finishing touches like smoothing the edges.
wooden coaster being cleaned using a microfiber towel.
After sanding, use a microfiber cloth to dust your coasters and then stain, mineral oil, shellac, or paint them as desired. Wood that has been sealed on both sides will be shielded from condensation from chilly glasses and will not dry out too much, which could lead to cracking.
⬇️ Visit us…. ✍️ Wood mdad™
🔵 Wood mdad™ 💚 any support pls contact [email protected] .
Good day!
2023 All Rights Reserved - woodmdad™
#woodmdad#woodworkingidea#woodworkingprojects#basicwoodworking#wood#woodworkingtips#kindofwood#typeofwood#woodhabit#woodworkingtool#diy projects#Wood diy
0 notes
Text
Halloween Wood Crafts You Can Make Yourself

With Halloween quickly approaching, there's no better way to embrace the spookiness of the season than by using wood to create some crafts. These ten inventive Halloween wood crafts will give a spooky, magical feel to your home, regardless of your level of competence in woodworking or desire to do DIY projects. Let's get going!
🔵**Luminary of the Haunted House:** - Make a wooden luminary that, when a tea light is inserted, transforms into a scary home silhouette. It makes a captivating focal point for your Halloween festivities.
🔘 **Wooden Pumpkins:** - Make wooden pumpkins of different sizes, paint them in eye-catching Halloween hues, and adorn them with distinct faces. Your patch of pumpkins will be genuinely unique.
🔘 **Sign for Broom Parking:** - A wooden board with a "Broom Parking Only" sign attached and a broomstick holder would add a whimsical touch. It's ideal for your design with a witch motif.
🔵 **Halloween Signs:** - Personalize wooden signs with spooky phrases like "Witch's Brew" or "Beware of Spiders." These messages help to establish the tone for your Halloween celebrations.
🔵 **Oversized Candy Corn Decor:** - Paint wooden blocks the traditional colors of candy corn to create enormous candy corn decorations. They provide your decor a splash of color.
🔵 **Spooky Silhouettes:** - Draw eerie silhouettes on wooden boards of witches, ghosts, or black cats. You can really frighten your windows with these.
🔵 **Wooden Ghosts:** - Cut out wooden ghost forms, coat them with white paint, and embellish them with cute expressions. You can put these amiable spirits outside or indoors.
🔵 **Bat Cutouts:** Craft wooden bat silhouettes in multiple dimensions and suspend them from the ceiling. They give your room an air of intrigue.
🔵 **Pallet Pumpkins:** - Craft rustic pumpkin decorations out of repurposed wooden pallets. Add wooden stems and faces, paint them orange, and stack them.
🔵 **Spiderweb Coasters:** - Paint dark, ominous colors and carve elaborate spiderweb patterns onto wooden coasters. These coasters give your table setting a hint of spookiness.
These easy Halloween wood crafts will help you turn regular wood into amazing Halloween enchantment. Gather your supplies, let your imagination run wild, and go on a crafting project that will make your house the talk of the neighborhood.
Best feature? By adding your own touches, you can make your Halloween décor genuinely one-of-a-kind. So gather your woodworking supplies, start a Halloween craft, and be creative. Your house will be outfitted to slay the spookiness of the coming season
Happy haunting!
#Woodmdad
Visit
0 notes
Text
waight loss recipes wood based
🔴Healthy food recipes plants based
BOOK - WOOD MDAD™️
Discover the ultimate guide to achieving your weight loss goals with our 'Weight Loss Food Book.' This comprehensive resource is your roadmap to a healthier, slimmer you. Inside, you'll find a treasure trove of delicious, nutritious recipes meticulously designed to support your weight loss journey.

satisfying breakfast options to mouthwatering lunches and dinners, our book provides a diverse range of meals that not only help you shed those extra pounds but also keep you energized and satisfied. We've included expert tips, portion control guidance, and meal plans to make your path to a healthier you smoother and more enjoyable.
Say goodbye to restrictive diets and hello to a sustainable, enjoyable approach to weight loss. The 'Weight Loss Food Book' is your trusted companion on the road to a fitter, happier, and healthier you."
#woodmdad#basicwoodworking#food#woodworkingprojects#reading#book review#book recommendations#Book & video
0 notes
Text
pineapple with black pepper & salt
🔴 Pineapple with Black Pepper
This very simple recipe is not Hawaiian but it is so good as part of a luau that I almost always serve it. It is important to use the best black pepper you can, crushed at the very last minute.

🔵INGREDIENTS
1 large ripe pineapple,
preferably white salt
1 tablespoon black peppercorns, coarsely crushed
DIRECTIONS
Place the pineapple horizontally on your work surface. Use a heavy, sharp knife to cut it in half lengthwise, cutting through the crown as well as the fruit itself.
Cut each half of the pineapple in half again, lengthwise. Use a paring knife to cut out the core at the top of each quarter, inserting the knife at one end and pulling it along to the other. Lift off and discard the core.
Using a sharp, somewhat flexible knife, cut each quarter wedge of flesh away from the skin; leave it in place. Cut each wedge into slices and about 3/4-inch thick, being sure not to cut through the skin.
Set the wedges in their skins on a serving platter. Using your fingers and holding your hand several inches above each wedge, shower the pineapple with a generous pinch of salt, followed by a heavier sprinkling of black pepper. Cover lightly with plastic wrap and chill for 30 minutes before serving.
Enjoy 💚
🔴 Health food recipes plants based | wood based recipe
Waight loss,
Wood working knowledge,
@wood mdad™️
💚"Welcome to @wood_mdad™️, where the artistry of woodworking converges with plant-based wellness, weight loss, and sustainable living. Our journey starts in the middle of the woods, where we celebrate the art of woodworking, from choosing the best wood to crafting beautiful sculptures.
we invite you to savor our collection of plant-based recipes, thoughtfully crafted to delight your palate while promoting health and aiding in weight loss. We're more than a blog; we're a community dedicated to your well-being.
Join us on this transforming journey where woodworking and wellness intersect, sustainable living flourishes,and the serenity of nature inspires. , @wood_mdadTM is your roadmap to a peaceful, full life." Wood mdad™️
@wood mdad™️
All rights reseved !
0 notes
Text
Health food recipes plants based |wood based recipe | wood mdad™️
"Welcome to @wood_mdad™️, where the artistry of woodworking converges with plant-based wellness, weight loss, and sustainable living. Our journey starts in the middle of the woods, where we celebrate the art of woodworking, from choosing the best wood to crafting beautiful sculptures.
we invite you to savor our collection of plant-based recipes, thoughtfully crafted to delight your palate while promoting health and aiding in weight loss. We're more than a blog; we're a community dedicated to your well-being.
Join us on this transforming journey where woodworking and wellness intersect, sustainable living flourishes,and the serenity of nature inspires. , @wood_mdadTM is your roadmap to a peaceful, full life."
https://woodmdad.blogspot.com/p/food.html

0 notes
Text
CINNAMON ROLL | Healthy food | wood mdad™️ 🍮️
🔴 CINNAMON ROLL | Healthy food | wood mdad™️ 🍮️
An EASY recipe for Homemade Cinnamon Rolls! The rolls are melt-in-your-mouth soft with a buttery cinnamon filling and topped with the best homemade frosting.

You cannot beat the aroma ☄️ of freshly baked cinnamon rolls in the home.
🔵 Ingredients ⏳
For Yeast Water •½ cup warm water, •1 tbsp of active dry yeast and, •1 tsp sugar.
Dough: 2 tbsp vegetable oil, plus more for brushing • ½ cup water/plant based milk, at room temp • 2 tbsp cup sugar • 1 teaspoon salt • 2¾ cups all-purpose flour, plus more for kneading.
Filling: ½ cup white sugar, you can use brown sugar if you have • 1½ tbsp cinnamon powder.
Glaze:• ½ cups powdered sugar • 3 to 4 tbsp water •½ teaspoon vanilla extract.
🔵Instructions-
⭕Yeast water: •Grease the baking dish. In a small bowl, stir together the water, yeast, & sugar. Set aside for 5 minutes, or until the yeast is foamy.
⭕Dough: In a medium bowl, mix the vegetable oil, water, sugar, & salt together. Stir the yeast mixture. Place the flour in a large bowl, & add the yeast mixture & stir well into a sticky mixture. Use your hands to roughly knead the mixture, then turn it out onto a floured surface. Knead for 3 to 4 minutes until smooth, sprinkle with more flour if needed, & mould it into a round shape.

Brush a large bowl with vegetable oil & place the dough inside. Cover with damp cloth & set aside in a warm place to rise it until doubled in size, about 60 minutes.
⭕Filling: In a small bowl, mix the sugar & cinnamon. Punch down dough & roll out on a floured surface into a 20x14-inch rectangle. Brush with 2 tablespoons vegetable oil & sprinkle the cinnamon sugar within the edges. •Starting at one of the edges, roll it tightly into a log, then slice into 10 rolls. Place the rolls into the baking dish cut-side up, cover, & let em rise for 1 hour.
⭕Bake: Preheat the oven to 250°C. •Bake the rolls at 180°C for 25 to 30 minutes or until lightly golden on top.
⭕Glaze: In a medium bowl, whisk together the powdered sugar, 3 tablespoons of water, & vanilla until smooth. If it’s too thick, add more liquid.
⭕Remove the rolls from the oven & allow em to cool for 10 minutes, then drizzle the glaze on top & serve.
https://woodmdad.blogspot.com/p/cinnamon-roll-healthy-food-wood-mdad.html
#cinnamon#cinnamon roll#recipe#woodworkingprojects#woodworkingidea#basicwoodworking#woodmdad#wood#waightloss#healthy eating#Ceylon cinnamon#woodworkingtips
0 notes
Text
5 Steps to Learn Woodworking | woodworking skills | woodworking free | beginner

🌳“Give me six hours to chop down a tree and I will spend the first four sharpening the axe.” -Abraham Lincoln👤
Woodworking is a timeless craft that allows individuals to transform raw pieces of lumber into functional and artistic creations. Whether you're dreaming of crafting your own furniture, building custom cabinets, or simply honing your woodworking skills as a hobby, embarking on this journey begins with a solid foundation.
In this comprehensive guide, we'll walk you through five essential steps to learn woodworking. From understanding the fundamentals of wood selection to mastering the art of safe tool usage, these steps will empower you to embark on your woodworking adventure with confidence and creativity.
here are easy and first 05 steps to get you started.
🔘Read books about woodworking
🔴Take a few courses (online or in-person)
🔵Watch videos
🔴Get tools
🔵Purchase material
And more..!
steps in more detail below.
Remember : The order of these steps is important.
You don’t want to purchase tools or materials before you’ve studied and found out what you need.
tempting to rush out and buy gadgets,
but without proper planning, you’ll get easily frustrated.
🔴 Read Woodworking Books
Books are a great way to get detailed and, usually, reliable information. You may want to purchase several books to have them as a reference; however, you can always check some out at a library.
🌿Start with the Basics
Begin by understanding the fundamental concepts of woodworking, including different types of wood, grain patterns, and the properties of various wood species.
🌿Tool Knowledge
Learn about the different woodworking tools and their uses. This includes hand tools like chisels and planes, as well as power tools like circular saws and routers.
🌿 Safety Precautions
Study safety guidelines thoroughly to ensure you know how to use tools safely. This includes wearing appropriate safety gear and keeping your workspace well-ventilated.
@
#wood#basicwoodworking#woodworkingidea#woodworkingprojects#typeofwood#kindofwood#woodmdad#wood crafts#wooden#natalie wood#woods and fields
1 note
·
View note
Text
Is Woodworking Hard to Learn? Explained @ wood mdad.
Is Woodworking Hard to Learn? Explained @ wood mdad.

Both a satisfying hobby and a profession, woodworking. But many people think it's impossible to become a skilled carpenter or that you need some specialized skills.
So, is Woodworking Hard to Learn?
Although woodworking is not difficult to learn, becoming a master requires dedication. If you are enthusiastic about building projects, you will overcome any obstacle in your way. Keep in mind three things for success: perseverance, patience, and passion.
💚passion
You should be passionate about everything you do in life, whether it be at work, on the side, or while playing sports. You can accomplish anything you set your mind to with the support of passion, which is fed by energy, motivation, and a laser-like focus on getting things done.

Do you want to work with wood?
The same may be said about passion. You can fly to roads if you have enough of it.
However, you will struggle if you aren't passion about woodworking or don't enjoy the process. If your primary goal is to complete something for others to appreciate, you'll get upset when difficulties come up.
However, you're more likely to acquire the finished item if you appreciate the process of making something out of a pile of wood.
💚 be patience
Beyond only being kind to people, patience is crucial in life. It benefits your interpersonal relationships and aids in the long-term maintenance of these ties. Being patient allows you to control your emotions and maintain a strong sense of well-being.

In woodworking, patience is a great asset. You need to have patience with yourself, the tools, and the subject, especially when you're learning.
It takes only one fly to kill two when you're patient. First off, it stops you from making careless errors. Second, it enables you to continue even after making mistakes.
When things get tough, if you have a short fuse and expect everything to work out the first time, you'll give up.
💚Perseverance
The act of persistently pursuing a goal or objective despite challenges, hurdles, or disappointments is referred to as perseverance. In order to succeed or accomplish a desired objective, it takes the determination to keep pushing forward, adapt, and overcome obstacles. Even in the face of difficulty, perseverance frequently involves resilience, patience, and a strong belief in one's capabilities and aspirations. It's a quality that can help one develop personally and attain noteworthy goals.

You put others first and are driven to fulfill your objectives and aspirations, but what happens if you don't succeed? Despite your best efforts and continued devotion for the objective, you were unable to succeed. Persistence is useful in situations like that.
You must decide whether you're going to finish any assignment, hike, job, or interest before starting it. This is important. If you think you'll give up when things become tough, that's exactly what you'll do.
Before you start making wood, make the decision to endure.
More ⬇️
thankyou @woodmdad
1 note
·
View note
Text
wood working safty rules
💚Safety Guidelines for Woodworkers That Everyone Should Be Aware Of
If you follow a few simple woodworking safety guidelines, woodworking may be a secure and pleasurable hobby or profession. The rules are all common sense concepts, but if you don't abide by them, your risk of getting hurt while using your tools will be significantly increased. An attitude of "it won't happen to me" or a hurry-up mentality are inappropriate in the wood shop. Your woodworking endeavors will be considerably safer and more fun if you make these 10 rules a habit.
#basicwoodworking#kindofwood#woodworkingprojects#woodmdad#wood#woodhabit#typeofwood#woodworkingidea#woodworkingtips#woodworkingtool
0 notes
Text
Bird House Plans | wood working as a hobby | mind relex bird sound | wood mdad
Bird House Plans | wood working as a hobby | mind relex bird sound | wood mdad
A weekend woodworking project that you may complete with young children is building a birdhouse. Watch this video and adhere to the instructions to make a simple birdhouse out of scrap wood.

A beginner can complete the enjoyable undertaking of building a bird house in a few of hours. Build your own one-board wooden bird house by following these easy steps and our free, basic bird house blueprint.
#wood#basicwoodworking#woodmdad#woodworkingidea#woodworkingtips#woodhabit#woodworkingprojects#woodworkingtool#typeofwood#kindofwood
0 notes
Text
🔴🔴 Wood Joinery Styles (You should know )

wood mdad - you should know
One of the most fundamental ideas in woodworking is wood joinery. All woodworking items would be sculptures cut from a single piece of wood if we weren't able to solidly link two pieces of wood together. A woodworker can pick from a variety of joints depending on the job thanks to the many diverse types of joinery available for wood. You will be well on your way to becoming a very competent carpenter if you can master these wood joinery principles.
visit our blogspot
🔴 Simple Butt Joint
The butt joint is the most fundamental type of wood joinery. A butt joint is nothing more than when two pieces of wood butt against one another and are secured with mechanical fasteners (often at a right angle or square to the other board). On building projects, this kind of joint is frequently utilized in the framing of walls. Learn how to use a butt joint properly and when to use a different style of wood joinery.
🔴 The Box Joint
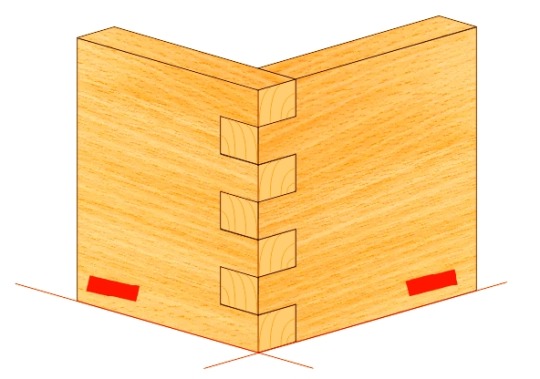
Although dovetail joints are attractive and sturdy, they are not always useful. A less complex option to a dovetail junction is a box joint. Find out how to construct reliable and durable box joints for your woodworking projects.
🔴 Mitered Joint
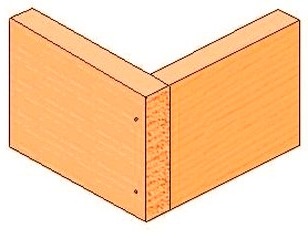
With the exception of the two boards being linked at an angle (rather than square to one another), a mitered butt joint is essentially identical to a basic butt joint. The benefit is that there won't be any end grain visible at the mitered butt joint, making it a little more aesthetically acceptable. The mitered butt joint isn't very sturdy, though.
🔴 half lap joint
In order to make the two boards join flush with one another, half of each of the two boards is removed for the half-lap joint. Although this style of wood joinery is stronger than butt joints, it might nonetheless impair the strength of the two adjacent boards.
🔴Tongue and Groove joint
One need only butt the joint together and secure it with bolts to attach two square boards together along a long edge. However, if you're going to glue the joint, the tongue and groove junction is significantly stronger and offers more adjoining surface surfaces.
🔴 Mortise and tenon joint
A traditional technique for wood joinery is the mortise and tenon. Since the dawn of woodworking, these joints have been in use, and they remain one of the best and most beautiful ways to join wood. Learn how to make perfect, tight mortise and tenon joints.
🔴 Pocket Joint
An example of a pocket junction is when two boards are joined together with a screw after a slot has been carved and an angle-drilled pilot hole. Pre-drilling must be done very precisely, hence a commercial jig is usually used to complete the task. For cabinet face frames and other comparable applications where a lot of strength is not required, pocket joints work excellently. In your woodworking tasks, learn how to make pocket joints.
🔴 Dado Joint
A dado is nothing more than an area on one board with a square groove where another board can fit. This is a typical wood joinery technique, like tongue and groove joinery, for joining plywood, such as when making cabinets.
🔴 Rabbet joint
The rabbet is yet another typical wood joint utilized in cabinetry. In essence, a rabbet is a dado cut made along a board's edge. When the back of cabinets and other similar assemblies is attached to the sides of the box using rabbets, the assembly gains a significant degree of strength. Find out when to use rabbets and how to cut them cleanly.
🔴 Dovetail Joint
The thru dovetail may be the most revered wood joinery technique. A traditional thru dovetail is stunning, extremely durable, and lends a touch of elegance to any item. Through dovetails can be made using a variety of techniques, such as hand cutting or jig machining. Discover the secrets to a quality
........................................
🔴🔴 Стили деревянных столярных изделий (вы должны знать)
Одной из самых фундаментальных идей в деревообработке является деревянная столярка. Все изделия из дерева были бы скульптурами, вырезанными из цельного куска дерева, если бы мы не могли прочно соединить два куска дерева вместе. Столяр может выбирать из множества соединений в зависимости от работы благодаря множеству различных типов столярных изделий, доступных для дерева. Вы будете на пути к тому, чтобы стать очень компетентным плотником, если освоите эти принципы столярного дела.
🔴 Простое стыковое соединение
Стыковое соединение является самым основным типом деревянных столярных изделий. Стыковое соединение — это не что иное, как когда два куска дерева упираются друг в друга и закрепляются механическими застежками (часто под прямым углом или под прямым углом к другой доске). В строительных проектах этот тип соединения часто используется в каркасе стен. Узнайте, как правильно использовать стыковое соединение и когда использовать другой стиль деревянных столярных изделий.
🔴 Коробчатый сустав
Хотя соединения типа «ласточкин хвост» привлекательны и прочны, они не всегда полезны. Менее сложным вариантом соединения типа «ласточкин хвост» является коробчатое соединение. Узнайте, как сконструировать надежные и прочные муфтовые соединения для ваших проектов по деревообработке.
🔴 Скошенный стык
За исключением того, что две доски соединены под углом (а не под прямым углом друг к другу), стыковое соединение под углом практически идентично обычному стыковому соединению. Преимущество заключается в том, что на скошенном стыковом стыке не будет видно торцевой шероховатости, что делает его немного более эстетически приемлемым. Однако скошенный стык не очень прочный.
🔴 соединение внахлест
Чтобы две доски стыковались заподлицо друг с другом, половина каждой из двух досок снимается для соединения внахлест. Хотя этот стиль деревянных столярных изделий прочнее, чем стыковые соединения, он, тем не менее, может ухудшить прочность двух соседних досок.
🔴Соединение языка и канавки
Нужно только соединить соединение встык и закрепить его болтами, чтобы соединить две квадратные доски вместе по длинному краю. Однако, если вы собираетесь склеивать соединение, соединение шпунт-паз значительно прочнее и предлагает больше соприкасающихся поверхностей.
🔴 Врезное и шиповое соединение
Традиционная техника деревянных столярных изделий - врезка и шип. С самого начала деревообработки эти соединения использовались, и они остаются одним из лучших и самых красивых способов соединения древесины. Узнайте, как сделать идеальные, плотные врезные и шиповые соединения.
🔴 Карманный сустав
Пример карманного соединения - это когда две доски соединяются вместе с помощью винта после того, как прорезан паз и просверлено направляющее отверстие под углом. Предварительное сверление должно быть выполнено очень точно, поэтому для выполнения этой задачи обычно используется коммерческое приспособление. Для лицевой рамы шкафа и других подобных применений, где не требуется большой прочности, идеально подходят карманные соединения. В своих задачах по деревообработке научитесь делать карманные соединения.
🔴 Дадо Джойнт
Дадо — это не что иное, как область на одной доске с квадратным углублением, куда может поместиться другая доска. Это типичная техника столярных работ по дереву, такая как соединение шпунтом и пазом, для соединения фанеры, например, при изготовлении шкафов.
🔴Шов внахлест
Фальц — еще одно типичное деревянное соединение, используемое в краснодеревщике. По сути, шпунт представляет собой вырез, сделанный вдоль края доски. Когда задняя часть шкафов и других подобных узлов крепится к бокам коробки с помощью шпунтов, сборка приобретает значительную степень прочности. Узнайте, когда использовать шпунты и как аккуратно их вырезать.
🔴 Соединение «ласточкин хвост»
Сквозной ласточкин хвост может быть самой почитаемой техникой столярного дела из дерева. Традиционный сквозной ласточкин хвост ошеломляет, чрезвычайно прочен и придает элегантность любому изделию. Сквозные ласточкины хвосты могут быть изготовлены с использованием различных методов, таких как ручная резка или координатная обработка. Откройте секреты качества
.............................................................
🔴🔴 أنماط نجارة الخشب (يجب أن تعرف)
تعتبر نجارة الخشب واحدة من الأفكار الأساسية في النجارة. ستكون جميع عناصر الأعمال الخشبية منحوتات مقطوعة من قطعة واحدة من الخشب إذا لم نتمكن من ربط قطعتين من الخشب معًا بقوة. يمكن لعامل الخشب الاختيار من بين مجموعة متنوعة من المفاصل اعتمادًا على الوظيفة بفضل الأنواع العديدة المتنوعة من النجارة المتوفرة للخشب. ستكون في طريقك إلى أن تصبح نجارًا كفؤًا للغاية إذا كنت تستطيع إتقان مبادئ نجارة الخشب هذه.
🔴 مفصل بعقب بسيط
المفصل التناكبي هو النوع الأساسي من نجارة الخشب. لا يعد مفصل المؤخرة أكثر من عندما تكون قطعتان من الخشب ضد بعضهما البعض ويتم تثبيتهما بمشابك ميكانيكية (غالبًا بزاوية قائمة أو مربع على اللوحة الأخرى). في مشاريع البناء ، يتم استخدام هذا النوع من الوصلات بشكل متكرر في تأطير الجدران. تعرف على كيفية استخدام مفصل تناكبي بشكل صحيح ومتى تستخدم نمطًا مختلفًا من نجارة الخشب.
🔴 مفصل الصندوق
على الرغم من أن المفاصل التعشيقة جذابة ومتينة ، إلا أنها ليست مفيدة دائمًا. الخيار الأقل تعقيدًا للتقاطع التعشيقي هو مفصل الصندوق. تعرف على كيفية إنشاء وصلات صندوقية موثوقة ومتينة لمشاريع الأعمال الخشبية الخاصة بك.
🔴 مفصل ميترييد
باستثناء اللوحين المرتبطين بزاوية (بدلاً من مربعتين لبعضهما البعض) ، فإن مفصل التراكب المتقلب مطابق بشكل أساسي لمفصل تناكبي أساسي. والفائدة هي أنه لن يكون هناك أي حبة نهائية مرئية عند مفصل المؤخرة المتقشرة ، مما يجعلها مقبولة أكثر من الناحية الجمالية. ومع ذلك ، فإن مفصل المؤخرة المتقوس ليس قويًا جدًا.
🔴 نصف حضن مشترك
من أجل جعل اللوحين يتحدان مع بعضهما البعض ، تتم إزالة نصف كل من اللوحتين لمفصل نصف اللفة. على الرغم من أن هذا النمط من نجارة الخشب أقوى من الوصلات التناكبية ، إلا أنه قد يضعف مع ذلك قوة اللوحين المتجاورين.
🔴 مفصل اللسان والأخدود
يحتاج المرء فقط إلى ربط المفصل معًا وتثبيته بمسامير لربط لوحين مربعين معًا على طول حافة طويلة. ومع ذلك ، إذا كنت ستلصق المفصل ، فإن تقاطع اللسان والأخدود يكون أقوى بشكل ملحوظ ويوفر المزيد من الأسطح المجاورة.
🔴 نقر ومفصل لسان
تقنية تقليدية لنجارة الخشب هي نقر ولسان. منذ فجر النجارة ، تم استخدام هذه المفاصل ، ولا تزال واحدة من أفضل وأجمل الطرق للانضمام إلى الخشب. تعلم كيف تصنع نقرًا مثاليًا وضيقًا ومفاصل لسان.
🔴 جيب مشترك
مثال على تقاطع الجيب هو عندما يتم ربط لوحين مع برغي بعد نحت فتحة وثقب تجريبي محفور بزاوية. يجب أن يتم الحفر المسبق بدقة شديدة ، ومن ثم يتم استخدام الرقصة التجارية عادةً لإكمال المهمة. بالنسبة لإطارات وجه الخزانة والتطبيقات المماثلة الأخرى التي لا تتطلب قدرًا كبيرًا من القوة ، تعمل مفاصل الجيب بشكل ممتاز. في مهام النجارة الخاصة بك ، تعلم كيفية عمل مفاصل الجيب.
🔴 دادو جوينت
دادو ليس أكثر من مساحة على لوحة واحدة بها أخدود مربع حيث يمكن أن تتسع لوحة أخرى. هذه تقنية نجارة خشبية نموذجية ، مثل نجارة اللسان والأخدود ، للانضمام إلى الخشب الرقائقي ، كما هو الحال عند صنع الخزانات.
🔴 مفصل أرنب
الأرنب هو مفصل خشبي نموذجي آخر يستخدم في الخزائن. في جوهرها ، الأرنب هو قطع دادو مصنوع على طول حافة اللوح. عندما يتم تثبيت الجزء الخلفي من الخزانات والتجمعات المماثلة الأخرى على جوانب الصندوق باستخدام الأرانب ، يكتسب التجميع درجة كبيرة من القوة. تعرف على وقت استخدام الأرانب وكيفية قصها بشكل نظيف.
🔴 وصلة متداخلة
قد يكون التوافق من خلال تقنية النجارة الخشبية الأكثر احترامًا. تتماشى القوالب التقليدية المذهلة والمتينة للغاية وتضفي لمسة من الأناقة على أي عنصر. يمكن إجراء التعشيق من خلال استخدام مجموعة متنوعة من التقنيات ، مثل القطع اليدوي أو التشكيل بالرقص. اكتشف أسرار الجودة
......................................................
🔴🔴 细木工风格(你应该知道)
木工中最基本的想法之一是木工。 如果我们不能将两块木头牢固地连接在一起,那么所有的木工制品都是从一块木头上切割下来的雕塑。 木工可以根据工作从各种接头中挑选,这要归功于木材可用的细木工制品种类繁多。 如果您能掌握这些细木工原则,您将成为一名非常称职的木匠。
🔴 简单对接
对接接头是最基本的木工制品类型。 对接接头只不过是两块木头相互对接并用机械紧固件固定(通常与另一块木板成直角或正方形)。 在建筑项目中,这种接头经常用于墙体框架。 了解如何正确使用对接接头以及何时使用不同风格的细木工制品。
🔴 盒子关节
尽管燕尾榫接头很吸引人且坚固,但它们并不总是有用。 燕尾接头的一个不太复杂的选择是箱形接头。 了解如何为您的木工项目构建可靠耐用的盒式接头。
🔴 斜接接头
除了两块板以一定角度连接(而不是彼此成直角)外,斜接对接接头与基本对接接头基本相同。 好处是在斜接接头处不会有任何可见的末端纹理,使其在美学上更容易接受。 不过,斜接接头不是很坚固。
🔴半搭接
为了使两块板拼接齐平,将两块板各取一半进行半搭接。 虽然这种木工工艺比对接接头更坚固,但它可能会削弱相邻两块木板的强度。
🔴舌槽接头
只需将接头对接在一起并用螺栓固定,即可将两块方板沿长边连接在一起。 但是,如果您要粘合接头,则榫槽连接处会明显更坚固,并提供更多的相邻表面。
🔴 榫卯
木工的传统技术是榫眼。 自木工诞生以来,这些接头就一直在使用,它们仍然是连接木材的最好、最漂亮的方法之一。 了解如何制作完美、紧密的榫卯接头。
🔴 袖珍关节
口袋连接的一个例子是,在刻槽和钻角钻导向孔后,用螺钉将两块板连接在一起。 预钻孔必须非常精确,因此通常使用商业夹具来完成任务。 对于柜面框架和其他不需要很大强度的类似应用,口袋接头非常有效。 在您的木工任务中,学���如何制作口袋接头。
🔴 Dado 关节
墙裙只不过是一块板上带有方形凹槽的区域,另一块板可以安装在该区域上。 这是一种典型的木工技术,如榫槽细木工,用于连接胶合板,例如在制作橱柜时。
🔴 榫接
槽口是橱柜中使用的另一种典型的木接头。 本质上,槽口是沿着木板边缘切割的墙裙。 当橱柜和其他类似组件的背面使用槽口连接到盒子的侧面时,组件会获得很大程度的强度。 找出何时使用槽口以及如何干净利落地切割它们。
🔴 燕尾接头
直通燕尾榫可能是最受推崇的木工技术。 传统的贯穿式燕尾榫令人惊叹,极其耐用,并为任何物品增添一丝优雅气息。 可以使用多种技术制作贯通燕尾槽,例如手工切割或夹具加工。 发现品质的秘密
.............................................................
🔴🔴 वुड जॉइनरी स्टाइल्स (आपको पता होना चाहिए)
वुडवर्किंग में सबसे मौलिक विचारों में से एक है वुड जॉइनरी। अगर हम लकड़ी के दो टुकड़ों को एक साथ जोड़ने में सक्षम नहीं होते तो लकड़ी के सभी सामान लकड़ी के एक टुकड़े से काटे जाते। लकड़ी के लिए उपलब्ध कई विविध प्रकार की जॉइनरी के लिए लकड़ी का काम करने वाला काम के आधार पर विभिन्न प्रकार के जोड़ों से चुन सकता है। यदि आप लकड़ी के जोड़ के इन सिद्धांतों में महारत हासिल कर लेते हैं, तो आप एक बहुत ही सक्षम बढ़ई बनने की राह पर अग्रसर होंगे।
🔴 सिंपल बट जॉइंट
बट जॉइंट वुड जॉइनरी का सबसे मौलिक प्रकार है। एक बट जोड़ इससे ज्यादा कुछ नहीं है जब लकड़ी के दो टुकड़े एक दूसरे के खिलाफ बट जाते हैं और यांत्रिक फास्टनरों (अक्सर एक समकोण या दूसरे बोर्ड के वर्ग) के साथ सुरक्षित होते हैं। परियोजनाओं के निर्माण पर, दीवारों के फ्रेमिंग में इस प्रकार के जोड़ का अक्सर उपयोग किया जाता है। जानें कि कैसे एक बट जोड़ का ठीक से उपयोग करना है और लकड़ी की एक अलग शैली का उपयोग कब करना है।
🔴 द बॉक्स जॉइंट
हालांकि डोवेटेल जोड़ आकर्षक और मजबूत होते हैं, लेकिन वे हमेशा उपयोगी नहीं होते हैं। ड्वेलटेल जंक्शन का एक कम जटिल विकल्प एक बॉक्स जोड़ है। अपने वुडवर्किंग प्रोजेक्ट्स के लिए विश्वसनीय और टिकाऊ बॉक्स जोड़ों का निर्माण कैसे करें, इसका पता लगाएं।
🔴 मिटर्ड ज्वाइंट
अपवाद के साथ दो बोर्डों को एक कोण पर जोड़ा जा रहा है (बजाय एक दूसरे से चौकोर), एक माइटर्ड बट जॉइंट अनिवार्य रूप से एक बेसिक बट जॉइंट के समान है। इसका लाभ यह है कि माइटर्ड बट जॉइंट पर कोई अंतिम दाना दिखाई नहीं देगा, जिससे यह सौंदर्य की दृष्टि से थोड़ा अधिक स्वीकार्य हो जाएगा। हालांकि, मिटर्ड बट जॉइंट बहुत मजबूत नहीं है।
🔴 हाफ लैप ज्वाइंट
दो बोर्डों को एक दूसरे के साथ फ्लश में शामिल करने के लिए, दो बोर्डों में से प्रत्येक के आधे हिस्से को आधा-लैप संयुक्त के लिए हटा दिया जाता है। हालांकि लकड़ी की यह शैली बट जोड़ों की तुलना में अधिक मजबूत है, फिर भी यह दो आसन्न बोर्डों की ताकत को कम कर सकती है।
🔴जीभ और नाली का जोड़
किसी को केवल जोड़ को एक साथ जोड़ने की जरूरत है और एक लंबे किनारे के साथ दो वर्ग बोर्डों को एक साथ जोड़ने के लिए इसे बोल्ट के साथ सुरक्षित करें। हालाँकि, यदि आप जोड़ को गोंद करने जा रहे हैं, तो जीभ और नाली का जंक्शन काफी मजबूत होता है और सतह से सटे अधिक सतह प्रदान करता है।
🔴 मोर्टिज़ और टेनन जोड़
लकड़ी के जोड़ के लिए एक पारंपरिक तकनीक मोर्टिज़ और टेनन है। लकड़ी के काम की शुरुआत के बाद से, ये जोड़ उपयोग में रहे हैं, और वे लकड़ी में शामिल होने के सबसे अच्छे और सबसे खूबसूरत तरीकों में से एक हैं। सही, टाइट मोर्टिज़ और टेनन जॉइंट बनाना सीखें।
🔴 पॉकेट जॉइंट
एक पॉकेट जंक्शन का एक उदाहरण है जब दो बोर्डों को एक स्लॉट के बाद एक पेंच के साथ जोड़ा जाता है और एक कोण-ड्रिल पायलट छेद होता है। प्री-ड्रिलिंग बहुत सटीक रूप से की जानी चाहिए, इसलिए कार्य को पूरा करने के लिए आमतौर पर एक वाणिज्यिक जिग का उपयोग किया जाता है। कैबिनेट फेस फ्रेम और अन्य तुलनीय अनुप्रयोगों के लिए जहां बहुत अधिक ताकत की आवश्यकता नहीं होती है, पॉकेट जोड़ उत्कृष्ट रूप से काम करते हैं। अपने वुडवर्किंग कार्यों में, पॉकेट जॉइंट बनाना सीखें।
🔴डेडो जोड़
एक डेडो एक बोर्ड पर एक चौकोर खांचे के साथ एक क्षेत्र से ज्यादा कुछ नहीं है जहां दूसरा बोर्ड फिट हो सकता है। यह एक विशिष्ट वुड जॉइनरी तकनीक है, जैसे जीभ और नाली जॉइनरी, प्लाईवुड में शामिल होने के लिए, जैसे कैबिनेट बनाते समय।
🔴खरगोश जोड़
रैबेट कैबिनेटरी में उपयोग किया जाने वाला एक और विशिष्ट लकड़ी का जोड़ है। संक्षेप में, एक रैबेट एक बोर्ड के किनारे के साथ बनाया गया डेडो कट है। जब कैबिनेट और अन्य समान असेंबली के पीछे खरगोशों का उपयोग करके बॉक्स के किनारों से जुड़ा होता है, तो असेंबली को काफी ताकत मिलती है। पता करें कि खरगोशों का उपयोग कब करना है और उन्हें कैसे साफ करना है।
🔴 डोवेटेल जॉइंट
ड्वेलटेल के माध्यम से सबसे सम्मानित लकड़ी की जॉइनरी तकनीक हो सकती है। डोवेटेल के माध्यम से एक पारंपरिक शानदार, बेहद टिकाऊ है, और किसी भी आइटम को लालित्य का स्पर्श देता है। डोवेटेल के माध्यम से विभिन्न प्रकार की तकनीकों का उपयोग करके बनाया जा सकता है, जैसे कि हाथ काटना या जिग मशीनिंग। गुणवत्ता के रहस्यों की खोज करें
Wood mdad™️
🔴 Simple Butt Joint
The butt joint is the most fundamental type of wood joinery. A butt joint is nothing more than when two pieces of wood butt against one another and are secured with mechanical fasteners (often at a right angle or square to the other board). On building projects, this kind of joint is frequently utilized in the framing of walls. Learn how to use a butt joint properly and when to use a different style of wood joinery.
🔴 The Box Joint
Although dovetail joints are attractive and sturdy, they are not always useful. A less complex option to a dovetail junction is a box joint. Find out how to construct reliable and durable box joints for your woodworking projects.
🔴 Mitered Joint
With the exception of the two boards being linked at an angle (rather than square to one another), a mitered butt joint is essentially identical to a basic butt joint. The benefit is that there won't be any end grain visible at the mitered butt joint, making it a little more aesthetically acceptable. The mitered butt joint isn't very sturdy, though.
🔴 half lap joint
In order to make the two boards join flush with one another, half of each of the two boards is removed for the half-lap joint. Although this style of wood joinery is stronger than butt joints, it might nonetheless impair the strength of the two adjacent boards.
🔴Tongue and Groove joint
One need only butt the joint together and secure it with bolts to attach two square boards together along a long edge. However, if you're going to glue the joint, the tongue and groove junction is significantly stronger and offers more adjoining surface surfaces.
🔴 Mortise and tenon joint
A traditional technique for wood joinery is the mortise and tenon. Since the dawn of woodworking, these joints have been in use, and they remain one of the best and most beautiful ways to join wood. Learn how to make perfect, tight mortise and tenon joints.
🔴 Pocket Joint
An example of a pocket junction is when two boards are joined together with a screw after a slot has been carved and an angle-drilled pilot hole. Pre-drilling must be done very precisely, hence a commercial jig is usually used to complete the task. For cabinet face frames and other comparable applications where a lot of strength is not required, pocket joints work excellently. In your woodworking tasks, learn how to make pocket joints.
🔴 Dado Joint
A dado is nothing more than an area on one board with a square groove where another board can fit. This is a typical wood joinery technique, like tongue and groove joinery, for joining plywood, such as when making cabinets.
🔴 Rabbet joint
The rabbet is yet another typical wood joint utilized in cabinetry. In essence, a rabbet is a dado cut made along a board's edge. When the back of cabinets and other similar assemblies is attached to the sides of the box using rabbets, the assembly gains a significant degree of strength. Find out when to use rabbets and how to cut them cleanly.
🔴 Dovetail Joint
The thru dovetail may be the most revered wood joinery technique. A traditional thru dovetail is stunning, extremely durable, and lends a touch of elegance to any item. Through dovetails can be made using a variety of techniques, such as hand cutting or jig machining. Discover the secrets to a quality
........................................
🔴🔴 Стили деревянных столярных изделий (вы должны знать)
Одной из самых фундаментальных идей в деревообработке является деревянная столярка. Все изделия из дерева были бы скульптурами, вырезанными из цельного куска дерева, если бы мы не могли прочно соединить два куска дерева вместе. Столяр может выбирать из множества соединений в зависимости от работы благодаря множеству различных типов столярных изделий, доступных для дерева. Вы будете на пути к тому, чтобы стать очень компетентным плотником, если освоите эти принципы столярного дела.
🔴 Простое стыковое соединение
Стыковое соединение является самым основным типом деревянных столярных изделий. Стыковое соединение — это не что иное, как когда два куска дерева упираются друг в друга и закрепляются механическими застежками (часто под прямым углом или под прямым углом к другой доске). В строительных проектах этот тип соединения часто используется в каркасе стен. Узнайте, как правильно использовать стыковое соединение и когда использовать другой стиль деревянных столярных изделий.
🔴 Коробчатый сустав
Хотя соединения типа «ласточкин хвост» привлекательны и прочны, они не всегда полезны. Менее сложным вариантом соединения типа «ласточкин хвост» является коробчатое соединение. Узнайте, как сконструировать надежные и прочные муфтовые соединения для ваших проектов по деревообработке.
🔴 Скошенный стык
За исключением того, что две доски соединены под углом (а не под прямым углом друг к другу), стыковое соединение под углом практически идентично обычному стыковому соединению. Преимущество заключается в том, что на скошенном стыковом стыке не будет видно торцевой шероховатости, что делает его немного более эстетически приемлемым. Однако скошенный стык не очень прочный.
🔴 соединение внахлест
Чтобы две доски стыковались заподлицо друг с другом, половина каждой из двух досок снимается для соединения внахлест. Хотя этот стиль деревянных столярных изделий прочнее, чем стыковые соединения, он, тем не менее, может ухудшить прочность двух соседних досок.
🔴Соединение языка и канавки
Нужно только соединить соединение встык и закрепить его болтами, чтобы соединить две квадратные доски вместе по длинному краю. Однако, если вы собираетесь склеивать соединение, соединение шпунт-паз значительно прочнее и предлагает больше соприкасающихся поверхностей.
🔴 Врезное и шиповое соединение
Традиционная техника деревянных столярных изделий - врезка и шип. С самого начала деревообработки эти соединения использовались, и они остаются одним из лучших и самых красивых способов соединения древесины. Узнайте, как сделать идеальные, плотные врезные и шиповые соединения.
🔴 Карманный сустав
Пример карманного соединения - это когда две доски соединяются вместе с помощью винта после того, как прорезан паз и просверлено направляющее отверстие под углом. Предварительное сверление должно быть выполнено очень точно, поэтому для выполнения этой задачи обычно используется коммерческое приспособление. Для лицевой рамы шкафа и других подобных применений, где не требуется большой прочности, идеально подходят карманные соединения. В своих задачах по деревообработке научитесь делать карманные соединения.
🔴 Дадо Джойнт
Дадо — это не что иное, как область на одной доске с квадратным углублением, куда может поместиться другая доска. Это типичная техника столярных работ по дереву, такая как соединение шпунтом и пазом, для соединения фанеры, например, при изготовлении шкафов.
🔴Шов внахлест
Фальц — еще одно типичное деревянное соединение, используемое в краснодеревщике. По сути, шпунт представляет собой вырез, сделанный вдоль края доски. Когда задняя часть шкафов и других подобных узлов крепится к бокам коробки с помощью шпунтов, сборка приобретает значительную степень прочности. Узнайте, когда использовать шпунты и как аккуратно их вырезать.
🔴 Соединение «ласточкин хвост»
Сквозной ласточкин хвост может быть самой почитаемой техникой столярного дела из дерева. Традиционный сквозной ласточкин хвост ошеломляет, чрезвычайно прочен и придает элегантность любому изделию. Сквозные ласточкины хвосты могут быть изготовлены с использованием различных методов, таких как ручная резка или координатная обработка. Откройте секреты качества
.............................................................
🔴🔴 أنماط نجارة الخشب (يجب أن تعرف)
تعتبر نجارة الخشب واحدة من الأفكار الأساسية في النجارة. ستكون جميع عناصر الأعمال الخشبية منحوتات مقطوعة من قطعة واحدة من الخشب إذا لم نتمكن من ربط قطعتين من الخشب معًا بقوة. يمكن لعامل الخشب الاختيار من بين مجموعة متنوعة من المفاصل اعتمادًا على الوظيفة بفضل الأنواع العديدة المتنوعة من النجارة المتوفرة للخشب. ستكون في طريقك إلى أن تصبح نجارًا كفؤًا للغاية إذا كنت تستطيع إتقان مبادئ نجارة الخشب هذه.
🔴 مفصل بعقب بسيط
المفصل التناكبي هو النوع الأساسي من نجارة الخشب. لا يعد مفصل المؤخرة أكثر من عندما تكون قطعتان من الخشب ضد بعضهما البعض ويتم تثبيتهما بمشابك ميكانيكية (غالبًا بزاوية قائمة أو مربع على اللوحة الأخرى). في مشاريع البناء ، يتم استخدام هذا النوع من الوصلات بشكل متكرر في تأطير الجدران. تعرف على كيفية استخدام مفصل تناكبي بشكل صحيح ومتى تستخدم نمطًا مختلفًا من نجارة الخشب.
🔴 مفصل الصندوق
على الرغم من أن المفاصل التعشيقة جذابة ومتينة ، إلا أنها ليست مفيدة دائمًا. الخيار الأقل تعقيدًا للتقاطع التعشيقي هو مفصل الصندوق. تعرف على كيفية إنشاء وصلات صندوقية موثوقة ومتينة لمشاريع الأعمال الخشبية الخاصة بك.
🔴 مفصل ميترييد
باستثناء اللوحين المرتبطين بزاوية (بدلاً من مربعتين لبعضهما البعض) ، فإن مفصل التراكب المتقلب مطابق بشكل أساسي لمفصل تناكبي أساسي. والفائدة هي أنه لن يكون هناك أي حبة نهائية مرئية عند مفصل المؤخرة المتقشرة ، مما يجعلها مقبولة أكثر من الناحية الجمالية. ومع ذلك ، فإن مفصل المؤخرة المتقوس ليس قويًا جدًا.
🔴 نصف حضن مشترك
من أجل جعل اللوحين يتحدان مع بعضهما البعض ، تتم إزالة نصف كل من اللوحتين لمفصل نصف اللفة. على الرغم من أن هذا النمط من نجارة الخشب أقوى من الوصلات التناكبية ، إلا أنه قد يضعف مع ذلك قوة اللوحين المتجاورين.
🔴 مفصل اللسان والأخدود
يحتاج المرء فقط إلى ربط المفصل معًا وتثبيته بمسامير لربط لوحين مربعين معًا على طول حافة طويلة. ومع ذلك ، إذا كنت ستلصق المفصل ، فإن تقاطع اللسان والأخدود يكون أقوى بشكل ملحوظ ويوفر المزيد من الأسطح المجاورة.
🔴 نقر ومفصل لسان
تقنية تقليدية لنجارة الخشب هي نقر ولسان. منذ فجر النجارة ، تم استخدام هذه المفاصل ، ولا تزال واحدة من أفضل وأجمل الطرق للانضمام إلى الخشب. تعلم كيف تصنع نقرًا مثاليًا وضيقًا ومفاصل لسان.
🔴 جيب مشترك
مثال على تقاطع الجيب هو عندما يتم ربط لوحين مع برغي بعد نحت فتحة وثقب تجريبي محفور بزاوية. يجب أن يتم الحفر المسبق بدقة شديدة ، ومن ثم يتم استخدام الرقصة التجارية عادةً لإكمال المهمة. بالنسبة لإطارات وجه الخزانة والتطبيقات المماثلة الأخرى التي لا تتطلب قدرًا كبيرًا من القوة ، تعمل مفاصل الجيب بشكل ممتاز. في مهام النجارة الخاصة بك ، تعلم كيفية عمل مفاصل الجيب.
🔴 دادو جوينت
دادو ليس أكثر من مساحة على لوحة واحدة بها أخدود مربع حيث يمكن أن تتسع لوحة أخرى. هذه تقنية نجارة خشبية نموذجية ، مثل نجارة اللسان والأخدود ، للانضمام إلى الخشب الرقائقي ، كما هو الحال عند صنع الخزانات.
🔴 مفصل أرنب
الأرنب هو مفصل خشبي نموذجي آخر يستخدم في الخزائن. في جوهرها ، الأرنب هو قطع دادو مصنوع على طول حافة اللوح. عندما يتم تثبيت الجزء الخلفي من الخزانات والتجمعات المماثلة الأخرى على جوانب الصندوق باستخدام الأرانب ، يكتسب التجميع درجة كبيرة من القوة. تعرف على وقت استخدام الأرانب وكيفية قصها بشكل نظيف.
🔴 وصلة متداخلة
قد يكون التوافق من خلال تقنية النجارة الخشبية الأكثر احترامًا. تتماشى القوالب التقليدية المذهلة والمتينة للغاية وتضفي لمسة من الأناقة على أي عنصر. يمكن إجراء التعشيق من خلال استخدام مجموعة متنوعة من التقنيات ، مثل القطع اليدوي أو التشكيل بالرقص. اكتشف أسرار الجودة
......................................................
🔴🔴 ���木工风格(你应该知道)
木工中最基本的想法之一是木工。 如果我们不能将两块木头牢固地连接在一起,那么所有的木工制品都是从一块木头上切割下来的雕塑。 木工可以根据工作从各种接头中挑选,这要归功于木材可用的细木工制品种类繁多。 如果您能掌握这些细木工原则,您将成为一名非常称职的木匠。
🔴 简单对接
对接接头是最基本的木工制品类型。 对接接头只不过是两块木头相互对接并用机械紧固件固定(通常与另一块木板成直角或正方形)。 在建筑项目中,这种接头经常用于墙体框架。 了解如何正确使用对接接头以及何时使用不同风格的细木工制品。
🔴 盒子关节
尽管燕尾榫接头很吸引人且坚固,但它们并不总是有用。 燕尾接头的一个不太复杂的选择是箱形接头。 了解如何为您的木工项目构建可靠耐用的盒式接头。
🔴 斜接接头
除了两块板以一定角度连接(而不是彼此成直角)外,斜接对接接头与基本对接接头基本相同。 好处是在斜接接头处不会有任何可见的末端纹理,使其在美学上更容易接受。 不过,斜接接头不是很坚固。
🔴半搭接
为了使两块板拼接齐平,将两块板各取一半进行半搭接。 虽然这种木工工艺比对接接头更坚固,但它可能会削弱相邻两块木板的强度。
🔴舌槽接头
只需将接头对接在一起并用螺栓固定,即可将两块方板沿长边连接在一起。 但是,如果您要粘合接头,则榫槽连接处会明显更坚固,并提供更多的相邻表面。
🔴 榫卯
木工的传统技术是榫眼。 自木工诞生以来,这些接头就一直在使用,它们仍然是连接木材的最好、最漂亮的方法之一。 了解如何制作完美、紧密的榫卯接头。
🔴 袖珍关节
口袋连接的一个例子是,在刻槽和钻角钻导向孔后,用螺钉将两块板连接在一起。 预钻孔必须非常精确,因此通常使用商业夹具来完成任务。 对于柜面框架和其他不需要很大强度的类似应用,口袋接头非常有效。 在您的木工任务中,学习如何制作口袋接头。
🔴 Dado 关节
墙裙只不过是一块板上带有方形凹槽的区域,另一块板可以安装在该区域上。 这是一种典型的木工技术,如榫槽细木工,用于连接胶合板,例如在制作橱柜时。
🔴 榫接
槽口是橱柜中使用的另一种典型的木接头。 本质上,槽口是沿着木板边缘切割的墙裙。 当橱柜和其他类似组件的背面使用槽口连接到盒子的侧面时,组件会获得很大程度的强度。 找出何时使用槽口以及如何干净利落地切割它们。
🔴 燕尾接头
直通燕尾榫可能是最受推崇的木工技术。 传统的贯穿式燕尾榫令人惊叹,极其耐用,并为任何物品增添一丝优雅气息。 可以使用多种技术制作贯通燕尾槽,例如手工切割或夹具加工。 发现品质的秘密
.............................................................
🔴🔴 वुड जॉइनरी स्टाइल्स (आपको पता होना चाहिए)
वुडवर्किंग में सबसे मौलिक विचारों में से एक है वुड जॉइनरी। अगर हम लकड़ी के दो टुकड़ों को एक साथ जोड़ने में सक्षम नहीं होते तो लकड़ी के सभी सामान लकड़ी के एक टुकड़े से काटे जाते। लकड़ी के लिए उपलब्ध कई विविध प्रकार की जॉइनरी के लिए लकड़ी का काम करने वाला काम के आधार पर विभिन्न प्रकार के जोड़ों से चुन सकता है। यदि आप लकड़ी के जोड़ के इन सिद्धांतों में महारत हासिल कर लेते हैं, तो आप एक बहुत ही सक्षम बढ़ई बनने की राह पर अग्रसर होंगे।
🔴 सिंपल बट जॉइंट
बट जॉइंट वुड जॉइनरी का सबसे मौलिक प्रकार है। एक बट जोड़ इससे ज्यादा कुछ नहीं है जब लकड़ी के दो टुकड़े एक दूसरे के खिलाफ बट जाते हैं और यांत्रिक फास्टनरों (अक्सर एक समकोण या दूसरे बोर्ड के वर्ग) के साथ सुरक्षित होते हैं। परियोजनाओं के निर्माण पर, दीवारों के फ्रेमिंग में इस प्रकार के जोड़ का अक्सर उपयोग किया जाता है। जानें कि कैसे एक बट जोड़ का ठीक से उपयोग करना है और लकड़ी की एक अलग शैली का उपयोग कब करना है।
🔴 द बॉक्स जॉइंट
हालांकि डोवेटेल जोड़ आकर्षक और मजबूत होते हैं, लेकिन वे हमेशा उपयोगी नहीं होते हैं। ड्वेलटेल जंक्शन का एक कम जटिल विकल्प एक बॉक्स जोड़ है। अपने वुडवर्किंग प्रोजेक्ट्स के लिए विश्वसनीय और टिकाऊ बॉक्स जोड़ों का निर्माण कैसे करें, इसका पता लगाएं।
🔴 मिटर्ड ज्वाइंट
अपवाद के साथ दो बोर्डों को एक कोण पर जोड़ा जा रहा है (बजाय एक दूसरे से चौकोर), एक माइटर्ड बट जॉइंट अनिवार्य रूप से एक बेसिक बट जॉइंट के समान है। इसका लाभ यह है कि माइटर्ड बट जॉइंट पर कोई अंतिम दाना दिखाई नहीं देगा, जिससे यह सौंदर्य की दृष्टि से थोड़ा अधिक स्वीकार्य हो जाएगा। हालांकि, मिटर्ड बट जॉइंट बहुत मजबूत नहीं है।
🔴 हाफ लैप ज्वाइंट
दो बोर्डों को एक दूसरे के साथ फ्लश में शामिल करने के लिए, दो बोर्डों में से प्रत्येक के आधे हिस्से को आधा-लैप संयुक्त के लिए हटा दिया जाता है। हालांकि लकड़ी की यह शैली बट जोड़ों की तुलना में अधिक मजबूत है, फिर भी यह दो आसन्न बोर्डों की ताकत को कम कर सकती है।
🔴जीभ और नाली का जोड़
किसी को केवल जोड़ को एक साथ जोड़ने की जरूरत है और एक लंबे किनारे के साथ दो वर्ग बोर्डों को एक साथ जोड़ने के लिए इसे बोल्ट के साथ सुरक्षित करें। हालाँकि, यदि आप जोड़ को गोंद करने जा रहे हैं, तो जीभ और नाली का जंक्शन काफी मजबूत होता है और सतह से सटे अधिक सतह प्रदान करता है।
🔴 मोर्टिज़ और टेनन जोड़
लकड़ी के जोड़ के लिए एक पारंपरिक तकनीक मोर्टिज़ और टेनन है। लकड़ी के काम की शुरुआत के बाद से, ये जोड़ उपयोग में रहे हैं, और वे लकड़ी में शामिल होने के सबसे अच्छे और सबसे खूबसूरत तरीकों में से एक हैं। सही, टाइट मोर्टिज़ और टेनन जॉइंट बनाना सीखें।
🔴 पॉकेट जॉइंट
एक पॉकेट जंक्शन का एक उदाहरण है जब दो बोर्डों को एक स्लॉट के बाद एक पेंच के साथ जोड़ा जाता है और एक कोण-ड्रिल पायलट छेद होता है। प्री-ड्रिलिंग बहुत सटीक रूप से की जानी चाहिए, इसलिए कार्य को पूरा करने के लिए आमतौर पर एक वाणिज्यिक जिग का उपयोग किया जाता है। कैबिनेट फेस फ्रेम और अन्य तुलनीय अनुप्रयोगों के लिए जहां बहुत अधिक ताकत की आवश्यकता नहीं होती है, पॉकेट जोड़ उत्कृष्ट रूप से काम करते हैं। अपने वुडवर्किंग कार्यों में, पॉकेट जॉइंट बनाना सीखें।
🔴डेडो जोड़
एक डेडो एक बोर्ड पर एक चौकोर खांचे के साथ एक क्षेत्र से ज्यादा कुछ नहीं है जहां दूसरा बोर्ड फिट हो सकता है। यह एक विशिष्ट वुड जॉइनरी तकनीक है, जैसे जीभ और नाली जॉइनरी, प्लाईवुड में शामिल होने के लिए, जैसे कैबिनेट बनाते समय।
🔴खरगोश जोड़
रैबेट कैबिनेटरी में उपयोग किया जाने वाला एक और विशिष्ट लकड़ी का जोड़ है। संक्षेप में, एक रैबेट एक बोर्ड के किनारे के साथ बनाया गया डेडो कट है। जब कैबिनेट और अन्य समान असेंबली के पीछे खरगोशों का उपयोग करके बॉक्स के किनारों से जुड़ा होता है, तो असेंबली को काफी ताकत मिलती है। पता करें कि खरगोशों का उपयोग कब करना है और उन्हें कैसे साफ करना है।
🔴 डोवेटेल जॉइंट
ड्वेलटेल के माध्यम से सबसे सम्मानित लकड़ी की जॉइनरी तकनीक हो सकती है। डोवेटेल के माध्यम से एक पारंपरिक शानदार, बेहद टिकाऊ है, और किसी भी आइटम को लालित्य का स्पर्श देता है। डोवेटेल के माध्यम से विभिन्न प्रकार की तकनीकों का उपयोग करके बनाया जा सकता है, जैसे कि हाथ काटना या जिग मशीनिंग। गुणवत्ता के रहस्यों की खोज करें
Wood mdad™️
#typeofwood#woodworkingidea#woodworkingprojects#wood#woodmdad#basicwoodworking#kindofwood#cabin in the forest#trees and forests#christmas
0 notes
Text
🔴 🌈️ Working with wood ( most wood work )
Wood is a natural material. It is therefore easily accessible, recyclable, and reusable. Wood is a more environmentally friendly alternative to steel, which costs a lot of money and work to procure. most of the woodwork below
🌿 🇬🇧🇷🇺🇸🇦🇯🇵
#wood #woodmdad
🔴Choosing the right wood for your upcoming project can be made much easier by being aware of the many different types of wood and their functions.. see more..
🌈️👤 Store/: bit.ly/3cZWWmK
#woodworkingtools #woodworkingtips #woodworkingidea #woodworkingtool #basicwoodworking #woodmdad #wood
#typeofwood #kindofwood #woodhabit
#woodworkingprojects
Работа с деревом (большинство работ по дереву)
Дерево – природный материал. Поэтому он легко доступен, перерабатывается и может использоваться повторно. Древесина является более экологически чистой альтернативой стали, производство которой стоит больших денег и работы. большая часть деревянных изделий ниже
🌿 🇷🇧🇷🇺🇸🇦🇯🇵
#дерево
🔴Выбор подходящей древесины для вашего будущего проекта может быть намного проще, если вы будете знать о множестве различных пород дерева и их функциях.. подробнее..
#woodworkingtools #woodworkingtips #woodworkingidea #woodworkingtool #basicwoodworking #woodmdad #wood
#вид древесины #вид древесины #деревянная привычка
#деревообрабатывающиепроекты
🔴العمل بالخشب (معظم الأعمال الخشبية)
الخشب مادة طبيعية. لذلك يمكن الوصول إليها بسهولة ، وإعادة تدويرها ، وإعادة استخدامها. الخشب هو بديل أكثر صداقة للبيئة للصلب ، والذي يكلف الكثير من المال والعمل على شرائه. معظم الأعمال الخشبية أدناه
🌿 🇬🇧🇷🇺🇸🇦🇯🇵
# خشب # وودمداد
يمكن أن يكون اختيار الخشب المناسب لمشروعك القادم أسهل بكثير من خلال إدراك العديد من أنواع الخشب المختلفة ووظائفها .. شاهد المزيد ..
🌈️👤 Store/: bit.ly/3cZWWmK
# أدوات_الأعمال
#typeofwood #kindofwood #woodhabit
# مشاريع_الأعما
🔴使用木材(大多数木制品)
木材是一种天然材料。 因此,它易于获取、可回收和可重复使用。 木材是一种比钢铁更环保的替代品,而钢铁的采购成本和工作量都很大。 下面的大部分木制品
🌿🇬🇧🇷🇺🇸🇦🇯🇵
#wood #woodmdad
🔴通过了解许多不同类型的木材及其功能,可以更轻松地为您即将进行的项目选择合适的木材。.查看更多..
🌈️👤 Store/: bit.ly/3cZWWmK
#woodworkingtools #woodworkingtips #woodworkingidea #woodworkingtool #basicwoodworking #woodmdad #wood
#typeofwood #kindofwood #woodhabit
#woodworkingprojects

#wood#basicwoodworking#woodmdad#woodhabit#woodworkingprojects#woodworkingtips#woodworkingidea#typeofwood#woodworkingtool#kindofwood
0 notes
Last Seen Blogs

guionismo-omar-y-daniela-blog
Guionisemé

aliraidxo
Ali_Raid

ctfoassociate0-blog
Ctfo associate

jimi-marshall-kim
제목 없음