#DMC-12
Text

190 notes
·
View notes
Text

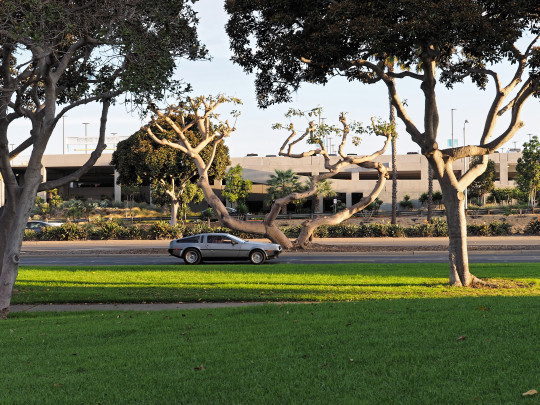
DMC DeLorean
Image by Simon Zakharov
83 notes
·
View notes
Text
Fuel Leak Snowball...
Firstly apologies for it being almost 38 months since my last post. Nothing happened with 16606 for the majority of that time, what with the pandemic, and then as lockdowns started to lift we started a building project at home, so the D went for a little holiday to a storage facility on a farm in deepest Essex. I had her back in late August 2022, got it re-taxed and MOT'd with only a few outings around the block until very recently.
Trust the D to ruin a lovely day
It was a lovely sunny Sunday on 30th September when I decided to take 16606 for a short spin following some in and out TLC. After parking up on the drive something drew me to look under the car where I found a liquid dripping from the mid section of the car.
youtube
Upon closer inspection is stank of fuel.
Side-note: Readers of this blog will know I've been on a learning journey with this car and as each issue arises I try to learn what needs to be done and then dive in, admit defeat and speak nicely to members of the DeLorean Eurotec club for assistance (who are always beyond fantastic and generous with their time), or go down the professional garage route (this is the last resort, not because I don't want to pay professional prices but because they tend to have never encountered a DeLorean, let alone a car of some 40 years old, and are actually not often able to do a "professional" job).
After taking advice from members of the DeLorean Eurotec club I tentatively started the engine and drove the D back into the garage in the knowledge that I should check the fuel pump. This filled me with dread since this was an area of the car I had no previous experience of and the thought of messing with the pump, fuel tank and fuel in general required me to pluck up courage and just go for it.
The following documents the journey I went on that comprised getting the job done over two attempts and almost giving in and asking a new business created by a club member to do the job in-between.
I got the car back into the garage and emptied my mandatory travel tools and parts out in order to access the fuel tank.

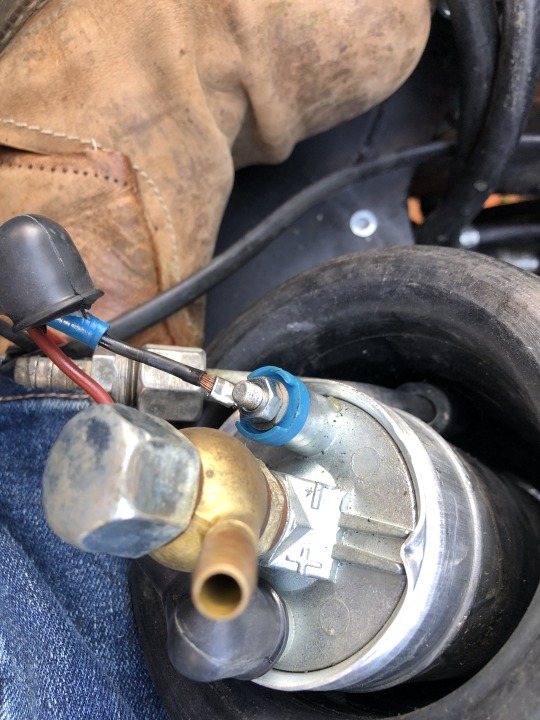
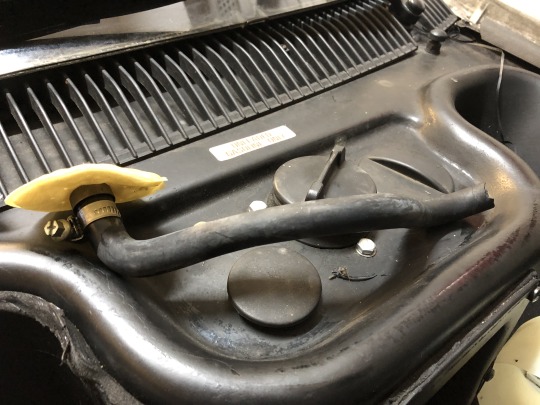
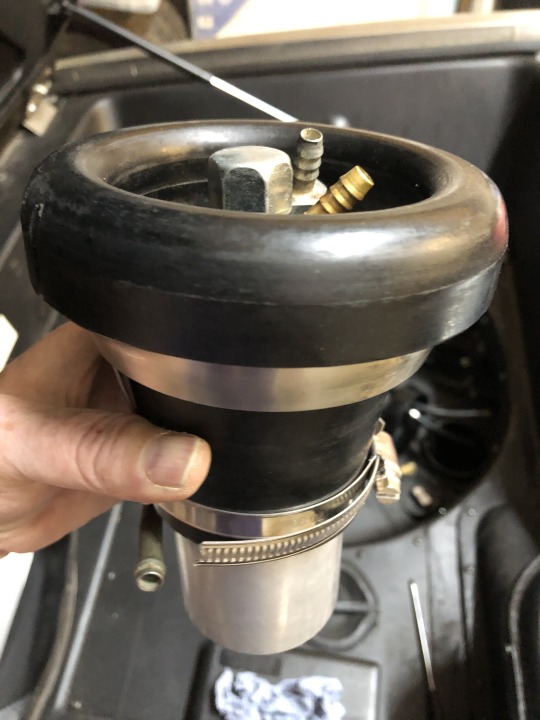
Inside the "Frunk" of the DeLorean, under the mat is this sunken area where the original spare tyre resides. I took this out, the first time I'd touched it since getting the car back following restoration in 2016. Once set aside I undid the screws to the access panel as seen above. This would expose the fuel tank and associated hoses and equipment.
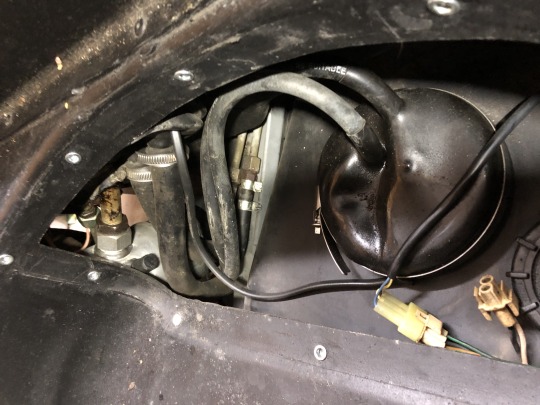
For reference the photo above shows, beneath the access panel, the fuel feed and return hoses coming from the fuel pump seal that covers the pump boot (that houses the pump). The boot is set into the tank, the black area beneath and surrounding the boot. On the left the fuel hoses attach to the pipes that flow eventually to the engine at the rear of the car.
With the access panel removed I could smell the over-powering odour of fuel (and odour but one of those strangely nice ones...). Mild panic set in when I saw the remnants of spilt fuel. I could see that the boot seal was a strange shape and not clamped down by the jubilee clip. I lifted the accessible part of the seal and could see the pump covered in fuel residue. Wondering how this had happened, and how it had apparently seeped over and out onto the top of the fuel tank, I decided to start the car to get the pump working. The following video is what I was confronted with.
youtube
The shakiness of the above video gives some idea of the "holy crap" moment I was experiencing. At this same time I had also noticed that the fuel feed and return lines were also deteriorating, showing signs of cracking all along the outside.
I had to figure out what to do next, so after switching the engine off, the fuel in the boot drained back into the tank and I stepped away from the offending car and did some research and messaging with the DeLorean Eurotec club over the course of the next week.
I watched some videos on YouTube to learn how the fuel pump assembly works and fits together so I could become familiar with this journey into the unknown. I specifically got benefit from the following two,
The first part of this video showing the extraction of the pump and it's assembly:
youtube
The following for learning how the fuel feed and return hoses attach.
youtube
I realised I needed to buy some parts so got on to DeLoreanGo.com and ordered,
SKU 106979 Fuel Hose - return and feed line
SKU 101391PU Polyurethane Fuel Pump Boot
SKU 106684PU Polyurethane Fuel Pump Cover Seal
SKU SP10830 W1 Steel Spring Clip for Fuel Pump Boot
SKU SP10356 Stainless Hose Clamp (lower fuel pump boot)
SKU 10349 Stainless Hose Clamp
Needless to say the turnaround at DeLoreanGo.com was amazingly fast and they arrived in a couple of days.
Next weekend
On 8th October I rolled the car out of the garage to start work. I was going to
Replace the feed and return fuel lines
Replace the fuel pump boot
Fit the W1 steel spring clip that was missing
Replace the fuel pump boot cover seal
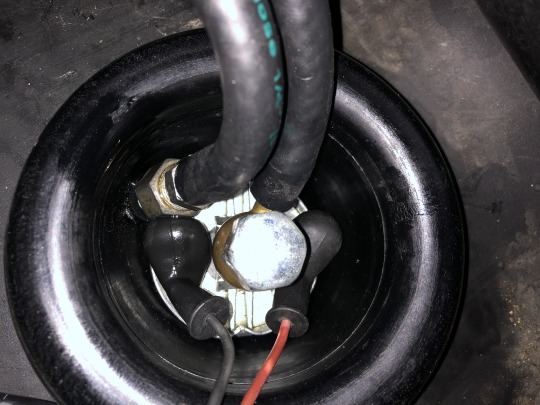
I made sure I had noted what goes where. I took the following photos to remind me which hose was the feed and the return, and which colour electrical connects went to positive and negative terminals
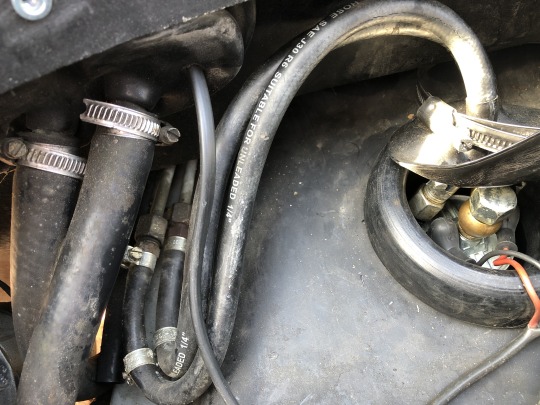
The feed is the hose from the banjo to right of the two fuel pipes, and the return runs from the left.
The black wire is the negative whilst the red is the positive.
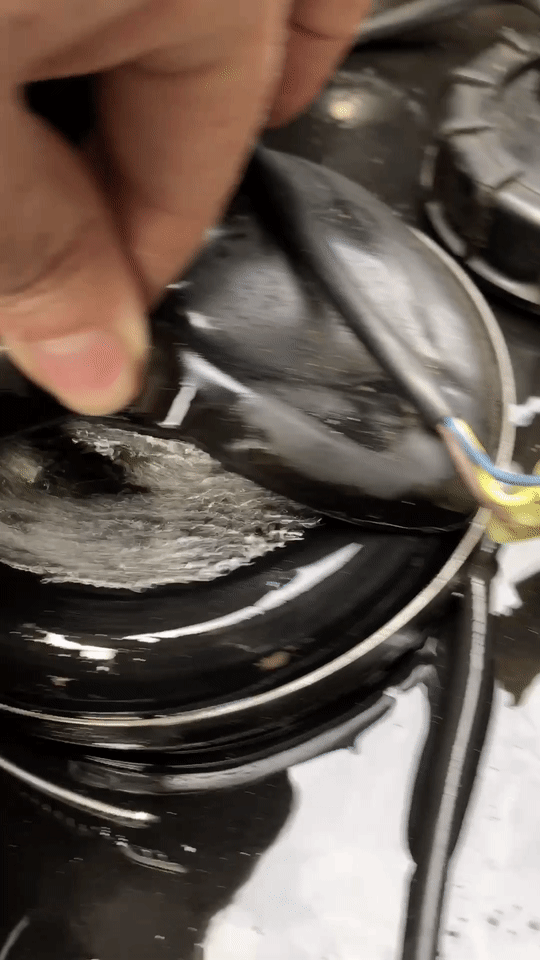
Whilst the boot was in situ, the pump was surprisingly moveable which I'm not sure it should have been. This made it difficult to pull the fuel hoses off and could have been a possible reason for why the boot was filling with fuel.
I undid the hose clamps to the fuel hoses and with plenty of tissue at the ready, in case of spills, I manipulated them until free at both ends.

So far so good. Next it was time to fit the new hoses, boot and seal and to reconnect the wires to the terminals. Easier said than done!
These were the parts purchased from DeLoreanGo.com. I had already transferred the return hose and support ring to the new boot.

Whilst removing the old hoses and attaching the new ones required a lot of manipulation and strength, I found this task to be less troublesome than the YouTube videos had implied.
The first connections were made to the pipes. It was as I was getting ready to attach them to the pump that I spotted how cracked the fuel pick up hose was.

No sooner had I noticed the state of this pick up hose, then as I picked it up to start attaching the fuel hoses it completely disintegrated and broke off.

With an almost full tank of fuel I had to find a cord to tie and secure the pick up hose to stop it falling back in.
It was clear that I would then need to get the pick up hose replaced, but that then also meant dealing with the baffle and associated parts, plus I had a virtually full tank of fuel. I realised this was as far as I was going to get for the day, and that I should pack away and spend some time thinking about how to tackle the new problem. I couldn't push the car back in to the garage due to the slope of my driveway, so I took a Stanley Knife to the pick up hose to make the end level and then reattached it to the pump. I then attempted to reconnect everything else to enable me to drive the car back in to the garage.
When trying to reconnect the wires to the terminals I could not get the rubber boots back over the connectors, they had turned from malleable to solid rubber with no give. This concerned me greatly since I was unsure what the consequence might be if fuel filled the boot once more when moving the car and these terminals were flooded. I took more advice from the Eurotec club and watched some more YouTube that some cars didn't even have rubber boots and also experienced similar flooding to me. So I risked it. Fortunately nothing happened and I was able to drive the car back into the garage.
Over the next day or two I searched more videos on YouTube and found the following one particularly useful to explain to me what it takes to replace the fuel pick up hose. It's a great tutorial.
youtube
Watching this also made me realise that my pump/tank had no return hose to return fuel back to the baffle area as well as no Baffle Seal. After watching I also felt confident that this was a job I could do if it were not for the almost full tank of fuel. My ability to do this job flip-flopped over the course of the next week. What was clear to me however was that I would not have this fixed before the following weekend, which was the DeLorean Eurotec October Meeting, 100 miles north in King's Lynn, Norfolk.
Having replayed the above video a few times I then generated a list of the parts I would need. I ordered the following from DeLoreanGo.com,
SKU 106287 Fuel Pickup Hose
SKU 106287A Stainless Fuel Pickup Hose Reinforcement Spring
SKU 106318 Pickup Pipe Baffle Seal
SKU 106286 Viton Lower Return Fuel Hose
SKU SP10573 Stainless Hose Clamp (fuel return pipe)
SKU SP110085 Fuel Pump Terminal Connectors
In true DeLoreanGo.com form these parts then arrived less than 24 hours after ordering with just the regular free shipping option selected.
DeLorean Eurotec October Meet Weekend
That next weekend I attended the Eurotec meet and garnered opinions about how to tackle the fuel pick up hose job. Opinions ranged from "dive in despite the full tank of fuel, it'll be fiddly, messy and your arms might sting somewhat" to "you must drain the tank before starting, then it will be fiddly". I also learnt that weekend how it seemed many owners were also experiencing fuel pump related issues. This is when I came to learn of one owner who had set up his own business for working on DeLorean's. I tentatively arranged for him to come and do mine next time he was in the area, which would have been a few weeks later, however during the journey home I changed my mind.
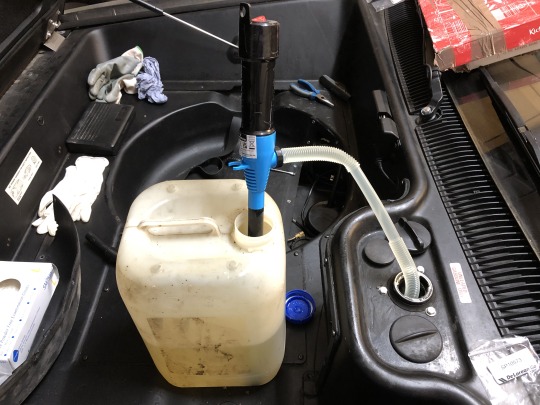
Close to home I decided to stop to charge my daily driver at Tesla Tottenham. Whilst charging I grabbed myself a tea and biscuits at the showroom. I sat in the lounge and started googling options for pumping out fuel from tanks. It was then I found the following product from Euro Car Parts, and fortuitously there was a branch, open across the road.
I was a little unsure at first but the reviews convinced me, and at £8.99, it wouldn't be a huge loss if it turned out not to be appropriate.
I purchased said pump and over the course of the next week I managed to find sufficient fuel cans/containers for up to 50 litres.
The Weekend after that
Okay, so it's now this recent weekend, the kids are away at Scout camp, it's peaceful at home so now is the time to do this!
I decided to leave the car in the garage this time due to constant rain so there wouldn't be much room around the side of the car to work.
After preparing the area I proceeded to pump the fuel out from the tank. This turned out to be amazingly simple with the new pump, so much so that I almost forgot to film the process. The following shows almost the final fuel being pumped out. The pump can do about 22 litres per minute, which I reckon we achieved, however the clip below is a little slower as the final fuel is trickier to pick up, but it did the job.
youtube
In the end I calculated I had taken approximately 46 litres of fuel out of the tank.

Following the pumping out I had a peek into the tank with my phone camera.
youtube
Whilst getting ready for pumping out the fuel I of course had to remove the boot and pump. When doing this I could see that the current pick up hose had in fact disintegrated further, unattached to the pump, lying in the tank. I felt relief that I had not attempted to drive up to the previous weekends' DeLorean Eurotec meeting, since once the fuel level would have dropped below the bottom of the pump, it would not have been able to draw any more fuel and I would have been stranded.
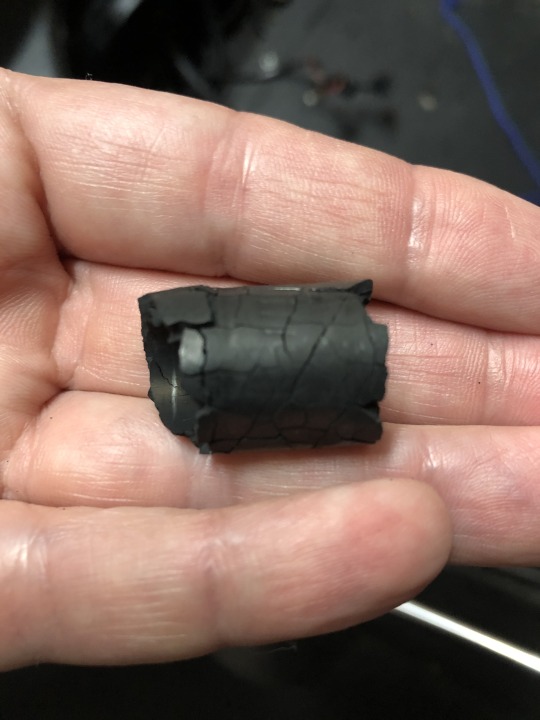
The following piece of pick up hose is all that was left attached to the pump, surrounded by the hose clamp.
I also removed the electrical connections from the pump terminals which I would later trim to attach new connectors and boots. Those boots were rock solid!

I set the pump and boot assembly to one side and then began tackling removal of the baffle in order to fit the new pick up hose, seal and return line.
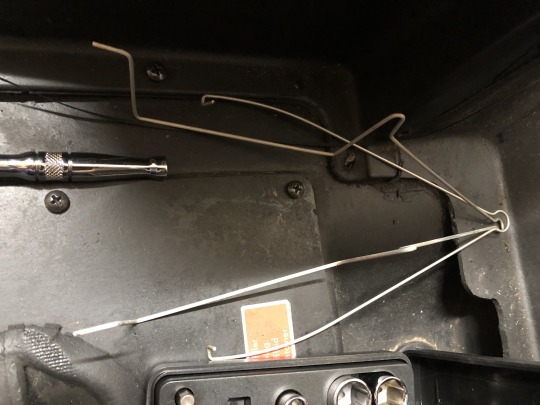
The only minor issue I faced in removing the baffle was removing the Fuel Tank Baffle Outer Retainer Spring, DGo SKU 108683. The YouTube video showed it being attached over the top of the baffle to the sides, however as can just be seen in the picture below, mine was attached through the perforations of the lower baffle assembly, which was very tricky to dislodge.

Once the baffle was removed the stud that the baffle and retaining springs attach to can be seen (near the fuel sender casing)

With all the components out of the tank I could take a closer look. Below you can see the failed fuel pick up hose complete with filter, the baffle with signs of disintegrated rubber settled on it, and the retaining springs.

I then reassembled the baffle with the new parts outside of the tank to ensure I knew how it all went together for when I would do it effectively blind inside.

As mentioned in the YouTube video I found I didn't have the clip to attached the end of the return hose to, so I used a tie to affix it to the baffle.
Since I couldn't make a video of me rummaging around inside the tank to fit all the components of the baffle assembly together, the photo below is a fast forward to the finished job.

Following the instructions in the YouTube video my only variation was that I did it from a standing position from the front passenger side wing, leaning over with just one hand in the tank. I expected to be really frustrated with this step but I think I got lucky. Everything slotted together nicely and the only minor difficulty encountered was attaching the nut on top of the washer and retainer springs to lock down the baffle. I found the arm of the baffle had an arch in it so I found a metal rod to push down on it, between the springs. Once flat the nut went on easily.
Relieved at the in-tank baffle success I now needed to replace the boots and connectors to the pump wiring.
Below shows the current state of the wires. The picture doesn't relay how solid the boots had become. These can't be replaced without removing the connectors, but even by my standards this is an simple job.

Below you can see the replaced wires with the new boots and connectors.

Now for re-connecting the fuel pump assembly and fitting it back into the tank.
Lessons learnt from my first attempt a couple of weeks back is that the positioning of the pump in the boot relative to the electrical connections, the fuel feed and return hose barbs, and the eventual placement in the tank so that hoses do not hinder the re-fastening of the compartment cover panel is very important. It would be a real pain to have to undo it all if you cannot fit the panel after all the hard work. Believe me I found out the hard way!
I'm not saying the following is the "correct" positioning, but it's what worked for me.

I think the indentations in the pump casing on opposite sides is designed to allow the return pipe to sit nicely in between, however I could not get the hoses to fit sufficiently such that the boot seal then can close nicely over the boot. So the above photo shows how I ended up positioning the pump and return pipe.
Below you can see a side on view that also shows the position of the return pick outside of the boot.

I then attached the pick up hose to the pump and the return hose to the pipe.
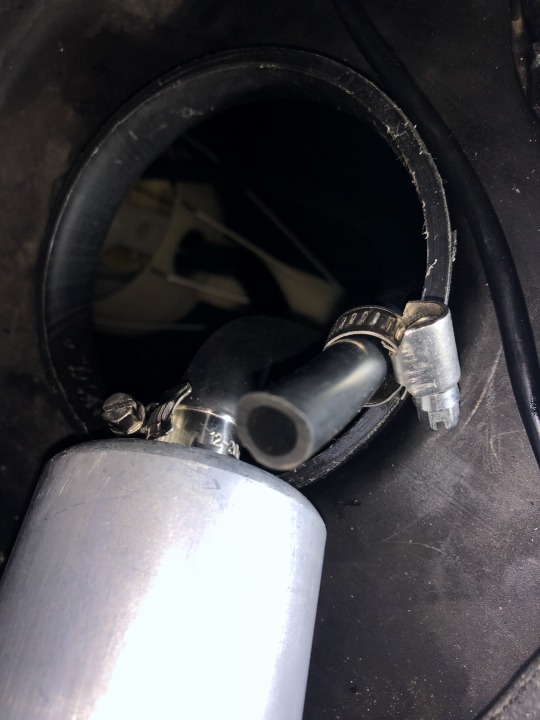
I inserted the boot into the tank and attached the electrical connections and the feed and return hoses.
I then completed this part of the job by sliding down the seal and after the below photo was taken, tightened the hose clamp.

As per the lesson learned, mentioned just above, I had to slightly twist the boot clockwise a little to position the hoses more pointing backwards so the compartment cover could be screwed back in.
Before closing the compartment I wanted to check to see if my low fuel indicator light worked. By my reckoning, with no fuel in the tank I should be able to turn ignition to position two and see the light illuminated in the binnacle.

Either my theory was wrong or my low fuel light wasn't working, as I had long suspected. I next put back a couple of litres of fuel and tried again also fully starting the car, no luck, then added up to five litres, repeated, and still nothing.
Finally I pumped all fuel back in to the tank.
and after starting the car for a final check, replaced the compartment cover.

Job done! Hopefully...
Upcoming jobs that I'll aim to document soon include fitting a fan override switch, and fitting new circuit breaker holder clips.
Stay tuned!
4 notes
·
View notes
Photo

DMC DeLorean at Cassandra's Motorsports Open House (2022) in Pewaukee, WI.
#stance#stanced#dmc#dmc delorean#delorean#alpha5#dmc alpha5#delorean alpha5#dmc12#dmc-12#12#dmc24#dmc-24#dmc44#dmc-44#dmc80#dmc-80#back to the future#back to the future 2#back to the future 3#marty mcfly#doc brown#bttf#bttf2#bttf3
14 notes
·
View notes
Text
#delorean#dmc-12#flux#capacitor#fail#failure#bttf#back#to#the#future#time#machine#doc#marty#mcfly#ev#electric#vehicle#conversion#launch#motor#car#brum#tesla#prototype
4 notes
·
View notes


Text
81 De Lorean DMC-12

1 note
·
View note
Text
Deloreaon DMC-12
1 note
·
View note
Photo

DeLorean DMC-12
1 note
·
View note
Photo

267 notes
·
View notes
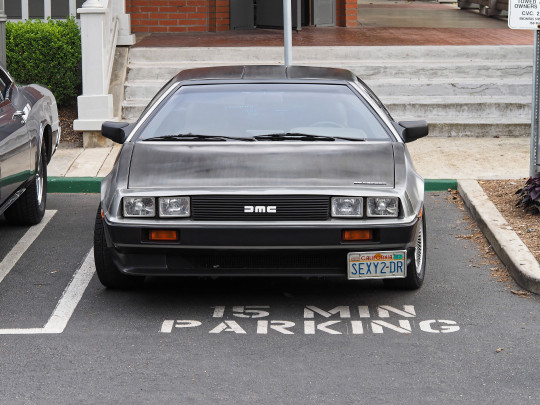
Photo

DMC DeLorean
Image by Tim Parbukov || IG
147 notes
·
View notes

Photo


DeLorean DMC-12 Rad Edition
0 notes
Last Seen Blogs

saltytrashmugcloud
Untitled

zerbrocheneseeleblog
Zerbrochene Seele💔

remromloceit
RemRomLoCeit


glacietion
ice make;