#ADB INSTALLER
Text

just deleted a shit ton of bloatware off my phone<3
#deacf talks#it was surprisingly easy once i figured out the adb commands and stuff from the guide i was using#fuck u facebook fuck u netflix go rot in hell for taking up space on my phone#and requiring me to fucking ENABLE DEVELOPER MODE. INSTALL SOFTWARE ON MY COMPUTER AND THEN HACK INTO THE LIFE FORCE OF MY PHONE#JUST TO GET RID OF U#but i also figured out how to install the z-l*b app on my phone so i can access all their books again<33#if anyone wants u can hmu with a dm and ill tell u how i did it. im not abt to make a post after what happened :/#or just go on r/piracy and look it up there lmao
2 notes
·
View notes
Text
need to send a letter to the creator of this fully open-source tool that allows for screen mirroring / input through ADB, both wired and wireless, thanking him immensely for allowing me to evacuate all of my best nudes off this phone. but i can’t decide which nudes to include in the letter as thanks
also PSA turn on that damn USB debugging whenever you get a new phone. so glad i’m anal about this or i’d be fucked
#seriously so thankful. this shit is so robust#and all the other options are like . $10/mo. this is open source#i was warned i'd have to build it myself on linux but it's actually got better linux support than windows i think#considering. it's on APT and i can just install it + ADB + all prereqs without having to maintain shit#sadly does not solve the issue of having an unusable screen#which really sucks i really like this phone and i want to keep it so so badly but. a new screen probably costs more than i paid for it#which i'd absolutely shell out for if i was confident i could do it myself & i didn't ask my friend to send their spare already..
3 notes
·
View notes
Text
How to update ADB and Fastboot to Latest Version ?
How to update ADB and Fastboot to Latest Version ?
If we installed ADB, Fastboot using Ubuntu packages as mentioned in our another post, “How to Install ADB and Fastboot on Ubuntu ?” , higher chances are the versions are quite old. As in our case, even with Ubuntu 22.04, ADB and Fastboot versions was “28.0.2”.
And we wanted both versions to be latest ( which is 33.0.1 when writing this post). So, here is what you can do to update and use latest…
View On WordPress
#Android Platform Tools#Install ADB#Install Fastboot#Latest ADB Version#Latest Fastboot Version#Update ADB Version#Update Fastboot Version
0 notes
Note
As the person I follow who does reverse engineering, do you have any suggestions for finding resources on reverse engineering Android apps?
Specifically, there's an app I'm playing with, where after seeing the structure of the "export as Markdown" output I want to know what the internal structure and representation of the data is. The end goal of understanding it is to be able to add certain kinds of data dynamically, rather than up front. That's certainly doable typing in raw markdown, but being able to do it "app style" would be more convenient.
The google Play Store entry does not mention any open source licenses, or looking for the source code and hopefully a git repo or something would have been my first step.
(I'll probably need to bang together a crappy app to do what I really want regardless, but maybe this app's data structure would be more convenient than doing so with markdown.)
So, android stuff:
First you need the APK. You can do some trickery with your phone to pull it over the ADB connection if you install the android SDK, but generally I just google "app name APK" and you'll find some greymarket site that'll give you a copy.
Secondly, APKs are just ZIP files (JAR files, technically, but JAR files are also just ZIP files!). Unzip them and you can find lots of interesting stuff, often.

For disassembling/decompiling them, my go-to program is jadx. It's a java decompiler that's been around a while and can natively open APK files and decompile them. There's some weirder new APKs that it can't handle (something to do with a newer bytecode revision, I think?) but I can't recall the details on how you handle those. Those are rare, in my experience. jadx is pretty good, but you'll occasionally find methods or entire classes that it just can't figure out, and it'll give you a bytecode dump. I don't yet have a good solution for those, other than "get good at reading JVM bytecode".
If you're dealing with games, another useful thing can be UABE and dotPeek. These are unity/C# tools, but you would be surprised how many android games (and non-games!) are actually unity under the hood.
Bluestacks can also be useful, because it'll let you run the app on your desktop and that can be handy for things like running WireShark to log all network traffic.
Speaking of logging, the other handy thing I've done is enabling android developer mode on my phone to get to one specific option: Bluetooth HCI snoop log.
Now, actually getting that log is tricky and varies from phone to phone, because for some reason manufacturers like to move it around, but it's one of the best ways to reverse engineer bluetooth communication stuff. You basically turn on the log and everything your phone does to communicate with your Smart Toothbrush or whatever will be logged to a file, then you can yank that file over and stuff it into Wireshark.
So... hopefully some of that is a helpful start? I've not done a huge amount of Android reversing so I'm not super familiar with the tools used, but these are the ones I've got on hand for when I do.
also sorry for all the horny robotgirl posters who saw "android reverse engineering" in the tags and thought this was gonna be about taking them apart with screwdrivers and rooting around in their insides. Not today!
109 notes
·
View notes
Note
do you know where i can download apk safely?
When downloading APK files from the internet you really just need to use your best judgement and make sure the site you're using isn't making you do anything shady, install anything unrelated, and that you're using a single APK (not a "bundle" or "split" APK). In my experience, APKPure and APKMirror are fine for downloading Tumblr's APK.. but always be cautious regardless of how well regarded a site is.
The absolute safest way to get an APK is from your phone. You need to use something called ADB, and it doesn't require root access, but you need to use your terminal a bit. I believe on Windows this is called the command line.
(Edited)
I won't detail how to set up and use ADB here as there are plenty of resources for that online, as well as for extracting (pulling) APKs from your phone.
Unfortunately it might just be the case that Tumblr is using something called "Split APKs" which are more difficult to work with. Technically it's possible to extract them and bundle them up, but at this point it's easier to just go to APKMirror and grab the Tumblr version of your choosing; I've verified myself that the latest version, and 29.7.0.110's universal APKs (not bundle/split) are safe and work.
6 notes
·
View notes
Text
how to make newpipe run on windows links:
android subsystem & adb install walkthru
15 second adb installer link since the article link is broken
newpipe
besides being ad free youtube, newpipe allows you to directly download videos as audio only, which is amazing if you're trying to get away from streaming services
1 note
·
View note
Text
You can truly, permanently, delete bloatware off your phone!
It genuinely stresses me out on a spiritual level that so many of you are just walking around with bloatware on your phone that your phone companies have convinced you are “necessary” or can’t actually be deleted (like that fucking netflix app, I’m looking at you), so you just hide it, shove it into a folder and put it out of the way of sight, or the only slightly better, “disable” when it lets you.
You can actually remove those. Not disable, not hide. Full on, straight up delete, removed, disappeared, gone. And no, you don’t need to root or jailbreak your phone to do this! That’s what they want you to think!
You will need a PC, and a your phone > PC cable, but it’s so easy and it works for all modern android phones. I’ve completely emptied my last like, 3 phones of bullshit this way. It’s the first thing I do whenever I get a new phone.
Step 1, install APK Analyzer, or another APK package inspector. This will tell you every single package installed on your phone, down to the system file ones. You’ll need the ones you want to remove, and this will tell you exactly what they are. They’ll be named something like “com.android.google.xxx” Alternatively, you can look up a list online for the obvious ones, like googles.
2. Download and unzip Android Platform tools from the official website on your PC, it doesn’t matter where, anywhere you can easily find it. I’ll put the link here https://developer.android.com/tools/releases/platform-tools but if you’re safety conscious and don’t click links you can also just search “android platform tools” in an engine.
3. In your phone, go into settings, search for build number, tap it 7 times. After about three, it tells you how many taps away you are from entering “developer mode.” You may have to enter your pin, but developer mode will be enabled.
4. Then in the newly unlocked developer options, turn on “USB debugging.” This effectively allows you to control your phone from your PC once connected, I’m about to tell you exactly how.
5. Connect your phone to your PC. Wait for it to finish making all the annoying connection sounds while it sorts itself out. Hit allow on the options that appear on your phone. Go to the platform-tools folder you just extracted, and in the file browser panel, where it’ll say something like “D:\Users\YourPC\Documents\Phone Hax\platform-tools“, type “cmd” without quotes and hit enter. This opens up the command prompt in this file location, so you don’t need to faff about getting there through the cmd.
6. In the cmd, type in “adb devices” without quotes, hit enter. Your phone model should come up after it throws a bit of a conniption (more annoying sounds), under a named list of “devices attached“ you should see your phone model number, and “device.” This means the computer can see your phone, and they’re ready to communicate. Now type “adb shell” without quotes, hit enter, and you’re ready to start swatting these apps away like flies.
7. Now for the fun part. You can freely go into the APK analyzer app you installed earlier and go dig out all that shit you wish you could banish from your eyesight and one by one start removing them. To do this, type, without quotes, “pm uninstall --user 0“ followed by the package name.
For example, removing GMail would look like this
“pm uninstall --user 0 com.google.android.gm”
Hit enter, it’ll say “Success,” and that’s it. It’s gone. It’s been deleted off your phone. Not disabled, not hidden. Banished. Removed.
When you’re done, just unplug your phone, go back into developer options, unclick debugging mode, turn developer mode off, and voila, your phone is now officially more “yours” than the phone companies would have you believe. Clears space, removes corporate spyware, and take note of how much longer your battery lasts, too!
You’re in more control than you think, these are your phones, make sure they act like it!
Disclaimer!: Be very careful deleting system apps! Don’t do the equivalent of deleting system32 or something. If you’re unsure, look it up, and most things can be redownloaded later if you make a mistake.
2 notes
·
View notes
Text
does any vpn for first generation fire stick
🔒🌍✨ Get 3 Months FREE VPN - Secure & Private Internet Access Worldwide! Click Here ✨🌍🔒
does any vpn for first generation fire stick
VPN compatibility for first generation Fire Stick
A Virtual Private Network (VPN) can enhance online security and privacy by encrypting internet traffic and masking the user's IP address. This added layer of protection is especially important when using streaming devices like the first-generation Fire Stick, which may have vulnerabilities that can be exploited by third parties.
When considering VPN compatibility for the first-generation Fire Stick, it is essential to understand the limitations of this older device. While newer Fire Stick models offer native VPN support, the first generation does not have this feature. However, there are ways to work around this limitation and still utilize a VPN with your device.
One common method is to install the VPN application on a compatible router. By doing so, all internet traffic from devices connected to that router, including the Fire Stick, will be routed through the VPN. This setup allows for seamless protection without the need for individual VPN installations on each device.
Another option is to use the screen mirroring feature available on the first-generation Fire Stick to connect it to a smartphone or computer running the VPN application. This workaround allows users to stream content securely through the VPN connection on their primary device.
In conclusion, while the first-generation Fire Stick may not directly support VPN applications, there are alternative methods to achieve VPN compatibility and enhance online security while using this device. By exploring these options, users can enjoy a safer and more private streaming experience on their Fire Stick.
Best VPN for first gen Fire Stick
Looking for the best VPN for your first-generation Fire Stick? Using a VPN with your Fire Stick can enhance your streaming experience by unblocking geo-restricted content, maintaining your online privacy, and securing your data from potential cyber threats.
One top choice for a VPN for your first-gen Fire Stick is ExpressVPN. Known for its fast connection speeds and strong security features, ExpressVPN offers servers in multiple locations around the world, allowing you to access a wide range of streaming content. Their user-friendly app makes it easy to connect and start streaming securely in just a few clicks.
Another excellent option is NordVPN, which boasts a large network of servers and robust encryption protocols to keep your data safe. NordVPN also offers dedicated apps for Fire Stick, making it simple to set up and use on your device.
If you're looking for a budget-friendly option, consider IPVanish. With unlimited simultaneous connections and a range of server locations, IPVanish is a reliable choice for Fire Stick users on a budget.
Ultimately, the best VPN for your first-gen Fire Stick will depend on your specific streaming needs and budget. Be sure to consider factors such as server locations, connection speeds, and security features when choosing the right VPN for you. By using a VPN with your Fire Stick, you can enjoy a more secure and versatile streaming experience.
VPN setup on old Fire Stick
Setting up a VPN on an old Fire Stick can enhance your online privacy and security while unlocking geo-restricted content. Though the older Fire Stick models may not have native VPN support, you can still configure a VPN connection manually using some workarounds.
To begin with, you need to subscribe to a reliable VPN service that offers compatibility with Fire Stick. Once you have subscribed, follow these general steps to set up a VPN on your older Fire Stick:
Start by plugging your Fire Stick into your TV and turning it on.
Navigate to the settings menu on your Fire Stick and select 'Device' or 'My Fire TV.'
Choose 'Developer Options' and enable 'ADB debugging' and 'Apps from Unknown Sources.'
Return to the home screen and search for 'Downloader' in the search bar.
Install the Downloader app and launch it.
Enter the URL provided by your VPN provider to download the VPN app for Fire Stick.
Install the VPN app and sign in with your credentials.
Connect to a server of your choice and ensure that the VPN connection is active.
It's important to note that the exact steps may vary depending on the VPN provider and the Fire Stick model you own. Always refer to the setup guides provided by your VPN service for detailed instructions tailored to your specific configuration.
By setting up a VPN on your old Fire Stick, you can encrypt your internet traffic, bypass censorship, and secure your online activities effectively. Enjoy a safer and more versatile streaming experience with the added protection of a VPN on your Fire Stick.
VPN options for early Fire Stick models
If you own an early model of the Fire Stick and are looking to enhance your online security and unlock geo-restricted content, utilizing a Virtual Private Network (VPN) can be the perfect solution. VPNs can help safeguard your privacy by encrypting your internet connection and masking your IP address, protecting you from potential cyber threats and allowing for anonymous browsing.
When it comes to choosing a VPN for your early Fire Stick model, there are a few key factors to consider. First and foremost, compatibility is crucial. Make sure to select a VPN provider that offers a dedicated app for Fire Stick or is compatible with the device through manual configuration.
Additionally, speed and performance are essential for seamless streaming and browsing. Opt for a VPN that provides fast server connections and minimal buffering to ensure a smooth user experience. Some popular VPN options known for their reliability on Fire Stick include ExpressVPN, NordVPN, and IPVanish.
Furthermore, consider the security features offered by the VPN provider. Look for features like a kill switch, DNS leak protection, and a no-logs policy to guarantee maximum privacy and data protection while using your Fire Stick.
Lastly, factor in the cost of the VPN service. While free VPNs may seem appealing, they often come with limitations such as data caps and slower speeds. Investing in a paid VPN service can provide you with better performance and a wider range of server locations to choose from.
Overall, selecting the right VPN for your early Fire Stick model can greatly enhance your online experience and ensure that your data remains secure and private while browsing the internet.
Secure browsing on first generation Fire Stick
When it comes to browsing on a first generation Fire Stick, ensuring a secure online experience is crucial to protect your privacy and data. While the device itself may not offer built-in security features like antivirus programs or firewalls, there are still steps you can take to enhance your browsing security.
One of the first things you can do to secure your browsing on a first generation Fire Stick is to use a virtual private network (VPN). A VPN encrypts your internet connection, making it harder for hackers or third parties to intercept your data. By using a VPN, you can browse the internet anonymously and access geo-restricted content without compromising your online security.
It is also recommended to only visit websites that use HTTPS encryption. Websites that have HTTPS in their URL are more secure than those using HTTP, as the data exchanged between your device and the website is encrypted, reducing the risk of your information being intercepted.
Furthermore, regularly updating the software on your Fire Stick is important to ensure that any security vulnerabilities are patched. By keeping your device and applications up to date, you can minimize the risk of cyber-attacks and malware infections.
Lastly, it is essential to exercise caution when downloading third-party apps or content on your Fire Stick. Stick to official app stores like the Amazon Appstore to minimize the risk of downloading malicious software.
By following these tips and being mindful of your online activities, you can enjoy a more secure browsing experience on your first generation Fire Stick.
0 notes
Text
Steps to Unlock Google Pixel 8 Pro
Unlocking a Google Pixel 8 Pro can refer to different processes, such as unlocking the device from a carrier to use with other networks, unlocking the bootloader for development purposes, or simply unlocking the screen. This article will guide you through the steps for each of these scenarios.
Carrier Unlocking Your Google Pixel 8 Pro
Carrier unlocking allows you to use your Pixel 8 Pro with different network providers besides the one from which you originally purchased your phone.
Step 1: Check Eligibility
Ensure your device is paid off completely.
Your account should be in good standing (no unpaid bills).
The device must have been active on the network for a certain period, as specified by the carrier.
Step 2: Obtain Unlock Code
Contact your carrier's customer service for an unlock code. You may need to provide your account details and the phone's IMEI number (found in Settings > About Phone).
Step 3: Insert New SIM Card
Power off your device, insert the new SIM card from a different carrier, and turn it back on.
Step 4: Enter Unlock Code
Once powered on, the phone may prompt you to enter an unlock code. Input the code provided by your carrier.
Step 5: Confirmation
Your device should now be unlocked. If you encounter issues, contact your carrier for further assistance.
Unlocking the Bootloader on Google Pixel 8 Pro
Unlocking the bootloader is generally sought by users who wish to root their device or install custom ROMs. Warning: This process will erase all data on your device.
Step 1: Enable Developer Options
Go to Settings > About Phone and tap on the Build Number 7 times to enable Developer Options.
Step 2: Enable OEM Unlocking
In Developer Options, toggle on the OEM Unlocking option.
Step 3: Boot into Fastboot Mode
Power off your device. Then, hold the Power and Volume Down buttons simultaneously to enter Fastboot Mode.
Step 4: Connect to Computer
Connect your Pixel 8 Pro to a computer with ADB and Fastboot installed.
Step 5: Unlock Bootloader
Open a command prompt or terminal on your computer and type: fastboot flashing unlock
On your phone, use the volume keys to select "Unlock the bootloader" and confirm with the power button.
Step 6: Reboot
Once the process is complete, reboot your device by selecting "Start" with the power button.
Screen Unlocking
If you're simply looking to unlock your Google Pixel 8 Pro screen (e.g., you've forgotten your PIN, pattern, or password), follow these steps:
Step 1: Use Google's Find My Device
Go to Google's Find My Device service from another device or computer.
Step 2: Select Your Device
Choose your Pixel 8 Pro from the list of devices.
Step 3: Use the "Lock" Option
Choose the "Lock" option to set a new lock screen password, which will replace the one you've forgotten.
Step 4: Unlock Your Phone
Use the new password to unlock your Pixel 8 Pro.
Conclusion
Unlocking your Google Pixel 8 Pro, whether for carrier use, bootloader access, or screen unlocking, is a straightforward process if you follow the steps carefully. Always ensure you understand the implications, especially with bootloader unlocking, as it can void your warranty and erase your data. If you're unsure about any step, consult with a professional or reach out to Google's customer support for assistance.

flickr
1 note
·
View note
Text
Android native mobile app development

Introduction:
Mobile app development has become essential to both individuals and organizations in the current digital world. The most popular mobile operating system, Android, has a large user base and multiple chances for developers. We will go over the basic principles of developing native Android mobile apps in this blog post, along with a thorough how-to to get you started.
Understanding Android Native Development:
Introduction to Android OS and its architecture.
Understanding the Android software stack.
Overview of the Android development ecosystem.
Setting up Your Development Environment:
Installing Java Development Kit (JDK) and Android Studio.
Configuring Android Virtual Devices (AVDs) for testing.
Overview of the Android Software Development Kit (SDK) components.
Exploring Android App Components:
Understanding Activities, Services, Broadcast Receivers, and Content Providers.
Exploring the Android Manifest file and its role.
Implementing Objectives for basic app navigation.
User Interface Design:
Introduction to Android XML layout files.
Building user interfaces using Views and ViewGroups.
Implementing common UI components like buttons, text fields, and lists.
Applying styles and themes to enhance the app's visual appeal.
Working with Data:
Overview of SQLite, the built-in database for Android.
Performing CRUD (Create, Read, Update, Delete) operations on the database.
Reading and writing data from/to external storage.
Consuming data from web services using RESTful APIs.
Handling User Input and Events:
Responding to user interactions like button clicks.
Handling touch events and gestures.
Implementing form validation and input controls.
Multimedia and Device Features:
Working with multimedia elements like images, audio, and video.
Utilizing device features such as camera, GPS, and sensors.
Integrating third-party libraries for advanced functionality.
Testing and Debugging:
Overview of the Android Debug Bridge (ADB) and Logcat.
Testing app behavior using the Android Emulator and physical devices.
Implementing unit tests and automated UI tests.
Publishing Your App:
Generating signed APKs.
Uploading your app to the Google Play Store.
App store optimization (ASO) techniques to enhance visibility.
Continuous Learning and Resources:
Staying updated with the latest Android development trends.
Exploring additional resources, tutorials, and communities.
Best practices for maintaining and updating your app.
Conclusion:
A strong basis for developing modern, packed with functions programs is provided by Android native mobile app development. You'll have an excellent foundation on which to grow when you follow this thorough tutorial to make your own Android apps. Recall that the secret to becoming a skilled Android developer is practice and ongoing education. Now get your palms dirty, explore the world of Android, and start creating incredible mobile applications!
0 notes
Text
7 Must-Have Android Studio Plugins for Efficient Android Mobile App Development
Quick Summary: Android Studio is an Integrated Development Environment (IDE) for Android application development. Based on IntelliJ IDEA, the Android Studio contains all the features you need to develop any kind of Android app and even has support for a Java-based web browser called WebView. It’s built via Gradle and offers a whole bunch of new features including faster build speeds, instant run, multi-monitor support, code analysis, lint tools, cloud tools integration, and various other great additions.

Essential Plugins for Android Mobile App Development
ADB Idea:
ADB Idea by SOOY KIM is an Android developer plugin for Android Studio and IntelliJ IDEA. It allows developers to perform various steps at the click of a button instead of creating them from scratch. This helps them speed up the development process. The plugin offers time-saving features such as creating Temporary Services, integration with Run, Debug, and Deploy actions, and much more.
CodeGlance:
The CodeGlance plugin is a handy tool to view the complete code. Once you enable the CodeGlance, the whole code displays at the side of the screen in a minimap format. It allows you to navigate through various functions, classes, and files. You can easily sort the blocks of code by their color. The CodeGlance supports PHP, HTML & CSS formats. It provides an excellent feature for programmers and web developers to improve productivity and coding efficiency.
Key Promoter X:
Developers who have grown tired of using a mouse to perform their repetitive tasks will be delighted with the new version 3.0.2 of Key Promoter X, a free plug-in from Microforte that automates creating keyboard shortcuts to help facilitate quicker and more efficient workflows. With this latest release, developers now have access to improved support for Internet Explorer both on Windows and on Mac OSs, as well as new capabilities for working with ActiveX controls in Microsoft Word and Excel.
Scala:
Sbt-android is a plugin that provides tools for creating Android applications using the Scala language. It’s an extension to sbt-native-packager and allows you to build and run your application from an sbt console quickly. It automatically downloads and updates the Android SDK for you. How to build up a new project with sbt-android and how to set up IntelliJ is very well explained in the README in the GitHub repository (or set up with Android Studio).
IdeaVim:
IdeaVim is a Vim plugin that integrates with the IDEA (IntelliJ IDEA) IDE and provides many additional features. It supports motion keys, deletion/changing, marks, registers, some Ex commands, Vim regexps, configuration via .ideavimrc, macros, and Vim plugins. IdeaVim is used by the alternative SciTE editor. IdeaVim can be installed in IDEA itself and in the external EditorPlugin directory; it provides many additional features to IDEA. To use IdeaVim you must have Vim 6.1 or higher installed on your machine.
Android Input:
The Android input plugin allows you to simply input text into an Android device or emulator easily. The plugin doesn’t require any advanced configuration. It’s as simple as typing your message into the copy-and-paste buffer and clicking a button.
Android Drawable Preview:
The Android system provides developers with different drawable items that are utilized to create the interface of an application. Some of these components comprise buttons, icons, and text labels. When developing an app, you have to remember not to use the same drawable for all the required items. You should use the default button but create a custom shape for it. Furthermore, you should also change the background color because the default one wouldn’t be appropriate in every situation.
Conclusion
While plugins can enhance your workflow and boost productivity, it’s important to exercise caution. Overloading your environment with plugins can have a detrimental impact on performance. Therefore, it’s advisable to make informed selections and utilize only the most valuable ones. We are a team of expert Android app developers offering our services to clients across the globe. You might be looking for an experienced mobile app developer to build your dream Android application. In case, you’re looking for app developers for Android, iOS or any other platform then do not worry and just get in touch with the experts at Brain Inventory. We’ll help you achieve your goal with a precise development approach.
#android mobile application development company#best android app development company#custom android app development services
0 notes
Text
Latest Nokia Flash Tool Without Box Version 2023
Prior to downloading and installing the Nokia Flash Tool, it's essential to ensure that your computer satisfies the specified minimum system requirements. Typically, these requirements include a minimum of 1 GB RAM, 500 MB of available disk space, and a processor with at least an Intel Pentium 4. Depending on the platform, additional memory may be necessary. If you are a Mac user, please verify the minimum system requirements before initiating the Nokia Flash Tool download. Once these conditions are met, you can proceed with the installation.
The Nokia Flash Tool is a handy utility for reinstalling the software on your Nokia phone and can be obtained for free on our website. Ensure you carefully follow the instructions provided by the tool. Once downloaded, proceed to install it on your Windows PC by following the detailed step-by-step guide. This process guarantees you access to the most recent firmware updates for your Nokia phones. Nevertheless, keep in mind that opting for the installation of the latest firmware will lead to the loss of all your personal data and settings on the phone.
Initially, you must install the ADB & Fastboot drivers along with the most recent firmware version. Subsequently, proceed to install the Nokia flash tool. After the installation, connect your Nokia device to your computer using an ADB or Fastboot cable. Choose the 'flashing' option from the menu and then proceed by following the provided instructions. Upon completion of the flashing process, your Nokia device will undergo an automatic reboot.
The Nokia OST Tool is an online service utility akin to the Android Odin flash tool. While it can be unofficially downloaded, it proves helpful for addressing diverse problems and installing stock firmware on your Nokia device. It's advisable to employ this tool on a sanctioned PC. This guide will walk you through the installation process on your computer. After obtaining the file, the next step involves installing the USB drivers specifically designed for Nokia HMD Global.
If your device is encountering issues like sluggish performance, frequent overheating, or being stuck in a boot loop, the Nokia OST Tool can serve as a solution to rectify these issues and return your device to its stock state. It's crucial to understand that this tool is exclusively compatible with Nokia phones utilizing the Qualcomm Snapdragon chipset and is not applicable to devices with MediaTek chipsets. In the event of any complications arising post-installation, it is advisable to promptly reach out to a nearby service center. Keep in mind that receiving updates for your device may require some patience, as the process could take several months.
Read the full article
1 note
·
View note
Text
Is It Possible to Remove Android Pre-installed Apps?
A new gadget is always an occasion to celebrate. And after using it for a while, you gradually become accustomed to its features and functionalities. Nevertheless, some pre-installed apps from some device manufacturers may not work well with this setup. Can you, however, remove these that come pre-installed on your Android phone? Let's investigate.
Whether you have used the pre-installed app before or not, once you start using your device, the majority of them will send you notifications. Most of the time, these apps' notifications cannot be turned off. Because of this, it's critical to understand whether and how to remove these pre-installed Android apps. Now let's get started.
Note: For demonstration purposes, we are using devices from ASUS and Xiaomi. The steps listed below may vary depending on the manufacturer of your device.
CAN YOU DELETE APPS ON ANDROID THAT CAME WITH YOUR PHONE
No, most pre-installed apps or, as commonly known, bloatware cannot be deleted from your Android device. This is because some apps are either used for specific system functions or installed as a part of your device’s modified OS version. Though they’re far and few, you can delete some of these apps. For others, you can uninstall their updates, delete the app data, or disable them on your device.

Furthermore, if you're a tech-savvy user, you can root your Android device to remove apps that otherwise won't uninstall. Additionally, you can get rid of bloatware without rooting by using programs like ADB.
Use caution, though, as altering the software of your device in any way not authorized by the manufacturer may void its warranty and, in the worst situation, cause your phone to brick.
HOW TO DELETE PRE-INSTALLED ANDROID APPS
It is possible to uninstall some pre-installed programs that are optional or not required by any system components. By doing this, you can unroot Android and get rid of bloatware. For a step-by-step procedure, continue reading.
Tip: Check our guide to know more about deleting apps on Android.
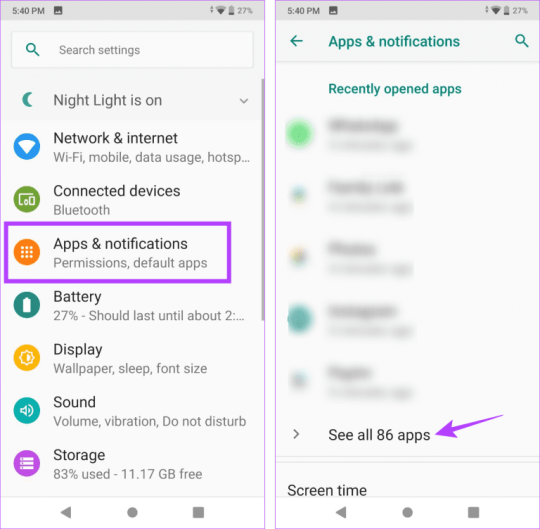
Step 1: Open the Settings menu on your device.
Step 2: Scroll down and tap on ‘Apps & notifications’.
Step 3: Here, tap on ‘See all apps’ to see all the installed apps on your device.
Step 4: From the list of apps, tap on the relevant app. Then, if available, tap on Uninstall.
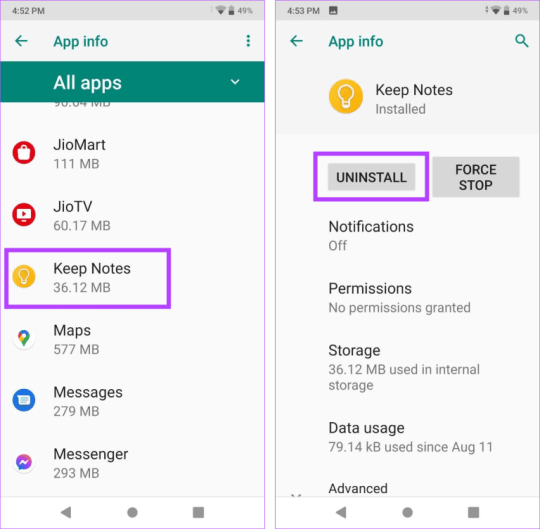
Step 5: Tap on OK to confirm.
This will remove the Android apps that were included with your phone. You can disable apps instead of uninstalling them, though, as not all apps can be removed. Read on to find out how.
How Does the Passcode on an Apple Watch Work?
1 note
·
View note

Text
Enhancing App Security: Best Practices and Tools for Android Developers"
Enhancing App Security: Best Practices and Tools for Android Developers"
In the rapidly evolving landscape of Android app development, ensuring robust security measures has become paramount. With the proliferation of mobile applications and the ever-increasing threats to data privacy and cybersecurity, app developers are challenged to implement the best practices and tools to fortify app security. As an established Android app development company committed to delivering secure, high-quality applications, it's essential to explore the methodologies and tools that elevate security standards.
Understanding the Importance of App Security
In the digital age, user data protection is a top priority. App developers must comprehend the significance of app security and the potential consequences of lax measures. Any vulnerability in an app can lead to data breaches, malware attacks, or unauthorized access, tarnishing both the company's reputation and user trust.
Best Practices for Android App Security
1. Encryption and Data Protection
Implementing robust encryption methods to safeguard sensitive data within the app and during transmission is crucial. Utilizing technologies like HTTPS, SSL/TLS, and encryption libraries aids in securing user information.
2. Secure Authentication Mechanisms
Employing strong authentication measures like multi-factor authentication, biometrics, or OAuth helps prevent unauthorized access and data breaches.
3. Regular Security Updates
Continuously updating the app to fix security vulnerabilities is imperative. Keeping up with the latest security patches and versions of libraries and frameworks helps in mitigating potential risks.
4. Secure Backend Services
Securing the backend infrastructure and services is as vital as securing the app itself. Adopting secure APIs, robust server authentication, and regular security audits are recommended.
5. User Education
Educating users about best security practices within the app, such as strong password creation, avoiding public Wi-Fi for sensitive transactions, and recognizing phishing attempts, can contribute significantly to overall security.
Essential Tools for Ensuring App Security
1. Proguard
A code obfuscation tool that helps protect the app's source code by making it difficult to reverse-engineer.
2. Android Debug Bridge (ADB)
Use ADB to control your device, install apps, and access system tools securely.
3. Android Device Manager
This tool assists in remotely locating, locking, or wiping data from lost or stolen devices, thereby protecting sensitive information.
4. OWASP Mobile Security Testing Guide
An open-source guide that aids in identifying and fixing security vulnerabilities in mobile applications.
5. Firebase Security Services
Utilize Firebase's suite of security tools, including authentication, database security rules, and Cloud Security Scanner, to ensure robust app security.
As an esteemed Android application development services provider, it's pivotal to integrate these best practices and tools to fortify app security. Prioritizing security not only safeguards users' data but also cultivates trust and credibility, setting a benchmark for the company's commitment to delivering secure, reliable, and innovative applications.
0 notes
Text
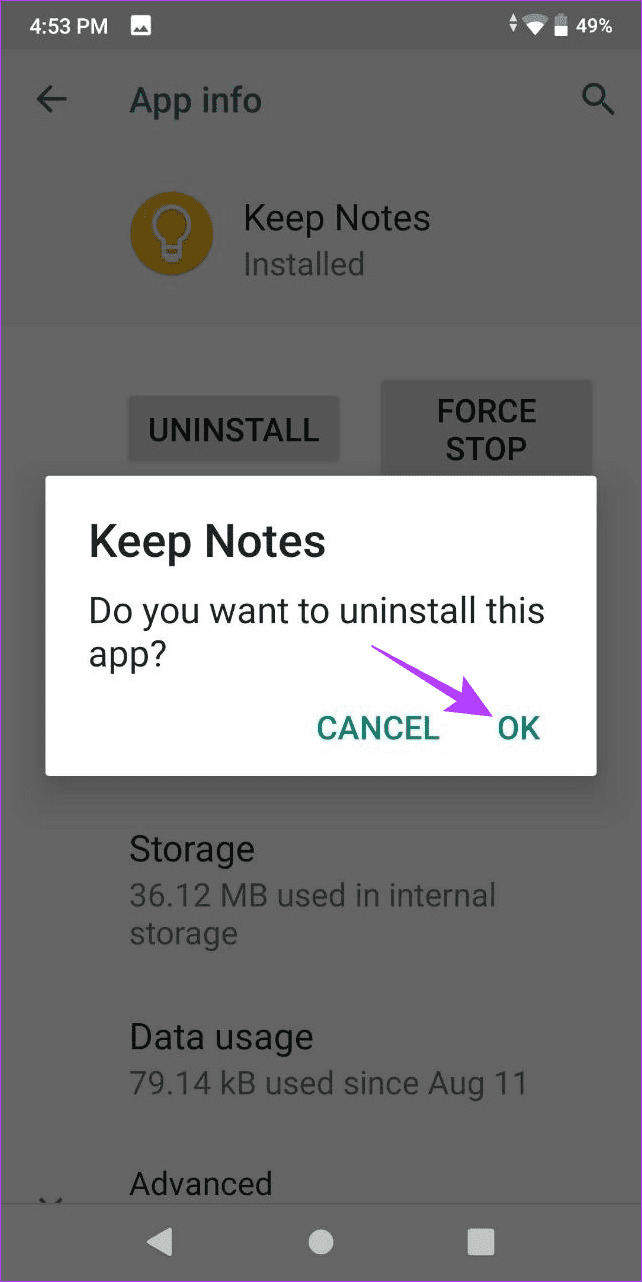
How to Uninstall Any Android App With ADB (Including System Apps and Bloatware)
Android phones often come with lots of extra apps installed. If you can’t uninstall them normally, you can remove them using the ADB tool. Here’s how.
Source: How to Uninstall Any Android App With ADB (Including System Apps and Bloatware)
View On WordPress
0 notes
Last Seen Blogs

le-etoille
それは違うよ!

charlespuke
Charlespuke

asukakimura
◇◑К|А◐◇

im-fucking-unstable
I'm my own enemy.

brittmurph
Brittany Murphy Appreciation