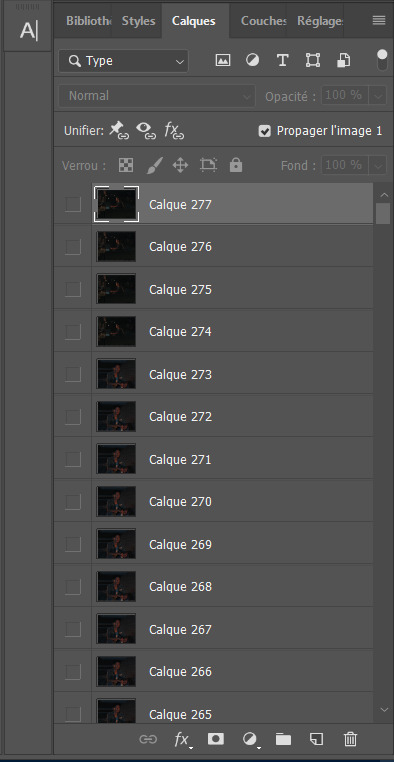
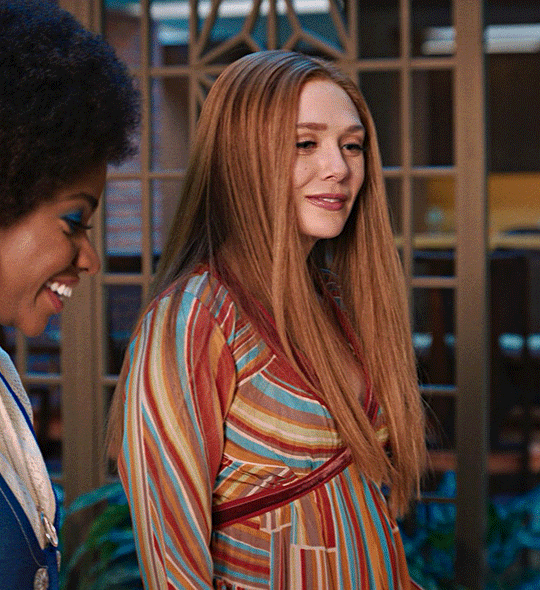
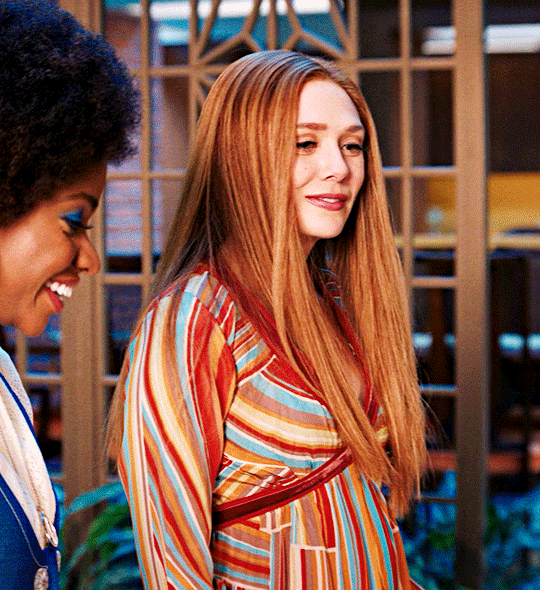
#3 gifset in a row from the same movie? that's not me
Photo
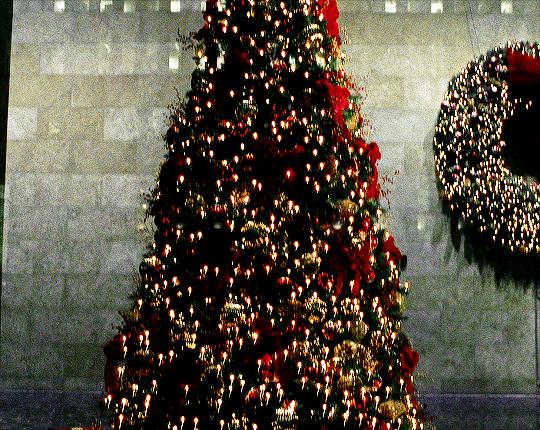
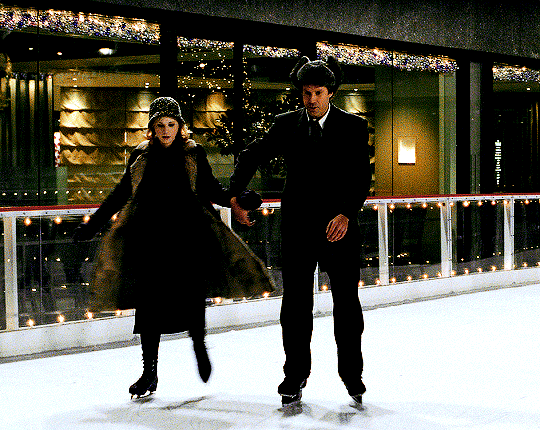
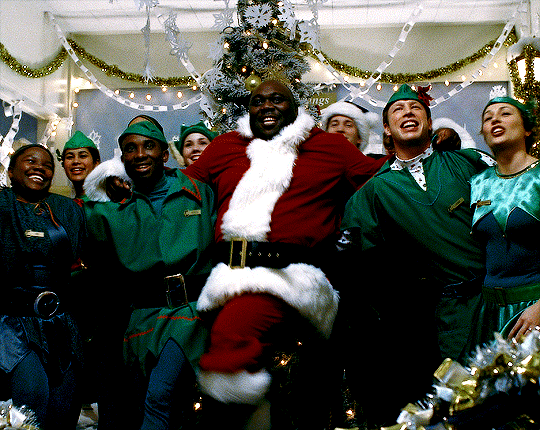

ELF (2003) Dir. Jon Favreau
#filmedit#userbbelcher#chewieblog#usersugar#usersavana#userlindir#useraurore#usermandie#duchessofhastings#userjack#usersjoy#userpavlova#usersmo#gownegirl#movies#movies*#*#3 gifset in a row from the same movie? that's not me
736 notes
·
View notes
Note
Sorry if you’ve answered this question before, but how do you make your gifs?
With an outdated version of photoshop and a lot of patience 😤
my messy process under the cut
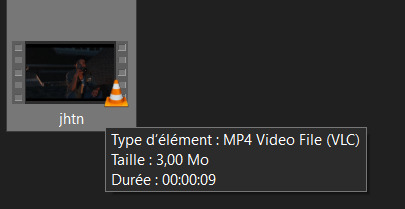
let's say i have this movie downloaded in .mp4
i open it in windows movie maker - or any other software that lets you do quick and easy edits and whatnot but me i use wmm even tho it's obsolete i knoooow leave me alone - cut the scene i want to gif out and save it into this tiny little file
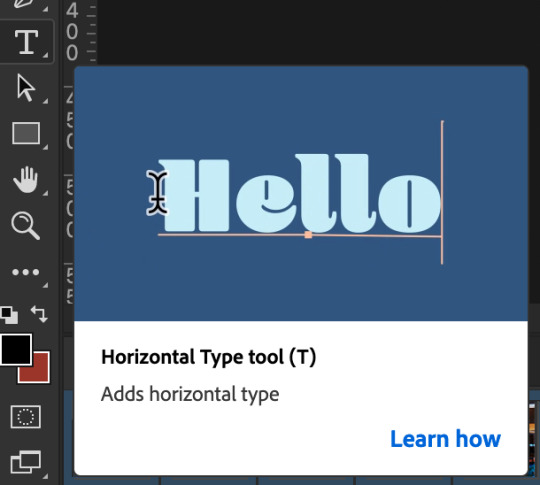
then i open photoshop and go into import > video frames into layers
(i may be a little bit off in how things are called on PS in english, but they should be in the same places anyway)
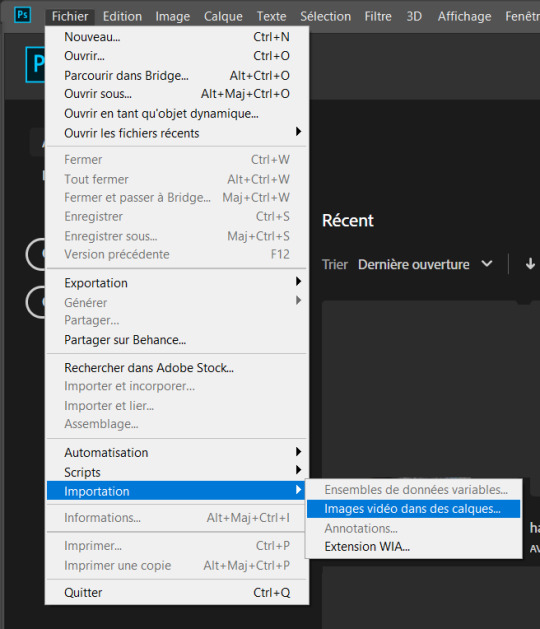
this little popup will open

since my file is exclusively the thing i want to gif i don't need to bother with the little arrow-ish things underneath the video player, they're there if you need to shorten your thing or like cut into it.
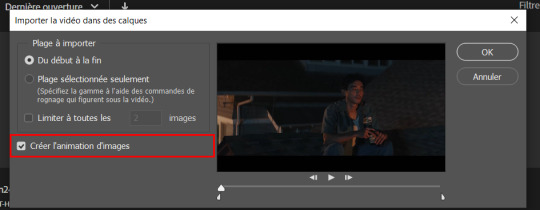
this bit here needs to be checked like this, it'll set up the gif animation or whatever. so yeah then click Ok
bim bam boom photoshop will open like this
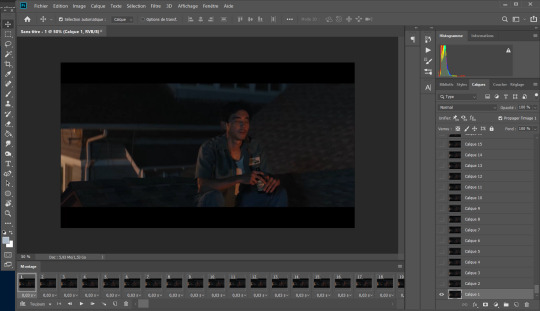
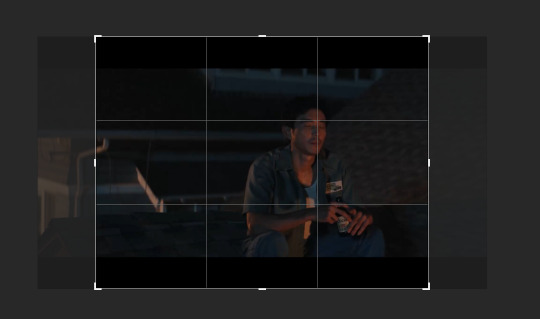
big scary image with many tiny scary images, so first of all what i do is get on the cropping tool

this will show up in the toolbar up top

and in there you set the dimensions of the gif,
1 gif in a gifset that takes up the whole post has to be 540px wide
for 2 gif next to each other it's 268px wide and i can't remember 3 by 3 but i never do that so whatever who cares.
once you've set up the dimensions you want, you got this grid thing to move around and set however you want it to be
and then you wait as it painstakingly takes its time to do it
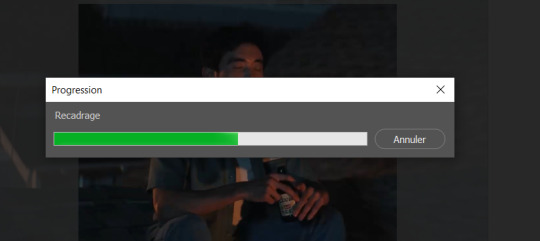
boom! it's done!

so that's your gif raw and unprepared without any filters or whatever, no length, no speed, nothing!
down there you've got the frames of the gif, depending how long is it'll be either a lot or very very short, in this case it's 277 frames, so already you know it's not gonna be just one gif but probably two or three - which i knew btw that's on purpose!!

first thing i do when all the cropping and setting up is done is scroll all the way through the frames to see if there's a bit that won't make it into the gif, and here, there is

these last four frames show a different bit of the scene because i cut shit very messily and don't check before opening photoshop but you know! trust the process! so make sure to select the unwanted bunch and delete them
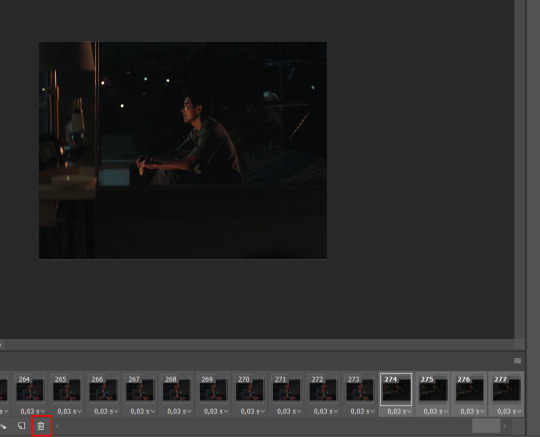
so now hurray the gif is 273 frames and it's only the one scene i want

and now the fun not fun starts!
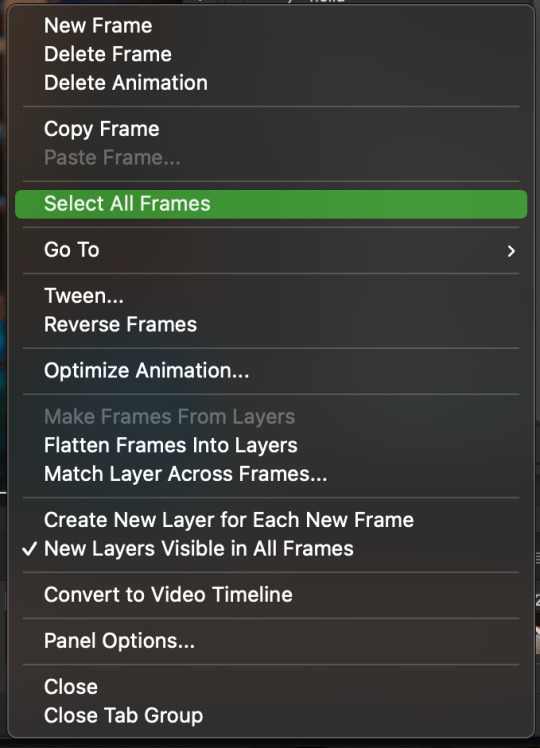
to the right you got these, the layers
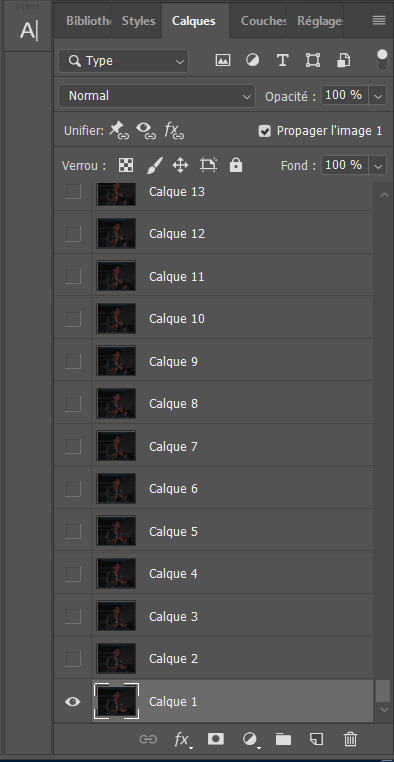
so you gotta scroll all the way up and NOT forget to click on the very last layer before you start playing around with filters and all that

this little guy right here is my bestien he's the only one i use when editing gifs, fuck everybody else on that row. when making gifs i mostly just use a combination of those three things, brightness/contrast, vibrancy and photo filters
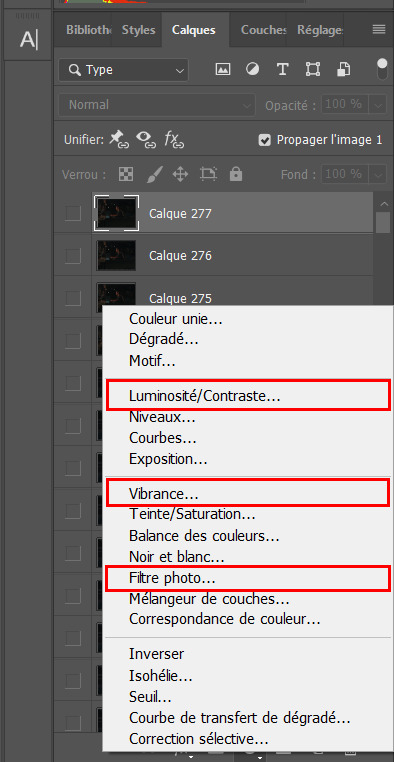
so anyway, let's fool around with those little things and make a gif
(i realize now the scene is very dark and it will look very ugly but never mind! we carry on) so there a bunch of random settings added - you gotta make sure they are all the way on top of everything or else they just won't appear on every single frame

what i do then is probably very stupid and there's probably a better way to do it, but MY PROCESS, so i divide the amount of frames i've got by the number of gifs i want to make in a set, so 273/3 that's 91 (thank you google), so we look back down at the frames
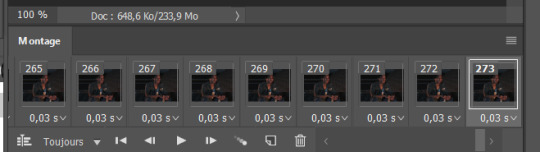
and then scroll aaaaaalllll the way back to frame 91 (if you hold shift and use the wheel it'll be much faster) and while still holding shift pressed down click on frame 92
that will select every frame from the last to that and we delete that shit

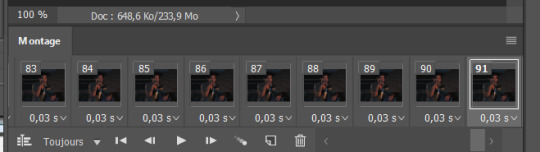
so now we only have 91 frames and that's one gif. so let's save it! but wait, no you forgot to do something!
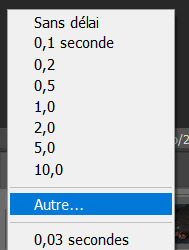
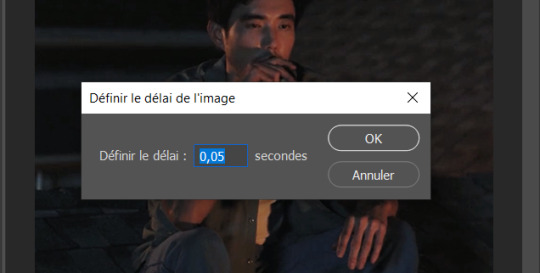
see the 0.03s? that's the gif speed or whatever, idk how it works but 0.03s is too fast, me i usually use 0.05s so what you do next is select every one of those frames you've got left and click the little pointing down arrow, that'll open that

click Other... and then set it as the speed you want
ok so your gif is at the correct speed NOW you can save it
so it's file > export > save for web
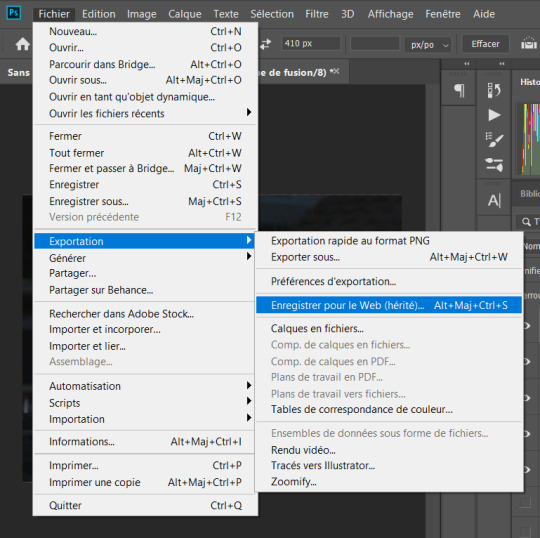
this new popup will appear
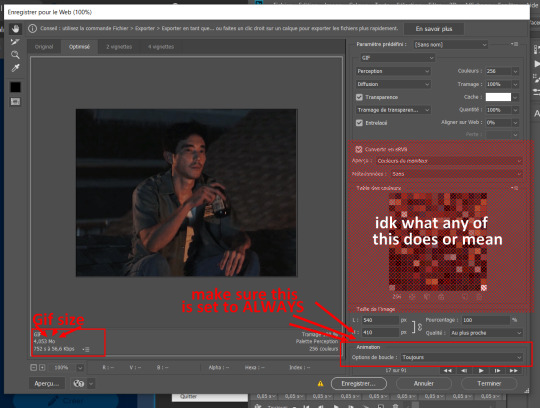
currently as of 2024 gifs can't be bigger than 10Mb/Mo, this one is 4mo

so we're good we're fine. so then you just click save, name the file whatever you want and VOILAAAA, a djeef!

(and then undo the delete and repeat everything for the other two gifs you'd want to make in that set)
7 notes
·
View notes
Note
Hi Nia! You're gifs are so pretty! Is it possible for you to show how you get your WandaVision gifs too look so clear and hd? And how do you do your colorings too? (specifically the wanda maximoff in episode 3 gifset ITS GORGEOUS) I'm new to giffing and all the tutorials are kind of old. It's okay if you don't want to though! I understand it may be time consuming.
omg no! never feel intimidated to ask!! i don’t mind at all!
so, i’m going to show you how i made and coloured this gif
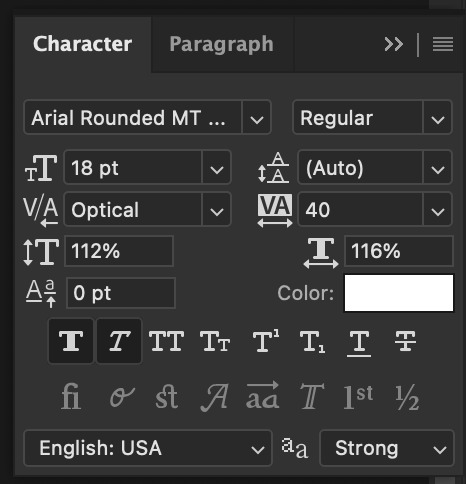
mostly bc it’s the only gif in that set w text and i’m going to share my text settings too!
tutorial is below :)
WHAT KIND OF VIDEOS ARE BEST?
.mkv files (the bigger the better BUT i usually think anything above 5 gb is excessive and unnecessary for an episode of television BUT for a movie worth it)
itunes downloads (logolesspro on twitter, hd-source on tumblr, live-action-raws on tumblr have some DEPENDING on what you’re looking for) (also, there’s a chance that if you search "show/movie hd download tumblr” you’ll find a tumblr with its itunes download available)
THAT IS IT NO OTHER TYPE OF FILES MAKE YOUR GIFS LOOK GOOD
- my suggestion is always if its new (like just came out the past month) t*rrent it! it’ll be downloaded quickly and .mkv files look the best! BUT if not check the sources above see who has the BIGGEST file if they even have what you’re looking for and then if not then you look to t*rrenting!!
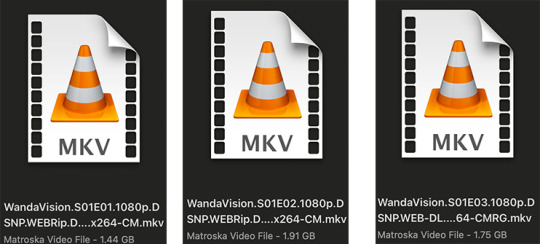
here are the wandavision files i use so you can see!!
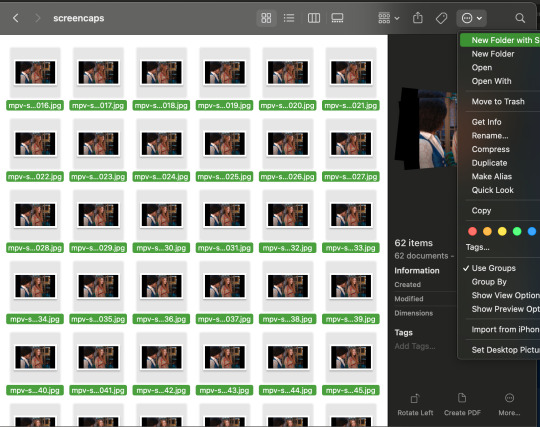
SCREENCAPPING
-if you have windows use potplayer! i have a mac so i can’t show you how to use it and it’s not available for me :( HOWEVER back when i had a windows potplayer was the best method in screencapping!!
-I HAVE A MAC! so i use mpv!! (go to mpv.io and follow the directions) BUT DON’T DOWNLOAD THE LATEST ONE (it has a bug that skips frames) try each before the latest one bc from what i heard different ones work differently for everyone!! and i don’t know which one i use (yikes!) THERE ISN’T THAT MANY I PROMISE AND IT’S WORTH IT BC MPV IS THE BEST (i used to use adapter but they didn’t take impressive screencaps in my opinion and it was evident in my gifs you can see it too! )
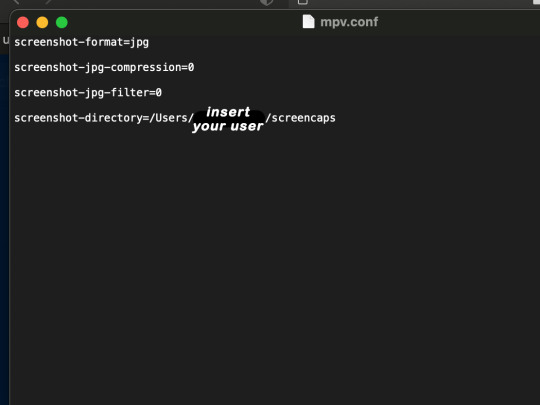
create a folder for your screencaps! and make sure to rmb the directory order! now we want to create a text file on our built in textedit app on mac! type up all this down below (i like jpg but you can replace jpg w png if you want) AND SAVE THE FILE AS mpv.conf THIS IS IMPORTANT SO DON’T FORGET IT! save it somewhere you’ll find easily and NEVER delete it until you don’t use mpv anymore
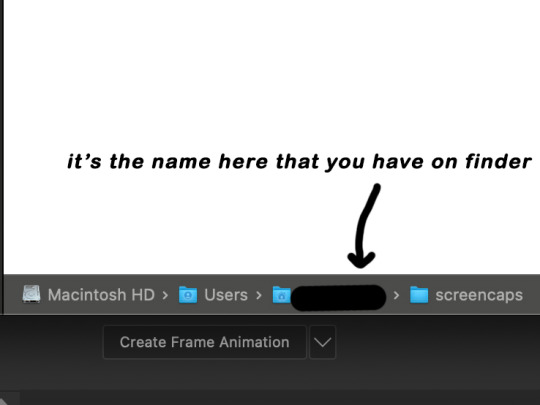
just in case you don’t know what to insert after, go to your screencaps folder
now you want to open mpv and go to the corner towards mpv -> preferences and they’ll tell you that there is no .conf file SO GO LOOK FOR THE TEXT FILE WE JUST MADE AND DRAG IT TO THE FOLDER THEY OPENED FOR US AFTER SAYING THERE IS NO .CONF FILE
(i learned all this from @kylos tutorial!! so if any of what i just said about setting up mpv makes NO SENSE to you check out their tutorial at kylos(.)tumblr(.)com/post/178497909311)
now we can screencap!
so let’s find the scene we want RIGHT BEFORE and MAKE SURE SUBTITLES ARE OFF
i pause and then press (option/alt + s) and then SCREENCAPS ARE BEING TAKEN!! and to end the screencaps being taken you once again press (option/alt + s)!!
now we want to delete the excess frames! and put it all into one folder!! DO NOT DELETE FRAMES IN THE MIDDLE OF WHAT YOU WANT TO GIF!! WHEN YOU SKIP FRAMES IT WILL BE NOTICEABLE!!

MAKING THE GIF
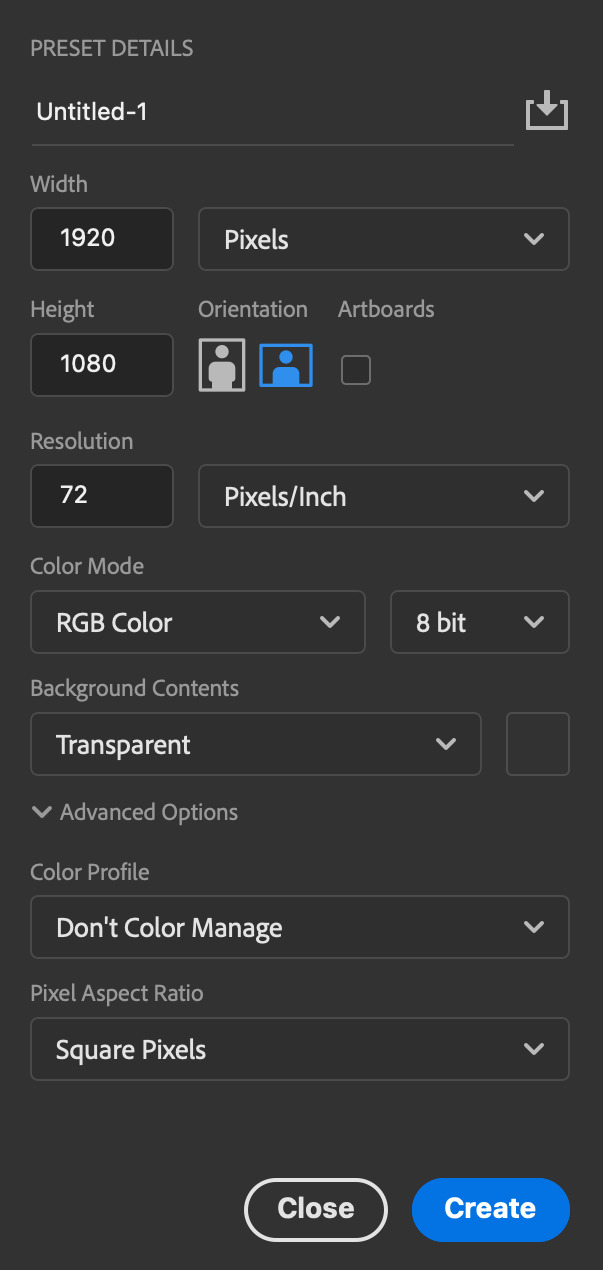
this method isn’t used that much BUT I LOVE IT so this is how i put my frames in! first i check to see the size of my frames: 1920 x 1080

so i create a NEW file on photoshop with those dimensions w these settings
now i set my tool on photoshop to path selection tool bc if you have it set on smth like move tool or crop tool at the end you might end up moving or cropping frames you don’t want to!

ok so now we select ALL our frames and drag it on top of our new file on photoshop and the MOMENT we see our first frame in photoshop JUST KEEP CLICKING ENTER until all the frames are loaded!!

you can do file -> scripts -> load files into stack but it is WAYYY slower in my opinion!
now i crop out the excess BUT i don’t resize the gif yet! the dimensions wandavision is filmed in is 4:3 so i go to crop and set the settings to this:

MAKE SURE IT’S ON RATIO SO WE’RE PRESERVING THE ORIGINAL SIZE JUST CUTTING OFF THE BLACK EDGES!! We are going from 1920 x 1080 to 1440 x 1080 this is the dimensions after i cropped

WE ARE KEEPING THE QUALITY BY NOT CHANGING THE DIMENSIONS OF ANYTHING INSIDE !!
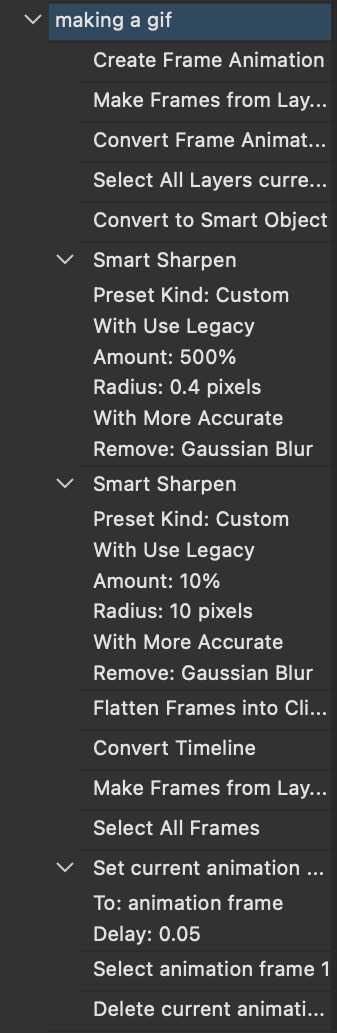
now we want to go to actions and create an action!! open up actions w one of these two depending on what your dash looks like!!


so we create an action with this button on the bottom of actions and we’re gonna title it making a gif and hit record!!

NOW LET’S GOOOOO!!
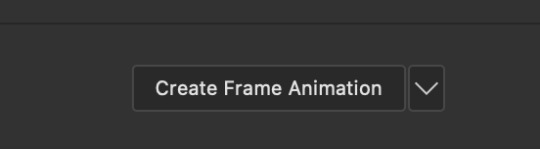
1. make sure you have timeline on your dash!

2. create frame animation (if you see create video timeline just click the arrow next to the button to see your other option which is frame animation!!)
3. now let’s meet our best friend!! the little bar in the top right corner that has all the commands for making our gifs and MAKE FRAMES FROM LAYERS
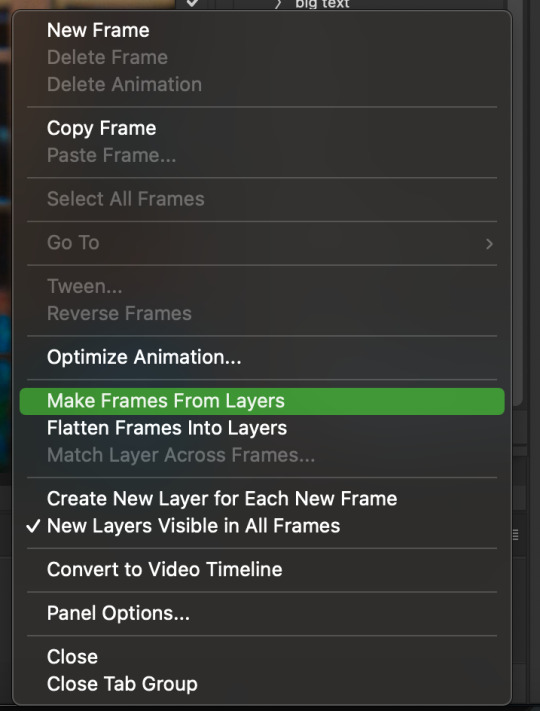
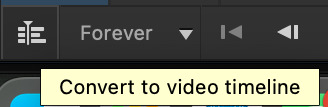
4. WE HAVE TO SHARPEN OUR GIFS NOW BUT TO DO THAT WE NEED TO CONVERT TO A SMART OBJECT SO NOW WE ARE GOING TO CONVERT TO VIDEO TIMELINE there are two ways: the button in the bottom left corner or the button in the top right corner w all the other commands!
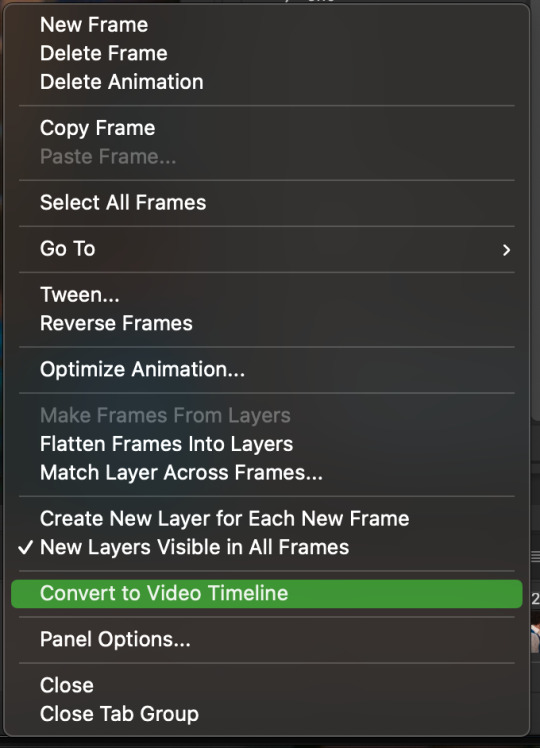
5. select -> all layers DON’T MANUALLY SELECT THEM ALL BC THE ACTION WILL ONLY SELECT THAT SAME NUMBER OF FRAMES SO IF THERE ARE MORE FRAMES YOU WON’T GET THEM IN THE SMART OBJECT!!

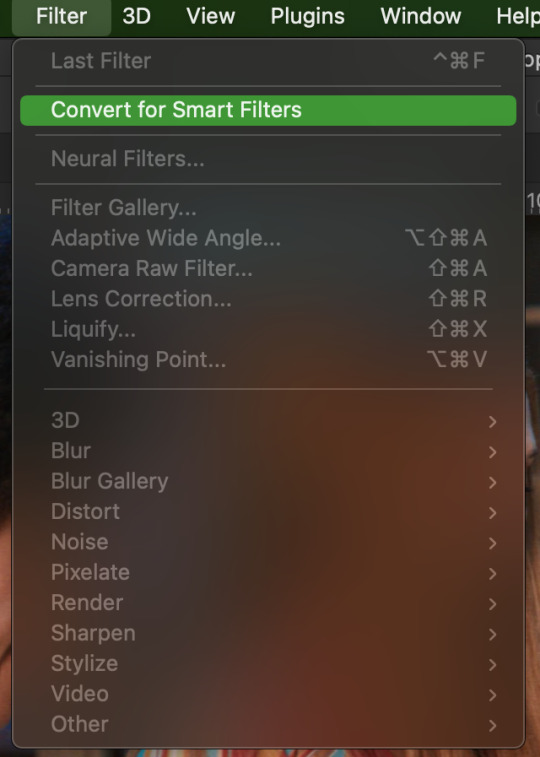
6. filter -> convert for smart filters
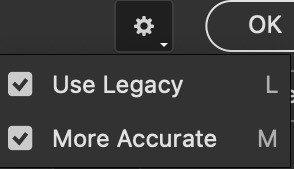
7. NOW WE SHARPEN!! (filter -> sharpen -> smart sharpen) i sharpen twice!! first, make sure we are on legacy w more accurate and remove gaussian blue! the first sharpening will be 500% with 0.4 px radius. NOW SHARPEN AGAIN (filter -> sharpen -> smart sharpen) also w legacy, more accurate and remove gaussian blur BUT this time 10% with a 10.0 px radius!


8. it’s hd now!! so let’s flatten frames into clips!! go to the top right magic button again!! and you should see a pop up saying layers are being made
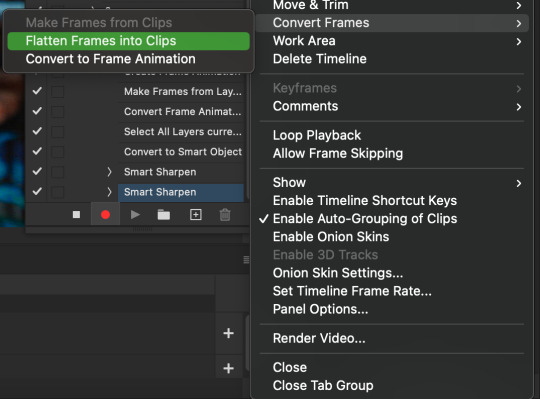

9. now we convert back to frame animation w either the bottom left button or our magic top right command center!

10. make frames from layers

11. select all frames w our magic command button
12. set the animation delay to 0.05 THAT IS THE BEST ONE ALWAYS ALWAYS ALWAYS only use 0.06 when the character is moving really fast in the video itself and it makes the gif itself look awkward BUT NEVER GO ABOVE 0.06 it’ll look slow and laggy and we don’t want that and don’t go below 0.05 bc then it’ll be tooo fast and we don’t want that either!


13. now delete the very first frame on the timeline bc it is an oversharpened duplicate of the second frame! end the recording w this button!

this is what your action should look like expanded! if you made mistakes on the way and it shows up you can just click the specific step and press the trash can on the action tab to delete in from the order!!
NOW AFTER LOADING YOUR FRAMES AND CROPPING THE EDGES OF YOUR FRAMES IF YOU NEED TO JUST PLAY THE ACTION AND THEN YOUR GIF WILL BE MADE FOR YOU!!!!
now i delete some unnecessary frames in the beginning and end and this is what my gif looks like (the size was 46 mb and the limit is 10 mb so the dimensions of the gif are 540 x 405 to get it to 5 mb BUT I HAVEN’T CROPPED IT YET SO THIS IS ME CROPPING JUST TO SHOW YOU WHAT IT LOOKS LIKE)

CROPPING THE GIF
in my opinion if you want your gif to look hd you shouldn’t crop before you sharpen!! i believe that if you crop before you sharpen you don’t allow photoshop to sharpen all the pixels whereas if you crop beforehand there is less to work with!!
dimensions is all up to you!! just make sure to go by tumblr rules!! 540 is the max width and if you want to make two gifs per row then my suggested width is 268 and for three gifs per row my suggested is 177 px! Just have the right width and the length can be whatever you want!!
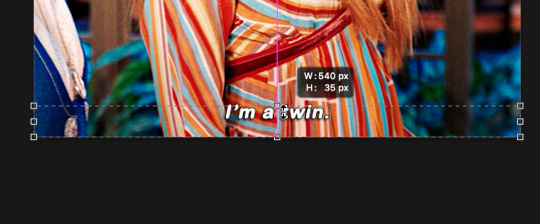
now i’m going to crop my gif to 540 by 590!!

NOW THIS IS WHAT MY GIF LOOKS LIKE!
COLOURING BASICS
let me show you the best adjustment tools in my opinion and a brief explanation for what they do!!
brightness/contrast: pretty simple increase/decrease the brightness/contrast BUT one of my techniques for when i first start colouring a gif is i select all my frames and do nothing to the settings of the adjustment but i set the layer to screen LIKE THIS

curves: ik others use curves to change brightness/contrast w the squiggly thing BUT i like it to set a white point and black point, this is also a technique i use when i first start colouring a gif when screen doesn’t look good for me SO you use white point to select a pixel on the gif to set as the lightest color on the gif (setting the white point) and you use black point to select a pixel on the gif to set as the darkest colour on the gif (setting the black point) usually the white point makes it TOO bright and that’s why we use the black point to counter it and same goes for when i use screen with brightness/contrast, it gets too bright so i use black point to counter it below is the button for white point and the button for black point, respectively they are shaped as color picker tools


vibrance: generally, i never use this except for color p*rn sets but they work really well in making colors seem more strong
hue/saturation: like vibrance, i never use this except for color p*rn sets but this adjustment is to help change the colors or hue of a color for example: turn blue into purple or turn a blue into a little lighter shade of blue
color balance: I ALWAYS USE THIS!! except for in black and white gifs BUT THIS IS MY GO TO AND IF I DON’T USE IT MY GIFS ARE JUST BLAND i feel like color balance is what essentially balances the colors on your gif and adds dimension to it, it makes your gif go from looking way too yellow to a more golden neutral look and it is an essential adjustment in my opinion
channel mixer: i rarely use channel mixer BUT it is so so useful when you are working w a dark scene just play w the settings and all of a sudden all the blue in a dark scene will be a little more yellow and red and your scene will kind of just look brighter and more visible
selective color: THIS IS ALSO AN ESSENTIAL this helps SPECIFIC colors pop you’re working on a scene where there is too much red on someones face you use this tool to remove the magentaness from the yellow section OR when you feel someones face is TOO yellow and needs more blush you add more magenta in the yellow section of selective color
gradiant map: gradiant map is perfect when you’re lazy if you feel like your gif looks more neutral and you want some red in it but you don’t want to mess with any other adjustments just set a red to black gradiant on soft overlay with a very low opacity and BOOM slightly red but not too much red added!
NOW TO COLOR THE GIF!
today i have decided to start with a brightness layer set on screen
and this is what we got!

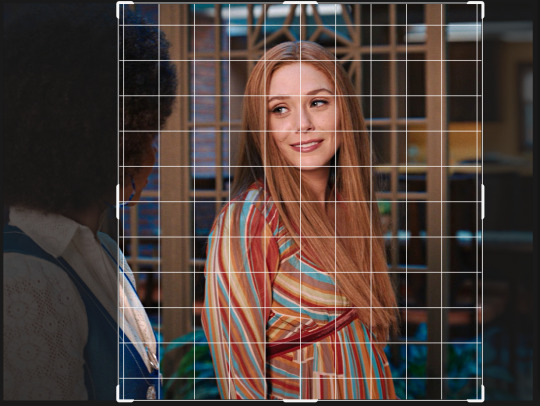
now that’s a little to bright and washed out in my opinion SOOOO to counteract it, i’m going to use my black point tool in curves and i’m going to select this point on the gif (it’s better to choose smth in the background and not smth that’s paid attention to such as monica’s hair or either of their eyelashes)

now my gif looks like this! the base color is complete!

now i think i need to balance all this yellow and red! SOOOO WE GONNA USE COLOR BALANCE!!
i think the best way to use color balance is to keep swinging the balancer until you see what you like and then keep going midtones i think i want more red and i don’t want a cyan midtone and then for shadows i think i want more cyan to counter the redness of the gif but highlights i don’t touch that much NOW HERE ARE MY SETTINGS SO YOU CAN SEE

and this is what my gif looks like

now you can stop here if you want but in my opinion i think the gif looks a lil too dead still SO IMMA USE SELECTIVE COLOR
i think there needs to be a lot lot more RED so i amp up the yellow magenta and black in the red! but i also think the yellows need to be LESS RED so i remove magenta from the yellow! and bc there’s some cyan and blue bc of monica and the flowers in the background im going to make the cyans more cyan and the blues a lil more black! i’m going to remove some yellows from the magenta!! and i add more black to the neutrals and black!! i think it’s always important to add more black to neutral and black bc it adds more depth to the gif by not just making it a bunch of bright colors and having dark colors to contrast to!! my settings are below!

and the result!
now let’s see everything together!

and the before and after!

I HOPE MY COLOURING EXPLANATION MADE SENSE!! if not you can always ask me more questions i don’t mind!!
ADDING SUBTITLES
we want to grab the text tool!
make a text box from anywhere in the middle from the left to right edge. this is so we can make sure our text is centered and will be in the same place for when we have sets w more than one gif w text!

type your text out and make sure you highlight the whole text so that all the settings apply to EACH character! you can find the alignments (for center) in the paragraph tab!

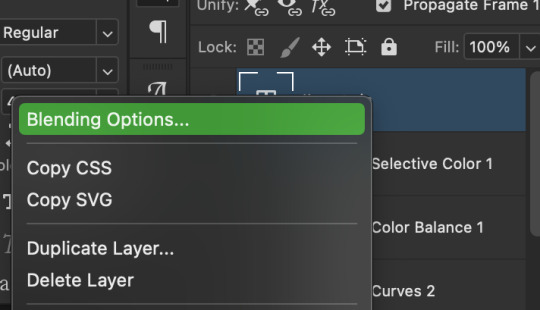
now lets right click on the text layer and go to blending options! add stroke and drop shadow!


now drag it to the desired height you would like and make sure to keep it in mind for when you have more than one subtitled gif in a set!
NOW TO MAKE SURE THE TEXT STAYS IN PLACE AND THE BLENDING STAYS YOU HAVE TO CONVERT TO SMART OBJECT!!

if you want to only have the text applied to certain frames instead of all frames, select the frames you don’t want by clicking the first frame in ur don’t want section ON THE TIMELINE and WHILST HOLDING SHIFT click the last frame of ur don’t want section and then toggle the eye switch next to the text layer
now you see the text

now you don’t

tip: use opacity to fade the text in and out!
the text is going to be on all my frames so i don’t need to toggle the eye but i just wanted to show you just in case!!
now here’s my FINAL RESULT

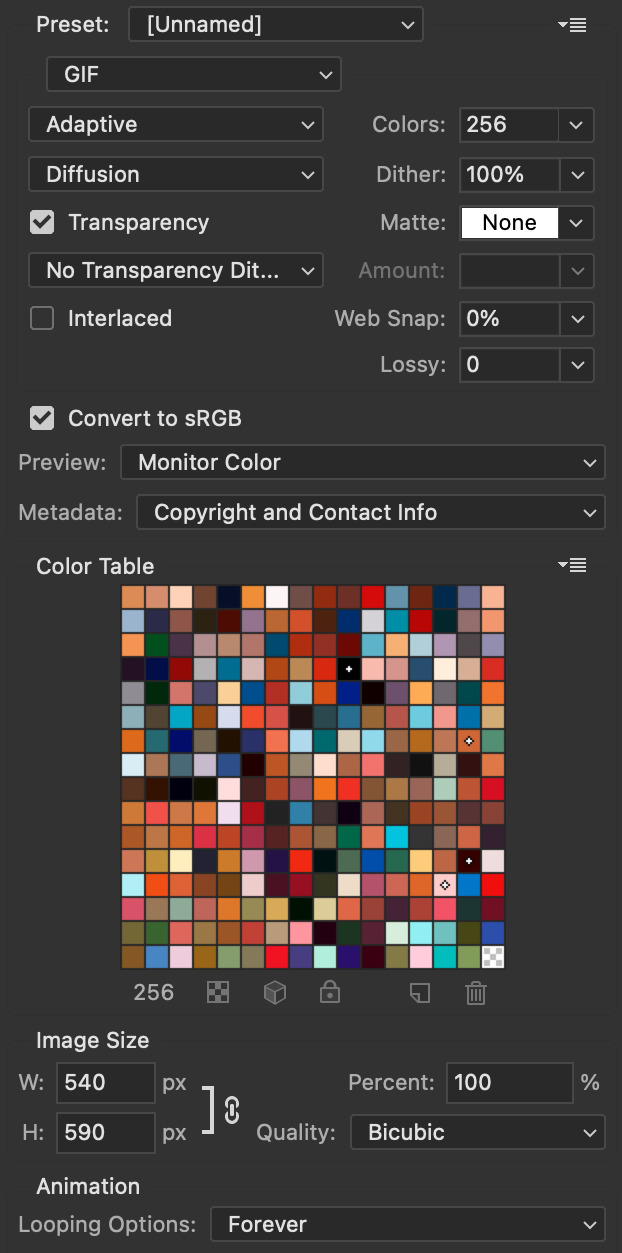
save for web (file -> export -> save for web)
your gifs have to always be under 10 mb! so, if your WAYYY overboard YOU HAVE TO DELETE FRAMES! or you can divide the gif in two and have two gifs instead of one! however, if you plan on going the deleting frames route MAKE SURE YOU DELETE FROM THE BEGINNING OR END OF YOUR SELECTION i promise you that most of us won’t notice that your characters dialogue is being cut off BUT WE WILL NOTICE IF FRAMES ARE BEING SKIPPED so, don’t delete frames in the middle of ur gif!! idc how little you do it IT WILL RUIN YOUR GIF AND I SAY THIS FROM EXPERIENCE i would delete every fifth frame to cut down my gifs and that may seem like not that big of a deal BUT IT IS my gif looked choppy and poor so it is way better to cut from the end/beginning of the gif
ANOTHER LAST PIECE OF ADVICE in the bottom left of when the save for web menu shows up THERE’S A PREVIEW BUTTON click on it! it’ll show you your gif on your default browser and show you what it’ll look like once uploaded! this is perfect to check the speed of ur gif and the colouring and to notice if there’s a problem with your subtitles or maybe there’s an obvious jump in frames you never noticed before!! i always use preview bc the built-in photoshop viewer of ur gif shows the colors differently and the speed is NEVER ACURRATE!
I USED THESE SAVE SETTINGS!! many say to use selective pattern but i DISAGREE and i think these save settings are the ✨ best ✨
OK NOW THAT IS THE END OF THIS VERY LONG GIF TUTORIAL!! I HOPE THIS IS WHAT YOU WANTED!! IF YOU HAVE ANY QUESTIONS DON’T BE AFRAID TO ASK I SINCERELY DON’T MIND!! JUST DON’T BE RUDE OR ANYTHING BC PPL HAVE BEEN RECENTLY :(
I WISH YOU ALL THE LUCK AND FUN IN YOUR GIFFING ADVENTURES !!
#tutorials#asks#sourceblog#allresources#completeresources#itsphotoshop#dailyresources#resourcemarket#chaoticresources#onlyresources#hisources#sibylresources#dailypsd
383 notes
·
View notes
Text
show your process
To continue supporting content makers, this tag game is meant to show the entire process of making creative content: this can be for any creation.
RULES - When your work is tagged, show the process of its creation from planning to posting, then tag up to 5 people with a specific link to one of their creative works you'd like to see the process of. Use the tag #showyourprocess so we can find yours.
tagged by @malortsev a few days to talk about this gifset which is cool bc for once it’s an edit that i actually have a lot to say about other than my usual colouring complaints. this got long and i’m getting embarrassed thinking of anyone actually reading this the whole way through but here we go x
planning:
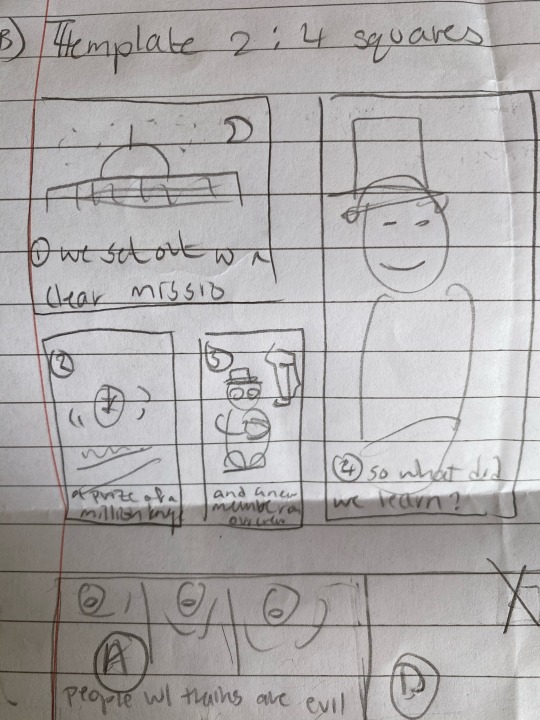
jesper’s recap of the crows’ failed mission was one of my favourite parts of the last s&b ep and i knew i wanted to gif it in a way that featured the scenes he was referring to mostly bc in my head i got the vibes of the luis recapping sequence in the ant man movies lmaoo. originally i was going to do a ten gif (540 x 350 px) set that you read from up to down but that seemed too boring and i wasn’t sure the quality would come out great with the dark scenes so i thought i should try out something more creative. and it seemed like the type of edit that needed to be just as fun as the quote anyway. i’ve been meaning to try out the multiple-different-sized-gifs-in-one-canvas layout that’s been trending so i settled on that but boyyy was that a process that involved a LOT of simple math which i am ridiculously poor at!!! but i looked at this post for reference and help
usually when i plan a set i write down a few lines of the idea/theme in my notes app and then match them with the corresponding scenes but this time i actually drew out the thing bc i had to see for myself which layout would look the best and i also wasn’t sure that i liked the dimensions in the example post (i ended up using this post as inspo for the first big gif). anyway here’s the terrible Art (i can’t believe this paper was still lying around):
giffing:
i’m not gonna go into detail about the actual gifmaking process bc it’s not very interesting - just the usual screencapping/colouring/saving steps. i will say tho that looking for the scenes took the longest bc i’m not familiar enough w the show to know where the ones i wanted were (only confident with ship scenes rip) and screencapping was the Actual Worst bc i had to use a new program that’s compatible with the version of the show i downloaded. and i’m still using this program which is why i’m even slower at getting stuff out if anyone was wondering :))
arranging:
so the steps for putting the gifs onto 1 canvas are to make sure they’re all the same number of frames, to convert them into smart objects that you can move onto the canvas (which should be in timeline mode), and of course to make sure the canvas is the right size to contain them all. you can divide up the canvas between any number of gifs as long as they total to the height and width (always 540 px) of the big gif, and account for the spaces in between each gif (which is 4 px). so if you want 3 gifs of different sizes next to each other, you need to make sure that their widths combined equal 540 minus 8 as there are two spaces between the three of them. my example for the row below is 130 + 272 + 130 = 532, and when accounting for/adding the 2 x 4 px spaces, the total amounts to 540.

this was a lot of trial and error bc i’m bad at this kind of easy math and honestly just typing this up took me forever (but if anyone actually uses these instructions it might be worth it). so basically i calculated the sizes i wanted then created the gifs + arranged them accordingly and went back and forth in case i made mistakes. there *is* still one glaring mistake in the gifset which is that the small gifs in the above row don’t line up with the small gifs in the first big gif but i’m too lazy to resize and re-upload. do keep that in mind though bc it looks so much cleaner when done properly. otherwise i must say it was very pleasing to see them all come together
posting:
i posted this close to 5 pm which is surprising bc i usually post at 3 am but it just proves how delayed i was getting this out bc i’d meant to post the edit 3 days before then. so obviously i was fed up by the time i published it and i tried to act nonchalant about it in the tags bc it honestly looked incomplete to me and still does, and i know more effort goes into edits with this kind of layout but whatever! it got good reception and it really was a learning experience for me :-)
ANYWAY tysm for tagging me seed!!<3 i’ll tag:
@number5theboy for this edit / @rockyblue for this edit / @jimhcpper for this edit / @lordbelacqua for this edit / @swanthief for this edit and soo many other creators + creations that i admire but am too tired to tag
20 notes
·
View notes
Note
oh my god?????? wowww????? can you do a gif making tutorial pleaseee? (or link it if you’ve already done it before sksjsk) what software and apps do you use? and what tips and advice would you give to a beginner? and also tumblr has some rules and stuff to post right? your gifs are amaaazinggg!!! thank you thank you thank you
oh, boo... thank you so much for the compliments. you’re so kind. i'm gonna be honest with you, though: making tutorials is a huge pain in the ass 😅. i’m gonna answer some of your questions myself, but i hope you'll forgive me for linking you to other people's tutorials that have helped me a lot.
i use ps cc 2019!
i use KMplayer to screenshot
i use videoder & 4k video downloader to download most of my videos (when it’s a movie or a tv show i usually go looking for the highest quality torrents)
here are a few tutorials:
a friend of mine did this AMAZING, super complete & resourceful tutorial for beginners. it basically has everything you need and more. it goes from downloading photoshop to which tags you should use.
here’s another tutorial made by the super talented @goldenlike. i’m linking you to second one because you can’t ever know too much & maybe a smaller tutorial will be less terrifying haha
this tutorial changed the way i used to brighten my gifs and i use these tips to this day.
i made this one tutorial once, because someone wanted to know something specific. if there’s anything in particular that you like about my edits, please, feel free to ask (despite my statement above, i would be willing to make a tutorial for something less... broad, yk? fhjdhks)
there are soooo many tutorials out there, and accounts that put these tutorials together. here’s an example. you can find tutorials for pretty much anything you want on tumblr dot com. if you see a gifset/effect you like in particular, don’t hesitate to message the creator asking for more info about the gifmaking process. 90% of the time they’ll be happy to explain it to you.
honestly, gif making is a very personal process. i’ve read countless tutorials since i started, because there’s always a tip you have never tried before. it may work for you or it may not. my main advice would be start out by following one of these tutorials step by step. then, once you get the gist of it and feel comfortable doing the basics, start messing around with any and every thing (i.e.: coloring (this is definitely one of the most personal aspects. what i think is a nice coloring might seem horrible to someone else), saving settings, typography etc).
as for some tips and advices:
everyone always says this, but it bears repeating: try to always use the highest quality source material you can. it makes all the difference.
learn the RIGHT PROPORTIONS if you’re planning on posting your gifs on tumblr. it makes me want to cry when i see a content creator working so hard only to end up posting their stuff in the wrong size. it ends up looking all wonky 😩
i believe the tutorials above mention the proportions, but, in any case: 540 px width for one gif per row, 268 px for two gifs, 177 px/178 px/177 px for three gifs. the height is up to you!
smart sharpen, exposure/gamma correction, vibrance and color balance are your best friends. i almost never mess with the saturation of a gif, i only increase the vibrance!
if there’s one color in particular that is bothering you, selective color will be there for you.
pay special attention to skin tones: you don’t want anyone to be red as a tomato but you also don’t want to whitewash someone. in my opinion, skin tones are almost always the trickiest part of a gif.
i always add at least one layer of selective color > black > increase black between 5-10, because i think it does wonders for the definition/quality of ur gifs, but that’s just me.
each fandom has its own rules & particularities when it comes to content... one of my main advices would be going to a content creator’s page and take notes on which tags they use to help spread their content and if there’s any apparent rules that the creators follow.
most fandoms have at least one account that helps with spreading content. in the 1d fandom i always tag: #stylesnews #dailytomlinson #stylesedits #tomlinsonedits #hlcreators #hljournal #1dsource and/or #hlsource (depends on what you’re posting. i’m not gonna tag “tomlinsonedits” in a harry gifset haha)
don’t be ashamed to self reblog like crazy 🤪 sometimes the timeline is too chaotic for people to see your creation (especially if you post it amidst a release day, when everybody else is also posting stuff), so you might as well just reblog your own post 2-3 times on the same day, just to make sure.
HAVE FUN!!!!!!!!!!!!! most of all, have fun. try not to stress too much about it. tumblr is a hobby, no one is paying you to create anything, so just have fun with it. gif the stuff you like (it doesn’t matter if a million other people have already edited the same thing), create gifs that look good to >you<, mess around with the settings, allow yourself to be creative and try not to be too discouraged if people end up not appreciating it the way they should. unfortunately, tumblr isn’t too kind to content creators in general, so don’t take it personally, yk?
#i'm almost sure this was no help at all#i'm just rambling nonsense i'm sorry#ask me for anything specific and i'll be happy to help i promise :(#answered#anonymous#GOOD LUCK I HOPE YOU HAVE FUN
24 notes
·
View notes
Note
hi! sorry if this is a bit out of nowhere but i love your gifs! they're so clear and crisp! and i was just wondering if you had any tips on how to achieve the quality that your gifs manage to have?
ooh thank you so much. nonnie! i’ll leave some tips under the cut. if you’re ever interested in a full tutorial, please lmk! i always thought about doing one, but there are already 5 million on this site... but so many are different from each other, so hey, who could it hurt. anyways here’s some stuff i thought of :)
1. ALWAYS use 1080p. Others say 720p or 1080p, but I don’t think i’ve ever used 720p unless the show/movie is literally not available in 1080p. you can see the difference! i’ve used 2160p as well, but that’s not necessary at all, and you’ll only find that on much newer stuff.... besides, 1. most computer monitors/phone screens only go up to 1080p anyway, and 2. once you resize the gifs to tumblr dimensions, there is literally no difference between those two)
2. know your sharpen settings! for me, it’s almost always .3 radius, 500%, gaussian blur & more accurate. however, once in a while, this can change, depending on the camera used when filming the show/movie (i.e. an indie film with a lower quality cam) or the quality of the file itself. for example, for my recent set here, i had to do that setting, and then an extra, lighter smart sharpen layer on top of that, because it still wasn’t crisp enough, due to the lower-budget camera quality. ALSO: PLEASEEEE DON’T OVERSHARPEN! equally, don’t skip sharpening. it is probably the base essential component, and your gifs will look amateur if you don’t have it, no matter how good you are at coloring :)
3. don’t be afraid to experiment. even if you think something will be too dark, too bright, too dull, too vibrant... try it! every show/movie is vastly different to color and edit, so always try out new things. ALSO a really good method is to upload the gifs you made into a new post, and save it as a draft. this will show exactly what the gifs will look like when posted, which is always quite different than what you see in your photoshop workspace. this will allow you to know your gifs are at the quality you want before posting
4. always upload every frame of a recording. don’t only capture every other frame, and definitely don’t skip two or more frames in between. this makes the gif jerky and definitely seem lower quality. i see this a lot with newer gifmakers. just use every frame, and make the giffed clip shorter if it’s over the size limit! better to have a smoother, shorter gif than a long, jerky one, any day. ((some people may argue that deleting every other frame doesn’t make a difference, but if you want a smooth gif... trust me, it does).
5. 98% of the time, my time delay between frames is .05. a lot of people say .06, but i find this a bit too slow, unless the gif is very small, in which case the frames move faster, so they need a slower delay (idk the logic okay just work with me!!). also, i’ve noticed a trend (esp in the pale community, even though i’m not a part of it anymore), is to put a lower frame delay, so the clip moves really quickly. i don’t like this personally, as i find it super distracting to watch gifs move at a fast forward pace, but it’s your choice. .05, i’ve found, moves closest to the natural pace of the source material, if not the TEEEEEENIEST bit slower, but in a very nice, natural way, and barely noticeable at all (.04 is just too fast imo).
6. this one is a complete and total preference thing, and you don’t at all need to follow it. but if you’d like an insight into how i like to make my gifs... i always like the coloring of the gif to be naturalistic and just slightly bright. meaning: i don’t make my gifs overly vibrant, i like to keep my colors natural. this isn’t to say i don’t change the coloring up from the original scene - if a someone is lit very blue, or red, or too much of any color, i like to try to adjust the colors so their natural skin tone shines through more. if a scene is extremely pale, i like to bring up the vibrance a bit - not unnaturally so, but so there is more color tone to look at. and in terms of the ‘slightly bright’ part, i like to up my exposure/levels/curves/brightness (the combos of those four change with every set... some gifs look Bad with adjusted levels, some look washed out with higher exposure, etc) so it pops a little bit more on the dash. again, not in an unnatural way.
7. in #6, remember when i said if something is lit too much of a certain color, i like to try to get natural skin tones back (if it’s a shot of a person)? sometimes, this isn’t possible. in this case, embrace your colors! for example, if a scene takes place in a darkroom with the intense red light on, your not getting any skin tone out of that... so embrace those reds! up the vibrance a bit, get your red selective color layer out, make the red pop. it’ll look lovely in a set!
8. very similarly, if a scene is extremely dark, a lot of the time it will diminish the quality if you try to brighten the whole thing up. embrace those darks, while finding the light areas to bring up. for example, that same gifset i linked above. there is a gif in there where he is standing in complete darkness, with only one side of his face lit up. not only is this a symbolic shot and there is a reason for one half of his face being in darkness, even if you did try to brighten the whole thing, alllll of that black space will become gross and pixel-y, and the light spots on his face will be overexposed. instead, what i did was take that black space and make it even blacker, while using curves to keep that area dark and bring up the brightness in his face, which gives it a lovely contrasting effect. i love this look in gifs... dark vs. light!! embrace what the scene gives you!
9. this may be obvious, but know tumblr’s dimensions. if you upload a gif at the wrong size, it will either shrink or stretch it, completely ruining the quality. (my most used dimensions are 540px for single gifs rows, and 268px for double gif rows)
10. always put a final BLACK selective color layer at the end of your layers, and up the blacks slightly until they are True Black. this will make sure everything has a good level of contrast, and appear as smooth and hq as possible!
hmmmmm i think this is all i can think of for now.... there is some other more subjective stuff as well i guess, but most of it doesn’t have to do with gid “quality” or “crispness”, so they’re prob beside the point. these are the important points i can think of. if you need anymore specific help, feel free to shoot me another ask/message!
28 notes
·
View notes
Note
3, 7, 13
3. Sweaters vs. Boots
See this is a strange question because like....we can be wearing both at the same time. You can wear both sweaters and boots. I mostly am wearing sweaters and boots. Unless I’m wearing flannel....
Okay. Decision made. Boots, because I will wear boots with absolutely everything, and while I love sweaters, I don’t think I could live without boots.
7. Apple Pie vs. Pumpkin Pie
Apple. See every year it really ends up turning out that I like pumpkin more for the aesthetic than the actual taste and texture. Though I do make a pumpkin chocolate chip cookie every year that’s really good, I definitely prefer apples in all things.
13. Harry Potter vs. Halloweentown.
God. Okay, I think I’m going to say Halloweenton because it’s untainted from anything else. I’ve seen a couple gifsets float around and every time I see them I’m just like transported to innocent childhood. I’m about to dress up as a witch for the fourth year in a row and then my aunts will come over and we’ll go trick-or-treating around the neighborhood and then come back for hot chocolate and to sort and trade our candy.
Harry Potter was probably more domineering a presence in my childhood but now it’s sort of tainted, not just by JK Rowling turning out to be a massive TERF and all around terrible person, but all of the rest of the ‘read another book’ crowd stuff which I simultaneously hate and think are just being mean and sometimes sort of agree with and that makes me feel bad and that last Fantastic Beasts movie was genuinely one of the worst movies I’ve ever seen...so yeah. It’s lost some of the nostalgia factor. And even then I didn’t really associate HP with Fall, it was more a summer thing for me, because the books would come out in the summer. We’d always preorder and I would like sit at the mailbox on release day being a very small pakige gremlin. My favorite was the Order of the Phoenix because we left to drive to Arizona (from Massachusetts) right after it came so I would read it in the car and at our campsite - I think I probably read it like 3 times on that trip alone.
Okay well the nostalgia’s back. Anyway -
[ask me to pick between Fall things because it is Peak Fall out there today and that sounds fun]
4 notes
·
View notes
Note
hey! i hope your layover isnt too horrible and that you manage to survive 💓💓 please try and convince me to watch the social network because honestly i really cant comprehend how a movie about mark zuckerberg can be anything but awful lol
omg thank you lovely
first of all, i just wanna say that i totally felt the same way before i watched it. to me, a movie about facebook seemed so bad and uninteresting. i didn’t care about mark zuckerberg at 13. i don’t care about him now, outside of wanting him to redistribute his wealth and then die. so i see where you’re coming from, and i want you to know that this movie is worth it.
however, i feel like this movie is only about mark zuckerberg on a surface level. it’s the story of facebook and it’s creation, but i think it’s primarily a social commentary: on nerd culture and privilege and male entitlement and money and how social media impacts our relationships. i don’t think it would’ve gotten the acclaim it’s gotten if it was just a movie about mark zuckerberg.
anyway, under the cut because this got LONG:
let’s start with my favourite part of this movie: mark and eduardo. i know it’s weird to think about mark zuckerberg in a) a romantic context and b) a gay context, but i think there’s intentional homoerotic undertones to their dynamic. fincher and sorkin are both so specific about the stuff they make, that i don’t think they would’ve let this get through unless they intended it that way. additionally, andrew garfield has called it a love story. more than once. even if it wasn’t a romantic relationship, it’s a great dynamic: two people who love each other deeply (in whatever way) and change the face of human communication together, only to have their own relationship destroyed due to their lack of it. it’s tragic, and it plays out so well.
jesse and andrew bring such life to the characters. in the director commentary, fincher has this whole spiel about how mark is a character, and was written as a fictional one, even if he’s based off a real person. and so it gives us jesse’s mark, who is cold and petty and smart but is also a 19 year old who finds himself making decisions he’s not prepared to make. a character who’s not an asshole, he’s just trying so hard to be. jesse talks about how he studied real mark zuckerberg a lot to prepare for this movie, and you can see it in his weird quirks and sense of superiority - but he also brings such his own heart and wit to the role. you see mark at 19/20 but also at 25, see him go from a bratty college kid so desperate for recognition to someone who learns how to be slightly more considerate towards others, who regrets hurting the person who cared about him most.
and eduardo....ugh, my favourite boy! andrew was robbed of an oscar nomination for this role, he really was. he’s so open and honest and loving at the start, and watching him go from that to someone who is closed off and heartbroken and angry always gets me. he twirls when he gets into the phoenix club and rolls his eyes at sean parker. eduardo’s father is mentioned three (3) times in the movie but it’s enough to know that it’s not a healthy relationship, that eduardo’s biggest fear is disappointing him. his fatal flaw is that he loves and trusts mark too much. he’s so well-meaning and that’s ultimately what screws him over in the end. he’s objectively the only main player in this movie that always had good intentions, and he’s the character that loses the most.
we spend two hours with the 2 main characters but it’s enough to let us know that there’s a history there, that they’re best friends and have been for a long time, that they’re smart enough to change the world together but not smart enough to save their relationship. it’s a tragedy. mark and eduardo, as we know them in this film, aren’t the Mark and Eduardo of the real world. they’re college kids thrown into the adult world in the blink of an eye, and it’s bittersweet to compare them in the flashbacks to how they are in the depositions. they’re fascinating characters with such a wonderful dynamic.
honourable cast shoutouts go to: brenda song for being the most intimidating character in the film (if you end up watching the movie and enjoy it, PLEASE watch the director commentary, david fincher won’t shut ip about how great she is), justin timberlake for being so insufferable that he’s the only movie counterpart who is worse than the rl version, armie hammer for being twins, josh pence for doing parts of the better twin, max minghella for the comedic performance of our generation, rooney mara for killing mark zuckerberg twice in one film, and joe mazzello for playing my son dustin moskovitz.
fincher!!! i actually won’t elaborate here we all know how good david is. i know this site has an understandable love of gone girl but i’d argue that the social network is the superior film.
sorkin: this movie gets quoted all the time because this screenplay is fucking iconic. i love that it won an oscar because it deserved it, but primarily i love that it won for best adapted screenplay because i’ve read parts of the accidental billionaires by ben mezrich (which is what TSN is ~loosely~ based on) and most of this is just stuff sorkin came up with. i could post the whole script because it’s all golden but instead just look at this gifset. and also this one.
this movie has the most beautiful soundtrack. if you follow me on twitter, you know that hand covers bruise is my whole heart and makes me cry every goddam time. and then you have in motion and a familiar taste, which are the ultimate Get Pumped songs. intriguing possibilities and painted sun in abstract are perfect pieces of music for watching facebook get created and go live. almost home is simple but intense, and hurts like hell when you remember what scene it is from. really i could talk about the entire score, because trent reznor and atticus ross really gave their all.
deposition cutaways: so many scenes in this movie pull you in and either make you smile or break your heart, and then it cuts back to a room with the main characters and lawyers and you remember! you’re watching the aftermath of what happened, you’re watching mark and eduardo smile at each other right before you’re reminded that they’re in the middle of a lawsuit. the way the two sections of this movie contrast is so well-done and it gets me every time.
on that note, the editing in this film? superb. i’d argue that the facemash scene is the best example, but the office scene and the club scene deserve love and praise as well. like, god, even if you don’t wanna watch this movie for the story, watch it for the technical stuff because it’s all so well done.
like, i can’t really discuss is that much but the rowing scenes? fucking incredible sir david fincher take my whole life.
what i think really works in this movie’s favour though, is that it does take you by surprise. i know so many people who were like you and me. didn’t think they’d be interested in a movie about facebook. but because absolutely everyone involved in this film gave it their all, and they turned a story about a shitty rich dude who made a website into a fictional love story slash social commentary...it’s just beautiful to watch. there’s a reason that critics and the gays of this hellsite all agree that this is one hell of a movie. and this sounds like a cop out, but i really feel like you can’t really give a reason why that is: it’s just something you have to experience.
also, if nothing else: who doesn’t want to watch andrew garfield wear a suit with several buttons undone while he smashes laptops and says the words FUCK YOU FLIP FLOPS?
10 notes
·
View notes
Last Seen Blogs