
skynettools
Latest News, Exploits, & Tutorials
4789 posts
Don't wanna be here? Send us removal request.
Last Seen Blogs

thicksexyasswomen44
アトランタ

saimin-seishidou
최면성지도 애니 보는곳 saimin seishidou 자막

hello-velia-odinson
Hello...

freedtm
I NEED MOUNTAIN DEW RED

dap6
Без названия
Text
Parse & Resolve Active Directory principal's DACL, Identify Inbound Access Allowed Privileges, & Resolve SIDS Of Inbound Permissions
New Post has been published on https://skynettools.com/parse-resolve-active-directory-principals-dacl-identify-inbound-access-allowed-privileges-resolve-sids-of-inbound-permissions/
Parse & Resolve Active Directory principal's DACL, Identify Inbound Access Allowed Privileges, & Resolve SIDS Of Inbound Permissions

Aced is a tool to parse and resolve a single targeted Active Directory principal’s DACL. Aced will identify interesting inbound access allowed privileges against the targeted account, resolve the SIDS of the inbound permissions, and present that data to the operator. Additionally, the logging features of pyldapsearch have been integrated with Aced to log the targeted principal’s LDAP attributes locally which can then be parsed by pyldapsearch’s companion tool BOFHound to ingest the collected data in to BloodHound.
Use case?
I wrote Aced simply because I wanted a more targeted approach to query ACLs. Bloodhound is fantastic, however, it is extremely noisy. Bloodhound collects all the things while Aced collects a single thing providing the operator more control over how and what data is collected. There’s a phrase the Navy Seals use: “slow is smooth and smooth is fast” and that’s the approach I tried to take with Aced. The case for detection is reduced by only querying for what LDAP wants to tell you and by not performing an action known as “expensive ldap queries”. Aced has the option to forego SMB connections for hostname resolution. You have the option to prefer LDAPS over LDAP. With the additional integration with BloodHound, the collected data can be stored in a familiar format that can be shared with a team. Privilege escalation attack paths can be built by walking backward from the targeted goal.
References
Thanks to the below for all the code I stole:
@_dirkjan
@fortaliceLLC
@eloygpz
@coffeegist
@tw1sm
Usage
└─# python3 aced.py -h _____ |A . | _____ | /.\ ||A ^ | _____ |(_._)|| / \ ||A _ | _____ | | || \ / || ( ) ||A_ _ | |____V|| . ||(_'_)||( v )| |____V|| | || \ / | |____V|| . | |____V| v1.0 Parse and log a target principal's DACL. @garrfoster usage: aced.py [-h] [-ldaps] [-dc-ip DC_IP] [-k] [-no-pass] [-hashes LMHASH:NTHASH] [-aes hex key] [-debug] [-no-smb] target Tool to enumerate a single target's DACL in Active Directory optional arguments: -h, --help show this help message and exit Authentication: target [[domain/username[:password]@]<address> -ldaps Use LDAPS isntead of LDAP Optional Flags: -dc-ip DC_IP IP address or FQDN of domain controller -k, --kerberos Use Kerberos authentication. Grabs credentials from ccache file (KRB5CCNAME) based on target parameters. If valid credentials cannot be found, it will use the ones specified in the command line -no-pass don't ask for password (useful for -k) -hashes LMHASH:NTHASH LM and NT hashes, format is LMHASH:NTHASH -aes hex key AES key to use for Kerberos Authentication (128 or 256 bits) -debug Enable verbose logging. -no-smb Do not resolve DC hostname through SMB. Requires a FQDN with -dc-ip.
Demo
In the below demo, we have the credentials for the corp.local\lowpriv account. By starting enumeration at Domain Admins, a potential path for privilege escalation is identified by walking backward from the high-value target.
And here’s how that data looks when transformed by bofhound and ingested in to BloodHound.

Download: https://github.com/garrettfoster13/aced
0 notes
Text
ZenBuster - Multi-Threaded, Multi-Platform URL Enumeration Tool Written In Python
New Post has been published on https://skynettools.com/zenbuster-multi-threaded-multi-platform-url-enumeration-tool-written-in-python/
ZenBuster - Multi-Threaded, Multi-Platform URL Enumeration Tool Written In Python
This software is intended for use in CTF challenges, or by security professionals to gather information on their targets:
It is capable of brute-force enumerating subdomains and also URI resources (directories/files).
Both methods of enumeration require the use of an appropriate wordlist or dictionary file.
Features Include:
Hostname format supports standard, IPv4, and IPv6.
Support for logging results to a file with -O [filename].
Specifying custom ports for nonstandard webservers with -p .
Optional file extensions in directory mode with -x .
Quiet mode for less distracting output with -Q.
Color can be disabled for less distracting output with -nc/-nl.
Tested on Python versions 3.9 and 3.10, with theoretical support for versions >= 3.6
Installation
Firstly, ensure that Python version >= 3.6 is installed, then clone the repository with:
git clone https://github.com/0xTas/zenbuster.git
Next, cd zenbuster.
Dependencies
ZenBuster relies on 3 external libraries to function, and it is recommended to install these with:
pip install -r requirements.txt
The modules that will be installed and their purposes are as follows:
Python requests
The backbone of each enumeration request. Without this, the script will not function.
termcolor
Enables colored terminal output. Non-critical, the script can still run without color if this is not present.
colorama (Windows only)
Primes the Windows terminal to accept ANSI color codes (from Termcolor). Non-critical.
These dependencies may be installed manually, with pip using requirements.txt, or via interaction with the script upon the first run.
Usage
Once dependencies have been installed, you can run the program in the following ways:
On Linux (+Mac?):
./zenbuster.py [options] or python3 zenbuster.py [options]
On Windows:
python zenbuster.py [options]
[Options]
Short FlagLong FlagPurpose-h–helpDisplays the help screen and exits-d–dirsEnables Directory Enumeration Mode-s-sslForces usage of HTTPS in requests-v–verbosePrints verbose info to terminal/log-q–quietMinimal terminal output until final results-nc–no-colorDisables colored terminal output-nl–no-lolcatDisables lolcat-printed banner (Linux only)-u <hostname>–hostHost to target for the scan-w <wordlist>–wordlistPath to wordlist/dictionary file-x <exts>–extComma-separated list of file extensions (Dirs only)-p <port#>–portCustom port option for nonstandard webservers-o [filename]–out-fileLog results to a file (accepts custom name/path)
Example Usage
./zenbuster.py -d -w /usr/share/wordlists/dirb/common.txt -u target.thm -v
python3 zenbuster.py -w ../subdomains.txt --host target.thm --ssl -O myResults.log
zenbuster -w subdomains.txt -u target.thm --quiet (With .bashrc alias)
Planned Features/Improvements
Increased levels of optional verbosity.
Allow optional throttling of task thread-count.
Allow users to modify the list of ignored status codes.
Allow greater user control over various request headers.
Allow optional ignoring of responses based on content-length.
Expand subdomain enumeration to include OSINT methods instead of just brute-forcing.
Explore a more comprehensive and source-readable solution to fancy colored output (possibly using rich).
Known Issues/Limitations
Enumerating long endpoints may result in ugly terminal output due to line-wrapping on smaller console windows. Logging to a file is recommended, especially on Windows.
If the target host is a vHost on a shared web server, enumeration via IP may not function as expected. Use domain/hostname instead.
Download: https://github.com/0xTas/zenbuster
0 notes
Text
SocialPwned - OSINT Tool To Get Emails Addresses, From Target, Published On Social Networks Like Instagram, Linkedin & Twitter
New Post has been published on https://skynettools.com/socialpwned-osint-tool-to-get-emails-addresses-from-target-published-on-social-networks-like-instagram-linkedin-twitter/
SocialPwned - OSINT Tool To Get Emails Addresses, From Target, Published On Social Networks Like Instagram, Linkedin & Twitter
SocialPwned is an OSINT tool that allows to get the emails, from a target, published in social networks like Instagram, Linkedin and Twitter to find the possible credential leaks in PwnDB or Dehashed and obtain Google account information via GHunt.
The purpose of this tool is to facilitate the search for vulnerable targets during the phase of Footprinting in an Ethical Hacking. It is common for employees of a company to publish their emails in social networks, either professional or personal, so if these emails have their credentials leaked, it is possible that the passwords found have been reused in the environment to be audited. If it’s not the case, at least you would have an idea of the patterns that follow this target to create the passwords and be able to perform other attacks with a higher level of effectiveness.
SocialPwned uses different modules:
Instragram: Making use of the unofficial Instagram API from @LevPasha, different methods were developed to obtain the emails published by users. An Instagram account is required.
Linkedin: Using @tomquirk’s unofficial Linkedin API, different methods were developed to obtain a company’s employees and their contact information (email, twitter or phone). In addition, it is possible to add the employees found to your contacts, so that you can later have access to their network of contacts and information. This module also generates different files with combinations of possible usernames for an organization. A Linkedin account is required.
Twint: Using Twint from @twintproject you can track all the Tweets published by a user looking for some email. A Twitter account is not necessary.
PwnDB: Inspired by the tool PwnDB created by @davidtavarez a module has been developed that searches for all credential leaks from the emails found. In addition, for each email a POST request is made to HaveIBeenPwned to find out the source of the leak.
Dehashed: Provides clear passwords and also the hash of passwords that could not be cracked. It is necessary to pay at Dehashed to get an API Key, but it can be a good alternative when PwnDB is slow or does not provide results.
GHunt: Using the tool created by @mxrch, GHunt, it is possible to obtain information related to Google mails, e.g. reviews, profile picture, possible location or public calendar events.
Installation
Easy way
$ service docker start $ docker pull mrtuxx/socialpwned $ docker run -v $(pwd)/credentials.json:/socialpwned/credentials.json -v $(pwd)/output:/socialpwned/output -it mrtuxx/socialpwned socialpwned.py --credentials credentials.json --help
NOTE: You will need to have the docker service correctly installed.
Manual way
The installation of Tor depends on your system. On a Debian:
$ sudo apt-get install tor $ /etc/init.d/tor start
Clone the repository using Git:
$ git clone https://github.com/MrTuxx/SocialPwned.git $ cd SocialPwned $ sudo pip3 install --user --upgrade git+https://github.com/twintproject/twint.git@origin/master#egg=twint $ sudo pip3 install -r requirements.txt $ sudo python3 socialpwned.py --credentials credentials.json --help
For the GHunt module to work correctly you must follow these steps:
GHunt Manual installation
Usage
To make use of the Instagram and Linkedin features you need to have an account created on each of the social networks. The credentials must be indicated in a JSON file:
"instagram": "username":"username", "password":"password" , "linkedin": "email":"email", "password":"password" , "ghunt": "SID":"SID", "SSID":"SSID", "APISID":"APISID", "SAPISID":"SAPISID", "HSID":"HSID" , "dehashed": "email":"email", "apikey":"apikey"
NOTE: The cookies necessary for the GHunt module to work can be obtained by following the steps explained here.
usage: socialpwned.py [-h] --credentials CREDENTIALS [--pwndb] [--tor-proxy PROXY] [--instagram] [--info QUERY] [--location LOCATION_ID] [--hashtag-ig QUERY] [--target-ig USERNAME] [--search-users-ig QUERY] [--my-followers] [--my-followings] [--followers-ig] [--followings-ig] [--linkedin] [--company COMPANY_ID] [--search-companies QUERY] [--employees] [--my-contacts] [--user-contacts USER_ID] [--search-users-in QUERY] [--target-in USERNAME] [--add-contacts] [--add-a-contact USER_ID] [--twitter] [--limit LIMIT] [--year YEAR] [--since DATE] [--until DATE] [--profile-full] [--all-tw] [--target-tw USERNAME] [--hashtag-tw USERNAME] [--followers-tw] [--followings-tw] [--ghunt] [--email-gh [email protected]] [--dehashed] [--email-dh [email protected]]
If you do a pull of the docker image you should run:
docker run -v $(pwd)/<YOUR CREDENTIALS JSON FILE>:/socialpwned/credentials.json -v $(pwd)/output:/socialpwned/output -it mrtuxx/socialpwned socialpwned.py --credentials credentials.json <COMMANDS>
Tips
Keep Linkedin and Instagram sessions in a browser to resolve possible blocks. Interact in a normal way.
Before trying to get all the emails of an organization’s employees on Linkedin make sure you have a wide network of contacts, friends in common and some employees added to your network. Many times you can’t see a contact’s information if they are not in your network.
Try not to perform massive searches to avoid being blocked.
Combine the modules when it is a specific target or will not handle a large amount of information, otherwise it may fail or you will be blocked.
Output format
Each time SocialPwned is run, a directory with the following format will be generated:
output └── session_year_month_day_time ├── dehashed │ ├── raw_dehashed.txt │ └── socialpwned_dehashed.txt ├── emails │ └── socialpwned_emails.txt ├── instagram │ └── socialpwned_instagram.txt ├── linkedin_userames │ ├── first.last.txt │ ├── firstl.txt │ ├── first.txt │ ├── f.last.txt │ ├── flast.txt │ ├── lastf.txt │ └── rawnames.txt ├── pwndb │ ├── passwords_pwndb.txt │ ├── pwndb.txt │ └── socialpwned_pwndb.txt ├── socialpwned.json └── twitter └── socialpwned_twitter.txt
The dehashed directory contains the raw API information in one file and the email-related passwords in another.
The pwndb directory contains a file with only the passwords, another one with the passwords and related emails and finally a file that adds the sources of the leaks.
The emails directory contains a file with all the emails obtained.
The instagram directory contains a file with user accounts and their related email addresses.
The twitter directory contains a file with user accounts and their related email addresses.
The linkedin directory contains different files with combinations of user names obtained. Inspired by the linkedin2username tool.
The socialpwned.json file provides in JSON format all the information obtained by SocialPwned and its different modules. Where the ID of each item is the email, in case you have information about a user but not his email, the ID will be his unique social network identifier.
Basic Examples and Combos
Video Demo
Here are some examples:
Instagram
docker run -v $(pwd)/credentials.json:/socialpwned/credentials.json -v $(pwd)/output:/socialpwned/output -it mrtuxx/socialpwned socialpwned.py --credentials credentials.json --instagram --info España
docker run -v $(pwd)/credentials.json:/socialpwned/credentials.json -v $(pwd)/output:/socialpwned/output -it mrtuxx/socialpwned socialpwned.py --credentials credentials.json --instagram --location 832578276
docker run -v $(pwd)/credentials.json:/socialpwned/credentials.json -v $(pwd)/output:/socialpwned/output -it mrtuxx/socialpwned socialpwned.py --credentials credentials.json --instagram --hashtag-ig someHashtag --pwndb
docker run -v $(pwd)/credentials.json:/socialpwned/credentials.json -v $(pwd)/output:/socialpwned/output -it mrtuxx/socialpwned socialpwned.py --credentials credentials.json --instagram --target-ig username --pwndb
docker run -v $(pwd)/credentials.json:/socialpwned/credentials.json -v $(pwd)/output:/socialpwned/output -it mrtuxx/socialpwned socialpwned.py --credentials credentials.json --instagram --target-ig username --followers-ig --followings-ig --pwndb
Linkedin
docker run -v $(pwd)/credentials.json:/socialpwned/credentials.json -v $(pwd)/output:/socialpwned/output -it mrtuxx/socialpwned socialpwned.py --credentials credentials.json --linkedin --search-companies "My Target"
docker run -v $(pwd)/credentials.json:/socialpwned/credentials.json -v $(pwd)/output:/socialpwned/output -it mrtuxx/socialpwned socialpwned.py --credentials credentials.json --linkedin --search-companies "My Target" --employees --pwndb
docker run -v $(pwd)/credentials.json:/socialpwned/credentials.json -v $(pwd)/output:/socialpwned/output -it mrtuxx/socialpwned socialpwned.py --credentials credentials.json --linkedin --company 123456789 --employees --pwndb
docker run -v $(pwd)/credentials.json:/socialpwned/credentials.json -v $(pwd)/output:/socialpwned/output -it mrtuxx/socialpwned socialpwned.py --credentials credentials.json --linkedin --company 123456789 --employees --add-contacts
docker run -v $(pwd)/credentials.json:/socialpwned/credentials.json -v $(pwd)/output:/socialpwned/output -it mrtuxx/socialpwned socialpwned.py --credentials credentials.json --linkedin --user-contacts user-id --pwndb
docker run -v $(pwd)/credentials.json:/socialpwned/credentials.json -v $(pwd)/output:/socialpwned/output -it mrtuxx/socialpwned socialpwned.py --credentials credentials.json --linkedin --user-contacts user-id --add-contacts
Twitter
docker run -v $(pwd)/credentials.json:/socialpwned/credentials.json -v $(pwd)/output:/socialpwned/output -it mrtuxx/socialpwned socialpwned.py --credentials credentials.json --twitter --hashtag-tw someHashtag --pwndb --limit 200 --dehashed
docker run -v $(pwd)/credentials.json:/socialpwned/credentials.json -v $(pwd)/output:/socialpwned/output -it mrtuxx/socialpwned socialpwned.py --credentials credentials.json --twitter --target-tw username --all-tw --pwndb --dehashed --ghunt
docker run -v $(pwd)/credentials.json:/socialpwned/credentials.json -v $(pwd)/output:/socialpwned/output -it mrtuxx/socialpwned socialpwned.py --credentials credentials.json --twitter --target-tw username --all-tw --followers-tw --followings-tw --pwndb
GHunt
docker run -v $(pwd)/credentials.json:/socialpwned/credentials.json -v $(pwd)/output:/socialpwned/output -it mrtuxx/socialpwned socialpwned.py --credentials credentials.json --ghunt --email-gh "[email protected]"
NOTE: Whenever you add the –ghunt flag this module will be executed. If you do it in a bulk search it may fail due to the amount of requests.
Dehashed
docker run -v $(pwd)/credentials.json:/socialpwned/credentials.json -v $(pwd)/output:/socialpwned/output -it mrtuxx/socialpwned socialpwned.py --credentials credentials.json --dehashed --email-dh "[email protected]"
NOTE: Adding the –dehashed flag at the end of each search will make an API request for each email.
Combos
docker run -v $(pwd)/credentials.json:/socialpwned/credentials.json -v $(pwd)/output:/socialpwned/output -it mrtuxx/socialpwned socialpwned.py --credentials credentials.json --instagram --target-ig username --followers-ig --followings-ig --linkedin --company 123456789 --employees --twitter --target-tw username --all-tw --pwndb --ghunt --dehashed
docker run -v $(pwd)/credentials.json:/socialpwned/credentials.json -v $(pwd)/output:/socialpwned/output -it mrtuxx/socialpwned socialpwned.py --credentials credentials.json --instagram --target-ig username --linkedin --target-in username --twitter --target-tw username --all-tw --pwndb --ghunt --dehashed
References
Instagram API. Author: LevPasha
Linkedin API. Author: tomquirk
Twint. Author: twintproject
PwnDB. Author: davidtavarez
GHunt. Author: mxrch
Disclaimer
The usage of SocialPwned to attack targets without prior mutual consent is illegal. In addition, it makes use of different modules that violate Linkedin and Instagram rules, therefore, you will be banned temporarily or permanently.
It is the responsibility of the end user to use SocialPwned. The developers are not responsible and are not liable for any misuse or damage caused.
Download: https://github.com/MrTuxx/SocialPwned
0 notes
Text
Python 3 Network Packet Sniffer
New Post has been published on https://skynettools.com/python-3-network-packet-sniffer/
Python 3 Network Packet Sniffer
A Network Packet Sniffer developed in Python 3. Packets are disassembled as they arrive at a given network interface controller and their information is displayed on the screen.
This application depends exclusively on the NETProtocols library (also developed and maintained by EONRaider) from version 2.0.0 and above and can be run by any Python 3.8+ interpreter.
Demo
Running the Application
I. Development Mode
Simply clone this repository with git clone, install the dependencies and execute the sniffer.py file.
user@host:~$ git clone https://github.com/EONRaider/Packet-Sniffer.git user@host:~$ cd Packet-Sniffer user@host:~/packet-sniffer$ pip install -r requirements.txt <--or--> poetry install user@host:~/packet-sniffer$ sudo python3 packet_sniffer/sniffer.py
The sudo command is required due to the use of socket.SOCK_RAW, which needs administrative privileges to run on GNU/Linux. Notice that the existence of dependencies may require the execution of the interpreter contained in the virtual environment in which the dependencies have been installed (if you use one), instead of just using the system interpreter.
II. (Optional) Build the binary
Use the build.py file to compile your own binary with the PyInstaller package. You just need to install all dependencies and build. Dependency management works with both Poetry (recommended) and Virtualenv.
<-- Install dependencies as shown above in Step I --> user@host:~/packet-sniffer$ python3 build.py
Usage
sniffer.py [-h] [-i INTERFACE] [-d] Network Packet Sniffer optional arguments: -h, --help show this help message and exit -i INTERFACE, --interface INTERFACE Interface from which packets will be captured (monitors all available interfaces by default). -d, --data Output packet data during capture.
Legal Disclaimer
The use of code contained in this repository, either in part or in its totality, for engaging targets without prior mutual consent is illegal. It is the end user’s responsibility to obey all applicable local, state and federal laws.
Developers assume no liability and are not responsible for misuses or damages caused by any code contained in this repository in any event that, accidentally or otherwise, it comes to be utilized by a threat agent or unauthorized entity as a means to compromise the security, privacy, confidentiality, integrity, and/or availability of systems and their associated resources. In this context the term “compromise” is henceforth understood as the leverage of exploitation of known or unknown vulnerabilities present in said systems, including, but not limited to, the implementation of security controls, human- or electronically-enabled.
The use of this code is only endorsed by the developers in those circumstances directly related to educational environments or authorized penetration testing engagements whose declared purpose is that of finding and mitigating vulnerabilities in systems, limiting their exposure to compromises and exploits employed by malicious agents as defined in their respective threat models.
Download: https://github.com/EONRaider/Packet-Sniffer
0 notes
Text
Psudohash - Password List Generator For Orchestrating Brute Force Attacks
New Post has been published on https://skynettools.com/psudohash-password-list-generator-for-orchestrating-brute-force-attacks/
Psudohash - Password List Generator For Orchestrating Brute Force Attacks
Psudohash is a password list generator for orchestrating brute force attacks. It imitates certain password creation patterns commonly used by humans, like substituting a word’s letters with symbols or numbers, using char-case variations, adding a common padding before or after the word and more. It is keyword-based and highly customizable.
Pentesting Corporate Environments
System administrators and employees tend to use the Company’s name (or a subset of the name) as password for Wi-Fi access points, network devices and application or even domain accounts. With the company’s name as input and the most basic options, psudohash will produce a wordlist with all possible character substitutions, char-case variations and more. Take a look at the following example:
The script includes a basic character substitution schema. You can add/modify character substitution patterns by editing the source and following the data structure logic presented below (default):
transformations = [ 'a' : '@', 'b' : '8', 'e' : '3', 'g' : ['9', '6'], 'i' : ['1', '!'], 'o' : '0', 's' : ['$', '5'], 't' : '7' ]
Individuals
When it comes to people, i think we all have (more or less) set passwords using a mutation of one or more words that mean something to us e.g., our name or wife/kid/pet/band names, sticking the year we were born at the end or maybe a super secure padding like “!@#”. Well, guess what?
Installation
No special requirements. Just clone the repo and make the script executable:
git clone https://github.com/t3l3machus/psudohash cd ./psudohash chmod +x psudohash.py
Usage
./psudohash.py [-h] -w WORDS [-an LEVEL] [-nl LIMIT] [-y YEARS] [-ap VALUES] [-cpb] [-cpa] [-cpo] [-o FILENAME] [-q]
The help dialog [ -h, –help ] includes usage details and examples.
Usage Tips
Combining options --years and --append-numbering with a --numbering-limit ≥ last two digits of any year input, will most likely produce duplicate words because of the mutation patterns implemented by the tool.
If you add custom padding values and/or modify the predefined common padding values in the source code, in combination with multiple optional parameters, there is a small chance of duplicate words occurring. psudohash includes word filtering controls but for speed’s sake, those are limited.
Download: https://github.com/t3l3machus/psudohash
0 notes
Text
Toxssin - Open-source Penetration Testing Tool That Automates Exploiting Cross-Site Scripting (XSS)
New Post has been published on https://skynettools.com/toxssin-open-source-penetration-testing-tool-that-automates-exploiting-cross-site-scripting-xss/
Toxssin - Open-source Penetration Testing Tool That Automates Exploiting Cross-Site Scripting (XSS)
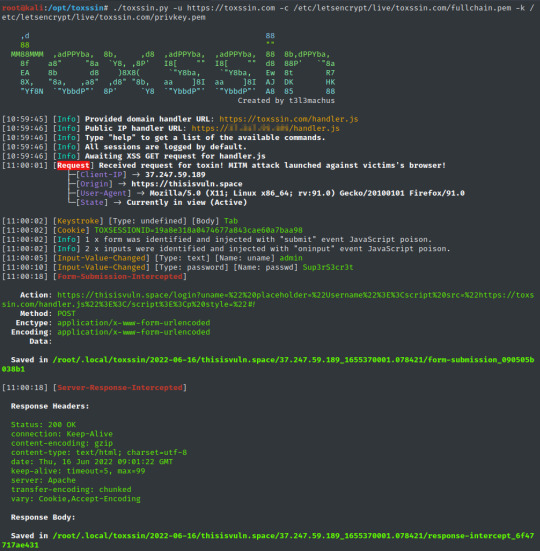
toxssin is an open-source penetration testing tool that automates the process of exploiting Cross-Site Scripting (XSS) vulnerabilities. It consists of an https server that works as an interpreter for the traffic generated by the malicious JavaScript payload that powers this tool (toxin.js).
This project started as (and still is) a research-based creative endeavor to explore the exploitability depth that an XSS vulnerability may introduce by using vanilla JavaScript, trusted certificates and cheap tricks.
Disclaimer: The project is quite fresh and has not been widely tested.
Video Presentation
youtube
Screenshots
Find more screenshots here.
Capabilities
By default, toxssin intercepts:
cookies (if HttpOnly not present),
keystrokes,
paste events,
input change events,
file selections,
form submissions,
server responses,
table data (static as well as updates),
Most importantly, toxssin:
attempts to maintain XSS persistence while the user browses the website by intercepting http requests & responses and re-writing the document,
supports session management, meaning that, you can use it to exploit reflected as well as stored XSS,
supports custom JS script execution against sessions,
automatically logs every session.
Installation & Usage
git clone https://github.com/t3l3machus/toxssin cd ./toxssin pip3 install -r requirements
To start toxssin.py, you will need to supply ssl certificate and private key files.
If you don’t own a domain with a trusted certificate, you can issue and use self-signed certificates with the following command (although this won’t take you far):
openssl req -x509 -newkey rsa:2048 -keyout key.pem -out cert.pem -days 365
It is strongly recommended to run toxssin with a trusted certificate (see How to get a Valid Certificate in this document). That said, you can start the toxssin server like this:
# python3 toxssin.py -u https://your.domain.com -c /your/certificate.pem -k /your/privkey.pem
Visit the project’s wiki for additional information.
XSS Exploitation Obstacles
In my experience, there are 4 major obstacles when it comes to Cross-Site Scripting attacks attempting to include external JS scripts:
the “Mixed Content” error, which can be resolved by serving the JavaScript payload via https (even with a self-signed certificate).
the “NET::ERR_CERT_AUTHORITY_INVALID” error, which indicates that the server’s certificate is untrusted / expired and can be bypassed by using a certificate issued by a trusted Authority.
Cross-origin resource sharing (CORS), which is handled appropriately by the toxssin server.
Content-Security-Policy header with the script-src set to specific domain(s) only will block scripts with cross-domain src from loading. Toxssin relies on the eval() function to deliver its poison, so, if the website has a CSP and the unsafe-eval source expression is not specified in the script-src directive, the attack will most likely fail (i’m working on a second poison delivery method to work around this).
Note: The “Mixed Content” error can of course occur when the target website is hosted via http and the JavaScript payload via https. This limits the scope of toxssin to https only webistes, as (by default) toxssin is started with ssl only.
How to get a Valid Certificate
First, you need to own a domain name. The fastest and most economic way to get one (in my knowledge) is via a cheap domain registrar service (e.g. https://www.namecheap.com/). Search for a random string domain name (e.g. “fvcm98duf”) and check the less popular TLDs, like .xyz, as they will probably cost around 3$ per year.
After you purchase a domain name, you can use certbot (Let’s Encrypt) to get a trusted certificate in 5 minutes or less:
Append an A record to your Domain’s DNS settings so that it points to your server ip,
Follow certbots official instructions.
Tip: Don’t install and run certbot on your own, you might get unexpected errors. Stick with the instructions.
Download: https://github.com/t3l3machus/toxssin
0 notes
Text
Uncover -Quickly discover exposed hosts on the internet using multiple search engines.
New Post has been published on https://skynettools.com/uncover-quickly-discover-exposed-hosts-on-the-internet-using-multiple-search-engines/
Uncover -Quickly discover exposed hosts on the internet using multiple search engines.

uncover is a go wrapper using APIs of well known search engines to quickly discover exposed hosts on the internet. It is built with automation in mind, so you can query it and utilize the results with your current pipeline tools. Currently, it supports shodan,shodan-internetdb, censys, and fofa search API.
Features
Simple and Handy utility to query multiple search engine
Multiple Search engine support (Shodan, Censys, Fofa, Shodan-InternetDB)
Automatic key/credential randomization
stdin / stdout support for input and output
Installation Instructions
uncover requires go1.17 to install successfully. Run the following command to get the repo –
go install -v github.com/projectdiscovery/uncover/cmd/uncover@latest
Usage
uncover -h
This will display help for the tool. Here are all the flags it supports:
Usage: ./uncover [flags] Flags: INPUT: -q, -query string[] search query or list (file or comma separated or stdin) -e, -engine string[] search engine to query (shodan,shodan-idb,fofa,censys) (default shodan) CONFIG: -pc, -provider string provider configuration file (default "$HOME/.config/uncover/provider-config.yaml") -config string flag configuration file (default "$HOME/.config/uncover/config.yaml") -timeout int timeout in seconds (default 30) -delay int delay between requests in seconds (0 to disable) (default 1) OUTPUT: -o, -output string output file to write found results -f, -field string field to display in output (ip,port,host) (default "ip:port") -j, -json write output in JSONL(ines) format -r, -raw write raw output as received by the remote api -l, -limit int limit the number of results to return (default 100) -nc, -no-color disable colors in output DEBUG: -silent show only results in output -version show version of the project -v show verbose output
Provider Configuration
The default provider configuration file should be located at $HOME/.config/uncover/provider-config.yaml and has the following contents as an example. In order to run this tool, the API keys / credentials needs to be added in this config file or set as environment variable.
shodan: - SHODAN_API_KEY1 - SHODAN_API_KEY2 censys: - CENSYS_API_ID:CENSYS_API_SECRET fofa: - FOFA_EMAIL:FOFA_KEY
When multiple keys/credentials are specified for same provider in the config file, random key will be used for each execution.
alternatively you can also set the API key as environment variable in your bash profile.
export SHODAN_API_KEY=xxx export CENSYS_API_ID=xxx export CENSYS_API_SECRET=xxx export FOFA_EMAIL=xxx export FOFA_KEY=xxx
Required keys can be obtained by signing up on Shodan, Censys, Fofa.
Running Uncover
uncover supports multiple ways to make the query including stdin or q flag
echo 'ssl:"Uber Technologies, Inc."' | uncover __ ______ _________ _ _____ _____ / / / / __ \/ ___/ __ \ | / / _ \/ ___/ / /_/ / / / / /__/ /_/ / |/ / __/ / \__,_/_/ /_/\___/\____/|___/\___/_/ v0.0.1 projectdiscovery.io [WRN] Use with caution. You are responsible for your actions [WRN] Developers assume no liability and are not responsible for any misuse or damage. [WRN] By using uncover, you also agree to the terms of the APIs used. 107.180.12.116:993 107.180.26.155:443 104.244.99.31:443 161.28.20.79:443 104.21.8.108:443 198.71.233.203:443 104.17.237.13:443 162.255.165.171:443 12.237.119.61:443 192.169.250.211:443 104.16.251.50:443
Running uncover with file input containing multiple search queries per line.
cat dorks.txt ssl:"Uber Technologies, Inc." title:"Grafana"
uncover -q dorks.txt __ ______ _________ _ _____ _____ / / / / __ \/ ___/ __ \ | / / _ \/ ___/ / /_/ / / / / /__/ /_/ / |/ / __/ / \__,_/_/ /_/\___/\____/|___/\___/_/ v0.0.1 projectdiscovery.io [WRN] Use with caution. You are responsible for your actions [WRN] Developers assume no liability and are not responsible for any misuse or damage. [WRN] By using uncover, you also agree to the terms of the APIs used. 107.180.12.116:993 107.180.26.155:443 104.244.99.31:443 161.28.20.79:443 104.21.8.108:443 198.71.233.203:443 2607:7c80:54:3::74:3001 104.198.55.35:80 46.101.82.244:3000 34.147.126.112:80 138.197.147.213:8086
Multiple Search Engine API (Shodan,Censys,Fofa)
uncover supports multiple search engine, as default shodan is used, engine flag can be used to specify any available search engines.
echo jira | uncover -e shodan,censys,fofa __ ______ _________ _ _____ _____ / / / / __ \/ ___/ __ \ | / / _ \/ ___/ / /_/ / / / / /__/ /_/ / |/ / __/ / \__,_/_/ /_/\___/\____/|___/\___/_/ v0.0.3 projectdiscovery.io [WRN] Use with caution. You are responsible for your actions [WRN] Developers assume no liability and are not responsible for any misuse or damage. [WRN] By using uncover, you also agree to the terms of the APIs used. 176.31.249.189:5001 13.211.116.80:443 43.130.1.221:631 192.195.70.29:443 52.27.22.181:443 117.48.120.226:8889 106.52.115.145:49153 13.69.135.128:443 193.35.99.158:443 18.202.109.218:8089 101.36.105.97:21379 42.194.226.30:2626
Shodan-InternetDB API
uncover supports shodan-internetdb API to pull available ports for given IP/CIDR input.
shodan-idb used as default engine when IP/CIDR is provided as input, otherwise shodan search engine is used.
echo 51.83.59.99/24 | uncover __ ______ _________ _ _____ _____ / / / / __ \/ ___/ __ \ | / / _ \/ ___/ / /_/ / / / / /__/ /_/ / |/ / __/ / \__,_/_/ /_/\___/\____/|___/\___/_/ v0.0.3 projectdiscovery.io [WRN] Use with caution. You are responsible for your actions [WRN] Developers assume no liability and are not responsible for any misuse or damage. [WRN] By using uncover, you also agree to the terms of the APIs used. 51.83.59.1:53 51.83.59.1:10000 51.83.59.2:53 51.83.59.3:25 51.83.59.3:80 51.83.59.3:389 51.83.59.3:443 51.83.59.3:465 51.83.59.3:587 51.83.59.3:993
Field Filters
-f, -field flag can be used to indicate which fields to return, currently, ip, port, and host are supported and can be used to return desired fields.
uncover -q jira -f host -silent ec2-44-198-22-253.compute-1.amazonaws.com ec2-18-246-31-139.us-west-2.compute.amazonaws.com tasks.devrtb.com leased-line-91-149-128-229.telecom.by 74.242.203.213.static.inetbone.net ec2-52-211-7-108.eu-west-1.compute.amazonaws.com ec2-54-187-161-180.us-west-2.compute.amazonaws.com 185-2-52-226.static.nucleus.be ec2-34-241-80-255.eu-west-1.compute.amazonaws.com
Field Formatting
uncover has a -f, -field flag that can be used to customize the output format. For example, in the case of uncover -f https://ip:port/version, ip:port will be replaced with results in the output while keeping the format defined, It can also be used to specify a known scheme/path/file in order to prepare the output so that it can be immediately passed as input to other tools in the pipeline.
echo kubernetes | uncover -f https://ip:port/version -silent https://35.222.229.38:443/version https://52.11.181.228:443/version https://35.239.255.1:443/version https://34.71.48.11:443/version https://130.211.54.173:443/version https://54.184.250.232:443/version
Output of uncover can be further piped to other projects in workflow accepting stdin as input, for example:
uncover -q example -f ip | naabu – Runs naabu for port scanning on the found host.
uncover -q title:GitLab | httpx – Runs httpx for web server probing the found result.
uncover -q 51.83.59.99/24 | httpx – Runs httpx on host/ports obtained from shodan-internetdb.
uncover -q http.title:GitLab -silent | httpx -silent https://15.185.150.109 https://139.162.137.16 https://164.68.115.243 https://135.125.215.186 https://163.172.59.119 http://15.236.10.197 https://129.206.117.248
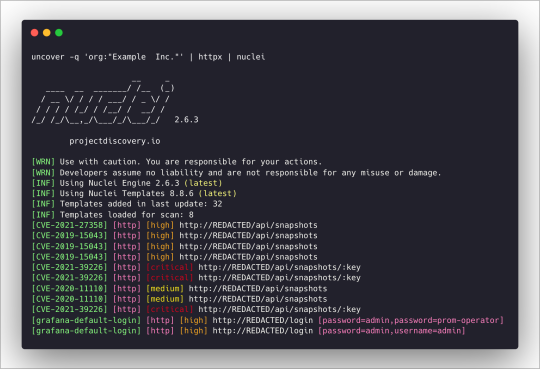
uncover -q 'org:"Example Inc."' | httpx | nuclei – Runs httpx / nuclei for vulnerability assessment.
Download: https://github.com/projectdiscovery/uncover
0 notes
Text
WEF - 802.11 Offensive Framework To Automate Attacks for WPA, WEP, Hash Cracking, Bluetooth Hacking & More
New Post has been published on https://skynettools.com/wef-802-11-offensive-framework-to-automate-attacks-for-wpa-wep-hash-cracking-bluetooth-hacking-more/
WEF - 802.11 Offensive Framework To Automate Attacks for WPA, WEP, Hash Cracking, Bluetooth Hacking & More
A fully offensive framework to the 802.11 networks and protocols with different types of attacks for WPA and WEP, automated hash cracking, bluetooth hacking and much more.
I recommend you my alfa adapter: Alfa AWUS036ACM, which works really great with both, 2.4 and 5 Ghz
Tested and supported in Kali Linux, Parrot OS, Arch Linux and Ubuntu
*However it’s not finished and may have issues, try it at your own risk.*
If you have any issue please, contact me or create a issue
SUPPORTED ATTACKS:
Deauthentication Attack
Authentication Attack
Beacon Flood Attack
PKMID Attack
EvilTwin Attack
Passive/Stealthy Attack
Pixie Dust Attack
Null Pin Attack
Chopchop Attack
Replay Attack
Michael Exploitation Attack
Caffe-Latte Attack
Jamming, Reading and Writing bluetooth connections
GPS Spoofing with HackRF
FEATURES:
Log generator
WPA/WPA2, WPS and WEP Attacks
Auto handshake cracking
Multiple templates for EvilTwin attack
Check monitor mode and it status
2Ghz and 5Ghz attacks
Custom wordlist selector
Auto detect requirements
Bluetooth support (Jamming, Reading, Writing)
REQUIREMENTS:
Don’t install them manually, WEF takes care of that if you don’t already have them
aircrack-ng reaver mdk4 macchanger hashcat xterm hcxtools python3 btlejack crackle php hostadp dnsmasq
INSTALLATION:
Run as root
git clone https://github.com/D3Ext/WEF cd WEF bash setup.sh
DEMO:
Demo on a Parrot OS with Kitty terminal
Type ‘help’ to view a list of different commands and utilities
Created by D3ext
Extra
If you are using bspwm, you can add this line to your bspwmrc for launching the xterm windows always beeing in floating mode (for a prettier design)
bspc rule -a XTerm state=floating
Download: https://github.com/D3Ext/WEF
0 notes
Text
Agartha - LFI, RCE, Auth, SQLi, Http-Js Payload Generator
New Post has been published on https://skynettools.com/agartha-lfi-rce-auth-sqli-http-js-payload-generator/
Agartha - LFI, RCE, Auth, SQLi, Http-Js Payload Generator

Agartha is a penetration testing tool which creates dynamic payload lists and user access matrix to reveal injection flaws and authentication/authorization issues. There are many different attack payloads exists, but Agartha creates run-time, systematic and vendor-neutral payloads with many different possibilities and bypassing methods. It also draws attention to user session and URL relationships, which makes easy to find user access violations. And additionally, it converts Http requests to JavaScript to help digging up XSS issues. In summary:
Payload Generator: It creates payloads/wordlists for different attacks.
Directory Traversal/Local File Inclusion: It creates file dictionary lists with various encoding and escaping characters.
Remote Code Execution: It creates command dictionary lists for both unix and windows environments with different combinations.
SQL Injection: It creates Stacked Queries, Boolean-Based, Union-Based, Time-Based and Order-Based SQLi wordlist for various databases to help finding vulnerable spots.
Authorization Matrix: It creates an access role matrix based on user sessions and URL lists to determine authorization/authentication related access violation issues.
And Http Request to JavaScript Converter: It converts Http requests to JavaScript code to be useful for further XSS exploitation and more.
Here is a small tutorial how to use.
Installation
For manual installation, you should download ‘jython’ file first, and then:
Burp Menu > Extender > Options > Python Environment > Locate jython standalone jar file
Burp Menu > Extender > Extensions > Add > Extension Type: Python > Select file: ‘agartha.py’
After, you will see ‘Agartha’ tab in the main window and it will be also registered the right click, under ‘Extensions > Agartha Http-Js’.
Tested in
Java versions:
openjdk 14 2020-03-17, OpenJDK Runtime Environment (build 14+36-1461)
java version “1.8.0_331”, Java(TM) SE Runtime Environment (build 1.8.0_331-b09)
Jython versions:
v2.7.1
v2.7.2
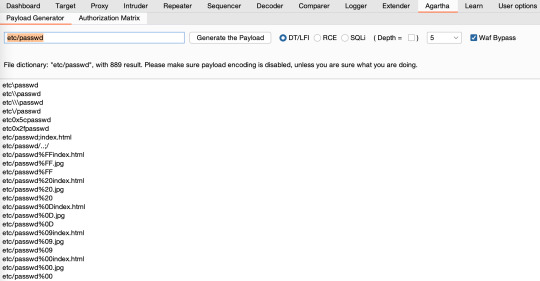
Directory Traversal/Local File Inclusion
It both supports unix and windows file systems. You can generate any wordlists dynamically for the path you want. You just need to supply a file path and that’s all.
‘Depth’ is representation of how deep the wordlist should be. You can generate wordlists ’till’ or ‘equal to’ this value.
‘Waf Bypass’ asks for if you want to include all bypass features; like null bytes, different encoding, etc.
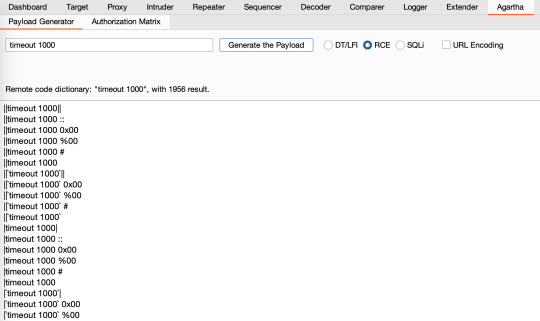
Remote Code Execution
It creates command execution dynamic wordlists for the command you supply. It combines different separators and terminators for unix and windows environments together.
‘URL Encoding’ encodes dictionary output.
SQL Injection
It generates payloads for Stacked Queries, Boolean-Based, Union-Based, Time-Based, Order-Based SQLi attacks, and you do not need to supply any inputs. You just pick what type of SQLi attacks and databases you want, then it will generate a wordlist with different combinations.
‘URL Encoding’ encodes dictionary output.
‘Waf Bypass’ asks for if you want to include all bypass features; like null bytes, different encoding, etc.
‘Union-Based’ and ‘Order-Based’ ask for how deep the payload should be. The default value is 5.
And the rest is related with database and attack types.

Authorization Matrix
This part focuses on user session and URLs relationships to determine access violations. The tool will visit all URLs from pre-defined user sessions and fill the table with all Http responses. It is a kind of access matrix and helps to find out authentication/authorization issues. Afterwards we will see what user can access what page contents.
User session name: You can right click on any request and send it ‘Agartha Panel’ to define user sessions.
URL Addresses user can visit: You can use Burp’s spider feature or any sitemap generators. You may need to provide different URLs for different users.

After sending Http request to Agartha, the panel will fill some fields in the tool.
What’s username for the session you provide. You can add up to 4 different users and each user will have a different color to make it more readable.
User’s request header and all user related URL visits will be based on it.
URL addresses the user can visit. You can create this list with manual effort or automatic tools, like spiders, sitemap generators, etc, and do not forget to remove logout links.
All URLs you supply will be in here. Also user cells will be colored, if the URL belongs to her/him.
Http requests and responses without authentication. All session cookies, tokens and parameters will be removed form Http calls.
Http requests and responses with the user session you define in the first step. Cell titles show Http response codes and response lengths.
Just click the cell you want to examine and Http details will be shown in here.
After clicking ‘RUN’, the tool will fill user and URL matrix with different colors. Besides the user colors, you will see orange, yellow and red cells. The URL address does not belong to the user and the cell color is:
Yellow, because the response returns ‘HTTP 302’ with authentication/authorization concerns
Orange, because the response returns ‘HTTP 200’ but different content length, with authentication/authorization concerns
Red, because the response returns ‘HTTP 200’ and same content length, with authentication/authorization concerns
It will be quite similar, even if we add more users and any authorization concerns will be highlighted in the same way.
You may also notice, it support only one Http request method and user session at the same time, because it processes bulk requests and it is not possible to provide different header options for each calls. But you may play with ‘GET/POST’ methods to see response differences.
Http Request to JavaScript Converter
The feature is for converting Http requests to JavaScript code. It can be useful to dig up further XSS issues and bypass header restrictions, like CSP, CORS.
To access it, right click any Http Request, Extensions, ‘Agartha’, and ‘Copy as JavaScript’.
It will automatically save it to your clipboard with some remarks. For example:
Http request with minimum header paramaters in JavaScript: <script>var xhr=new XMLHttpRequest();xhr.open('POST','http://vm:80/dvwa/login.php');xhr.withCredentials=true;xhr.setRequestHeader('Content-type','application/x-www-form-urlencoded');xhr.send('username=admin&password=password&Login=Login');</script> Http request with all header paramaters in JavaScript: <script>var xhr=new XMLHttpRequest();xhr.open('POST','http://vm:80/dvwa/login.php');xhr.withCredentials=true;xhr.setRequestHeader('Host',' vm');xhr.setRequestHeader('User-Agent',' Mozilla/5.0 (Macintosh; Intel Mac OS X 10.15; rv:97.0) Gecko/20100101 Firefox/97.0');xhr.setRequestHeader('Accept',' */*');xhr.setRequestHeader('Accept-Language',' en-US,en;q=0.5');xhr.setRequestHeader('Accept-Encoding',' gzip, deflate');xhr.setRequestHeader('Content-type',' application/x-www-form-urlencoded');xhr.setRequestHeader('Content-Length',' 44');xhr.setRequestHeader('Origin',' http://vm');xhr.setRequestHeader('Connection',' close');xhr.setRequestHeader('Referer',' http://vm/dvwa/login.php');xhr.send('username=admin&password=password&Login=Login');</script> For redirection, please also add this code before '</script>' tag: xhr.onreadystatechange=function()if (this.status===302)var location=this.getResponseHeader('Location');return ajax.call(this,location);;
Please note that, the JavaScript code will be called over original user session and many header fields will be filled automatically. In some cases, the server may require some header field mandatory, and therefore you may need to modify the code for an adjustment.
Download: https://github.com/volkandindar/agartha
0 notes
Text
BlackBird - OSINT Tool To Search Fast For Accounts By Username Across 85 Sites
New Post has been published on https://skynettools.com/blackbird-osint-tool-to-search-fast-for-accounts-by-username-across-85-sites/
BlackBird - OSINT Tool To Search Fast For Accounts By Username Across 85 Sites
OSINT tool to search fast for accounts by username across 85 sites.
Disclaimer
This or previous program is for Educational purpose ONLY. Do not use it without permission. The usual disclaimer applies, especially the fact that me (P1ngul1n0) is not liable for any damages caused by direct or indirect use of the information or functionality provided by these programs. The author or any Internet provider bears NO responsibility for content or misuse of these programs or any derivatives thereof. By using these programs you accept the fact that any damage (dataloss, system crash, system compromise, etc.) caused by the use of these programs is not P1ngul1n0's responsibility.
Setup
Clone the repository
git clone https://github.com/p1ngul1n0/blackbird cd blackbird
Install requirements
pip install -r requirements.txt
Usage
Search by username
python blackbird.py -u username
Run WebServer
python blackbird.py --web
Access http://127.0.0.1:5000 on the browser
Read results file
python blackbird.py -f username.json
List supportted sites
python blackbird.py --list-sites
Supported Social Networks
Supersonic speed
Blackbird sends async HTTP requests, allowing a lot more speed when discovering user accounts.
JSON Template
Blackbird uses JSON as a template to store and read data.
The data.json file store all sites that blackbird verify.
Params
app – Site name
url
valid – Python expression that returns True when user exists
id – Unique numeric ID
method – HTTP method
json – JSON body POST (needs to be escaped, use this https://codebeautify.org/json-escape-unescape)
username – Username place (URL or Body)
response.status – HTTP response status
responseContent – Raw response body
soup – Beautifulsoup parsed response body
jsonData – JSON response body
Examples
GET
"app": "ExampleAPP1", "url": "https://www.example.com/username", "valid": "response.status == 200", "id": 1, "method": "GET"
POST JSON
"app": "ExampleAPP2", "url": "https://www.example.com/user", "valid": "jsonData['message']['found'] == True", "json": "\"type\": \"username\",\"input\": \"username\"", "id": 2, "method": "POST"
If you have any suggestion of a site to be included in the search, make a pull request following the template.
Contact
Feel free to contact me on Twitter
Download: https://github.com/p1ngul1n0/blackbird
0 notes
Text
AutoPWN Suite - Automatically Scan For Vulnerabilities & Exploit Systems
New Post has been published on https://skynettools.com/autopwn-suite-automatically-scan-for-vulnerabilities-exploit-systems/
AutoPWN Suite - Automatically Scan For Vulnerabilities & Exploit Systems
How does it work?
AutoPWN Suite uses nmap TCP-SYN scan to enumerate the host and detect the version of software running on it. After gathering enough information about the host, AutoPWN Suite automatically generates a list of “keywords” to search NIST vulnerability database.
Demo
AutoPWN Suite has a very user friendly easy to read output.
Installation
You can install it using pip. (sudo recommended)
sudo pip install autopwn-suite
OR
You can clone the repo.
git clone https://github.com/GamehunterKaan/AutoPWN-Suite.git
Usage
usage: autopwn.py [-h] [-o OUTPUT] [-t TARGET] [-hf HOSTFILE] [-st SCANTYPE] [-s SPEED] [-a API] [-y] [-m MODE] [-v] AutoPWN Suite options: -h, --help show this help message and exit -o OUTPUT, --output OUTPUT Output file name. (Default : autopwn.log) -t TARGET, --target TARGET Target range to scan. This argument overwrites the hostfile argument. (192.168.0.1 or 192.168.0.0/24) -hf HOSTFILE, --hostfile HOSTFILE File containing a list of hosts to scan. -st SCANTYPE, --scantype SCANTYPE Scan type. (Ping or ARP) -s SPEED, --speed SPEED Scan speed. (0-5) (Default : 3) -a API, --api API Specify API key for vulnerability detection for faster scanning. You can also specify your API key in api.txt file. (Default : None) -y, --yesplease Don't ask for anything. (Full automatic mode) -m MODE, --mode MODE Scan mode. (Evade, Noise, Normal) -v, --version Print version and exit.
TODO
Vulnerability detection based on version.
Easy to read output.
Function to output results to a file.
pypi package for easily installing with just pip install autopwn-suite.
Automatically install nmap if its not installed.
Noise mode. (Does nothing but creating a lot of noise)
Function to automatically download exploit related to vulnerability.
.deb package for Debian based systems like Kali Linux and Parrot Security.
Arch Linux package for Arch based systems like BlackArch and ArchAttack.
Separate script for checking local privilege escalation vulnerabilities.
Windows and OSX support.
Functionality to brute force common services like ssh, vnc, ftp etc.
Built in reverse shell handler that automatically stabilizes shell like pwncat.
Function to generate reverse shell commands based on IP and port.
GUI interface.
Meterpreter payload generator with common evasion techniques.
Fileless malware unique to AutoPWN Suite.
Daemon mode.
Option to email the results automatically.
Web application analysis.
Web application content discovery mode. (dirbusting)
Option to use as a module.
Config file argument to specify configurations in a separate config file.
Argument for passing custom nmap flags.
Download: https://github.com/GamehunterKaan/AutoPWN-Suite
0 notes
Text
WordPress User Meta Lite and Pro 2.4.3 Vulnerable to Path Traversal Exploit
New Post has been published on https://skynettools.com/wordpress-user-meta-lite-and-pro-2-4-3-vulnerable-to-path-traversal-exploit/
WordPress User Meta Lite and Pro 2.4.3 Vulnerable to Path Traversal Exploit
The WordPress plugin User Meta 2.4.3 and below is vulnerable to path traversal exploitation. Both the lite and pro version are exploitable and the solution is to update to version 2.4.4.
RCE Security Advisory https://www.rcesecurity.com 1. ADVISORY INFORMATION ======================= Product: User Meta Vendor URL: https://wordpress.org/plugins/user-meta Type: Relative Path Traversal [CWE-23] Date found: 2022-02-28 Date published: 2022-05-24 CVSSv3 Score: 4.3 (CVSS:3.0/AV:N/AC:L/PR:L/UI:N/S:U/C:L/I:N/A:N) CVE: CVE-2022-0779 2. CREDITS ========== This vulnerability was discovered and researched by Julien Ahrens from RCE Security. 3. VERSIONS AFFECTED ==================== User Meta Lite 2.4.3 and below User Meta Pro 2.4.3 and below 4. INTRODUCTION =============== An easy-to-use user profile and management plugin for WordPress that allows user login, reset-password, profile update and user registration with extra fields, all on front-end and many more. User Meta Pro is a versatile user profile builder and user management plugin for WordPress that has the most features on the market. User Meta aims to be your only go to plugin for user management. (from the vendor's homepage) 5. VULNERABILITY DETAILS ======================== The WordPress ajax action "um_show_uploaded_file" is vulnerable to an authenticated path traversal when user-supplied input to the HTTP POST parameter "filepath" is processed by the web application. Since the application does not properly validate and sanitize this parameter, it is possible to enumerate local server files using a blind approach. This is because the application doesn't return the contents of the referenced file but instead returns different form elements based on whether a file exists or not. The following Proof-of-Concept triggers this vulnerability: POST /wp-admin/admin-ajax.php HTTP/1.1 Host: localhost Content-Length: 147 Content-Type: application/x-www-form-urlencoded; charset=UTF-8 Cookie: [your-wordpress-auth-cookies] Connection: close field_name=[your-field-name]&filepath=/../../../../../etc/passwd&field_id=[your-field-id]&form_key=[your-form-key]&action=um_show_uploaded_file&pf_nonce=[your-auth-nonce]&is_ajax=true 6. RISK ======= The vulnerability can be used by an authenticated attacker to enumerate local server files based on a blind approach. 7. SOLUTION =========== Update to User Meta/User Meta Pro 2.4.4 8. REPORT TIMELINE ================== 2022-02-28: Discovery of the vulnerability 2022-02-28: WPScan (CNA) assigns CVE-2022-0779 2022-03-03: Contacted the vendor via their contact form 2022-03-06: Vendor response, acknowledgement of the issue 2022-03-18: Version 2.4.2 is released 2022-03-22: Vulnerability is still exploitable since fix was applied only client-side. Contacted vendor again. 2022-04-13: No response, contacted vendor again 2022-04-18: Vendor added a new fix to version 2.4.3. Asked to retest. 2022-04-19: Vulnerability is still exploitable due to a logic bug in the fix. Contacted vendor again. 2022-04-29: Vendor asks whether another fix in version 2.4.4 is fine 2022-05-16: Fix seems to work 2022-05-24: Public disclosure 9. REFERENCES ============= https://github.com/MrTuxracer/advisories
0 notes
Text
Free Ethical Hacking Labs & Capture The Flag Services
New Post has been published on https://skynettools.com/free-ethical-hacking-labs-capture-the-flag-services/
Free Ethical Hacking Labs & Capture The Flag Services
Ethical hacking is a growing field in this day and age. Whether you are a beginner or a more experienced hacker, you need a safe and legal place to test your skills. Fortunately, the community is strong and provides a variety of free options to reach your potential. This article outlines a few of the many free ethical hacking labs and capture-the-flag services to test and better your skills. Check back for updated listings.
https://www.hackthebox.com/
Hack The Box has been a staple in the ethical hacking community for years. They offer a variety of services. Hacking labs provide you with machines that you can attempt to hack on your own, or if you’re feeling competitive you can step into the realm of capture the flag and either host your own event or join others.
https://overthewire.org/wargames/
OverTheWire provides 12 different wargame servers with some having 20+ levels you can work through. If you are someone with a basic set of skills or someone with a more advanced understanding, these games have something for everyone. They also have an IRC and Discord server where you can discuss the related games or meet like-minded hackers who share the passion for wargames.
https://247ctf.com
247CTF currently has 71 challenges to test your hacking skills in cryptography, networking, reverse engineering, and exploitation. They aim to update and release new challenges from their team or community contributors. Upon completion of challenges, users can rate the challenge based on a difficulty scale ranging from very easy to very hard. They also provide a scoreboard to see where you compare against others.
https://hackthissite.org/
Hack This Site was launched in 2003 to provide a legal area for hackers to try out their skills in a safe environment. This site offers basic challenges such as realistic websites, steganography, forensics, and a few other categories. Completing challenges increases your account’s score. Currently, their forum is offline, but they have an active discord of 11k users.
0 notes
Text
Forensicator - Powershell Script To Aid Live Forensics & Incidence Response
New Post has been published on https://skynettools.com/forensicator-powershell-script-to-aid-live-forensics-incidence-response/
Forensicator - Powershell Script To Aid Live Forensics & Incidence Response

Live Forensicator is part of the Black Widow Toolbox, its aim is to assist Forensic Investigators and Incidence responders in carrying out a quick live forensic investigation.
It achieves this by gathering different system information for further review for anomalous behavior or unexpected data entry, it also looks out for unusual files or activities and points them out to the investigator.
It is paramount to note that this script has no inbuilt intelligence its left for the investigator to analyse the output and decide on a conclusion or decide on carrying out a deeper investigation.
Optional Dependencies
This script is written in PowerShell for use on Windows PCs and Servers.
For additional features, it depends on external binaries.
It has a supporting file WINPMEM for taking RAM dumps https://github.com/Velocidex/WinPmem
It also depends on Nirsoft’s BrowserHistoryView for exporting browser history http://www.nirsoft.net/utils/browsing_history_view.html
This script is expected to work out of the box.
winpmem_mini_x64_rc2.exe | BrowsingHistoryView64.exe | BrowsingHistoryView86.exe | etl2pcapng64.exe | etl2pcapng86.exe
Usage
# copy the files to the computer git clone https://github.com/Johnng007/Live-Forensicator.git # Execution .\Forensicator.ps1 <parameters>
Examples
# Basic .\Forensicator.ps1 # Check your Version .\Forensicator.ps1 -Version # Check for Updates .\Forensicator.ps1 -Update # Decrypt An Encrypted Artifact .\Forensicator.ps1 -DECRYPT DECRYPT # Extract Event Logs alongside Basic Usage .\Forensicator.ps1 -EVTX EVTX #Grab weblogs IIS & Apache .\Forensicator.ps1 -WEBLOGS WEBLOGS #Run Network Tracing & Capture PCAPNG for 120 secounds .\Forensicator.ps1 -PCAP PCAP # Extract RAM Dump alongside Basic Usage .\Forensicator.ps1 -RAM RAM # Check for log4j with the JNDILookup.class .\Forensicator.ps1 -log4j log4j # Encrypt Artifact after collecting it .\Forensicator.ps1 -ENCRYPTED ENCRYPTED # Yes of course you can do all .\Forensicator.ps1 -EVTX EVTX -RAM RAM -log4j log4j -PCAP PCAP -WEBLOGS WEBLOGS # For Unattended Mode on Basic Usage .\Forensicator.ps1 -OPERATOR "Ebuka John" -CASE 01123 -TITLE "Ransomware Infected Laptop" -LOCATION Nigeria -DEVICE AZUZ # You can use unattended mode for each of the other parameters .\Forensicator.ps1 -OPERATOR "Ebuka John" -CASE 01123 -TITLE "Ransomware Infected Laptop" -LOCATION Nigeria -DEVICE AZUZ -EVTX EVTX -RAM RAM -log4j log4j # Check for files that has similar extensions with ransomware encrypted files (can take some time to complete) .\Forensicator.ps1 -RANSOMWARE RANSOMWARE # You can compress the Forensicator output immidiately after execution Oneliner .\Forensicator.ps1 ; Start-Sleep -s 15 ; Compress-Archive -Path "$env:computername" -DestinationPath "C:\inetpub\wwwroot\$env:computername.zip" -Force
Notes
Run the script as an administrator to get value.
The results are output in nice-looking HTML files with an index file.
You can find all extracted Artifacts in the script’s working directory.
Forensicator Has the ability to search through all the folders within a system looking for files with similar extensions as well known Ransomware, Albeit this search takes long but it’s helpful if the Alert you received is related to a Ransomware attack, Use the -RANSOMWARE Parameter to invoke this.
Forensictor now hs the ability to capture network traffic using netsh trace, this is useful when your investigation has to do with assets communicating with known malicious IPs, this way you can parse the pcapng file to wireshark and examine for C&C servers. By Default I set the capture to take 120secs
Sometimes it may be paramount to maintain the integrity of the Artifacts, where lawyers may argue that it might have been compromised on transit to your lab. Forensicator can now encrypt the Artifact with a unique randomly generated key using AES algorithm, you can specify this by using the -ENCRYPTED parameter. You can decrypt it at will anywhere anytime even with another copy of Forensicator, just keep your key safe. This task is performed by the FileCryptography.psm1 file
What Forensicator Grabs
================================= USER AND ACCOUNT INFORMATION ================================= 1. GETS CURRENT USER. 2. SYSTEM DETAILS. 3. USER ACCOUNTS 4. LOGON SESSIONS 5. USER PROFILES 6. ADMINISTRATOR ACCOUNTS 7. LOCAL GROUPS ================================= SYSTEM INFORMATION ================================= 1. INSTALLED PROGRAMS. 2. INSTALLED PROGRAMS FROM REGISTERY. 3. ENVIRONMENT VARIABLES 4. SYSTEM INFORMATION 5. OPERATING SYSTEM INFORMATION 6. HOTFIXES 8. WINDOWS DEFENDER STATUS AND DETAILS ================================= NETWORK INFORMATION ================================= 1. NETWORK ADAPTER INFORMATION. 2. CURRENT IP CONFIGURATION IPV6 IPV4. 3. CURRENT CONNECTION PROFILES. 4. ASSOCIATED WIFI NETWORKS AND PASSWORDS. 5. ARP CACHES 6. CURRENT TCP CONNECTIONS AND ASSOCIATED PROCESSES 7. DNS CACHE 8. CURRENT FIREWALL RULES 9. ACTIVE SMB SESSIONS (IF ITS A SERVER) 10. ACTIVE SMB SHARES 11. IP ROUTES TO NON LOCAL DESTINATIONS 12. NETWORK ADAPTERS WITH IP ROUTES TO NON LOCAL DESTINATIONS 13. IP ROUTES WITH INFINITE VALID LIFETIME ======================================== PROCESSES | SCHEDULED TASK | REGISTRY ======================================== 1. PROCESSES. 2. STARTUP PROGRAMS 3. SCHEDULED TASK 4. SCHEDULED TASKS AND STATE 5. SERVICES 6. PERSISTANCE IN REGISTRY ================================= OTHER CHECKS ================================= 1. LOGICAL DRIVES 2. CONNECTED AND DISCONNECTED WEBCAMS 3. USB DEVICES 4. UPNP DEVICES 5. ALL PREVIOUSLY CONNECTED DRIVES 6. ALL FILES CREATED IN THE LAST 180 DAYS 7. 500 DAYS WORTH OF POWERSHELL HISTORY 9. EXECUTABLES IN DOWNLOADS FOLDER 10. EXECUTABLES IN APPDATA 11. EXECUATBLES IN TEMP 12. EXECUTABLES IN PERFLOGS 13. EXECUTABLES IN THE DOCUMENTS FOLDER ========================================= ORTHER REPORTS IN THE HTML INDEX FILE ========================================= 1. GROUP POLICY REPORT 2. WINPMEM RAM CAPTURE 3. LOG4J 4. IIS LOGS 5. TOMCAT LOGS 6. BROWSING HISTORY OF ALL USERS 7. CHECK FOR FILES THAT HAS SIMILAR EXTENSIONS WITH KNOWN RANSOMWARE ENCRYPTED FILES NOTE: THIS CHECK CAN TAKE SOME TIME TO COMPLETE DEPENDING ON THE NUMBER OF DRIVES AND AMOUNT OF FILES. 8. RUNS NETWORK TRACING USING NETSH TRACE & CONVERTS TO PCAPNG FOR FURTHER ANALYSIS
##ChangeLog
v2.0 25/04/2022 Minor Bug Fixes Added the possiblity of encrypting the Artifact after acquiring it to maintain integrity. v1.4 14/04/2022 Added Ability perform network tracing using netsh trace, the subsequent et1 is converted to pcapng Minor Bug Fixes in Script Update. Added Weblogs as an option parameter. v1.3 11/04/2022 Added a feature to check for files that has similar extensions with known ransomware encrypted files. You can now check for updates within the script. UI update v1.2 29/03/2022 Added unattended Mode Feature Added Ability to grab browsing history of all users Minor Bug Fix v1 28/01/2022 Initial Release
Screenshot
HTML Output
Download: https://github.com/Johnng007/Live-Forensicator
0 notes
Text
Git-Secret - Go Script For Finding API Keys & Keywords In Repository
How to Installgo get github.com/daffainfo/Git-SecretHow to Use./Git-Secret- For path contain dorks, you can fill it with some keywords, for examplekeyword.txtpasswordusernamekeysaccess_keysDownload: https://github.com/daffainfo/Git-Secret
Read the full article
0 notes
Text
TugaRecon - Pentesting Tool to Enumerate Subdomains
New Post has been published on https://skynettools.com/tugarecon-pentesting-tool-to-enumerate-subdomains/
TugaRecon - Pentesting Tool to Enumerate Subdomains

Tugarecon is a python tool designed to enumerate subdomains using modules. It helps penetration testers and bug hunters collect and gather subdomains for the domain they are targeting. Bruteforce was integrated as a module to increase the possibility of finding more subdomains using bruteforce with an improved wordlist. TugaRecon, a tribute to Portuguese explorers reminding glorious past of this country.
During the 15th and 16th centuries, Portuguese explorers were at the forefront of European overseas exploration, which led them to reach India, establish multiple trading posts in Asia and Africa, and settle what would become Brazil, creating one of the most powerful empires.
LordNeoStark = skynet0x01 (Same person)
Version
1.30
More modules will be added! And much more… 🙂
Screenshots

Installation
git clone https://github.com/skynet0x01/tugarecon.git
pip install -r requirements.txt
Usage
python3 tugarecon.py -d google.com python3 tugarecon.py -d google.com --savemap python3 tugarecon.py -d google.com --bruteforce python3 tugarecon.py -d google.com --bruteforce --full python3 tugarecon.py -d google.com -b --full python3 tugarecon.py -r
Modules
bruteforce (tuga_bruteforce - wildcards, wordlist) certspotter ssl hackertarget threatcrowd Alienvault Threatminer Omnisint API Sublist3r
Dependencies
You need to install dnspython to do DNS query
dnspython>=1.16.0 argparse sys time datetime urllib3 requests webbrowser os pathlib json threading re queue whois progress
Download: https://github.com/skynet0x01/tugarecon
0 notes
Text
JFSscan - Super-Fast Port Scanner
New Post has been published on https://skynettools.com/jfsscan-super-fast-port-scanner/
JFSscan - Super-Fast Port Scanner

Description
Killing features
Perform a large-scale scans using Nmap! Allows you to use Masscan to scan targets and execute Nmap on detected ports with custom settings. Nmap on steroids. *
Scans targets in variety of formats, including domain names!
Results can be produced in domain:port format.
It works in stdin/stdout mode, allowing you to stream results to/from other tools.
Auto-adjusts a packet rate for masscan so you don’t have to (disable it by –disable-auto-rate).
Produces a standard Nmap XML report.
The JFScan (Just Fu*king Scan) is a wrapper around a super-fast port scanner Masscan. It’s designed to simplify work when scanning for open ports on targets in a variety of formats. The JFScan accepts a target in the following forms: URL, domain, or IP (including CIDR). You can specify a file with targets using argument or use stdin.
The JFScan also allows you to output only the results and chain it with other tools like Nuclei. The domain:port output of JFScan is crucial if you want to discover vulnerabilities in web applications as the virtual host decides which content will be served.
Finally, it can scan discovered ports with Nmap. You can also define custom options and use Nmap’s amazing scripting capabilities.
JFScans logic of input & output processing:

Usage
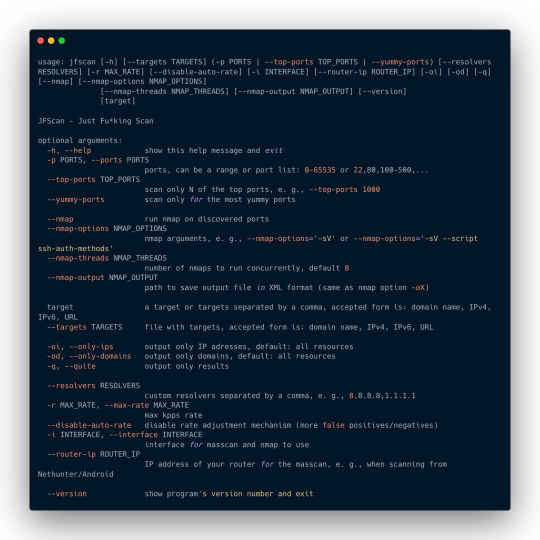
Please follow installation instructions before running. Do not run the JFScan under a root, it’s not needed since we set a special permissions on the masscan binary.
Example
Scan targets for only for ports 80 and 443 with rate of 10 kpps:
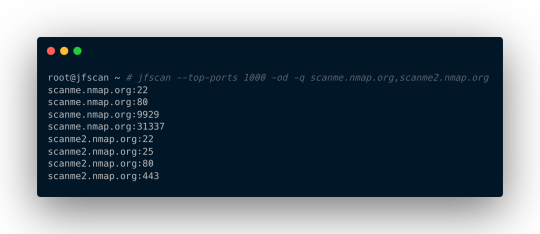
$ jfscan -p 80,443 --targets targets.txt -r 10000
Scan targets for top 1000 ports :
$ jfscan --top-ports 1000 1.1.1.1/24
You can also specify targets on stdin and pipe it to nuclei:
$ cat targets.txt | jfscan --top-ports 1000 -q | httpx -silent | nuclei
Or as positional parameter:
$ jfscan --top-ports 1000 1.1.1.1/24 -q | httpx -silent | nuclei
Or everything at once, the JFScan just does not care and scans all the targets specified:
$ echo target1 | jfscan --top-ports 1000 target2 --targets targets.txt -q | httpx -silent | nuclei
Utilize nmap to gather more info about discovered services:
$ cat targets.txt | jfscan -p 0-65535 --nmap --nmap-options="-sV --scripts ssh-auth-methods"
The targets.txt can contain targets in the following forms:
http://domain.com/ domain.com 1.2.3.4 1.2.3.0/24
Installation
Before installation, make sure you have the latest version of Masscan installed (tested version is 1.3.2).
First, install a libpcap-dev (Debian based distro) or libcap-devel (Centos based distro):
sudo apt install libpcap-dev
Next, clone the official repository and install:
sudo apt-get --assume-yes install git make gcc git clone https://github.com/robertdavidgraham/masscan cd masscan make sudo make install
The Masscan requires root permissions to run. Since running binaries under root is not good idea, we will set a CAP_NET_RAW capability to the binary:
sudo setcap CAP_NET_RAW+ep /usr/bin/masscan
For installation of JFscan a python3 and pip3 is required.
sudo apt install python3 python3-pip
Install JFScan:
$ git clone https://github.com/nullt3r/jfscan.git $ cd jfscan $ pip3 install .
If you can’t run the jfscan directly from command line you should check if $HOME/.local/bin is in your path.
Add the following line to your ~/.zshrc or ~/.bashrc:
export PATH="$HOME/.local/bin:$PATH"
Download: https://github.com/nullt3r/jfscan
0 notes