
Last Seen Blogs

scattered-winter
aspec headcanons connoisseur

skleds
Untitled

brainboxschool
BrainBoxSchool

i-rate-queer-romance-novels-blog
Queer Romance Ratings

lazybonesthings
Untitled
Photo
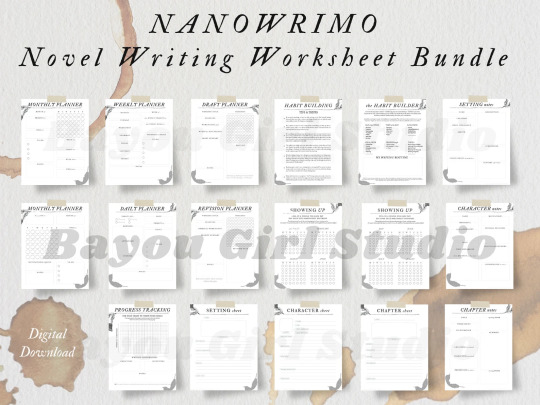

I have an Etsy shop!
Just a reminder, that I have an Etsy shop with some writing goodies (and some artwork, too)!
I have a Worksheet set, a Productivity set, and a NaNo bundle that includes both sets.
If you use the promo code, LETSWRITESOMENOVELS, you’ll get 70% off through the end of 2022.
34 notes
·
View notes
Link
If January 1st is going to be the day we decide we’ll really sit down and focus on starting/getting back to/finishing that novel, we have to do something in December to prepare, right?
Inspired by one of my best writer friends, I’ve created a four-week fiction writing challenge with twenty days* of holiday-themed writing prompts to get your creativity flowing!

Enjoy the season with small writing prompts dedicated to savoring the season and flexing your writing muscles. We’ll start off small in Week One, with descriptions of various holiday concepts. Then, we’ll expand in Week Two to holiday odes, poems, and songs. In Week Three, we’ll get into retellings, playing with stories that already exist. Finally, in Week Four, we’ll dive fully into original holiday scenes and stories.
And just to make everything that much easier and more put together, I’ve created both:
an editable Google Docs workbook to complete the prompts in. Just follow this link, go to “File,” select “Make a Copy,” and write away!
a progress tracking chart!
I hope you join in and enjoy!
#icymi#writing#novel writing#writing tips#writing advice#writing reference#holiday writing prompts#writingprompt
40 notes
·
View notes
Photo
I have an Etsy shop!
Just a reminder, that I have an Etsy shop with some writing goodies (and some artwork, too)!
I have a Worksheet set, a Productivity set, and a NaNo bundle that includes both sets.
If you use the promo code, LETSWRITESOMENOVELS, you’ll get 70% off through the end of 2022.
34 notes
·
View notes
Link
If January 1st is going to be the day we decide we’ll really sit down and focus on starting/getting back to/finishing that novel, we have to do something in December to prepare, right?
Inspired by one of my best writer friends, I’ve created a four-week fiction writing challenge with twenty days* of holiday-themed writing prompts to get your creativity flowing!
Enjoy the season with small writing prompts dedicated to savoring the season and flexing your writing muscles. We’ll start off small in Week One, with descriptions of various holiday concepts. Then, we’ll expand in Week Two to holiday odes, poems, and songs. In Week Three, we’ll get into retellings, playing with stories that already exist. Finally, in Week Four, we’ll dive fully into original holiday scenes and stories.
And just to make everything that much easier and more put together, I’ve created both:
an editable Google Docs workbook to complete the prompts in. Just follow this link, go to “File,” select “Make a Copy,” and write away!
a progress tracking chart!
I hope you join in and enjoy!
40 notes
·
View notes
Text

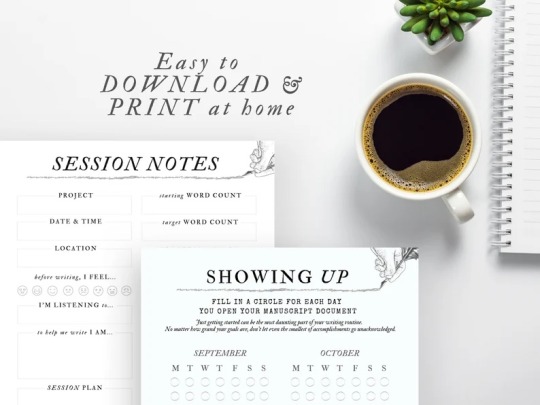
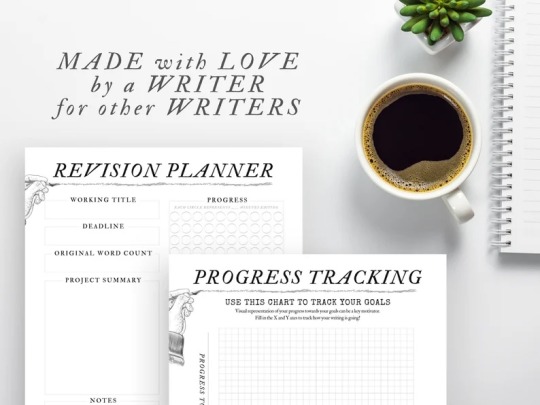
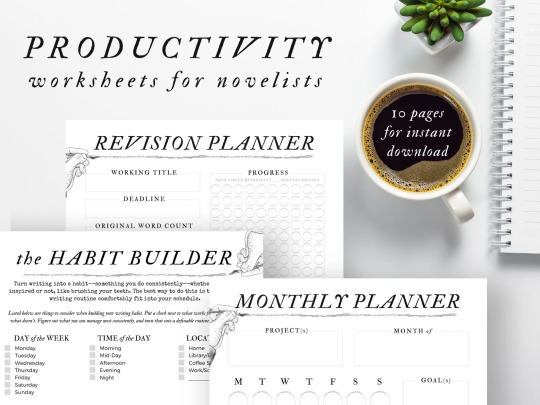
I’ve created productivity worksheets that I’m selling at my Etsy shop for $8.
What’s included:
1 - 8.5 x 11in PDF file (Letter - US & Canada) &
1- 210 x 270 mm PDF file (A4 - International)
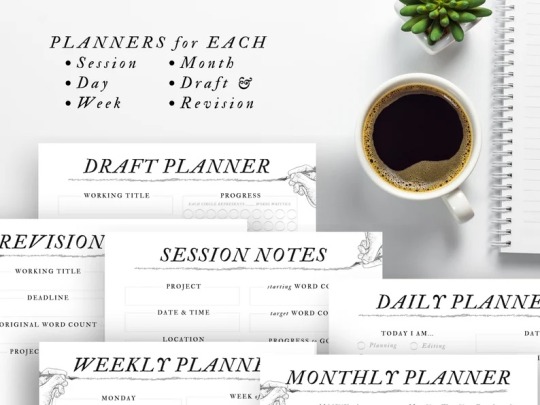
Both with the following printable pages:
- Cover Page
- The Habit Builder
- Habit Building Tips
- Progress Tracking Chart
- Session Notes Template
- Daily Planner
- Weekly Planner
- 2 Monthly Planners
- Draft Planner
- Revision Planner
- 3 Quarterly Showing Up Trackers
I would offer them for free here, like many other writing tools I’ve created, but I’m trying to create some passive income for my upcoming (unpaid) maternity leave!
68 notes
·
View notes
Text
I’ve created productivity worksheets that I’m selling at my Etsy shop for $8.
What’s included:
1 - 8.5 x 11in PDF file (Letter - US & Canada) &
1- 210 x 270 mm PDF file (A4 - International)
Both with the following printable pages:
- Cover Page
- The Habit Builder
- Habit Building Tips
- Progress Tracking Chart
- Session Notes Template
- Daily Planner
- Weekly Planner
- 2 Monthly Planners
- Draft Planner
- Revision Planner
- 3 Quarterly Showing Up Trackers
I would offer them for free here, like many other writing tools I’ve created, but I’m trying to create some passive income for my upcoming (unpaid) maternity leave!
68 notes
·
View notes
Text
What's New in Writing Analytics?
After launching the new editing tools at the end of last year, I’ve been focusing on making smaller tweaks to the app.
I have a ton of features that I’d like to build. It’s so easy to get caught in the cycle of chasing the next big feature. Often, the smaller improvements can have just as big or even larger impact on the app.
So that’s what I’ve been doing recently. Here’s a round-up of some of the things I shipped in the past month.
Improved Overview
Previously, when you logged into the app, you’d see a big overview chart of your week. It showed your goals and how well you did against them on each day — that’s a lot of data to show at once. I wanted to simplify this section a bit so that you could see how much work have you done at a glance. I made it focused on today.
Here’s how it looks after the update:
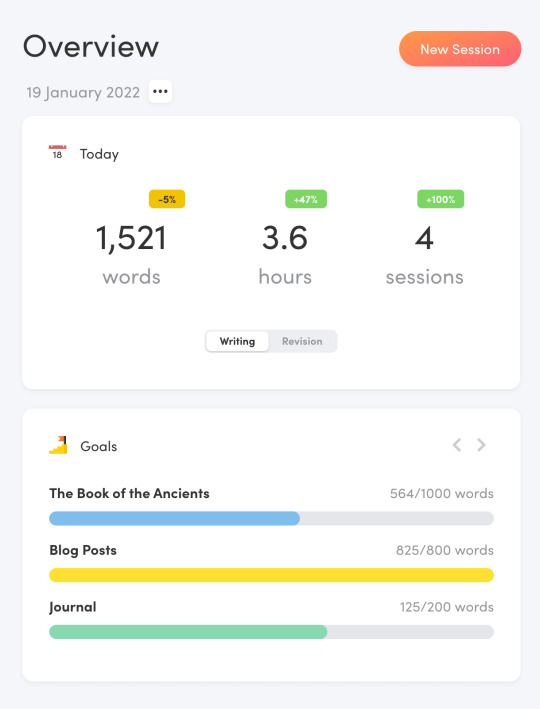
The top card shows your stats. The bottom one has your daily goals and how well you’re doing against them.
You can still access the comprehensive chart. The three dots button next to the date and switching to week view.

Redesigned Project Cards
I’ve spent a considerable amount of time building the original project cards. They had a miniature progress chart rendered on them which was a pain to build. However, it didn’t turn out to be the best use of that space. The chart was out of context and often not even that pleasing to the eye.
A few weeks ago, I redesigned the whole component. The new project cards are smaller and more focused. The chart is gone, replaced by two progress bars.
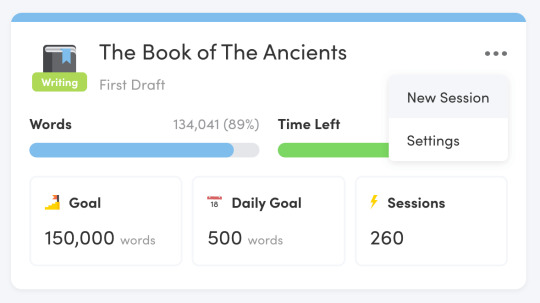
There’s also a drop-down menu that you can use to quickly start a session.
Renamed Words to Analytics
A few users gave me this feedback earlier, and I sat on it for a while. When I first built the app, it was just a tracker without a full editor built-in. At that time, the Words dashboard made sense. But, the name didn’t age particularly well.

As the app evolved, the dashboard became confusing users. People assumed (rightly so) that that’s where their drafts are. I finally pulled the trigger on that a few weeks ago. I renamed the dashboard to Analytics to reflect what’s actually on it.
Added Days Off
Not everybody writes every day for a variety of reasons. And even if you do, you will eventually want to take a few days off to recharge. Until now, you would have to give up your writing streak to do so.
I also sat on this one for a while, too. In the end, I decided to do it. People work very hard on their streaks. Losing it can be extremely demotivating. At the same time, you shouldn’t be forcing yourself to burnout just to keep it going.
This week, I released days off — a way to preserve your streak when you need to chill for a couple of days.
You can take as many days off as you like. They don’t count towards your streak total, but they will keep the chain going. You can’t schedule them in advance or put in retroactively. You can only take one at a time.
The Future

I’ve got a bunch of smaller updates that I’d like to do over the next few weeks, so stay tuned!
And in case you’re not using Writing Analytics yet, check it out! It’s an editor and writing tracker that helps you get words on the page and create a sustainable writing routine.
99 notes
·
View notes
Photo

Submissions for Pitch Wars open in less than a week, so I thought I’d share some posts to help people prepare their entries.
1. Query Letter
“How to Write the Perfect Query Letter” lays out all of the “rules” for writing a good query (including formatting. word length, and meta data), as well as helping you figure out what exactly your query letter needs to say about your novel and yourself.
You can also go to my new website (querylettergenerator.com/). The generator will ask you questions about your novel and use the advice laid out in my blog post to write a query for you. It won’t be perfect, but it’s a great starting point!
2. Synopsis
“How to Write a Synopsis” likewise tells you everything you need to know about the “rules” of synopsis writing–from word count to CAPS LOCKING characters’ names when they’re introduced. It also gives advice about how to balance your plot and your protagonist’s inner journey within your limited word count.
3. First Chapter
“How to Get the First Chapter Right” goes through the main three tasks of your first chapter. This post isn’t as prescriptive as the rest; there are no hard and fast rules to a good first chapter, but that doesn’t mean there aren’t helpful guidelines to follow.
4: Elevator Pitch
Your elevator pitch isn’t necessary for your Pitch Wars submission, but they recommend you have one ready. I originally wrote my “How to Pitch Your Novel in Under a Minute” post as advice to writers participating in my MA’s anthology launch party for editors and agents in London, but it will work for Pitch Wars, too!
Good luck!
x Julia
Please consider supporting Let’s Write Some Novels on Ko-Fi
220 notes
·
View notes
Text
How to Write Relationships Your Readers Can Get Behind

There’s a quote from Harry Potter and the Sorcerer’s/Philosopher’s Stone that I adore:
There are some things you can’t share without ending up liking each other, and knocking out a twelve-foot mountain troll is one of them.
I think it states in simple (silly) terms a complicated truth about friendship and relationships and the moments that cement them.
Real, lasting bonds are formed by acts of support in moments of vulnerability.
The more two characters expose vulnerabilities to each other and the more they support each other in those moments, the stronger their relationship will be.
During the troll fighting incident in Harry Potter, Harry, Ron, and Hermione’s lives are all in danger (vulnerability) and they each play a role in getting one another out of danger (support.)
This example works particularly well because there’s an equilibrium of support and vulnerability. There may be a bond between two people when one person is doing all of the supporting, but it won’t be a healthy one.
Of course, moments of vulnerability don’t have to be life threatening. They can be moments of emotional vulnerability. For example, if person A performs in a dance recital for the first time ever (vulnerability) and person B comes to watch them (support).
As humans, we don’t like to expose our vulnerabilities to people with whom we don’t already have a strong bond. When starting out a relationship, these moments are usually out of the person’s control.
For example, person A walks into a crowded classroom for the first time, looking for an empty seat and person B takes pity and moves their backpack from the seat next to them onto the floor, freeing a place for person A.
After class, person B spills the entire contents of their backpack onto the floor and person A helps pick everything up.
These two moments won’t make person A and person B instantly friends. Bigger moments strength bonds quicker than smaller ones, but the more we support people and the more we expose ourselves to them, the greater our bonds grow. The stronger the bonds, the more likely we are to willingly expose our vulnerabilities to people and purposefully deepen the relationship.
If you’re writing a relationship and you want it to be something built on solid foundations that your readers can support, you’ll want to show these moments of vulnerability and support.
Start small, with moments of vulnerability that are accidental or forced. As the bonds grow stronger, let the characters purposefully initiate the moments, signaling trust and comfort in the relationship. Level One is moving a backpack and freeing up a seat. Level Ten might be fighting a mountain troll together. Level Twenty is handing someone a ticket to your first ever dance recital.
How to Manipulate This Rule to Create Complex Relationships
Just because the foundation for a relationship is there doesn’t mean the characters have to act like it is.
A perfect relationship is boring to read about. Support doesn’t have to be given or received kindly. Especially in those first stages of the relationship. Person B can be grumpy and resentful of having to give up their extra seat to person A, and they might not want to accept person A’s help when person A helps them pick up the contents of their spilled backpack. Even once a person admits to themselves that they like the other person, two people who openly care about each other can still bicker and squabble and disagree. Supporting each other when it counts in no way precludes that.
If you want to complicate the relationship even more, if you want to write about a complex, difficult relationship: have characters fail to support each other in moments. Explore the consequences of those decisions.
As for characters who would die for one another…
Your characters should all have driving motivations. The best way to build strong relationships in your writing is to show your characters supporting each other in those specific efforts.
Show moments of support that come at a cost to the person offering it. Person B goes to Person A’s dance recital, but skips out on a date to do so.
A recommendation: show the non-POV character support the POV character in a moment of vulnerability first. We’re already in the POV’s head and we’re already on their team. We still need to be convinced by the non-POV, as the author, you have to make the reader like the non-POV character before we like the relationship. A quick and easy way to do this is to have them support the character we already like.
If the relationship is more contentious at first or your story doesn’t allow for that, a second option is to have the non-POV character do/say something that the POV disagrees with, but the reader knows is right. it will not only be a point in favor of the non-POV character, but it will show the reader that a relationship with the non-POV will be good for the POV.
5K notes
·
View notes
Photo


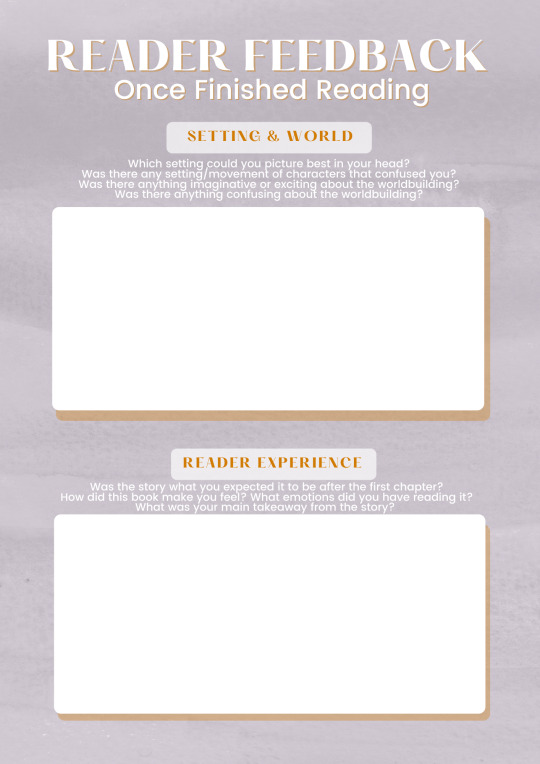
Sorry it’s been a while! A lot of things have been happening in my personal and professional lives (I’m getting married next month!)
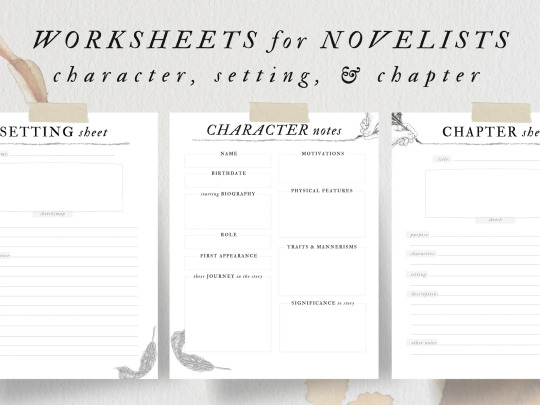
As an apology, here are some Reader Feedback worksheets! These can be used when giving workshop of critique partner feedback, or even when trying to “read like a writer.”
These can be used to give to give straight to a writer who’s asked you for feedback, to give to non-writer friends when asking them for feedback, or to get basic ideas down before you write up a more thorough critique letter.
Reader Feedback
Observations to Keep Track of While Reading
Notable Dialog
Dialog that stands out to you while you are reading--good or bad
Notable Descriptions
Descriptions that stand out to you while you are reading--good or bad
Confusing Moments & Major Continuity Errors
Moments that give you pause while you’re reading, either because something about the plot or a character doesn’t make sense, or something in the writing directly contradicts an earlier event or description.
Exciting/Favorite Moments
Moments that make you eager to see what happens next, a particularly exciting or well-executed development in a character or plot, an extremely satisfying moment. Something that would make you revolt if the writer took it out in the next draft.
Other Observations
Anything else you want to take note of for the author. This may include things like chapter lengths or a consistent grammar error, or brilliant chapter titles.
Feedback Once Finished Reading
Characters
Which character felt the most fully realized?
Which characters did you have trouble understanding/believing?
Are there any characters that felt extraneous or under-utilized?
Did the protagonist’s motivation and developement make sense?
Plot
Did the story have a well-defined beginning, middle, and end?
Were there any points where the story moved too slow/fast?
Did anything not happen that you were expecting?
Was the ending a satisfying conclusion of the story's events?
Setting & World
Which setting could you picture best in your head?
Was there any setting/movement of characters that confused you?
Was there anything imaginative or exciting about the worldbuilding?
Was there anything confusing about the worldbuilding?
Reader Experience
Was the story what you expected it to be after the first chapter?
How did this book make you feel?
What emotions did you have reading it?
What was your main takeaway from the story?
For more thorough advice on critiquing and giving writing feedback, make sure to check out my Writing Workshops: An Introduction post!
128 notes
·
View notes
Text

Drafting
The Draft Notebook
Be More Productive with Ambient Noise
How to Steal: Know Your Tropes
How to Steal: Good Writers Borrow
Write What You Know (Not What You’ve Experienced)
The Best Way to End a Writing Session
How To Finish a Draft
A Few Tips on Chapters
Language, Description, & Dialog
“To Be” Or Not “To Be”: What Exactly Is Passive Voice?
Tagging Dialog
Narrative Voice
Writing Better Descriptions
Basic Rules for Metaphors and Similes
Character, Plot, & Setting
Creating Characters: a 4-Step Process
Writing Relationships Your Reader Can Get Behind
Informative Character Names
The Strength of a Symmetrical Plot
How to Foreshadow
Crafting Homes of Paper, Ink, and Neutral PH Glue
Motivation
On Writing Flawed Books
How to Return to Your Manuscript
The Acknowledgements Page
Staring at Blank Pages
What to Do When You Can’t Write
Motivational Writing Posters
Publishing
Writing the Perfect Query Letter
How to Write a Synopsis
How to Pitch Your Novel in Under a Minute
A Glossary of Publishing Terms: Vol 1
Writing Tools
Why You Should Give Scrivener a Try
Outlining, Brainstorming, and Researching with Scrivener
Drafting with Scrivener
Editing with Scrivener
CTRL+F
The Forest Productivity App
Editsaurus
NaNoWriMo
Why Try NaNoWriMo
October Prep
Why Listen to Writing Podcasts
Pick a New Daily Word Count Goal
How to Write 2000 Words a Day
How to Plan a Novel without a Story
Pacemaker: Custom Daily Word Count Website
NaNoWriMo Master Post
Other
How to Read an Absurd Number of Books
Writing Workshops: An Introduction
Writing Groups
Different Types of Fantasy Novels
Ambient Soundscapes Based on Famous Writers
Ko-Fi & Other Support
If you enjoy my posts and can afford it, I would greatly appreciate it if you donated to my new ko-fi page! Each of these posts represents multiple hours of unpaid labor. I love writing for this blog, but I’m also an underpaid 20-something trying to stay afloat. I’ve made this master post of every essay I’ve written for this blog as a way to show my appreciation in advance of any support. If you donate, to further show my gratitude and appreciation, I’ll take requests for essay topics in the ‘messages of support.’
If you can’t afford to donate via ko-fi, another great way to show your support is simply by reblogging posts that you find useful and helping my blog reach new writers.
Thanks so much!
9K notes
·
View notes
Text
My revision plan! If you have finished--or are about to finish--a first draft of a project and aren’t sure what to do next, feel free to borrow as much as you’d like!
And because it wasn’t in the original post, here’s the timeline I’m shooting for:
Step One (Day One-Two)
Complete immediately after finishing the first draft.
Step Two (Week One-Two)
Step two doesn’t require too much complex thought, and is really nice to use for staying in your writing routine while taking a break from the “hard” work. Personally, I’ve gotten in the habit of spending at least two hours a day writing. I don’t want to fall too far out of that habit and have to rebuild it later, so I do this during that time.
Step Three (Week One-Six)
Reading for fun and reading writing advice can start pretty immediately after you finish your draft and obviously should continue on for as long as you want to be a writer, but can continue as a research effort for your revision until it’s time to start re-outlining. That’s when it will be most useful.
Reading writing advice in an organized way can also fill your “writing time” at this point so you don’t fall out of your routine.
I think re-reading your first draft should be done somewhere in the four-six week timeframe, when you’e not too close to the drafting process, but you’re not too far out of it either.
Step Four & Five (Week Four-Eight)
Immediately after you read the draft, you can start outlining the story as it currently stands. This process will also help you look at the story objectively, letting you see what’s really on the page versus what you hoped would be there.
I’ve included step five in here too, because it’s part of the re-outlining process. If you’re able to share your story, the initial re-outlining process can be shorter because you can talk through your issues with other writers, but the time it takes your CPs to read/react to your story is built into this. If you aren’t able to share your draft and new outline ideas with a CP, that time can be spent working through your story issues on your own.
Step Six (Month Two-Month Five)
However long you spend on everything else, at the end of two months, it’s definitely time to start the revision process.
I can’t tell you how long to give yourself for this. Personally, I’m giving myself three months for revision. Like drafting, revision can take as long as you let it. Your book will never be perfect, so you’ll never run out of things to fix.
It took me nearly a year for a total revision of my last book, but that was a total of maybe 100-150 hours of work. Working on it two hours every day, that’s at most two and a half months. This book is in a much rougher state than that book’s original draft was, but it’s also 2/3 the length. I’m confident that if I put the work in, three months will be enough.
Step Six Point Five (Last Two-Three Days)
I didn’t mention this in the original post, but my favorite part of my last revision was copyediting. I printed my entire book out, went to a coffee shop with a giant binder and wide array of post it notes, highlighters, and colorful pens (thanks Minnesotan family for having a stationary-lovers dream 3M hookup), and spent one weekend copyediting. Printing out the entire thing was extremely thrilling. Also, external validation motivates me (obviously, if I’m posting this) and it was a lot of fun to look like A Capital-W Writer Doing Serious Work On My Completed Manuscript while polishing everything up.
This is my last revision task, and also almost works as a reward for completing the rest of the work.
My Revision Plan
I’ve been posting a lot about finishing a first draft of something new. So I thought it might be helpful if I also included my plans about what to do next.
Step One: Preserve the Draft
I work in Scrivener, so my first step is to compile, save, and preserve my draft. For me, this means I’m:
Capturing a snapshot of the current version of my chapters in Scrivener, so I can keep editing the main ‘manuscript’ files without losing access to the current version.
Exporting and saving the entire manuscript as “[TITLE] - First Draft - July 2020″ so that as I finish further revisions, I’ll always know which version this one is.
Emailing the draft to myself, saving it in iCloud, and printing it. Whatever it takes to ensure its safe keeping. This way, no matter what happens–if my computer falls into a pool and is destroyed–my entire first draft of this book will be safe somewhere.
This way, I can revise and edit and generally make a mess of things again without having to worry that anything I do going forward is going to affect the contents or completeness of my first draft.
Step Two: Second Sketches
I don’t want to dive into the editing process just yet, so before doing a serious re-read or re-plotting my entire book, I’m going to set about re-sketching my settings and characters.
In my first drafts, I treated my settings and characters as flexible. When I realized something about them wasn’t working, I changed that thing and kept going. Events changed locations, buildings changed distance from one another, Three of my characters had abrupt job changes in chapter ten, when I realized I could remove an extraneous plot and weave their storylines into a more central plot by doing so. Somewhere immediately after I tell the reader my protagonist has glasses, I forgot to ever mention them again.
This means my initial character and setting sketches are all–well, not useless, but not quite useful anymore either. Now that I’ve figured out where and what things and people need to be in order to make the story work, I’m writing down new “character/setting rules” to guide me through my first revision. I want to make them consistent.
For settings, this means I’m going to go through and decide on:
A “map” of the locations of the story and figure out exactly where things are in relation to one another
The layouts of individual settings
What specific places look, smell, and sound like
The “rules” of the world
For characters, this means I’m going to go through and decide on their:
physical characteristics
personality and backstory
relationships both with other characters and the world around them
character arcs: their wants, their fears, their internal conflicts, and how they’re supposed to be growing and changing throughout the novel
And if I decide my protagonist does wear glasses, I’m going to make sure she’s wearing them throughout the entire story.
Step Three: Read
Writing Advice
In the next few weeks, I’m going to read and reread books and blogs on writing. I am going to soak it all up. I’m going to learn or remind myself about what makes a story good. Refine my knowledge of writing craft. These are the ideas that are going to help me make my revised draft better than my first one.
Fun books!
I’m also going to read for fun, especially the books I was avoiding because they were in a similar genre/category to the one I was drafting. I want to know how good the “competition” is, and also see those “writing rules” I’ve been reading about in writing advice books/blogs in action.
The First Draft
Finally, I’m going to crack open my own book.
This is the hardest part of a revision: critically reading what I’ve written so I can prepare to tear it to pieces and rebuild it.
Oof.
For this, I recommend changing the font, either printing it out or putting it on an e-reader, settling down in your favorite spot to read, and reading it in one go. I’m probably going to print mine out and put it in a binder. This will help me see it with the eye of a reader/editor instead of an author, and hopefully help me put some emotional distance between me and the work I’ve done.
I’m going to keep a notebook nearby and take notes about things that are working, things that aren’t working, ideas for changes, and other stray observations (like words I’m using too often, or where I’m repeating myself, or abandoned plot points, etc.).
Step Four: Re-Outline
This step itself has many steps.
Step One: Identify the core idea of the story. In clear terms, write out in one or two sentences what this story is about, English-major style. ie. “This story is about a girl finding the courage to pursue the life she wants, not the one her parents have planned for her. Her struggles are reflected back on her when she encounters the ghost of a princess who cares so much what history thinks of her, she’s letting its opinion turn her into a literal monster.”
Step Two: Outline the events in the story as it currently exists.
Step Three: Evaluate how well it conveys the core idea, and how the current structure works. Identify:
the purpose of various scenes (ie. inciting incident)
Extraneous scenes/plots/characters
Plot points that should be in the story but are missing
Key moments of character arcs
Events that support the core idea
Events that either don’t support or work in opposition to the core idea
Step Four: Rebuild the outline so that the story has a strong structure that supports the core idea.
Step Five: Share
I know I’m going to struggle with figuring out exactly how to rebuild my story, so I’m going to share both my first draft and my unfinished plan with my writing friends. I’m going to ask them for their ideas and advice. With their feedback, I’m going to solidify my plan for my new outline, hopefully a bit more confident that it’s the right one.
I know not all people have a group of writing buddies they can easily do this with. If you don’t have a critique group, don’t sweat it. It helps and it’s worth an attempt to try to find one, but it’s not a vital step.
Step Six: Revise
Finally, I’m going to go through my work chapter by chapter: editing scenes, trashing scenes, and writing new scenes entirely from scratch until I have a manuscript that’s hopefully much better than the first.
If I revise this book like I did my last one, I’ll probably polish the chapters as I move through them, so that when i’m done, some chapters will be on their twelfth drafts, some will be on their second, but overall it’ll be the best version of the story I’m currently able to write.
–
It’s a lot, and it seems like a very daunting process from my current standpoint, but finishing the first draft seemed daunting too, just a few weeks ago, and I got through that process. With time and effort, I’ll get through this one too.
886 notes
·
View notes
Text
My Revision Plan
I’ve been posting a lot about finishing a first draft of something new. So I thought it might be helpful if I also included my plans about what to do next.
Step One: Preserve the Draft
I work in Scrivener, so my first step is to compile, save, and preserve my draft. For me, this means I’m:
Capturing a snapshot of the current version of my chapters in Scrivener, so I can keep editing the main ‘manuscript’ files without losing access to the current version.
Exporting and saving the entire manuscript as “[TITLE] - First Draft - July 2020″ so that as I finish further revisions, I’ll always know which version this one is.
Emailing the draft to myself, saving it in iCloud, and printing it. Whatever it takes to ensure its safe keeping. This way, no matter what happens--if my computer falls into a pool and is destroyed--my entire first draft of this book will be safe somewhere.
This way, I can revise and edit and generally make a mess of things again without having to worry that anything I do going forward is going to affect the contents or completeness of my first draft.
Step Two: Second Sketches
I don’t want to dive into the editing process just yet, so before doing a serious re-read or re-plotting my entire book, I’m going to set about re-sketching my settings and characters.
In my first drafts, I treated my settings and characters as flexible. When I realized something about them wasn’t working, I changed that thing and kept going. Events changed locations, buildings changed distance from one another, Three of my characters had abrupt job changes in chapter ten, when I realized I could remove an extraneous plot and weave their storylines into a more central plot by doing so. Somewhere immediately after I tell the reader my protagonist has glasses, I forgot to ever mention them again.
This means my initial character and setting sketches are all--well, not useless, but not quite useful anymore either. Now that I’ve figured out where and what things and people need to be in order to make the story work, I’m writing down new “character/setting rules” to guide me through my first revision. I want to make them consistent.
For settings, this means I’m going to go through and decide on:
A “map” of the locations of the story and figure out exactly where things are in relation to one another
The layouts of individual settings
What specific places look, smell, and sound like
The “rules” of the world
For characters, this means I’m going to go through and decide on their:
physical characteristics
personality and backstory
relationships both with other characters and the world around them
character arcs: their wants, their fears, their internal conflicts, and how they’re supposed to be growing and changing throughout the novel
And if I decide my protagonist does wear glasses, I’m going to make sure she’s wearing them throughout the entire story.
Step Three: Read
Writing Advice
In the next few weeks, I’m going to read and reread books and blogs on writing. I am going to soak it all up. I’m going to learn or remind myself about what makes a story good. Refine my knowledge of writing craft. These are the ideas that are going to help me make my revised draft better than my first one.
Fun books!
I’m also going to read for fun, especially the books I was avoiding because they were in a similar genre/category to the one I was drafting. I want to know how good the “competition” is, and also see those “writing rules” I’ve been reading about in writing advice books/blogs in action.
The First Draft
Finally, I’m going to crack open my own book.
This is the hardest part of a revision: critically reading what I’ve written so I can prepare to tear it to pieces and rebuild it.
Oof.
For this, I recommend changing the font, either printing it out or putting it on an e-reader, settling down in your favorite spot to read, and reading it in one go. I’m probably going to print mine out and put it in a binder. This will help me see it with the eye of a reader/editor instead of an author, and hopefully help me put some emotional distance between me and the work I’ve done.
I’m going to keep a notebook nearby and take notes about things that are working, things that aren’t working, ideas for changes, and other stray observations (like words I’m using too often, or where I’m repeating myself, or abandoned plot points, etc.).
Step Four: Re-Outline
This step itself has many steps.
Step One: Identify the core idea of the story. In clear terms, write out in one or two sentences what this story is about, English-major style. ie. “This story is about a girl finding the courage to pursue the life she wants, not the one her parents have planned for her. Her struggles are reflected back on her when she encounters the ghost of a princess who cares so much what history thinks of her, she’s letting its opinion turn her into a literal monster.”
Step Two: Outline the events in the story as it currently exists.
Step Three: Evaluate how well it conveys the core idea, and how the current structure works. Identify:
the purpose of various scenes (ie. inciting incident)
Extraneous scenes/plots/characters
Plot points that should be in the story but are missing
Key moments of character arcs
Events that support the core idea
Events that either don’t support or work in opposition to the core idea
Step Four: Rebuild the outline so that the story has a strong structure that supports the core idea.
Step Five: Share
I know I’m going to struggle with figuring out exactly how to rebuild my story, so I’m going to share both my first draft and my unfinished plan with my writing friends. I’m going to ask them for their ideas and advice. With their feedback, I’m going to solidify my plan for my new outline, hopefully a bit more confident that it’s the right one.
I know not all people have a group of writing buddies they can easily do this with. If you don’t have a critique group, don’t sweat it. It helps and it’s worth an attempt to try to find one, but it’s not a vital step.
Step Six: Revise
Finally, I’m going to go through my work chapter by chapter: editing scenes, trashing scenes, and writing new scenes entirely from scratch until I have a manuscript that’s hopefully much better than the first.
If I revise this book like I did my last one, I’ll probably polish the chapters as I move through them, so that when i’m done, some chapters will be on their twelfth drafts, some will be on their second, but overall it’ll be the best version of the story I’m currently able to write.
--
It’s a lot, and it seems like a very daunting process from my current standpoint, but finishing the first draft seemed daunting too, just a few weeks ago, and I got through that process. With time and effort, I’ll get through this one too.
886 notes
·
View notes
Text
The smaller you can make your goals the better! Celebrate every tiny milestone! It’ll keep you reaching for the next one.
NaNoWriMo Prep: How to Write 2000 Words a Day

Two thousand is a big number. Sitting down to write 2000 words can be extremely intimidating, so the first thing you should do is make that number friendlier.
Write 500 words in 4 writing sessions.
Chop up that big, intimidating number. Start with a goal of 500 words. In one session, with no breaks, write them all. Take a break, then write the next 500. Repeat until you reach at least 2000.
If you write 650 words in one session, don’t aim for 350 in the next. Let those extra words add up. A few hundred extra words each day will get you to 50k quicker than you could imagine.
I recommend timing your sessions, aiming for 20 minutes each time. The deadline will help you get the words out, With 10 minute breaks between each session, you can reach your 2000 word goal in two hours. Which brings me to the next point:
Write fast.
Don’t stop and think about your words. Don’t go back and improve a previous sentence. Save all of your edits for later. Focus on writing as quickly as possible, throwing everything you have at that blank page. This will actually help boost your creativity. Make your brain work so fast, be so focused, that it doesn’t have any space to doubt itself and you’ll be amazed at what you can come up with.
But don’t worry if you can’t write 500 words in 20 minutes on day one. Writing quickly is a skill and it will take a few days of training.
Let the words suck.
This is absolutely key if you want a high word count. When you’re writing an entire chapter in a day, you shouldn’t expect the words to be beautiful. You’re not aiming at lyrical prose. You’re mining raw material that you can work into art later.
Letting the words suck can include:
Writing [something happens here] in place of a scene.
Letting yourself use cliches as shorthand.
Dialog that is really exposition.
Long descriptions of things that don’t matter.
Letting your characters ramble until you discover what it is they actually need to say.
As long as there are 2000 words and they relate to your story, they’re exactly what you need. And if you hate having bad words on a page, once you have your 2000 for a day, you can go back and fix all of it. Take all the time you need. Just reach that word count first.
Tip: if you do edit at the end of each day, make that a separate document from your official NaNo doc. This way, you can trim scenes, descriptions, and dialog without worrying about its effect on your word count. (If you make a scene/description/sentence longer, feel free to include that in your NaNo doc.)
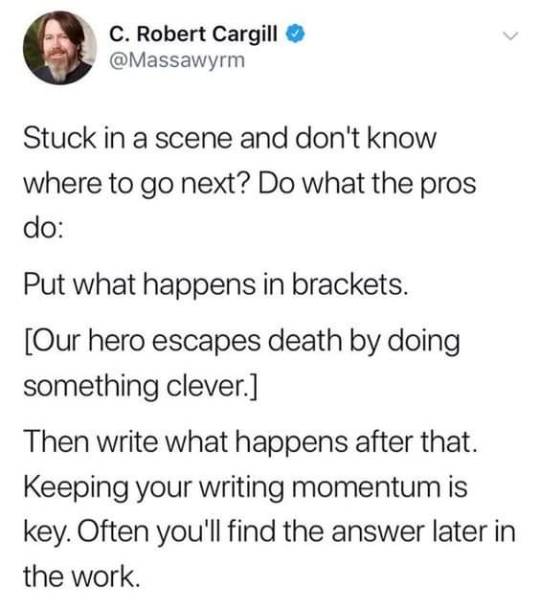
Don’t know what to write next?
So you’ve written 1200 words, completed a scene, and you have no idea where the story is going next. Here are some things you can do to get those 800 words in anyway:
Go to writeordie.com and FORCE the words out.
If that doesn’t work, reread the scene you’ve just written and see if you’re missing some obvious foreshadowing, some clue as to where the story’s headed. (You can also add a few lines to bulk up your wc.)
If that fails, take a walk and let the fresh air usher a solution to you.
If that fails, skip the next section. Write another scene. Go where the story is waiting for you. Come back to the other scene at a later time.
Helpful tip:
Instead of breaking your writing session into four parts, break it into five. Use your first writing session to sketch out an entire chapter, like an outline, but with bits and pieces of dialog and description. Figure out where you’re headed and a couple of key stops along the way. Knowing what you’re writing towards will make doing the actual, fleshed-out writing much easier and quicker.
You can also do an outline for the next day’s writing after you’ve gotten your 2000 words for the day in. Future you will be extremely pleased.
9K notes
·
View notes
Video
youtube
The second lesson in my online workshop series is about to go live!
The Let’s Write Some Novels Online Workshop aims to answer the question “how do you turn 40k+ words into a novel?” by exploring where ideas come from, examining craft elements, and providing advice for completing a first draft, revising a novel, and keeping your confidence up along the way.
Lesson Two: The First Draft (Running a Marathon in a Taxi Cab) focuses on getting in the drafting mindset, making goals, keeping yourself accountable, and editing while drafting. It is aimed at the writer who’s ready to start writing their story and is feeling a bit daunted by the task ahead of them.
The lesson’s slides and script, as well as further writing advice, can be found at my website: www.juliaenroute.com/writing-advice/2020/6/1/lwsn-lesson-two-the-first-draft
Lesson Three, “Revising Your Work (My Novel FINAL DRAFT Final V. 2 (3)” is coming soon!
61 notes
·
View notes
Text
Staring at Blank Pages
So you just finished writing Chapter Two and you’re on a bit of a high. You’re pretty sure it’s your best work ever. It’s award winning stuff. The kind of word soufflé that would put Shakespeare to shame.
You think you like this writing thing. You’re going to keep at it.
You start a new page, a new chapter, and freeze.
You labor over that first sentence. That first word. Everything you put down is crap. You’re re-thinking your love of this whole “writing” thing. It’s no good at all.
That page can be blank for hours… days… weeks. Staring at you. Taunting you. Chapter Two was never this evil.
So how do you move past it?
Don’t worry about how you’re going to tell the story to your reader. Focus on telling yourself the story in the easiest manner possible, in broad strokes or with snippets of dialog. It’s a lot harder to put words on a page when you don’t know which words should be there or where the sentence will lead. Figuring out what you know you want to happen in the scene/chapter/page is a priority.
Once you have a skeleton draft, the words will come easier. Having stuff on the page helps, no matter how insignificant. The simple act of writing down what you know will lead you to new facts, new phrases, new pieces of dialog. You can connect plot-point to plot-point, filling in whatever comes to mind, until you have something vaguely resembling a chapter. Then you can focus on making the words pretty.
And what will come next?
So you’ve just finished writing Chapter Three and you’re on a bit of a high. You’re pretty sure it’s your best work ever…
619 notes
·
View notes